Nitta PolySprint NPS-1205H1 User manual

PSM-NIT-13004E
PolySprint™
Follow this manual when using Nitta PolySprint™ Heat Press.
Please pass this manual to PolySprint™ Heat Press users for a safe
and trouble-free operation.
H
He
ea
at
t
P
Pr
re
es
ss
s
N
NP
PS
S-
-1
12
20
05
5H
H1
1/
/H
H2
2
Operation Manual

- 1 -
Contents
1. Safety Precautions ・・・・・・・・・・ 2
2. Confirmation of Product ・・・・・・・・ 6
3. Specifications ・・・・・・・・・・・・ 7
4. Use Environment ・・・・・・・・・・・ 8
5. Storage Environment ・・・・・・・・・ 8
6. Name of Each Part ・・・・・・・・・・ 9
7. How to Operate ・・・・・・・・・・・・ 11
8. How to Make Belts Endless ・・・・・・ 13
9. Troubleshooting ・・・・・・・・ 17
10. Inspection ・・・・・・・・・・・・・ 18
11. Warranty and after-sales service ・・ 19

- 2 -
1. Safety Precautions
Please go over these safety precautions carefully to secure a correct and
safe operation of the PolySprint™ Heat Press NPS-1205H1/H2.
Disregarding instructions marked with this symbol
may lead to death or serious injury.
Disregarding instructions marked with this symbol
may lead to injury or property damage.
WARNING
Do not use the PolySprint™ Heat Press for any application other
than the intended purpose of making belts endless.
Use for any unintended purpose may cause an unexpected accident.
A wrong operation may impair safety protection functions of the
press.
This machine is not intended for the physical, sensory or
mental handicapped persons use. They must have the
supervision of a person responsible for their safety, if they use
this machine.
Failure to do this may cause fire, electric shock or injury.
Do not allow children to handle this machine. Keep this
machine out of reach of children.
Children should not play with this machine.
Failure to do this may cause fire, electric shock or injury.
A person with experience and skills should always operate,
maintain and inspect the PolySprint™ Heat Press.
Handling by an inexperienced person may cause fire, electric shock
or injury.
Do not dismantle or remodel the PolySprint™ Heat Press in any
event.
Dismantling or remodeling the PolySprint™ Heat Press may cause
fire, electric shock or injury.
For repair or inspection, please contact your local distributor or agent
in your area.
In case of an emergency (such as smoke, fire, foul smell),
disconnect the main plug from the socket outlet and contact
Nitta or your local distributor or agent in your area for
inspection.
Failure to disconnect the main plug from the socket outlet may cause
fire or electric shock.
CAUTION
WARNING
WARNING
WARNING
WARNING
WARNING
WARNING
WARNING

- 3 -
1 Safety Precautions- Continued-
Confirm that the power source used is within the designated
specifications of the PolySprint™ Heat Press.
Use beyond the designated specifications may cause fire or electric
shock.
Type Power Source
NPS-1205H1 100V-120V 50/60Hz
NPS-1205H2 200V-240V 50/60Hz
Connect the main plug correctly to the socket outlet.
The power cable of the press uses an earth connection plug.
Connect the main plug correctly into an earth connection outlet to
prevent electric shock.
Always use anti-heat gloves when handling the Heat Press to
prevent burns.
A label “Hot!” is on the top and bottom plates of the press to warn
against high temperature.
Do not touch any part of the press, other than its handle, even
with anti-heat gloves on while the press is being heated or while it
is still hot after using.
Metal edge portions beyond the handle shaft can exceed 100℃, which
may cause burns even with anti-heat gloves on.
Disconnect the main plug from the socket outlet immediately after
use. An operator should pay attention so that others do not
touch the press carelessly and get burned before the press has
cooled down.
It takes about two hours for a heated press (210°C) to cool down to
40°C in the room temperature of 25°C once it has been unplugged.
Do not use the Heat Press on a flammable material.
Use of any other product may cause fire.
Always use a pre-setter supplied by Nitta.
Use of any other product may cause fire.
WARNING
WARNING
WARNING
WARNING
WARNING
WARNING
WARNING

- 4 -
1 Safety Precautions- Continued-
Impressed voltage is distributed in the power cable.
To prevent fire, electric shock or damage, please consider the
following:
・ Disconnect the main plug from the socket outlet with your hand.
・ Do not hang or carry the heat controller or the press by the power
cable or control cable. Always hold the press body and heat
controller.
・ Do not remodel or replace the main plug.
・ Do not place any object on the power cable or the control cable.
・ Do not fold the power cable or the control cable.
・ Do not pull or stretch the power cable or the control cable.
・ Do not wrap the cable around the press and the controller.
Use a three-pin earth line as an extension cord.
When an extension cord is required, use an earth-connection type
extension cord to prevent electric shock.
To prevent fire or electric shock, do not use the PolySprint™ Heat
Press under the following conditions:
・ Under flammable gas or combustible gas environment
・ Under a corrosive gas environment
・ Under an ambient temperature of 5℃ or below
・ Under an ambient temperature of 30℃ or above
・ Under a high humidity environment. (humidity surpassing 85%)
・ In places exposing the press to steam or water drops
To prevent electric shock, do not operate the PolySprint™ Heat
Press with moistened hands.
Do not pour water on the PolySprint™ Heat Press and do not get it
wet.
Use of a wet press may cause fire or electric shock.
Use a dry cloth for cleaning the PolySprint™ Heat Press.
To prevent fire, do not use alcohol, benzine, thinner or
any other inflammable solvent.
WARNING
WARNING
WARNING
WARNING
WARNING
WARNING

- 5 -
1 Safety Precautions- Continued-
Caution
Do not use the PolySprint™ Heat Press outdoors.
Do not give a strong shock.
This may cause fire or electric shock or injury.
When using the PolySprint™ Heat Press on any equipment, use a
safety catcher for the press so it doesn’t fall or collapse. This
will help prevent fire, electric shock or injury.
The heat controller is equipped with suspension fittings.
Pass a hook or string through the suspension fitting and attach the
heat controller to a sturdy and stable object.
Before using the PolySprint™ Heat Press be sure to inspect the
press in accordance with the procedure described on page 18 to
help prevent fire or electric shock.
Do not use this machine for the endless splicing of belt of other
manufacturers.
Endless splicing may become imperfect if this machine is used for the
endless splicing of belt of other manufacturers.
This may spoil the full functioning and performance of the belt.
CAUTION
CAUTION
CAUTION
CAUTION
CAUTION
Suspension fitting

- 6 -
2. Confirmation of Product
Thank you for choosing our PolySprint™ Heat Press NPS-1205H1/H2.
Check that the product is exactly what you have ordered. Use of
the wrong product may cause fire, electric shock or injury.
2-1)Confirmation of Product
Confirm the following items upon accepting delivery of your order. Contact your
local sales office or distributor in your area if you find any deficiency or defect in
your item.
① Are descriptions on the face plate the same as those of your order item?
Please confirm the model type and the power source specifications.
② Has the product been damaged during transportation?
③ Has a nut or screw slackened?
2-2)How to Read Face Plate
MODEL: Press model
INPUT: Input power supply specification and power consumption
S/N: Serial number
2-3)Heat Press Type
H1 or H2 appearing at the end of the press type indicates the specifications of
the power source. H1 is compatible with AC100-120V, while H2 is compatible
with AC200-240V.
2-4)Inquiries
When making inquiries, please inform our sales representative of the model type
and the production serial number.
CAUTION

- 7 -
3. Specifications
3-1)Outline of Heat Press
① PolySprint™ Heat Press is exclusively designed for making finger-endless
Nitta PolySprint™ belts and is made up of (1) springs that apply pressure to
the belt (2) electronically controlled heating plates
② PolySprint ™ Heat Press is compatible with the following endless
specifications:
Joint specifications: finger shape 120mm long x 10mm pitch
finger shape 70mm long x 10mm pitch
Maximum belt width: up to 50mm
Maximum belt thickness: up to 6mm
※Specification of pre-setter is different depending on the thickness of the
belt.
③ Tools required for making finger endless belts: finger puncher FP120-10-50
or FP70-10-50, cooling press NPS-1205C, pre-setter and pre-setter clamps.
※A pre-setter is required for each width belt that is to be made endless.
3-2)Major Specifications of Heat Press
※The range of the set temperature of the controller is between 0°C and
210°C, but it can not control if it is below the room temperature. When
making finger endless belts, the temperature should be set within the
range of 170°C ~ 200°C.
Type NPS-1205H1 NPS-1205H2
Power Source
100V-120V 200V-240V
50/60Hz 50/60Hz
416W-600W 416W-600W
Temperature 0-210 ℃
Outer Dimension
Press Body:165mm wide x 320mm long x 115 mm high
Controller: 90mm wide x 225mm long x 45mm high
Weight 3.6kg

- 8 -
4. Use Environment
Ambient Temperature 5-30 ℃(no condensation)
Ambient Humidity 15~85%RH
Place of Use Indoors (free from dust, water)
Environment No flammable, combustible or corrosive gas;
no steam
In order to prevent fire or electric shock, do not use the PolySprint
™ Heat Press under the following conditions:
・ Under flammable gas or combustible gas environment
・ Under a corrosive gas environment
・ Under an ambient temperature of 5℃ or below
・ Under an ambient temperature of 30℃ or above
・ Under a high humidity environment (humidity surpassing 85%)
・ In places exposing the press to steam or water drops
5. Storage Environment
Ambient Temperature 0-40 ℃ (no condensation)
Ambient Humidity 15~85%RH
Place of Use Indoors (free from dust, water)
Environment No flammable, combustible or corrosive gas;
no steam
The PolySprint™ Heat Press which is not in use should be stored
subject to the above conditions.
Wrong or poor storage may cause mechanical disorder to the
press and may cause fire or electric shock.
Before using the PolySprint™ Heat Press, perform a prior-to-use
inspection and confirm that the press is working properly.
Any problem found in the prior-to-use inspection should
immediately be notified to your local sales office or distributor in
your area.
WARNING
WARNING
WARNING

- 9 -
6. Name of Each Part
6-1)Main Press Body
Warning label
Heat controller
Main plug
Handle
Heater
(top)
Heater (bottom)
Heating plate
(top)
Heating plate
(bottom)
Temperature label
Power cable

- 10 -
6. Name of Each Part- continued
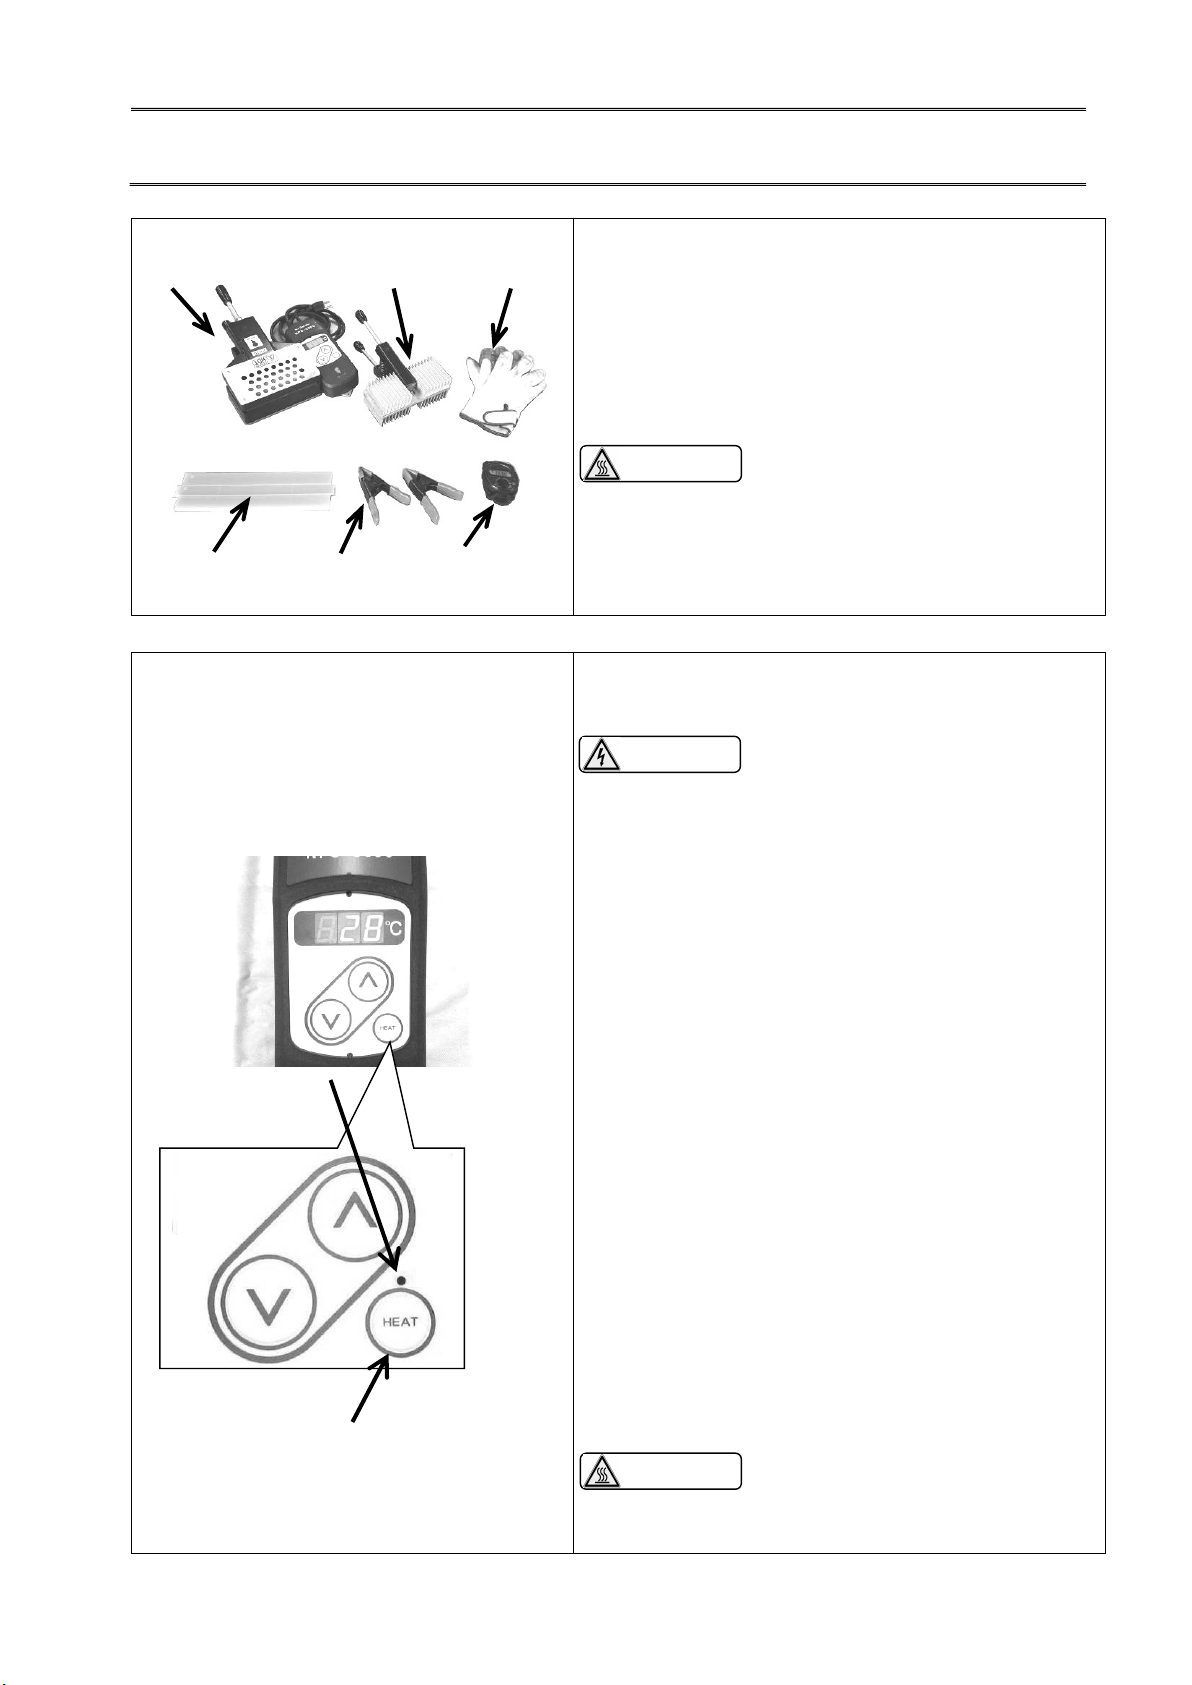
6-2)Heat controller
Upward button
Downward button
Suspension fitting
In-operation lamp
Heat switch
Control Cable
(to press)
Face plate
Heater output power
indicator
The indicator goes on and
off according to the
controlled output power of
the heater.
Power cable
(from socket outlet)
Temperature indication display

- 11 -
7. How to Operate PolySprint™ Heat Press
7-1) Power-on
Connect the main plug correctly to the socket outlet.
Power is supplied to the heat controller and the current temperature of the press is indicated
on the heat controller. Now it is possible to confirm and change the set temperature.
Be sure to connect an earth line to prevent electric shock.
7-2) Temperature Setting (Heat Controller)
① Make sure first if the heat switch is off. (The in-operation lamp is also off.)
※Be careful that you can not change the set temperature while the heat switch is
on and the in-operation lamp is also on.
② Push the temperature setting button (upward) or (downward) once and the
current set temperature is indicated for about 2 seconds.
※The temperature indicator goes on and off when the set temperature is indicated.
③ To raise the set temperature, push button while the set temperature is indicated.
Push the button once and the temperature goes up one ℃ each time.
Push and hold button and the temperature goes up continually.
When the temperature indicator is coming closer to the set temperature, give the button
a one-push a couple of times until obtaining the temperature required.
※When the temperature indicator surpasses the required set temperature, push the
button to lower the set temperature.
※ When the temperature setting button is left untouched for about 2 seconds, the
temperature indicator automatically goes back to the current temperature and
the set temperature is fixed.
④ To lower the set temperature, follow the same directions as above using the appropriate
temperature setting buttons.
7-3) Confirmation of Set Temperature
To indicate the set temperature, push either button or button lightly once, and the
set temperature is indicated for about 2 seconds.
※You can see the set temperature, but can not change it while the heat switch is on.
WARNING
- 12 -
7. How to Operate PolySprint™ Heat Press- continued
7-4) Operation (Heating)
To start operation, push and hold the switch. The in-operation lamp lights up and
controlled power is supplied to the heater. Heating begins.
※To avoid malfunction, you always need to push and hold the switch for about
two seconds when turning it on or off.
When handling the press while it is in use, always wear anti-heat gloves to
prevent burns.
※As the controlled power is supplied to the heater, the heater output power indicator
on the temperature indication display goes on and off (the heater output power
indicator is on when the controlled power is supplied and is off when the controlled
power is ready to supply.)
An operator should not leave a press unattended while it is in use. To help
prevent burns, pay attention to others who may carelessly touch the press.
To stop operation, push and hold the switch once more. Heating control of the
heater comes to a stop and the in-operation lamp lights off.
The press is still at a high temperature after operation. When handling the
press, always wear anti-heat gloves to prevent burns.
The press is still at a high temperature after operation. It takes about two
hours for the press to cool down to room temperature. An operator
should pay attention to others who might carelessly touch the press.
HEAT
HEAT
WARNING
WARNING
WARNING
WARNING
HEAT
- 13 -
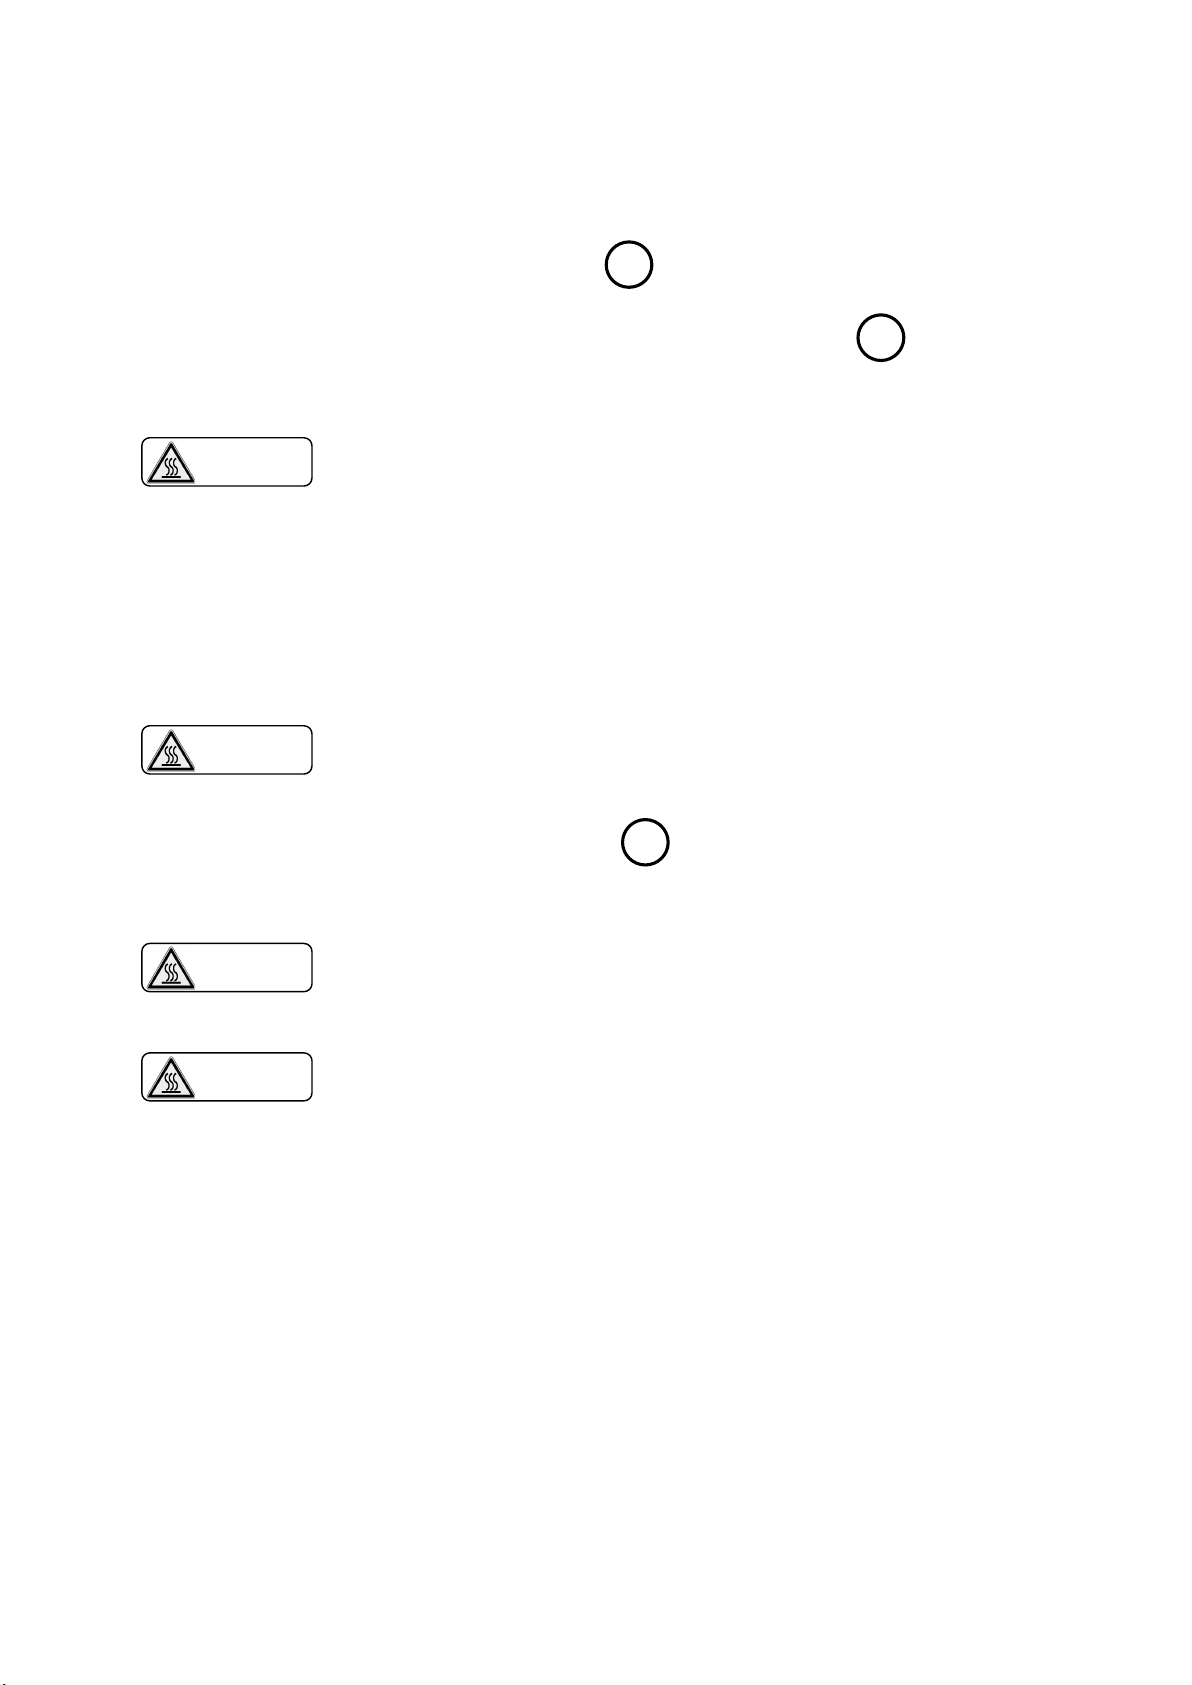
8. How to Make Belts Endless
8-1) Required Tool
a. Heat Press (NPS-1205H1/H2)
b. Cooling Press (NPS-1205C)
c. Pre-setter
※Pre-setter is required for each belt width.
d. Pre-setter Clamp
e. Anti-heat Gloves (burn-preventive protection kits)
The press body reaches a
high temperature. Always use
anti-heat gloves to prevent
burns.
f. Stopwatch or timer
8-2) Work Procedures
① Pre-heating
Connect the main plug to the socket outlet.
Be sure to connect an earth line to
prevent electric shock.
The current temperature is indicated on the
temperature indication display.
Confirm the set temperature. Set the
temperature to match the belt type and belt
width.
※For the set temperature by belt type and
belt width, refer to the Endless Conditions
Table.
※For changing of the set temperature, refer
to the procedure 7-2) on page 11.
Push and hold the Heat Switch for about two
seconds to start heating. The press will be
heated up to the set temperature.
※The in-operation lamp above the Heat
Switch is on while the press is in use.
Be sure to wear anti-heat gloves
when handling the press while it
is in use.
He
at Switch
In-Operation
Lamp
WARNING
WARNING
WAR
N
ING
a. b.
c. d.
e.
f.

- 14 -
② Setting Belt on Pre-setter
Set both edges of the belt on the bottom plate.
※Match both edges so that there is no gap
in the joint sections.
※Set the joint section within the marking
lines on the Pre-setter.
※Confirm that the belt is not twisted.
※Refer to the Endless Conditions Table for
correct placement of each belt in the
Pre-setter.
Always use a pre-setter
supplied by Nitta.
Use of any other product possibly results in an
improper endless joint and may cause fire.
Set the silicon sheet on the belt.
※The silicon sheet can be used on each
surface.
※Remove any dust or foreign object on the
silicon sheet.
※If there is any deterioration, damage or
destruction to the silicon sheet, replace it
with a new one.
Place the top plate over the silicon sheet.
Fix the pre-setters with clamps.
※Fix pre-setter clamps the edges of the
pre-setter. Otherwise, the pre-setter will
not fit into the press correctly.
No gap
Marking lines
WARNING

- 15 -
③ Heating Belt
Be sure to wear anti-heat
gloves in the following
procedures.
Grasp the press handles and open the mouth of
the press.
Hold the pre-setter clamps and set the pre-setter
in the heat press.
Loosen the grip of the handle, is carried out
under pressure, and then heated for a
predetermined time.
※Be sure the pre-setter is set as shown left.
Do not set it upside down or it may cause an
unsuccessful joint. (Place the bottom plate of
the pre-setter on the bottom part of the heat
press, and the top plate of the pre-setter under
the top part of the heat press.)
※Position the pre-
setter so that it is centered in
the press.
※Insert the pre-
setter all the way into the press
until it touches the hinge.
※Is Pre-setter upper die, please set as to be to
the upper side of the press body.
※Monitor the heating time by a stopwatch or
timer. Heat the press for the specified time for
the belt type and belt width. For details on the
heating time, refer to the attached Endless
Conditions Table.
Immediately disconnect the
main plug from the socket
outlet after the use of the press. Pay
attention that others do not touch the
press before it is cooled down to a
safe temperature.
Top part of Pre-setter
Top part of Heat
Bottom part of Heat Press
Bottom part of Pre-setter
Centre the pre-setter in the heat press.
Make sure that the pre-setter
touches the hinge.
WARNING
WARNING

- 16 -
④ Cooling the Belt
Remove the pre-setter from the heat press by
grasping the pre-setter clamps and move the
pre-setter to the cooling press.
※There is no specification in the vertical
direction to the cooling press.
※Relax the handles, which apply pressure, and
cool for specified time. For cooling time, refer
to the Endless Conditions Table.
※Like the heat press, position the pre-setter
centered in the cooling press and insert the
pre-setter all the way in until it touches the
back of the press.
⑤ Taking out the Belt
After cooling for the specified time, hold the
clamps and remove the pre-setter from the
cooling press.
※The pre-setter is still at a high temperature
after cooling time. Be careful when handling
the pre-setter.
Remove the belt from the pre-setter in this order:
clamps, pre-setter top plate, silicon sheet, and
belt.
※The belt may be used once it reaches room
temperature.
Continual use of the cooling
press may cause the press body to
sustain a high temperature. This may
result in burns and tends to deteriorate
the cooling efficiency. Use the
cooling press after it cools down to
room temperature.
WARNING

- 17 -
9. Troubleshooting
Problem Cause Solution
There is no indication on the
temperature indication display.
The main plug is disconnected. Connect the main plug.
Is the power supplied to the
socket outlet?
YES
The heat controller may be out of order or
the power cable may be broken.
※Contact Nitta for more information.
NO Supply the power to the socket outlet.
The temperature indication
display is indicating “0” and it can
not be changed by pushing the
temperature setting button.
Did the problem occur within
a few seconds after the main
plug is connected to the
socket outlet?
YES
The press is starting to work.
Wait for a while.
NO
The heat controller may be out of order.
※Contact Nitta for more information.
The temperature indication
display indicates E-1
The temperature sensor is out of
order.
The temperature sensor must be repaired.
※Contact Nitta for more information.
The temperature indication
display indicates E-2
and the press does not work.
The heater of the press is overheated.
(The temperature is over 240 ℃ and
controlled power is shut off with the
protection circuit.)
Disconnect the main plug. Leave the heat
press as is for a short while until it is cooled
down. Then start over.
If E-2 is indicated repeatedly, contact Nitta
for more information.
The temperature can not be
set.
The heat switch is on. (The
in-operation lamp is on.)
Turn the heat switch off and change the set
temperature.
Push the temperature setting
button. Is the temperature
indication display showing
the set temperature?
YES
Push the button once and the temperature
raises 1℃ each time. Push and hold, and the
temperature can be changed continually.
※For more details, refer to the procedure 7-
2
on page 11.
NO
The heat controller may be out of order.
※Contact Nitta for more information.
The press can not be heated up
to the set temperature.
Is the power source applied
correct?
YES
The heat controller may be out of order or the
wire in the heater may be broken.
※Contact Nitta for more information.
NO Apply appropriate power.
The heat switch is on, but the
press isn’t heated up or
continues to cool down.
The heater is disconnected, the fuse
blew out or the temperature controller
is broken.
The heat press must be repaired.
※Contact Nitta for more information.

- 18 -
10. Inspection
Inspection items date/staff date/staff date/staff date/staff date/staff
The power cable is free of damage
or destruction.
The control cable is free of damage
or destruction.
The heat controller is free of
damage or destruction.
All screws of the heat controller are
tightened.
Main plug is free of damage or
destruction.
The press body is free of damage or
destruction.
All screws of the press body are
tightened.
The heating plate is free of foreign
object or any resin.
The pre-setter is free of damage or
destruction.
The pre-setter is free of foreign
object or any resin.
Make a copy of this page and use it for a prior-to-use inspection

- 19 -
11. Warranty and after-sales service
1. Warranty period
The warranty period is for one full year after the delivery of the order at your
appointed place.
2. Warranty coverage
1) Should the product malfunction due to causes for which our company is
responsible during the abovementioned warranty period, our company will
provide a replacement product or repair the product free of charge. However,
even within the warranty period the following cases shall not be covered by the
warranty. Please note that even if our company provides a replacement product
or repairs the product, the warranty period will be calculated from the initial date
on which the product was delivered.
① Malfunction arising from any inappropriate conditions, environment, handling
and usage which are not described in the Operation Manual and the Endless
Splicing Procedure.
② Malfunction due to a cause arising from something other than the product,
such as your own device.
③ Malfunction arising from any remodeling or repairing by other than our own
company.
④ Malfunction arising from any reasons unpredictable due to our level of
chemistry and technology before shipment.
⑤ Malfunction arising from fire, earthquake, flood, other disasters, voltage error,
or other external factors for which our company bears no responsibility.
2) The warranty coverage is limited to what is stated in 1) above, and the warranty
does not cover secondary damages (equipment damage, opportunity loss, profit
loss) and any other damage incurred by the user as a result of a malfunction of
the product.
3) After the warranty period, if after examination the product is repairable, our
company will repair it upon request.
This manual suits for next models
1
Table of contents
Other Nitta Power Tools manuals

Nitta
Nitta PolySprint NPS-1210A-1 User manual

Nitta
Nitta FP-120G-60 User manual

Nitta
Nitta PP103 User manual

Nitta
Nitta PolySprint NPS-0310H1 User manual

Nitta
Nitta NittaBeltPoly PI-30 User manual

Nitta
Nitta NPS-2005A-1 User manual

Nitta
Nitta PolySprint NPS-3050C User manual

Nitta
Nitta PP1535-1 User manual


