Nitta NPS-2005A-1 User manual

GM-NIT-20004E
I
In
nt
te
eg
gr
ra
al
l
H
He
ea
at
ti
in
ng
g
a
an
nd
d
C
Co
oo
ol
li
in
ng
g
P
Pr
re
es
ss
s
N
NP
PS
S-
-2
20
00
05
5A
A-
-1
1/
/2
2
OPERATOR'S MANUAL
Thoroughly read this operator’s manual before operating the press.
To use endless splicing tools safely, be sure to hand this manual to the
operator or worker.

- 1 -
Table of Contents
1. Safety Precautions ............................. 2
2. Confirmation of Product ..................... 6
3. Specification ....................................... 7
4. Operation Environment ...................... 8
5. Storage Environment ......................... 8
6. Name of each Parts ............................ 9
7. Operation Procedure ......................... 11
8. Endless Splicing Procedure ............ 13
9. Troubleshooting ................................ 17
10. Inspection .......................................... 18
11. Maintenance ...................................... 19
12. Warranty and after-sales service ...... 20

- 2 -
1. Safety Precautions
We would like to thank you for having purchased our Integral Heating and Cooling Press
NPS-2005A
Thoroughly read this manual, especially the chapter on Safety Precautions, to use this
machine safely.
This indicates a hazardous situation which, if improperly
handled, will result in death or serious injury.
This indicates a potentially hazardous situation which, if
improperly handled, will result in minor injury or property
damage.
WARNING
Do not use this machine for any use other than belt endless splicing.
Any use not intended for the prescribed purpose may invite an unexpected
accident.
Improper use may render ineffective the safety protection features of the
product.
This machine is not intended for use by the physically, sensory or
mentally handicapped. They must have the supervision of a person
responsible for their safety, if they use this machine.
Failure to do this may cause fire, electric shock or injury.
Do not allow children to handle this machine. Keep this machine out
of reach of children.
Failure to do this may cause fire, electric shock or injury.
A person with technical knowledge and skills should always operate,
maintain and inspect this machine.
Handling by a person not having technical knowledge may cause fire,
electric shock or injury.
Strictly avoid disassembling or remodeling this machine.
Disassembling or remodeling this machine may cause fire or electric shock.
When repair or check is required, please contact your local distributor,
agent in your area or our company.
In the event of trouble (smoke, fire or nasty smell, etc.), please
immediately disconnect the power plug and contact your local
distributor, agent in you area or our company for inspection or repair.
Failure to do this may cause fire or electric shock.
When not using or carrying this machine, be sure to set the hook and
turn the torque limiter until it slips to securely clamp the heat plate.
Failure to do this may cause injury.
CAUTION
WARNING
WARNING
WARNING
WARNING
WARNING
WARNING
WARNING
WARNING

- 3 -
Confirm that the power supply to be used is within the designated of
specification for this machine.
Failure to do this may cause fire or electric shock.
Avoid using the press in the following environment.
Failure to do this may cause fire or electric shock.
In an atmosphere of inflammable or ignitable gas
In an atmosphere of corrosive gas
In ambient temperature of 5C or below
In ambient temperature of 40C or above
In an atmosphere of high humidity (environment where humidity exceeds
85%)
In an environment subject to wet conditions from steam, water droplets or dew
condensation, etc.
Be sure to wear heat-resistant gloves when operating this press.
Failure to do this may cause burns.
When operating this press, avoid touching the heat plate area even if
wearing heat-resistant gloves.
Failure to do this may cause burns, even if wearing heat-resistant gloves, since
press heat plates get heated to the press’s preset temperature once the press is
plugged in.
Avoid operating the press at the place close to combustible material.
Failure to do this may cause fire.
Always use the pre-setter designed for this product.
Failure to do this may cause fire or electric shock.
Use of a pre-setter made for other products or by another manufacturer may
render ineffective the safety protection features of the product.
Use a dry cloth for cleaning this machine. Strictly avoid using alcohol,
benzene, thinner or other inflammable solvents.
Using inflammable solvents may cause fire.
Impressed voltage is directly applied to the power cable. Observe the
following precautions not to damage the cable.
Failure to do this may cause fire or electric shock.
Disconnect the power plug by hand.
Avoid pulling the cable to disconnect the power plug.
Avoid modifying the power plug or replacing the plug with one from another
manufacturer.
Avoid placing anything on the power cable.
Avoid bending the power cable.
Take care to prevent the power cable from touching the heat plate of the
press.
Connect the power plug to the socket correctly.
Failure to do this may cause electric shock.
The power cable of this machine uses a grounded connection plug. Connect the
power plug correctly into a grounded connection socket.
Model Power supply
NPS-2005A-1 100 - 120V 50 / 60Hz
NPS-2005A-2 200 - 240V 50 / 60Hz
WARNING
WARNING
WARNING
WARNING
WARNING
WARNING
WARNING
WARNING
WARNING
- 4 -
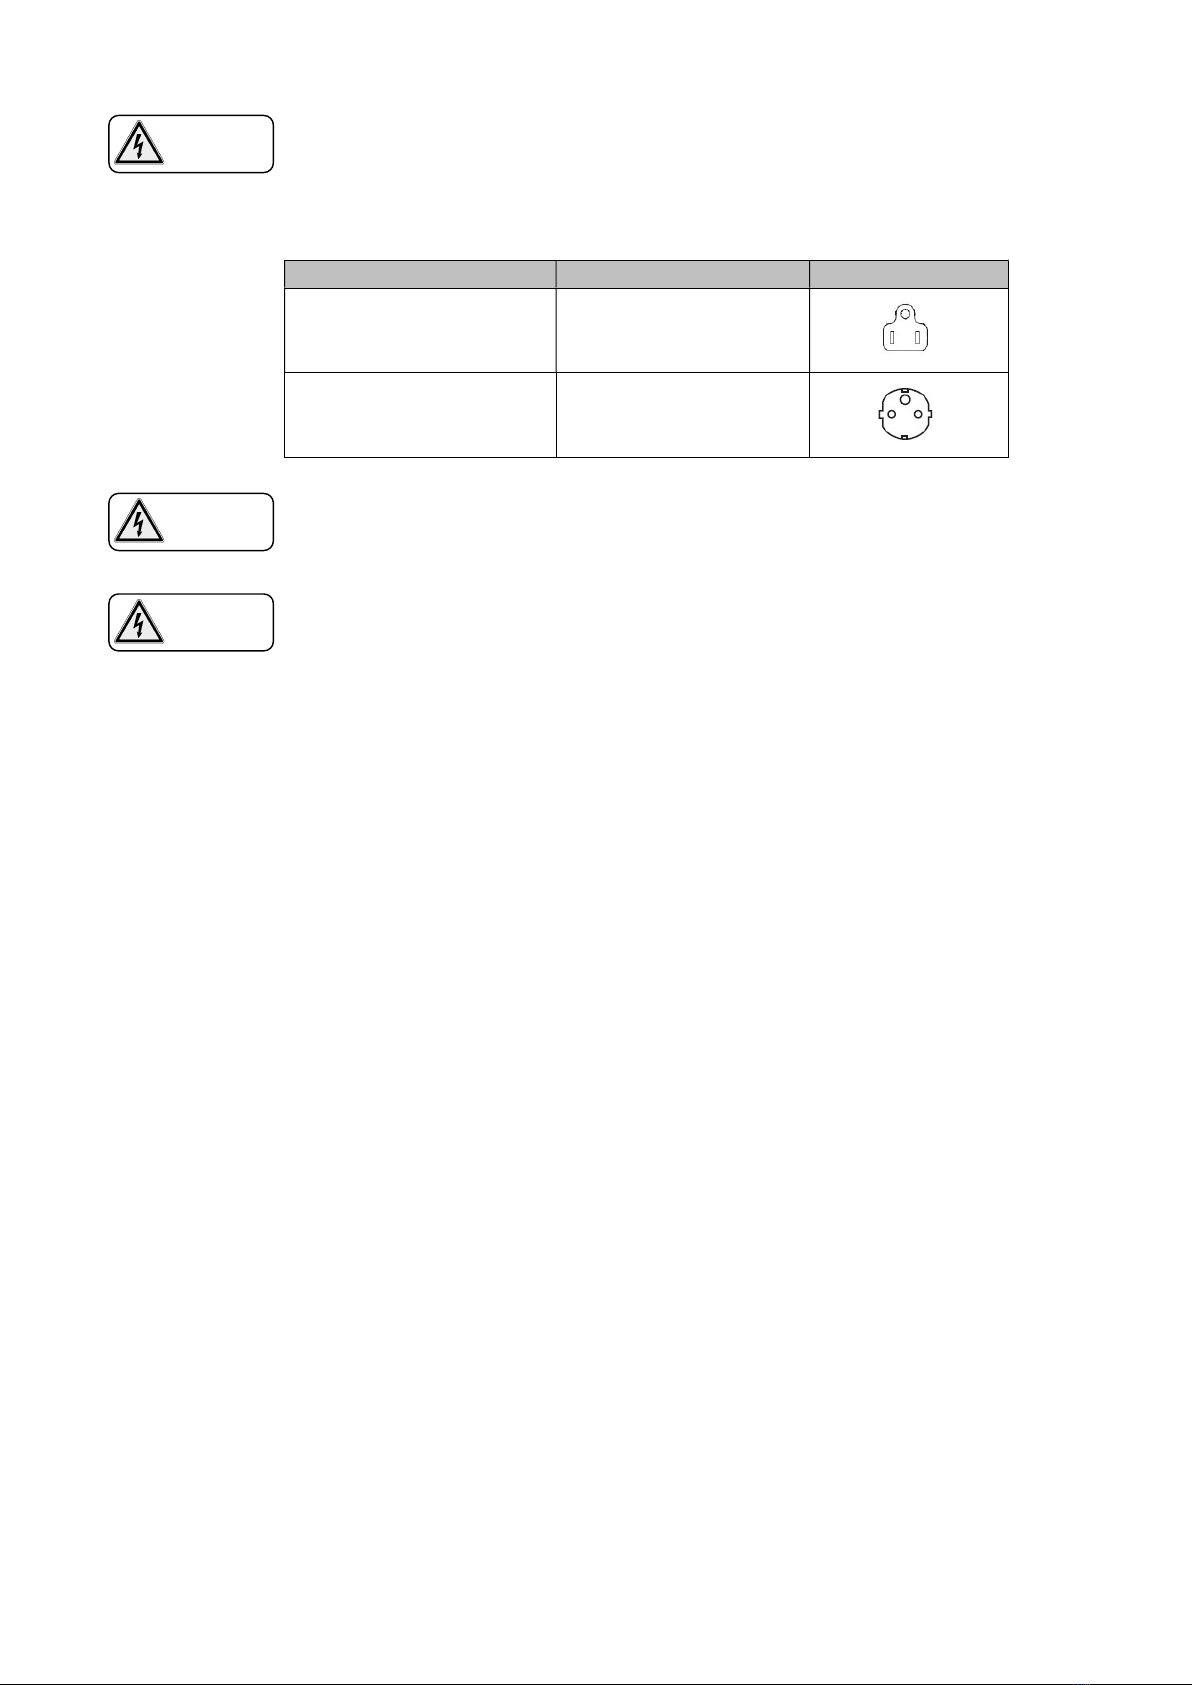
Use a conversion plug when the plug shape does not match the socket.
Failure to do this may cause electric shock.
The plug shape of the attached power cable is as follows. The conversion plug is
not attached. When a conversion plug is necessary, users must provide their
own.
Never handle this machine or the plug, cable, etc. with wet hands.
Failure to do this may cause electric shock..
Never use this machine if it is wet.
Failure to do this may cause electric shock or fire..
Model Plug type Plug illustration
NPS-2005A-1 A Type
NPS-2005A-2 CEE7 (S Type)
WARNING
WARNING
WARNING

- 5 -
CAUTION
Exercise care not to pinch your hands between the top cover and control
box or the upper and lower heat plates.
Failure to do this may cause injury.
Avoid inserting your hands into the opening on the front face of the press.
Failure to do this may cause burns..
Avoid using this machine outdoors.
This product is not intended for the use outdoors.
Avoid dropping this machine or giving it a strong jolt.
Failure to do this may cause fire or electric shock.
Take measures to prevent this machine from dropping or falling, and do not
install or operate the press in an unstable location.
Failure to do this may cause injury, fire or electric shock.
Carry out the inspection described on page 18 of this manual before
operating this machine.
Failure to do this may cause fire or electric shock.
Do not use this machine for the endless splicing of belt of other
manufacturers.
Splice defects may occur if this machine is used for endless splicing of belts from
other manufacturers.
This may reduce the function and performance of the belt, or render it unusable.
CAUTION
CAUTION
CAUTION
CAUTION
CAUTION
CAUTION
CAUTION
- 6 -
2. Confirmation of Product
Before operating the press, check that the product is exactly what you have
ordered. Using this product other than those specified in this manual may
cause fire, electric shock, injury or burn.
2-1) Confirmation of Product
On opening the package, confirm the following points.
1) Are descriptions on the nameplate the same as those of item ordered?
Confirm the model and power supply specification.
2) Is there any breakage or anything missing?
The package contains this manual, the press and power cable.
3) Have screws and nuts loosened during shipping?
We double-check all items during inspection and shipment of products. In the event of any
defect or failure, please contact your local distributor, agent in your area or our company.
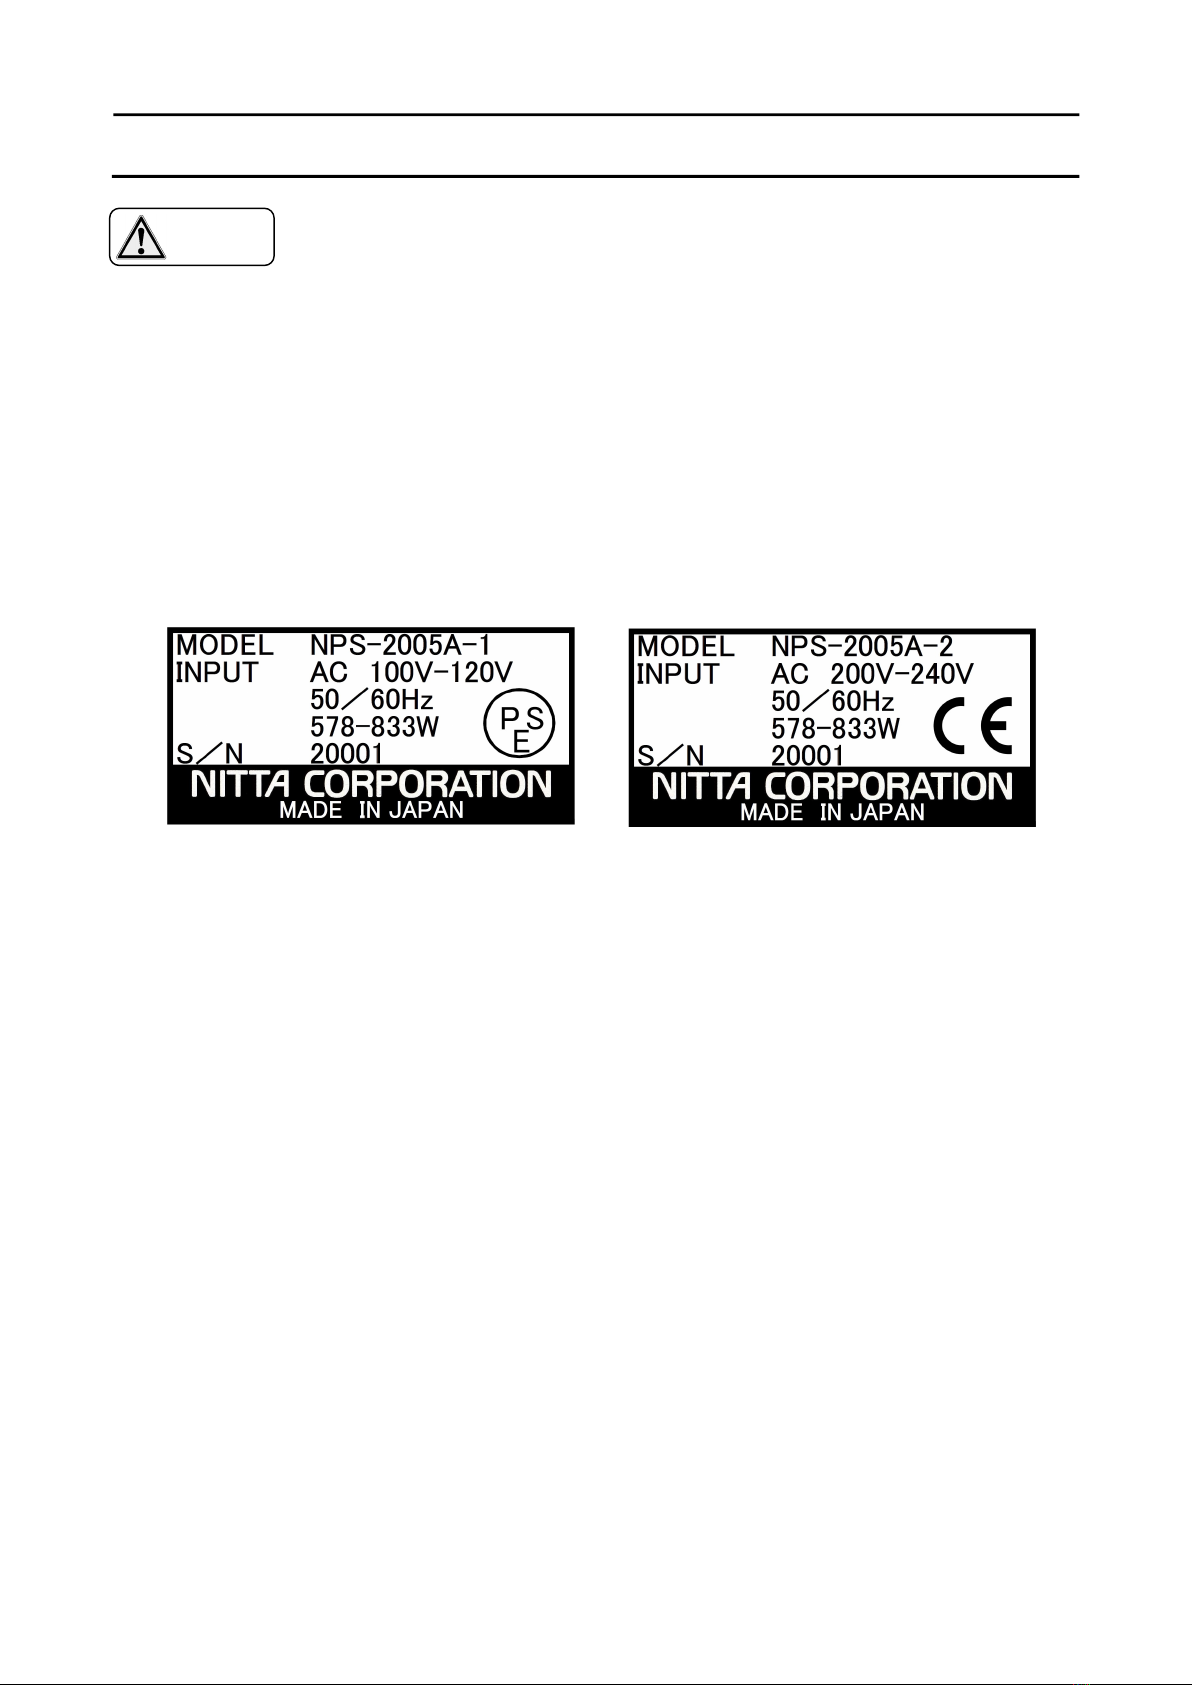
2-2) Confirmation of the nameplate
MODEL: Press model
INPUT: Input power supply specification and power consumption
S/N: Serial number
2-3) Press model
There are two kinds of models with a different input power supply.
The specification of the power supply is described by the input.
2-4) Notes for inquiry
When making inquiries, please contact us with both the press model and serial number.
CAUTION

- 7 -
3. Specification
3-1) Outline of the press
(1) The NPS-2005A press is specially designed for the joining of NITTA’s CFTG belts using
200mm long “fingers.”
(2) This machine is applicable with the following belt endless splicing specifications.
Joint specification: Finger shape: 200 mm long 10 mm pitch
Maximum belt width: 60 mm or less
Maximum belt thickness: 7.5mm or less
(3) Finger-endless splicing requires the finger puncher and pre-setter* of another-sales.
The pre-setter is required for each width belt that is to be made endless-spliced.
3-2) Main specifications of the Press
Model NPS-2005A-1 NPS-2005A-2
Input power supply
100 - 120V 200 - 240V
50 / 60Hz 50 / 60Hz
578 - 833W 578 - 833W
Fuse 5.2 20mm 10A, 250V*
Preset temperature 45 - 200C**
Outer dimension With the press closed: 301 mm wide 300 mm long 180 mm high
With the press opened: 301 mm wide 440 mm long 266 mm high
Weight 8.2 kg
* When replacing the fuse, use the article of the specification shown above.
** Cannot set outside the range of the preset temperature (44C or lower, 201C or
higher).
This machine has been set to end cooling at 45C of temperature. Hence setting
the temperature to around 45C may cause this machine to go standby without
operating the cooling fan.
- 8 -
4. Operation Environment
Ambient temperature 5 – 40C (no dew condensation)
Ambient humidity 15 – 85%R.H.
Working place Indoor (place without dust and water)
Atmosphere No inflammable, combustible or corrosive gas and steam
Avoid using this machine in the following environment.
Failure to do this may cause fire or electric shock.
In the environment of inflammable or combustible gas
In the environment of corrosive gas
In the ambient temperature of 5C or below
In the ambient temperature of 40C or above
In the environment of high humidity (humidity exceeds 85%)
In the environment of wetting by steam, water drop or dew condensation, etc.
5. Storage Environment
Ambient temperature 5 - 40C (no dew condensation)
Ambient humidity 15 - 85%R.H.
Working place Indoor (place without dust and water)
Atmosphere No inflammable, combustible or corrosive gas and steam
When not in use, store this machine under the above conditions.
Poor storage conditions may cause mechanical disorders in the machine
and may result in electric shock or fire.
When not using or carrying the machine, be sure to set the hook and turn
the torque limiter until it slips.
Insufficient clamping may cause injury.
Before operating the machine, be sure to conduct the prior-to-use
inspection and confirm the normal performance.
In the event any abnormality is found in the prior-to-use check, please
immediately contact your local distributor, agent in your area or our
company.
WARNING
WARNING
WARNING
WARNING

- 9 -
6. Name of each Part
6-1) Left side view of the press
6-2) Right side view of the press
WARNING label
Temperature controller
Start switch
Pilot lamp
Top cover
Power cable inlet
Nameplate
Torque limiter ASSY
Fuse box
Upper heat plate
Lower heat plate
Pre-setter guide Hook
Fuse nameplate
Handle
WARNING label
Pressure screw

- 10 -
6-3) Temperature controller
Current temperature display
Programmed temperature display
Setting buttons
Display change button
- 11 -
7. Operation Procedure
7-1) Power ON
Connect the power plug to the socket correctly.
The power is supplied to the temperature controller. The controller indicates the present
temperature (upper display) and preset temperature (lower display).
Be sure to connect to a grounded outlet.
7-2) Temperature setting (Temperature controller)
1) Check that the pilot lamp is off (no heating or cooling).
2) Push the para display change button three times to indicate “SP-1” on the present
temperature display. At this time, the preset temperature display indicates the preset
temperature.
* The preset temperature before shipping is 185C.
3) Push the (up) button to raise the preset temperature or push the (down) button to
lower. Push the button once and the flickering figure increase or decrease 1C each
time.
Pushing the (side) button shifts the figure of temperature.
4) The figure of the preset temperature display is flickering when the figure of the
temperature is adjusting.
The preset temperature will be fixed when no pushing is made for 2 sec or more.
5) Push the para display change button two times to return the present temperature
display to the original state.
7-3) Hold time setting (Temperature controller)
1) Check that the pilot lamp is off (no heating or cooling).
2) Push the para display change button four times to indicate “E1.on” on the present
temperature display. At this time, the preset temperature display indicates the hold time
(in sec).
* The hold time before shipping is 300 sec.
3) Push the (up) button to increase the time or push the (down) button to decrease.
Push the button once and the flickering figure increase or decrease 1 sec each time.
Pushing the (side) button shift the figure of hold time setting.
4) The figure of the hold time display is flickering when the figure of the hold time is
adjusting.
The hold time setting will be fixed when no pushing is made for 2 sec or more.
5) Push the para display change button once to return the present temperature display to
the original state.
The indicator of temperature returns to the preset temperature.
Although changing the preset temperature and hold time is possible also
during heating or cooling, heating or cooling may become incorrect.
Hence avoid changing the setting during heating or cooling since it may
cause incorrect endless splicing.
WARNING
CAUTION

- 12 -
7-4) Operation
1) To start operation, push the start switch for 0.5 sec or more.
2) On starting of operation, the pilot lamp lights and the heating of upper and lower heat
plates start.
3) The machine operates in the sequence of; heating to the preset temperature,
temperature holding (period previously set) and cooling. On completion of temperature
holding, the pilot lamp goes off, and the machine operate the cooling fan until present
temperature goes below 45C.
4) When present temperature goes below 45C, the cooling fan stops and the machine
become a standby.
Be sure to wear heat-resistant gloves when operating the press.
Failure to do this may cause burn.
An operator should not leave the machine in use. Take a measure to
prevent other people from touching this machine unexpectedly.
Failure to do this may cause burn on other people.
7-5) Discontinuing operation of the machine while in use
Disconnect the plug if it becomes necessary to discontinue operation of the machine while it is
in use.
* Even if the plug is disconnected during operation, preset data of preset temperature
and hold time are maintained.
When operation is discontinued during use, the machine is kept at high
temperature. Be sure to wear heat-resistant gloves when handling the
machine.
Failure to do this may cause burns.
The operator should take measures to prevent other people from touching
the machine accidentally, until the machine temperature lowers to near
room temperature (about two hours).
Failure to do this may cause burns to others.
If machine operation is discontinued during the process of splicing a belt,
do not use the belt.
The splice may become defective, reducing the function and performance of the
belt, or rendering it unusable.
CAUTION
WARNING
WARNING
WARNING
WARNING
- 13 -
8. Endless Splicing Procedure
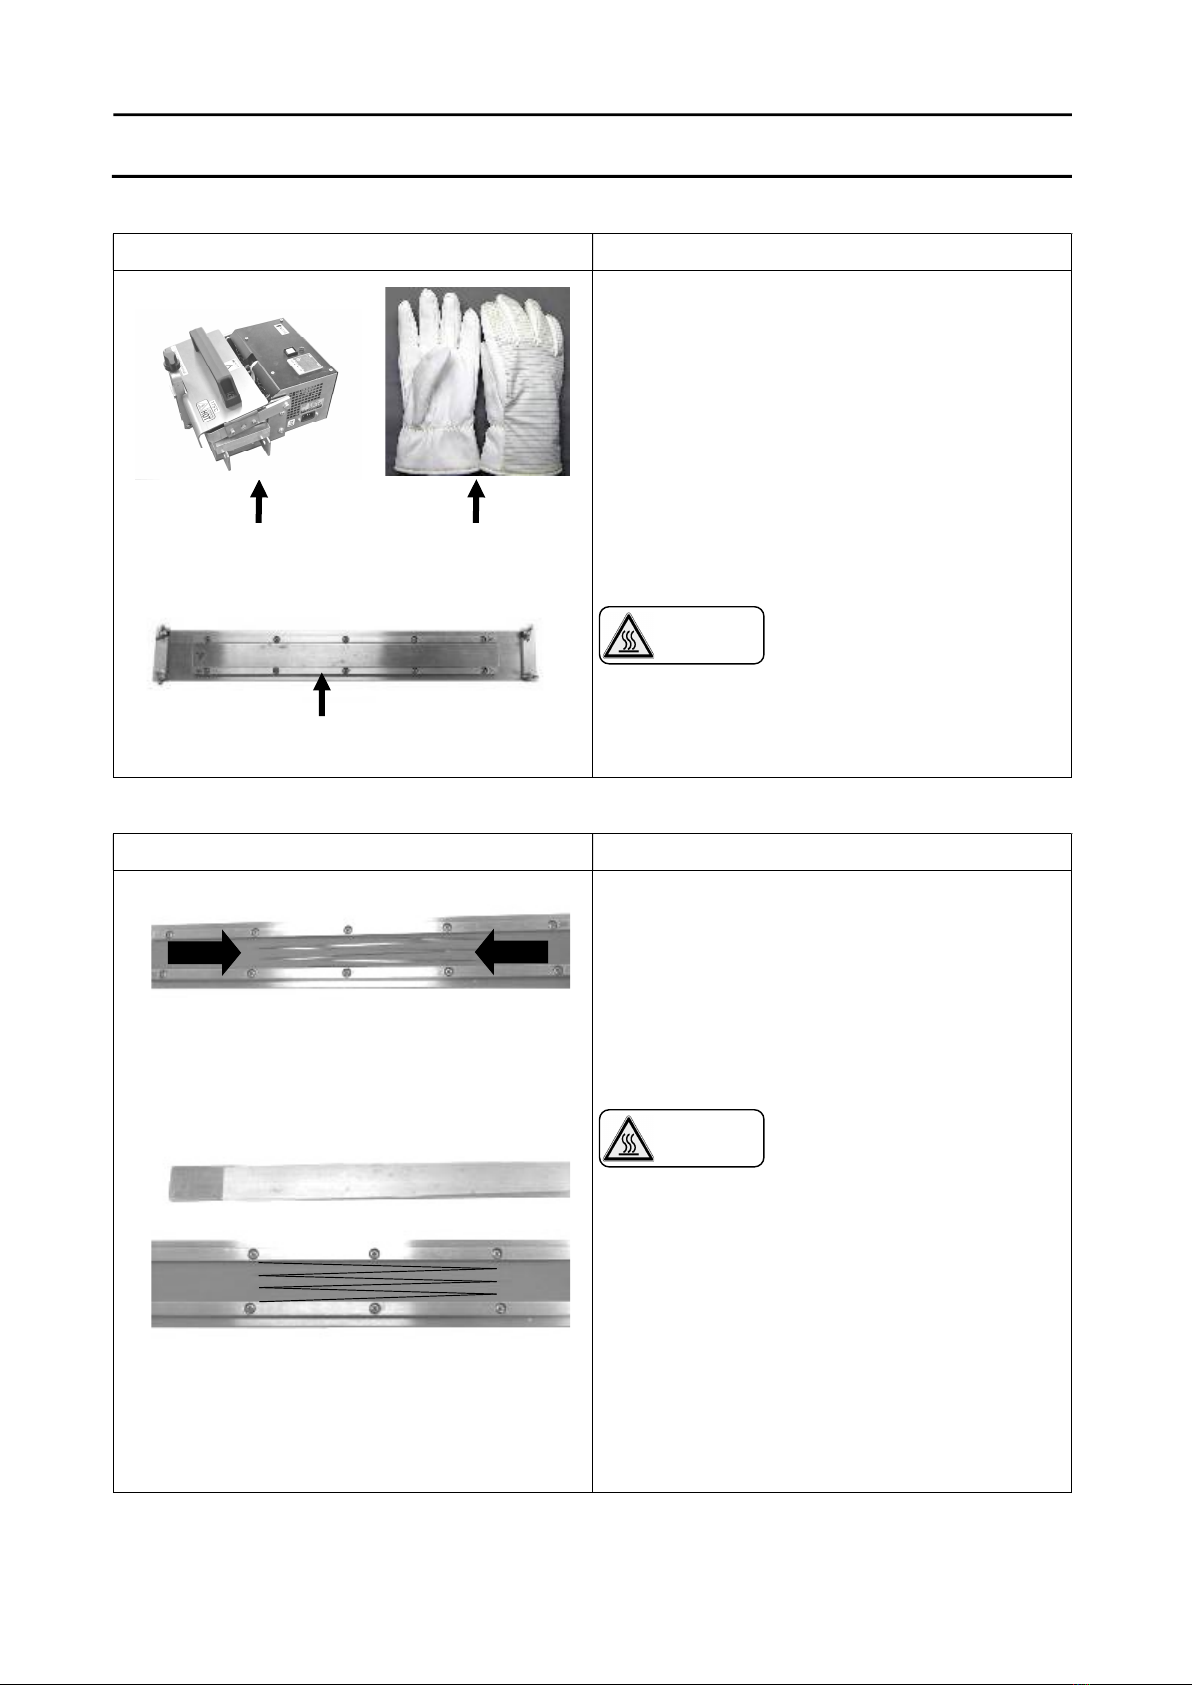
8-1) Required Tool
Figure/Photo Description
Fig. a Integral Heating and Cooling Press
[NPS-2005A-1/2]
Fig. b Heat resistant gloves (burn-preventive
protection kits)
This item is not contained in the product
package. The user must prepare
gloves yourself.
Fig. c Pre-setter
This item is not contained in the product
package.
The pre-setter is required for each width
belt.
This machine reaches a
high temperature. Be sure
to prepare heat-resistant
gloves and wear it.
Failure to do this may cause
burn.
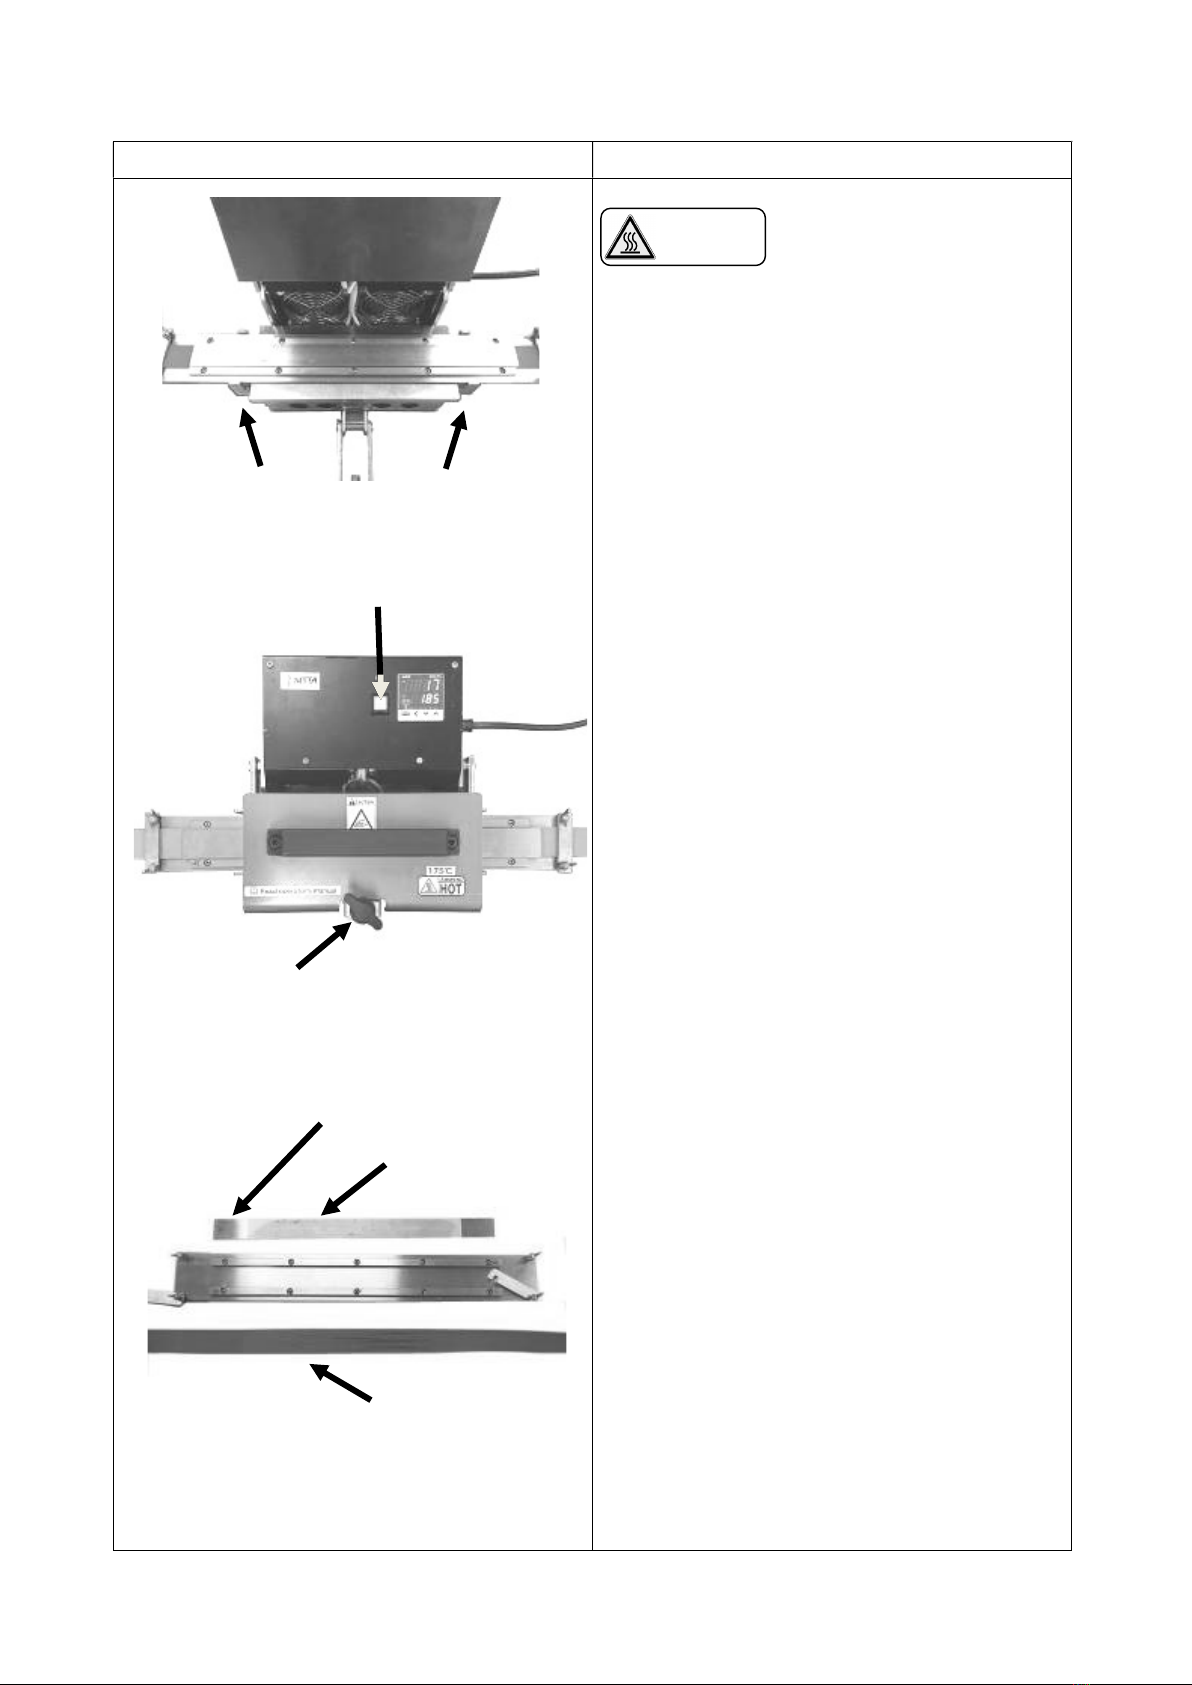
8-2) Belt setting
Figure/Photo Description
Fig. d
Fig. e
1) Set both ends of the belt punched into finger
shape beforehand on the lower pre-setter as
shown in Fig. d.
* Exercise care not to twisting on the way
of belt.
* Confirm the front side and the back side
of belt before setting. Refer to the
attached endless condition table.
Always use the pre-setter
of our product.
Use of any other product
possibly results in an
improper endless joint and
my cause fire.
2) Set the belt by mating finger joints leaving
no gap so that the joint part is located within
marking lines on the pre-setter as shown in
Fig. e.
Fig. a Fig. b
Fig. c
WARNING
WARNING

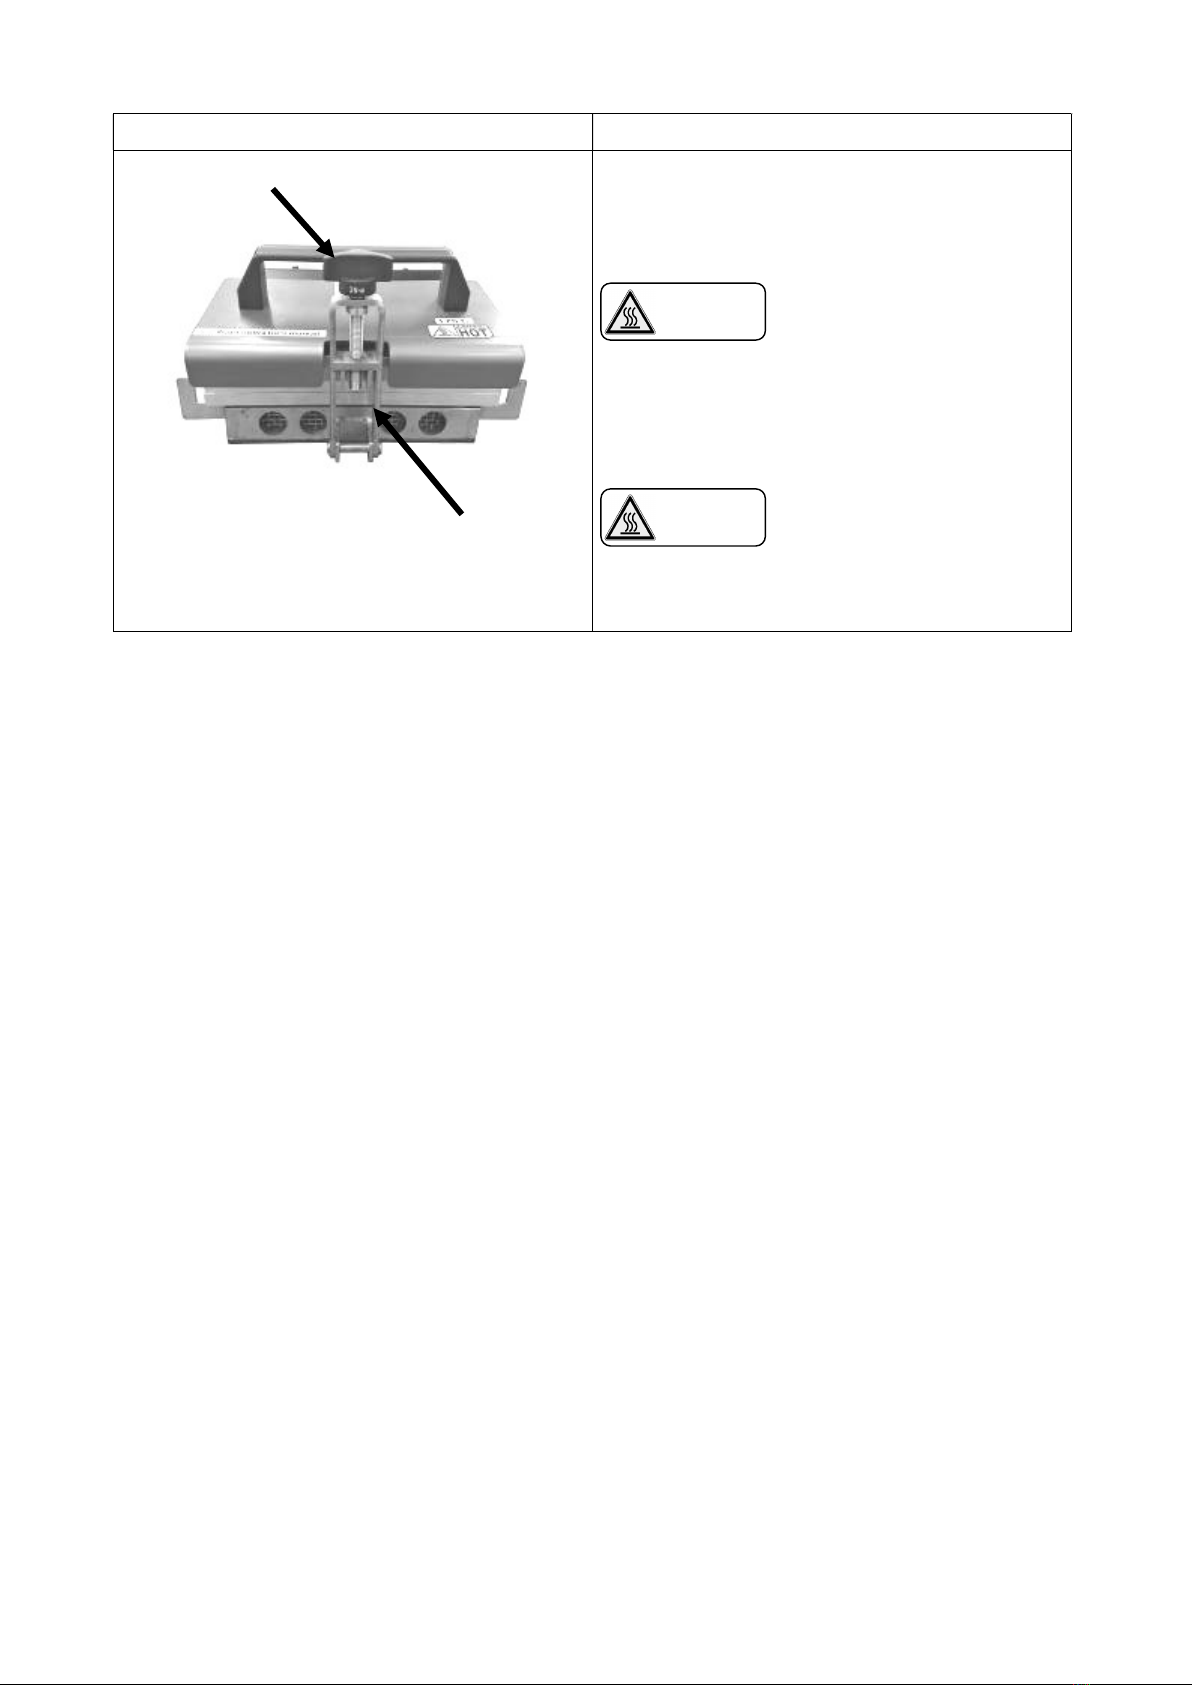
- 14 -
Figure/Photo Description
Fig. f
Silicone sheet (Both sides can be used.)
Presetter upper half
Fig. g
3) Set the silicone sheet on the belt as shown
in Fig. f.
* Remove any dust or foreign object on the
silicon sheet before operation.
* Change the sheet if deteriorated,
scratched or torn.
4) Place the upper pre-setter over the silicone
sheet as shown in Fig. g.
* The upper pre-setter has also marking
lines. Place the upper pre-setter over
the lower one while mating the marking
lines.
8-3) Preparation of press
Figure/Photo Description
Temperature controller
Start switch (Do not touch now.)
Fig. h
1) Connect the power plug to the socket.
Be sure to connect an earth
line. Failure to do this
may cause electric shock.
2) Set the preset temperature and hold time on
the temperature controller according to
sections 7-2) Temperature setting and 7-3)
Hold time setting on page 11.
* Preset temperature and hold time
differ by belt widths. Set them by
referring to the attached endless
condition table.
* Avoid touching the start switch before
setting the belt and then clamping the
hook.
WARNING
- 15 -
8-4) Endless splicing
Figure/Photo Description
Presetter guide
Fig. i
Start switch
Torque Limiter
Fig. j
Fig.k
This machine reaches a
high temperature in
operation. Wear
heat-resistant gloves when
carrying out the following
works.
1) Place the pre-setter prepared as described
in section 8-2) Belt setting on page 13,
between pre-setter guides as shown in Fig.
i.
* Place the pre-setter at the center as
much as possible.
* When placing, be careful not to pull out
the belt from the pre-setter.
2) Gradually close the top cover so that the
upper plate is positioned in parallel with the
pre-setter.
* Quick closing the top cover may cause
the pre-setter to shift its position or the
belt to come off the pre-setter.
3) Set the hook and turn the torque limiter until it
slips as shown in Fig. j.
* Excessive turning will cause the torque
limiter to slip in removing also, disturbing
easy removing.
4) Push the start switch to start endless
splicing.
* It takes about 60 min to finish one cycle
of operation (heating, temperature
holding and cooling) with the presetting
before shipping at 23C of environmental
temperature.
* The required time changes according to
ambient environmental temperature or
the setting of preset temperature or hold
time of the press.
5) On completion of temperature holding, the
pilot lamp goes off and operate the cooling
fan. Check that the cooling fan has
stopped after cooling completion before
opening the top cover.
6) Take out the pre-setter and remove the
upper one, silicone sheet and belt in order.
Figk
* Use the belt after it has cooled down to
room temperature.
Belt
Siliconsheet
Presetter upper half
WARNING
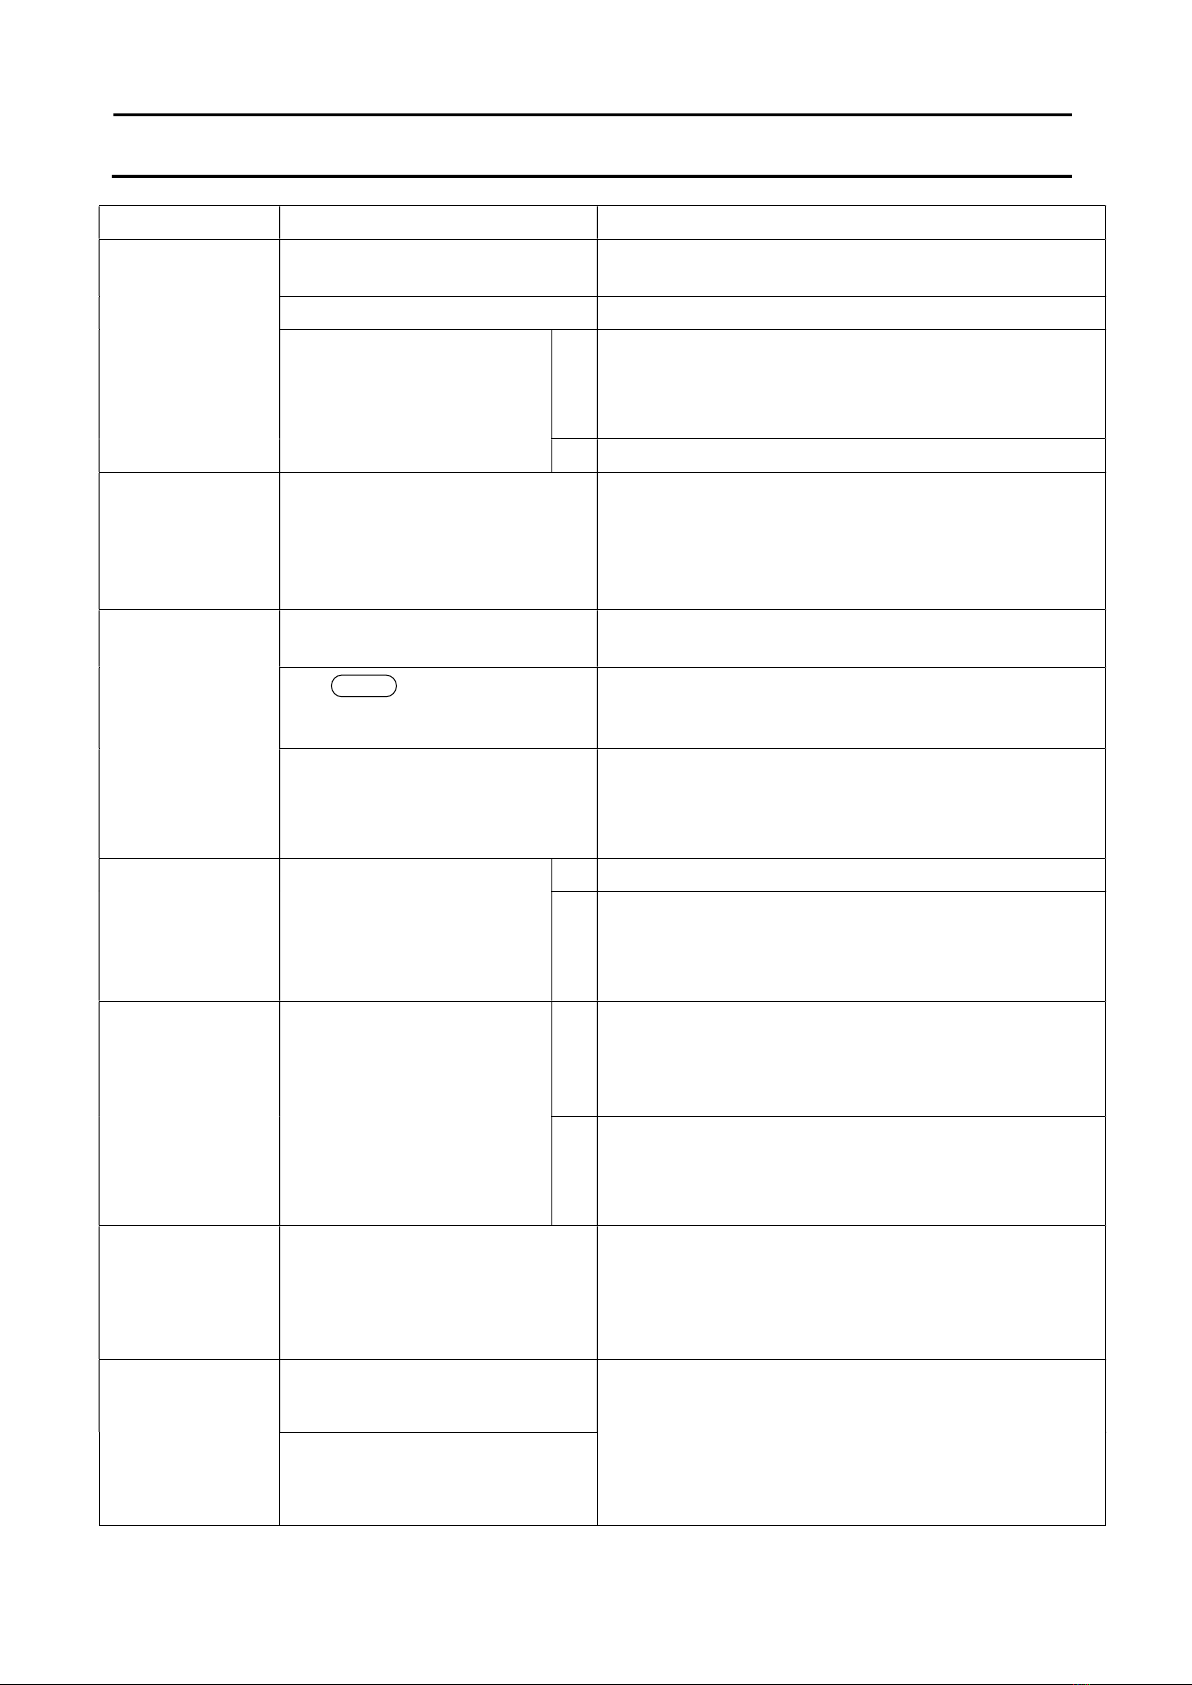
- 16 -
Figure/Photo Description
Torque Limiter
Hook
Fig. l
7) To continue endless splicing, prepare the
pre-setter by following the procedure of
section 8-2) Belt setting and then repeat the
procedure of section 8-4) Endless splicing.
Be sure to wear
heat-resistant gloves when
operating the press.
8) To end operation, check that cooling is
completed. Then set the hook and turn the
torque limiter to lock before disconnecting
the power plug as shown in Fig. l.
Securely clamp the hook
and torque limiter.
Insufficient clamping may
cause injury.
WARNING
WARNING
- 17 -
9. Troubleshooting
Problem Cause Solution
No display on the
temperature
controller
The power plug has been
disconnected. Connect the power plug.
The fuse has blown out. Replace the fuse.
Is power supplied to the
outlet?
Yes
Failure of the temperature controller or disconnection
of power cable or internal wiring is suspected.
* Please contact your local distributor, agent in
your area or our company.
No
Supply power to the outlet.
The temperature
controller gives a
display starting
with AL.
(AL01 - AL99)
Defective data on temperature
controller
Disconnect the power plug once and connect it again.
* If the alarm display does not disappear, failure
on the temperature controller is suspected.
* Please contact your local distributor, agent in
your area or our company.
Temperature and
hold time cannot
be set.
Setting change is not possible for
6 sec. right after power ON. Wait 6 sec. or more to make a setting.
The para and other buttons
were pushed right after the
preset value was changed.
To fix the preset value, avoid pushing buttons for 2
sec. or more.
Other than the above:
Failure of the temperature
controller
If setting is not possible even by the above methods,
failure on the temperature controller is suspected.
* Please contact your local distributor, agent in
your area or our company.
Cannot be heated
to the set
temperature.
Does power supply not
match the specification?
Yes
Use the correct power supply.
No
Failure of the temperature controller or disconnection
of internal wiring is suspected.
* Please contact your local distributor, agent in
your area or our company.
The cooling fan
does not operate.
Has preset temperature
been set to around 45 C?
Yes
This machine has been set to end cooling at 45 C
.
Setting the temperature to around 45 C may
cause the cooling fan to operate incorrectly.
Set the preset temperature higher.
No
Failure of the cooling fan or disconnection of internal
wiring is suspected.
* Please contact your local distributor, agent in
your area or our company.
The torque limiter
slips and cannot
be loosened.
The torque limiter was turned
excessively.
Lightly tap the torque limiter from the rear to the front
with a plastic hammer while taking care not to give
the press any strong jolts.
* Throttling force is sufficient when the torque
limiter begins to slip.
The splice part
shows air bubbles
Out of grease in the pressure
parts
Lightly apply the grease to the pressure parts
(see “11. Maintenance”).
If not corrected by applying grease, the torque limiter
should be checked.
* Please contact your local distributor, agent in
your area or our company.
The malfunction of the torque
limiter

- 18 -
10. Inspection
Check item Date/check
Date/check
Date/check
Date/check
Date/check
The power cable have no
flaw.
The temperature controller
is not damaged.
There is no screw or part
missing.
The machine body is not
damaged.
Heat plates have no resin
or foreign matter adhered.
The pre-setter have no
flaw.
The pre-setter have no
resin or foreign matter
adhered.
The hook or the torque
limiter have no distortion.
* Please make copies of this page and use them for daily check before use.

- 19 -
11. Maintenance
Applying grease to the pressure parts
Lightly apply the grease periodically to the point shown below ① through ④.
This will deliver a correct pressure. However please do not apply excessively.
① screw
② boss of the screw
③ boss of torque limiter
④ sliding part of metal plate
④
①
②
③
This manual suits for next models
1
Table of contents
Other Nitta Power Tools manuals

Nitta
Nitta NittaBeltPoly PI-30 User manual

Nitta
Nitta PolySprint NPS-1205H1 User manual

Nitta
Nitta PP1535-1 User manual

Nitta
Nitta FP-120G-60 User manual

Nitta
Nitta PolySprint NPS-3050C User manual

Nitta
Nitta PolySprint NPS-1210A-1 User manual

Nitta
Nitta PolySprint NPS-0310H1 User manual

Nitta
Nitta PP103 User manual


