Njoy cStation 600 User manual

User Manual
Manual de ulizare
Before using this product, carefully read all product documentaon and retain it for future reference.
314.21.23.0
Power Staon 600
Power Staon 1000
ESPS-60TBEHJ-CT012
ESPS-10HBAKU-CT012

2
LED Display Buon:
Short press to control LCD display on/o.
Long press for 2 seconds to clear the Bluetooth bind list.
Input:
1.USB Type C: Power Delivery System (100W max)
2.DC 7909 30V:
- AC Power Adapter (100W max) - 60W AC Power Adapter included
- Solar Panel with MPPT 17V-24V (120W max) - panel not included
- DC 12V Car Port Adapter 12-30V (100W max) - included
Aenon! This manual is generally used in energy storage system
products with an AC output of 230V/50Hz.
Note!
In the preparaon of this document, every eort has been made to
ensure the accuracy of this content, but keep in mind that all statements,
informaon, and recommendaons presented in this document do
not constute an agreement of any kind, either expressed or implied.
Unless specied otherwise in your contract terms, all statements,
informaon, and recommendaons are provided “AS IS.”
The portable power staon is a sturdy Li-ion NCM baery pack
with advanced features like fast charging USB ports, extended
baery life and solar panel input. Mulple charging ports are
available for any type of electronic device when there isn’t
access to the power grid, as in campings, trips, outdoor acvies,
remote events etc. The power staon can be recharged very
quickly in 4 ways, through an AC outlet, solar panel, 12V car
adapter and USB Type-C port.

3
English
Română
LED display switch
LCD display
Car Port 12V
DC 7909
Input
Output/Input
USB Type C
Output USB-A
Shucko
Output:
1. USB-A x2 (18W max)
2. USB Type C port with Power Delivery (100W max)
3. DC 5525 12V (120W max)
4. Car Port 12V (120W max)
5. AC x2 Schuko 230V
Power staon 600: Stable at 600W, Max total output: 800W
Power staon 1000: Stable at 1000W, Max total output: 1200W
4
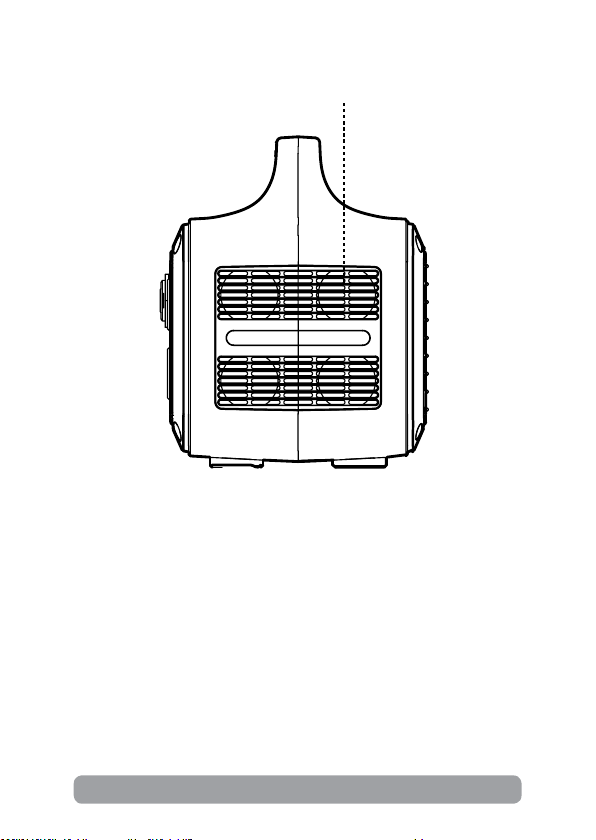
Cooling fan
Chargeable device:
USB output: smartphone, smartwatch, digital camera, e-reader, tablet,
etc.
12V car charger outlet: light, car adapter, etc.
DC 5525 output: router, CPAP breathing machine, etc.
5
English
Română
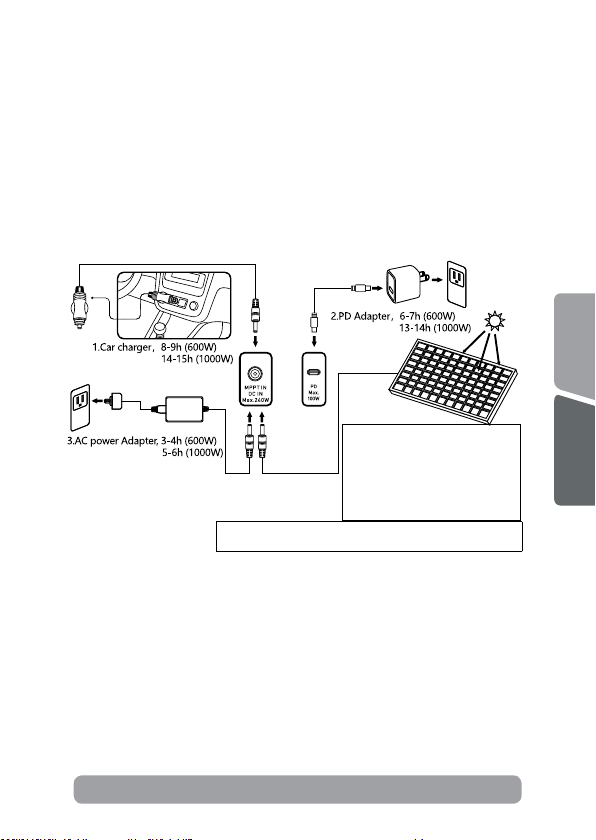
Charging Method:
To ensure opmal performance, please charge the product before use or
storage. When the charger is connected to the power outlet, the indicator
light will turn on, and the LCD screen will display the current charging
level. Once the LCD screen shows that the baery is 100%, it is fully
charged. You can check the current baery level at any me by looking
at the LCD screen.
4. 200W Solar Panel, 3-8h (600W)
6-12h (1000W)
Support MPPT (Maximum Power Point
Tracking) technology, which is oen
used in wind or solar power system to
obtain the maximum output and best
charging performance.
* Actual performance is related to weather,temperature, baery
status and other factors.

6
Important safety informaon:
Please read the following safety precautions carefully:
A. Do not short-circuit the device. Avoid storing the product with
metal objects such as coins, jewelry, keys, etc.
B. Do not expose the product to water or heat, such as placing it in a
fire or liquid, including direct sunlight.
C.Do notplacethe product ina highlyhumidor dustyenvironment.
D. Do not disassemble the device in any way.
E. Do not drop, put heavy objects on, or strongly impact the
product.
F. Keep the product out of reach of people with low physical,
sensory, and mental abilities, as well as those who lack experience
and knowledge, unless they are supervised or guided by personnel
responsible for their safety.
G. Children should not operate this product.
H. Do not cover the product with towels or clothing when using it.
I. Heating during charging is normal, so please be careful.
J. Do not exceed the recommended charging time for this product.
K. Disconnect the product from the power source when the devices
are fully charged.
L. Please use the product normally and avoid electric shock.
M. Dispose of the scraps according to regulations. Do not treat
the built-in batteries as household waste to avoid explosion and
pollution.
N. This product is only used for emergency power supply and
cannot replace standard DC power supply or AC power supply for
household appliances or digital equipment.
WARNINGS!

7
English
Română
Use Instrucons:
1. Press the buon next to each port you wish to use.
2. When the indicator light next to the port is on, the output is enabled,
and a device can be charged.
3. The AC output is stable at 600W (Maximum 800W) for Power Base 600
model and stable at 1000W (Maximum 1200W) for Power Base 1000. If
the product is used beyond the maximum power, the power supply will be
automacally turned o to protect the product from overload use.
4. Press the ON/OFF buon to turn o the output.
5. If the product is not used for an extended period, it should be recharged
every three months. It is recommended to keep the power between 60%
to 80% and store it in a cool and dry place.
LCD Screen Instrucons:
The LCD screen displays the usage status of the product. When the prod-
uct is fully charged, the LCD screen turns o and stops charging. When
any funcon is acvated, the screen will light up. You can press the buon
to turn o the LCD screen when the display is not needed
1.The input power
2.Baery level display
3.The Bluetooth logo
4.The output power
Note!
If the ports are not in use, please turn them o to save power.

8
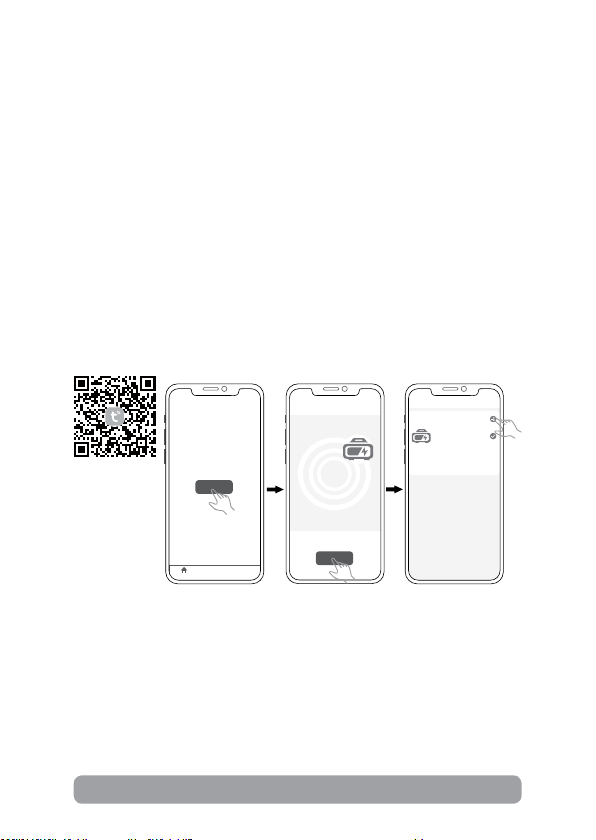
APP Instrucons:
Operang Temperature range:
1) Search “Tuya Smart” and download it through the App Store or Android
applicaon.
2) For the rst use, please press the screen buon unl the Bluetooth icon
appears on the screen. If you have already installed, please go directly to
step 7.
3) Aer installing and running the app, aer logging in, select
“Add Device”.
4) Aer nding the equipment, It will display the following page (If it can’t
be nd, please check the Bluetooth permissions or repeat the rst step).
5) Click “Next”, enter the add page.
6) Click “+” , add the equipment, connect it.
7) Once the connecon is completed, the user can control the USB port
output, the in-vehicle output, the AC output.
The product’s baery capacity may be aected by low temperatures. The
product can be charged in a temperature range of 0°C to 40°C. If charging
the product when the temperature is below 0°C, it is recommended to
place the product in a temperature-controlled environment and connect
it to a power source (AC output socket, solar photovoltaic panel). The
product can charge devices in the temperature range of -10°C to 40°C.
Add Device
no device
HOME
Next
Find available device
Portable Power
Station
Portable Power Station
Bluetooth device
Add a device
Cancel

9
English
Română
Fault diagnosis:
If your device is not being charged successfully with this product, please
follow the steps below:
1. Ensure that the output port is open, and the LED indicator light is on
the power buon.
2. Check the LCD power display, and if it shows 20% or less, please charge
the product.
3. Ensure that the power of the device you are using does not exceed the
maximum power capacity of the product port.
Solar photovoltaic panels:
AC adapter:
To charge your product with solar energy, choose a solar photovoltaic
product, and simply insert it in the DC port. This product uses MPPT
(Maximum Power Tracking) technology, which compares the output
voltage point of the solar panel with the baery voltage of the product
in real me. This helps to nd the maximum power output point that the
solar panel can provide and charge the machine’s baery to obtain the
best charging eciency.
It is essenal to charge the product with the AC adapter specied by us.
We will not be responsible for any consequences caused by charging with
other adapters.
4. Check the device link cable to make sure it is properly plugged in and
has good contact.

10
Butonul panoului LED
Apasare scurta: acune care iniaza controlul panoului LED ON/OFF
Apasare susnuta 2 sec: sterge lista de conexiuni Bluetooth
Intrare
1. DC: 240W(30V)
2. USB-C:PD 100W
3. Solar: 240W(17-24V)
4. Incarcator auto: 240W(12-30V)
Atene! Acest manual este desnat sistemelor de stocare a
energiei electrice cu iesire AC de 230V/50Hz.
Nota!
Am facut toate eforturile pentru a asigura acuratetea connutului
acestui document, dar toate declaraile, informaile si recomandarile
din acesta nu constuie o garane de nicio natura, e explicita sau
implicita. Daca nu exista o specicare diferita in contractul incheiat
cu dumneavoastra, toate declaraile, informaile si recomandarile din
acest document sunt furnizate “asa cum sunt”, fara nicio garane, e
explicita, e implicita.
Staa de incarcare portabila pentru exterior are o construce
ABS solida si conne baterii de p Liion NCM care asigura
o durata de viata exnsa. Este caracterizata de specicai
avansate cum sunt incarcarea rapida prin USB si intrare pentru
atasarea unui panou solar. Pune la dispozie mulple porturi de
incarcare pentru dispozivele electronice atunci cand nu exista o
alta sursa de electricitate, cum ar in camping, excursii, acvita
in natura, evenimente in locai izolate etc. Staa portabila poate
reincarcata ecient prin 4 metode, de la priza, prin panou solar,
adaptor auto 12V si port USB Type-C.


12
Venlator
Dispozive compabile pentru incarcare
Iesire AC: Drona, Venlator, Rotopercutor, Uscator de par, Blender,
Masina de gat electrica, Cuptor electric, Proiector.
Iesire DC:(12V): Incarcator auto, Mini-frigider de masina.
Iesire USB: Smartphone, Consola de jocuri, Tableta.

13
English
Română
Metoda de incarcare
Inainte de a uliza sau depozita produsul va rugam sa il incarca la retea
prin intermediul incarcatorului. Conectat la retea, indicatorul de retea este
aprins iar pe ecranul LED va aparea nivelul de incarcare in mp real. Cand
pe ecranul LED este asat 100% inseamna incarcare completa. Nivelul de
incarcare poate vericat pe ecranul LED.
4. Panoul solar 200W, 3-8h (600W)
6-12h (1000W)
Suporta tehnologia MPPT (Maximum
Power Point Tracking) ulizata
frecvent in panourile solare pentru
obne cea mai ecienta incarcare.
Ecienta reala este relava, depinzand de vreme, temperatura,
starea bateriei si al factori.
Incarcator
auto

14
INFORMATII DE SIGURANTA ESENTIALE
Va rugam cititi cu atentie urmatoarele informatii pentru siguranta
in utilizare:
A. Evitati provocarea unui scurtcircuit. Evitati atingerea obiectelor
metalice de dispozitiv cum ar fi monede, bijuterii, chei etc.
B. Nu expuneti la caldura sau umezeala produsul. Evitati sa il tineti
aproape de foc, lichide sau in bataia directa a soarelui.
C. Nu utilizati sau depozitati produsul in conditii de umiditate
ridicata sau cu praf.
D. Nu desfaceti statia sub nici o circumstanta.
E. Nu il scapati pe suprafete dure, nu il loviti si nu puneti obiecte
grele pe el.
F. Nu lasati dispozitivul nesupravegheat in jurul persoanelor
cu handicap fizic sau mental si celor complet nefamiliarizati cu
utilizarea acestui produs.
G. Nu lasati produsul la indemana copiilor pentru utilizare.
H. Nu acoperiti produsul cu imbracaminte sau prosoape in timpul
utilizarii lui.
I. Atentie. Produsul se va incalzi in timpul functionarii, este un
fenomen complet normal.
J. Nu depasiti timpul de incarcare recomandat.
K. Inchideti statia in momentul in care toate dispozitivele conectate
sunt incarcate.
L. Utilizati produsul in limite rationale.
M. Reciclati dispozitivul dupa reglementarile locale. Nu tratati
nici o componenta interna ca gunoi menajer., pentru a nu provoca
accidente si poluare.
N. Acest produs nu inlocuieste alimentarea standard in utilizarea
zilnica a dispozitivelor. Acest produs este destinat pentru cazuri de
urgenta sau cand nu exista acces imediat la o sursa conventionala
de electricitate.
Avertismente

15
English
Română
Instrucuni de ulizare
Cum se ulizeaza:
1. Apasa butonul de langa ecare port pe care dori sa il uliza.
2. Cand indicatorul luminos de langa port este aprins, iesirea este acvata,
iar dispozivul atasat se incarca.
3. Iesirea AC este constanta la 600W (cu un varf maxim de 800W) pen-
tru modelul Power Staon 600 si 1000W (cu un varf maxim de 1200W)
pentru modelul Power Staon 1000. Daca produsul este ulizat peste ca-
pacitatea maxima admisa, sursa de tensiune il va opri automat pentru a-l
proteja de deteriorare.
4. Apasa butonul ON/OFF pentru a opri iesirea.
5. Daca produsul nu este ulizat o perioada indelungata este recomandata
incarcarea lui la ecare 3 luni. Nivelul de incarcare opm este 60-80% si
este necesara depozitarea intr-un loc uscat si racoros.
Explicai ecran LED
Ecranul LED aseza parametrii de ulizare a produsului. Cand produsul e
incarcat complet, ecranul se opreste si incarcarea se sisteaza. In momentul
in care orice funce este acvata ecranul se va aprinde. Cand nu este
folosit ecranul se poate snge prin butonul aferent lui.
1. Puterea de intrare
2. Asaj nivel baterie
3. Bluetooth logo
4. Puterea de iesire
16
Instrucuni aplicae
Temperatura de funconare
1. Căutați aplicaa Tuya Smart si descarca-o din App Store sau Google
Play.
2. La prima ulizare, apasa butonul ecranului pana cand iconita Bluetooth
apare. (Daca a mai ulizat aceasta applicae, merge direct la pct 7).
3. Dupa deschiderea aplicaei si crearii unui cont, selecta Add Device.
4. Cand produsul devine vizibil prin conexiunea bluetooth, va aparea pe
ecran in maniera urmatoare. (Daca nu este vizibil, reincerca sa il gasi
repetand pasul 2).
5. Apasa Next si selecta Add Page.
6. Apasa + si adauga produsul dorit si conecta-l.
7. O data realizata aceasta conexiune, ulizatorul poate avea control total
asupra iesirilor de incarcare.
Temperatura foarte scazuta poate afecta capacitatea bateriei din interiorul
produsului. Temperatura de incarcare recomandata este in intervalul 0-40
grade Celsius. Daca temperatura este sub 0 grade C recomandam plasarea
produsului intr-un mediu izolat de frig extrem si conectarea sa la reteaua
electrica sau la panoul fotovoltaic. Produsul poate incarca dispozive in
intervalul de temperatura-10 - 40 grade Celsius.
Add Device
no device
HOME
Next
Find available device
Portable Power
Station
Portable Power Station
Bluetooth device
Add a device
Cancel

17
English
Română
Diagnoza erori:
Daca dispozivele conectate nu se incarca ecient verica urmatoarele:
1. Asigura-va ca portul de iesire este deschis, lumina indicatorului de pe
buton sa aprinsa.
2. Verica nivelul de incarcare al staei, daca ecranul aseaza 20%
incarca staa.
3. Verica ca puterea de incarcare necesara dispozivului conectat sa nu
e mai mare de capabilitatea staei.
4. Cablul de incarcare poate defect sau nu e conectat direct.
Panouri fotovoltaice (solare)
Adaptor AC:
Daca alege sa incarca staa cu ajutorul unui panou solar doar conecta
panoul la portul DC al staei. Produsul susne tehnologia MPPT
(maximum power tracking), tehnologie care monitorizeaza in paralel
tensiunea generata de panou si tensinea din bateria produsului pentru a
obne cea mai ecienta incarcare a produsului.
Produsul trebuie incarcat cu adaptorul AC specicat de producator. Nu
suntem responsabili de deteriorarea produsa de incarcarea cu alt p de
adaptor.

Memo

Memo

This manual suits for next models
3
Table of contents
Languages:
Other Njoy Power Supply manuals

Njoy
Njoy Garun Series User manual

Njoy
Njoy PWPS-065A04W-BU01B User manual

Njoy
Njoy TC2421IX User manual

Njoy
Njoy Titan Series User manual

Njoy
Njoy PSAD-12CB21X-CK01B User manual

Njoy
Njoy Royer 16A User manual

Njoy
Njoy Garun Series User manual

Njoy
Njoy Legion 600 User manual

Njoy
Njoy Freya Series User manual

Njoy
Njoy Storm Series User manual


