Njoy Legion 600 User manual

Legion Series User Manual
PWPS-060ASBL-BU01B
PWPS-070ASBL-BU01B
Before using this product, carefully read all product documentation and retain it for future reference.
Bedienungsanleitung
Manual de utilizare
Korisničko uputstvo
Ръководство на потребителя

02 03
Thank you for purchasing our products!
Please read this manual before using the product.
If you are a gaming addict or a tech enthusiast and you
want to build your own computer system you must choose
a high quality power supply. nJoy Legion is a powerful semi-
modular power supply with high quality protection and
80PLUS Silver ECOVA certification. Legion operates silent
and has an intelligent cooling system. The user-friendly
semi-modular construction improves cable management,
reduces clutter and increases air flow and cooling inside
your chassis. Legion is extremely reliable because offers
excellent protection for your components (OCP, OVP, UVP,
OPP, OTP and SCP) certified in accordance with international
safety standards. It is fully compatible with AMD / Intel, ATI
/ Nvidia platforms and it is NVIDIA SLI/ATI CrossFireX ready.
Focusing on quality at competitive prices, nJoy
designs consumer products for a better and
enjoyable way into the digital world.
English
Srpskiбългарски Română Deutsch
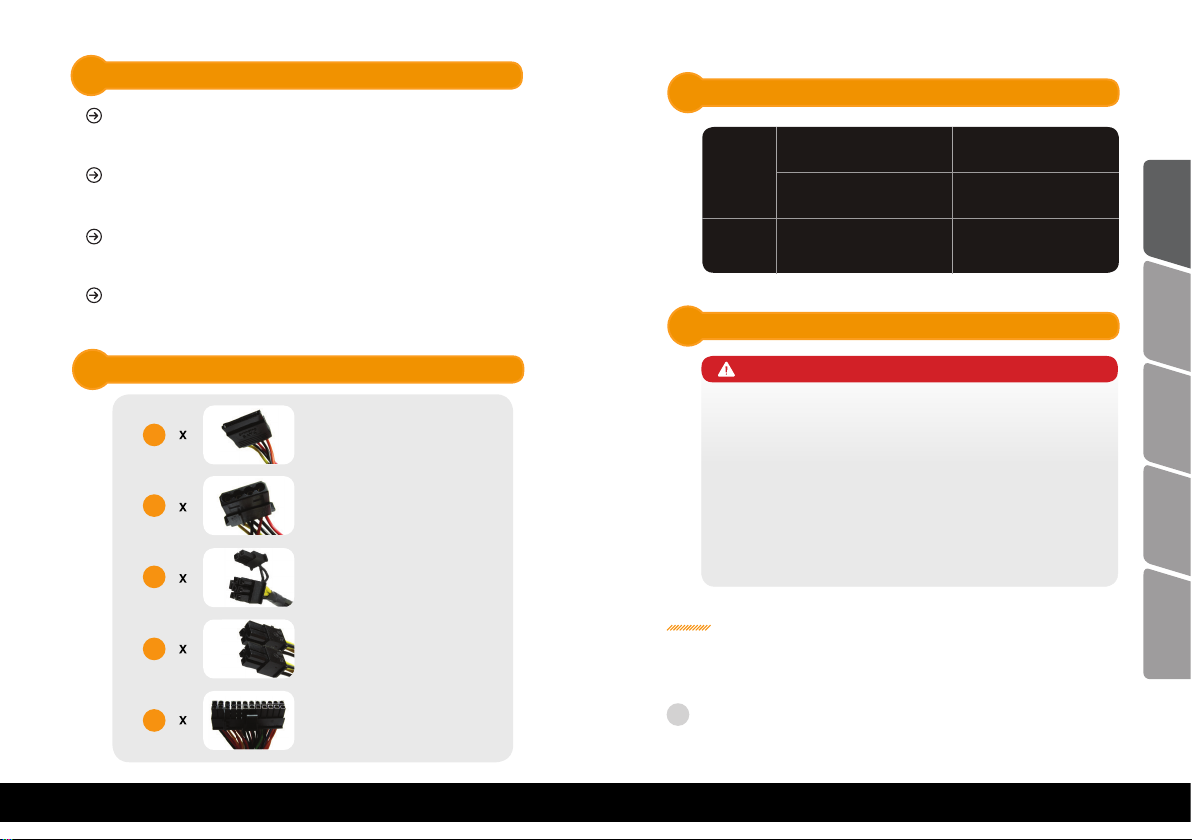
2 x PCI-E 6+2pin cable (4 connectors)
2 x Sata cable (6 connectors)
2 x Molex cable (4 connectors)
1 x Power cord
1 x package of screws
Warranty card
User manual
Package Contents
1
NOTE: If any of the above package content is missing or is
damaged please contact the shop where you have bought the
product from.

04 05
English
Srpskiбългарски Română Deutsch
S-ATA
Molex
PCI-E 6+2pin
4+4pin ATX12V / EPS12V
20+4pin
6
4
4
1
1
Connectors3
Warnings2
PSU should be powered by the source indicated on the
rating label.
Do not place the power supply in a high humidity or
temperature environment.
Do not unplug the AC power cord when the power
supply is in use.
Do not open the power supply case unless you are an
authorized service technician.
Input / Output
Installation
4
5
Input
Voltage 230V
Frequency Range 47Hz - 63Hz
Output Nominal Power 600W - Legion 600 model
700W - Legion 700 model
Attention!
Before starting the installation please make sure your
system is turned off and disconnected from the AC
power supply.
Use only the original cable set. Using different cables
may lead to major defects!
You will need a screwdriver for the installation. Use only
the screws provided in the package.
Removing your existing power supply.
If you are building a new system, skip to Step B.
Step A
1. Disconnect the AC power cord from your wall outlet or
UPS and from the existing power supply.

06 07
English
Srpskiбългарски Română Deutsch
1. Make sure the power supply’s AC power cable is not
connected.
2. Follow the directions in your chassis manual and
install the power supply with the screws provided.
3. Connect the main 24-pin power cable. The main 24-
pin power cable has a detachable 4-pin mechanism in
order to support either a 24-pin or a 20-pin socket on
the motherboard.
A. If your motherboard has a 24-pin socket, you may
connect the 24-pin main power cable from the
power supply directly to your motherboard.
B. If your motherboard has a 20-pin socket, you
must detach the four-pin cable from the 24-pin
connector, and then plug the 20-pin cable onto
your motherboard without connecting the four-pin
connector.
4. Connect the eight-pin +12V (EPS12V) cable to the
motherboard.
A. If your motherboard has an eight-pin +12V socket,
connect the eight-pin cable directly to your
motherboard.
B. If your motherboard has a four-pin socket, detach
the four-pin from the eight-pin cable, and then plug
this four-pin cable directly to your motherboard.
5. Connect the peripheral cables, PCI-Express cables,
and SATA cables.
A. Connect the peripherals cables to your hard drive
and CD-ROM/DVD-ROM power sockets.
B. Connect the SATA cables to your SATA SSD or hard
drive’s power sockets.
C. Connect the PCI-Express cables to the power sockets
of your PCI-Express video cards if required.
D. Connect the peripheral cables to any peripherals
requiring a small 4-pin connector.
E. Make sure all the cables are tightly connected. Be
sure to save any unused modular cables for future
component additions.
6. Connect the AC power cord to the power supply and
turn it on by pushing the switch to the ON position
(marked with “I”).
Installing the nJoy Legion power supply
Step B
The detachable four-pin from the 24-pin main connec-
tor is not a “P4” or “+12V” connector. Serious damage
can be caused if you use it in place of a “P4” or “+12V”
connector.
WARNING
2. Disconnect all the power cables from your video card,
motherboard and all other peripherals.
3. Follow the directions in your chassis manual and
uninstall your existing power supply.
4. Proceed to Step B.

08 09
Disposal of Old Electrical & Electronic Equipment
(Applicable in the European Union and other European countries with
separate collection systems)
This symbol on the product or on its packaging indicates that this product shall not be
treated as household waste.
Instead it shall be handed over to the applicable collection point for the recycling of
electrical and electronic equipment.
By ensuring this product is disposed of correctly, you will help prevent potential negative
consequences for the environment and human health, which could otherwise be caused
by inappropriate waste handling of this product.
The recycling of materials will help to conserve natural resources.
English
Srpskiбългарски Română Deutsch
Protections6
OCP (Over Current Protection)
Is enabled if the load on the individual circuits exceeds the
specified limit.
UVP (Undervoltage Protection)
This protection comes into action if the voltage on the
circuits drops below a certain limit. The power supply is
automatically switched off in this case.
OVP (Overvoltage Protection)
The overvoltage protection is triggered if the voltage in the
circuits is too high.
SCP (Short Circuit Protection)
The fuse protecting the power supply’s secondary circuits
prevents physical defects of the power supply and the
components connected to it.
OTP (Over Temperature Protection)
In the case of excessive heat build-up in the power supply,
the power supply automatically switches off. You can switch
it back on when has cooled down.
OPP (Overload Protection)
This protection is triggered if the total output of the power
supply exceeds the specified maximum load.

10 11
2 x PCI-E 6+2pin cable (4 Steckverbindungen)
2 x Sata cable (6 Steckverbindungen)
2 x Molex cable (4 Steckverbindungen)
1 x Speisekabel
1 x Schraubenpaket
Garantiekarte
Bedienungsanleitung
Inhalt der Packung
1
Vielen Dank, dass Sie unsere Produkte
ausgewählt haben!
Lesen Sie dieses Handbuch aufmerksam bevor Sie das Produkt verwenden.
Indem wi uns auf Qualität zu wettbewerbsfähigen
Preise konzentrieren, bauen wir Produkte für
Verbraucher in der Idee einer desto angenehmer
Wechselwirkung mit der Digitalwelt.
Wenn du von Spielen oder allgemein von der Technologie
begeistertbistunddeineigenesSystemaufbauenwillst,musst
du unbedingt ein leistungsfähiges und hochwertiges Netzteil
auswählen.DasNetzteilLegionvonnJoyhateinesolideshalb-
modulares Aufbau mit zahlreichen Schutzvorrichtungen
und ECOVA 80PLUS Silver Zertifizierung. Beim Betrieb ist
die Legion geräuscharm und verfügt über ein intelligentes
Kühlungssystem von Temperaturfühlern gesteuert. Das
intuitive, halb-modulare Design hilft zu einer besseren
Ausführung der Kabeln im Inneren des Gehäuses, sie trägt zur
Steigerung der Lüftung an die anderen Bestandteile bei. Das
Netzteil Legion gewährt zahlreiche Schutzvorrichtungen für
andere Aufbauten des Systems (OCP, OVP, UVP, OPP, OTP und
SCP) in Übereinstimmung mit der internationalen gültigen
Gesetzgebung. Verträglich mit der Plattform AMD/ Intel, ATI/
NVIDIA und vorbereitet für NVIDIA SLI/ATI CrossFire.
English
Srpskiбългарски Română Deutsch

12 13
Stecker2
Achtung1
Die Quelle muss mit den Parameter angegeben auf
dem Kleber angezeigt am Produkt versorgt werden.
Lagern Sie die Quelle nicht in einer Umgebung
erhöhter Temperatur und Feuchtigkeit.
Entfernen Sie den Versorgungskabel nicht, wenn die
Quelle in Betrieb ist.
Öffnen Sie die Versorgungsquelle nicht. Gehen Sie zu
einem befugten Service.
S-ATA
Molex
6+2 pin PCI-E
4+4 pin ATX12V / EPS12V
20+4 pin
4
1
1
6
4
English
Srpskiбългарски Română Deutsch
Eingang/ Ausgang
Installation
3
4
Achtung!
Vor dem Beginn der Installation versichern Sie sich, dass
das System ausgeschaltet ist und von der Stromquelle
abgeklemmt ist.
Verwenden Sie nur den originalen Kabelsatz aus dem
Paket. Wenn man andere Kabeln einsetzt können diese
das Netzteil schwer stören.
Um das Netzteil anzubringen brauchen Sie einen
Schraubendreher. Verwenden Sie die Schrauben aus dem
Lieferumfang.
Eingang
Spannung 230V
Häufig 47Hz - 63Hz
Ausgang Nominal Stärke 600W - Modell Legion 600
700W - Modell Legion 700
Entfernung des vorhadenen Netzteils aus Ihrem System.
Wenn Sie ein neues System aufbauen, gehen Sie zum Schritt
B über.
Schritt A
1. Schalten Sie die Stromversorgung von der Steckdose
oder vom UPS ab.

14 15
English
Srpskiбългарски Română Deutsch
1. Stellen Sie sicher, dass das Netzteil nicht unter
Spannung ist.
2. Verfolgen Sie die Anweisungen aus der
Betriebsanleitung des Gehäuses und verwenden Sie
die Schrauben aus dem Lieferumfang um das Netzteil
anzubringen.
3. Schließen Sie den Kabel mit 24 Pins an. Diese
Steckverbindung hat 4 abnehmbare Pins damit sie für
Festplatten mit 24 Pins oder 20 Pins eingesetzt werden
kann.
A. Wenn die Grundplatte eine Steckverbindung mit
24 Pins verträgt, schließen Sie das Kabel an, ohne
jedwelche Änderung.
B. Wenn die Grundplatte eine Steckverbindung von 20
Pins verträgt, nehmen Sie die letzten 4 Pins ab und
schließen Sie das Kabel an.
4. Verbinden Sie das Kabel mit 8 Pins von +12V an die
Grundplatte.
A. Wenn die Grundplatte einen Eingang für 8 Pins
von +12V hat, dann schließen Sie das Kabel ohne
jedwelche Änderung an.
B. Wenn die Grundplatte einen Eingang für 4 Pins hat,
entnehmen Sie 4 Pins vom Kabel mit 8 Pins und
schließen Sie es an die Grundplatte an.
5. Schließen Sie die Kabel für die Nebengeräte, das PCI-
Express Kabel und die SATA-Kabel an.
A. Schließen Sie die Kabel für die Nebengeräte zur
Festplatte und an die Eingänge für CD-ROM/DVD-
ROM an.
B. Schließen Sie die SATA-Kabel an die SSD- Eingänge
oder Festplatte an.
C. Schließen Sie die PCI-E Kabel an die PCI-E-
Videoplatte an, wenn es notwendig ist.
D. SchließenSiedieKabelfürNebengeräteanjedwelche
andere Bestandteile die eine Steckverbindung mit 4
Pins brauchen.
E. Stellen Sie sicher, dass sämtliche Kabel
ordnungsgemäß angeschlossen sind. Lagern Sie
sämtliche andere Kabel, die Sie nicht gebrauchen.
6. Nach Anschluss des Speisekabels, schalten Sie das
Netzteil ein, indem sie den Schalter mit dem Zeichen
“I” drücken.
Anbringung des Netzteils nJoy Legion
Schritt B
Die4abnehmbarenPinsvonderSteckverbindungmit 24
Pins ersetzen nicht eine Steckverbindung P4 oder +12V.
Das Netzteil kann schwer beschädigt werden, wenn es
als eine Steckverbindung P4 oder +12V eingesetzt wird.
ACHTUNG
2. Ziehen Sie sämtliche Kabeln von den Bestandteilen
(Grundplatte, Videoplatte und andere Nebenteile) ab.
3. Verfolgen sie die Anweisungen aus der
Betriebsanleitung Ihres Gehäuses um das Netzteil aus
seinem Sitz zu demontieren.
4. Gehen Sie zum Schritt B über.

16 17
Schließen Sie den Versorgungskabel der Steckdose an die
Versorgungsquelle an.
(Angewandt für die Mitgliedstaaten der Europäischen Union und für andere
europäische Staaten mit einem getrennten Sammelsystem).
Dieses Symbol auf dem Produkt oder auf seiner Verpackung weist darauf hin, dass dieses
Produkt nicht als Hausmüll entsorgt werden kann.
Er muss an die Recyclingversorgung der elektrischen und elektronischen Geräte
abgegeben werden.
Stellen Sie sicher, dass diese Geräte sicher entsorgt wurden, damit Sie mögliche negative
Folgen für die Umwelt und der Gesundheit von Menschen vermeiden, die Auftreten
können falls die Geräte nicht ordnungsgemäß entsorgt wurden.
Materialrecycling hilft natürliche Ressourcen zi schonen.
English
Srpskiбългарски Română Deutsch
Schutzvorrichtungen6
OCP (Starkstromschutz)
Diese Schutzvorrichtung wird angesprochen wenn
die Aufladung der Kreisläufe die zugelassene Grenze
überschreitet.
UVP (Schwachstromschutz)
Diese Schutzvorrichtung wird angesprochen wenn
die Aufladung der Kreisläufe die zugelassene Grenze
unterschreitet.In diesemFall wirddas Netzteil automatisch
abgeschaltet.
OVP (Überspannungsschutz)
Diese Schutzvorrichtung wird angesprochen wenn die
Spannung in den Kreisläufen zu hoch ist.
SCP (Kurzschlussschutz)
Die Sicherung beschützt die Kreisläufe aus dem Netzteil,
sie beugt die Störungen die sowohl am Netzteil als auch an
den angeschlossenen Bestandteilen auftreten können.
OTP (Hochtemperaturschutz)
Im Falle in dem die Temperatur im Netzteil sehr stark
ansteigt, wird diese automatisch abgeschaltet. Das Netzteil
kann erneut eingeschaltet werden, wenn sie abkühlt.
OPP (Überlastungsschutz)
Diese Schutzvorrichtung wird angesprochen wenn die
gesamte Aufladung beim Ausgang des Netzteils den
Höchstwert überschreitet.

18 19
Vă mulţumim că aţi ales produsele noastre!
Citiţi acest manual cu atenţie înainte de a folosi produsul.
Concentrându-ne pe calitate la preţuri competitive,
construim produse pentru consumatori în ideea unei
interacţiuni cât mai plăcute cu lumea digitală.
Daca esti pasionat de jocuri sau entuziasmat in general
de ce iti ofera tehnologia si vrei sa iti construiesti propriul
sistem trebuie neaparat sa alegi o sursa eficienta de calitate
superioara. Sursa Legion de la nJoy are o constructie semi-
modulara solida cu protectii multiple si certificare ECOVA
80PLUS Silver. In functiune Legion este silentioasa si dispune
de un sistem de racire inteligent controlat de senzori de
temperatura. Design-ul semi-modular intuitiv ajuta la o
aranjare mai buna a cablurilor din interiorul carcasei si
contribuie la cresterea nivelului de ventilatie catre celelalte
componente. Sursa Legion iti ofera numeroase protectii
pentru celelalte structuri ale sistemului (OCP, OVP, UVP, OPP,
OTP si SCP) conforme cu legislatia internationala in vigoare.
Este compatibila cu platforma AMD/ Intel, ATI/NVIDIA si e
pregatita pentru NVIDIA SLI/ATI CrossFire.
2 x PCI-E 6+2pin cable (4 conectori)
2 x Sata cable (6 conectori)
2 x Molex cable (4 conectori)
1 x Cablu de alimentare
1 x Pachet de suruburi
Certificat de garantie
Manual de utilizare
Package Contents
1
NOTE: În situația în care oricare din articolele incluse în cutie
lipsesc sau sunt deteriorate vă rugăm să contactați unitatea de
unde ați achiziționat produsul.
English
Srpskiбългарски Română Deutsch

20 21
Conectori2
Atenţie1
Sursa trebuie să fie alimentată la parametrii indicaţi
pe eticheta afişată pe produs.
Nu depozitaţi sursa într-un mediu cu temperatură
sau umiditate ridicată.
Nu deconectaţi cablul de alimentare atunci când
sursa este în uz.
Nu deschideţi sursa de alimentare. Mergeţi la un
service autorizat.
S-ATA
Molex
6+2 pin PCI-E
4+4 pin ATX12V / EPS12V
20+4 pin
4
1
1
6
4
English
Srpskiбългарски Română Deutsch
Intrare / Ieşire
Instalarea
3
4
Atenţie!
Înainte de a începe instalarea asiguraţi-vă că sistemul
este oprit şi deconectat de la sursa de curent.
Foloseste doar setul original de cabluri din pachet. Daca
se utilizeaza alte cabluri, acestea pot defecta sursa grav.
Pentru a instala sursa vei avea nevoie de o surubelnita.
Foloseste suruburile primite in cutie.
Intrare
Tensiune 230V
Frecvenţă 47Hz - 63Hz
Ieşire Putere nominală 600W - model Legion 600
700W - model Legion 700
Dezinstalarea sursei existente din sistemul tau.
Daca construiesti un sistem nou, sari la Pasul B.
Pasul A
1. Deconecteaza alimentarea de la priza sau de la UPS.

22 23
English
Srpskiбългарски Română Deutsch
1. Asigura-te ca sursa nu e conectata la curent.
2. Urmareste instructiunile din manualul de utilizare
al carcasei si foloseste suruburile primite in pachet
pentru a instala sursa.
3. Conecteaza cablul de 24 de pini. Acest conector are 4
pini detasabili pentru a se potrivi pe placi de baza cu
24 de pini sau 20 de pini.
A. Daca placa de baza suporta conector de 24 de pini,
ataseaza cablul fara a-i face vreo modificare.
B. Daca placa de baza suporta conector de 20 de pini,
desfa ultimii 4 pini si apoi conecteaza cablul.
4. Conecteaza cablul cu 8 pini de +12V la placa de baza.
A. Daca placa de baza are intrare pentru 8 pini de +12V
atunci conecteaza cablul conform fara a-i aduce
nicio modificare.
B. Daca placa de baza are intrare de 4 pini, detaseaza 4
pini de pe cablul de 8 pini si conecteaza-l la placa de
baza.
5. Conecteaza cablurile pentru periferice, cablul PCI-
Express si cablurile SATA la sursa.
A. Conecteaza cablurile pentru perferice la hard si la
intrarile pentru CD-ROM/DVD-ROM.
B. Conecteaza cablurile SATA la intrarile SSD sau hard.
C. Conecteaza cablurile PCI-E la placa video PCI-E
daca e necesar.
D. Conecteaza cablurile pentru periferice la orice alte
componente care necesita un conector de 4pini.
E. Asigura-te ca toate cablurile sunt corect conectate.
Depoziteaza celelalte cabluri pe care nu le folosesti
in caz de nevoie.
6. Dupa conectarea cablului de alimentare porneste
sursa apasand butonul intrerupator pe simbolul „I”.
Instalarea sursei nJoy Legion
Pasul B
Cei 4 pini detasabili de la conectorul de 24 de pini nu tin
locul unui conector P4 sau +12V. Sursa se poate defecta
grav daca ii folosesti ca pe un conector P4 sau + 12V.
ATENTIE
2. Deconecteaza toate cablurile de la componente (placa
de baza, placa video si alte periferice).
3. Urmareste instructiunile din manualul de utilizare al
carcasei tale pentru a demonta sursa din lacasul ei.
4. Treci la Pasul B.

24 25
Dezafectarea echipamentelor electrice și electronice vechi
(Se aplică pentru ţările membre ale Uniunii Europene și pentru alte țări
europene cu sisteme de colectare separată.
Acest simbol aplicat pe produs sau pe ambalajul acestuia indică faptul că acest produs nu
trebuie tratat ca pe un deșeu menajer.
El trebuie predat punctelor de reciclare a echipamentelor electrice și electronice.
Asigurându-vă că acest produs este dezafectat în mod corect, veţi ajuta la prevenirea
posibilelor consecințe negative asupra mediului și a sănătății umane, care ar fi putut
surveni dacă produsul ar fi fost dezafectat în mod necorespunzător.
Reciclarea materialelor va ajuta la conservarea resurselor naturale.
English
Srpskiбългарски Română Deutsch
Protectii6
OCP (Protectie la curent puternic)
Intra in functiune cand incarcarea pe circuite trece de limita
acceptata.
UVP (Protectie la curent slab)
Aceasta protectie se activeaza cand tensiunea in circuite
scade sub limita acceptata. Sursa este oprita automat in
acest caz.
OVP (Protectie la supra-voltaj)
Aceasta protectie este declasanta daca voltajul pe circuite
este prea mare.
SCP (Protectie la scurt-circuit)
Siguranta care protejeaza circuitele din sursa previne
defectele ce pot aparea atat la sursa cat si la componentele
conectate la ea.
OTP (Protectie la termperatura indicata)
In cazul in care temperatura creste foarte mult in sursa,
aceasta se opreste automat. Sursa se poate porni din nou
doar cand se raceste.
OPP (Protectie la supra-incarcare)
Aceasta protectie intervine atunci cand incarcarea totala a
sursei depaseste valoarea maxima.

26 27
English
Srpskiбългарски Română Deutsch
Hvala vam što ste ukazali poverenje nama i
našim proizvodima!
Molimo vas da pre upotrebe detaljno pročitate ovo uputstvo.
Ako ste zaljubljenik u igranje ili ljubitelji tehnologije,
koji sam sklapa svoj računar, pri odabiru komponenata
morete obratiti pažnju na kvalitet napajanja. nJoy Legion
predstavlja moćano, polu-modularno napajanje visokog
kvaliteta koje donosi visok nivo zaštite i sertifikat 80PLUS
Silver ECOVA. Legion radi tiho i poseduje inteligentni sistem
hlađenja. Polu-modularna konstrukcija donosi visok stepen
prilagodljivosti i omogućava lakše organizovanje kablova u
kućištu, smanjuje gužvu i povećava protok vazduha a samim
tim i hlađenje unutar kućišta. Legion je izuzetno pouzdano
rešenje, jer donosi odličnu zaštitu vašeg sistema, zahvaljujući
primeni tehnologija kao što su (OCP, OVP, UVP, Opp OTP i SCP)
usklađenih sa međunarodnim standardima. Ovaj uređaj
u potpunosti je kompatibilan sa platformama kompanija
AMD / Intel, ATI / Nvidia i omogućava kreiranje sistema koji
koriste SLI / ATI CrossFireX.
Mi se, kao kompanija nJoy, fokusiramo na to da
obezbedimo kvalitetan proizvod po pristupačnoj
ceni kako bi vama kao našim korisnicima omogućili
što veći užitak u svetu digitalnih komunikacija i
tehnologija.
2 x PCI-E 6+2pin cable (4 konektora)
2 x Sata cable (6 konektora)
2 x Molex cable (4 konektora)
1 x Strujni kabl
1 x Paket šrafcigera
Kartica sa garantnim uslovima
Korisničko uputstvo
Package Contents
1
NOTE: Ukoliko bilo koji deo sadržaja pakovanja nije prisutan
ili je oštaćen, molimo vas da kontaktirate prodavnicu u kojoj ste
kupili uređaj.

28 29
S-ATA
Molex
6+2 pina PCI-E
4+4 pina ATX12V / EPS12V
20+4 pina
6
4
4
1
1
Konektori2
Upozorenja1
Napajanje povežite samo sa napojnom mrežom u
kojoj je napon isti kao što je deklarisano na uređaju.
Nemojte izlagati napajanje visokoj vlažnosti i
temperaturi.
Nemojte isključivati strujni kabl dok je napajanje u
upotrebi.
Ukoliko niste ovlašćeni serviser, nemojte otvarati
napajanje.
English
Srpskiбългарски Română Deutsch
Ulaz / Izlaz
Instalacija
3
4
Ulaz
Napon 230V
Frekventni opseg 47Hz - 63Hz
Izlaz Nominalna snaga 600W - Model Legion 600
700W - Model Legion 700
Upozorenje!
Pre nego što pristupite montiranju napajanja proverite
da li je sistem isključen i nije povezan sa naponskom
mrežom.
Koristite samo originalni set kablova. Upotreba nekih
drugih kablova može dovesti do oštećenja uređaja!
Za instalaciju napajanja biće vam potreban šrafciger.
Koristite samo šrafove koji se nalaze u paketu.
Uklonite postojeće napajanje. Ukoliko sklapate novi
računarski sistem, pređite odmah na korak B.
Korak A
1. Izvucite kabl za napajanje iz zidne utičnice ili UPS
uređaja i iz postojećeg napajanja u računaru.

30 31
1. Uverite se da strujni kabl nije povezan sa uređajem.
2. Pratite uputstva vašeg kućišta i montirajte napajanje
pomoću šrafova koji su vam dati u kutiji sa napajanjem.
3. Povezivanje glavnog, 24-pinskog, kabl za napajanje.
Glavni 24-pinski strujni kabl poseduje odvojiv segment
od 4-pina, kako bi se obezbedila kompatibilnost sa
matičnim pločama koje poseduju konektore 24-pina ili
20-pina.
A. Ukolikomatičnapločaposeduje24-pinskipriključak,
možete povezati glavni kabl za napajanje, sa 24-
pina, direktno na matičnu ploču.
B. Ukoliko matična ploča ima 20-pinski priključak
morate otkačiti segment od četiri pina, a zatim
priključite 20-pinski kabl na matičnu ploču bez
povezivanja konektora sa četiri-pina.
4. Povezivanje 8-pinskih konektora od + 12V (EPS12V) sa
matičnom pločom.
A. Ukoliko matična ploča poseduje 8-pinsku utičnicu
od 12V povežite je direktno na matičnu ploču.
B. Ukoliko matična ploča poseduje 4-pinski priključak,
odvojite četiri pina sa 8-pinskog kabla, a zatim
priključite 4-pinski kabl direktno na matičnu ploču.
5. Povezivanje kablova perifernih uređaja, PCI-Express
kablova i SATA kablova.
A. Povežite kablove perifernih uređaja kao što su hard
disk i CD-ROM / DVD-ROM.
B. Povežite SATA kablove sa SATA SSD uređajima i hard
diskovima.
C. Povežite kablove sa PCI-Express video karticama
ukoliko je potrebno.
D. Povežite kablove za periferne uređaje sa svim
uređajima koji zahtevaju 4-pinski konektor.
E. Proverite da li su svi kablovi čvrsto povezani.
Sačuvajte sve neiskorišćene modularne kablove
zarad budućeg proširenja vašeg računara.
6. Priključite kabl za napajanje sa naponskom mrežom
i uključite napajanje prebacivanjem prekidača na
poziciju UKLJUČENO (označeno sa “I”).
Instalacija napajanja nJoy Legion
Korak B
Četiri pina koja su odvojiva iz glavnog konektora od
24-pina nisu “P4” odnosno “+ 12V” konektor. Ukoliko
koristite ovaj konektor od 4-pina umesto odgovarajućeg
“P4” ili “+ 12V” konektora, može doći do ozbiljnog
oštećenja matične ploče.
UPOZORENJE
2. Isključite sve kablove za napajanje iz video kartice,
matične ploče i svih ostalih periferija.
3. Pratite uputstva vašeg kućišta i demontirajte postojeće
napajanje.
4. Pređite na korak B.
English
Srpskiбългарски Română Deutsch

32 33
Zbrinjavanje starih električnih i elektronskih uređaja
(Primenjivo u Evropskoj uniji i ostalim evropskim državama s posebnim
sistemima za odlaganje)
Ovaj simbol na proizvodu ili na ambalaži, znači da se proizvod ne sme bacati kao kućni
otpad.
Umesto toga potrebno je predati ga na odgovarajućim sabirnim punktovima za
recikliranje električne i elektronske opreme.
Potvrdom da je ovaj uređaj zbrinut kako treba, sprečavate potencijalne negativne
posledice po životnu sredinu i ljudsko zdravlje.
Recikliranje materijala pomaže u očuvanju prirodnih resursa.
English
Srpskiбългарски Română Deutsch
Zaštita6
OCP (zaštita od prekomerne struje)
Aktivira se u situacijama kada opterećenje u određenim
strujnim vodovima prevazilazi optimalne vrednosti.
UVP (Podnaponska zaštita)
Ovajtip zaštiteaktivirase kadanapon uodređenimstrujnim
vodovima padne ispod definisane granice. U ovom slučaju
napajanje se automatski isključuje.
OVP (prenaponska zaštita)
Zaštita od visokog napona se aktivira ukoliko je napon u
određenim vodovima previsok.
SCP (Zaštita od kratkog spoja)
Osigurač štiti napajanje i priključene potrošače,
komponente, povezane sa njim od fizičkih oštećenja.
OTP (zaštita od pregrevanja)
U slučaju nagomilavanja prekomerne toplote u napajanju,
napajanje se automatski isključuje. Možete ga ponovo
uključititi kada se ohladi.
OPP (zaštita od preopterećenja)
Ova zaštita se aktivira ukoliko je ukupna izlazna snaga
iznad navedenog maksimalnog opterećenja.

34 35
Благодарим, че закупихте нашите
продукти!
Моля прочетете това ръководство преди да използвате
продукта.
Ако сте пристрастени към компютърни игри или
сте компютърен ентусиаст и желаете да изградите
сами своя компютър, трябва първо да изберете
висококачествен захранващ блок. nJoy Legion е мощен
полу-модулен захранващ блок с висококачествена
защита и сертификат 80PLUS Silver ECOVA. Legion
работи тихо и разполага с интелигентна охлаждаща
система. Полу-модулната конструкция подобрява
кабел мениджмънта, намалява хаоса и повишава
въздушния поток от охлаждането във Вашата
кутия. Legion е изключително надежден, защото
предлага отлична защита за Вашите компоненти
(OCP, OVP, UVP, OPP, OTP и SCP) сертифицирано според
международните стандарти за сигурност. Напълно
съвместимо с AMD / Intel, ATI / Nvidia платформи и
поддържа Nvidia SLI / ATI CrossFireX.
Фокусирайки се върху качеството и конкурентните
цени, nJoy проектира потребителски продукти
за по-добър и приятен път към дигиталния свят.
English
Srpskiбългарски Română Deutsch
2 x PCI-E 6+2pin кабел (4 конектора)
2 x Sata кабел (6 конектора)
2 x Molex кабел (4 конектора)
1 x Захранващ кабел
1 x комплект крепежни елементи
Гаранционна карта
Упътване на потребителя
Package Contents
1
ЗАБЕЛЕЖКА: Ако някой от горепосочените елементи
съдържащи се в тази опаковка липсва или е повреден,
моля свържете се с търговеца от който сте закупили
този продукт.

36 37
S-ATA
Molex
6+2 pin PCI-E
4+4 pin ATX12V / EPS12V
20+4 pin
6
4
4
1
1
Конектори
2
Предипреждения
1
Захранването трябва да бъде свързано към
източник отговарящ на посочения в маркировката.
Не поставяйте захранването в среда с висока
влажност и температура.
Не изключвайте захранващия кабел по време на
работа.
Не отваряйте кутията на захранването, освен ако
не сте оторизиран сервизен техник.
English
Srpskiбългарски Română Deutsch
Вход / Изход
Инсталация
3
4
Вход
Волтаж 230V
Честотен Диапазон 47Hz - 63Hz
Изход Номинална Мощност 600W - Legion 600 модел
700W - Legion 700 модел
Внимание!
Преди инсталация, уверете се, че вашата система е
изключена от електрическата мрежа.
Използвайте само оригиналния комплект кабели.
Използването на различни кабели може да доведе
до повреда!
Нуждаете се от отвертка за инсталацията.
Използвайте само болтчетата предоставени в
комплекта.
Премахнете старото захранване. Ако сглобявате нова
система, преминете към стъпка „Б“.
Стъпка „А“
1. Изключете AC захранващия кабел от контакта или
UPS-а и от стария захранващ блок.

38 39
1. Уверете се че AC захранващия кабел не е включен
към ел. мрежата.
2. Следвайте насоките във Вашето потребителско
ръководство за кутия, дънна платка и видео карта
и инсталирайте захранващия блок с болтчетата в
комплекта.
3. Свържете главния 24-pin захранващ кабел.
Главния 24-pin захранващ кабел има откачваща
се 4-pin букса, за да може да поддържа както 20-
pin така и 24-pin сокети на дънната платка.
A. Ако Вашата дънна платка има 24-pin сокет,
можете да свържете 24-pin захранващия кобел
от захранващия блок директно към дънната
платка.
B. Ако Вашата дънна платка има 20-pin
сокет, трябва да откачите 4-пин буксата от
захранващия кабел и да включите само 20-pin
буксата към дънната платка, без да свързвате
4-pin конектора.
4. Свържете 8-pin +12V (EPS12V) кабел към дънната
платка.
A. Ако Вашата дънна платка има 8-pin +12V сокет,
свържете 8-pin кобела директно към дънната
платка.
B. Ако Вашата дънна платка има 4-pin сокет, откачете
4-pin кабела от снопа на 8-pin кабела и свържете
4-pin кабела директо към дънната платка.
5. Свържете кабелите за периферните компоненти,
PCI-Express и SATA кабели.
A. Свържете периферните кабели към
захранващия сокет на Вашия твърд диск, CD-
ROM/DVD-ROM.
B. Свържете SATA кабела към захранващия сокет
на SATA SSD или твърд диск.
C. Свържете PCI-Express кабела към захранващия
сокет на Вашата видео карта ако е необходимо.
D. Свържете периферните кабели към
съответните периферни компоненти нуждаещи
се от 4-pin конектор.
E. Уверете се, че всички кабели са правилно
свързани. Запазете ненужните модулни
кабели за бъдещо свързване на допълнителни
компоненти.
6. Свържете AC захранващи кабел към захранващия
модул и включете модула, като поставите
превключватела в позиция „ON“ (маркирана на
него с „I“).
Инсталиране на захранващ блок nJoy Legion
Стъпка „Б“
Разкачващия се 4-pin конектор от 24-pin буксата
да главния захранващ кабел не e “P4” или “+12V”
конектор. Възможно е да си причините сериозни
повреди ако го свържете вместо “P4” или “+12V”
конектор.
ВНИМАНИЕ
2. Изключете всички захранващи кабели вътре в
кутията от Вашата видео карта, дънна платка и
друга периферия.
3. Следвайте упътванията от Вашето ръководство
на потребителя за кутия, дънна платка и видео
карта.
4. Преминете към стъпка „Б“.
English
Srpskiбългарски Română Deutsch
This manual suits for next models
2
Table of contents
Languages:
Other Njoy Power Supply manuals

Njoy
Njoy PSAD-12CB21X-CK01B User manual

Njoy
Njoy Titan Series User manual

Njoy
Njoy Freya Series User manual

Njoy
Njoy PWPS-065A04W-BU01B User manual

Njoy
Njoy Garun Series User manual

Njoy
Njoy Royer 16A User manual

Njoy
Njoy cStation 600 User manual

Njoy
Njoy TC2421IX User manual

Njoy
Njoy Storm Series User manual

Njoy
Njoy Garun Series User manual