NLI DS-9 Series User manual

NLIF-008
NEWLONG INDUSTRIAL CO., LTD.
NLIF-006
袋口縫ミシン

For Operator Safety
Thank you for purchasing the NLI
Model DS-9 Bag Closing Machine Head.
Thismanualcontainstheinstructionsandprecautionsfor
using the Model DS-9 Bag Closing Machine Head. Be
suretoreadandunderstandthismanualbeforeuseand
usethemachinecorrectly.
Keep this manual near the sewing machine for easy
reference.Besuretoattachthismanualtothemachine
when lending or transferring it to another person or
company.
PleaseorderthismanualfromthenearestNLIofficeifitis
lost.
Thecontentsofthismanualaresubjecttochangewithout
priornoticeforimprovementandsafetypurpose.
安全について
ニューロング工業(株)DS-9 型袋口縫ミシンをお
買い上げいただき有り難うございます。
この取扱説明書は DS-9 型袋口縫ミシンの取扱い方法と
使用上の注意事項が記載されています。ご使用前にこの
取扱説明書を必ずお読みください。内容を十分理解して
正しくご使用ください。
この取扱説明書はミシンのそばに、いつでもご利用いただ
けるよう、保管してください。
DS-9型袋口縫ミシンを貸し出し、または譲渡の場合はこ
の取扱説明書を機械に添付してください。
この取扱説明書を紛失された場合はニューロング工業
(株)全国連絡所にご注文ください。
この取扱説明書は機能向上または安全のため、予告なし
に変更することがあります。
●ミシンに袋を挿入する時は、注意しないと針や押エ金
に指が巻き込まれるおそれがあります。
●ミシンには巻込注意マークを貼っています。指はミシン
の下側を通るよう、手はミシンに直接さわらないように
注意してください。
●Theinstructionmanualandpartslistissubjecttochangewithoutpriornotice.
●この取扱説明書/パーツリストは機能向上のため予告なしに変更することがあります。
Becareful,whenyouinsertabagtobeclosedintothe
sewingmachine,oryourfingersmaybecaughtinthe
machinebetweenthepresserfootandfeeddog.
A“Hazardous”markisattachedtothemachine.When
sewing,besuretosupportthebagwiththehandfrom
beneath the sewing head and not to touchon the
machine.
●TheModelDS-9CsewingMachineheadisprovided
with a built-in automatic tape/thread cutter. The
operatorʼsfingersmaybeinjuredbythecutter.A
“hazardofinjuringthefingers”markisattachedtothe
sewingmachine.Donotputyourfingersinornearthe
cutterwhenthemachineisrunning.
●DS-9C型自動カッター付ミシンを使用中はカッターの
作動で、指にケガをする恐れがあります。ミシンには危
険マークを貼っています。
カッター刃の近くに手を出さないでください。
Instructionswiththismarkareespecially
importantforoperatorsafety.Besureto
observethesemarkedinstructions.
印のマークは
安全
上
特
に重要
な
項目で
す。必ずお守りください。
HazardofInjuringtheFingers 切断危険
HazardofBeingCaughtintheMachine
巻込注意

下記の安全項目を順守しなかった場合
には事故の原因となりますので注意し
てください。
1. BESURETHEAREASURROUNDINGMACHINEIS
FREEOFALLHAZARDSSUCHASFIRE,WATER,
OIL,RUBBISHORANYTHINGTHATCANCAUSE
INJURY.
2. DONOTOPERATEMACHINEINANEXPLOSIVE
AREAORUNDERWETCONDITIONS.
THEMACHINEISNOTAN EXPLOSION-PROOF
TYPENORWATER-PROOFTYPE.
3. DONOTOPERATEMACHINEBEFOREREADING
INSTRUCTIONMANUAL.
4. DONOTOPERATEMACHINEONVOLTAGESOTHER
THANSPECIFIEDFORTHEMACHINE.
5. BESUREMACHINEISCONNECTEDTOBUILDING
ELECTRICALSAFETYGROUND(EARTH).
6. BESUREPOWER(ANDAIRSUPPLY)ISOFF
BEFOREPERFORMINGMACHINEMAINTENANCE,
PARTS REPLACEMENT, ADJUSTMENTS OR
CLEANING.
7. DONOTOPERATEMACHINEWITHGUARDSAND
COVERSREMOVED.
8. DONOTTOUCHKNIFE,NEEDLE,PULLEY,BELT
AND MOVING PARTS WHEN MACHINE IS IN
OPERATION.
9. BESUREMACHINEISPLACEDONASMOOTH
(LEVEL)SURFACEWHENPERFORMING
MAINTENANCE,PARTSREPLACEMENT,
ADJUSTMENTS,CLEANINGORSTORAGE.
10.BESURETHEMATERIALTOBESEWNORCLOSED
COMPLIESWITHTHEMACHINESPECIFICATIONS.
11.DO NOT USE SPARE PARTS OTHER THAN
“NLI”GENUINEPARTS.
1. 機械の周辺に事故を起こす原因となる火
気、水、油、可燃物などがないか確かめて
ください。
2. 爆発の危険のある環境・水滴が直接機械に
かかる環境では使用しないでください。
この機械は、防爆型・防滴型ではありませ
ん。
3. 取扱説明書を必ず読んでから機械を運転し
てください。
4. 機械の指定電圧以外では運転しないでくだ
さい。
5. アース線が接続されている事を確認してく
ださい。
6. 機械の整備・部品交換・調整・又は掃除の
前に必ず電源(及びエアー源)を切ってく
ださい。
7. 蓋やカバーが外れた状態では機械を運転し
ないでください。
8. 機械の運転中はカッター、針、プーリー、
ベルトその他動いている箇所には手を触れ
ないでください。
9. 機械の整備・部品交換・調整・掃除や保管の
時には平らな場所に置いてください。
10.縫おうとする素材が機械の仕様に合ってい
るか確かめてください。
11.“ニューロング工業(株)”純正部品以外は使
用しないでください。
PERSONALINJURYMAY
RESULTIFTHEFOLLOWING
SAFETYPRECAUTIONSARE
NOTOBSERVED.
i
Identifying and Ordering Parts サービスに関するお問い合せ
Wheretheconstructionpermits,eachpartisstampedwith
itspartnumber.Onallorders,pleaseincludepartnumber,
partnameandmodelnameofmachine.
SafetyRules
Topreventpersonalinjury:
Allpowersourcestothemachinemustbeturnedoffbefore
threading,oiling,adjustingorreplacingparts.
Allcoverandguardsmustbeinpositionbeforeoperating
machine.
Donottamperwithsafetycover,guards,etc.,while
machineisinoperation.
部品交換とご注文上の注意
ニューロング工業(株)全国連絡所にはDS-9の純正部品
を常備しております。
ご注文の際は、パーツリストのパーツ番号と名称でご指示
ください。
使用上ご不明な点及び使用中の故障や不審な点、そ
の他整備などで解りにくい場合は、お買い上げいただき
ましたニューロング工業(株)全国連絡所にご連絡くださ
い。尚その際、機種名、機械番号、ミシン頭部名、ミシン
番号をご指示くださいますようお願いいたします。
Cautions When Using the Machine 使用上の注意
SafetyPrecautions
1)Always turn power off before threading, oiling, and
adjustingthemachineorreplacingparts.
2)Wearsafetyglasses.
3)Makesure,beforestartingthemachine,thatallcovers
andshieldsareinplaceandclosed.
4)Donottouchonthemachinewhenitisrun.
5)Turnpoweroffandmakesurethecutterdoesnotoperate
beforeyouputyourfingersunderthecutterbladesand
theneedlestoadjust.
6)Donottouchonthemachinewhenitisrun.
安全について
1)袋詰まり・糸切れのときの糸通し、糸の交換、給油、調整、
部品交換、保守点検作業の前に必ず電源を切ってくださ
い。
2)調整作業のときは安全メガネの使用をおすすめします。
3)全ての蓋・カバーは必ず運転前に閉めてください。
4)カバーなどが閉まっていることを確認してから運転してく
ださい。
5)針の下に手を入れるときは、必ず電源を切ってください。
修理調整のときは、必ず電源を切りミシンが動かないこと
を確認してから作業を行ってください。
6)ミシンの運転中には、ミシンに触れないでください。
Maintenance 整備
Pleasekeepinmindtohandlethemachinecarefullyandto
maintainthemachineingoodcondition.
Threadfuzzordustmustbecleanedwithairorbrushon
throatplate,inthegrooveoffeeddogoraroundlooper
aftertheday'swork.
Wipetheareaeasytorustwithoilcloth.
Checkthemachineforloosescrewsandtightenthem,i
f
any,onceamonth.
Goodmaintenancewillprolongthemachinelife.
ミシン頭部は精密な小さな部品から出来上がっています。
注意深く取扱うとともに常に整備に心掛けてください。
一日の作業が終了しましたら、針板の上、送リ金の溝の
中、ルーパーのまわりに集まったほこり等はきれいに取り
除いて下さい。
その他錆易い箇所は油布等で拭いてください。
月に一度はネジの緩みがないか点検してください。
手入れの良し悪しは機械の寿命に影響しますのでご注意
ください。
ii

1.Specifications/仕様2
2.ThePointsBeforeOperation/運転前の確認2
3.Threading/糸通し3
1.DS-9A,9C,9P ・・・・・・・・・・・・・・・・・・・・・・・・・・・・・・・・・・・・・・・・・・・・・・・・・・・・・・・・・・・・・・・・・・・・・・・・・・・・・・・・・・・・・・・・・・・・・ 3
2.DS-9AW,9CW・・・・・・・・・・・・・・・・・・・・・・・・・・・・・・・・・・・・・・・・・・・・・・・・・・・・・・・・・・・・・・・・・・・・・・・・・・・・・・・・・・・・・・・・・・・・・ 3
4.Oiling/給油4
1.OilFilling 注油・・・・・・・・・・・・・・・・・・・・・・・・・・・・・・・・・・・・・・・・・・・・・・・・・・・・・・・・・・・・・・・・・・・・・・・・・・・・・・・・・・・・・・・・・・・ 4
2.ExchangingOil 油の交換・・・・・・・・・・・・・・・・・・・・・・・・・・・・・・・・・・・・・・・・・・・・・・・・・・・・・・・・・・・・・・・・・・・・・・・・・・・・・・ 4
5.Adjusting/調整5
1.ThreadTension 糸調子の調整・・・・・・・・・・・・・・・・・・・・・・・・・・・・・・・・・・・・・・・・・・・・・・・・・・・・・・・・・・・・・・・・・・・・・・・ 5
2.PresserFootPressure 押エ金の調整・・・・・・・・・・・・・・・・・・・・・・・・・・・・・・・・・・・・・・・・・・・・・・・・・・・・・・・・・・・・・・ 5
3.Looper ルーパーの調整・・・・・・・・・・・・・・・・・・・・・・・・・・・・・・・・・・・・・・・・・・・・・・・・・・・・・・・・・・・・・・・・・・・・・・・・・・・・・・・ 6
4.FeedMechanism 送り金の調整 ・・・・・・・・・・・・・・・・・・・・・・・・・・・・・・・・・・・・・・・・・・・・・・・・・・・・・・・・・・・・・・・・・・・・・・ 8
5.ThreadCutter ナイフの調整(DS-9A) ・・・・・・・・・・・・・・・・・・・・・・・・・・・・・・・・・・・・・・・・・・・・・・・・・・・・・・・・・・・・・・・10
6.Cutterカッターの調整(DS-9C) ・・・・・・・・・・・・・・・・・・・・・・・・・・・・・・・・・・・・・・・・・・・・・・・・・・・・・・・・・・・・・・・・・・・・・・10
7.AdjustmentforSingleThreadSewing 単環縫いの調整 ・・・・・・・・・・・・・・・・・・・・・・・・・・・・・・・・・・・・・・・・・12
6.TroubleShooting/ミシンのトラブルの原因と対処13,14
PartsList/部品表15〜39
ListofScrew,Nut&Washer/ネジ、ナット、ワッシャー一覧図40,41
NumericalIndexofParts/パーツ索引42〜44
1
CONTENTS/目次
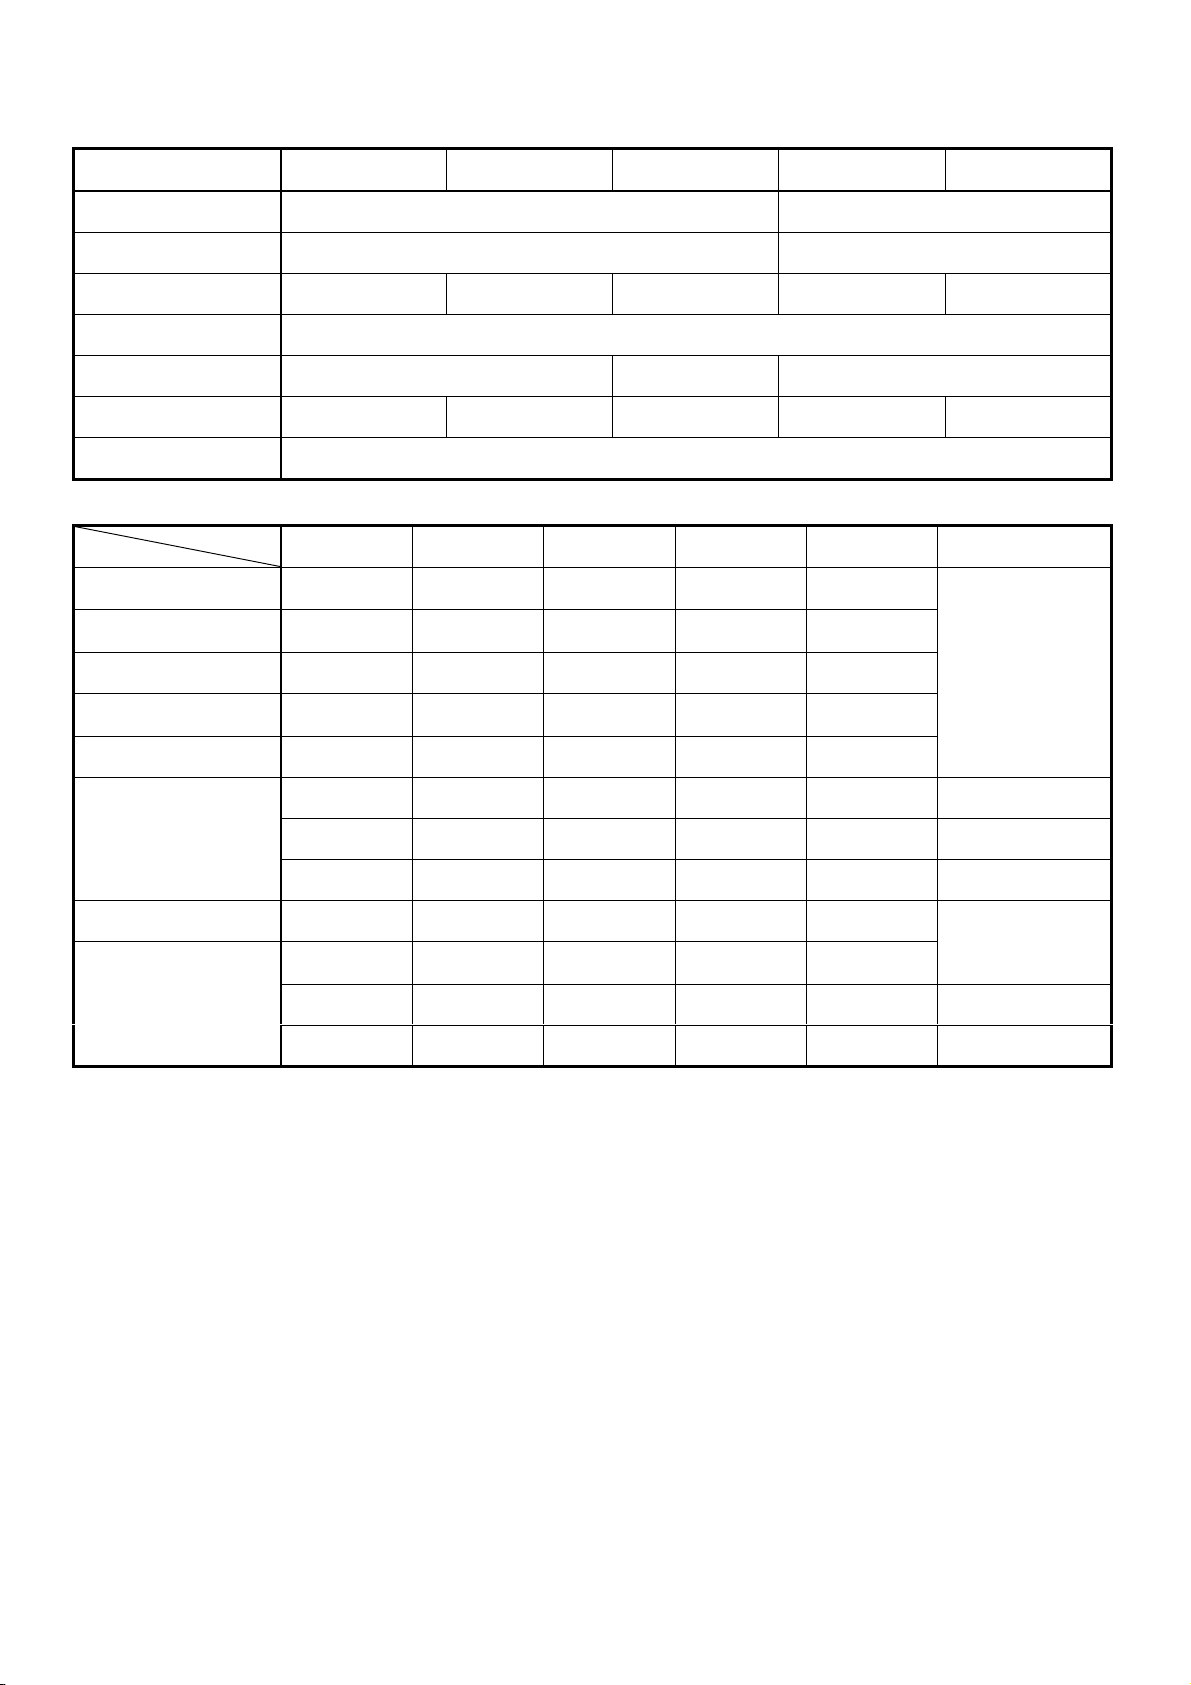
1.Specification/仕
様
Model DS-9A DS-9C DS-9P DS-9AW DS-9CW
Max.Speed
最高回転数 2700rpm 2500rpm
OrdinarySpeed
常用連続回転数 2500rpm 2300rpm
StitchLength
縫目巾 7-11.5mm 7-10.5mm 7-11.5mm 7-11.5mm 7-10.5mm
StitchType
縫目形式 Doublethreadchainstitch
2重環縫い
NeedleTypeandSize
針の形式、サイズ DR-H30#26 DRG-67#27 DR-H30#26
Cutter
カッター ThreadCutter
糸切りカッター
CrepeTapeCutter
クレープカッター
-
カッター無し
ThreadCutter
糸切りカッター
CrepeTapeCutter
クレープカッター
Lubrication
給油方式 Totallyenclosedoilbath
完全密閉型オイルバス
Model
機種名
Part部品名DS-9A DS-9C DS-9P DS-9AW DS-9CW Purpose用途
PresserFoot,left
押エ金組(左) 062251A 102135A 302161A 062391A 102281A
PresserFoot,right
押エ金組(右) 062261 102162 - 062381 102261
FeedDog,front
送リ金(前) 304211 304131 304221 304291 104231
FeedDog,rear
送リ金(後) - 104072 - - 104072
ThroatPlate
針板 304181 104123 304231 304281 104241
Standard
標準
- 102134A - 062392A 102311A Handfeed
手差し用
- 102136A - - - Sub-Tape
当て紙用
PresserFoot,left
押エ金組(左) - 102321A - - 102331A BagMouthHolder
口折り機用
PresserFoot,right
押エ金組(右) - 102161 - - -
- 104093 - - -
Hand Feed
and
Jute Bag
手差し用、麻袋用
- 104122 - - - byleverstart
ミシンスタートレバー式
ThroatPlate
針板 304311 304171 304241 - - SingleThread
単環縫い用
2.ThePointsBeforeOperation/運
転前
の
確
認
Oiltheareathroughwhichthreadpasses,thetensiondisc,
thethreadguide,looper,etc.
(Note:Ananticorrosiveagentisappliedtothemachinesat
thefactory,inordertopreventrusting.Itisnecessaryto
useoiltoremovethisagent.oritmaypreventthethread
frompassingsmoothly.)
Confirmthatthemachinehasbeenthreadedasperthe
instructions3.inthemanual.
Confirmthatthemachinehasbeenlubricatedasperthe
instructions4.inthemanual.
解梱して、ミシンを初めて運転するときは、糸の通る箇所、
糸調子・糸ガイド・ルーパーなどに必ず油を差してくださ
い。
ミシンには、錆の発生を防ぐため工場出荷時に錆止め油
を塗っています。錆止め油を除去しないと糸がスムースに
流れないことがあります。
運転前に必ず糸通しの説明を見て、糸通しが正しいことを
確認してください。
運転前に必ず給油の説明を読んで、給油方法が正しいこ
とを確認してください。
2
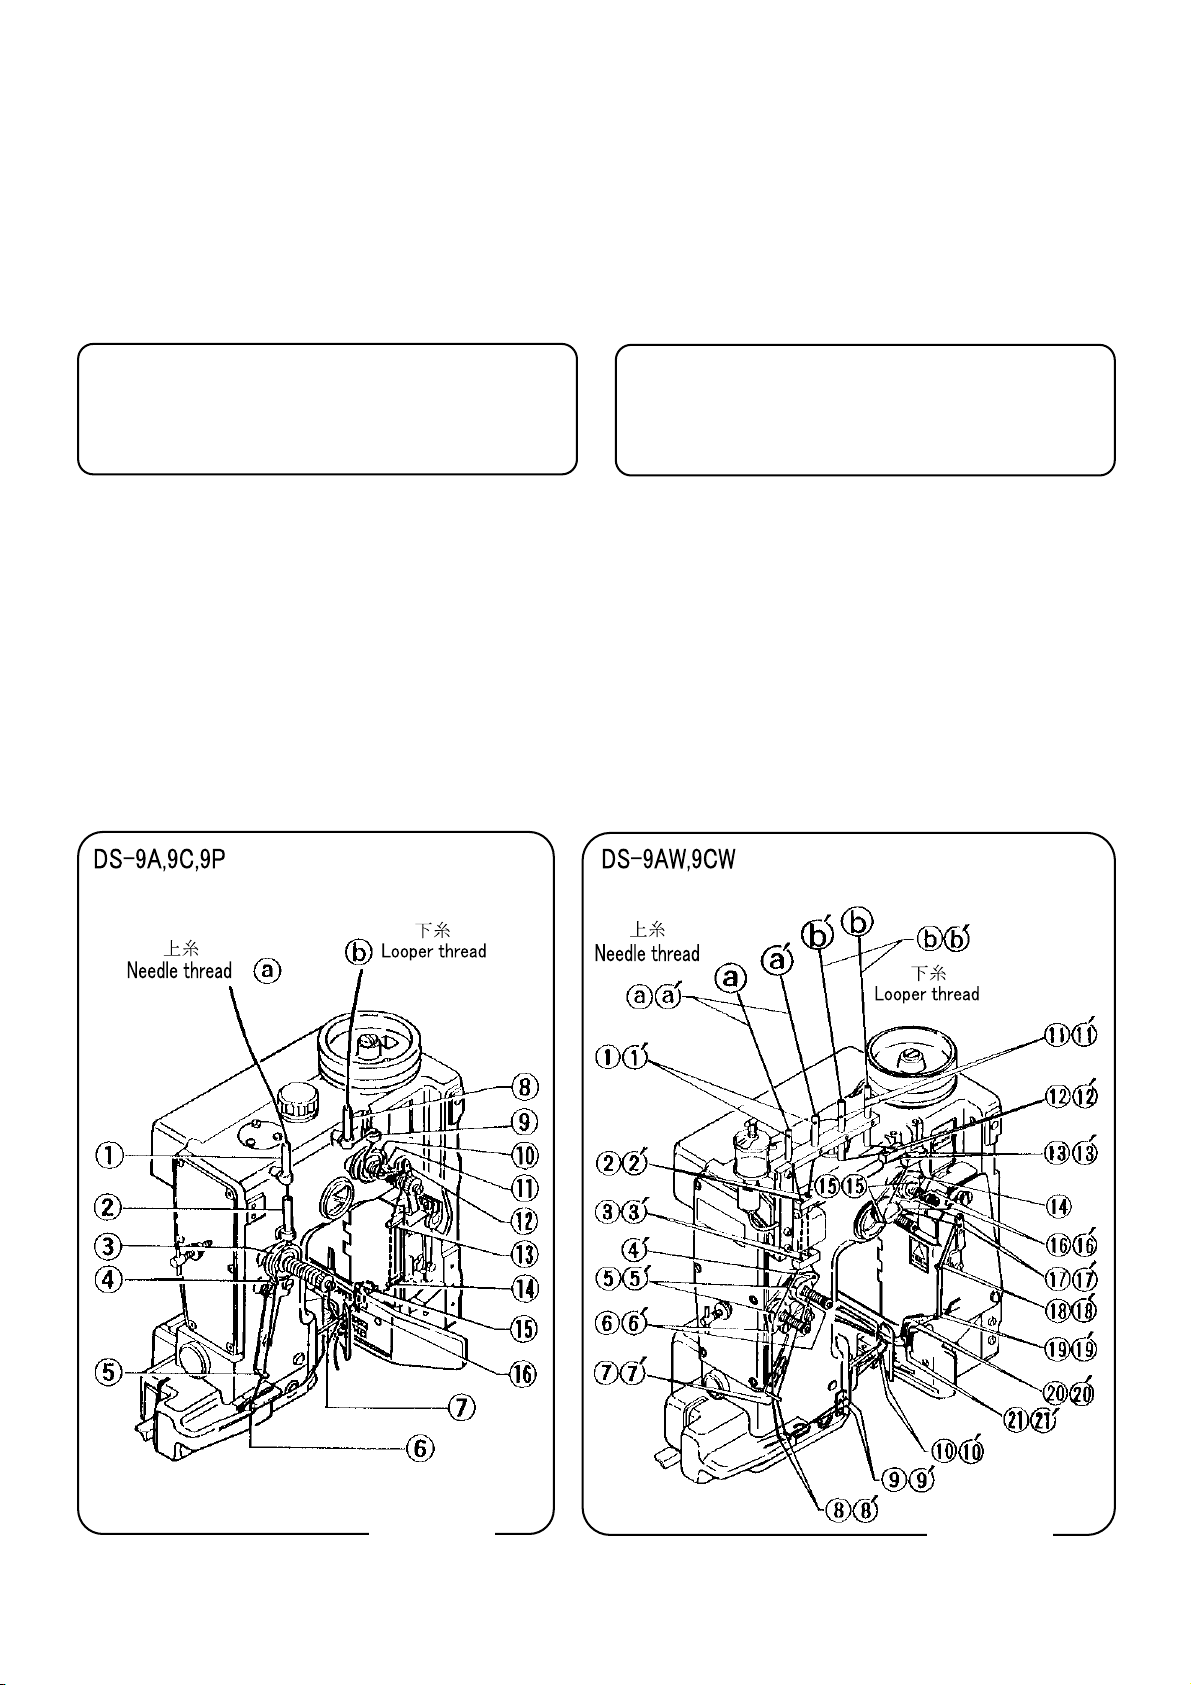
1.ForDS-9A,DS-9C,DS-9P<Fig.1-A.○
a○
b>
a)Thread ○
aon the left sideof thread stand is Needle
thread.Threaditpoints①through⑦inorder.
b)Thread ○
bon the right hand side of thread stand is
Looperthread.Threaditpoints⑧through⑯inorder.
c)Boththreadsshouldextendfromthelastthreadingpoint
by15to20cm.
1.DS-9A,DS-9C,DS-9P の場合<Fig.1-A.○
a○
b>
a)糸立ての向って左側の糸○
a(上糸)を①〜⑦まで順番に通
してください。
b)糸立ての向って右側の糸○
b(下糸)を⑧〜⑯まで順番に通
してください。
c)上糸は針から、下糸はルーパーから
15cm〜20cm
ぐらい長
く出してください。
[注意]
糸の通し方を間違えますと、全然縫えないか、糸切れ、目
飛びなどの原因となります。
<Fig.1-A,B>をよくご覧になって、上糸、下糸とも番号順に
間違いなく通してください。
2.DS-9AW,DS-9CW の場合<Fig.1-B.○
a○
aʼ ○
b○
bʼ>
a)上糸 1○
aは①〜⑩までの順番に通してください。
b)上糸 2○
aʼは①ʼ〜⑩ʼまでの順番に通してください。
c)下糸 1○
bは⑪〜○
21 までの順番に通してください。
d)下糸 2○
bʼは⑪ʼ〜○
21ʼまでの順番に通してください。
Caution:
Nostitchingatall,orthreadbreakorskippingstitches
resultifthemachineisnotproperlythreaded.Checkthe
threading with <Fig.1-A,B>, and be sure both Needle
threadandLooperthreadarecorrectlythread.
2.ForDS-9AW,DS-9CW<Fig.1-B. ○
a○
aʼ ○
b○
bʼ>
a)NeedleThread1 ○
a:Threaditpoints①through⑩
inorder
b)NeedleThread2 ○
aʼ:Threaditpoints①ʼthrough⑩ʼ
inorder.
c)LooperThread1○
b:Threaditpoints⑪through○
21
inorder.
d)LooperThread1 ○
bʼ:Threaditpoints⑪ʼthrough○
21ʼ
inorder.
3
3.Threading/
糸
通し
Fig.
1
-BFig.
1
-
A
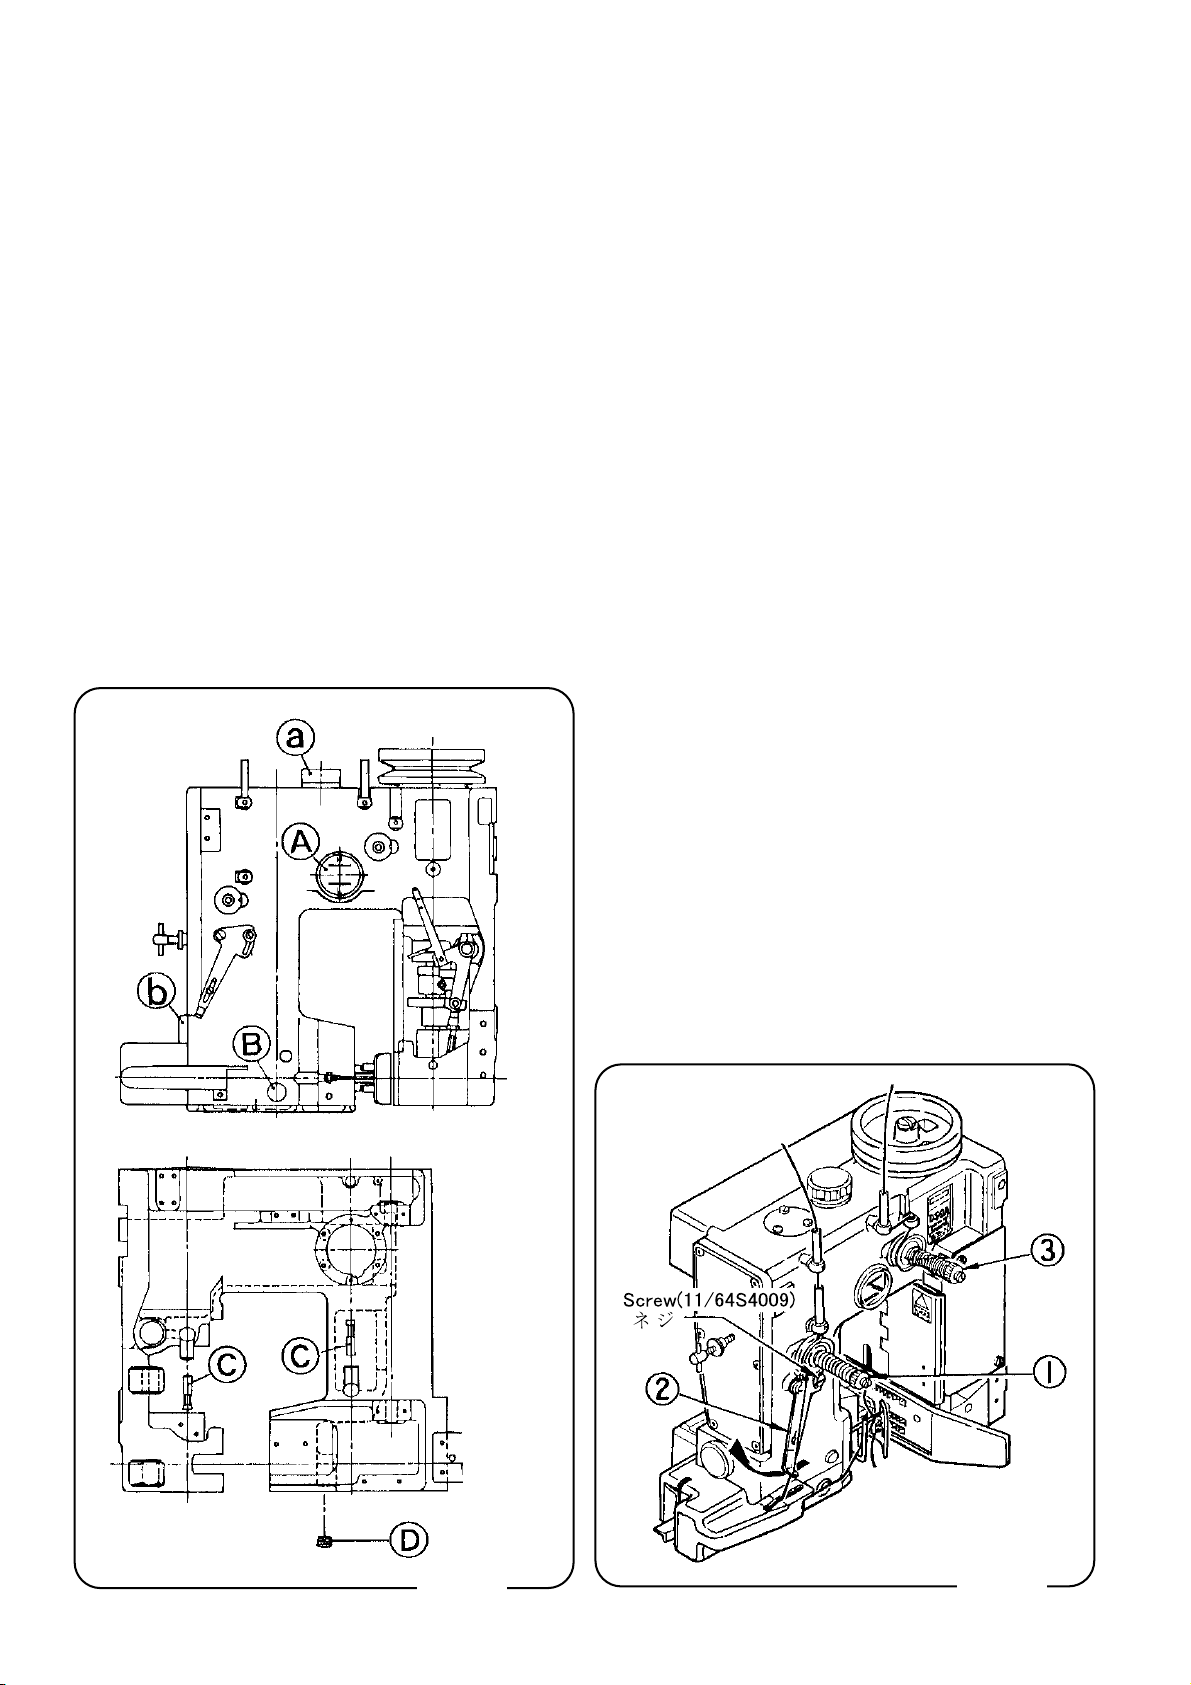
OilisCompletlydrainedfromthemachinebeforepacking.
Ensurethemachineisfilledtothe correctlevelsasdescribed
below.Usemineraloil22-32cStat40℃.(Eg.Tellusoil
#32.)
1.OilFilling
a)Unscrewbreathercapaandfillwithoiltobetweenthe
maximumandminimumlevels○
A.
Approximately1,600ccshouldbeused.(Fig.2)
b)Removecover○
bandfillwithoilsothatlevelreaches
theʻredpointʼindicator○
B.Approximately140ccshould
beused.(Fig.2)
2.ExchangingOil
a)Oil should be exchangedafterthefirst1,000hourso
f
operationthenafterevery2,000hours.
b)OilDraining
Asindicated(Fig.2)oilisdrainedfromthemachineby
rotatingandun-plugging.○
c,○
D.
1.注油
a)オイルレベル○
A部に油を注油するには○
aの給油口蓋を
はずしてオイルレベルのレベル“H”まで注油してくださ
い。注油量は約 1600cc です。(Fig.2)
b)オイルレベル○
B部に油を注油するには○
bの給油口蓋を
はずして赤丸の部分まで注油してください。注油量は約
140cc です。(Fig.2)
4
Fig.2 Fig.3
DS-9 型ミシンは完全密閉型オイルバス式ミシンですが、油
を抜いた状態で出荷しています。
初めて運転するとき、かならず注油してから運転してく
ださい。
注油するところは 2 ヵ所ありますので、注意してください。
注入する油は、40℃での動粘度 22cSt〜32cSt の鉱油を
使用してください。
(例)シェルテラスオイル#32
相当長期間使用しないミシンの再使用については、弊
社
技術員に相談ください。
2.油の交換
a)最初は、稼働時間 1000 時間で、油を交換してください。2
回目以降は 2000 時間ごとに油を交換して下さい。
b)油を抜くときは、図のようにプラグ○
c,○
Dをはずしてくださ
い。(Fig.2)
4.Oiling/給油

The looper movement of this machine has been properly
adjustedbeforeshipmentfromthefactory,butifitneeds
re-adjustment when it is disassembled for repair or etc,
prcceedasfollows.
DS-9型ミシンは、弊社で適正に調整をして、出荷しています
が、部品交換などで調整が必要になりましたら、次の調整方
法を参照に、調整してください。
1.ThreadTension(Figure3)
Threadtensionismostimportantforsuccessfulsewing,
Maladjustmentresultsinthreadbreak,skippingstitchesand
breakofbag.
Properthreadtensionmayslightlyvarywiththetypeofbag
and thread. The norm is given below. Thread tension
regulatorsaremountedsothatthetensionisuniformfor
stitchlength.Toadjustthetightnessofseam,adjust①,③
inFigure3.
1)Heavymaterial(jute,etc.)
Threadtensionregulators①shouldbeloosenedslightly
(turn the adjust nut counterclockwise), Needle thread
controller②afterlooseningsetscrew.
2)Lightmaterial
Tightenthreadtensionregulators①(turntheadjustnut
clockwise).
3)Needlethread
At the shipment, the needle thread controller ② for
CrepedPaperTapeisadjustedalittledownward.Incase
ofusingsewingmachinewithoutCrepedPaperTape,the
needle thread controller ② should be re-adjusted
upward.
Thefeedrateofthreadmustbeadjustedaccordingto
stitch length and thickness of bag. If thread tension
regulator adjustment is not sufficient for obtaining the
requiredthreadtightness,useneedlethreadcontroller②
bymovingitupordownasnecessary,afterlooseningset
screw.Threadistighterbymovingitup(inthedirection
ofthearrow),andislooserbymovingitdown.Tightenthe
setscrewafteradjustment.
4)Looperthread
Looperthreadtensionregulator③shouldbeadjustedin
accordancewithadjustmentoftheneedlethreadtension
regulator.Adjustitsothatthelooperthreadwillnotsag.I
f
looperthreadtensionistoomuch,theneedlethreadmay
break.
1.糸調子の調整(Fig.3 参照)
糸調子は袋を縫う上で最も重要な部分です。注意してくださ
い。糸調子の調整を間違えると糸切れ・目飛び・袋の破断な
どの原因となります。
糸調子<Fig.3-①③>の調整は袋と糸の種類で多少の違い
がありますが、原則として次の通りに調整してください。
1)厚物袋(麻袋など)使用の調整
糸調子①の糸の押さえかたを比較的ゆるくしてください。
糸調子スプリングを指で押し下げてから糸調子ナットを左
へ(時計と逆方向に)回してください。糸調子スプリングが
ナットの裏側の溝に入ってナットの回転が固定されるまで
まわします。確認してください。
(また上糸調節②はネジを緩めてやや下げます)
2)薄物袋使用の調整
糸調子①の糸の押さえかたを強くしてください。糸調子ナ
ットを右に回してください。
(また上糸調節②はネジを緩めてやや上げてください)
3)上糸調節の調整
工場出荷時はクレープテープ用に上糸調節②を少し下
げて調整しています。テープを使用しない時は上糸調節
を上げて再調整してください。
縫い目幅、袋の厚さの違いで糸調子だけでは糸締まりが
悪いときは上糸調節②を上下させ調節します。上糸調節
を矢印方向に上げると糸は締まり、逆の方向に動かすと
糸は緩みます。適正な位置でネジ(11/64S40009)で上糸
調節を固定してください。
4) 下糸の調整
下糸の糸調子③の調整は上糸の糸調子に合わせます。
下糸がたるまないように調整してください。下糸の糸
調子の押さえ方が強いと、上糸の糸切れの原因となり
ます。注意してください。
2.PresserFootPressure
Presser foot pressure must be adjustedaccording to the
materialofbagandthickness.Checkthereversesideo
f
seams.Thepressureistoostrongifseamsshowasigno
f
scratchesbyfeeddogteeth,ortheactualstitchlengthis
shorterthanthepresetfeedrateoffeeddogteeth.Inthis
case,unscrewplatespringadjustscrew(102171),Figure4,
afterlooseningnut(5/16N24301).Besuretotightenthenut
aftertheadjustment.Ifthepressureistooweak,seamsdo
notformastraightline,orthestitchlengthisirregular.In
thiscase,increasethepressurebyscrewingtheplatespring
adjustscrew. Decreasethepressurewhenclosingjuteand
otherheavybagmaterial,andincreaseitwhenclosingPP
wovenclothandotherlightbagmaterial.Yourmachineis
adjustedfor3-plykraftpaperbagsatthefactory.
2.押エ金の調整
押エ金の押エ圧は袋の材質や厚さの違いで調節してくださ
い。縫った袋の裏側の縫い目を見てください。送リ金によっ
て傷がつき、また縫い目幅が送リ量より小さいときは押エ圧
が強すぎます。板バネ調節ネジ(102171)を緩めて調節して
下さい。そのあとナット(5/16N24301)をしっかり締めてくださ
い。押エ圧が弱いと縫い目が直線に縫えず、また縫い目幅
も不揃いになります。前述の調整と逆に調節ネジを締めてく
ださい。麻袋など厚物の袋を縫うときは押エ圧を弱くしてくだ
さい。PP クロス袋など薄物の袋を縫うときは押エ圧を強めに
してください。工場出荷のときはクラフト3層の紙袋に合わせ
た調整をしています。
5
5.Adjusting/調
整
6
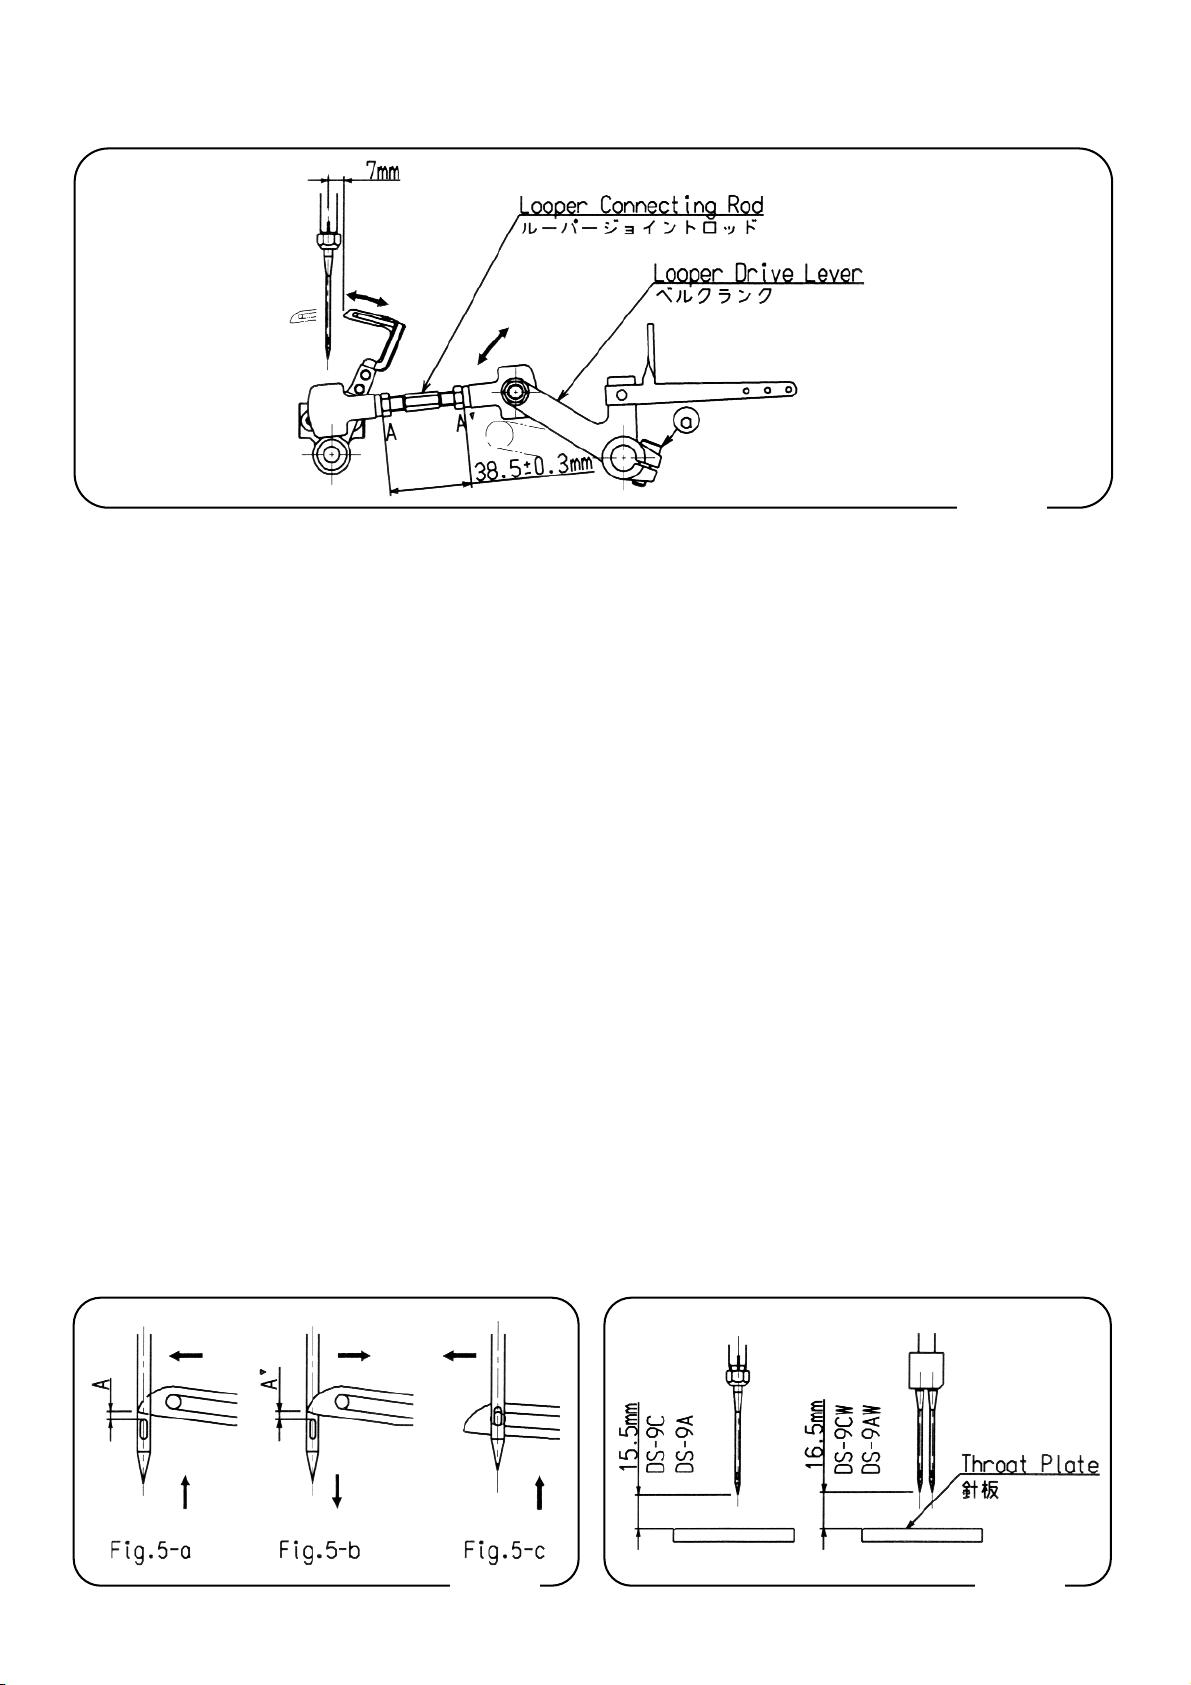
b)CheckofHeightofNeedle
Needleandloopermovementsarecorrectlytimedi
f
distance(AandAʼofFig.4)betweenLooperpointand
NeedleholewhenLooperpointsgetsinlinewithleft-side
edgeofNeedleisthesameasLooperpassesNeedlein
forward and backward movements. A=Aʼ±0.3mm is
allowable. Adjust by hightly tapping the looper Drive
Lever.Loopereyeletshouldoverlapwithlowerparto
f
ovalholeofNeedle,asshownin(Fig.5-c.)asloopergoes
forward.Adjustmentcanalsobedonebylooseningtheset
screwoftheneedlebarconnectingstudandadjustingthe
heightoftheneedlebarsothattheendoftheneedleis
15.5mm from the upper surface of the throat plate as
shownin(Fig.6).
3.Looper
a)DistancebetweenNeedleandLooper
Turnthepulleyintheforwarddirectionandadjustthebell
cranksothattheendofthelooperis7mmawayfromthe
needlecenterwhentheneedleisinthemostretracted
position,asshownin(Fig.4).Thedistancebetweenthe
nut(outside)ofLooperConnectingRodmustbe38.5±
0.3mm.(Fig.4)
Uponcompletionoftheadjustment,tightenthescrewo
f
thebellcrank.
3.ルーパーの調整
a) 針とルーパーの距離
あらかじめボールジョイントロッドの、図の距離(A-Aʼ)を
38.5mm±0.3mm 以内にして取り付けてください。(Fig.4)
ルーパーが最も後退したとき針芯とルーパーの距離は
7mm です。
この調整は、ベルクランクのネジ a を緩めてベルクランクを
調整し、締め付けてください。この時ベルクランク軸にガタ
(隙間)ができないように注意してください。
b)針の高さ
ルーパーの先端と、針の穴の寸法が同じになるように調整
します。ルーパーを前進・後退させ、ルーパーと針が交差
するときに、ルーパーの先端から針穴の寸法が同じになる
よう(A=Aʼ)に調整してください。(Fig.5-a・b)A=Aʼ±0.3mm
は許容範囲です。
ルーパーの先端と、針の穴の寸法があわない場合には、
ベルクランク軸を、前または後ろ側から、プラスチックハン
マーでかるくたたいて調整してください。
A=Aʼの寸法を確認した後で、(Fig.5-c)ルーパー穴の下
面と、針穴の下面が一致するように、針棒抱キのネジをゆ
るめ、針棒の高さを調整してください。
あらかじめ、(Fig.6)の通り針が最もあがったとき、針と針板
の距離が 15.5mm になるように、針棒の高さを定めると、調
整が容易にできます。
調整のあとで針棒抱キネジをしっかり締めてください。
5.Adjusting/調
整
Fig.4
Fig.6Fig.5

c)ClearanceBetweenLooperandNeedle
Adjusttheclearancebetweentheneedleandthelooperto
between0.05-0.1mmwhentheneedlegoesforwardand
passes the rear of the needle. To obtain the correct
clearance, loosen the screw ○
bof the looper rocker
frame○
aandincline ○
cthelooperrocker.Adjustthe
clearanceoftheneedleandloopertobetween0.1-0.5mm
whentheloopermovesforwardtotherightattheclosest
pointtotheneedle.(Fig.7-a)
Tofacilitatetheadjustmentfirstadjustthelooperavoid
eccentriccamsothatitsscrewis45°tocenterofthe
mainshaft.(Fig.7-b)
c)針とルーパーの間隔
針のえぐりとルーパーとの間隔を調整します。
ルーパーの先端が針の後ろを通過するとき、針のえぐり
と、ルーパーの先端との間隔は、0.05〜0.1mm に調整して
ください。
ルーパー倒しアーム○
aのネジ○
bを緩めて、ルーパー台
○
cを倒して調整してください。
次に、ルーパーが前進から右に後退するとき、針のえぐり
とルーパーの間隔は 0.1〜0.5mm に調整してください。
(Fig.7-a)
ベルクランクが下がった位置で、ルーパー倒しカムのネジ
が 45°の位置になるように、ルーパー倒しカムを仮締めし
て、微調整をしてください。(Fig.7-b)
d)ClearanceBetweenLooperRetainerandNeedle
Loosensetscrew○
dand adjust the clearance of the
needleandlooperretainertobetween0.05-0.1mmasthe
needlegoesup.(Fig7-c)
d)針とループガイドの間隔
ループガイドと針の間隔を調整します。
針がもっとも下がった位置から、上昇するときに、ループ
ガイドと針の間隔を 0.05〜0.1mm になるように調整して下
さい。(Fig.7-c)
7
Fig.7
5.Adjusting/調
整

4.FeedMechanism
a)ClearancebetweenThroatPlateandFeedDog
Ensurethatthefeeddogdoesnottouchthethroat plate
asitpassesthrough.Aclearanceof1.5mmshouldbeseen
betweenthemiddleteethofthefrontfeeddogandthe
throatplateasindicated(Fig.8).
b)HeightoftheFeedDog
Adjust the height of the feed dog so that it protrudes
2.5mmfromtheuppersurfaceofthethroatplatewhenthe
feeddoghasrisentothehighestposition,asshownin
(Fig.9).Ifthefeeddogishigherthanthis,stitchwillnot
chainsatisfactorily,andifitislowerthanthis,thestitch
widthwillbetoosmall.Slackennut ○
bwithaboxspanner
toadjusttheheightoftheFeedDog.Itisimportantto
adjusttheheightwithsetscrew○
atoensurethatthe
pressurefromthePressureFootshouldnotforceitback
down.Tightennut○
bwhentheadjustmentiscorrect.
TheRearFeedDogshouldbeset0.1mmlowerthanthe
FrontFeedDog.
4.送リ金の調整
a)針板と送り金の間隔
送リ金がもっとも前進したとき、針板の溝と送リ金の間隔は
1.5mm です。(Fig.8)
送リ元土台のネジを緩めて、調整してください。
b)送リ金の高さ
送リ金(前)の高さは、送リ金が最も上がったとき、針板上面
から 2.5mm 出るように調整します。(Fig.9)
調節ネジ○
aを回して送リ金が2.5mm でる位置になるように
調整して下さい。調整が終わってから、ボックススパナで
ナット○
bを締めて送リ金を固定してください。
送リ金(後)は、送リ金(前)に対して同じ高さか、0.1mm ほど
下げ気味にして取り付けてください。
Caution:
Tentativelytightenthenutandmakeseveralstitchesto
besuretherequiredstitchlengthisobtained.Afterthe
confirmation,firmlytightenthenutwithaspanner.
[注意]
ナットを仮締めして調整が終わりましたらナット○
bをしっか
り締めて下さい。
8
Fig.8 Fig.9
5.Adjusting/調
整

9
Fig.10
5.Adjusting/調
整
d)NeedleGuide
Whenthestitchwidthischanged,theneedleguidemust
be adjustedaccordingly, as the clearance between the
needleguideandtheneedlewillchange.Turnthepulleyin
the forward direction after loosening the screw ○
ao
f
Fig.11andadjusttheclearancebetweentheneedleand
needleguidetozerowhentheendoftheloopercomesto
thesideoftheneedle,asshownin(Fig.11)andtightenthe
screw○
a.
d)針ガイドの調整
DS-9 型ミシンの縫い目幅は前述のように 10mm に調整し
てありますが、針ガイドも合わせて 10mm に調整していま
す。
針ガイドが最も前進したときに(Fig.11)の示すように針との
間隔が 0mm になるようにネジ○
aを緩めて調整します。
DS-9 型の場合は、縫い目幅をかえても針ガイドの調整は
必要ありませんが、念のため再確認してください。
c)StitchSpacing
Thestitchwidth of thismachinehasbeenadjusted to
10mmbeforeshipmentfromthefactory.Thestitchwidth
isadjustablefrom7to11.5mm.
(onlyDS-9Cisadjustablefrom7to10.5mm)
Loosenthenut○
aofthefeedregulatorandmovethe
feedconnectingrod○
binthedirectionofS,asshownin
(Fig.10),todecreasethestitchwidth,andmovetherodin
thedirectionofLtoincreasethewidth.Whenmovingthe
feedconnectingrod,dosoafterconfirmingthatthefeed
connectingrodcanmovefreelyalongtheslotinthefeed
rocker(Rotatethepulleyintheforwarddirectionuntilthe
feeddogisintheforefrontposition).
c)縫い目幅
縫い目幅は 7〜11.5mm の範囲で調整可能ですが、工場
出荷のときは縫い目幅10mmに合わせて調整しています。
縫い目幅の調整は(Fig.10)を参照ください。
(但し DS-9C は 7〜10.5mm)
送リ調節軸のナット○
aを緩めて送リロッド○
bを動かしてナ
ット○
aを仮締めします。
送リロッドを S 方向に動かすと縫い目幅は細かくなり、L 方
向に動かすと縫い目幅はあらくなります。
送リロッドを動かすときは、送リロッドが送リ元弓の長穴に
そって軽く動く状態にして調整してください。
ナットを仮締めして調整が終わりましたら、ナット○
aをしっ
かり締めてください。
Fig.11
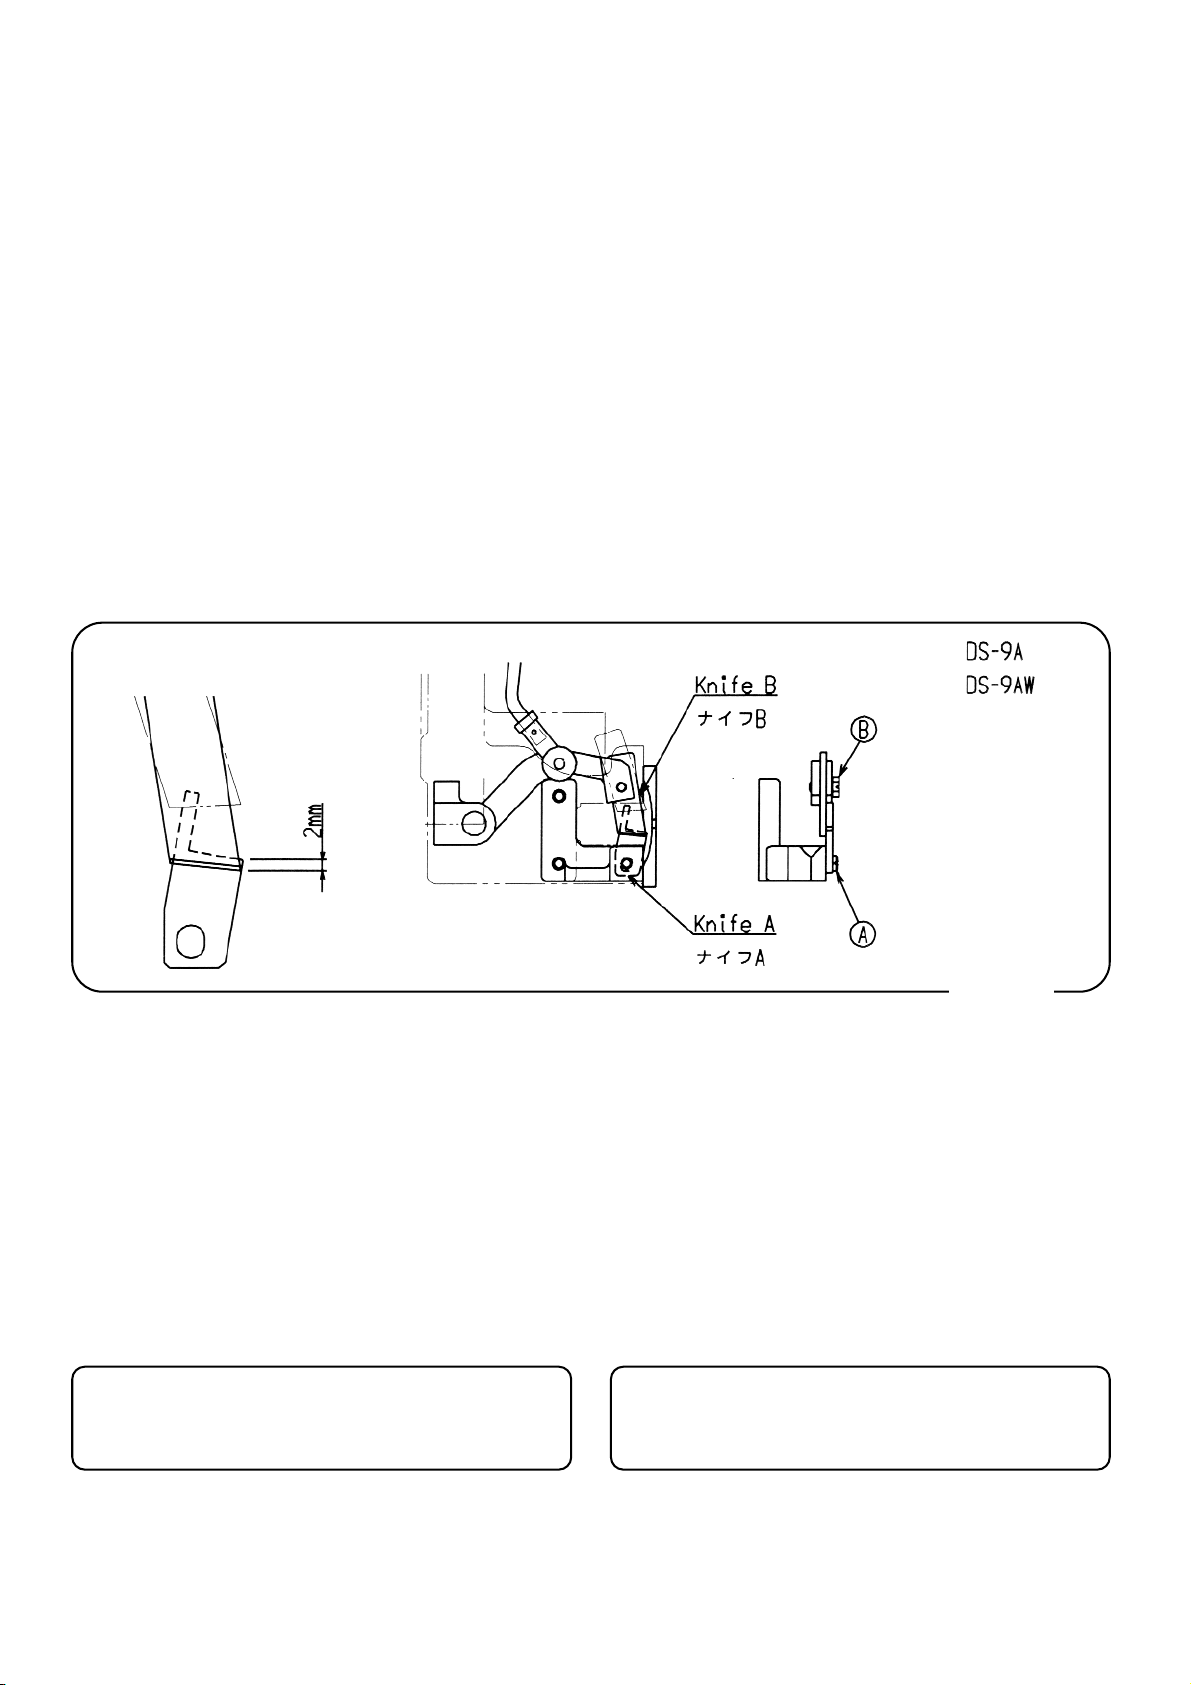
5.ThreadCutter(DS-9A)
Theknives,(A)and(B)aretobeadjustedasfollowingsteps.
a)Fixtheknife(A)withtighteningscrew ○
Aattheproper
position.Besurethattheknifeedgedoesnotprotrude
fromthreadgutterofthroatplate.
b)Fixtheknife(B)inthegutterofknifelever,bytentatively
tighteningscrew○
B.
c)Turnpulleyclockwisedirection.Whentheknife(B)moves
farthestrightposition,fixtheknife(B)movessothatit
contactwiththeedgeofknife(A)approx,2mm.
d)Slightlybendknifelevertoobtainpropercontactbetween
knife(A)and(B).
e)Trytocutseveralthreadswoundandthenconfirmifthey
arecutsharplyandstraightly.
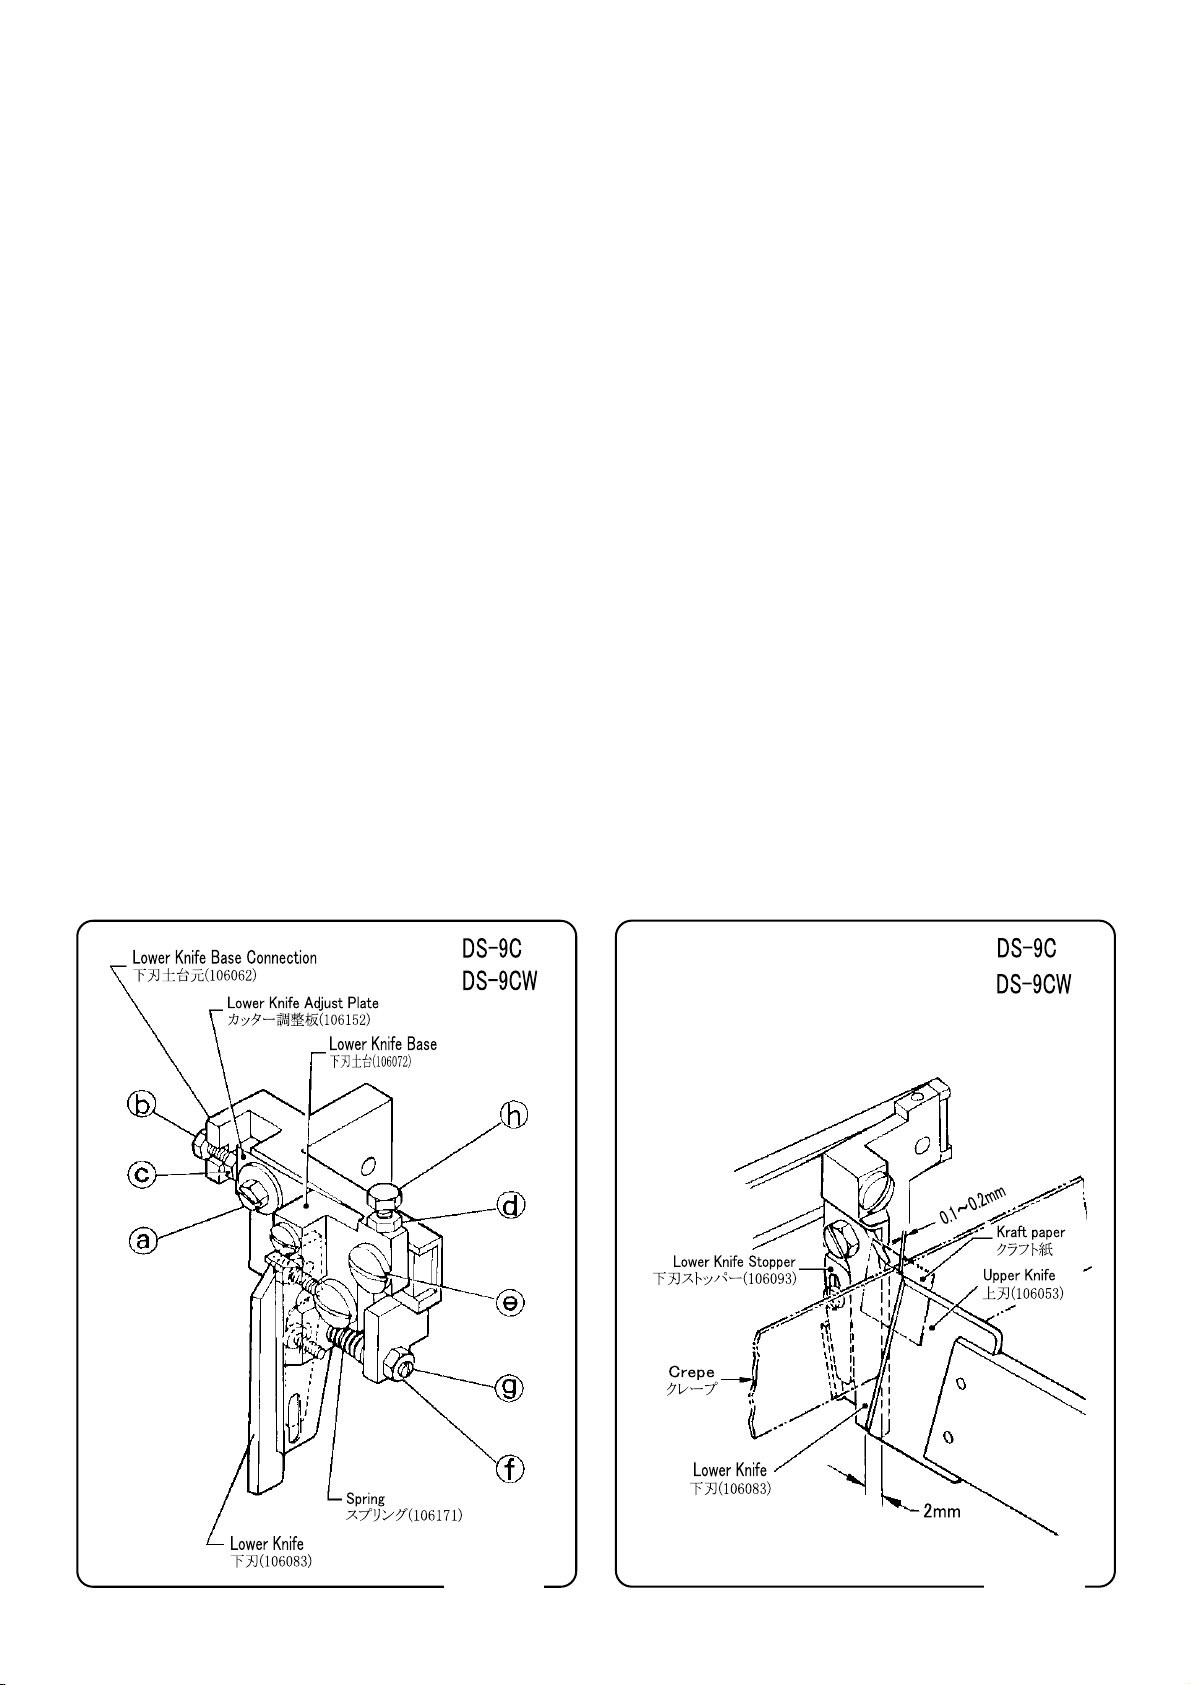
6.Cutter(DS-9C)
a)Tooccludetheupperandlowerblades,manuallymovethe
upperblade.Todoso,putoffairsource.Here,priorto
loweringtheupperblade,loosenthescrews○
a,○
band
○
handthenuts○
cand○
dshownin(Fig.13).
Whenbothbladesareoccluded,allowagapof0.1to
0.2mmbetweenthefacesofthetwobladesontherear
side,andtightenthescrew○
aandthenut○
d.
6.カッターの調整
カッターの調整をする前に、必ずエアー源を切ってくださ
い。エアー源が切れていることを確認してください。
上刃・下刃を交換するときは、いつでも調整が必要です。
a)手動で上刃を動かして、上刃と下刃を噛み合わせます。
上刃を下げるとき(Fig.13)ネジ○
a,○
b,○
hナット○
c,○
dは緩
めてください。
上刃と下刃の噛み合わせは(Fig.14)のようにうしろ側スキ
マが 0.1mm〜0.2mm になるようにネジ○
bで調整します。こ
のとき上刃と下刃の先端側は、接触しているように調整し
てください。
NOTE:
Thegapadjustmentcanbeeasilymadeplacingasheeto
f
Kraftpaperbetweentheupperandlowerblades,asshown
in(Fig.14).
b)Afterthesettingdescribedin① above,wherethescrew
○
h isinlightcontactwiththescrew ○
e,tightenthenut
○
d.
[注意]
このスキマをとるとき(Fig.14)のように、上刃と下刃の間に
クラフト紙 1 枚をはさんでいただけば、簡単に出来ます。
b)この調整のあとネジ○
hをネジ○
eに軽くあてて、ナット○
dを
締めてください。
10
Fig.12
5.Adjusting/調
整
5.ナイフの調整(DS-9A)
ナイフAとナイフBの噛み合わせは次のように調整してくださ
い。(Fig.12)
a)ナイフ A は固定刃土台の取り付け場所にネジで固定して
ください。空縫い糸が溝の中でさわらないよう、ナイフ A の
刃先は針板の糸溝からはみ出さないように注意してくださ
い。
b)ナイフ B はナイフレバーの溝にいれ、ネジ○
Bで仮締めし
てください。
c)プーリーをまわしてナイフBがもっとも前進したとき、ナイフ
Aの刃先に2mmかみ合う位置でネジ○
Bを締めて固定して
ください。
d)ナイフ A とナイフ B とのセリは(スパナなどを使用し)ナイフ
レバーを曲げて調整します。
e)糸 5 本を束ねてナイフ A・B の間に入れ、プーリーを手で
まわして切ったとき、切れ残りがなく切断面が直角に切れ
ているか、ナイフの切れ味を確認してください。
c)Aftertheadjustmentbysteps○
aand○
b,cutacrepe
tapeorthreadfortest.Ifthefrontendofthecuttercuts
buttherearenddoesnot,thereisagapontherearside.
Inthiscase,loosenthenut○
dandloosenthescrew○
h
by1/8turn,andcutthethreadagainfortest.Ifitstill
doesnotcut,loosenthescrewbyanother1/8turnand
repeatthisadjustmentandtestcutuntilthethreadcanbe
cut,andthenretightenthenut ○
d.Iftherearendo
f
cuttercutsbutthefrontenddoesnotcut,theadjustment
bystep○
aisinsufficient.Then,makere-adjustmento
f
therearsidesothatthegapbetweenboththeblades
becomes0.1to0.2mm.Here,adjusttheupperandlower
bladessothattheyareincontactwitheachotheronthe
frontside.Ifthelowerbladetendstoturnawaywithout
cutting,loosenthenut○
fandincreasethepressureo
f
thespringbyturningthescrew○
gclockwise.(Fig.13)
c)前述○
a,○
bの調整がすみましたら、手動でカッターを動か
して、クレープ紙または糸を切断してみてください。
カッターの先端側が切れて、後ろ側が切れない場合は、
後ろ側のスキマが広すぎます。
ナット○
dを緩めて、ネジ○
hを 1/8 回転緩めてからクレープ
紙または糸を再度切断してみて下さい。切れるところまで
ネジ○
hを 1/8 回転ずつ緩めて調整してください。切れると
ころでナット○
dを固定してください。
後ろ側が切れて先端側が切れない場合は、○
aの調整が
不良です。もう一度、上刃と下刃の後ろ側スキマが 0.1〜
0.2mm になるようにネジ○
bで調整します。また切断時に、
下刃がにげるようでしたら、ナット○
fを緩めてネジ○
gを時
計方向に回しスプリングの圧力を強くしてください。
(Fig.13)
d)上刃と下刃の噛み合わせは 2mm です。シリンダーロッドと
ロッドエンドの接続長さをかえて、(Fig.14)を参照に、上刃
と下刃の噛み合わせの深さを 2mm に調整してください。
e)スタンド側の電磁弁にエアースピードコントローラーを必
ず取り付けて使用してください。(パーツリスト A2/A6(2L)
の 12 ページ図番 49 参照)。取付けない場合は部品破損
などのトラブル発生の原因になります。
f) エアー圧は 0.4Mpa(4kg/cm)から 0.5Mpa(5kg/cm)に合わ
せてください。
0.5Mpa(5Kg/cm)を超えて使用すると、部品破損などのト
ラブル発生の原因になります。
11
5.Adjusting/調
整
Fig.13 Fig.1
2
2
2
d)Adjusttheoverlappeddepthoftheupperandlowerblades
bychangingthelengthofaircylinderrodendsothatthe
distancebetweentheupperfaceofthelowerbladeandthe
rearsideoftheupperbladebecomes2mm,asshownin
(Fig.14).
e)Do not operate without Air Speed Controller on the
Solenoid Valve of the Stand. (See the Parts List
A2/A6(2L)page12Ref.No.49).Incaseofoperatingthe
SolenoidValvewithoutairSpeedController,itwillbethe
causationforsomepartsbroken.
f) Adjustairpressureto0.4Mpa(4kg/cm)nottoexceed
0.5Mpa(5kg/cm). In case of using with excessive air
pressure(over0.5Mpa(5Kg/cm)),itwillbethecausation
forsometroubles.
2
2
2

7.AdjustmentforSingleThreadSewing
a)FixingThroatPlateThreadRetainer(Fig.15)
FixThroatPlateThreadRetainer○
batThroatPlate○
a
with Screw ○
c, keeping its point having 0〜0.3mm
clearancefromNeedlecenter.
b)ClearancebetweenNeedleandLooper(Fig.16)
Turnthepulleyintheforwarddirectionandadjustthebell
cranksothattheendofthelooperis7.5mmawayfromthe
needlecenterwhentheneedleisinthemostretracted
position. The distance between the nut (outside) o
f
LooperConnectingRodmustbe39.5±0.3mm.
Uponcompletionoftheadjustment,tightenthescrewo
f
thebellcrank.
c)AdjustmentbetweenLooperandThroatPlateThread
Retainer(Fig.17)
Adjust Throat Plate Thread Retainer with Looper
ConnectingRod,keepingitnottouchingconcaveparto
f
LooperwhenLooperpassthroughthenearestpositionA
fromThroatPlate.
7.単環縫いの調整
a)針板爪の取付(Fig.15)
針板爪○
bの先端が針芯より 0〜0.3mm になる位置で針板
爪を針板○
aにネジ○
cにて取付ける。
b)針とルーパーの調整 (Fig.16)
あらかじめボールジョイントロッドの、図の距離(A-Aʼ)を
39.5mm±0.3mm 以内にして取り付けてください。
ルーパーが最も後退したとき針芯とルーパーの距離は
7.5mm です。この調整は、ベルクランクのネジ○
fを緩めて
ベルクランクを調整し、締め付けてください。この時ベルク
ランク軸にガタ(隙間)ができないように注意してください。
c)ルーパーと針板爪の調整(Fig.17)
ルーパーが A 点で前後に倒れる時、針板爪がルーパー
の逃げ溝に当たらないようにルーパージョイントロッドを調
整する。
When the test to run, if the thread does not slipout
smoothly from Throat Plate Thread Retainer, adjust
keepingitspointhaving0〜0.5mmfromNeedlecenter.
試し縫いをして糸が針板爪に引っ掛かりが強い場合は
針
芯より 0〜0.5mm に引っ込めて調整する。
Fig.16
Fig.17
Fig.15
5.Adjusting/調
整
12

Problem Cause Solution Ref.
Needle(looper)
threadbreaks
1.Damagedlooper
2.Toomuchthreadtension
3.Toolittlethreadtension
4.Threadsnarledorhungupalongpathbetweenthreadstand
andneedle/looper
5.Incorrectthreading.Threadnotbetweentensiondiscs
6.incorrectneedlesetting
7.Bentordamagedneedle
8.Doublesewing
9.Decreasedstitchlengthbecauseofwornfeeddogteeth
Replace
Decrease
Increase
Correct
Threadcorrectly
Setcorrectly
Replace
Moveupthreadcontroller
Replacefeeddog
5-3
5-1
5-1
3
3
5-3-b
5-3-b
5-1
5-4-b
Nochainformed
betweenbags
1.Incorrectthreading
2.Toomuchlooperthreadtension
3.Toolittleneedlethreadtension
4.Threadcontrollertoolow
5.Needleandloopernottimedeachother
6.Notenoughpresserfootpressure
7.Threadiscutbyfeeddogteeth
8.Threadisfeedbackbecausefeeddogissettoohigh
Threadcorrectly
Decrease
Increase
Moveitup
Adjusttiming
Increase
Filetherowoffeeddogteeththat
comesintouchwiththread
Adjustheightoffeeddog
3
5-1
5-1
5-1
5-3-c
5-2
5-4
5-4-b
Skippingstitchs
1.Wrongsettingofneedle
2.Bentordamagedneedle
3.Threadcontrollertoolow
4.Wornlooperpoint
5.Needletoohigh
6.Threadstickingtoneedleduetoheat
7.Needleguardpushingneedle
8.Looperthreadtooloosetoformagoodtriangle(reverseskip)
9.Needleandlooperwideapart(scoopskip)
Setcorrectly
Replace
Moveitup
Replacelooper
Lowerneedlebar
Dampenneedlethreadwithoil
Adjustneedleguard
Increaselooperthreadtension
Adjustdistanceneedletolooper
5-3-b
5-3-b
5-1
5-3-c
5-3-b
*
5-4-d
5-1
5-3-c
Needleorlooper
breaks
1.Bentneedle
2.Looperpointhittingneedle.Needlepointhittinglooper
3.Needleguardpushingneedleortheyarewideapart
Replace
Adjusttimingofneedleandlooper
Adjustneedleguard
5-3-b
5-3-c
5-4-d
Stitchlengthnot
uniform,Curved
seam
1.Notenoughpresserfootpressure
2.Wornfeeddogteeth
3.Bentneedle
Increase
Replacefeeddog
Replace
5-2
5-4-b
5-3-b
Threadbitesinto
crepetape
1.Twomuchneedlethreadtension
Decrease
5-1
Crepetapecreases
1.Feeddog,rear,ishigherthanfeeddogfrontalittle
Adjustheight
5-4-b
6.Troubleshooting
*Plasticcontentsexistentinbagmaterialismeltbytheheatedneedleandmaysticktoneedle,etc.,causingskipping
stitches.Whenclosingwovenclothbags,kraftpaperbagsinclusiveofpolyethylenecoatedlayer,polyethyleneandPVC
bags,etc.,dampenneedlethreadwithoiltopreventstickingofplasticcontents.Usesiliconeoilprocessedthreadfo
r
packingriceandotherfoodproducts.
13

トラブル内容 原 因 対 処 参照
上糸、下糸が切れる
1.ルーパーに傷がある。
2.上・下糸調子のテンションが強すぎる。
3.上・下糸調子のテンションが極端に弱すぎる。
4.糸立てから針・ルーパーまでの間で、糸がからまったり、
もつれたりする。
5.糸通しが間違っている。糸調子皿から糸がはずれている。
6.針の取付け方が間違っている。
7.針が曲がったり、傷がある。
8.二度がけしている。
9.送リ金が摩耗して縫目幅がこまかくなる。
ルーパーを交換する。
テンションを弱くする。
テンションを強くする。
糸がからまったり、もつれないよう
注意する。
糸通しを正しく通す。
針を正しく取付ける。
針を交換する。
上糸調節を上げる。
送り金を交換する。
5-3
5-1
5-1
3
3
5-3-b
5-3-b
5-1
5-4-b
空縫いが出ない
1.糸通しが間違っている。
2.下糸調子のテンションが強すぎる。
3.下糸調子のテンションが弱すぎる。
4.上糸調節が低すぎる。
5.針とルーパーとのタイミングが合っていない。
6.押エ金の圧が弱い。
7.送リ金の歯で糸を切る。
8.送リ金が高くセットされていて糸を送り返す。
糸通しを正しく通す。
テンションを弱くする。
テンションを強くする。
上糸調節を上げる。
針とルーパーとのタイミングを調
整する。
押エ金の圧を強くする。
送リ金の糸押え部をヤスリで落
す。
送リ金の高さを調整する。
3
5-1
5-1
5-1
5-3-c
5-2
5-4
5-4-b
目飛び
1.針の取付け方が間違っている。
2.針が曲がったり、傷がある。
3.上糸調節が低くセットしすぎている。
4.ルーパーの先端が摩滅している。
5.針が高くセットされている。
6.熱のため糸が針にくっつく。
7.針ガイドが針を押している。
8.下糸がゆるすぎてよい三角形をつくらない。(かえり目飛び)
9.針とルーパーの間隔が広い。(すくい目飛び)
針を正しく取付ける。
針を交換する。
上糸調節を上げる。
ルーパーを交換する。
針棒を下げる。
糸に油を使用する。
針ガイドを調整する。
下糸のテンションを強くする。
針とルーパーの間隔を調整する。
5-3-b
5-3-b
5-1
5-3-c
5-3-b
*
5-4-d
5-1
5-3-c
針が折れる
ルーパーが折れる
1.針が曲がっている。
2. 針にルーパーの先端が当っている。ルーパーに針先が
当っている。
3.針ガイドで針を押しているか、隙間がある。
針を交換する。
針とルーパーとのタイミングを調
整する。
針ガイドを調整する。
5-3-b
5-3-c
5-4-d
縫目巾が不揃い
縫目が曲がっている
1.押エ金の圧が弱い。
2.送リ金の歯が摩滅している。
3.針が曲がっている。
押エ金の圧を強くする。
送リ金を交換する。
針を交換する。
5-2
5-4-b
5-3-b
クレープ紙に糸が
くいこむ
1.上糸調子のテンションが強すぎる。 テンションを弱くする。 5-1
クレープ紙にしわが
できる
1.送リ金後が送リ金前より高くセットされている。 送リ金後を正しくセットする。 5-4-b
6.ミシンのトラ
ブ
ルの原因と対
処
*樹脂クロス袋や、クラフト紙袋にポリエチレンコーティングされている袋、ポリエチレン、塩化ビニール袋等を縫う時に、摩擦
熱によって袋が溶けて針等にくっつき、目飛び等が発生し易い傾向がありますので、その場合には、上糸に油をつけたり、
供米用、食品関係等にはシリコン加工糸をご使用ください。
14

ORDERINGPARTS
1.Descriptionofeachpartanditsstampnumberisdescribedinthispartslist.Screwsandnutsforpartsare
shownadjacenttotherelevantparts.Whenorderingparts,describeclearlystampnumberwithitsnameofpart.
2.ThepartswhichhavenoRef.Numbercannotbedeliveredindependently;alwaysoderitasanassembly.
3.Asetofassembledpartsisrepresentedbythestampnumberofitsmainparts.
4.Thelastfigureonthepartsstampnumberadvancesoneachimprovementoftheparts.
5.PartsNo.describedin[]ofRemarksmeansoldpartsNo.
Thepartslistissubjecttochangewithoutpriornotice.
ご
注
文上の
注意事
項
1.ご注文の際は、部品番号、部品名称、個数を明記ください。
2.但し(図番 Ref.No.)の記入がない部品は、単体販売できませんので、それに該当する完備部品(組部品
)をご注文ください。
3.組部品はその中の主パーツの刻印番号で表示してあります。
4.刻印番号は、その部品が改良される都度に、最後の数字が 1 番ずつ繰り上がり、新しい刻印番号にかわ
りますのでご了承ください。
5.摘要欄中の[]内は旧パーツ番号です。
本部品表は改良のため予告なく変更することがあります。
CONTENTS目次
01. MISCELLANEOUSCOVERSPARTS ・・・・・・・・・・・・・・・・・・・・・・・・・・・・・・・・・・・・・・・・・・・・・・・・・・・・・・・16
カバー関係
02-1. THREADTENSION&OILINGPARTS ・・・・・・・・・・・・・・・・・・・・・・・・・・・・・・・・・・・・・・・・・・・・・・・・・・・・・・18
糸調子、給油関係
02-2.THREADTENSION&NEEDLETHREADOILER(DS-9AW,DS-9CW)・・・・・・・・・・・・・・・・・・・・・・・20
糸調子、上糸給油器関係
03.BUSHINGPARTS・・・・・・・・・・・・・・・・・・・・・・・・・・・・・・・・・・・・・・・・・・・・・・・・・・・・・・・・・・・・・・・・・・・・・・・・・・22
軸受関係
04.NEEDLEBAR&CRANKSHAFTPARTS・・・・・・・・・・・・・・・・・・・・・・・・・・・・・・・・・・・・・・・・・・・・・・・・・24
針棒、クランクシャフト関係
05.PRESSERFOOTPARTS・・・・・・・・・・・・・・・・・・・・・・・・・・・・・・・・・・・・・・・・・・・・・・・・・・・・・・・・・・・・・・・・・・・26
押エ金関係
06.LOOPERROCKER&CONNECTINGRODPARTS ・・・・・・・・・・・・・・・・・・・・・・・・・・・・・・・・・・・・・・・・・28
ルーパー揺動関係
07-1.FEEDDRIVING&THROATPLATEPARTS(DS-9A,DS-9AW) ・・・・・・・・・・・・・・・・・・・・・・・・・・・・30
送リ機構、針板関係
07-2.FEEDDRIVING&THROATPLATEPARTS(DS-9C,DS-9P,DS-9CW)・・・・・・・・・・・・・・・・・・・・32
送リ機構、針板関係
08-1.CUTTERPARTS(DS-9A,DS-9AW)・・・・・・・・・・・・・・・・・・・・・・・・・・・・・・・・・・・・・・・・・・・・・・・・・・・・・・・・34
カッター関係
08-2.CUTTERPARTS(DS-9C,DS-9CW) ・・・・・・・・・・・・・・・・・・・・・・・・・・・・・・・・・・・・・・・・・・・・・・・・・・・・・・・36
カッター関係
09.THREADBREAKDETECTOR&BINDERPARTS ・・・・・・・・・・・・・・・・・・・・・・・・・・・・・・・・・・・・・・・・・・38
糸切れ検出バインダー関係
LISTOFSCREW,NUT&WASHER ・・・・・・・・・・・・・・・・・・・・・・・・・・・・・・・・・・・・・・・・・・・・・・・・・・・・・・・40,41
ネジ、ナット、ワッシャー一覧図
NUMERICALINDEXOFPARTS・・・・・・・・・・・・・・・・・・・・・・・・・・・・・・・・・・・・・・・・・・・・・・・・・・・・・・・・・・42〜44
パーツ索引
15
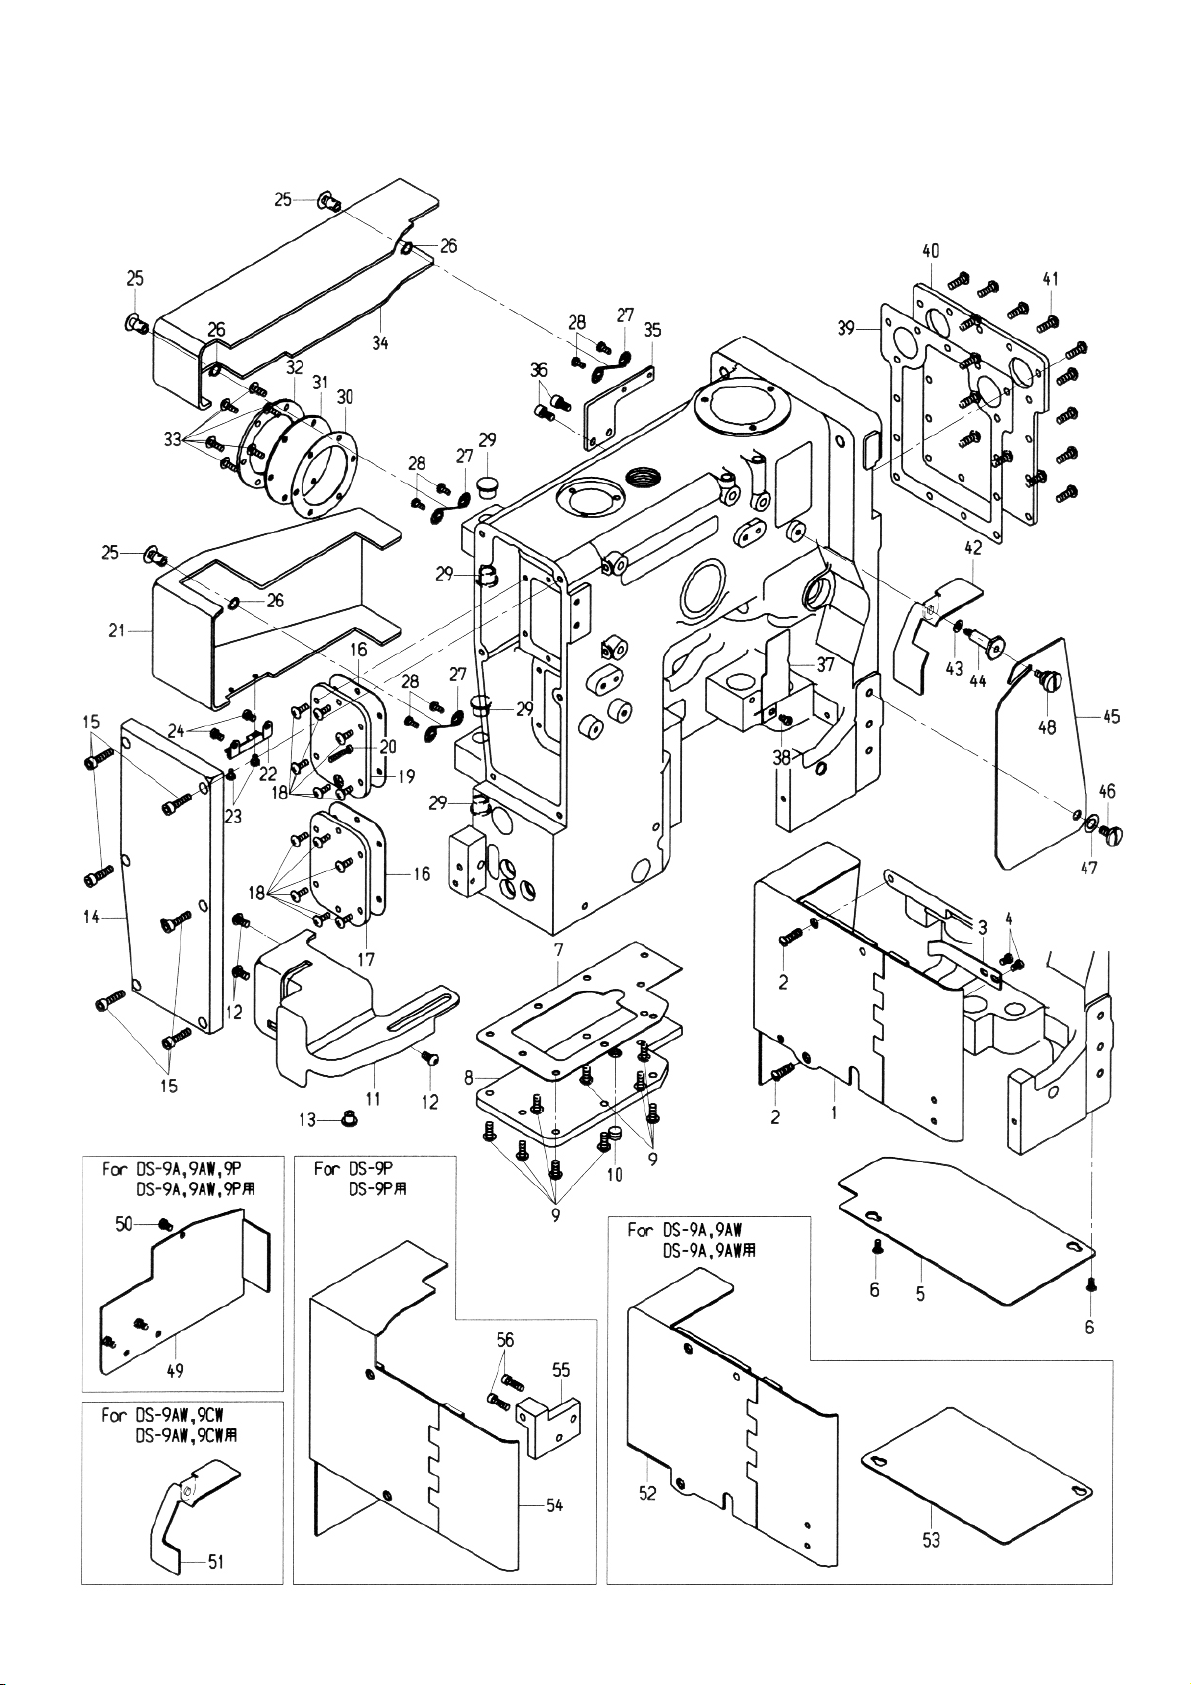
01.MISCELLANEOUSCOVERSPARTS
カバー関係
16
This manual suits for next models
5
Table of contents
Languages:
Other NLI Sewing Machine manuals


