1.Specifications/仕様 2
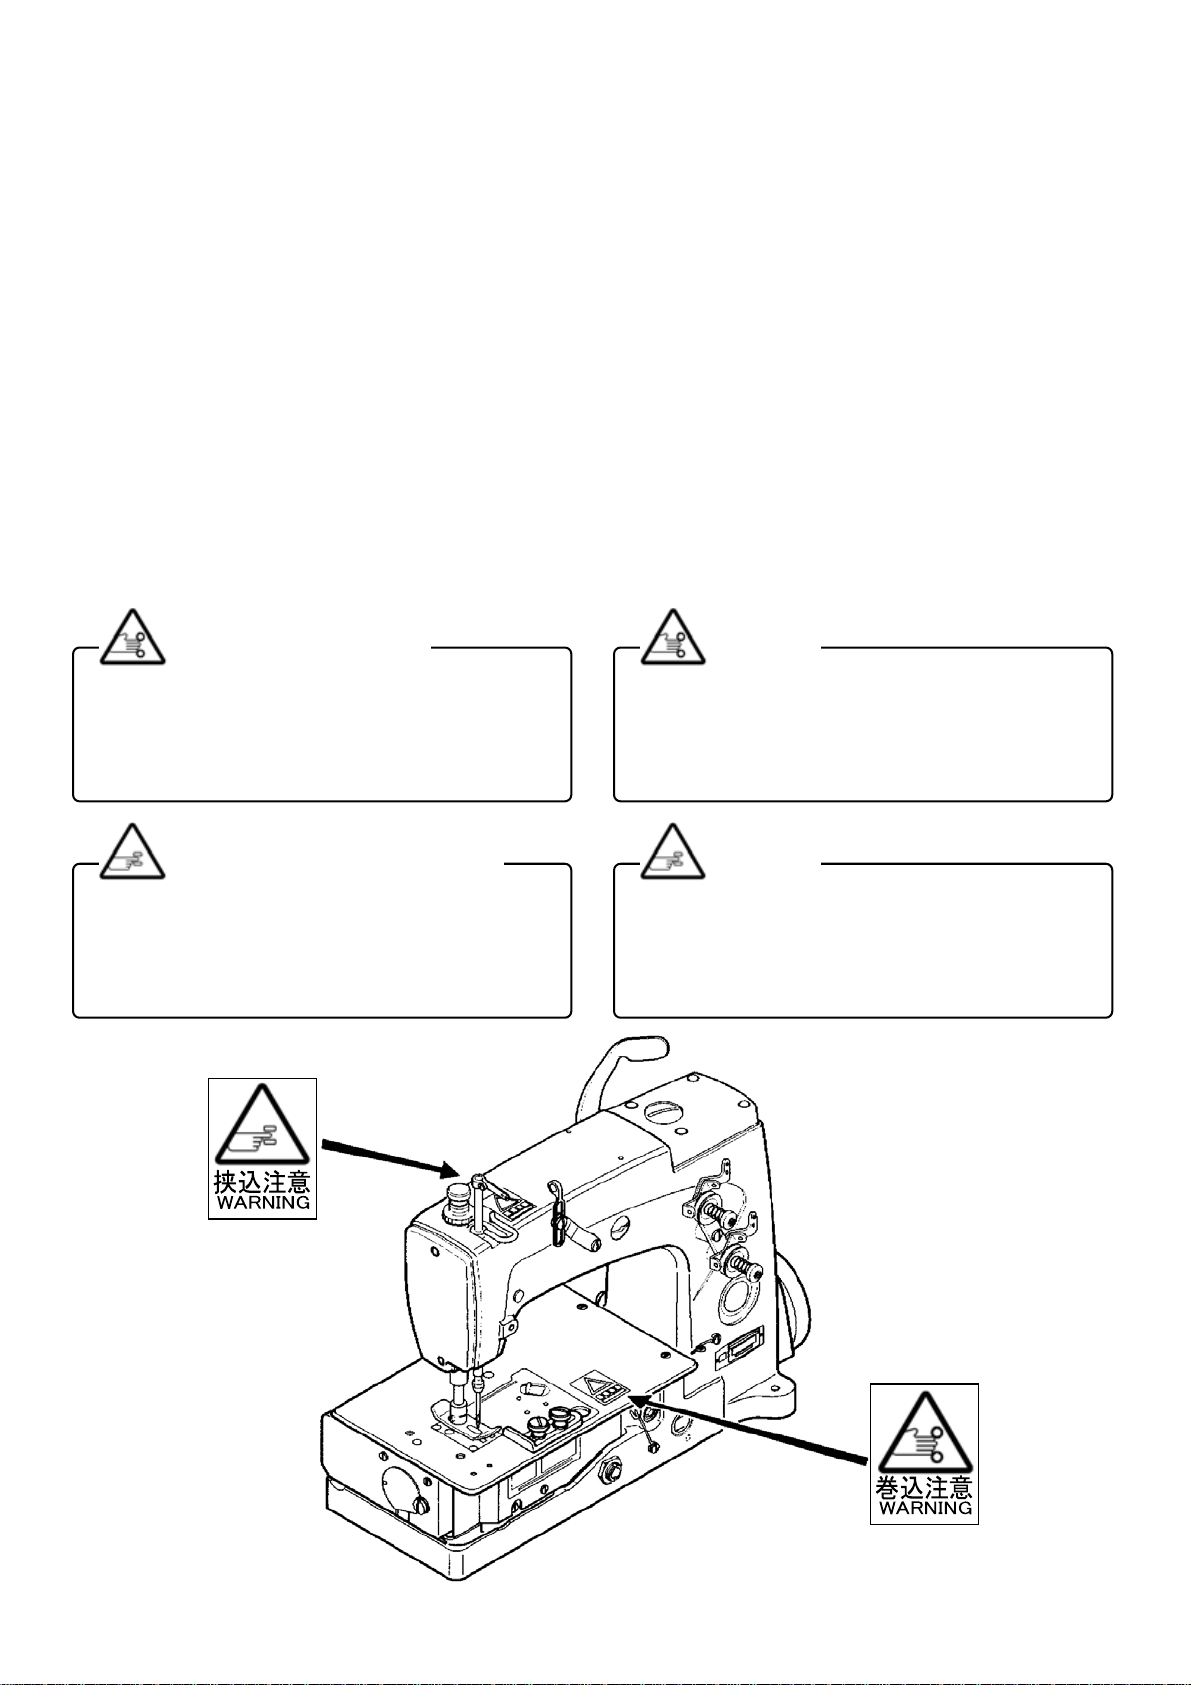
2.ThePointsBeforeOperation/運転前の確認 2
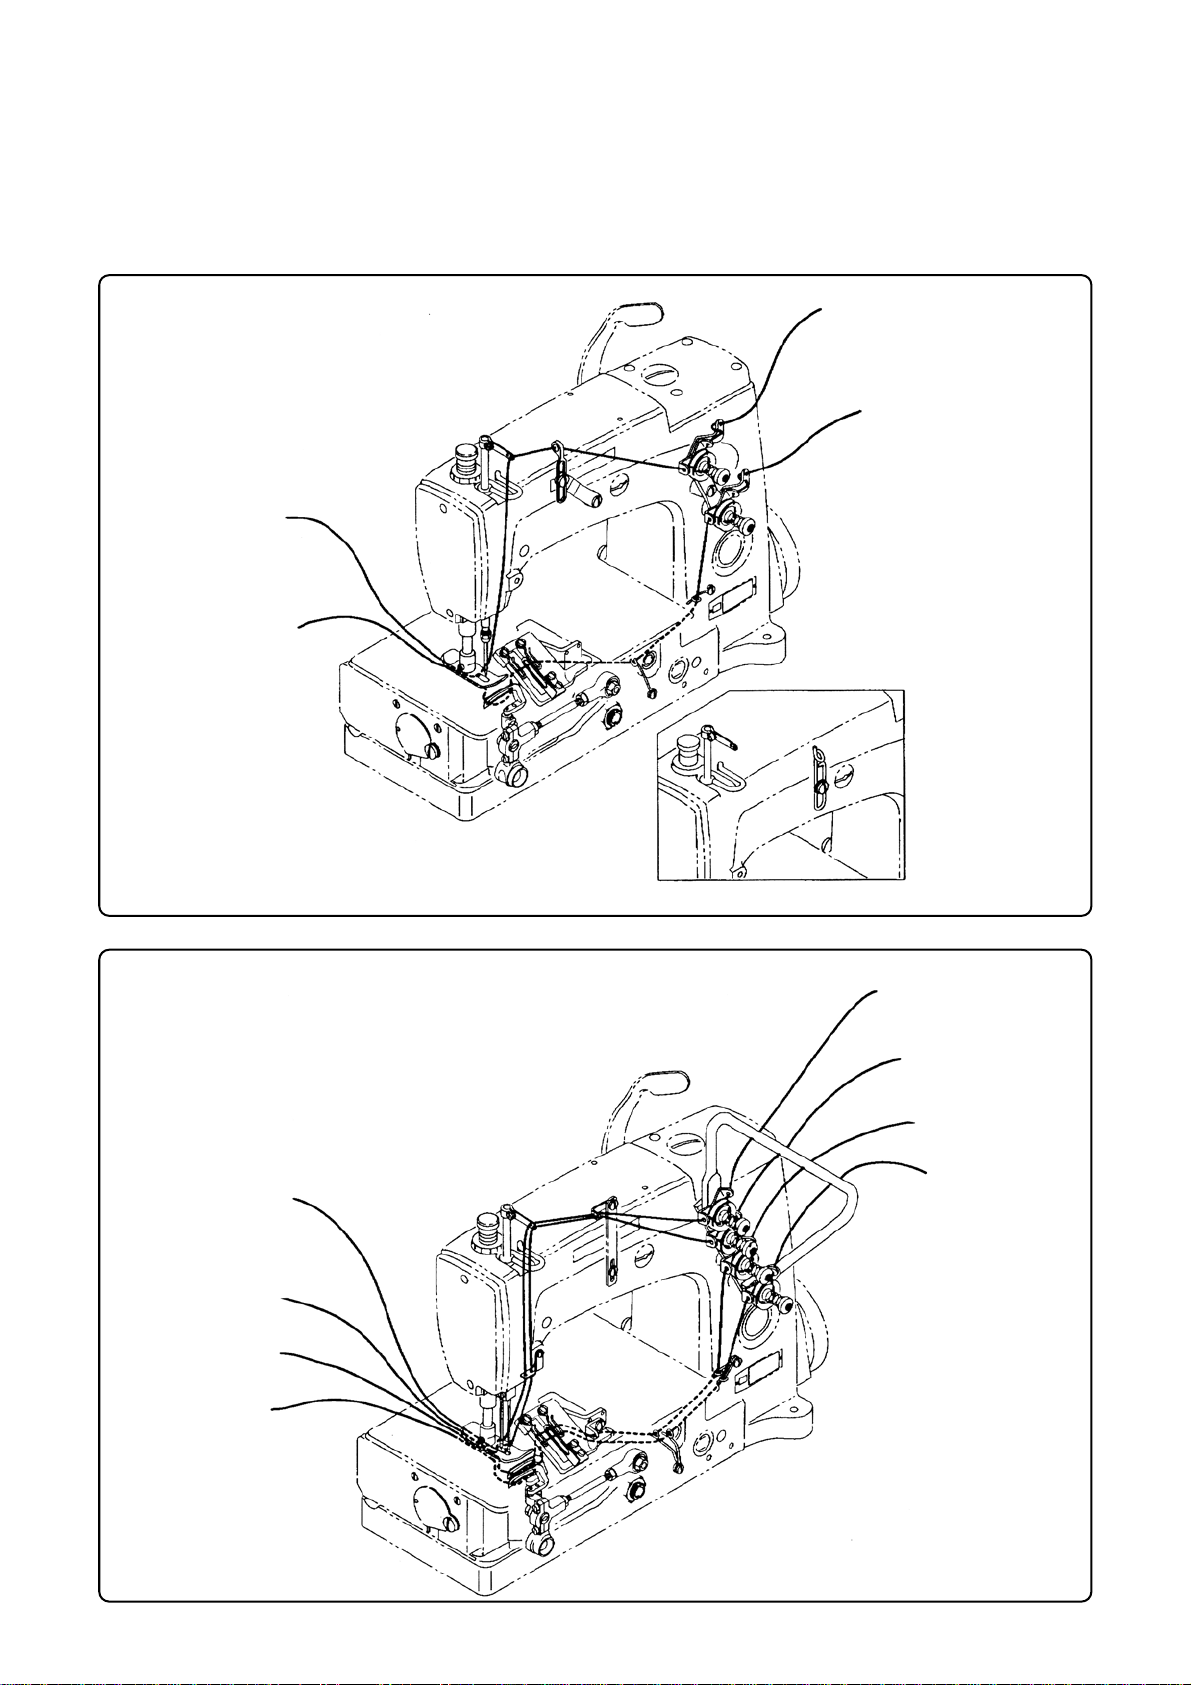
3.Threading/糸通し図 3
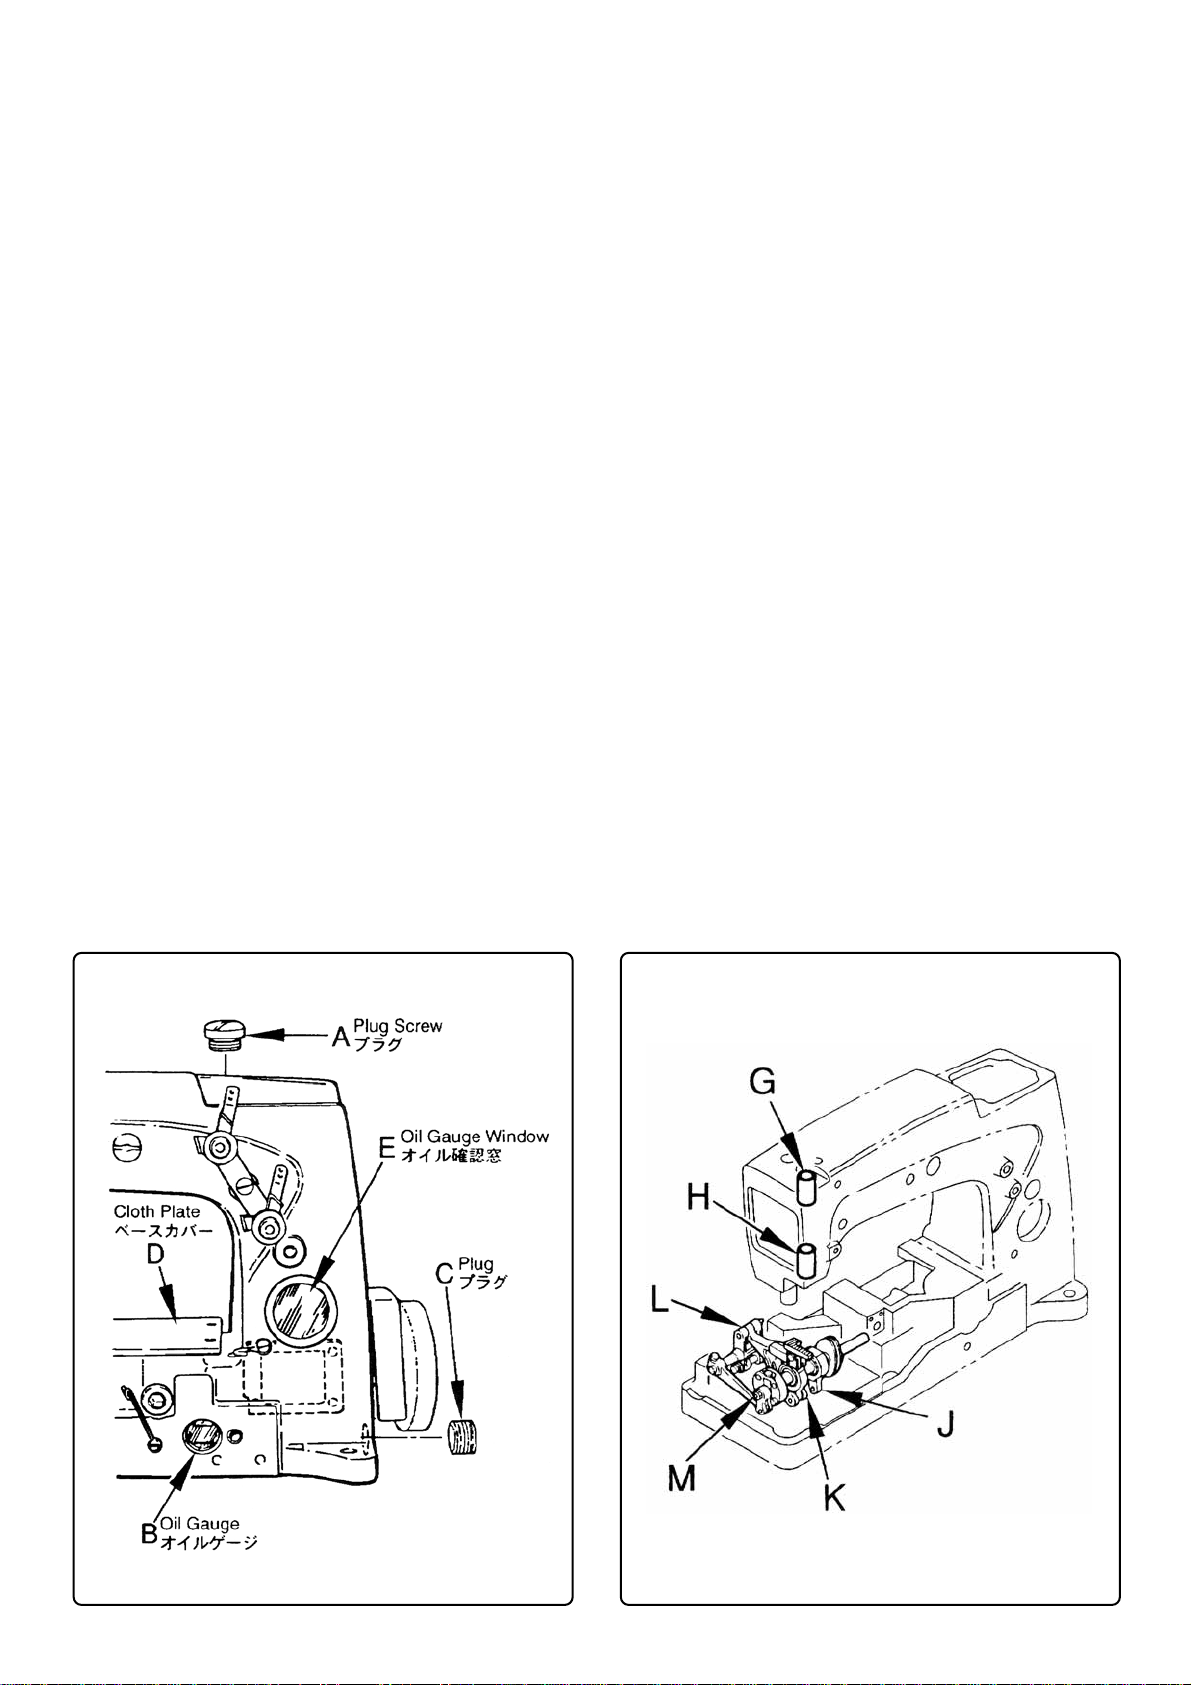
4.Lubrication/給油 4
5.Adjustment/調整 5
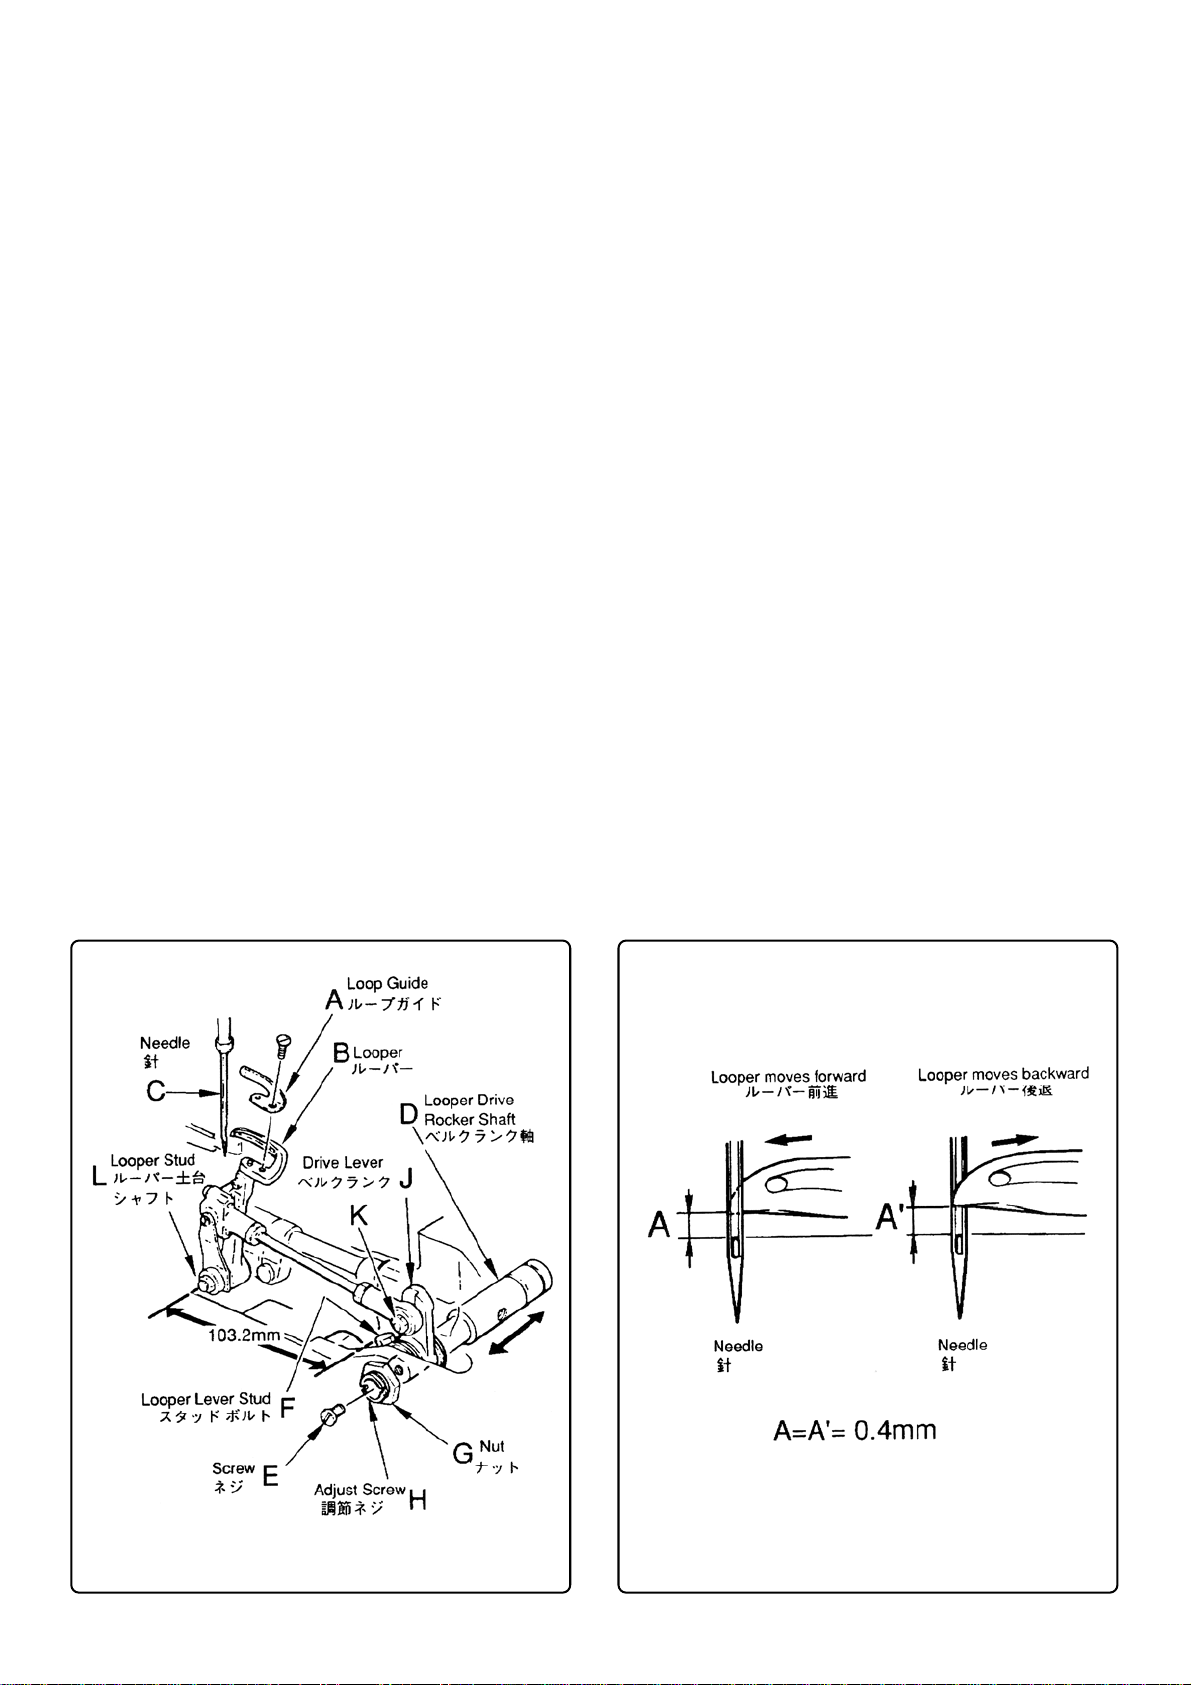
1Looper(ルーパーの調整)・・・・・・・・・・・・・・・・・・・・・・・・・・・・・・・・・・・・・・・・・・・・・・・・・・・・・・・・・・・・・・・・・・・・・・・・・・5
1-1CheckofLooperTravelDistance (ルーパーの運動量)・・・・・・・・・・・・・・・・・・・・・・・・・・・・・・・・・・・5
1-2CheckofDimensionofNeedleCentertoLooperPoint
(針芯カッルーパーの先端までの寸法)・・・・・・・・・・・・・・・・・・・・・・・・・・・・・・・・・・・・・・・・・・・・・・・・・・・・6
1-3CheckofHeightofNeedleandLooper (針の高さ)・・・・・・・・・・・・・・・・・・・・・・・・・・・・・・・・・・・・・・・・・6
1-4ClearancebetweenNeedleandLooper (針とルーパーの調整)・・・・・・・・・・・・・・・・・・・・・・・・・・7
2FeedMechanism (送り関係の調整)・・・・・・・・・・・・・・・・・・・・・・・・・・・・・・・・・・・・・・・・・・・・・・・・・・・・・・・・・・・・・・・・8
2-1PositioningofFeedLiftEccentricCam (送り上下カムの位置決め)・・・・・・・・・・・・・・・・・・・・8
2-2NeedleGuideandLoopretainer (針ガイド及びループガイドの調整)・・・・・・・・・・・・・・・・・8
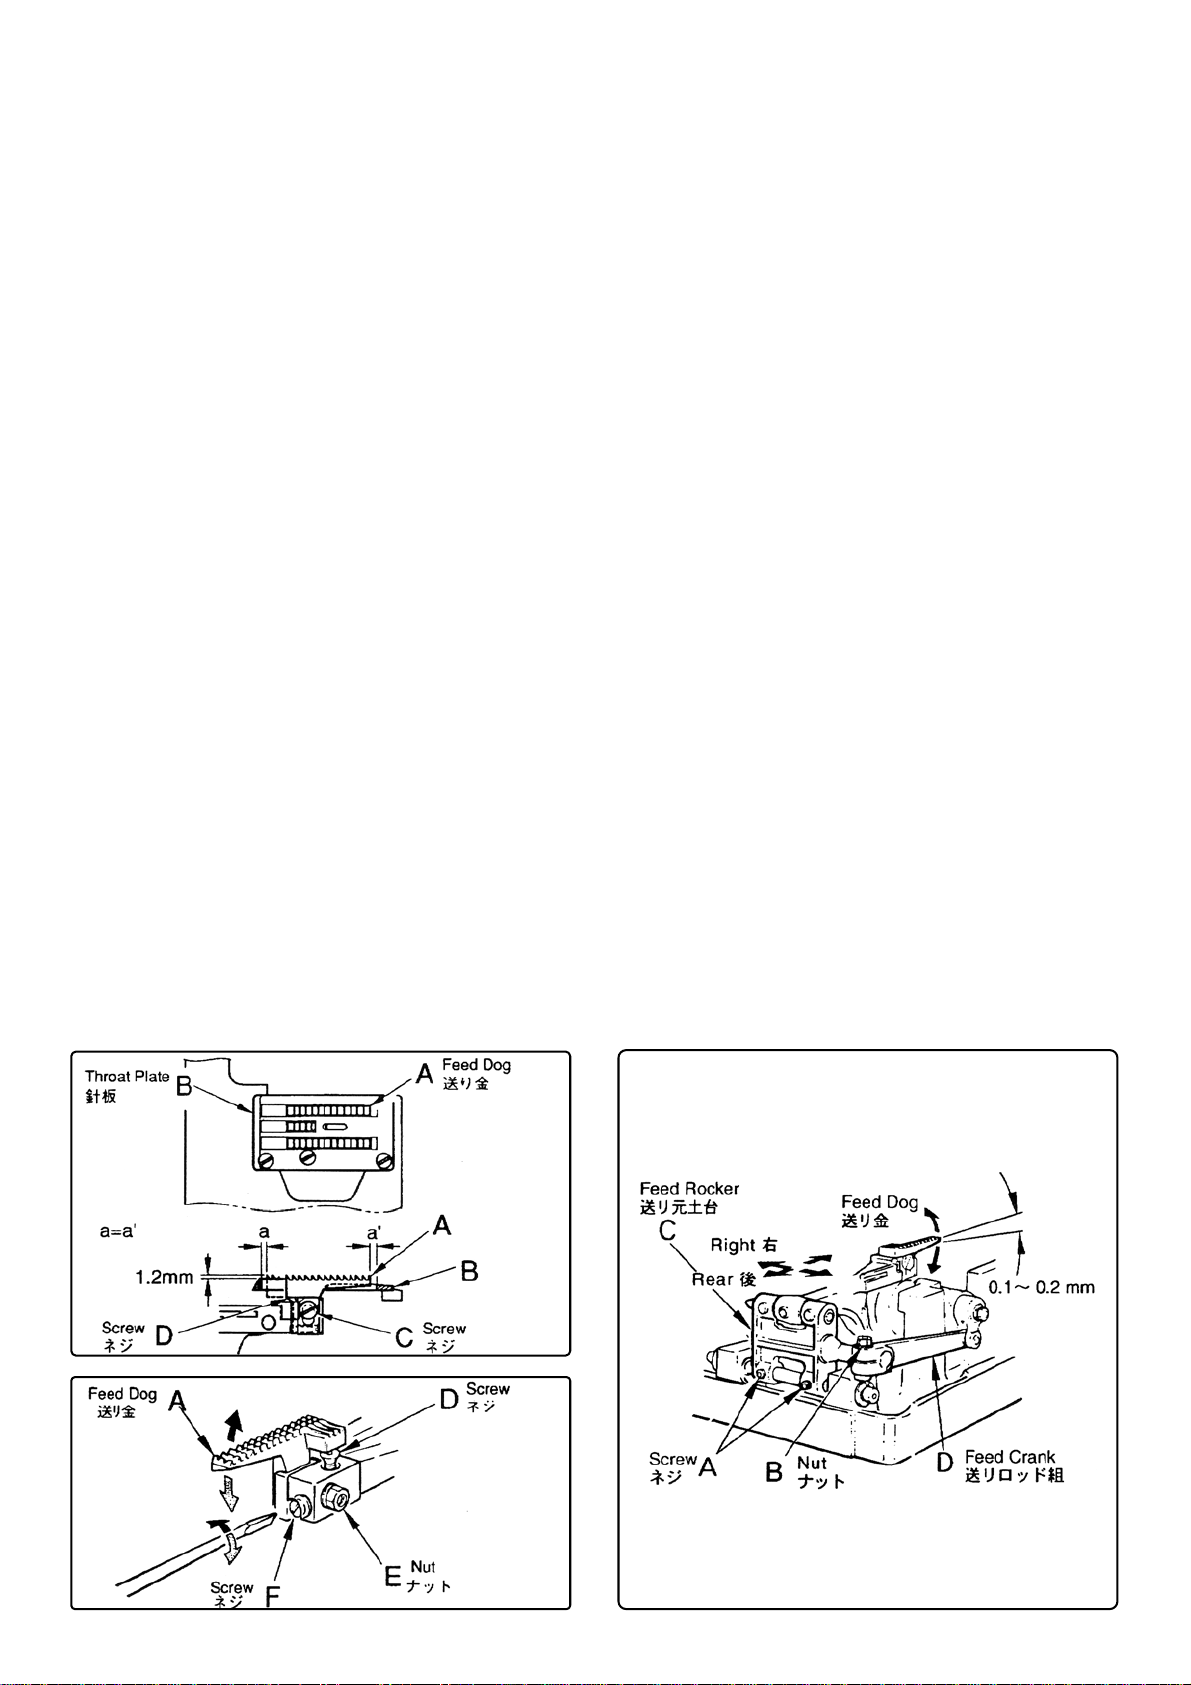
2-3FeedDog (送り金の調整) ・・・・・・・・・・・・・・・・・・・・・・・・・・・・・・・・・・・・・・・・・・・・・・・・・・・・・・・・・・・・・・・・・・・・・・・9
a)AdjustmentinCrosswiseDirection (左右の調整)・・・・・・・・・・・・・・・・・・・・・・・・・・・・・・・・・・・・・・・・・9
b)AdjustmentinLongitudinalDirection (前後の調整)・・・・・・・・・・・・・・・・・・・・・・・・・・・・・・・・・・・・・・9
c)HeightAdjustment (上下の調整)・・・・・・・・・・・・・・・・・・・・・・・・・・・・・・・・・・・・・・・・・・・・・・・・・・・・・・・・・・・・・9
2-4ChangeofStitchSpacing (縫目巾の変更) ・・・・・・・・・・・・・・・・・・・・・・・・・・・・・・・・・・・・・・・・・・・・・・・・・ 10
3PresserFoot (押え金の調整)・・・・・・・・・・・・・・・・・・・・・・・・・・・・・・・・・・・・・・・・・・・・・・・・・・・・・・・・・・・・・・・・・・・・・・・ 11
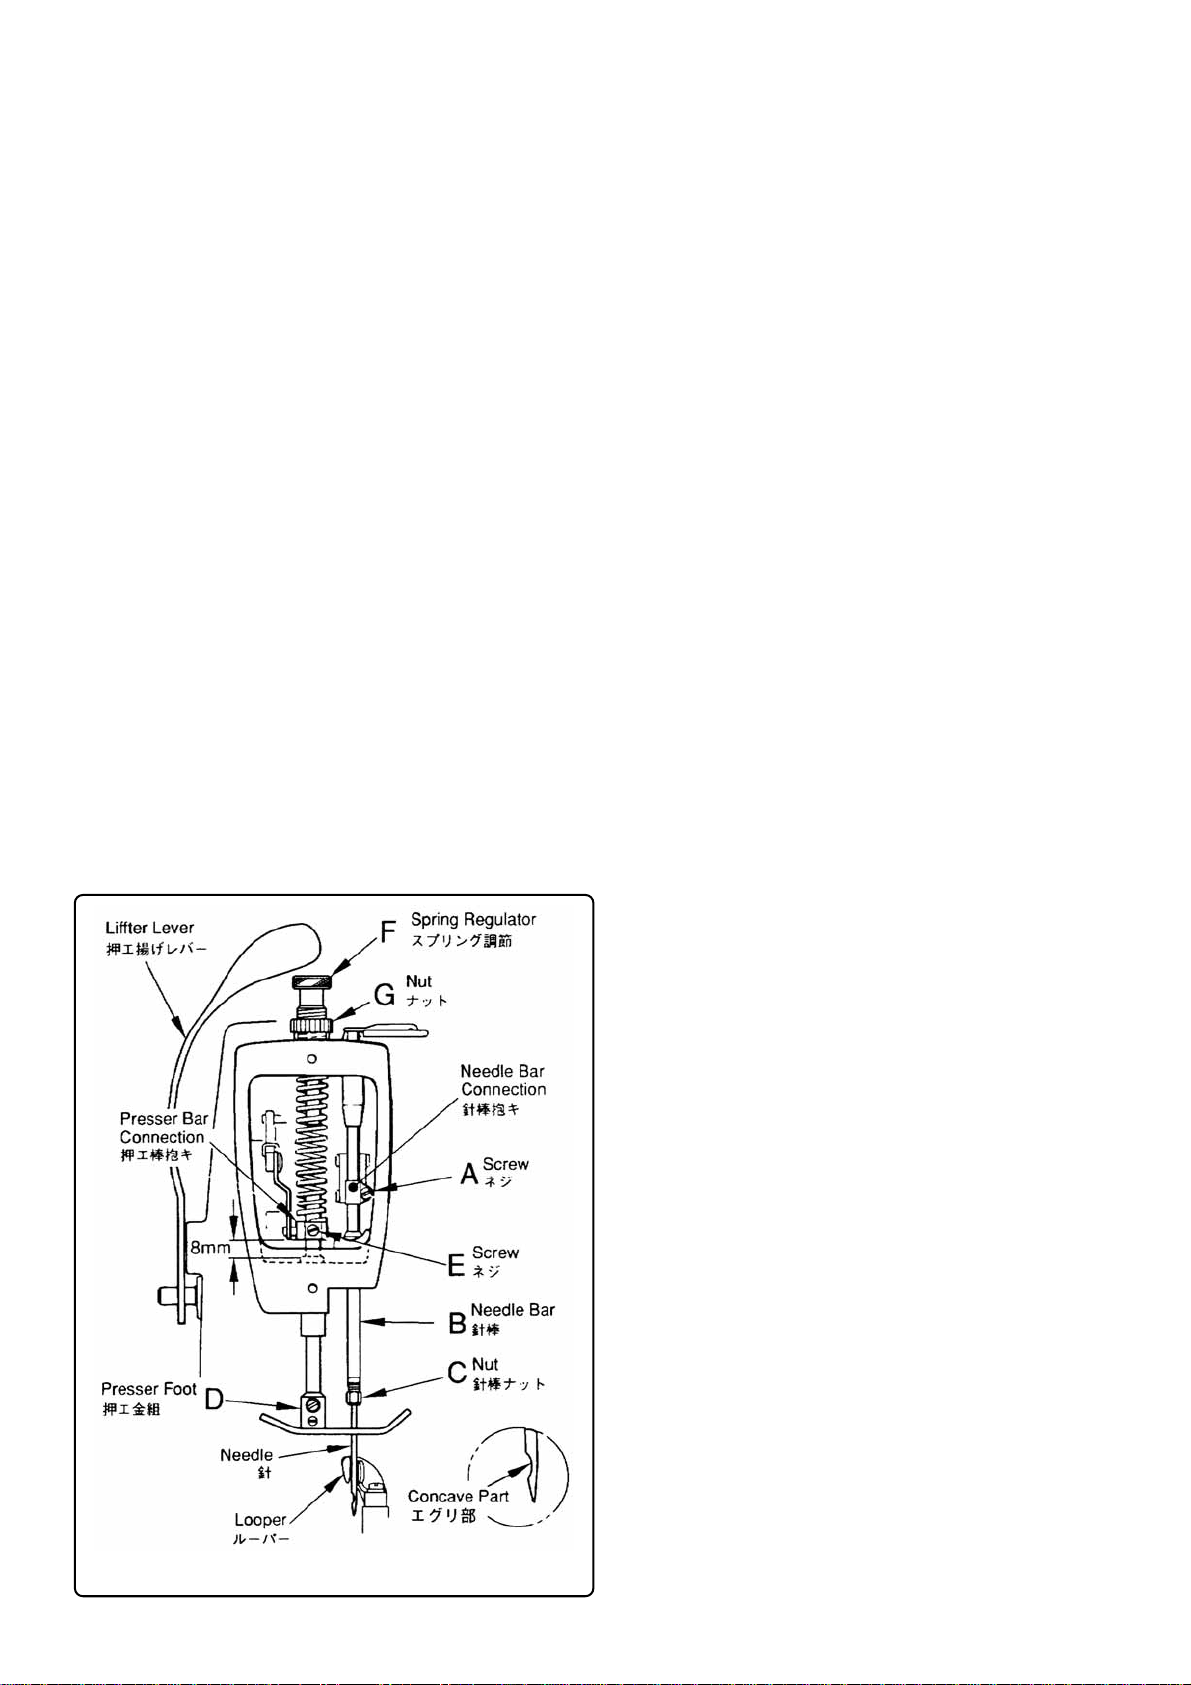
3-1PositioningofPresserBagConnection (押え棒ダキの位置決め)・・・・・・・・・・・・・・・・・・・・・・ 11
3-2PressureAdjustmentofPresserFootAss' (押え金の圧力調整)・・・・・・・・・・・・・・・・・・・・・ 11
4NeedleSetting (針の取付け方)・・・・・・・・・・・・・・・・・・・・・・・・・・・・・・・・・・・・・・・・・・・・・・・・・・・・・・・・・・・・・・・・・・・・・ 12
5.ThroatPlate (針板の交換)・・・・・・・・・・・・・・・・・・・・・・・・・・・・・・・・・・・・・・・・・・・・・・・・・・・・・・・・・・・・・・・・・・・・・・・・・・ 12
6AdjustmentforSingleThreadSewing (単環縫いの調整)・・・・・・・・・・・・・・・・・・・・・・・・・・・・・・・・・・・・・・ 13
6-1CheckofLooperTrayelDistance (ルーパーの運動量トルーパーの距離) ・・・・・・・・・・・ 13
6-2CheckHeightofNeedleBar (針棒の高さ)・・・・・・・・・・・・・・・・・・・・・・・・・・・・・・・・・・・・・・・・・・・・・・・・・ 13
6-3FixingLoopGuide (針板爪の取付け)・・・・・・・・・・・・・・・・・・・・・・・・・・・・・・・・・・・・・・・・・・・・・・・・・・・・・・・・ 13
6.TroubleShooting/ミシンのトラブルの原因と対処14,15
PartsList/部品表17〜
DiagramofScrew,Nut&Washer/ネジ、ナット、ワッシャー原寸図34,35
NumericalindexofParts/パーツ索引36〜37
CONTENTS/目次
1.Specifications/仕様 2
2.ThePointsBeforeOperation/運転前の確認 2
3.Threading/糸通し図 3
4.Lubrication/給油 4
5.Adjustment/調整 5
1Looper(ルーパーの調整)・・・・・・・・・・・・・・・・・・・・・・・・・・・・・・・・・・・・・・・・・・・・・・・・・・・・・・・・・・・・・・・・・・・・・・・・・・5
1-1CheckofLooperTravelDistance (ルーパーの運動量)・・・・・・・・・・・・・・・・・・・・・・・・・・・・・・・・・・・5
1-2CheckofDimensionofNeedleCentertoLooperPoint
(針芯カッルーパーの先端までの寸法)・・・・・・・・・・・・・・・・・・・・・・・・・・・・・・・・・・・・・・・・・・・・・・・・・・・・6
1-3CheckofHeightofNeedleandLooper (針の高さ)・・・・・・・・・・・・・・・・・・・・・・・・・・・・・・・・・・・・・・・・・6
1-4ClearancebetweenNeedleandLooper (針とルーパーの調整)・・・・・・・・・・・・・・・・・・・・・・・・・・7
2FeedMechanism (送り関係の調整)・・・・・・・・・・・・・・・・・・・・・・・・・・・・・・・・・・・・・・・・・・・・・・・・・・・・・・・・・・・・・・・・8
2-1PositioningofFeedLiftEccentricCam (送り上下カムの位置決め)・・・・・・・・・・・・・・・・・・・・8
2-2NeedleGuideandLoopretainer (針ガイド及びループガイドの調整)・・・・・・・・・・・・・・・・・8
2-3FeedDog (送り金の調整) ・・・・・・・・・・・・・・・・・・・・・・・・・・・・・・・・・・・・・・・・・・・・・・・・・・・・・・・・・・・・・・・・・・・・・・・9
a)AdjustmentinCrosswiseDirection (左右の調整)・・・・・・・・・・・・・・・・・・・・・・・・・・・・・・・・・・・・・・・・・9
b)AdjustmentinLongitudinalDirection (前後の調整)・・・・・・・・・・・・・・・・・・・・・・・・・・・・・・・・・・・・・・9
c)HeightAdjustment (上下の調整)・・・・・・・・・・・・・・・・・・・・・・・・・・・・・・・・・・・・・・・・・・・・・・・・・・・・・・・・・・・・・9
2-4ChangeofStitchSpacing (縫目巾の変更) ・・・・・・・・・・・・・・・・・・・・・・・・・・・・・・・・・・・・・・・・・・・・・・・・・ 10
3PresserFoot (押え金の調整)・・・・・・・・・・・・・・・・・・・・・・・・・・・・・・・・・・・・・・・・・・・・・・・・・・・・・・・・・・・・・・・・・・・・・・・ 11
3-1PositioningofPresserBagConnection (押え棒ダキの位置決め)・・・・・・・・・・・・・・・・・・・・・・ 11
3-2PressureAdjustmentofPresserFootAss' (押え金の圧力調整)・・・・・・・・・・・・・・・・・・・・・ 11
4NeedleSetting (針の取付け方)・・・・・・・・・・・・・・・・・・・・・・・・・・・・・・・・・・・・・・・・・・・・・・・・・・・・・・・・・・・・・・・・・・・・・ 12
5.ThroatPlate (針板の交換)・・・・・・・・・・・・・・・・・・・・・・・・・・・・・・・・・・・・・・・・・・・・・・・・・・・・・・・・・・・・・・・・・・・・・・・・・・ 12
6AdjustmentforSingleThreadSewing (単環縫いの調整)・・・・・・・・・・・・・・・・・・・・・・・・・・・・・・・・・・・・・・ 13
6-1CheckofLooperTrayelDistance (ルーパーの運動量トルーパーの距離) ・・・・・・・・・・・ 13
6-2CheckHeightofNeedleBar (針棒の高さ)・・・・・・・・・・・・・・・・・・・・・・・・・・・・・・・・・・・・・・・・・・・・・・・・・ 13
6-3FixingLoopGuide (針板爪の取付け)・・・・・・・・・・・・・・・・・・・・・・・・・・・・・・・・・・・・・・・・・・・・・・・・・・・・・・・・ 13
6.TroubleShooting/ミシンのトラブルの原因と対処14,15
PartsList/部品表17〜
DiagramofScrew,Nut&Washer/ネジ、ナット、ワッシャー原寸図34,35
NumericalindexofParts/パーツ索引36〜37
1.Specifications/仕様 2
2.ThePointsBeforeOperation/運転前の確認 2
3.Threading/糸通し 2
4.Lubrication/給油 3
5.Adjusting/調整 4
5-1NeedleSetting/針の交換 ・・・・・・・・・・・・・・・・・・・・・・・・・・・・・・・・・・・・・・・・・・・・・・・・・・・・・・・・・・・・・・・・・・・・・・・・・・・・・・・・・・・・ 4
5-2Looper/ルーパーの調整・・・・・・・・・・・・・・・・・・・・・・・・・・・・・・・・・・・・・・・・・・・・・・・・・・・・・・・・・・・・・・・・・・・・・・・・・・・・・・・・・・・・・ 5
5-2-aTimingofLooperandNeedle/針とルーパーの同調 ・・・・・・・・・・・・・・・・・・・・・・・・・・・・・・・・・・・・・・・・・ 5
5-2-bLooperStroke/ルーパーの運動量・・・・・・・・・・・・・・・・・・・・・・・・・・・・・・・・・・・・・・・・・・・・・・・・・・・・・・・・・・・・・・・ 5
5-2-cAdjustmentofLooperandNeedle/針とルーパーの距離・・・・・・・・・・・・・・・・・・・・・・・・・・・・・・・・・・ 6
5-2-dLooperandNeedle/針とルーパーの間隔 ・・・・・・・・・・・・・・・・・・・・・・・・・・・・・・・・・・・・・・・・・・・・・・・・・・・・・・・ 6
5-2-eNeedleHeight/針の高さ ・・・・・・・・・・・・・・・・・・・・・・・・・・・・・・・・・・・・・・・・・・・・・・・・・・・・・・・・・・・・・・・・・・・・・・・・・・・・・・・ 6
5-2-fMountingofLoopGuide/ループガイド・・・・・・・・・・・・・・・・・・・・・・・・・・・・・・・・・・・・・・・・・・・・・・・・・・・・・・・・・・・・ 6
5-3FeedDog/送リ金の調整・・・・・・・・・・・・・・・・・・・・・・・・・・・・・・・・・・・・・・・・・・・・・・・・・・・・・・・・・・・・・・・・・・・・・・・・・・・・・・・・・・・・・・ 7
5-3-aVerticalAdjustment/上下の調整・・・・・・・・・・・・・・・・・・・・・・・・・・・・・・・・・・・・・・・・・・・・・・・・・・・・・・・・・・・・・・・・・・・ 7
5-3-bLevelAdjustment/水平の調整・・・・・・・・・・・・・・・・・・・・・・・・・・・・・・・・・・・・・・・・・・・・・・・・・・・・・・・・・・・・・・・・・・・・・・ 7
5-3-cAdjustmentinLongitudinalDirection/前後の調整・・・・・・・・・・・・・・・・・・・・・・・・・・・・・・・・・・・・・・・・・・・ 7
5-3-dAdjustmentinCrosswiseDirection/左右の調整 ・・・・・・・・・・・・・・・・・・・・・・・・・・・・・・・・・・・・・・・・・・・・・ 7
5-4ChangeofStitchingLength/縫目巾の変更 ・・・・・・・・・・・・・・・・・・・・・・・・・・・・・・・・・・・・・・・・・・・・・・・・・・・・・・・・・・・ 8
5-5NeedleGuard/針ガードの調整・・・・・・・・・・・・・・・・・・・・・・・・・・・・・・・・・・・・・・・・・・・・・・・・・・・・・・・・・・・・・・・・・・・・・・・・・・・・・ 8
5-6PresserFoot/押エ金の調整・・・・・・・・・・・・・・・・・・・・・・・・・・・・・・・・・・・・・・・・・・・・・・・・・・・・・・・・・・・・・・・・・・・・・・・・・・・・・・・・ 8
5-6-aPresserFootHeight/高さ調整 ・・・・・・・・・・・・・・・・・・・・・・・・・・・・・・・・・・・・・・・・・・・・・・・・・・・・・・・・・・・・・・・・・・・・・・ 8
5-6-bPresserFootPressure/押エ圧の調整・・・・・・・・・・・・・・・・・・・・・・・・・・・・・・・・・・・・・・・・・・・・・・・・・・・・・・・・・・・ 8
5-7ThreadTension/糸調子関係 ・・・・・・・・・・・・・・・・・・・・・・・・・・・・・・・・・・・・・・・・・・・・・・・・・・・・・・・・・・・・・・・・・・・・・・・・・・・・・・・ 9
5-7-aThreadTension/糸調子・・・・・・・・・・・・・・・・・・・・・・・・・・・・・・・・・・・・・・・・・・・・・・・・・・・・・・・・・・・・・・・・・・・・・・・・・・・・・・・・ 9
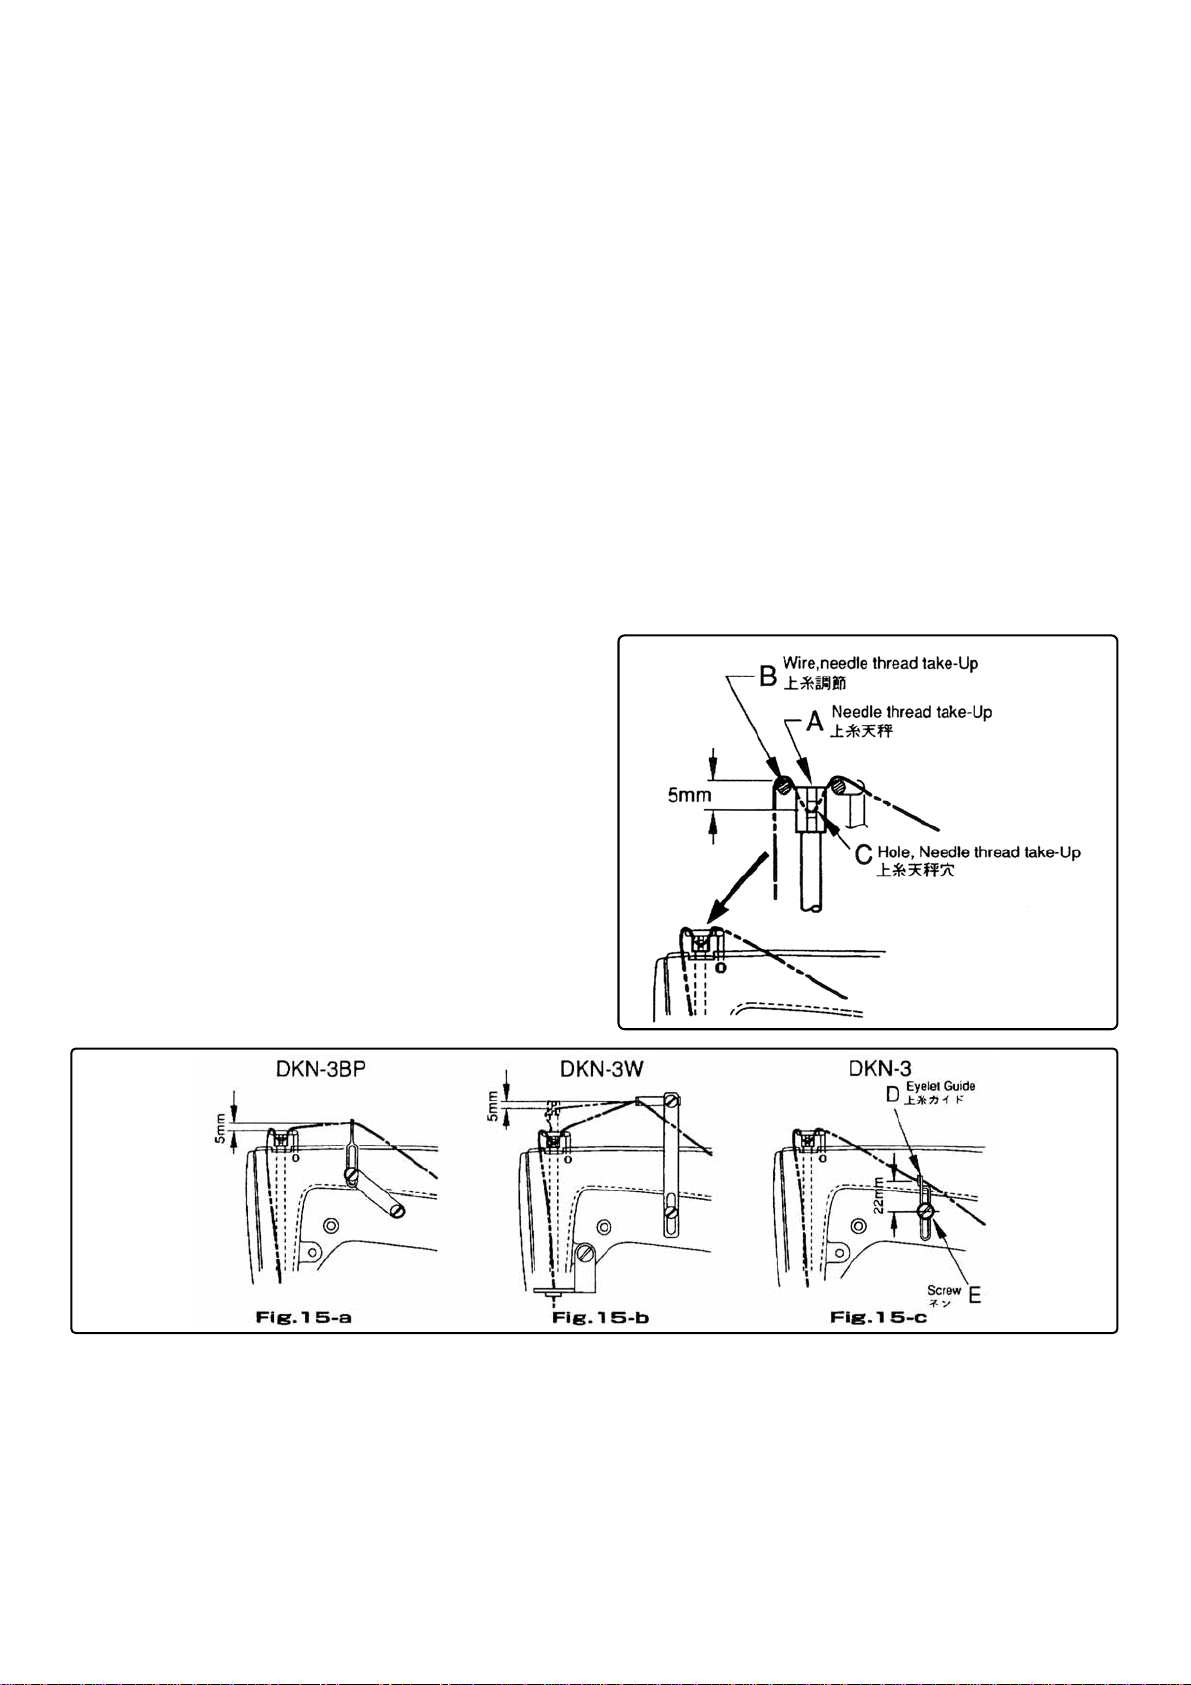
5-7-bNeedleThreadTensionandGuide/上糸調節と上糸ガイド・・・・・・・・・・・・・・・・・・・・・・・・・・・・・・・・ 9
6.Cautionswhenusingthemachine/使用上の注意事項 9
7.Troubleshooting/ミシンのトラブルの原因と対処 10、11
8.PartsList/部品表 13〜
9.NUMERICALINDEXOFPARTS/パーツ索引 31、32
1.DIAGRAMOFSCREW,NUT&WASHER/ネジ、ナット、ワッシャー一覧図 33、34
1