NO DIG VM500 User manual
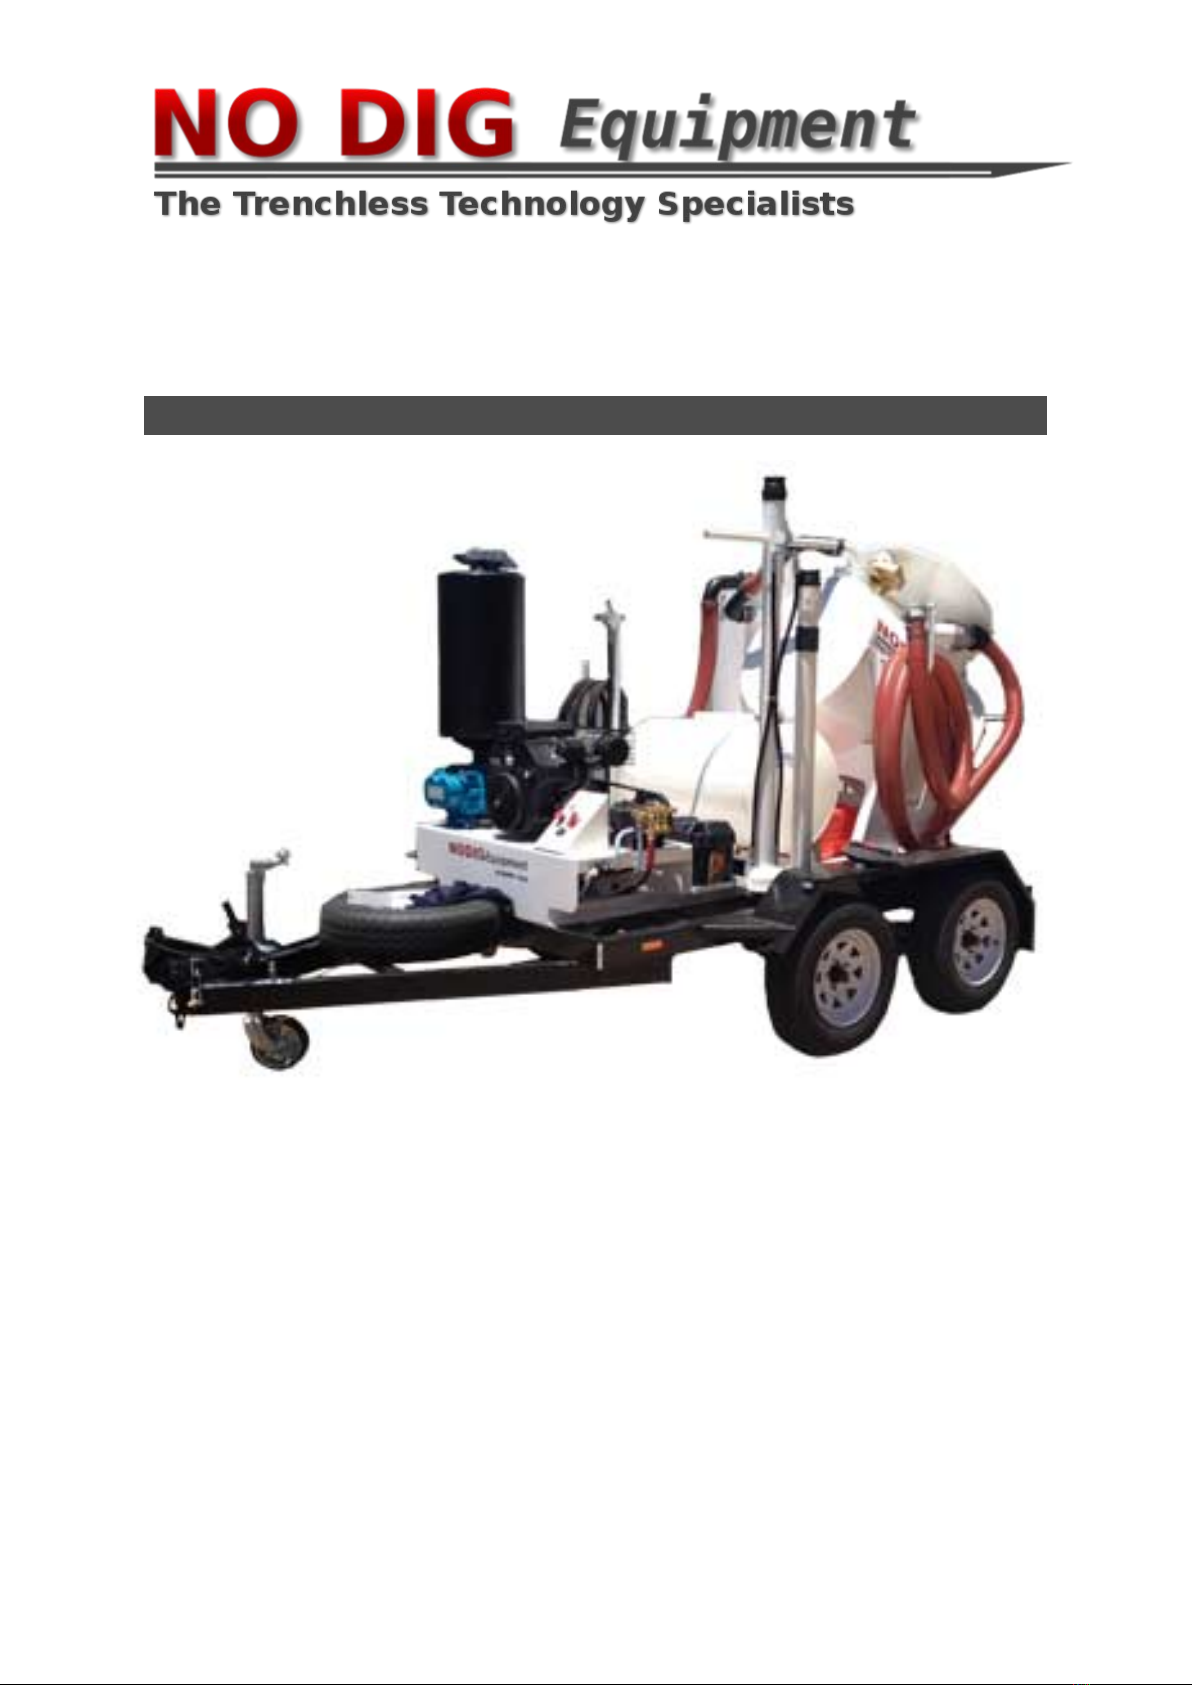
VM500
Vacuum Excavation System
Directional Boring Mud Slurry Clean-Up
Pot oling to Locate Buried Utilities
Valve Box, Catc Basin, Manway Cleanout
1

Owners Manual
Table of Contents
Important................................................................................................................................ 3
Safety Precautions – Summary..............................................................................................4
Towing................................................................................................................................4
Parking & Set-up.................................................................................................................4
Operating En ironment.......................................................................................................4
Operating Water Blaster......................................................................................................4
Operating Vacuum Sucker..................................................................................................4
Emptying Storage Tank......................................................................................................4
Machine O er iew.................................................................................................................. 5
Operating Principles...............................................................................................................6
Operating Instructions............................................................................................................7
Towing the Vacuum Exca ator...........................................................................................7
Parking and Set-Up.............................................................................................................9
Operating En ironment.....................................................................................................10
Operating Vacuum Exca ator...........................................................................................11
Operating Water Blaster....................................................................................................15
End of Day (Shift) Ser icing of the Vacuum Machine........................................................17
Trouble Shooting Guide........................................................................................................18
Determining Tank Fill Le el..................................................................................................19
Daily (Shift) Pre-Start Checklist............................................................................................20
Pre-Start – Towing............................................................................................................20
Pre-Start – Operational Set-Up.........................................................................................20
Pre-Start – Water Blaster..................................................................................................20
Pre-Start – Vacuum Exca ation........................................................................................21
Pre-Start – Collection Drum Emptying..............................................................................21
Operational Risk Assessment...............................................................................................22
2

Important
Read all safety precautions and instructions carefully before operating this equipment. Refer
to specific instructions on how to tow, set up, operate and empty the Spoil Tank. The
machine must only be operated by an adult person who has both the physical and mental
capacity to do so.
Ensure that the machine is shutdown prior to trying to perform any maintenance tasks on it.
Whilst this machine has a wide ariety of capacities it is not intended to be used for any of
the following purposes: -
Water blasting or acuum exca ation of any strongly acidic or alkaline solids or
liquids;
Vacuum exca ation of materials such as asbestos fibres or other similar hazardous
materials;
Vacuum sucking of any flammable or combustible liquid or solid where the mixture of
a high quantity of air may lead to either a combustible or explosi e atmosphere;
Vacuum exca ation of “contaminated wastes” such as human or animal effluent, food
grease traps etc. as the machine is not designed or licensed to perform such tasks;
Water blasting of people or animals or water blasting near where people or animals
are likely to walk or stand.
Warranty co erage for the machine is in accordance with the Australian Consumer
Guarantee under the Competition and Consumer Act 2010 (the "Act"). As such, no warranty
co er is pro ided to damage caused to the machine by operator error or omission or from
incorrect towing or ehicular accident. Refer to correct operating instructions detailed in this
manual.
With correct operation, maintenance and care, the VM500 Vacuum Exca ator is designed
for many hours of operating use. If it does not function correctly, please consult the fault
finder list for potential causes and remedies. If that fails to resol e the issue, please contact
our maintenance department for assistance.
_________________________________________________________________________
Model No: _______________
Serial Number: _______________
Purchase Date: ____ / ____ / 20__
Original Purchaser: _______________
3

Safety Precautions – Summary
The following safety precautions must be obser ed with the VM500 Vacuum Exca ator: -
Towing Parking & Set-up
The towing ehicle must ha e:-
A two (2) tonne towing capacity;
50mm tow ball.
Standard trailer electrical
connections.
Maximum Towing Speeds: -
80 km/hr on sealed roads;
60 km/hr on unsealed / rough roads.
Before dri ing off: -
Attach safety chains;
Raise and stow trailer jockey wheel;
Release handbrake & stow wheel
chocks.
When parking and setting up: -
Do not park on a tilt angle greater
than 20 degrees lean angle in any
trailer direction;
Apply the trailer (and if attached, the
ehicle) park brake;
Lower the trailer jockey wheel;
Install wheel chocks.
Do not park in a situation that will: -
Cause a traffic hazard;
Interfere with other workplace
machines;
Be hazardous to pedestrians.
Operating Environment Operating Water Blaster
The exhaust gases from the machine
engine are toxic. Hence: -
Do not operate in a fully
or partially enclosed building such
as a warehouse or building
basement, unless sufficient fresh air
is a ailable
The noise from the operating machine is
high, therefore: -
Do not operate in areas at time
where noise restrictions apply.
Whilst water blasting, do not blast: -
Any person or animal with the water
blast;
Too close or at an angle to the
ground in a manner that produces a
lot of blow back.
Do wear: -
Fully enclosed footwear;
Long trousers;
Sealed safety glasses or goggles.
Operating Vacuum Sucker Emptying Storage Tank
Whilst acuuming, Do Not: -
Bring the end of the suction nozzle
into contact with a person’s skin;
Plunge suck into either a liquid or
solids as the suction action will stop;
Collect acidic, alkaline, flammable
or combustible materials or
controlled waste.
Do: -
Suck up material dislodged by the
water blaster;
At a maximum, only half co er the
end of the suction hose nozzle.
Prepare for storage tank emptying by: -
Positioning trailer in suitable dump
location;
Drain liquids first by drain al e.
Open the dump door by: -
Unlocking the door whilst the
acuum pump is still on;
Stand clear and turn off acuum
pump. Door will swing open by
itself.
Wash out tank with water blaster.
4
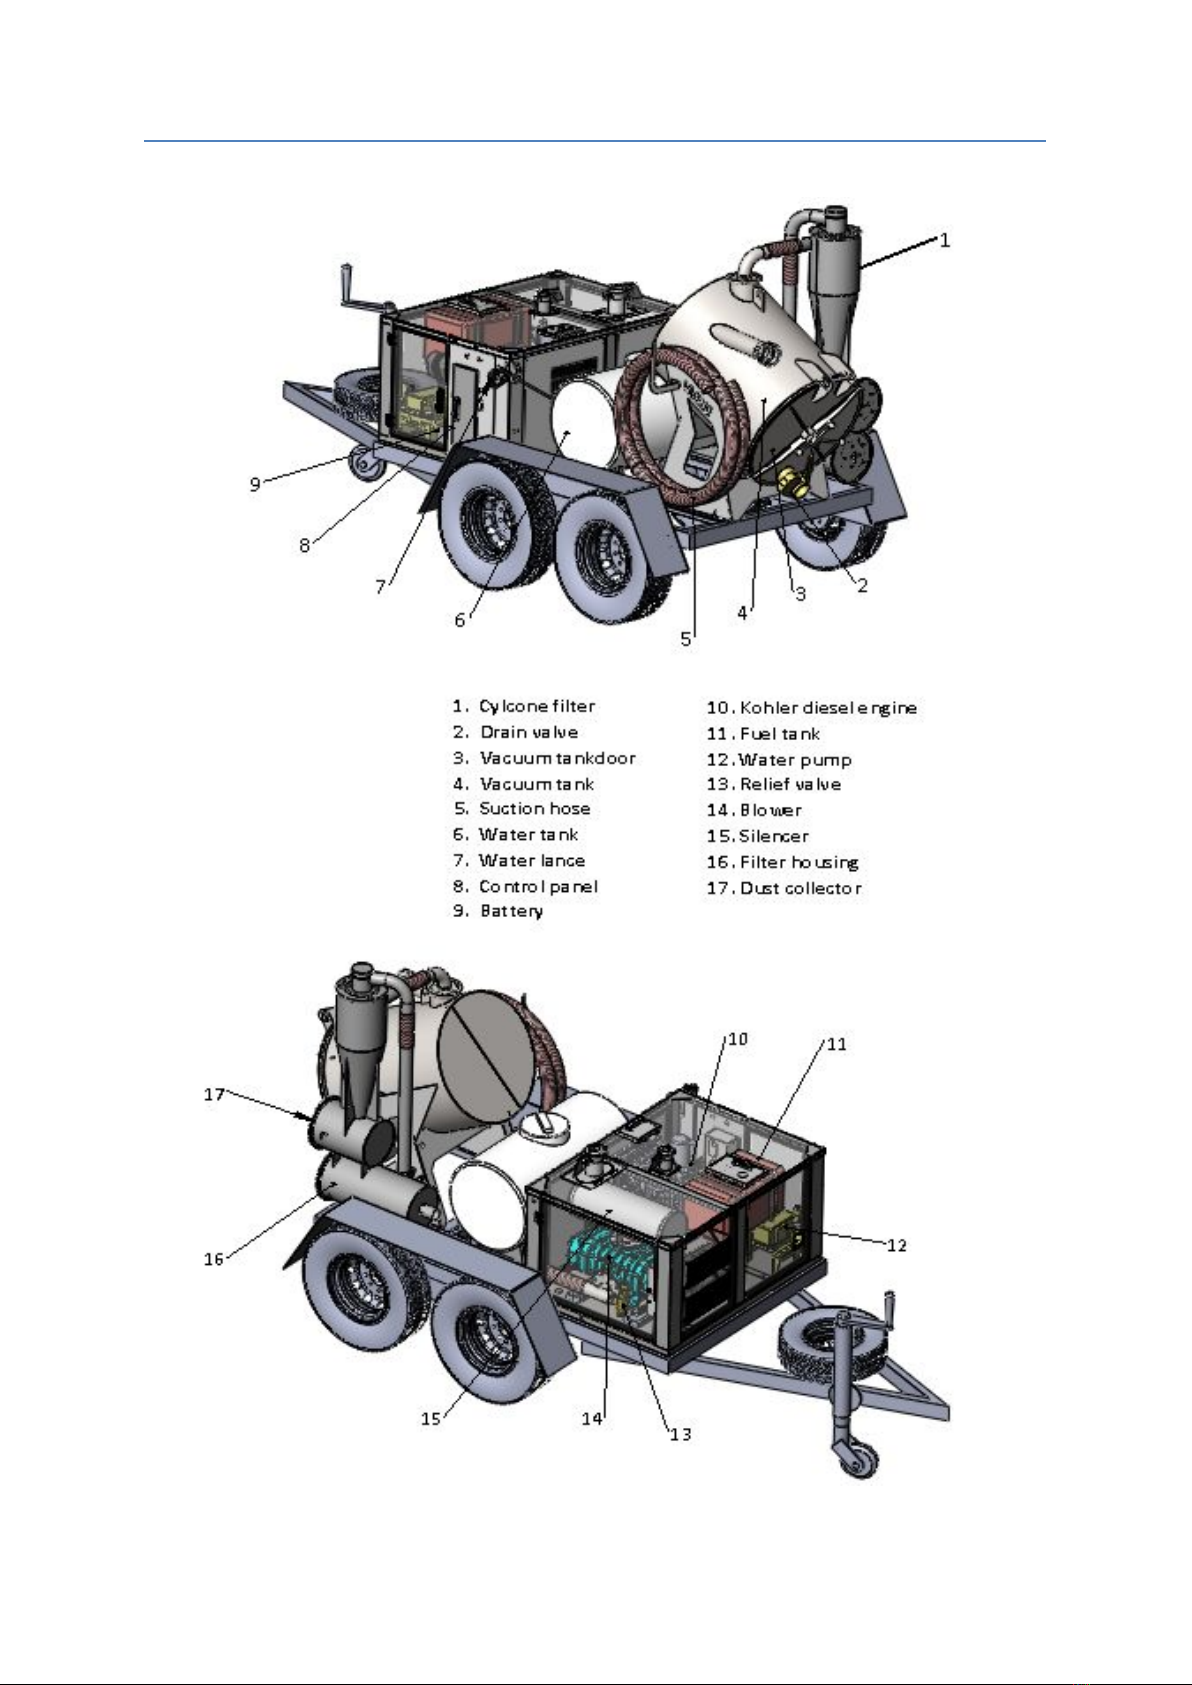
Machine Overview
5

Operating Principles
The Vacuum Exca ator works on the principle of air elocity in order to produce suction at
the end of the hose nozzle. Therefore if the end of the suction hose is fully plunged into
either a solid or liquid no air flow will occur and there will be no suction.
The acuum system uses a 3 stage filtration system in order to filter dirt from the air stream.
Firstly solid or liquid material is drawn into the air stream at the end of the suction hose and
tra els to the collection tank. Due to a sudden change in olume in the tank, the air speed
dramatically drops and the solid or liquid material falls out of the air stream into the collection
tank.
Second filtration is by cyclone to remo e any course dust particles.
Then the third and final stage remo es dust from the airstream ia a cartridge type air filter.
Air flow through the whole air circuit is important to ensure that suction is maintained. It is
critical not to o erload the filters in the air stream circuit. This is best achie ed by not sucking
dry material into the machine. Therefore always use water to break up the ground to be
sucked away by using the in-built water blaster.
The “No-Dig” action of the machine is achie ed by firstly wetting, loosening and breaking up
tight hard ground with the water blaster and then sucking away the loosened ground with the
acuum hose. The machine is primarily designed as a two person operation where one
person is performing the water blasting operation whilst the other is acuuming away the
loosened material.
The primary design intent of the machine is to loosen and suck away ground and small rocks
around buried ser ices or in tight work areas.
The machine is not designed or intended to for acuuming toxic or hazardous material. In
case of accidental contact with toxic or hazardous material use appropriate dumping and
clean out procedures.
6

Operating Instructions
Towing the Vacuum Excavator
Task Step Key Points
Trailer
inspection
1. Complete a trailer
inspection using the
checklist on the right.
ACTIVITY
Check that the following items on
the trailer: -
Any obvious damage to the
trailer structure
The tyres are correctly inflated
The wheel nuts are tight
The handbrake is operational
The safety chains are in good
order
All trailer lights are in good
condition
The wheel chocks are available
DANGER!!!
Do not tow the trailer if any
faults are found.
Towing vehicle
inspection
1. Complete a towing ehicle
inspection using the
checklist on the right.
ACTIVITY
Check that the following items on
the towing vehicle: -
Minimum towing capacity of 2T
50mm tow ball hitch with safety
chain connection rings
Trailer lights connection
Correct vehicle tow height for
the trailer
DANGER!!!
Do not tow the trailer with an
undersized towing capacity
ehicle.
Connect Trailer
to towing vehicle
1. Raise the trailer tow hitch
to abo e the height of the
ehicle tow ball.
Wind the jockey wheel handle in order to
raise the trailer hitch to be just slightly
higher than the trailer tow ball.
2. Position tow ball under the
trailer tow hitch.
Either back the ehicle or mo e the trailer
into the correct position. Be aware that the
trailer is ery hea y and difficult to mo e.
Apply hand brake on towing ehicle.
3. Lower the trailer hitch onto
the ehicle tow ball.
Wind the jockey wheel handle in order to
lower the trailer hitch onto the towing
ehicle tow ball. Remember to open the
trailer tow ball hitch to allow the ball to
fully engage with the hitch.
Secure tow ball hitch and lock out.
7

Task Step Key Points
4. Stow the jockey wheel. With the trailer correctly connected to the
trailer, release the jockey wheel clamp
and swing the jockey wheel 900 to ensure
it is clear of road.
5. Connect the safety chains. Connect the safety chains on the trailer to
the connection links on the towing ehicle
tow hitch.
6. Connect the electrical
connections.
Connect the trailer electrical connections
to the towing ehicle and check for correct
brake light and indicator light operation.
7. Stow wheel chocks. Collect the wheel chocks from the ground
and stow in brackets on the trailer.
8. Release the trailer
handbrake.
Operate the trailer handbrake le er and
ensure that the brakes are released.
DANGER!!!
Ensure that the re ersing arm is
returned to open position to
enable the trailer brakes to auto
operate.
Towing Trailer 1. Test ehicle / trailer
brakes.
If possible on a flat good road surface,
test that the towing ehicle can brake and
hold the Trailer
DANGER!!!
If the towing ehicle is ha ing
trouble being able to brake with
the load of the Vacuum machine
trailer then do not tow further.
2. Tow at a safe road speed. NOTE
The Vacuum Exca ator and
trailer ha e poor aerodynamics
and when the drum has contents
in it, it has a high centre of
gra ity
Only tow the VM500 Vacuum Machine
trailer at the following maximum speeds: -
80 km/hr on good sealed roads.
60 km/hr on unsealed or poor
condition sealed roads.
If strong cross winds or slippery roads,
reduce speed to a lower safer speed.
3. Trailer o erride brakes will
assist in braking the trailer.
REMEMBER!!!
The trailer is fitted with override
brakes that will assist in the
overall braking effort but can
produce jerks in stop-start traffic
8

Parking an Set-Up
Task Step Key Points
Positioning the
Trailer for
operation
1. Position trailer with towing
ehicle.
Use the towing ehicle to position the
Vacuum Machine in the correct location.
2. Install o erride-brake
locking latch if re ersing.
Prior o re ersing the trailer into position it
is necessary to swing the re ersing lea er
on the trailer hitch into position to pre ent
trailer brakes engaging whilst re ersing.
3. Check for reasonably
le el surface. No greater
than 200 lean angle.
Both the engine and the blower ha e
lubricating oil sumps in them. If the trailer
is parked at an angle of greater than 200
then oil star ation and equipment damage
can occur.
4. Apply towing ehicle and
trailer park brake.
Apply towing ehicle handbrake from
inside the ehicle and then apply the
trailer hand brake.
5. Install trailer wheel chocks Collect trailer wheel chocks from the
trailer and position under the trailer
wheels in the direction of most likely trailer
mo ement.
6. Lower jockey wheel. If detaching the towing ehicle from the
trailer, release the jockey wheel bracket,
swing down 900. Wind down jockey wheel
until it is touching the ground.
7. Disconnect the trailer from
the towing ehicle if
required.
The Vacuum Machine trailer can remain
attached to the towing ehicle or detached
if required.
ACTIVITY
If you wish to detach the towing
vehicle then: -
Disconnect the electrical
connection
Disconnect the safety chains
Release tow ball on trailer tow
hitch
Wind up jockey wheel until the
tow hitch clears the tow ball
Drive towing vehicle away
9

Operating Environment
Task Step Key Points
Check for
adequate fresh
air in operational
area
1. Check that the operating
area has adequate fresh
air.
DANGER!!!
DO NOT operate the Vacuum
Machine in an enclosed or mostly
enclosed building, tank or
underground basement without
providing adequate fresh air to
the operator’s position
Note The engine exhaust
gases are toxic.
ACTIVITY
If used in an operating area
where fan forced fresh air is
provided to the operator’s,
ensure that they also wear a gas
monitor for: -
High levels of Carbon
Monoxide and Carbon Dioxide;
Low levels of Oxygen
Operating Noise 1. Both the engine and
blower make loud
industrial noise.
Consider the impact of the operating
noise of the Vacuum Machine if used in
an area near residential, office or
shopping areas.
Also some planned work locations may
ha e night time noise restrictions.
10
Operating Vacuum Excavator
Task Step Key Points
Perform pre-
start check
1. Perform pre-start check of
the trailer engine and
blower.
ACTIVITY
Complete the Engine and Blower
pre-start check list section of the
Vacuum Excavator
Lay out suction
hose
1. Set up the suction hose
and connect to the
collection drum.
Unroll the suction hose from the machine
and lay it out on the ground. Ensure that it
is not forced around tight corners that will
damage the hose.
Attach the suction hose to the collection
drum using the Camlock fittings.
REMEMBER!!!
The suction hose is heavy duty
and heavy to lift Best performed
as a two person operation
Start the engine 1. Start the engine in order
to pro ide power to dri e
the blower.
ACTIVITY
Start the trailer engine by: -
Turn the battery isolator on
Rotate Emergency Stop to off
(out) position
Check for adequate fuel and
turn fuel lever to half
If petrol engine set the choke if
the engine is cold
Turn and hold the ignition key
in the “on” position until the
engine starts Let go of the key
If the engine is cold, allow it to
warm up for several minutes
When the engine is warm, bring
the operating speed up to full
speed
Vacuum
Excavation
1. Wear correct Personal
Protecti e Equipment
(PPE).
The combined operation of water blasting
and acuum exca ation can generate
blow back of high elocity particles.
The operator and persons nearby shall
wear: -
Face shield;
Ear plugs or muffs;
Industrial clothing or o eralls;
Closed in footwear.
2. Two Person operation NOTE
The removal of ground material
using the Vacuum Excavator is
best performed as a two person
team
One person operates the water
blaster, whilst the other the
vacuum hose / nozzle
11

Task Step Key Points
3. Initial ground breaking. First operate the water blaster from a
distance to wet the ground or completely
wet it with a garden hose. This will
minimise dust generation.
As the ground becomes wetter, bring the
water blaster nozzle closer to the ground
surface, but not too close to cause
extensi e splash back.
When loose ground is produced by the
water blaster, acuum it away with the
acuum hose nozzle with a maximum of
50% of the nozzle in the material.
DO NOT plunge the nozzle completely
into the ground as this will result in loss of
acuum and thus no material remo al.
REMEMBER!!!
DO NOT suck dry dusty ground
material, otherwise the machine
dust filters will become clogged
resulting in reduced or no
suction
4. Working the exposed
face.
When the initial section of material has
been remo ed, it will form an edge.
It is best for the water blaster operator to
blast and break away the exposed edge
whilst the acuum hose operator sucks
away the loosened material.
Reduced suction 1. Operator notices reduced
or no suction.
ACTIVITY
If reduced suction is noticed,
check the following: -
Suction nozzle is completely
covered Remove whatever is
covering the nozzle DO NOT
plunge the complete nozzle in
solids or liquids
Blocked suction hose A large
object may have lodged in the
suction hose and a blockage
has built up around it Shut
down the engine, remove the
suction hose and remove
blockage
Engine speed has dropped or
stopped Check if the engine
has run out of fuel
Full collection drum Empty the
drum
Blocked filter Shut down the
machine, remove and clean the
filter
Added length of suction hose
Reduce suction hose length to
standard supplied length
12

Task Step Key Points
Shutting down
the Vacuum
Excavator
1. Shut down water blaster. Switch off the water pump on the control
panel in order to stop the water blaster.
2. Empty the suction line. Lay the suction hose down with the nozzle
completely open to allow any material in
the suction hose to be sucked into the
collection drum.
3. Shut down engine.
(Lea e it on if material
discharge is going to
occur at current work
location)
Lower the engine speed to idle. After 10
seconds at idle, turn the ignition key to the
off position.
Emptying the
storage drum 1. Choose the discharge
location.
The material storage drum can be
emptied at the work location or towed to a
different location.
NOTE
If the trailer is going to be towed
to a different location for
emptying, always following the
towing instructions detailed
earlier in this manual
Also stow water blasting and
suction hoses as detailed below
2. Decide on liquid or solid
material release.
Dependent on what has been sucked into
the storage drum; choose a liquid release
instead of a solid release.
3. Mainly or initial LIQUID
release.
ACTIVITY
If mainly or initially a LIQUID
release then:-
Return the engine to idle and
switch off
Move to the rear of the
collection drum and slowly
open the gate valve and allow
the liquid to drain
4. Mainly SOLID material
release.
ACTIVITY
If mainly SOLID material release:
Ensure that the engine is at full
speed in order to achieve full
suction
Move to the rear of the
collection drum and unscrew
the central door handle until it
is completely released As long
as suction is being maintained,
the door will remain closed
Whilst no person is standing in
front of the door, return to the
engine, reduce the speed to
idle then switch it off
The drum door should open by
itself and the solid material
should discharge
13

Task Step Key Points
5. Washing inside of the
collection drum.
Use the water blaster to wash out any
remaining material.
NOTE
Do not water blast the rubber seal
at the end of the drum, otherwise
the seal can become damaged
and prevent correct vacuum seal
for the next operation
DANGER!!!
Do not enter the inside of the
collection drum without following
correct Confined Space entry
procedures
6. Lea e collection drum
door open to allow drum
to dry out.
If desired the drum door can be left open
to allow it to dry out.
DANGER!!!
Ensure that no member of the
public can access the open drum
Closing the
drum door
1. Correct body position The drum door is best closed by standing
directly behind the middle of the door.
2. Push the door shut. Using one foot lodged in the discharge of
the discharge al e, push the door shut
and engage the door locking handle.
DANGER!!!
Be aware of the pinch point area
between the door and the drum
Keep all hands and fingers clear
of this area
3. Fully close the door with
the locking screw.
When the locking screw is engaged, the
door can be fully closed by winding the
locking handle in until it is tight.
Packing up
hosing
1. Disconnect and pack
away suction hose.
Disconnect the suction nozzle from the
suction hose and stow it
The suction hose can remain connected
to the tank and coil up hose on the
pro ided hook.
REMEMBER!!!
The suction hose is heavy duty
and heavy to lift Best performed
as a two person operation
2. Disconnect and pack
away water blaster.
Disconnect the water blaster gun from the
hose and stow it.
Wind up the water blaster hose onto the
hose holding area.
14

Operating Water Blaster
Task Step Key Points
Perform a pre-
start check
1. Perform pre-start check of
the water blaster.
ACTIVITY
Complete the Water Blaster pre-
start check list section of the
Vacuum Excavator
Lay out pressure
hose and attach
water gun
1. Set up water pressure
hose and gun.
Uncoil water pressure hose from the
machine and lay it out on the ground.
Ensure that no kinks are made in the
hose.
Attach the water gun to the end of the
hose using the quick connect fittings.
Start the engine 1. Start the engine in order
to pro ide power to dri e
the high pressure water
pump.
Start the trailer engine as detailed in the
“Vacuum Exca ation” operating
instructions. Allow the engine to warm up.
Bring engine speed up to full.
Water Blasting 1. Wear correct Personal
Protecti e Equipment
(PPE).
The operation of water blasting can
generate blow back of high elocity
particles.
The operator & persons nearby shall
wear: -
Face shield
Ear plugs or muffs
Industrial clothing or o eralls
Closed in footwear
2. Engage the water pump
ia the control panel.
Engage the water pump by switching the
electric clutch to the “On” position on the
control panel.
3. Operate the trigger on the
water gun.
Operate the trigger on the water gun to
commence blasting operations.
4. Water blast at the correct
angle to exposed face.
The water blasting action will work best if
performed at a slight angle from the
ertical and “biting” away slowly from the
exposed face.
5. DO NOT water blast
people or animals.
DANGER!!!
Water blasting can cause injury
to persons
DO NOT water blast any part of a
person’s body or use it to wash
6. Do not run water pump
dry.
Always ensure that there is adequate
water in the water tank prior to operation
of the water blaster. Damage will occur to
the water pump if it is run dry.
7. Shut down water pump
when water blasting has
been completed.
If no further water blasting is going to
occur for a period of time, shut down the
water pump by switching the electric
clutch to the “Off” position.
Damage will occur to the water pump if no
flow occurs for an extended period of
time.
15

Task Step Key Points
Completed
Water Blasting
1. Switch off water pump. When water blasting has been completed,
switch water pump to the “Off” position.
2. Disconnect water Lance Disconnect the water blasting gun from
the hose using the quick connect
coupling.
Stow water blasting gun on trailer.
3. Stow water blasting hose. Wind up and stow the water blasting hose
on the trailer. Ensure the hose is not
kinked whilst stowing it.
16

En of Day (Shift) Servicing of the Vacuum Machine
Task Step Key Points
End of day
(shift) servicing 1. Shutdown and if required
isolate the engine, using
battery isolator.
DANGER!!!
The machine drive engine must
be shut down If required by your
worksite, switch off battery
isolator and lock it out prior to
performing any servicing tasks
2. Clean the blower pre-
filters
The blower is protected by a cyclone pre-
filter and final cartridge filter.
3. Cleaning cyclone filter. Remo e the co er door & place to one
side. The chamber may ha e some
collected dust.
Sweep the dust out with a brush.
If this chamber has a lot of dust in it, the
suction work has been performed “too
dry”. Next time use more water.
Replace the co er door.
4. Cleaning filter cartridge. Remo e co er door & place to one side.
Remo e the cartridge filter and at a
separate location either blow it clean with
compressed air (max pressure 100 kPa)
or wash it with a garden hose. Do not use
the water blaster.
If washed allow the filter to dry before
reinstalling.
NOTE
DO NOT bang filter cartridge on
ground to clean it, as it will
damage the filter and potentially
cause damage to the blower
5. Reinstall filter cartridge. When the filter cartridge is clean and dry,
reinstall into the chamber and replace the
co er door.
6. Refill the water tank. For most work tasks the water tank has
sufficient quantity of water to last one
waste tank fill.
Refill the tank with water as required. Only
use clean water to fill the tank and do not
add any detergents etc.
Check and if necessary clean the water
filter.
7. Refill engine fuel tank. For most work tasks the fuel tank has
enough fuel to last one day or shift.
Refill the fuel tank with the correct fuel at
the end of the working day.
8. Conduct a general
condition check.
Conduct a general condition check of the
machine looking for oil leaks, damaged
hoses, flat tyres etc.
17

Trouble Shooting Guide
If your Vacuum Machine fails to function correctly, refer to the following table for potential
issues and solutions.
Symptom Cause Solution
1. Engine does not turn
over.
a) Low or dead battery
b) Corroded or bad connections
c) Faulty ignition switch
d) Faulty starter motor
e) Seized blower
a) Charge or replace battery
b) Clean or replace connections
c) Replace ignition switch
d) Replace starter motor
e) Clean out or replace blower.
2. Engine does not start
a) Emergency Stop pressed in
b) Battery Isolator
c) Empty uel tank
d) Fuel line disconnected
e) Dirty uel ilter
) Faulty uel pump
g) Faulty spark / glow plugs
h) Faulty ignition coil
a) Release Emergency Stop
b) Open Battery Isolator switch
c) Re ill uel tank
d) Connect uel line
e) Replace uel ilter
) Replace uel pump
g) Replace spark / glow plugs
h) Replace ignition coil
3. Engine lugs or stalls
a) Empty uel tank
b) Engine speed too low
c) Vacuum relie blocked or set
too high
d) Air ilter blocked
a) Re ill uel tank
b) Increase engine speed to 3600 RPM
c) Clean relie area or readjust relie
setting
d) Clean or replace air ilter
4. No water pressure
a) Water pump not switched on
b) Water tank empty
c) Water ilter blocked
d) Water nozzle blocked
e) Air in water system
) Water pump not turning
g) Blocked water supply hose
h) Faulty water pump
a) Switch on water pump
b) Re ill water tank
c) Clean or replace water ilter
d) Clean or replace nozzle
e) See #8 below
) See # 7 below
g) Clean or replace hose
h) Replace water pump
5. Low water pressure
a) Water ilter partially blocked
b) Air in the water system
c) Leak in the water system
d) Water pump turning too slow
e) Incorrect nozzle size or worn
out nozzle
a) Clean or replace water ilter
b) See #8 below
c) Repair leak
d) See #7 below
e) Replace with correct or new nozzle
6. Water pressure
fluctuates up and
down
a) Air in the water system
b) Leak in the water system
c) Water ilter partially blocked
a) See #8 below
b) Repair leak
c) Clean or replace water ilter
7. Water pump not
turning or turning too
slowl
a) Engine speed too low
b) Water pump rozen
c) Faulty water pump
a) Increase engine speed to 3600 RPM
b) Thaw out pump
c) Replace water pump
8. Air in water s stem a) Cracked ilter housing
b) Loose itting(s)
a) Replace ilter housing
b) Tighten ittings
For further assistance, please call No Dig Equipment Ser ice Department on (08) 9493 0642.
Our technician will be pleased to assist you with your questions
18

etermining Tank Fill Level
Note: applicable to trailer units only.
The VM500 is designed as a potholing machine and its general operation is suck and dump.
It can be used to cart spoil but caution must be exercised to ensure the trailer is not
o erloaded. Use the reference chart below to help determine how full of arious materials
the acuum tank can be without o erloading the trailer.
Exceeding the maximum fill le el will o erload the trailer.
To use this chart, first find the material being exca ated, if the material being exca ated is
not listed, select material with similar density. Then determine the maximum fill le el.
Material Maximum Vacuum Tank Fill Le el
Wood Chip 100%
Leaf / grass waste 100%
Water 100%
Drill Mud high water contents 100%
Sand 100%
Earth loose 100%
Limestone 100%
Asphalt 100%
Granite / Road Base 100%
Pindan / Iron Ore based mud 100%
Gra el 100%
Shale, rip rap. 100%
19

aily (Shift) Pre-Start Checklist
The following two page checklist should be used at the start of each working day (shift)
rele ant to the area(s) of the Vacuum Machine that will be used during the working day. A
rele ant section of the checklist may be filled out prior to the area of the machine being
used.
Vacuum Machine Location ______________________________ Date: __________
Pre-Start – Towing
# Pre-Start Check Requirement Initials
1 Check general condition o the trailer – no damage or protruding items – drum door closed.
2 Check tyres are correctly in lated and no visual damage to them.
3 Check wheel nut tightness – Tight turning the heavy trailer can cause the wheel nuts to loosen.
4 Check that the towing vehicle has a minimum o two (2) tonne towing capacity.
5 Check that towing vehicle has a standard diameter 50mm tow ball.
6 Connect trailer to vehicle – Check sa ety chains are secured and electrical connections made.
7 Check or correct operation o all trailer lights.
8 With vehicle handbrake applied, check that trailer handbrake is released & revering link removed.
9 Stow jockey wheel and wheel chocks correctly.
Pre-Start – Operational Set-Up
# Pre-Start Check Requirement Initials
1 Check that trailer handbrake is applied and wheel chocks installed.
2 Ensure that trailer operation angle does not exceed 20 degrees in any direction.
3 Check that the operational environment is not in an enclosed or partially enclosed building.
4 Plan where the removed material will be dumped.
5 Check that the planned material to be removed is not acidic, caustic, combustible, lammable,
toxic or hazardous material such as asbestos etc.
Pre-Start – Water Blaster
# Pre-Start Check Requirement Initials
1 Check that the water tank has su icient water in it.
2 Check or correct oil level on the water pump – look at sight glass.
3 Check the condition o the water pressure hose – no damage or kinks
4 Check the condition o the water blaster wand & nozzle. Do not inspect whilst connected to hose.
5 Check that the quick connect unctions correctly.
6 Visual checks or water leaks in hoses rom water tank to pump.
7 Clean water ilter i required.
8 Operator is competent to use the water blaster.
20
Table of contents
Popular Utility Vehicle manuals by other brands

Toro
Toro 07252 Workman 1100 Operator's manual

Nilfisk-Advance
Nilfisk-Advance City Ranger 3500 Operator's manual

Taylor-Dunn
Taylor-Dunn ET-015-00 Operation, t roubleshooting and replacement parts manual

Vermeer
Vermeer S650TX Operator's manual

Cushman
Cushman Trackster 898002 Operator's manual

Komatsu
Komatsu D61EX-24 Operation & maintenance manual

Roketa
Roketa GK-13 Owners manual, assembly guide, and parts list

Ingersoll-Rand
Ingersoll-Rand Club Car CARRYALL 710 LSV ELECTRIC Operator's manual

ACG
ACG MOKE NEV 2016 owner's manual

TOMCAR
TOMCAR Utility Vehicle Service manual

Selecta
Selecta TC3080PL Assembly instructions

TYCROP
TYCROP SmoothFlow SF3 owner's manual


