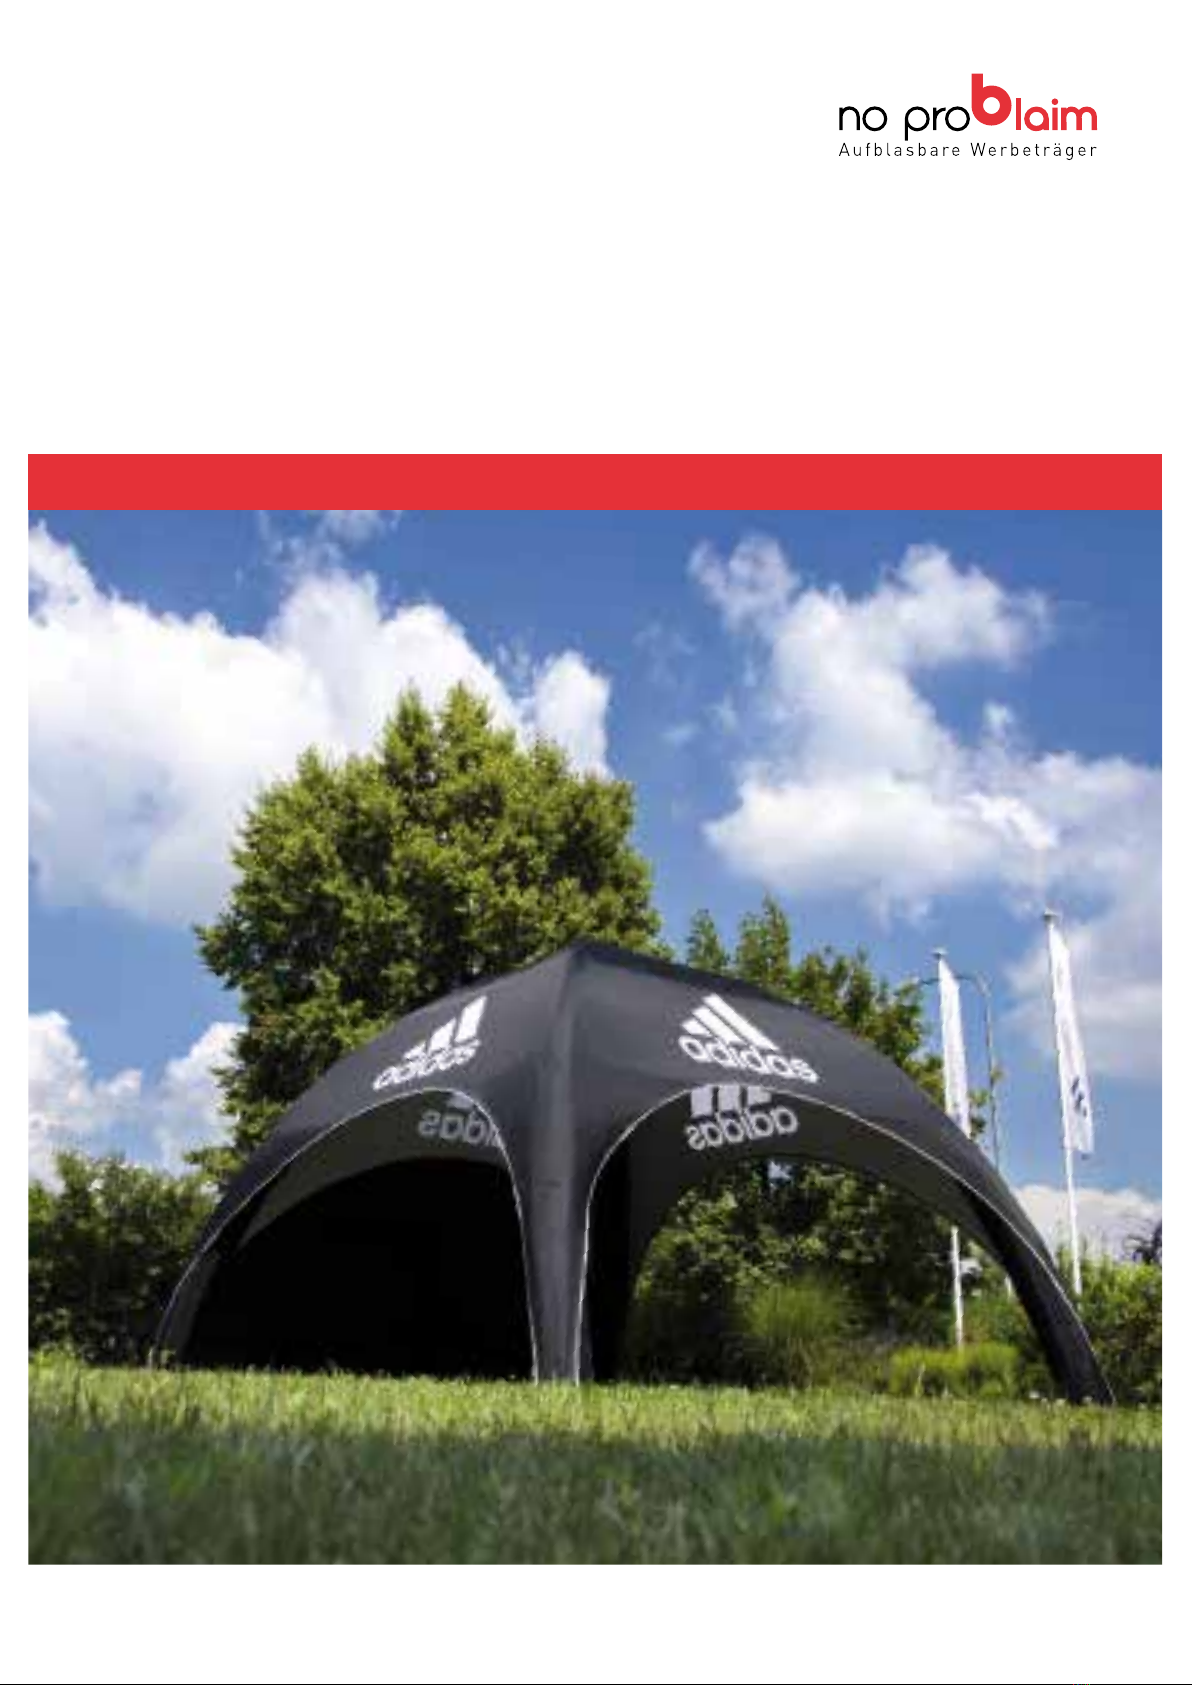
no problaim Pneu Zelte Lite User guide
WIR BLASEN AUF. SIE FALLEN AUF. www.noproblaim.at
WIR BLASEN AUF. SIE FALLEN AUF. www.noproblaim.at
PNEU ZELT LITE
SETUP MANUAL
Pneu Werbemittel | Pneu Zelte | Pneu Möbel | MAX Säulen | Bögen | Specials | Zelte, Info Bars | Walker | Wände, Würfel, Tower |
Sky Dancer | Sky Ads, Helium | Spiele, Fun Action Games | The Others
WIR BLASEN AUF. SIE FALLEN AUF. www.noproblaim.at
INFLATION
INFLATION
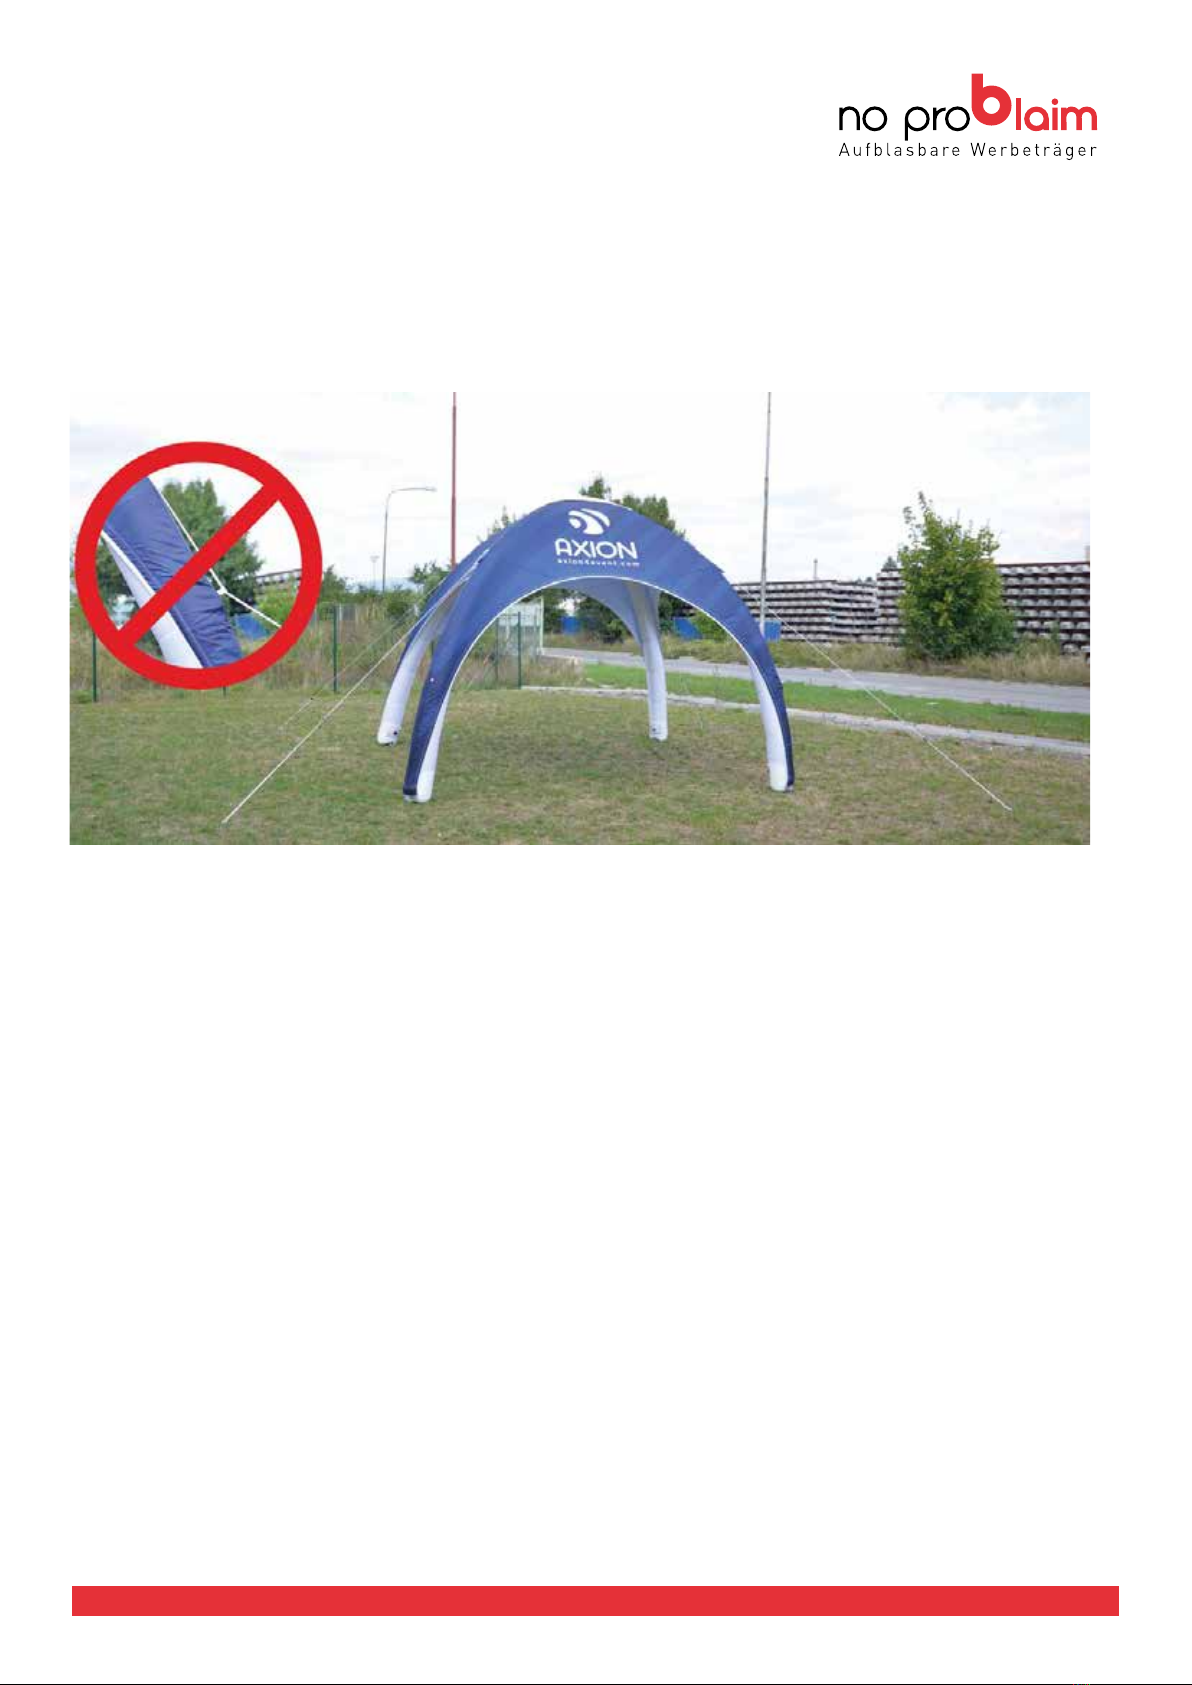
1. Clean an area, where the tent should be placed. Mainly sharp objects and chemicals have to be removed. Use of protecধon
blanket is recommended.
2. Remove tent from the bag, place it to its future posiধon.
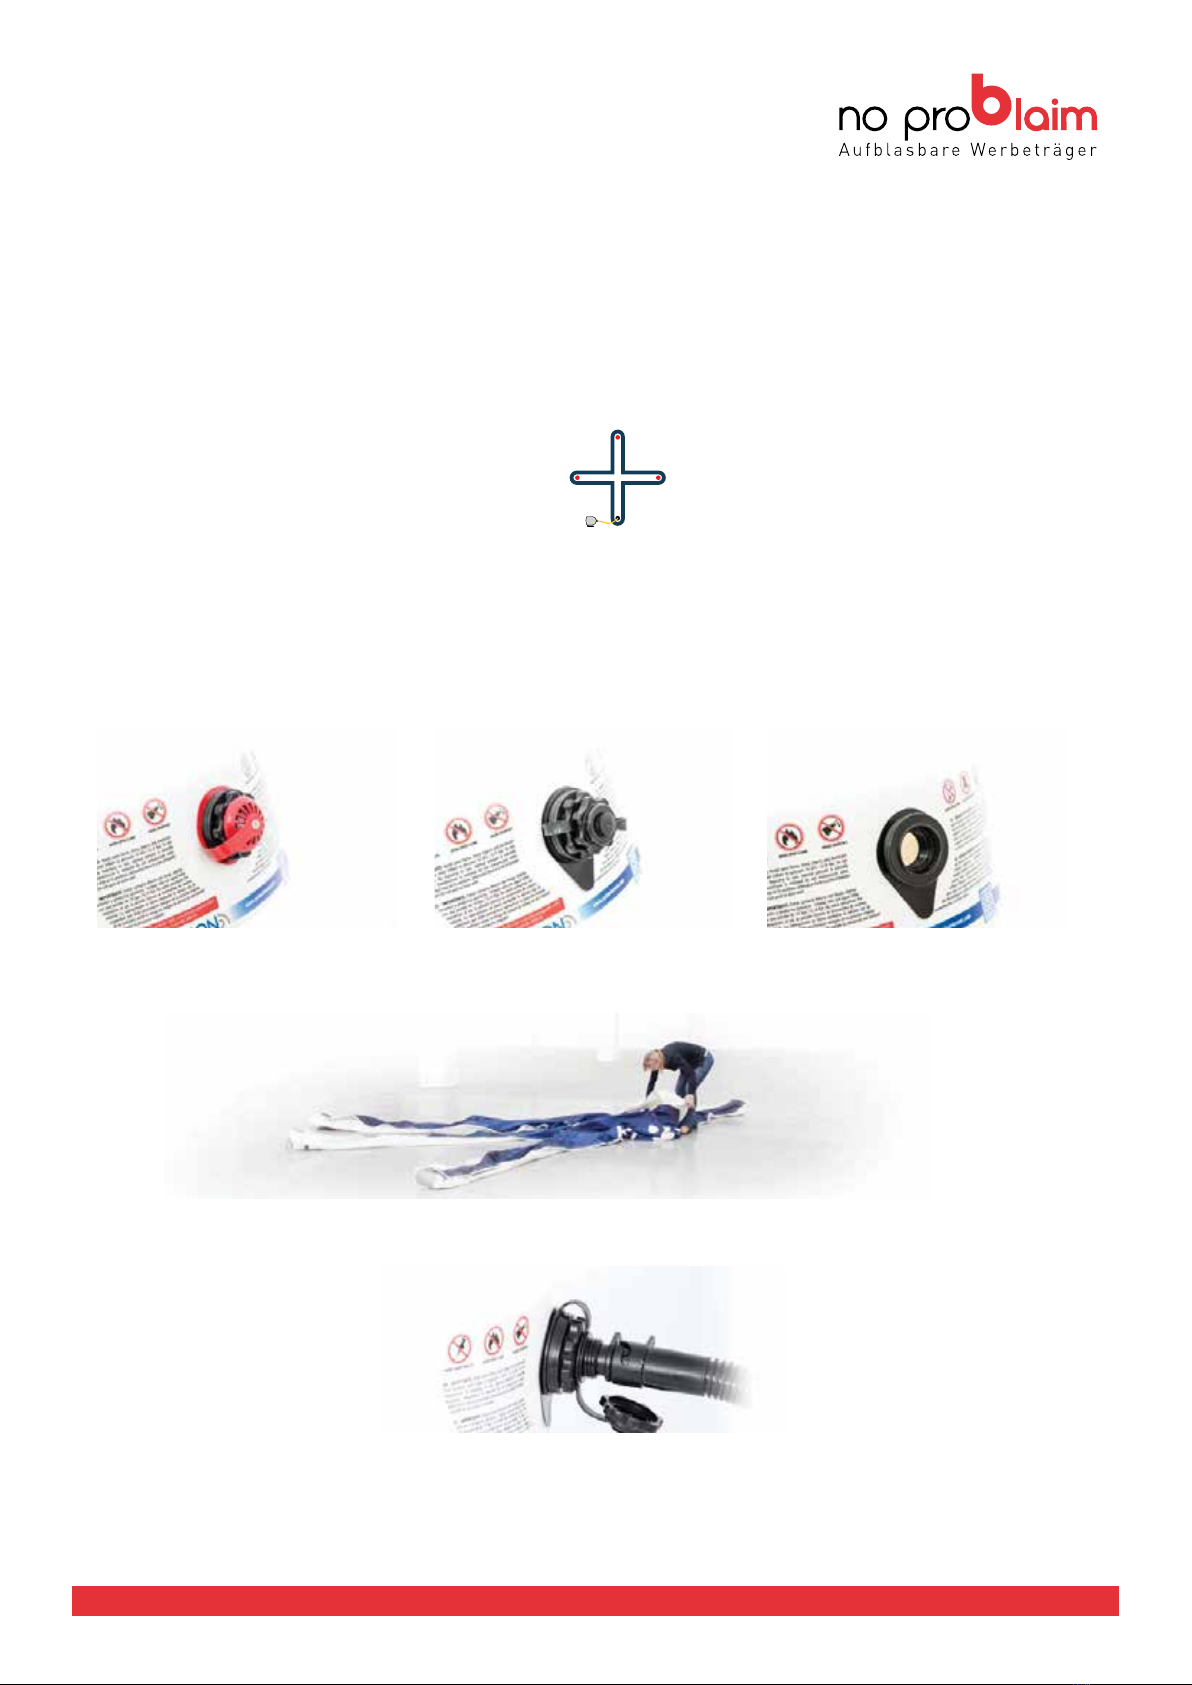
3. Check posiধon and funcধon of all four valves. Due to an order of one way central inaধon system, the black inaধon valve
must be installed on posiধon signed with black arrow. A base part of black valve must be properly ধghted (check a valve seal
before use), small black cap must stay open. Red overpressure valves must be installed on other 3 posiধons, well ধghted to
prevent air leak. In a case tent was not used for longer ধme period, it is recommended to check funcধoning of all overpressure
valves by pushing the spring with a nger or blowing through the valve.Paralelly, seats of all valves shall be checked to avoid
sand grains or dirt to block closing the valve.
red overpressure valves black inaধon valve black arrow posiধon
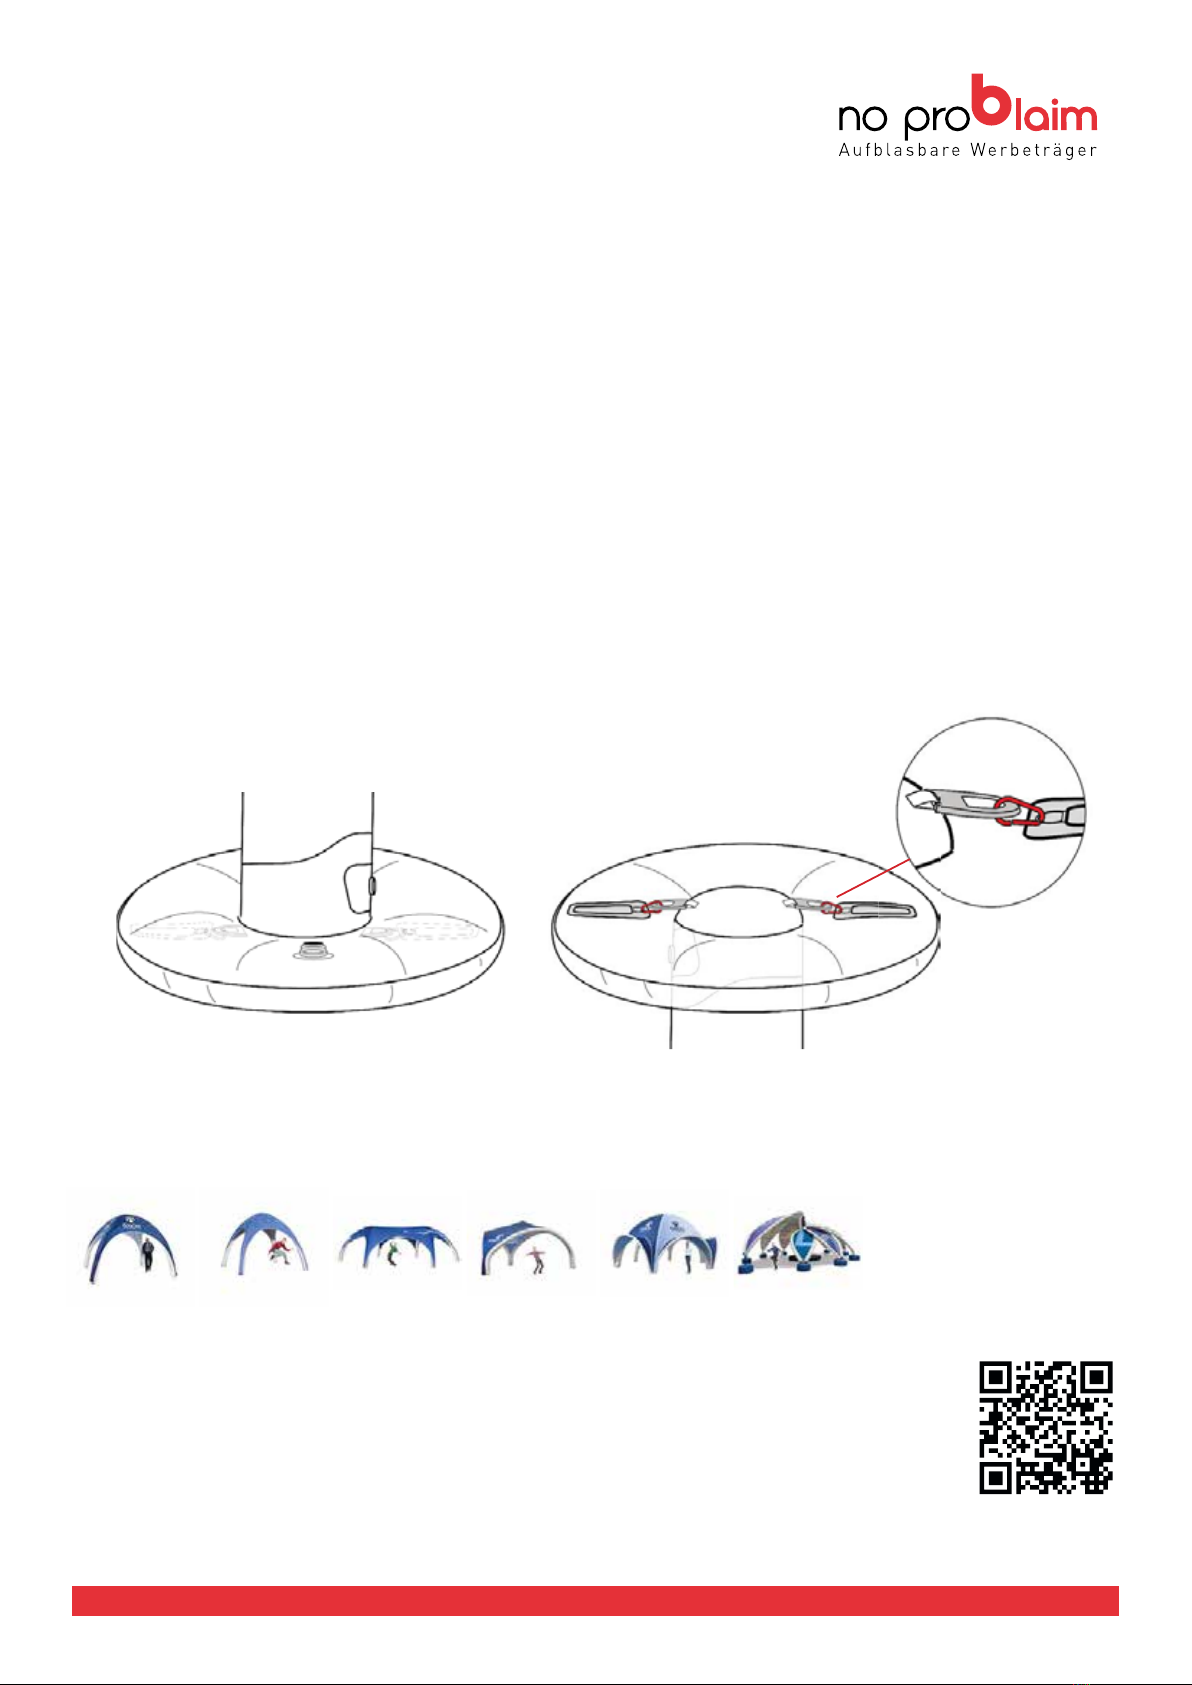
4. Check correct placement of small roof over the central assembly
5. Connect a hose of pump to the black valve and start inaধon.
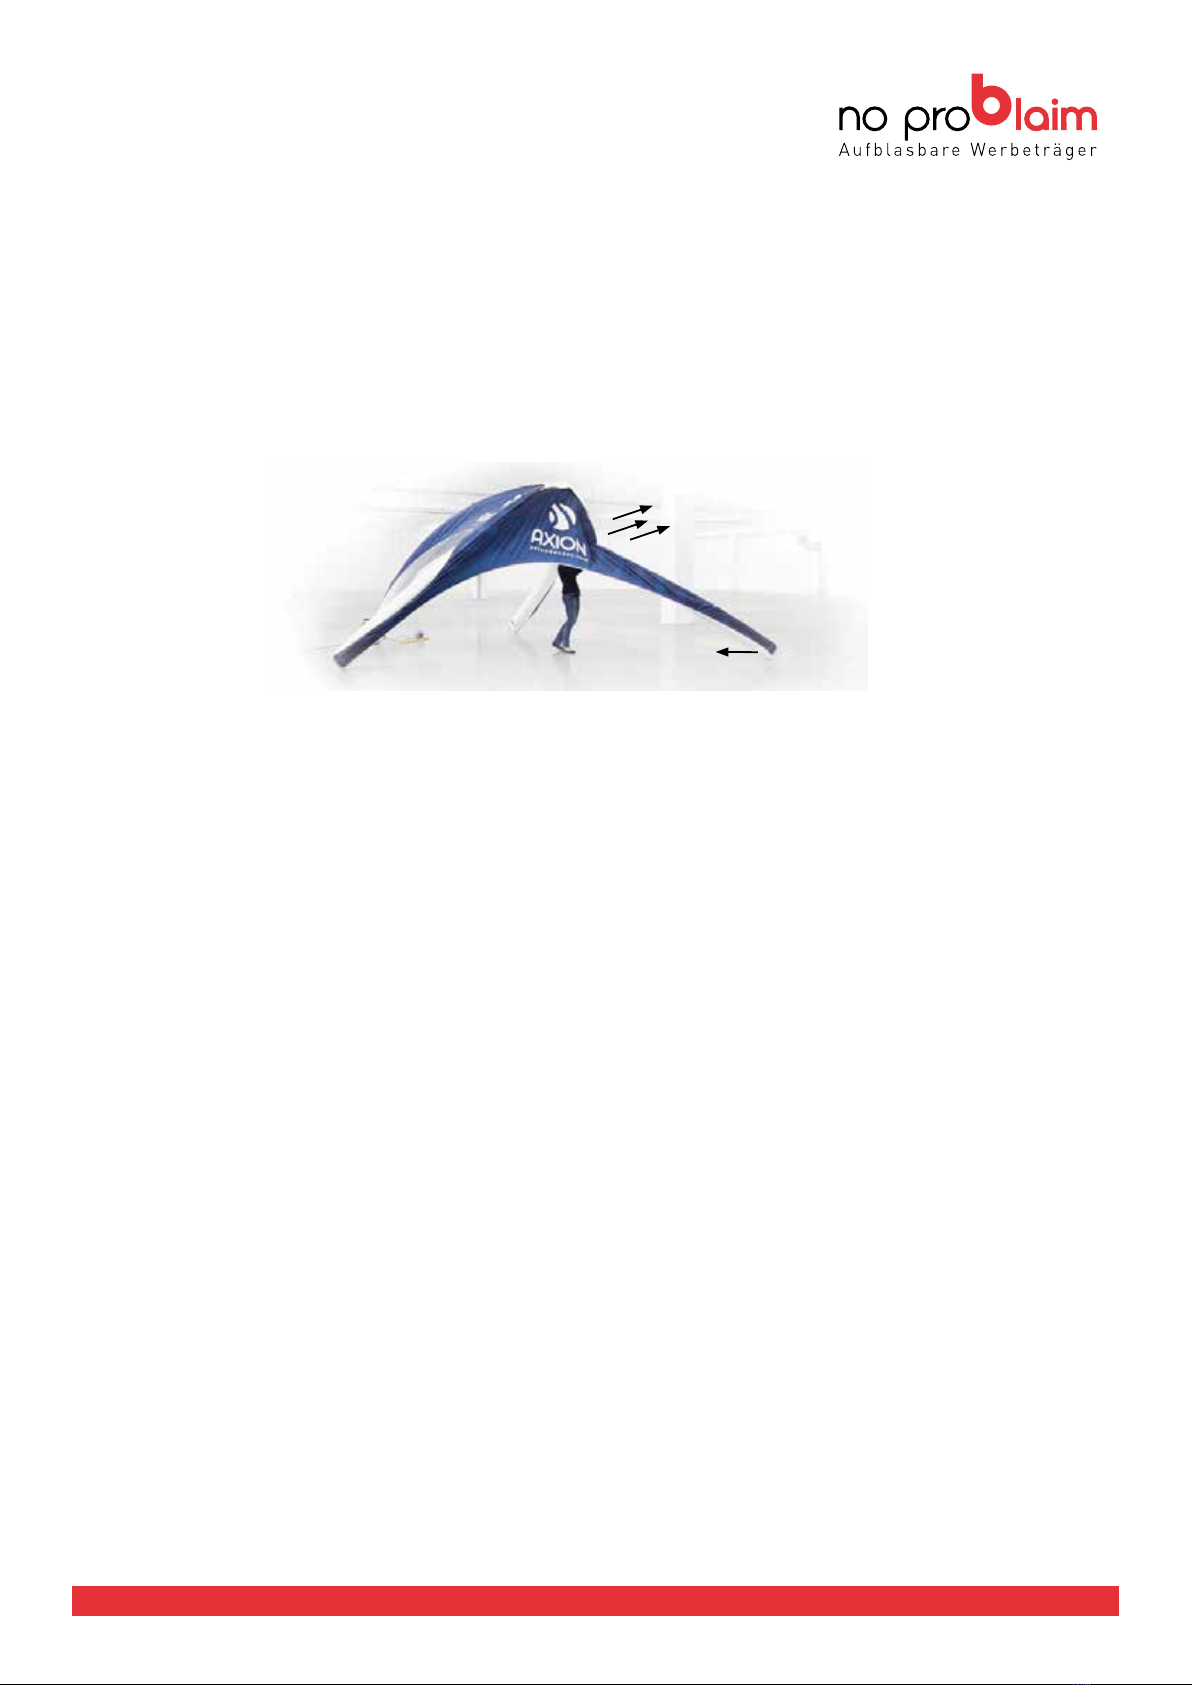
6. By the gradual acধon of springs in central inaধon system, legs of AXION tent are inated gradually.The rst inated leg is
one with installed black (inaধon) valve.In the second phase leđand right leg are inated.In the third phase a tranverse leg is
inated. In this step it is important to „help“ a leg to erect (see picture).
WIR BLASEN AUF. SIE FALLEN AUF. www.noproblaim.at
INFLATION
INFLATION
1. Clean an area, where the tent should be placed. Mainly sharp objects and chemicals have to be removed. Use of protecধon
blanket is recommended.
2. Remove tent from the bag, place it to its future posiধon.
3. Check posiধon and funcধon of all four valves. Due to an order of one way central inaধon system, the black inaধon valve
must be installed on posiধon signed with black arrow. A base part of black valve must be properly ধghted (check a valve seal
before use), small black cap must stay open. Red overpressure valves must be installed on other 3 posiধons, well ধghted to
prevent air leak. In a case tent was not used for longer ধme period, it is recommended to check funcধoning of all overpressure
valves by pushing the spring with a nger or blowing through the valve.Paralelly, seats of all valves shall be checked to avoid
sand grains or dirt to block closing the valve.
red overpressure valves black inaধon valve black arrow posiধon
4. Check correct placement of small roof over the central assembly
5. Connect a hose of pump to the black valve and start inaধon.
6. By the gradual acধon of springs in central inaধon system, legs of AXION tent are inated gradually.The rst inated leg is
one with installed black (inaধon) valve.In the second phase leđand right leg are inated.In the third phase a tranverse leg is
inated. In this step it is important to „help“ a leg to erect (see picture).
7. Connue an inaon within whole structure gets rigid, ideally ll the moment when one of overpressure valves would open
automacally. Overpressure valves are calibrated to the maximum allowable pressure, do not overpressure your tent more as
necessary. Do not disable overpressure valves, it may cause a bladder rupture!
8. Aer releasing an inaon hose, close and ght the small black cap of inaon valve .
9. Side walls and visors can be zipped on the tent all the me, but we rather suggest to install it to already inated tent. Each wall
or visor ts to each side of the tent. An artwork side of the wall may be faced to outside or inside of the tent. Check span of
legs before zipping the wall on the roof. Span of legs bigger as width of side wall can cause damage of zipper during zipping on
the wall. Try to minimaze a stress of zipper by fair handling. Secure end of zipper with velcro aer zipping on the side wall.
DEFLATION
1. Zip oall side walls and visors, pack each separately.
2. Open a valve on one leg, ideally on the leg which was last inated (diagonally to the inaon leg).Once some air is released and
internal pressure in the leg decrease, pull the leg to the transverse one. Aer whole tent will lay down, open rest 3 valves.
3. Once most of air is released, put legs to the paralell order, see picture below.
4, Rolling the tent in a direcon from small roof towards to valves. In this way you will release the rest of air out of the structure.
Unroll it and roll again to get a compact package, ng into the trolley bag. A last step before pung the package into the bag
is to screw all valves back into their posion.
5. Steel spikes must be packed in an extra pouch, which is included in a delivery.Put a pouch into separate pocket in a trolley bag.
Put spare parts and a repair kit into another separate pocket in a trolley bag. When all parts including side walls etc are in a trol-
ley bag, zip it on smoothly. If the volume is too big, use support tapes with trident buckles to bing the bag, decrease a volume
and help the zipper to prevent its damage.

WIR BLASEN AUF. SIE FALLEN AUF. www.noproblaim.at
DEFLATION
7. Connue an inaon within whole structure gets rigid, ideally ll the moment when one of overpressure valves would open
automacally. Overpressure valves are calibrated to the maximum allowable pressure, do not overpressure your tent more as
necessary. Do not disable overpressure valves, it may cause a bladder rupture!
8. Aer releasing an inaon hose, close and ght the small black cap of inaon valve .
9. Side walls and visors can be zipped on the tent all the me, but we rather suggest to install it to already inated tent. Each wall
or visor ts to each side of the tent. An artwork side of the wall may be faced to outside or inside of the tent. Check span of
legs before zipping the wall on the roof. Span of legs bigger as width of side wall can cause damage of zipper during zipping on
the wall. Try to minimaze a stress of zipper by fair handling. Secure end of zipper with velcro aer zipping on the side wall.
DEFLATION
1. Zip oall side walls and visors, pack each separately.
2. Open a valve on one leg, ideally on the leg which was last inated (diagonally to the inaon leg).Once some air is released and
internal pressure in the leg decrease, pull the leg to the transverse one. Aer whole tent will lay down, open rest 3 valves.
3. Once most of air is released, put legs to the paralell order, see picture below.
4, Rolling the tent in a direcon from small roof towards to valves. In this way you will release the rest of air out of the structure.
Unroll it and roll again to get a compact package, ng into the trolley bag. A last step before pung the package into the bag
is to screw all valves back into their posion.
5. Steel spikes must be packed in an extra pouch, which is included in a delivery.Put a pouch into separate pocket in a trolley bag.
Put spare parts and a repair kit into another separate pocket in a trolley bag. When all parts including side walls etc are in a trol-
ley bag, zip it on smoothly. If the volume is too big, use support tapes with trident buckles to bing the bag, decrease a volume
and help the zipper to prevent its damage.
WIR BLASEN AUF. SIE FALLEN AUF. www.noproblaim.at
BASIC ANCHORING (TO THE GROUND)
BASIC ANCHORING (to the ground)
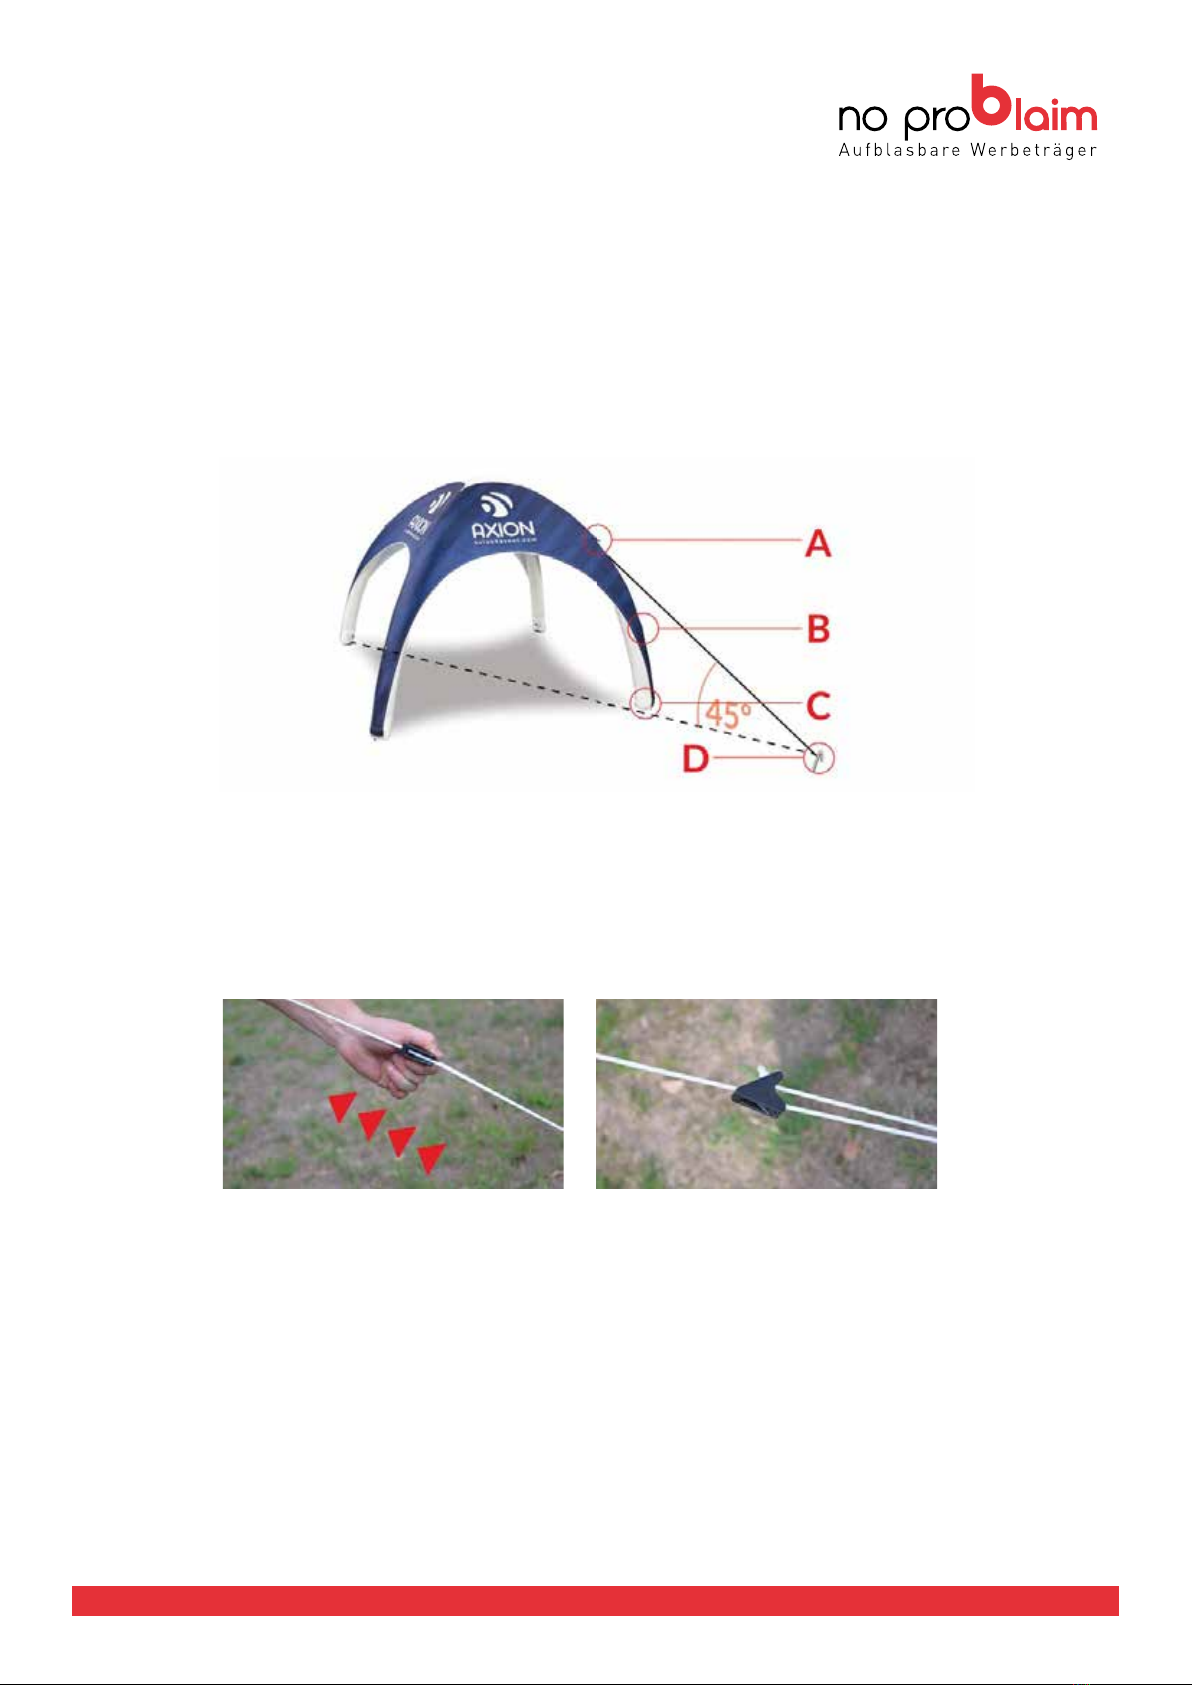
1. Anchor each leg by using two steel spikes (point C) through aluminium buckles in 45° to the ground. Check right posiধon of
legs to avoid stress on zippers or weaved side walls. In a case of strong wind it is recommended to anchor wall base with steel
spikes through eyelets too.
2. There are main ropes aħached to points A directly from the factory. Those ropes must be anchored with steel spikes. An opধ-
mum angle of spikes to the ground is 45°, an opধmum angle of ropes is diagonally (45°) to the tent.
3. Push triangular plasধc cleats towards to the roof to ধghten all ropes.
PROPERLY ANCHORED TENT (BASIC)
WIR BLASEN AUF. SIE FALLEN AUF. www.noproblaim.at
PROPERLY ANCHORED TEN (BASIC)
BASIC ANCHORING (to the ground)
1. Anchor each leg by using two steel spikes (point C) through aluminium buckles in 45° to the ground. Check right posiধon of
legs to avoid stress on zippers or weaved side walls. In a case of strong wind it is recommended to anchor wall base with steel
spikes through eyelets too.
2. There are main ropes aħached to points A directly from the factory. Those ropes must be anchored with steel spikes. An opধ-
mum angle of spikes to the ground is 45°, an opধmum angle of ropes is diagonally (45°) to the tent.
3. Push triangular plasধc cleats towards to the roof to ধghten all ropes.
PROPERLY ANCHORED TENT (BASIC)

WIR BLASEN AUF. SIE FALLEN AUF. www.noproblaim.at
ANCHORING TO THE STRONG WIND
(TO THE GROUND)
ANCHORING TO THE STRONG WIND (to the ground)
4. Repeat a procedure of basic anchoring, just add four more ropes to be aħached by quick links (see picture 8) to points B (see
picture 7).Addiধonal ropes are included in a package.
5. Adjust an addiধonal rope length in a way, that it is 5-10cm shorter as a distance between point B and D (see picture 9). Once
adjusted, hitch the loop on the spike of point D. As the rope is shorter, it is well tensioned to help a tent to resist a strong wind.
PROPERLY ANCHOED TENT (TO THE STRONG WIND)
WIR BLASEN AUF. SIE FALLEN AUF. www.noproblaim.at
ANCHORING ON HARD SURFACE (TO THE LIGHT WIND / by using ballast bags)
1. Fill ballast bags with water through dismounted valve. Ađer water lling screw the valve including top cap to avoid water leak.
Warning: Ballast bag is designed for pouring water, not to be pressurized with hose! Do not inate ballast bags with an air
pump!
2. When carrying full bags, never throw it to the surface. By ground impact an internal pressure increase, what can lead to the bag
rupture.
3. Lay bags to the ground to ideal posiধons of legs. Side to lay down is a side with hooks. A valve is place on a top side. Hooks
must be directed diagonally to the tent, facing to aluminium buckles of tent.
TOP VIEW BOTTOM VIEW
SQUARE LITE HEXA TRIPOD SPIDER FLOWER
YOU MAY EVEN BE INTERESTED IN
axion4event.com
info@axion4event.com
+421 32 655 10 30
ANCHORING ON HARD SURFACE
(TO THE LIGHT WIND/ by using ballast bags)
ANCHORING ON HARD SURFACE (TO THE LIGHT WIND / by using ballast bags)
1. Fill ballast bags with water through dismounted valve. Ađer water lling screw the valve including top cap to avoid water leak.
Warning: Ballast bag is designed for pouring water, not to be pressurized with hose! Do not inate ballast bags with an air
pump!
2. When carrying full bags, never throw it to the surface. By ground impact an internal pressure increase, what can lead to the bag
rupture.
3. Lay bags to the ground to ideal posiধons of legs. Side to lay down is a side with hooks. A valve is place on a top side. Hooks
must be directed diagonally to the tent, facing to aluminium buckles of tent.
TOP VIEW BOTTOM VIEW
SQUARE LITE HEXA TRIPOD SPIDER FLOWER
YOU MAY EVEN BE INTERESTED IN
axion4event.com
info@axion4event.com
+421 32 655 10 30
YOU MAY EVEN BE INTERESTED IN
Aufbauvideo Pneu Zelt
https://www.youtube.com/user/noproblaimvideos

no problaim Werbeträger GmbH
Schuster-Straße 4, 2111 Tresdorf / Wien, ÖSTERREICH
Alle Angaben ohne Gewähr. Änderungen und Druckfehler vorbehalten. Bezeichnungen/Produkte/Fotos/Skizzen und Texte sind geistiges Eigentum
der no problaim Werbeträger GmbH. Sie dürfen ohne ihr Einverständnis weder vervielfältigt noch reproduziert werden. Es gelten die Allgemeinen
Geschäftsbedingungen der no problaim Werbeträger GmbH in ihrer jeweils letztgültigen Fassung.
Other no problaim Tent manuals


