Noirot SPOT PLUS PRO Product guide
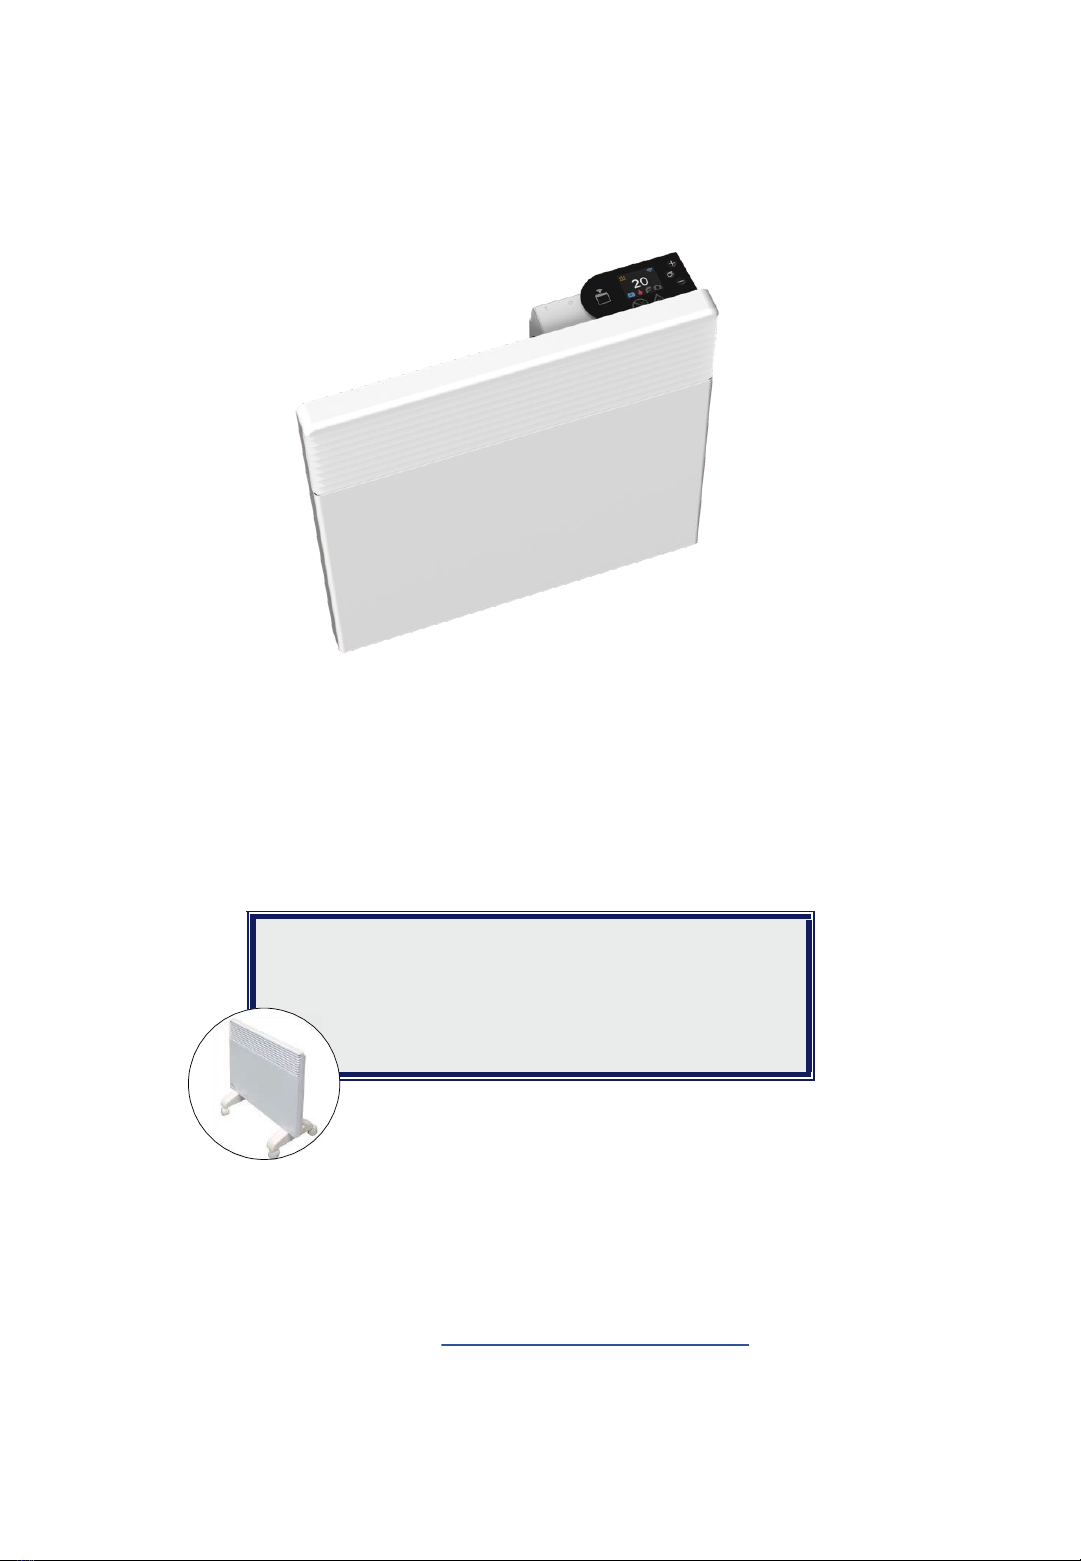
NOIROT SPOT PLUS PRO
Electric Convection Panel Heater
Model with Wi-Fi
Operating & Installation
Instructions
In Order To Qualify For Your Lifetime Warranty
Please Visit our Website and complete the Online Registration
Visit us at www.olimpiasplendid.com.au
Distributed by Olimpia Splendid Australia Pty Ltd.

Page
1. Safety……………………………………………….………………….......3
2. Installation………………………………………………….……………....5
3. Basic Controls……………………………………….………………….....9
4. Advanced Menu Overview……………………………………………….10
5. Maintenance…………………………………………….…………...…....11
6. Specifications………………………………………………..…………….11
7. Warning……………………………………………….…………….……...11
8. Warranty..……………………………………………..……………...…....12
2
TABLE OF CONTENTS
APPLICATION DOWNLOAD AND WI-FI OPERATION
Scan the QR Code below to access the latest owner’s manual. The
manual contains instructions for downloading the WIFI application
and controlling the heater via your smart device.
How to scan QR codes
•Open the camera on your smart device
•Hold the camera over the QR code until a code appears.
•Press the code to access the owner’s manual.

1. SAFETY
Read the Installation and User Guide(*), especially the safety instructions below.
WARNING -Certain parts of this product
may become very hot and may cause
burns. Pay extra attention to small
children and vulnerable people when
they are around the heater.
This heater may be used by children aged 8 and over and by persons with
reduced physical, sensory or mental capacity or without any experience or
knowledge providing they are correctly supervised, or they have been given
instructions on how to use the heater safely and they clearly understand the
potential hazards. Children must not play with the heater. Children must not
perform user cleaning and maintenance.
Ensure children aged under 3 are kept at a safe distance unless they are
under constant supervision.
Children aged between 3 and 8 may only turn the heater on or off providing it
has been placed or installed in the normal position for its operation and
providing they are under supervision, or they have been given instructions on
how to use the heater safely and clearly understand the potential hazards.
Children aged between 3 and 8 must not plug in, change the heater
settings, clean or perform any user maintenance on the heater.
Do not insert anything into the heater.
The heater may only be connected by a qualified person after the power has
been switched off.
All service operations must be performed by a qualified and authorised person
after the power has been switched off.
Electrical supply in the fixed wiring must include means for disconnection in
accordance with the wiring rules.
The heater must not be installed underneath a power socket.
3

1.1 SAFETY
4
The power supply must be protected by a residual current device of at least 30 mA,
especially when installed in a room with a bath or shower.
If the power supply cable is damaged, it must be replaced by the manufacturer, its
after-sales service or a person with similar qualifications in order to prevent any
potential hazards.
The heater risks overheating if it is
covered. The following logo reminds
users of this risk.
It is therefore strictly forbidden to cover or block the air intakes or outlets at the risk
of causing an accident or damaging the heater.
Comply with the minimum installation distances from floors, walls, furniture, etc.
When installing the heater in bathrooms, it must comply with local regulations.
Avoid installing the heater in a draught which may otherwise affect its thermostat
control.
This direct electric heater is designed for ambient heating of residential type rooms,
or similar, in new or existing, single and multi-unit dwellings.
Do not use this heater in the immediate surroundings of a bath, a shower or a
swimming pool.
Do not use this heater if it has been dropped.
Do not use if there are visible signs of damage to the heater.
Use this heater on a horizontal and stable surface on castors, or fix it to the wall, as
applicable.
Do not use this heater in small rooms when they are occupied by persons not
capable of leaving the room on their own, unless constant supervision is provided.
To reduce the risk of fire, keep textiles, curtains, or any other flammable material to
a minimum distance of 1m from the air outlet.
(*) These instructions were correct at the time of the heater's manufacture and
comply with the standards applicable as at that date. The company reserves the
right to modify the Installation and User Guide at any time in order to take into
account any new standards or changes to existing standards.

2. INSTALLATION
RECOMMENDATION FOR WALL INSTALLATION
This heater is sold ready for DIY installation, with wall bracket and flexible cord
supplied. To remove the wall bracket from the heater you need to push down on
the spring-loaded clips located at the top of the bracket. This can be done by
using your fingers or, if preferred, a screwdriver (No: 1 Fig.1). Fit the wall bracket
to the wall with suitable fixing method according to the surface you mount the
heater on (note: fixings not included). Place the heater on to the bracket and clip
into position.
Note: To centre your appliance laterally on the wall, use the hole marked 2.
The heater must not be located immediately below a socket outlet (as per
requirement of Clause 7.12 of AS/NZS 60335.2.30).
Model Power (W) Height (mm) A (mm) B (mm) C (mm)
7358-3TPRO 1000 440 420 208 106
7358-5TPRO 1500 440 580 178 201
7358-7TPRO 2000 440 745 320 210
7358-8TPRO 2400 440 900 405 248
5
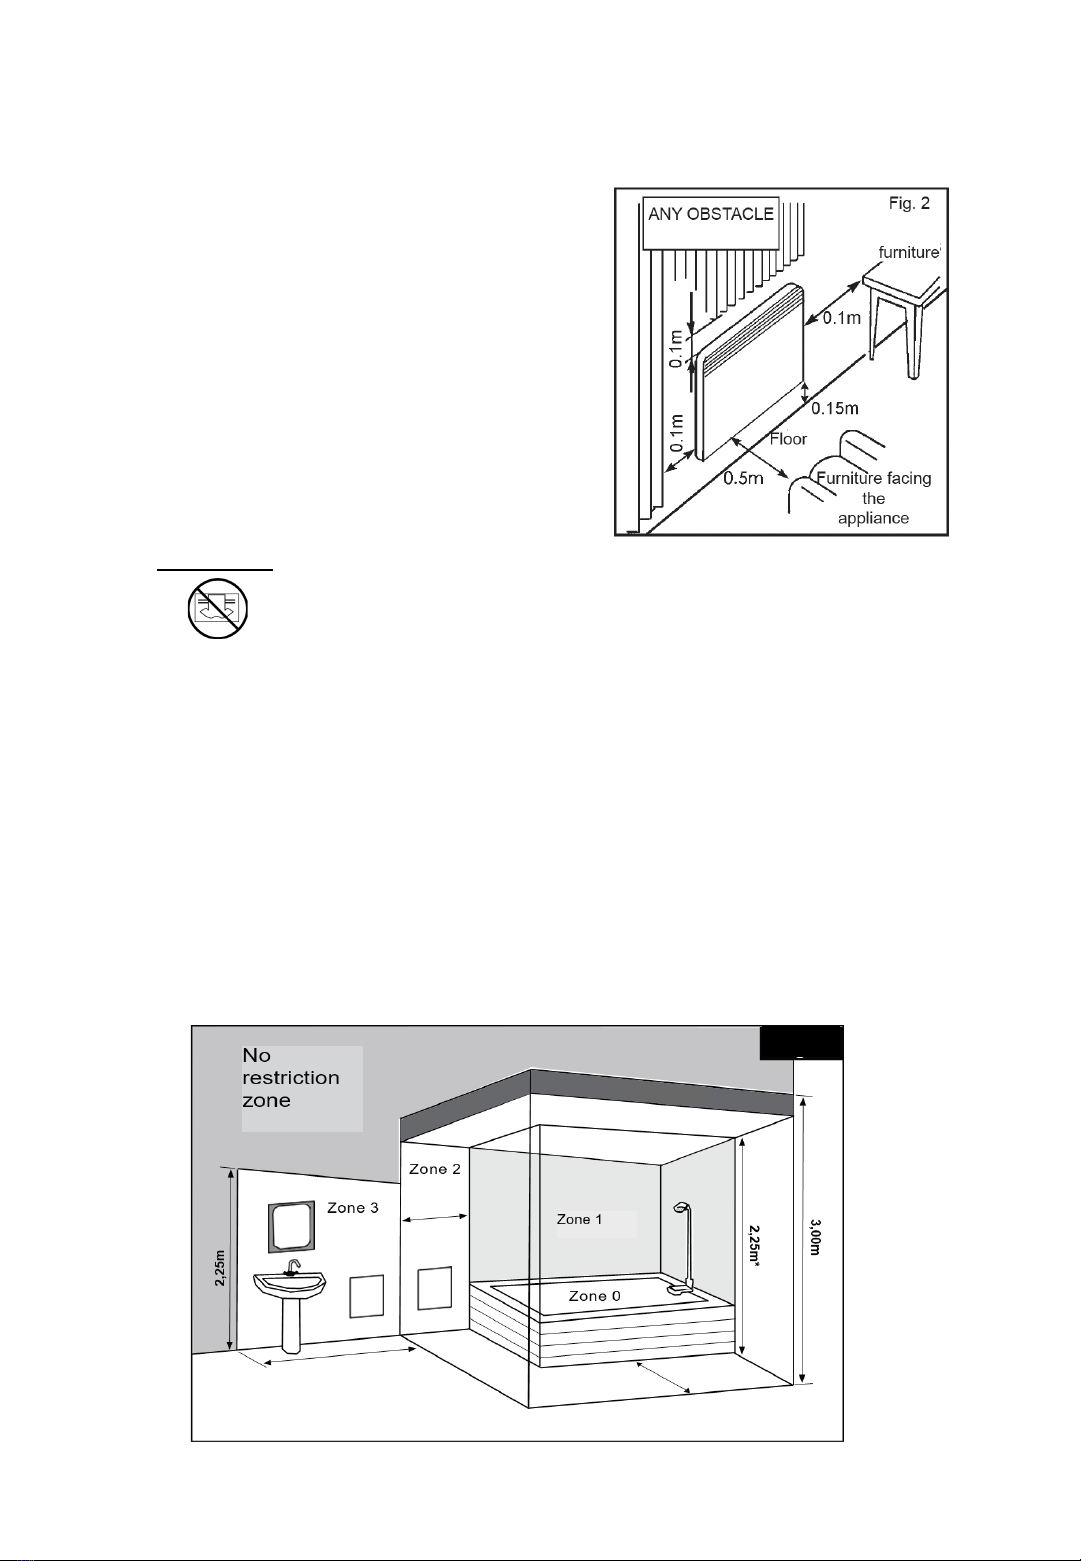
2.1 INSTALLATION
For maximum efficiency, this heater is to be
wall mounted between a minimum height of
100mm and a maximum height of 150mm off
the floor. This is to allow the necessary volume
of air to flow freely through the vents. It is also
important to allow a minimum of 100mm
clearance at the top and sides of the heater
and 500mm from the front (Fig. 2) so as not to
force the air back into the heater and activate
the Over Temperature Safety Thermal Cut-Out
Switch.
WARNING: IN ORDER TO AVOID
OVERHEATING, DO NOT COVER
THE HEATER
PANEL LOCATIONS
If the “Over Temperature Safety Thermal Cut-Out Switch” is activated, the heater
will automatically switch off to limit the temperature to a safe value. To reset the
thermal cut-out, simply switch the heater off, unplug it from the power point and
remove the obstruction(s). Plug the heater back in and switch it on. The thermal
cut-out switch will reset after a few minutes and the heater will function normally.
This heater is IPX4 rated and suitable for use in all rooms including Zone 2 in Bathrooms
(Fig.3) in accordance with AS/NZS 3000: 2018 (Wiring Rules).This heater is double
insulated and does not require earthing, for use in the bathroom it must be located so
that the controls cannot be touched by a person in the bath or shower.
Fig. 3
6

2.2 INSTALLATION
INSTRUCTIONS FOR MOUNTING CASTORS ON THE HEATER
Please follow these instructions.
1. For maximum stability,
space castors at 50mm from
the edge of the base as
shown
2. To lock castors into place,
insert the black clips provided
through the bottom of the
castors into the base of the
heater
Note: This heater is tested and approved for use with the optional "Easy Glide Castors".
Please follow the fitting instructions (supplied with the castors) closely, ensuring the
BLACK CLIPS are correctly installed. Note that once the BLACK CLIPS are fixed into
position, the castors CANNOT be removed without breaking them.
WARNING: DO NOT use the heater on the floor without the "Easy Glide Castors".
7
2.3 INSTALLATION
ELECTRICAL CONNECTION
This heater is fitted with an Australian Approved Flexible Cord and Plug. For wall-
mounted installations connection can be either by plugging into an existing
10amp power point (DIY) or direct wired by a Licensed Registered Electrical
Contractor, who is required to issue a Certificate of Electrical Safety.
PLEASE NOTE:
For safety reasons the Flexible Cord must not be modified or repaired in any way.
If there are any concerns, contact Olimpia Splendid Pty Ltd on 1 300 664 768
before plugging in.
IMPORTANT:
DO NOT PLUG HEATER INTO A POWER BOARD,
DOUBLE ADAPTOR OR EXTENSION LEAD.
USING YOUR HEATER FOR THE FIRST TIME
Remove the heater from its packaging (please dispose of packaging responsibly).
Contents should be as follows:
1.Heater
2.Wall bracket (pre-attached to the back of the heater)
3.Instructions for installation and use (booklet)
4.Castors (Note: not included with Evolution models)
Ensure the heater is correctly mounted on the wall or fitted to the castors prior to
turning it on. Remove the white plastic protective covers from the plug pins and
insert the plug into the wall socket.
NOTE: When first turning on your new heater, we recommend doing so in a
large, open space or ventilated room for a few minutes to allow the “new heater
smell” to dissipate. It is also common for the heater to emit vapour from the vents
during this initial process and shouldn’t last for more than 2-3 minutes. If it should
persist, switch the heater off and have it inspected.
Noirot is distributed by Olimpia Splendid. For additional Support, please go to:
www.olimpiasplendid.com.au
8
WARNING
Do not connect to power board
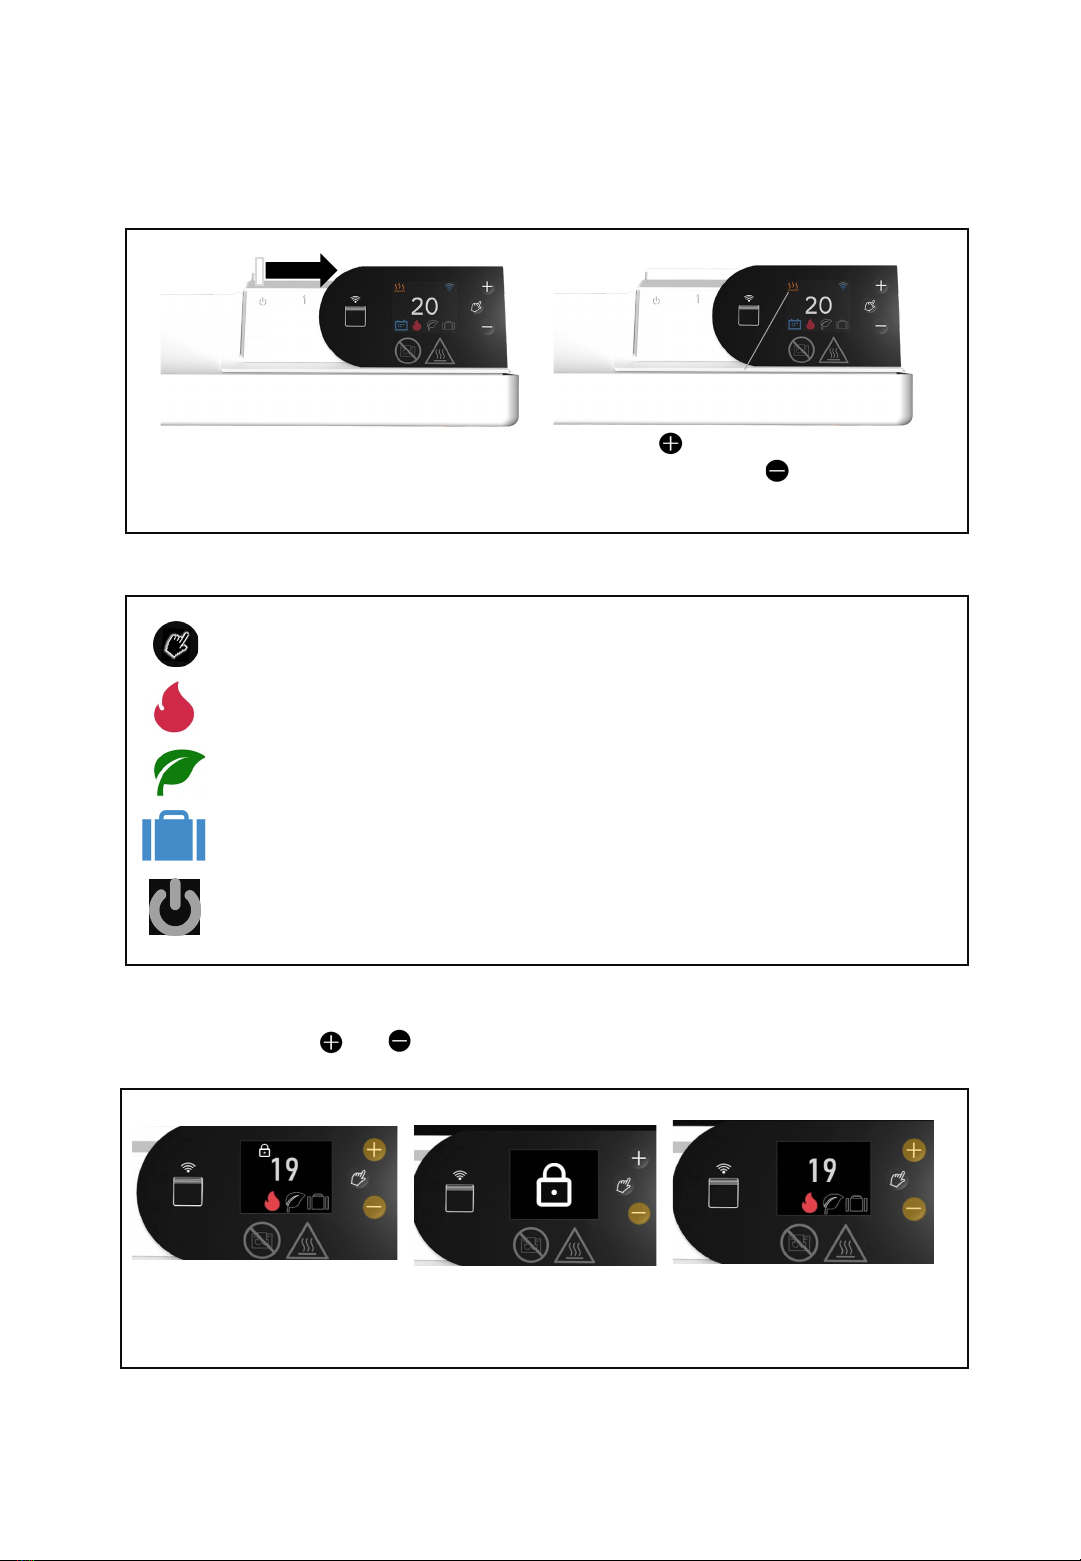
3. BASIC CONTROLS
ON | OFF SWITCH
Slide the switch located in the back
of the panel to the ‘1’ position.
ADJUST TEMPERATURE
Press the button to increase the
temperature and the button to
decrease the temperature.
HEAT ICON
Lights when heating element is active
MODE SETTINGS
OFF | ON
Press and hold the and buttons simultaneously for three seconds to engage.
Repeat operation to disable.
Hold + and –until lock
appears in the display
Controls will be disabled.
A large lock will appear in
the display
Press and hold + and -
until lock icon disappears
to disengage child lock
CHILD SAFETY LOCK
MODE SELECT: Choose modes and access advanced menu
COMFORT MODE: Adjustable between 7C and 32C
ECO MODE: Adjustable between 7C and 32C
AWAY MODE: Fixed 7C (Not Adjustable)
STAND BY MODE: The heater is not on
9
10
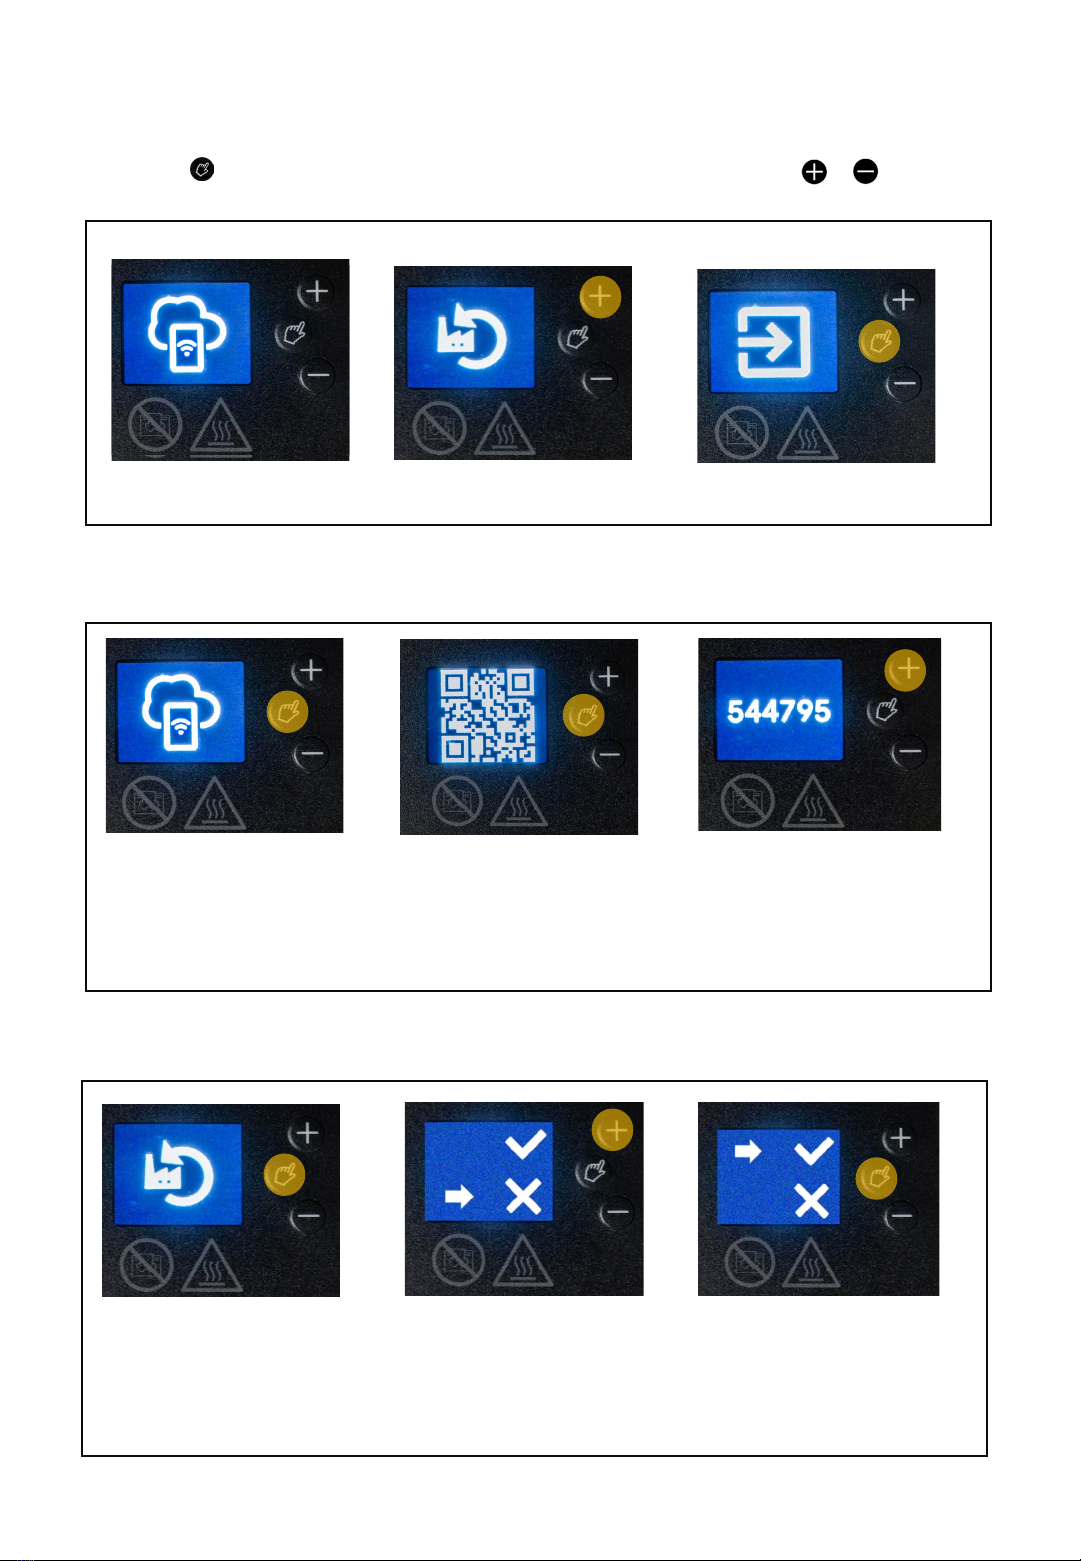
4. ADVANCED MENU OVERVIEW
Press the icon for three seconds to access the advanced menu. Press or to
scroll through menu options.
WI-FI SET UP ACCESS
Press the hand button for
three seconds until the
pairing symbol appears.
Press the hand button again
to access the QR code.
Scan the QR from your
smart phone or mobile
device to begin.
WI-FI pairing Factory reset Exit advanced menu
As part of WI-FI set up a code
needs to be entered. Press the
+ button to access the pairing
code. PIN code and QR code
may also be found on product
plate located on its side.
Press the hand button for
three seconds to enter the
advanced menu. Press +
or -until the factory reset
icon appears.
Press the hand icon to begin
the factory reset. The tick
will begin to flash. When it
stops, factory reset is
complete.
Press the + or -button so
that the arrow points to the
tick.
HEATER RESET

5. MAINTENANCE
6. SPECIFICATIONS
Your Noirot Electric Panel Heater requires very little maintenance. To remove
surface dust use a soft cloth; to remove marks use a damp cloth. Never use
abrasives or metal scourers which could damage the polyester coating. It is
recommended to periodically clean the front and under carriage air vents using
the soft brush on your vacuum cleaner, as dense accumulation of dust will cause
the heater to over-heat and trigger the safety thermal cut-out switch.
Models Power (W) Current (A) Height
(mm)
Width
(mm)
Depth
(mm)
7358-3TPRO 1000 4.2 440 420 80
7358-5TPRO 1500 6.3 440 585 80
7358-7TPRO 2000 8.3 440 745 80
7358-8TPRO 2400 10.0 440 900 80
7. WARNING
Do not use this heater if it has been dropped.
Do not use if there are visible signs of damage to the heater.
Use this heater on a horizontal and stable surface on castors, or fix it to the wall, as
applicable.
Do not use this heater in small rooms when they are occupied by persons not
capable of leaving the room on their own, unless constant supervision is provided.
To reduce the risk of fire, keep textiles, curtains, or any other flammable material to
a minimum distance of 1m from the air outlet
During operation it is normal for the power plug to become warm, especially for the
larger 2000 watt and 2400 watt models. If the power plug seems excessively hot to
touch, ensure that the heater is being used in a room no larger than the
recommended size or that the plug is not sitting loosely in the wall socket (older wall
sockets can wear and become loose over time and cause extra heat to build up). If
unsure, contact our office for advice.
11

8. WARRANTY REGISTRATION
IMPORTANT: To validate your product warranty, you are required to do the following:
1. Register your product online at olimpiasplendid.com.au, click on “Product Registration” and fill out the
required fields.
2. You must also retain your receipt of purchase
WARRANTY CONDITIONS
Your Noirot Spot Plus electric panel heaters come with a LIFETIME WARRANTY, therefore any
replacement of faulty parts or repairs of any kind must be carried out by a qualified person and authorised
by Olimpia Splendid (AU/NZ) or their approved representative. Failure to do so will VOID the
WARRANTY.
•Olimpia Splendid (AU/NZ) reserves the right to reject any warranty claim deemed to be false. Retailers
must have warranty claims authorised by a representative of Olimpia Splendid (AU/NZ).
•Olimpia Splendid (AU/NZ) reserves the right to review and reject any warranty claims due to changes
in technology
If you believe your product to be faulty and under warranty you are required to do the following:
1. Return the product, at your expense, to the place of purchase for assessment by an authorised
representative of Olimpia Splendid (AU/NZ).
2. This may require leaving the product at the place of purchase.
3. If the product is deemed faulty and under warranty, the place of purchase of the product will order a
replacement heater to which Olimpia Splendid (AU/NZ), at our cost, will deliver the heater to the place of
purchase.
4. The consumer will then be required, at their cost, to pick up the replacement heater from the place of
purchase.
5. If the heater is faulty but not deemed to be under warranty, an explanation will be provided to the
consumer and that the faulty heater can be picked up by the customer from the place of purchase.
6. Castors are a bonus item and have a 6-month warranty. Replacement castors can be purchased in-
store or online.
Our goods come with guarantees that cannot be excluded under the AU/NZ Consumer Law. You are
entitled to a replacement or refund for a major failure and for compensation for any other reasonably
foreseeable loss or damage. You are also entitled to have the goods repaired or replaced if the goods fail
to be of acceptable quality and the failure does not amount to a major failure.
If you have any queries regarding your product or its warranty please contact:
Olimpia Splendid Australia Pty Ltd
80-84 Burlington St
Oakleigh Victoria 3166
Australia
P: 1 300 664 768
E: sales@olimpiasplendid.com.au
Olimpia Splendid New Zealand Pty Ltd
C / Key Service Ltd 34A Cryers Road.
East Tamaki, Auckland 2013
New Zealand
P: (09) 916-0960
E: sales@olimpiasplendid.co.nz
12
This manual suits for next models
4
Table of contents
Other Noirot Electric Heater manuals


Popular Electric Heater manuals by other brands

Airflow
Airflow SunShine Threesome 6500A Installation Instructions and Warranty

Harvia
Harvia TRC70EE Instructions for installation and use

flowair
flowair LEO EL 23 Operation manual

HeatQ
HeatQ NORD user manual

Bionaire
Bionaire BQH308C-U Instruction leaflet

Flagro
Flagro FLE-150RC Operating instructions manual


Bionaire
Bionaire BHH7522MX instruction manual

Eurostove
Eurostove EUROSTOVE PARIS manual

Honeywell
Honeywell HZ2800P - Turbo Heater Fan instructions

Goldair
Goldair GPCT500 operating instructions

SeasonsComfort
SeasonsComfort ERH185 user manual

Haverland
Haverland RCWave 2022 Instruction & installation manual