The Nokia 9300 combines popular voice communication features with
important productivity applications in one well-appointed device. Now
the tools you need to stay in touch and on top of schedules, email, news,
and messages are conveniently at your fingertips.
Set time, date, and personal information
Now it’s time to power on your Nokia 9300. You’ll be asked to set the following
information (fig. 7.1):
• Home city – From the list, select the city in which you reside.
• Date & Time – Set the current date and time.
• Owner Contact – Input your personal information.
TIP! You can share your contact information with colleagues by sending a
virtual business card (vCard) via SMS.
Configure Settings
Your Nokia 9300 makes setting up your mobile Internet, MMS, and other
settings a breeze. The first time you insert your SIM card and turn the phone
on, the Nokia 9300 may automatically create Internet access points that
contain the GPRS/MMS settings for your service provider. You can view or
modify these settings from the Internet Setup page (fig. 7.2) in Tools > Control
Panel > Connections > Internet setup.
Configure Email Settings
You can utilize the Settings Wizard on the enclosed MMC card to configure email settings. To do this,
make sure your MMC card is installed, launch the Settings Wizard and select your country, ISP and
Internet access point from the list provided. After entering your email login and password, POP/IMAP and
SMTP server settings will be automatically configured on the device. Please note that since GPRS/MMS
settings are automatically configured, as discussed above, you do not need to use the Advanced tab in the
Settings Wizard.
You can view or modify these settings in Tools > Control Panel > Messaging > (select your ISP email service).
Copyright ©2004 Nokia. All rights reserved. Nokia, Nokia Connecting People and Pop-Port are registered
trademarks of Nokia Corporation. Bluetooth is a registered trademark of Bluetooth SIG, Inc. Other
product and company names mentioned herein may be trademarks or trade names of their respective
owners. Mobile enhancements sold separately. The availability of Bluetooth wireless technology may
vary by country and Bluetooth products are not
approved for use everywhere. Please check with
the local authorities. Specifications subject to
change without notice.
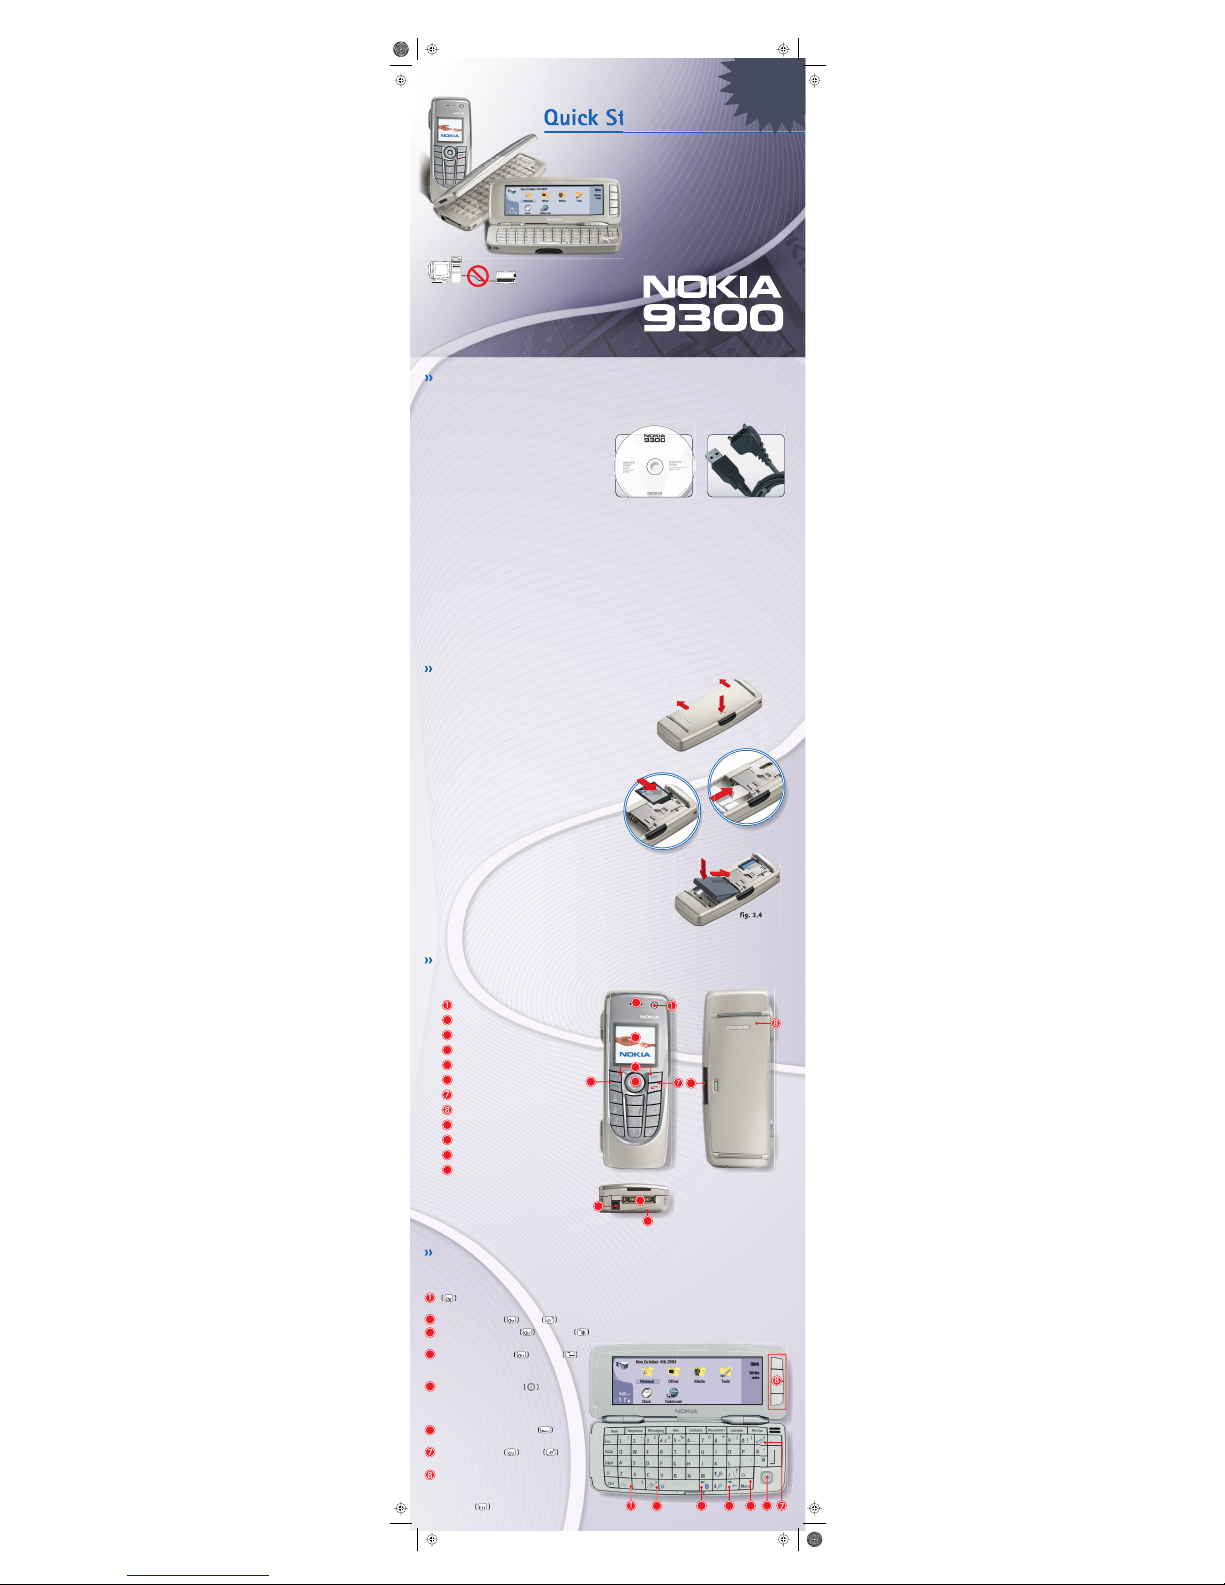
The main view on the Nokia 9300 is referred to as the Desk (fig. 6.1).
The Nokia 9300 screen is divided into three functional areas:
Indicator Area:
Shows application
and system-related
information.
Command Area:
Displays the current
function of the corresponding
command keys.
Application Area:
Displays folders and applications.
The application area becomes the viewing area
when running an application.
Tabbed View Screens (fig. 6.2)
Within multi-page dialog screens, use the Menu key to
switch the tab view screens. (Time, Date, Numbers, Currency)
The Nokia 9300 makes it easy to start up and shut down.
Simply open the cover and start working! When you close the
cover, the Nokia 9300 automatically displays the same file
when the device is reopened. Fig. 6.2
Fig. 6.1
Get familiar with the mobile desk.Get familiar with the mobile desk.
Power on.Power on.
Go for it!Go for it!
Get in sync.Get in sync.
Make contact.Make contact.
ABC
Fig. 7.1
Fig. 7.2
Copy contacts from SIM to contacts directory
1. Press the Contacts key.
2. Scroll to highlight the SIM card folder (fig. 8.1).
3. Press the Open command key.
4. The SIM card contents are opened, with the first entry highlighted.
5. Scroll up once to highlight the SIM card folder.
6. Press the Copy all command key.
7. In the Copy contacts popup box, highlight Contacts
and press the Select command key.
8. You are asked to confirm the action. Press the Copy command key.
Create a new contact card
1. Press the Contacts key.
2. Press the New card command key (fig. 8.2).
Scroll up or down to enter various contact fields and edit with the keyboard. All fields are optional.
If you would like to be able to call or email this person, make sure their phone number and email
address are included. Remember, you can always add more information later.
Create an appointment in the Calendar
1. Press the Calendar key.
2. Scroll to highlight the date for the event you wish to create.
3. Press the Menu key.
4. With New entry highlighted, press the Select command key.
5. With Meeting highlighted, press the Select command key.
6. Enter a description for the meeting (fig. 8.3).
7. Scroll down to Location and enter a location for the event.
8. Scroll down to Start and enter a start time for the event.
9. Scroll down to End and enter an end time for the event.
10. Press the Done command key.
Synchronize contacts, calendar, and to-do lists with Nokia PC Suite
In order to complete these steps, you must have already installed and configured Nokia PC
Suite on your PC. If you need help, please refer to the Get started section of this guide.
Caution! Do not connect the DKU-2 data cable to your PC before you have installed
the appropriate software.
1. Connect the Nokia 9300 to the PC using the DKU-2 data cable, Bluetooth, or Infrared.
2. From the Desk, scroll to highlight the Tools folder (fig. 9.1).
3. Press the Open command key.
4. Scroll to highlight the Sync application (fig. 9.2).
5. Press the Open command key.
6. With the PC Suite profile highlighted,
press the command key labeled Sync.
Note! Before synchronizing data, click on the Edit command
key to confirm that the Connection type displays the method
that you will use (Data cable, Bluetooth, Infrared) to
connect to your PC. If not, scroll through the list to select
the correct setting (fig. 9.3).
Nokia offers a wide range of mobile enhancements to extend the functionality of your
Nokia 9300. To find out more, please visit www.nokia-asia.com. Please review the User
Guide to learn more about the many features of your Nokia 9300.
Fig. 9.1
Fig. 9.2
Fig. 9.3
Fig. 8.1
Fig. 8.2
Fig. 8.3
TIP! There is a shortcut to open the Sync application. Hold down the Chr key and press the + key
at the same time to sync.