Nokia Lumia 800 User manual

Nokia Lumia 800 User Guide
Issue 1.0

Contents
Safety 4
Get started 6
Keys and parts 6
Back, start, and search keys 7
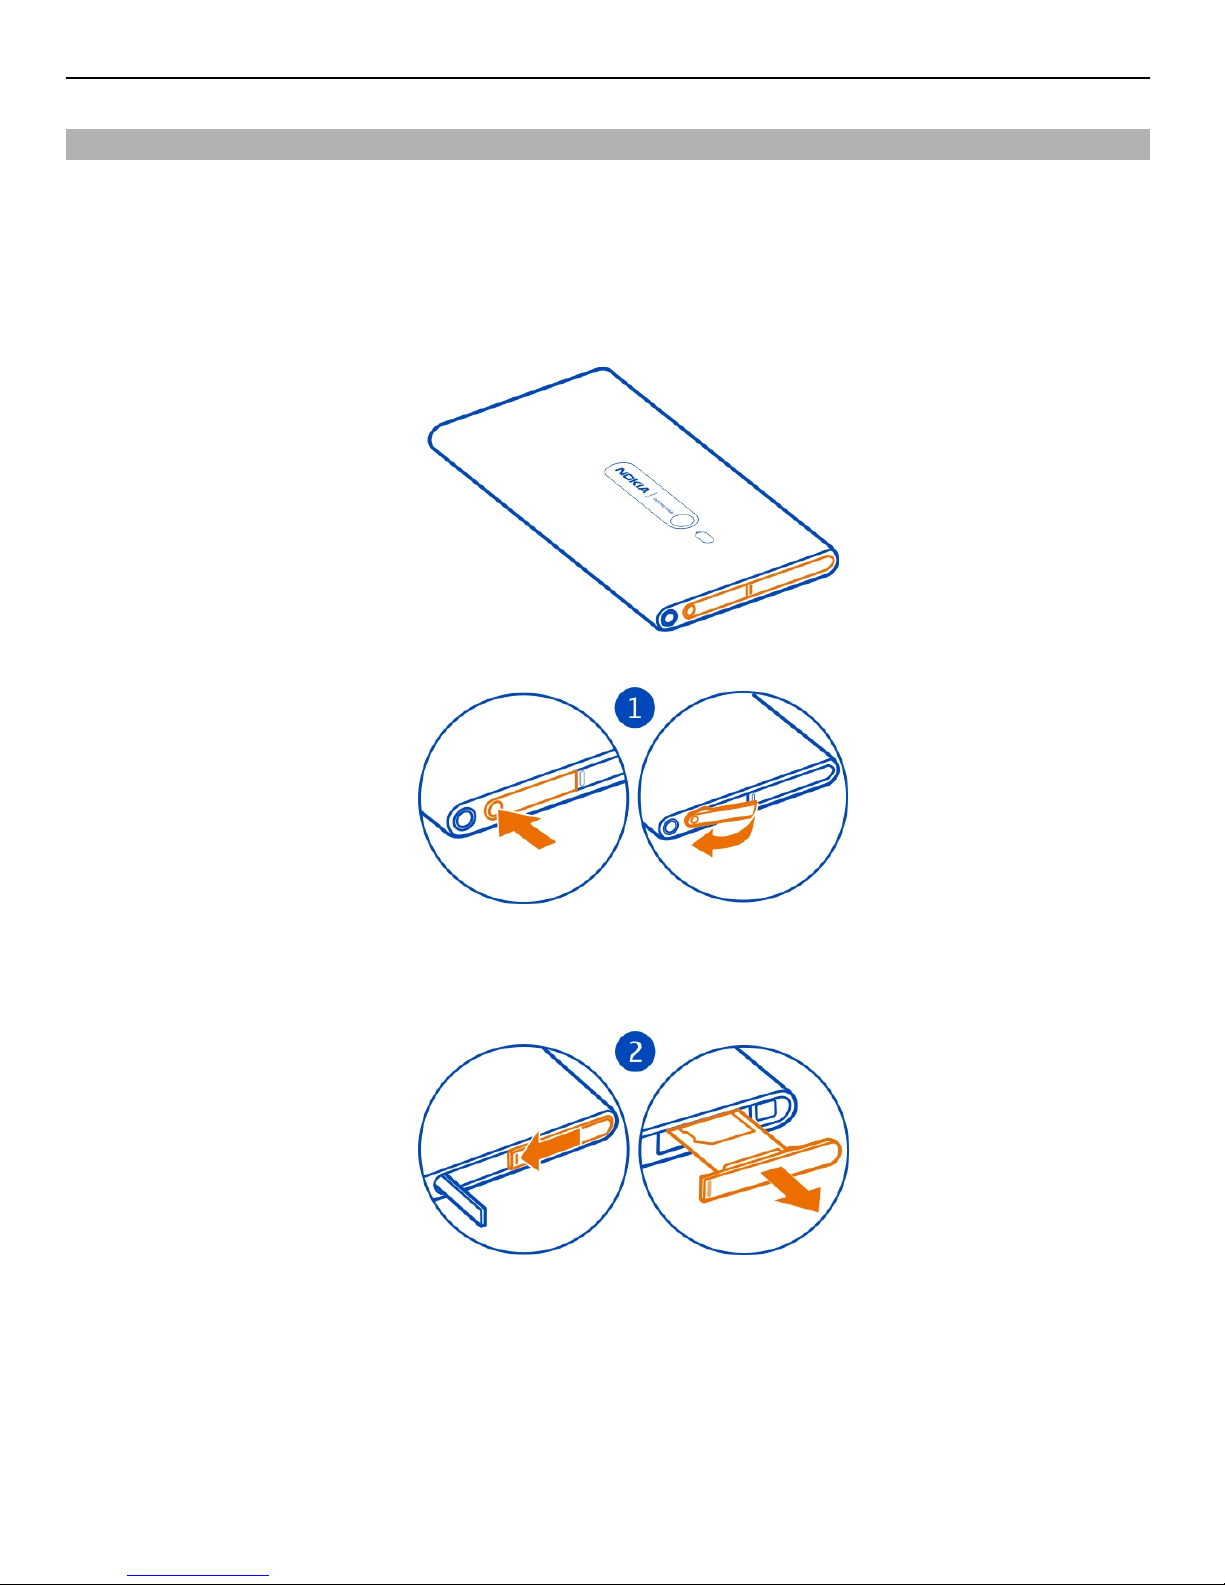
Insert the SIM card 8
Charge your phone 9
Antenna locations 12
Switch the phone on or off 12
Create your accounts 13
Windows Live ID 14
Nokia account 14
Copy contacts from your old phone 14
Lock or unlock the keys and screen 15
Headset 16
Change the volume 16
Access codes 17
Set your phone to sync with your
computer 17
Basics 18
About the start screen 18
Touch screen actions 19
Use your phone when it's locked 22
Switch between open apps 22
Personalise your phone 23
Write text 24
Search your phone and the web 26
Indicators on the status bar 27
Use your phone offline 28
Prolong battery life 28
Calls 29
Call a contact 29
Call the last dialled number 29
Call your voice mailbox 30
Divert calls to your voice mailbox or
another phone number 30
Make a conference call 30
Silence an incoming call 31
Contacts & social networking
services 31
Contacts 31
Social networks 35
Internet 36
Internet connections 36
Internet 38
Messaging & mail 40
Messages 40
Mail 42
Camera 45
About the camera 45
Take a picture 45
Take a close-up picture 45
Take a picture in the dark 46
Take a picture of a moving object 46
Camera tips 46
Record a video 46
Save location information to your
pictures and videos 47
Send a picture 47
Share your pictures and videos 48
Your pictures 48
About the Pictures hub 48
View pictures 49
Mark a picture as a favourite 49
Upload pictures and videos to the
web 50
Change the background in the Pictures
hub 50
Create an album 51
Copy your pictures between your
phone and PC 51
Entertainment 51
Music and videos 51
2Contents

Marketplace 53
Games 56
Maps & navigation 57
Positioning and location services 57
Bing Maps 58
Office 61
Clock 61
Calendar 62
Microsoft Office Mobile 64
Use the calculator 68
Connectivity & phone
management 68
Bluetooth 68
Copy a picture or other content
between your phone and PC 69
Keep your phone software and
applications up to date 70
Back up, sync, and restore your phone 71
Free up phone memory 71
Remove an application from your
phone 72
Security 72
Support 73
Nokia original accessories 73
Practical rules about accessories 73
Battery 73
Product and safety information 74
Index 81
Contents 3

Safety
Read these simple guidelines. Not following them may be dangerous or illegal. For
further information, read the complete user guide.
SWITCH OFF IN RESTRICTED AREAS
Switch the device off when mobile phone use is not allowed or when it may
cause interference or danger, for example, in aircraft, in hospitals or near
medical equipment, fuel, chemicals, or blasting areas. Obey all instructions
in restricted areas.
ROAD SAFETY COMES FIRST
Obey all local laws. Always keep your hands free to operate the vehicle while
driving. Your first consideration while driving should be road safety.
INTERFERENCE
All wireless devices may be susceptible to interference, which could affect
performance.
QUALIFIED SERVICE
Only qualified personnel may install or repair this product.
BATTERIES, CHARGERS, AND OTHER ACCESSORIES
Use only batteries, chargers, and other accessories approved by Nokia for use
with this device. Do not connect incompatible products.
KEEP YOUR DEVICE DRY
Your device is not water-resistant. Keep it dry.
GLASS PARTS
The device screen is made of glass. This glass can break if the device is
dropped on a hard surface or receives a substantial impact. If the glass breaks,
do not touch the glass parts of the device or attempt to remove the broken
glass from the device. Stop using the device until the glass is replaced by
qualified service personnel.
4Safety

PROTECT YOUR HEARING
Listen to a headset at a moderate level, and do not hold the device near your
ear when the loudspeaker is in use.
Safety 5

Get started
Keys and parts
1Connector for headphones and loudspeakers (3.5 mm)
2Micro-USB connector. Also used to charge the battery.
3Micro-SIM card holder
4Volume key
5Power key/Key lock button
6Camera key
7Back key
8Start key
9Search key
6Getstarted

10 Camera flash
11 Camera lens
12 Microphone
13 Loudspeaker
If there is protective tape on the camera lens, remove the tape.
Back, start, and search keys
The back, start, and search keys help you to navigate your phone.
Back key
Return to the previous screen
Press . Your phone remembers all the apps and websites you have visited since the
last time your screen was locked.
Switch between open apps
Press and hold , swipe left or right, and select the desired app.
Start key
Go to the start screen
Press .
Search key
Search the web
Press .
Get started 7

Insert the SIM card
Your phone uses a micro-SIM card, also known as a mini-UICC card.
Do not attach any stickers to your SIM card.
1 You must first open the cover of the micro-USB connector. Press the left end of the
cover, and carefully pull the cover away from the phone.
2 To unlock the SIM card holder, press and slide the holder to the left. Carefully pull
out the holder.
3 Make sure the contact area is facing up, and insert the SIM card into the SIM card
holder.
8Getstarted

4 Insert the SIM card holder back into the phone, and slide the holder to the right.
5 Close the cover of the micro-USB connector.
Remove the SIM card
1 Switch the phone off.
2 Open the cover of the micro-USB connector.
3 Unlock the SIM card holder, and carefully pull out the holder.
4 Pull the card out of the holder.
If you later change your network service provider, for instructions, go to
www.nokia.com/support.
Charge your phone
About the battery
Your phone has an internal, nonremovable, rechargeable battery. Use only Nokia
approved chargers designated for this phone. You can also use a compatible USB data
cable to charge your phone.
You can set your phone to automatically save power when the battery charge level is
low. Select > and battery saver > Always turn on Battery Saver when battery
is low.
When battery saver mode is switched on, you may not be able to change the settings
of all apps.
Do not attempt to remove the battery from the device. To replace the battery, take the
device to your nearest authorised service facility.
Get started 9

Important: Only qualified personnel or an authorised service facility should replace
the battery. Unauthorised battery replacement may invalidate your warranty.
Charge the battery
Your battery has been partially charged at the factory, but you may need to recharge it
before you can switch on your phone for the first time.
You do not need to charge the battery for a specific length of time, and you can use the
phone while it is charging.
If the phone indicates a low charge, do the following:
Charge from a wall outlet
1 First connect the USB cable to the charger, and the charger to the wall outlet, then
connect the USB cable to your phone.
2 When the battery is full, disconnect the charger from the phone, and then from the
wall outlet.
10 Get started

To avoid breaking the charger connector, be careful when connecting or disconnecting
the charger cable.
Charge from a computer
You can use USB charging when a wall outlet is not available. Data can be transferred
while charging the device. The efficiency of USB charging power varies significantly, and
it may take a long time for charging to start and the device to start functioning.
1 First connect the USB cable to the computer, then to your phone.
2 When the battery is full, first disconnect the USB cable from your phone, then from
the computer.
If the battery is completely discharged, it may take several minutes before the charging
indicator is displayed or before any calls can be made.
If the battery has not been used for a long time, to begin charging, you may need to
connect the charger, then disconnect and reconnect it.
Get started 11

Antenna locations
Avoid touching the antenna area while the antenna is in use. Contact with antennas
affects the communication quality and may reduce battery life due to higher power level
during operation.
The antenna area is highlighted.
Switch the phone on or off
Switch the phone on
Press and hold the power key, until the phone vibrates.
12 Get started

Switch the phone off
Press and hold the power key, and drag the lock screen down.
Create your accounts
Your phone guides you through the initial setup when you insert your SIM card and
switch your phone on for the first time. To access all Windows Live and Nokia services,
create your Windows Live ID and Nokia account.
To create a Windows Live ID and Nokia account, you need an internet connection. For
information about possible data costs, contact your network service provider. If you
can't connect to the internet, you can create the accounts later.
If you already have a Windows Live ID or Nokia account, sign in with your existing
username and password.
Tip: Forgotten your password? You can request it to be sent to you in a mail or text
message.
To create a Windows Live ID later, connect your phone to your PC, and open the Zune
PC app, and you are prompted to create an account.
Get started 13

To create a Nokia account later, use your phone to access a Nokia service, and you are
prompted to create an account.
To make an emergency call during the initial setup, select emergency call.
Windows Live ID
With a Windows Live ID, you can access all Windows Live and Zune services with a single
username and password on your computer or phone. You can also use the same
username and password to access Xbox Live services on your Xbox.
With your Windows Live ID, you can, for example:
•Download content from Marketplace
•Back up your contacts in Windows Live
•Upload, store, and share pictures and documents on SkyDrive
•Keep track of and lock your lost phone with Find My Phone
•Get your gaming achievements on your phone, and add to them when you play
games on your phone
To learn more about Windows Live ID and Windows Live services, go to
www.live.com.
Nokia account
When you switch your phone on for the first time, your phone guides you through
creating a Nokia account.
With your Nokia account, you can, for example:
•Access all Nokia services with a single username and password, both on your phone
and a compatible computer
•Download content from Nokia services
•Save details about your phone model and contact information. You can also add
your payment card details.
To learn more about the Nokia account and Nokia services, go to www.nokia.com/
support.
To create a Nokia account later, use your phone to access a Nokia service, and you are
prompted to create an account.
Copy contacts from your old phone
Have your nearest and dearest instantly at your fingertips. Use the Contacts Transfer
app to easily copy your contacts from your old phone.
14 Get started

Your old phone needs to support Bluetooth. The contacts on your old phone need to be
stored in the phone memory, not on the SIM card.
1 On your old phone, switch Bluetooth on.
2 On the start screen of your new phone, swipe left to the apps menu, and select
Contacts Transfer.
3 Select Continue, and switch Bluetooth on.
4 Select your old phone from the list of found devices, and follow the instructions
shown on both phones.
If your contacts are written in a language that is not supported by your new phone, the
contact information may not be shown correctly.
If you have previously backed up your contacts in Windows Live, you can also import
them to your phone straight from the service.
Lock or unlock the keys and screen
To avoid accidentally making a call when your phone is in your pocket or bag, lock the
keys and screen of your phone.
Lock the keys and screen
Press the power key.
Unlock the keys and screen
Press the power key, and drag the lock screen up.
Get started 15

Set the keys and screen to lock automatically
Select > and lock+wallpaper > Screen times out after, and select the length
of time after which the keys and screen are locked automatically.
Headset
You can connect a compatible headset or compatible headphones to your phone.
Do not connect products that create an output signal, as this may damage the device.
Do not connect any voltage source to the audio connector. If you connect an external
device or headset, other than those approved by Nokia for use with this device, to the
audio connector, pay special attention to volume levels.
Change the volume
Use the volume keys. They control all sounds, including the volume of alarms and
reminders.
The built-in loudspeaker allows you to speak and listen from a short distance without
having to hold the phone to your ear.
16 Get started

Switch the loudspeaker on or off during a call
Select or .
Access codes
PIN or PIN2 code
(4-8 digits)
These protect your SIM card against unauthorised use or are
required to access some features.
You can set your phone to ask for the PIN code when you switch
it on.
If not supplied with your SIM card or you forget the codes,
contact your service provider.
If you type in the code incorrectly three times in a row, you need
to unblock the code with the PUK or PUK2 code.
PUK or PUK2 code
(8 digits)
These are required to unblock a PIN or PIN2 code.
If not supplied with your SIM card, contact your service provider.
Lock code (security
code)
(min. 4 digits)
This helps you protect your phone against unauthorised use.
You can set your phone to ask for the lock code that you define.
Keep the code secret and in a safe place, separate from your
phone.
If you forget the code and your phone is locked, your phone will
require service. Additional charges may apply, and all the
personal data in your phone may be deleted.
For more information, contact Nokia Care or your phone dealer.
Set your phone to sync with your computer
With the Zune PC app, you can sync music, videos, and pictures between your phone
and your compatible computer. You can also back up and update your phone with the
latest software, to improve performance and get new features.
Get started 17

To download and install the latest version on your PC, or to learn more about Zune, go
to www.zune.net.
Tip: If you're using an Apple Mac, download Windows Phone 7 Connector for Mac from
Mac App Store.
If you have previously used another app, such as Nokia Ovi Suite, to sync your files
between your phone and computer, you can set Zune to sync files to the same folders
you have used earlier, and have your music and other content easily synced to your new
phone.
Basics
About the start screen
Your start screen contains tiles that you can select to open apps or call contacts. Live
tiles show you what's going on and what you've missed.
The tiles show notifications of missed calls and received messages.
18 Basics

The start screen is yours to personalise. Pin contacts, apps, music, pictures, feeds,
mailboxes, and other favourites, so they're always with you. You can call pinned contacts
directly from the start screen.
Tip: To quickly open the apps menu, swipe left on the start screen.
Touch screen actions
To use your phone, tap or tap and hold the touch screen.
Important: Avoid scratching the touch screen. Never use an actual pen, pencil, or
other sharp object on the touch screen.
Open an app or other screen element
Tap the app or element.
Tap and hold to open a menu with further options
Place your finger on an item, until the menu opens.
Basics 19

Example: To edit or delete a calendar appointment, tap and hold the appointment, and
select the appropriate option.
Tap and hold to drag an item
Place your finger on the item for a second or two, and slide your finger across the screen.
Swipe
Place a finger on the screen, and steadily slide your finger in the desired direction.
20 Basics
Other manuals for Lumia 800
5
Table of contents
Other Nokia Cell Phone manuals

Nokia
Nokia Asha 311 User manual

Nokia
Nokia C3 User manual

Nokia
Nokia 6260 - Smartphone 6 MB User manual

Nokia
Nokia RM-608 User manual

Nokia
Nokia 2125 User manual

Nokia
Nokia SLIDE 6700 User manual

Nokia
Nokia 500 User manual

Nokia
Nokia 1255(RH-79) User manual

Nokia
Nokia 5230 User manual

Nokia
Nokia E55 User manual

Nokia
Nokia GOLD ARTE 8800 User manual

Nokia
Nokia 7510a User manual

Nokia
Nokia C5-03 User manual

Nokia
Nokia 7260 - Cell Phone - GSM User manual

Nokia
Nokia 6700 classic Quick start guide

Nokia
Nokia N900 Quick start guide

Nokia
Nokia E5-00 User manual

Nokia
Nokia 2323 classic User manual

Nokia
Nokia N97-5 User manual

Nokia
Nokia N97 User manual