TycoHD T8 User manual

MENU
MENU............................................................................................................................................................. 2
INTRUDUCTION............................................................................................................................................ 3
GENERAL OVERVIEW................................................................................................................................ 4
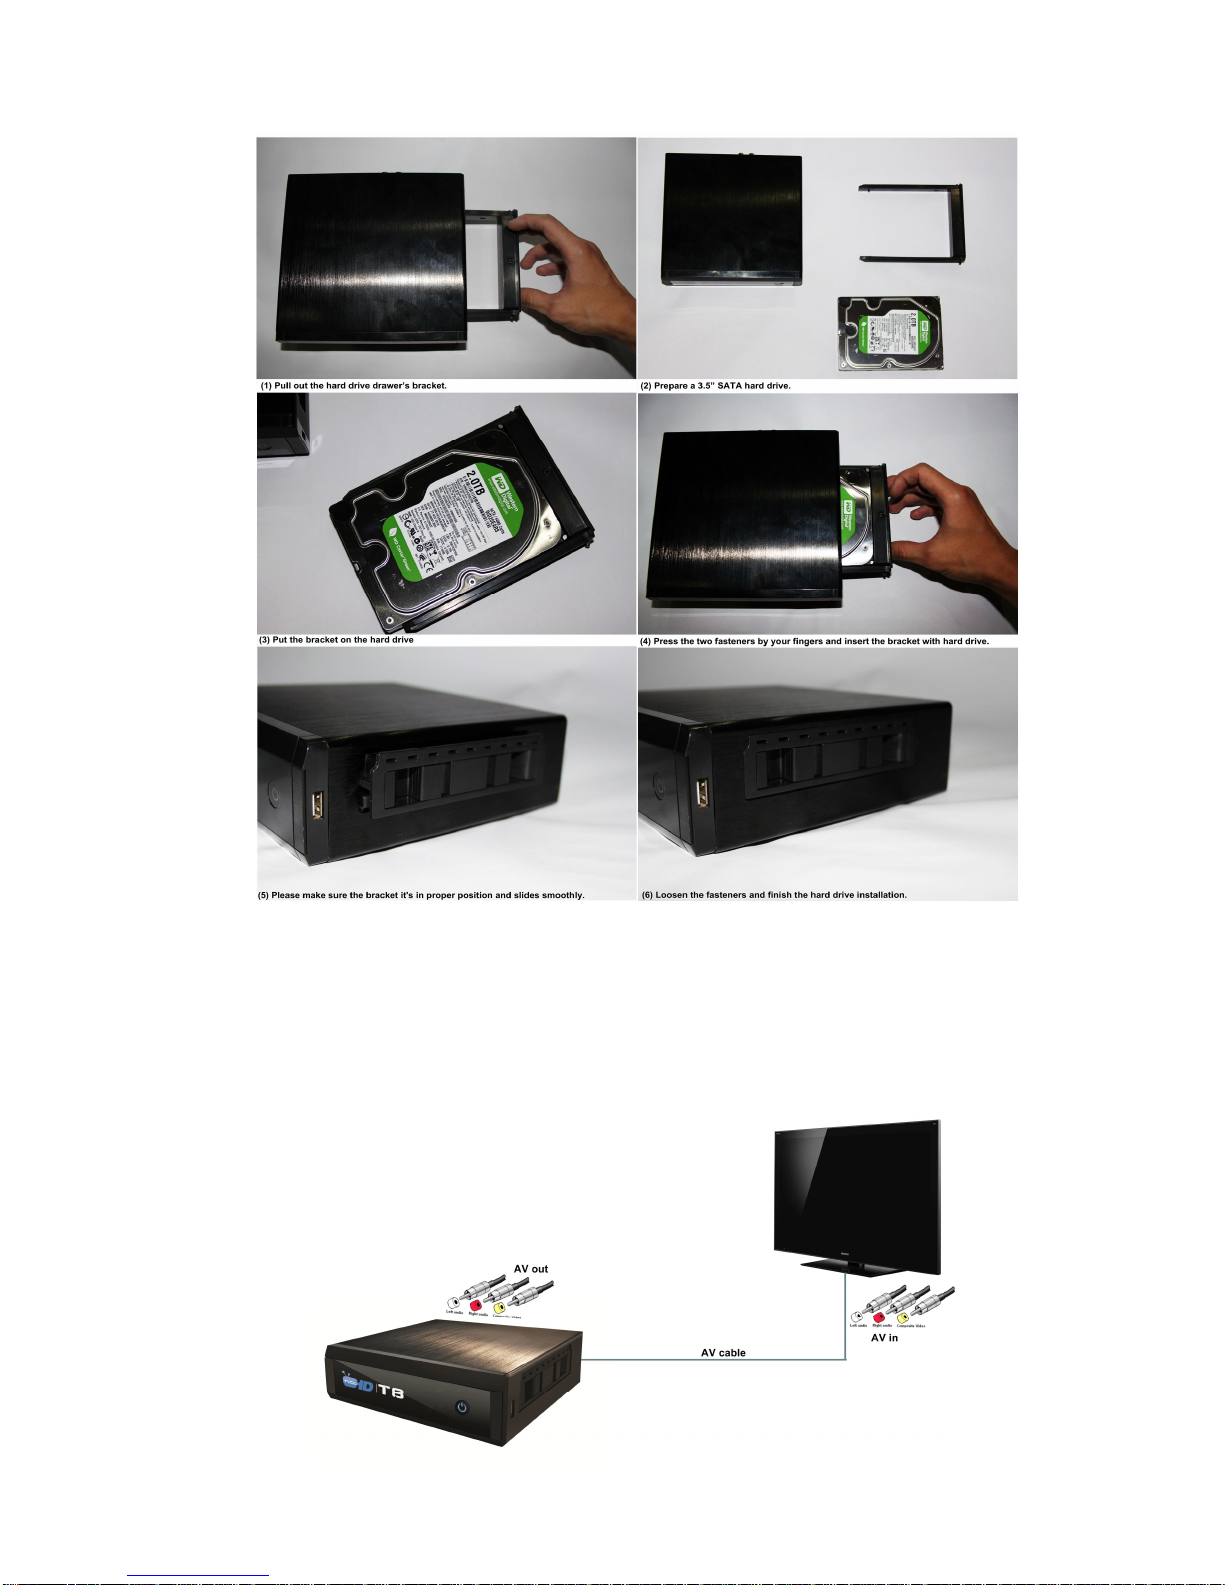
INSTALLING A HARD DRIVE..................................................................................................................... 5
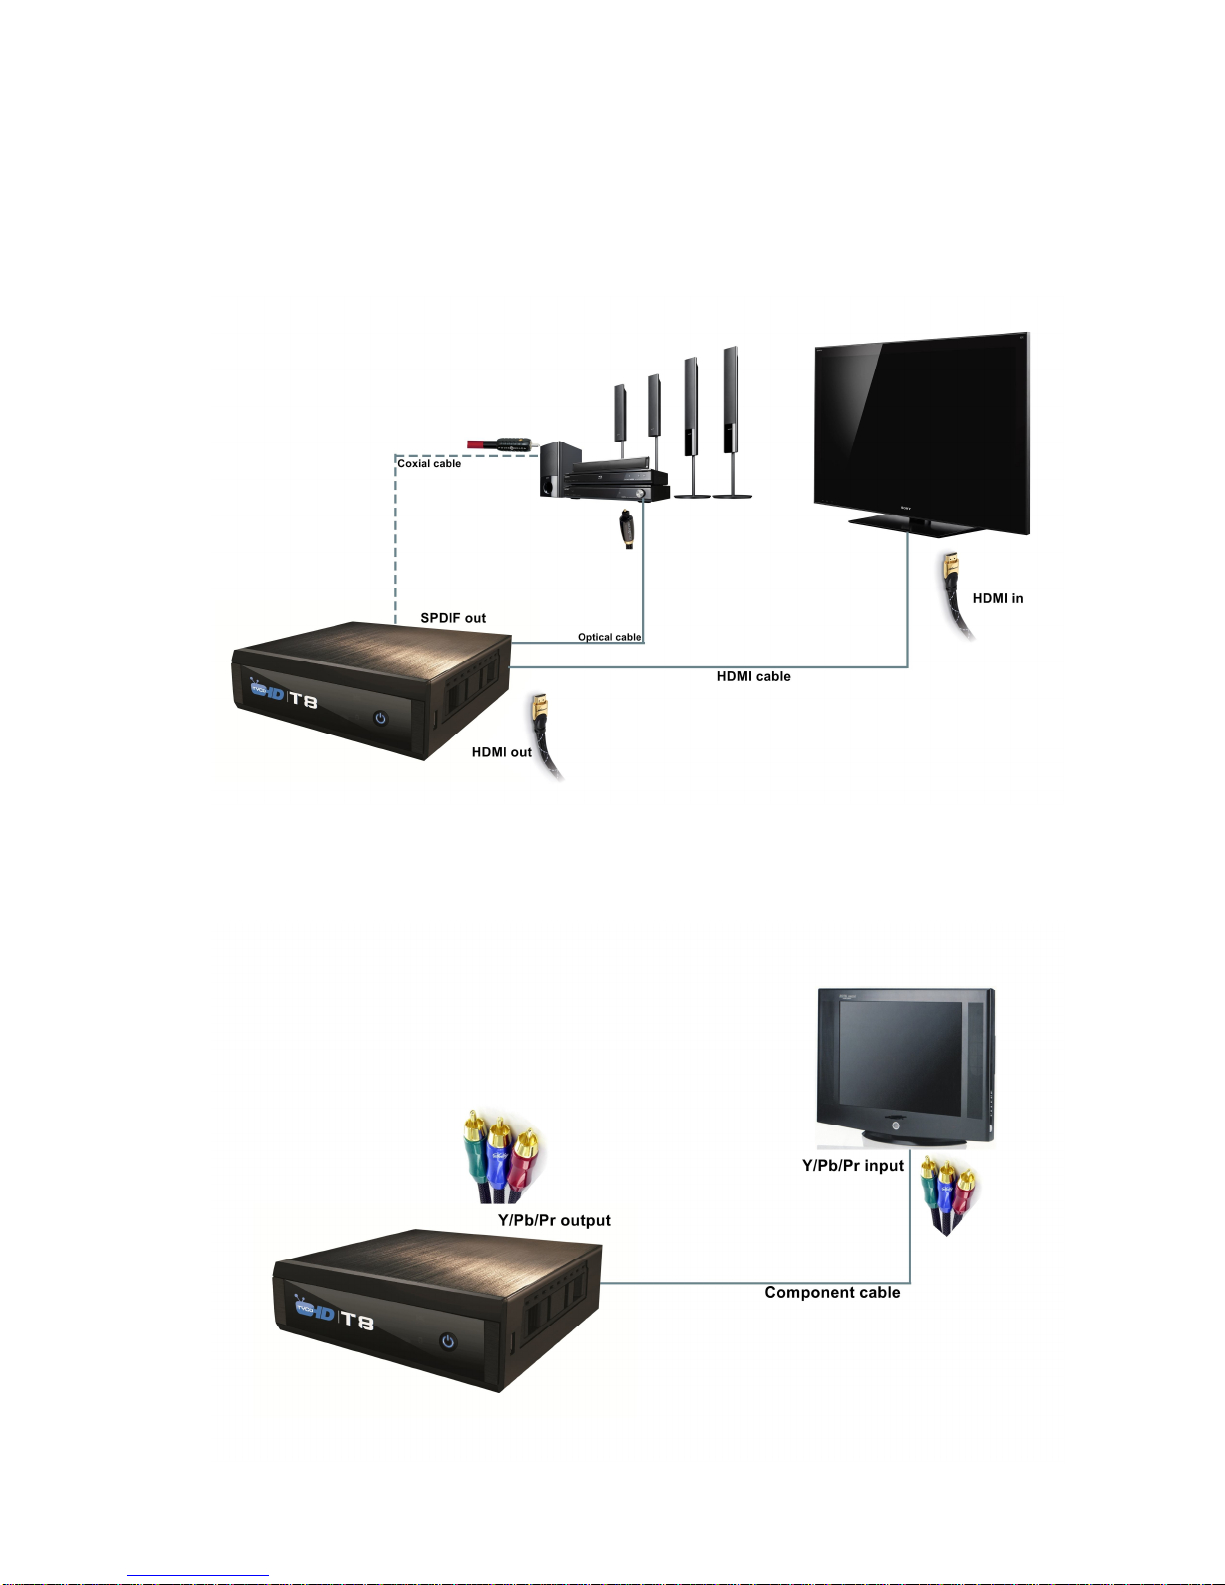
CONNECTIONS ............................................................................................................................................ 5
TV OUTPUT SETTINGS............................................................................................................................... 7
AUDIO SETTINGS........................................................................................................................................ 7
FORMATTING THE HARD DRIVE.............................................................................................................. 8
USB CONNECTION TO PC......................................................................................................................... 8
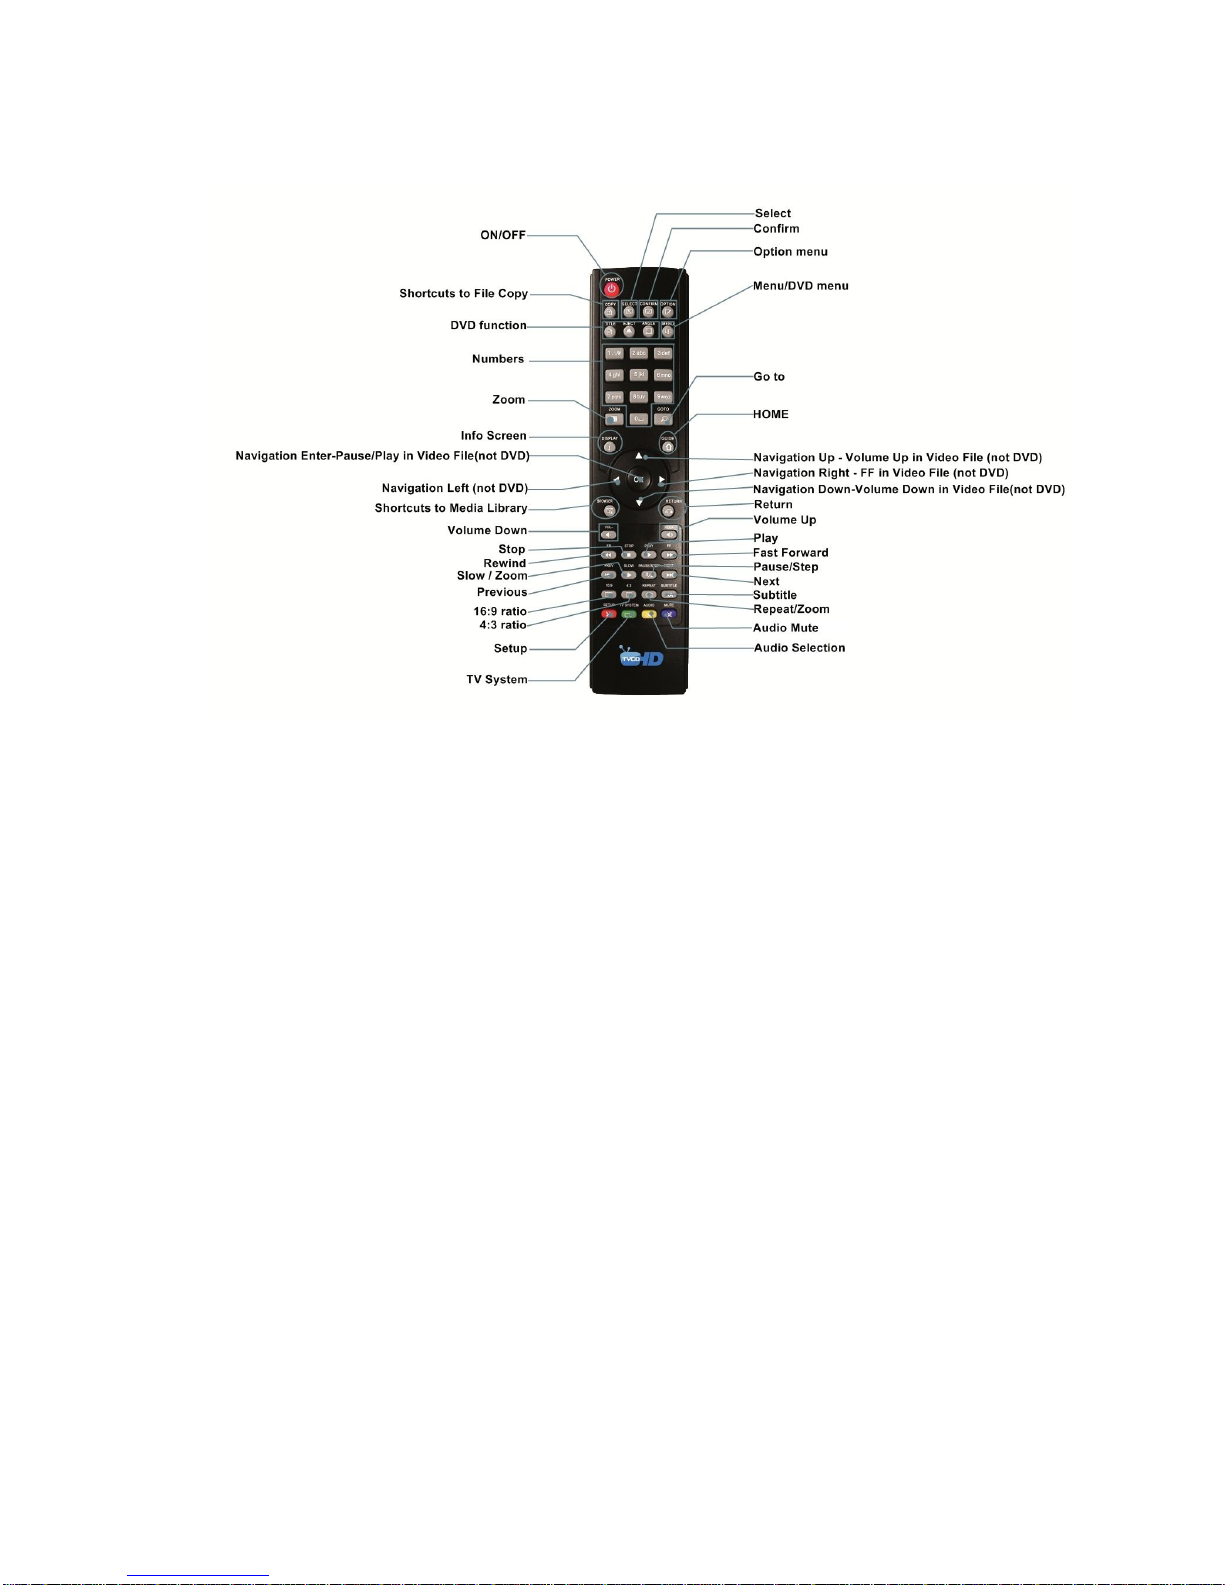
REMOTE FUNCTIONALITY......................................................................................................................... 9
HOME NETWORK SAMBA SERVER........................................................................................................10
WIRED NETWORK CONNECTION AND SETUP.....................................................................................11
WIRELESS NETWORK CONNECTION ....................................................................................................12
FIRMWARE UPDATE..................................................................................................................................12
MEDIA LIBRARY.........................................................................................................................................13
MEDIA LIBRARY - MUSIC PLAYER.........................................................................................................14
FANART PREVIEW.....................................................................................................................................15
PLAY FOLDER.............................................................................................................................................16
PLAY VIDEO FROM COVER ART.............................................................................................................16
WATCHED INDICATOR..............................................................................................................................16
LOCK FACILITY...........................................................................................................................................17
CHANGE PIN CODE....................................................................................................................................17
PIN PROTECTION .......................................................................................................................................17
FOLDER PROTECTION..............................................................................................................................17
RESET PIN CODE .......................................................................................................................................17
FILE OR FOLDER JUMP TO FACILITY....................................................................................................18
QUICK PLAYLIST FUNCTION...................................................................................................................19
TIME BAR JUMP .........................................................................................................................................20
TIME BAR FF/RW........................................................................................................................................21
VIDEO GOTO ...............................................................................................................................................21
SCREEN CALIBRATION ............................................................................................................................22
ZOOM............................................................................................................................................................22
SUBTITLES ..................................................................................................................................................23
PLASMA MODE / VIDEO SCREEN TRANSPARENCY...........................................................................23
AUTOPLAY...................................................................................................................................................23
COVER ART.................................................................................................................................................24
FILE MANAGER...........................................................................................................................................26
INTERNET RADIO.......................................................................................................................................29
NFS (NETWORK FILE SYSTEM)...............................................................................................................30

3
Thank you for purchasing the TycoHD Multimedia Player.
The T8 is the latest generation multimedia player specially developed by TycoGroup for
today’s demanding media enthusiast. With stylish, simple and elegant design, It will be a
perfect match with your home appliances like Hi-Fi, flat TV, and amplifier. In addition, the
Cover art function and fanart browser function allows users to select their favorite movies to
wahtch quickly on a extremely beautiful interface. Enjoy instant music, video and photo
playback on your TV and share them with your family and friends!
Please check the TycoHD forum for the latest user guide. www.tycohd.com
Warranty
TycoHD products carry a 12 month from date of purchase warranty. All of Tyco products
have bar code on the devices, the user can check warranty of product by entering this code
when you visit the website: www.tycohd.com. Return your product to the store that it was
purchased from or return it directly to TycoHD 2400 Bruce Street APT 63, Conway, AR
72034 Arkansas, USA
Warranty does not cover damage by
a) Lightning or over voltage
b) Water damage or liquid spill
c) Misuse or abuse
d) User tampering
e) Using non TycoHD approved Firmware
TycoGroup Electronics is not responsible for any loss of data irrespective of the cause.
Important Safety Instructions
Read these instructions for all components before using this product.
Do not use this apparatus near water or moisture. Do not use this product near a
bathtub, washbowl, kitchen sink, laundry tub, in a wet basement, near a swimming
pool, or anywhere else that water or moisture are present.
Clean only with a soft dry cloth and as directed by the manufacturer. Unplug this
product from the wall outlet before cleaning.
Do not block any ventilation openings. Install in accordance with the manufacturer
instructions. To ensure reliable operation of the product and to protect it from
overheating, put the product in a position and location that will not interfere with its
proper ventilation. For example, do not place the product on a bed, sofa, or similar
surface that may block the ventilation openings. Do not put it in a built-in system, such
as a bookcase or a cabinet that may keep air from flowing through its ventilation
openings.
Do not install near any heat sources, such as radiators, heat registers, stoves or other
apparatus that produce heat.
Protect the power cord from being walked on or pinched, particularly at plugs,
convenience receptacles, and the point where they exit from the apparatus.
Only use attachments or accessories specified by the manufacturer.
Unplug this apparatus during lightning storms or when unused for long periods of
time to prevent damage to this product.
Refer all servicing to qualified service personnel.

4
GENERAL OVERVIEW
1. Y/Pb/Pr out: for high-quality video output.
2. Coxial out: for digital audio high quality.
3. Power switch.
4. 10/100 Mbps ETHERNET: for network connection (RJ45 port).
5. AV out: for standar video & audio output.
6. Optical out: for digital audio high quality.
7. HDMI 1.3 out: for HD video output to 1080p and digital audio in highest quality.
8. 2xUSB 2.0 HOST: for conection of USB devices.
9. USB 2.0 divice: for conection with your computer.
10. Power supply: with external free voltage adapter.

5
INSTALLING A HARD DRIVE
CONNECTIONS
Analogue Audio and Composite Video connection to TV.
Composite Video offers the most basic picture quality connection and should only be used if
your TV does not have a HDMI or Component input. Use RCA analogue audio outputs in the
absence of HDMI or Digital Audio inputs on your TV or Home Theatre system. RCA
analogue outputs will output a downmix from mutli-channel to stereo.

6
HDMI - Coax Digital - Toslink Connection to a TV or Amplifier
For digital audio connection to your Home Theatre System you can either use the TOSLINK
Optical or the Coax Digital or HDMI output. The T8 supports both Passthrough and Downmix
for Dolby Digital 5.1, DTS 5.1, Dolby True HD 7.1 and DTS Master 7.1 signals. If you want
your Home Theatre Amplifier to decode the surround sound stream you should use either
Digital Audio output and set the HDMI Output to Passthrough Mutil CH or SPDIF output to
Passthrough Multi CH in the Audio setup menu.
Component Video Connection to Amp or TV
Component Video offers the next best picture quality to HDMI so if your system does not
have a HDMI input we suggest you use the Component Video Connection.

7
Power up and Standby
Plug the AC/DC adapter into the mains outlet and plug the DC Jack into the DC IN at the rear
of the T8. DO NOT USE ANY AC/DC ADAPTER AND ONLY USE THE ONE SUPPLIED
otherwise you may cause damage to the unit. Turn on the switch at rear and then press the
On/ Off button on the TycoHDs front panel and front facia LED will turn on Blue. You can put
your TycoHD into standby by pressing the On/ Off button on the remote. When in standby
the front facia LED will turn Red.
TV OUTPUT SETTINGS
Connect the TycoHD to your TV by one of the connection options as shown on page 5 & 6
and change the input option on your TV to match the option you selected. If you do not get to
see the TycoHD GUI on your TV you will need to toggle the TycoHD TV output until you get
a picture.
TV SYS Toggle Procedure
The TycoHD has three video output options ie Composite Video
(yellow RCA connectors, Component Video (Red - Green- Blue
connectors) and HDMI. Each output option also offers different screen
resolution settings and these will need to be adjusted to match the
type of TV used.
To change the Video Output on the TycoHD just press the TV SYS
button on the remote and it will change the Video Output to the next
available output option. If after pressing the TV SYS button you still do
not get a picture then after a short pause press the TV SYS again until
you see the TycoHD GUI on your TV. Keep repeating this procedure
until you see a picture on your TV.
Once you see the TycoHD GUI on your TV then you must enter the Video Setup mode
and adjust the Video settings to match the screen size resolution of your TV.
AUDIO SETTINGS
HDMI Downmix (2 channel)
Use this setting if you are connecting the TycoHD directly to the HDMI input on your TV. The
sound will be downmixed to 2 channel stereo.
HDMI Passthrough
Use this setting if you are connecting to the HDMI input of a Home Theatre Amplifier. The
audio will be passed through as Bitstream or LPCM and the amplifier will do the multichannel
decoding.
SPDIF Downmix (2 channel)
Use this setting to connect to a Amplifier via Toslink optical cable or Co-Axial Digital RCA
cable. The sound will be downmixed to 2 channel stereo.
SPDIF Passthrough
Use this setting to connect to amplifier via Toslink optical cable or Co-Axial Digital RCA
cable. The sound will be passed through as Bitstream or LPCM and the amplifier will do the
multichannel decoding.
Note: If you want the audio will be passed through as DolbyDigital True HD 7.1 or DTS Master
7.1, you have to use the HDMI conection and set “1080p 24HZ” mode in Video setup menu is
“ON”.

8
FORMATTING THE HARD DRIVE
The T8 has a built in Hard Drive format feature that formats the hard drive with a main NTFS
partition and other small internal partitions for propriety use.
The Hard Drive should be formatted in the TycoHD T8 to ensure full functionality. A pre
formatted Hard Drive can be used but you may not be able to use all the internal features of
the T8.
To Format the internal Hard Drive select SETUP menu and then HDD Format. The Hard
Drive format function can be protected by the built in “Pin Code Lock” function. To enable
Hard Drive Format protection just enable “Pin Protection” option in the Setup menu.
WARNING: FORMATTING THE HARD DRIVE WILL ERASE ALL DATA
USB CONNECTION TO PC
You can transfer files to and from the TycoHD via fast USB2.0 transfer. Use the included
USB cable to connect the TycoHD T8 to your PC. As soon as the USB cable from the
TycoHD is connected to your PC the front Blue LED on the TycoHD will switch off and then
on again. The TycoHD will now connect.The computer will automatically install the correct
drivers and then you will be able to navigate the TycoHD like any normal external USB drive.
Note: Some Computers may take up to a fewminutes to install the correct USB drivers.
EXTERNAL USB DEVICE DRIVER NOT REQUIRED

9
REMOTE FUNCTIONALITY
Navigation Buttons Additional Functionality
To assist ease of use operation - The TycoHD remote has been designed to be ergonomic
and simple to use. While watching your Videos you can intuitively navigate and change
certain function without the need to continually look at the remote control.
During Video Playback (excluding DVD files) you can use the navigation buttons for
operational functions like Fast Forward, Rewind, Pause, Stop, Volume Up and Volume
Down.

10
HOME NETWORK SAMBA SERVER
The TycoHD has NAS (Network Attached Storage) functionality built in. And although it is
limited in transfer speed compared to standalone NAS servers it performs very well if speed
is not your major requirement. You can also use the T8 as a Media Server and stream
content to other TycoHD’s on your home network.
The Samba function is enabled or disabled in the System menu under Network. Should the
Samba stop working for any reason we suggest you re-boot the TycoHD, turn off the switch
at the rear and re-turn on and press the on/off button on the front panel.

11
WIRED NETWORK CONNECTION AND SETUP
The TycoHD T8 can be connected to your local network by means of a RJ45 CAT5 cable.
The TycoHD is supplied standard with a UPnP facility and a Samba Client that allows
connection to your local area network via a router or switch. You can share media files from
your PC and stream media content to the TycoHD and you can use the TycoHD as a Media
Server to stream media content to other TycoHD’s on your network.
Press the “setup” button on the TycoHD Remote or select “setup” tab on the home page.
Select “Network” option in the setup window and press “OK” to confirm. Network
configuration allows for either automatic or manual IP setup.
Follow the on-screen instructions to complete the network setup.
If you connect to a wired Ethernet network using DHCP, TycoHD automatically detects your
network. Alternately you may have to enter your IP address, subnet mask, router, and DNS
addresses manually.
DHCP IP (AUTO)
Choose this option if you want your router to assign a dynamic IP address to TycoHD. This
option is easy to use and recommended for normal users.
FIX IP (MANUAL)
This option allows you to assign a static IP address to TycoHD. This option requires
modifying network settings of the TycoHD and is recommended for advanced users. To set a
Static IP for your TycoHD, enter the information IP Address, Subnet Mast and Gateway and
DNS Server Address as relevant to your router as in the screen below.
The IP address, Gateway information shown below is for reference purposes only. Do NOT
copy these.

12
WIRELESS NETWORK CONNECTION
Plug the Wireless USB adapter into USB host ports on the side or rear of the TycoHD. The
RF signal strength may be depended on your particular environment. In order to get the best
placement for your Wireless USB adapter, you may need to extend the length with an
additional USB extension cable (not supplied).
Note: The draft N standard prohibits using High Throughput with WEP or WPA2-PSK as the
unicast cipher, and your data rate will drop to 54 Mbps (802.11g) which is normal. Please try
other encryption methods (WPA-PSK), or choose to configure an unsecured profile.
The operating distance or range of your wireless connection can vary significantly based on
the physical placement of the Router and the WiFi Dongle.
For best results, place your Router:
Near the center of the area in which your TycoHD will operate,
In an elevated location such as a high shelf,
Away from potential sources of interference, such as PCs, microwaves, and cordless
phones,
With the Antenna screwed in tight and in the upright position, * Away from large metal
surfaces.
FIRMWARE UPDATE
Download the latest TycoHD Firmware from www.tycohd.com.
UnZIP or UnRAR the file and you will find one file named install.img. Copy this file to the root
directory of a Flash Drive.
Plug the flash drive into the TycoHD. Turn off
the switch at the rear of the TycoHD. Now press
the on/off button at the front and hold it. In
simultaneously, turn on the switch and press
ON/OFF button for 10 seconds and then
release.
After approximately 15 seconds the LED on the
TycoHD with flash red-blue and you will get a
progress bar on your TV display (some TV's will
not display this) wait until the TycoHD reboots
itself +- 60 sec. You TycoHD is now be
updated.
DO NOT REMOVE POWER DURING THE EMERGENCY RECOVERY PROCEDURE.

13
MEDIA LIBRARY
Select Media Library from the home page and a new screen will load then select the source
option you require. You can choose between USB device, SD Card, Local HDD, USB
DVD,Network, UPnP, NFS and Playlist.
Once you have selected your source input you can browse to the folder or file you want to
view by using the navigation buttons on the remote control. The top tabs filter the files by All,
Music, Photo and Movies. All files and folders are displayed on the left hand side and a
preview window is located on the right of the screen. When you play music files a music
window will appear at the bottom left of the screen.
The Media Library offers additional functionality when the “menu” button on the remote is
pressed. Select a file or folder and press the “menu” button and the menu dialogue will
appear and display all the available options.

14
MEDIA LIBRARY - MUSIC PLAYER
Select any supported music file and the Music Player Screen will launch. If the music file has
embedded information tags then these will be displayed on the right hand side in the preview
window area.

15
FANART PREVIEW
TycoHD has the built in facility to preview fanart and will read folder.jpg and about.jpg
inside a folder. All you need to do in order to use this very useful feature is to arrange your
collection with each video, in its own folder. Place a JPEG picture together with each movie
in the folder and you will be ready to go. You can easily download DVD cover art via internet
for your picture.
IMPORTANT: We recommend that you firstly set your screen size in the Setup menu before viewing
in folder full screen cover art. Only those fanarts that are smaller 1MB can be displayed, if not the
folder.jpg will be loaded automatically in full screen cover art.
Navigate to a folder. The image will be displayed in the preview window.
To view the preview fanart in full screen press the DISPLAY button.
Press the Nav Up/Down to browse by cover art.

16
PLAY FOLDER
TycoHD allows you to play a video file within a folder without the need to open the folder.
Just focus on the required folder and press the “Play” button. The first video file found in the
folder will be played. The folder play will only work with video files.
PLAY VIDEO FROM COVER ART
With TycoHD you can play the video directly from the cover art. Zoom the about.jpg by
pressing the “Display” button then press Play or Enter to play the video.
WATCHED INDICATOR
TycoHD is equipped with a watched video indicator feature. To enable this function go to
Setup -- Misc -- Watched Indicator and switch it on. TycoHD will mark the Video file with a
popcorn icon once more than 10% of a video has been watched. You can also mark a video
as watched or clear the watched icon manually. To do this, focus on the file you require to
change and press the Menu button. The Menu dialogue screen will be shown on screen and
now you can mark the video as watched or remove the watched icon.

17
LOCK FACILITY
TycoHD has a built in Lock facility designed to restrict
access to certain folders.
Lock facility functions
a. System access areas such as Hard Drive Format
screen and File Manager.(Pin Protection)
b. User Folders (Folder Protection)
You can enable or disable these options in the Setup menu.
CHANGE PIN CODE
The default 4 digit Pin Code is 0000.
To change the Pin Code go to Setup -- Misc -- Password -- You will be prompted to enter the
existing pin code. For the first time you must enter the default factory pin ie 0000 then the Pin
Code change screen will open. Now enter you new personal 4 digit code by pressing the
numbers on your remote. Once you have entered the code press the “ENTER” button on the
remote and the new code will be saved.
PIN PROTECTION
Enable Pin Protection to protect access to the Hard Drive Format area and the File Manager
functionality. Once the Pin Protection is enabled you will be prompted to enter your personal
4 digit pin code when trying to gain access to these screens.
FOLDER PROTECTION
Folder protection will allow you to protect folders on the Local Hard Drive, USB Drive, SD
Card or Network Shares (write enabled shares). To protect a folder focus on the folder and
press the Menu button on the remote. Select the
Lock icon and the folder will be locked. To unlock a
folder focus on the folder and press the Menu
button on the remote. Select the Unlock icon and
you will be prompted to enter your Pin Code. After
the correct code is entered the folder will be
Unlocked.
RESET PIN CODE
To reset the Pin Code re-install the latest firmware and the Pin Code will default back to
0000.

18
FILE OR FOLDER JUMP TO FACILITY
TycoHD has the built in jump facility that allows you to jump to a certain file or folder number
on the Media Library screen. This facility is very useful for users that store many files or
folders in a directory as it allows you to jump to any file or folder number quickly.
Enter the file or folder number you want to jump to. The number you enter will be displayed on the top
left of the screen.
After a brief pause the TycoHD will jumpto the file or folder number you entered.

19
QUICK PLAYLIST FUNCTION
You can make quick Playlist on the fly while you are in Media Library view. To make a Music
playlist you must select the “MUSIC” tab on the top right of the screen.
Focus on the file you want to add to the Playlist and press the Select button on the remote. A
yellow tick will appear next to the file selected. To remove a selected file just focus on the file
and press the Select button again. Repeat the above to add more files. Once you have
completed ticking the required files press the Confirm button to add the files to the Playlist. In
the Playlist view select the “MUSIC” tab and you can use the same procedure to remove any
files from the Playlist.
You cannot make a quick Playlist from an external drive or network source.
You can easily start the music playlist at any time by enter playlist in “Browser”.

20
TIME BAR JUMP
The TycoHD has the built in Time Bar Jump facility that allows you to quickly jump to a
certain time in the video file you are viewing.
Press any numeric button on the TycoHD remote and the Time Bar will appear. the Time Bar
graphically displays the current time play time in minutes and seconds and the total length of the video
in minutes and seconds.
Enter the desired time you want to jump to on the remote controls numeric keypad and the TycoHD
will display the time you entered on the top left of the screen and then automatically jump to this time
in the video.

21
TIME BAR FF/RW
The TycoHD Time Bar is displayed during normal Fast Forward or Fast Rewind. Press Right
or Left Navigation buttons on the remote for video files (DVD files use the FF/RW buttons)
The Time Bar will appear and show you the current time in the video and the total length of
the video in minutes. The Time Bar will dynamically update the current position in minutes as
you Fast Forward or Fast Rewind. To stop Fast Forward or Fast Rewind press the enter
button (Play button for DVD files).
Press any numeric button on the TycoHD remote and the Time Bar will appear.
the Time Bar graphically displays the current time play time in minutes and the total length of
the video in minutes.
To change the Fast Forward speed just press the Right Nav Button and it will advance to the
next higher speed. To change to a slower speed press the Left Nav button. For DVD files use
the FF/FRW buttons.
VIDEO GOTO
Press the GOTO on the remote and the GOTO screen will open on the top centre of the
screen. Press The GOTO screen allows you to change Time, Title, and Chapter. Press the
Up or Down Navigation button to change the value or enter the numeric values on the
remote. Press Enter once you have made your selection. To remove the screen press GOTO
again or press the Return button.
Table of contents