Nordmann Engineering NDC User manual
2560680 DE/EN/FR 1304
INSTALLATIONS- UND BEDIENUNGSANLEITUNG
INSTALLATION AND OPERATING INSTRUCTIONS
INSTRUCTIONS D’INSTALLATION ET D’EXPLOITATION
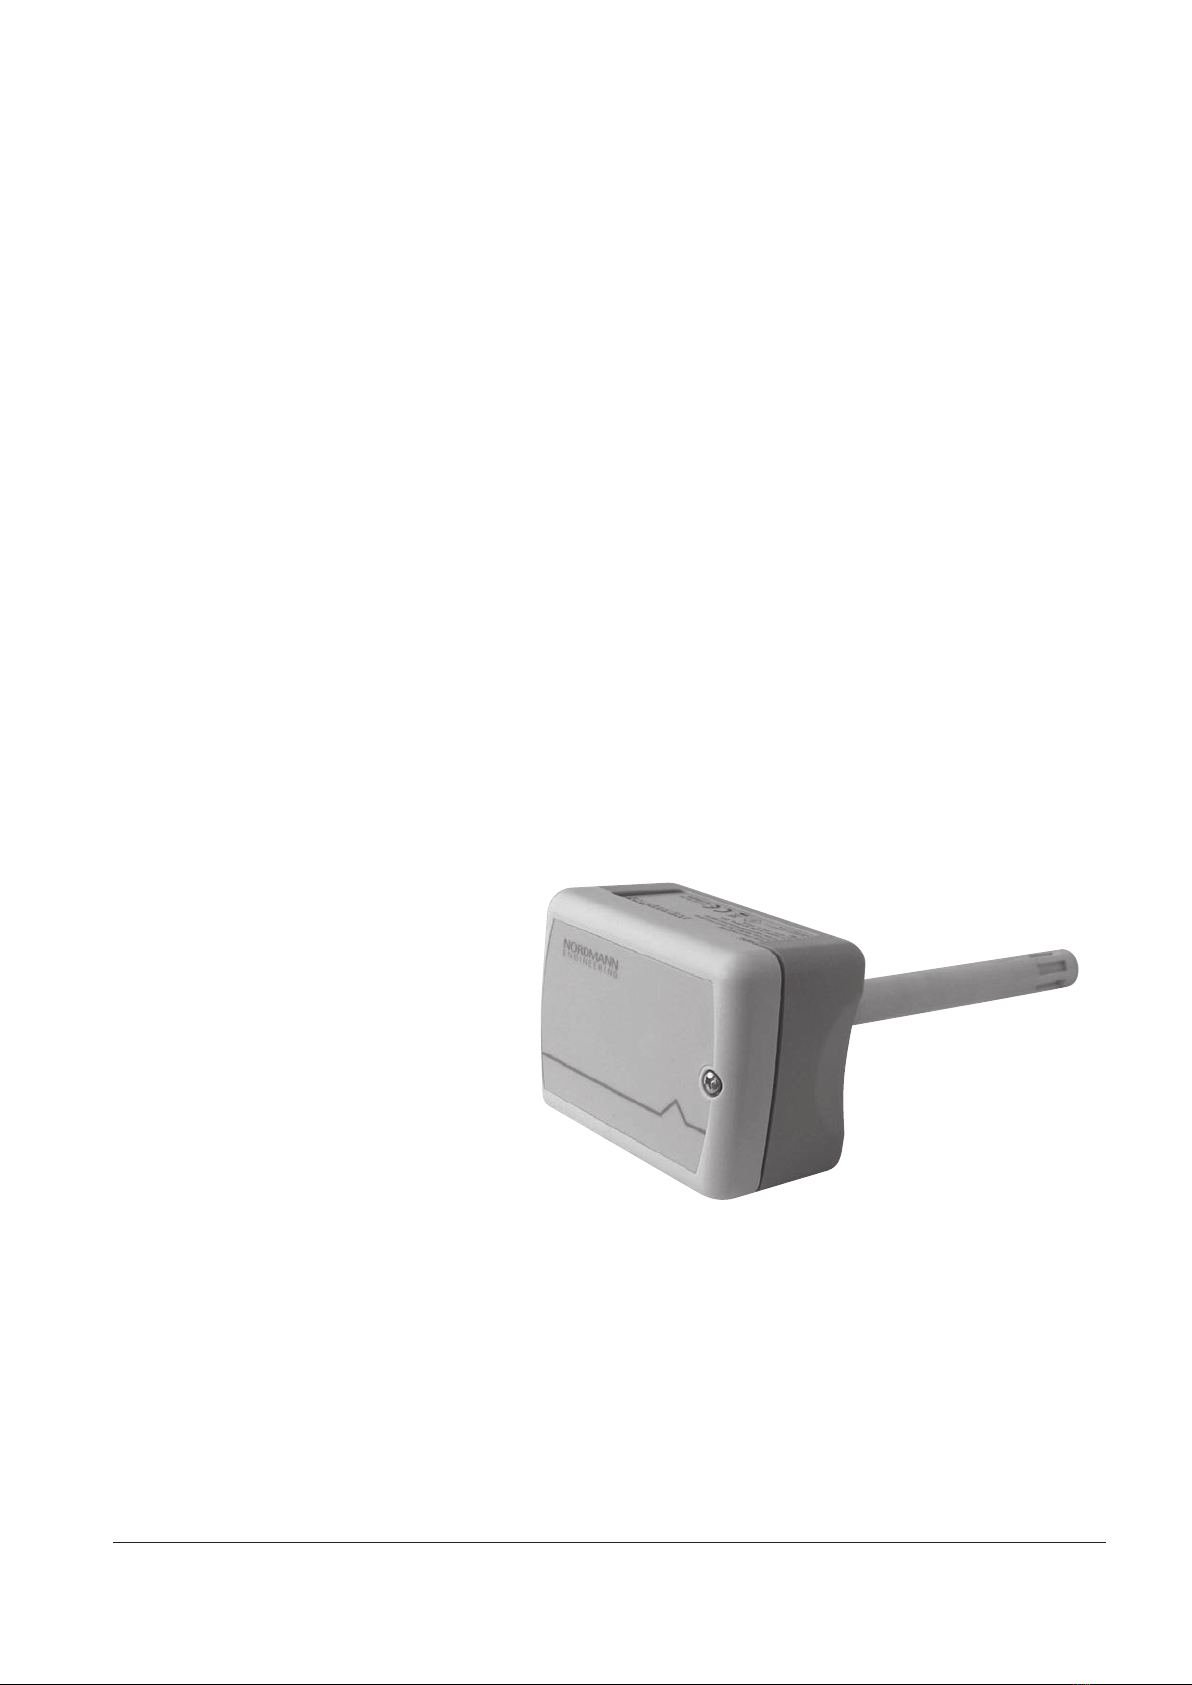
Kanalfeuchtefühler
Duct humidity sensor
Sonde d’humidité pour gaine
Nordmann NDC
NORDMANN
ENGINEERING
NORDMANN
ENGINEERING
Dampfluftbefeuchter econoVap

2
1 Funktionsbeschreibung
Der Nordmann NDCdient zur Feuchtemes-
sung in einem Lüftungskanal. Für die Feuch-
temessung wird ein kapazitiver Feuchtesen-
sor verwendet. Der Mikroprozessor erfasst
die Feuchtigkeit einmal pro Sekunde und
berechnet ein Durchschnittsignal über eine
bestimmte Zeit in Sekunden und generiert
dauraus einAusgangssignal. Die angewandte
Messtechnologie garantiert eine hervorragen-
de Zuverlässigkeit und Langzeitstabilität. Die
Sensor-Ausgangssignale 0…10V, 0…20mA
oder 2…10V, 4…20mAsind über Jumper
einstellbar.
2 Sicherheit
Beachten Sie bitte alle lokalen Vorschriften
betreffend die Ausführung von elektrischen
Installationen.
Die Installationsarbeiten dürfen nur durch
ausgewiesenes Fachpersonal (Elektriker
oder Fachkraft mit gleichwertiger Ausbil-
dung) durchgeführt werden.
Achtung Stromschlaggefahr! Vor Beginn
der Installationsarbeiten ist das Gerät, an das
der NDCangeschlossen werden soll, vom
Stromnetz zu trennen. Der Wiederanschluss
an das Stromnetz darf erst nach Fertigstellung
sämtlicher Installationsarbeiten erfolgen.
Achtung! Die elektronischen Bauteile im
Innern des NDCsowie des Befeuchters sind
sehr empndlich gegen elektro statische Entla-
dungen. Zum Schutz dieser Bauteile müssen
für alle Installationsarbeiten Massnahmen
gegen Beschädigung durch elektrostatische
Entladung (ESD–Schutz) getroffen werden.
3 Lieferumfang
Der Lieferumfang umfasst:
– Feuchtefühler Nordmann NDC
– Kabelverschraubung
– Befestigungsmaterial
– Installationsanleitung
4 Platzierung
Der Nordmann NDCwird direkt an den Kanal
montiert.
Platzierung im Abluftkanal (empfohlen):
Platzieren sie den NDCim Abluftkanal so
nah wie möglich beim Lufteintritt, aber immer
nach einem allenfalls vorhanden Ventilator
im Abluftkanal.
Platzierung im Zuluftkanal: Platzieren sie
den NDCim Zuluftkanal mindestens 3 Meter
nach einem Ventilator oder einem Heizregister
und mindestens in einem Abstand von 5x
der Befeuchtungsstrecke zum Dampfverteiler
(siehe Anleitung zum Befeuchter).
1 Functional description
Nordmann NDCserves for the humidity meas-
urement in air ducts. For the humidity measure-
ment a capacitive humidity sensor is used. The
microprocessor samples the humidity once
per second. It calculates an averaging signal
over a preset number of seconds and gener-
ates the output signal. The applied measuring
technology guarantees excellent reliability
and long term stability. The output signal of
the sensor 0-10VDC, 2-10VDCor 4-20mA,
0-20mA may be customized by jumpers.
2 Safety
Please observe all local regulations concern-
ing the electric installation.
The installation work must be performed only
by adequately qualied personnel (electri-
cian or workman with equivalent training).
Warning - danger of electric shock! Before
starting the installation work the unit to which
the NDCwill be connected must be discon-
nected from the mains and may be recon-
nected to mains only after all installation work
has been completed.
Warning! The electronic components inside
the NDC and the humidier are very sus-
ceptible to electrostatic discharges. For the
protection of these components, measures
must be taken during all installation work
to prevent damage caused by electrostatic
discharge (ESD–protection).
3 Delivery
The delivery includes:
– Humidity sensor Nordmann NDC
–Cable gland
– Fixing material
– Installation instructions
4 Mounting location
The Nordmann NDCis installed directly on
the duct.
Mounting in a return air duct (recommend-
ed): Mount the NDCin a return air duct close
to the air outlet of the room but downstream
from a return fan if one is present.
Mounting in a supply air duct: Mount the
NDC in a supply air duct at least three meters
downstream from the nearest fan and coil and
with a minimum distance of 5x the humidi-
cation distance to the steam distributor (see
manual of the humidier).
1 Description de fonctionnement
Le Nordmann NDCest destiné à effectuer la
mesure d’humidité dans une gaine de ventila-
tion. La mesure d’humidité s’opère au moyen
d’une sonde hygrométrique capacitive. Le
microprocesseur saisit l’humidité une fois par
seconde, calcule une valeur moyenne durant
une période déterminée et génère un signal
de sortie en conséquence. La technologie de
mesure appliquée garantit une abilité et une
stabilité à long terme remarquables. Par le
biais de cavaliers, on peut régler les signaux de
sorties de sonde suivants: 0…10V, 0…20mA
ou 2…10V, 4…20mA.
2 Sécurité
Veuillez observer chaque prescription locale
concernent l’exécution d’installations élec-
triques.
Seules les personnes spécialisées compé-
tentes (électricien ou spécialiste de même
formation) sont autorisées à effectuer les
travaux d’installation.
Attention, risque de choc électrique! Avant
de commencer des travaux d’installation,
séparer du réseau électrique l’appareil des-
tiné à être raccordé à le NDC. N’effectuer le
raccordement de l’humidicateur au réseau
électrique qu’au terme de tous les travaux
d’installation.
Attention! Les composants électroniques
intégrés dans le NDC et l’humidicateur sont
très sensibles aux décharges électrostatiques.
Ces composants impliquent, lors de tous les
travaux d’installation, la prise des mesures
de précaution contre leur détérioration par
décharge électrostatique.
3 Ampleur de la livraison
La livraison comporte:
–Sonde hygrométrique NDC
–Presse-étoupe
– Matériel de xation
– Instructions d’installation
4 Emplacement
Le montage du Nordmann NDCs’effectue
directement dans la gaine.
Emplacement dans la gaine d’évacuation
d’air (recommandé): placez le NDCdans
la gaine d’évacuation d’air, le plus près pos-
sible de la sortie de local, toutefois toujours
après un ventilateur disposé dans la gaine
d’évacuation d’air.
Emplacement dans la gaine d’admission
d’air: placez le NDCdans la gaine d’admission
d’air à 3 mètres au moins d’un ventilateur ou
d’un dispositif de chauffage et à une distance
minimale de 5 fois la distance d’absorption de
la rampe de diffusion de vapeur (consulter le
manuel concernant l’humidicateur).
3
5 Installation
1. Am vorgesehenen Ort in den Kanal ein
Loch Durchmesser 16 mm (5/8"), sowie
vier Löcher für die Selbstbohrschrauben
bohren (siehe Masszeichnung).
2. Schraube des Gehäusedeckels lösen und
Deckel entfernen.
3. Anschlusskabel durch die Kabeldurchfüh-
rung ins Gerät führen und gemäss dem
Elektroschema an dieAnschlussklemmen
anschliessen.
4. Dichtung auf der Sensorseite zentrisch
auf das Gehäuse kleben (selbstklebend).
5. Sensor in die Bohrung im Kanal einschie-
ben. Anschliessend Gehäuse mit den vier
mitgelieferten Bohrschrauben am Kanal
befestigen.
6. Gehäusedeckel wieder in die Scharniere
des Gehäuses einschnappen, Gehäuse-
deckel schliessen und mit der Schraube
befestigen (Schraube nur mässig anzie-
hen).
6 Produktspezikationen
6.1 Technische Daten
Stromversorgung / Power Supply / Alimentation de courant
Betriebsspannung / Operating voltage / Tension d’alimentation 24 V AC 50/60 Hz ± 10%, 24VDC ± 10%
Leistungsaufnahme / Power Consumption / Puissance absorbée Max. 2 VA
Klemmenanschlüsse / Terminal Connectors / Bornes Für Litzen / for wires / pour ls 0.34…2.5 mm2
(AWG 24…12)
Sensorelement / Sensor probe / Elément de sonde
Messelement / Measuring element / Elément de mesure Kapazitives Messelement / Capacitive measur-
ing element / Elément de mesure capacitif
Messbereich / Measuring range / Plage de mesure 0…100 % rH / % rh / % hr
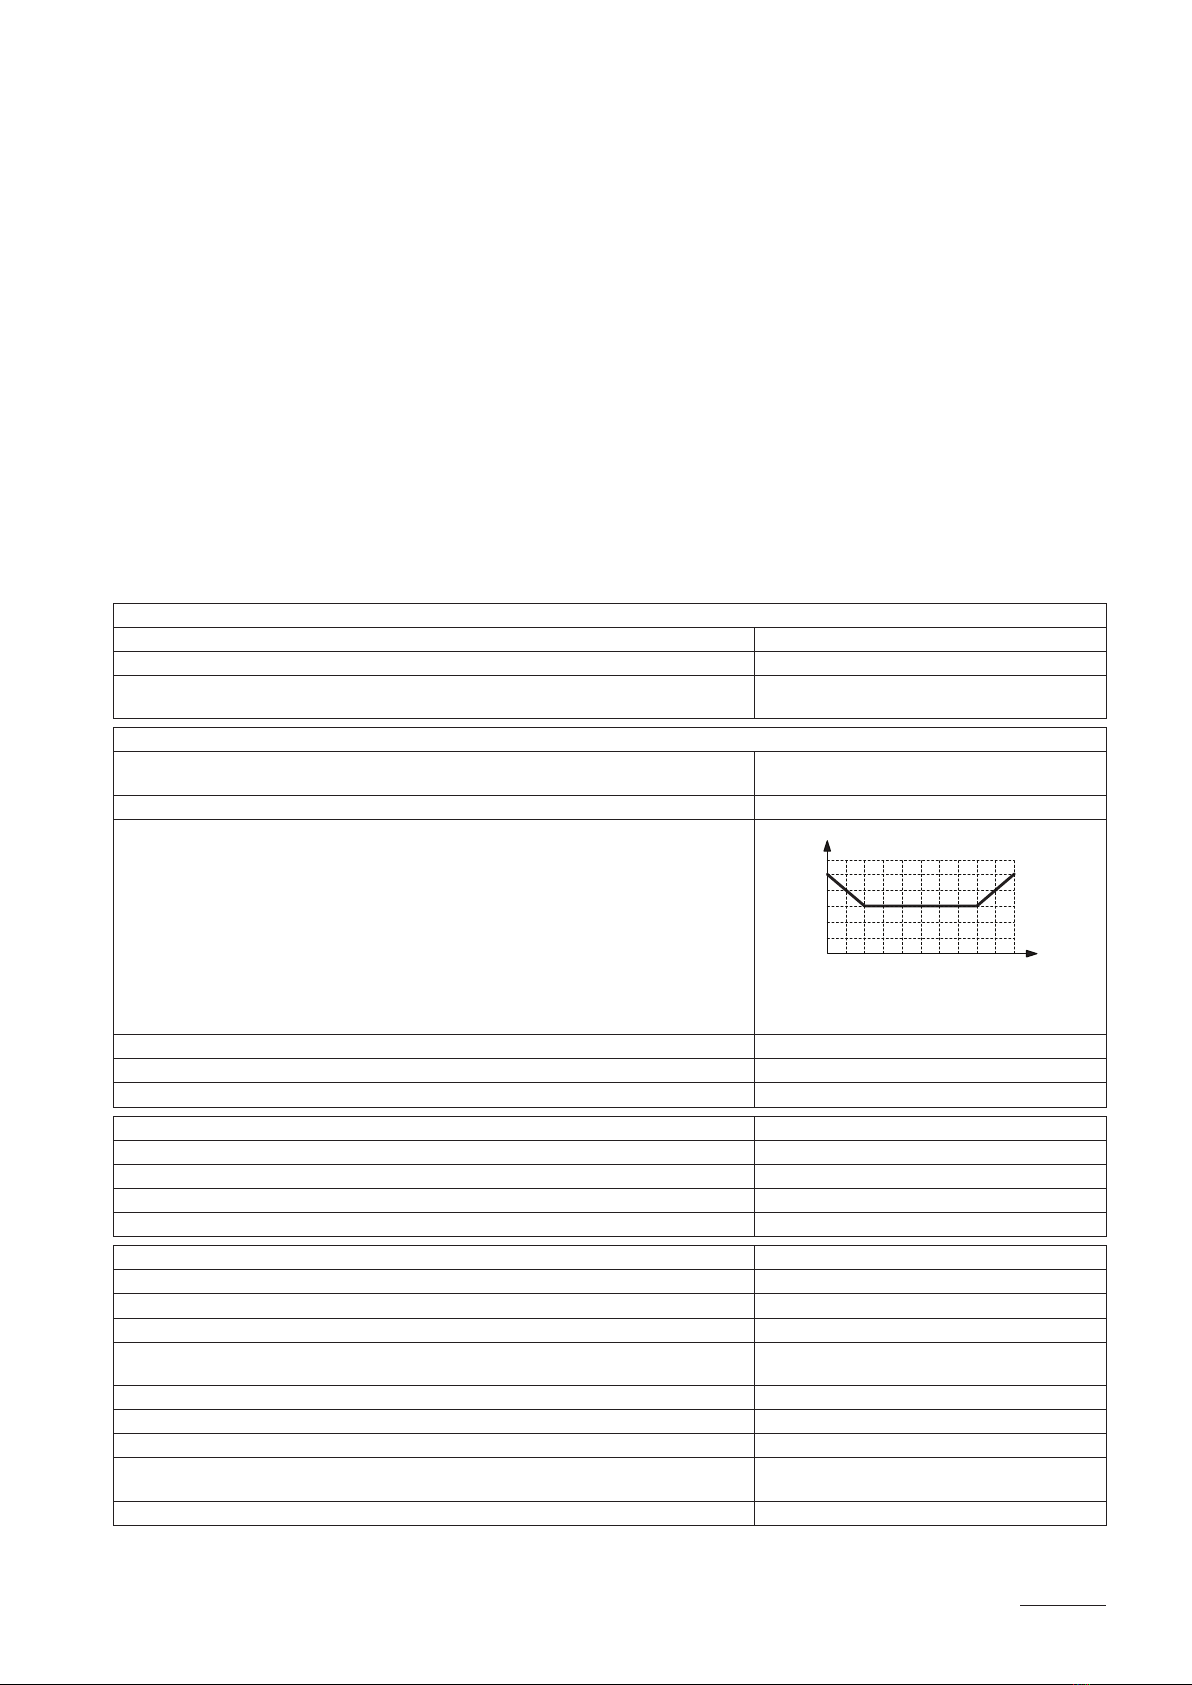
Messgenauigkeit / Measuring Accuracy / Fidélité de mesure
100
0
±1
±2
±3
±4
±5
%rF
%rh
%hr
%rF
%rh
%hr
20 30 40 50 60 70 80 90 100
Max. rF-Toleranz bei 25 °C (77°F)
Max. RH tolerance at 25 °C (77°F)
Tolérance HR max. à 25 °C (77°F)
Hysterese / Hysteresis / Hystérésis ± 1%
Wiederholbarkeit / Repeatability / Reproductibilité ± 0.1%
Stabilität / Stability / Stabilité < 0.5% / Jahr / year / année
Signalausgänge / Signal Outputs / Sorties de signal
Analogausgänge / Analog Outputs / Sorties analogiques
Ausgangssignal / Output Signal / Signal de sortie DC 0-10V oder / or / ou 0…20mA
Auösung / Resolution / Résolution 10 Bit, 9.7 mV, 0.019.5 mA
Maximale Last / Maximum Load / Charge maximum 20 mA, 500Ω
Umgebung / Environment / Environnement
Betrieb / Operation / Exploitation IEC 721-3-3
Klimatische Bedingungen / Climatic Conditions / Conditions climatiques Class 3 K5
Temperatur / Temperature / Température -40…70°C (-40…158°F)
Feuchtigkeit / Humidity / Humidité <95% rF nicht kondensierend / <95% rh non-
condensing /<95% hr sans condensation
Transport & Lagerung / Transport & Storage / Transport & entreposage IEC 721-3-2 und / and / et IEC 721-3-1
Klimatische Bedingungen / Climatic Conditions / Conditions climatiques Class 3 K3 und / and / et Class 1 K3
Temperatur / Temperature / Température -40…80°C (-40…176°F)
Feuchtigkeit / Humidity / Humidité <95% rF nicht kondensierend / <95% rh non-
condensing /<95% hr sans condensation
Mechanische Bedingungen / Mechanical Conditions / Conditions mécaniques Class 2M2
5 Installation
1. Dans la gaine, percer un trou de 16 mm
(5/8") à l’endroit désiré ainsi que les 4
trous pour vis autoperceuses (consulter
le dessin coté).
2. Desserrer la vis du couvercle de boîtier et
ôter le couvercle.
3. Introduire le câble de raccordement dans
l’appareil par la traversée de câble et le
brancher aux bornes de raccordement
selon le schéma électrique.
4. Coller le joint sur la face de la sonde en
ayant soin de le centrer (autocollant).
5. Introduire la sonde dans l’alésage du canal.
Ensuite, xer le boîtier à la gaine à l’aide
des 4 vis autoperceuses livrées.
6. Positionner le couvercle dans le logement
de boîtier, fermer le couvercle et le xer à
l’aide de la vis (ne la serrer que modéré-
ment).
6 Spécicationsdesproduits
6.1 Caractéristiques techniques
5 Installation
1. At the place of location drill a hole with a
diameter of 16mm (5/8") as well as 4 holes
for the self tapping screws into the duct.
2. Open the screw on the housing cover and
remove cover.
3. Lead connecting cable through the cable
gland and connect wires to the terminals
according to the wiring diagram.
4. Attach gasket to the sensor side of the
housing (self-adhesive).
5. Insert the probe into the hole in the duct,
then x housing to the duct using the 4
self-tapping screws provided.
6. Snap cover into the hinge of the housing,
then close cover and x it with the screw
(do not thighten screw too much).
6 Productspecications
6.1 Technical data

4
Standards / Standards / Standard
Konform mit / conform according to / conforme selon
EMC Standard 89/336/EEC EMEI Standard 73/23/EEC
EN 61 000-6-1/ EN 61 000-6-3
Normen Produkt / Product standards / Normes de produit
Automatische elektrische Steuerungen für Haushalt und ähnlichen Gebrauch /
Automatic electrical controls for household and similar use /
Commandes électriques automatiques pour le ménage et l’usage semblable
EN 60 730 –1
Spezielle Anforderung an temperaturabhängige Steuerungen /
Special requirement on temperature dependent controls /
Exigences spéciales concernant sur des commandes à charge de la température
EN 60 730 – 2 - 9
Schutzart gemäss EN 60529 / Degree of Protection to EN 60529 /
Genre de protection selon EN 60529
IP60
Montierter Sensor unten mit AMS-1 / Mounted probe down with AMS-1 /
Sonde montée vers le bas avec AMS-1
IP63
Sicherheitsklasse / Safety Class / Classe de sécurité III (IEC 60536)
Allgemein / General / En général
Gehäuse und Gehäusedeckel / Housing and Cover / Boîtier et couvercle de boîtier PC+ABS (UL94 class V-0)
Filtermaterial / Filter material / Matériel de ltre PTFE coated 1μm pores
Dimensionen Sensorgehäuse (HxBxT) / Dimensions (HxWxD) sensor housing /
Dimensions boîtier de sonde (HxLxP)
68 mm x 91 mm x 47 mm (2.7” x 3.7” x 1.9”)
Dimensionen Sensor / Dimensions Probe / Dimensions sonde ø 14 mm x 157 mm (ø 0.55 x 6.2”)
Gewicht NDC (inkl. Verpackung) / Weight NDC (including package) /
Poids NDC (avec emballage)
260 g (9.2 oz)
6.2 Dimensionen [mm] (")
6.3 Elektroschema/Konguration
6.2 Dimensions [mm] (")
6.3 Wiringdiagram/Conguration
6.2 Dimensions [mm] (")
6.3 Schémaélectrique/Conguration
JP1
Signaltyp
Signal type
Type de signal
3
2
1
U1
0-10V, 2-10V
3
2
1
I1
0-20mA, 4-20mA
JP3
Signalbereich
Signal range
Plage de signal
3
2
1
U1: 0-10V
I1: 0-20mA
3
2
1
U1: 2-10V
I1: 4-20mA
Status LED
brennt nicht: keine Spannung
5 s Blinken: Normal
1 s Blinken: Sensorelement defekt
No light: no power
5 s blinking: Normal
1 s blinking: Sensor element defective
ne brûle pas: pas d’alimentation de tension
5 s clignoter: Normal
1 s clignoter: Elément de sonde defectueuse
24V AC/DC
1
0V / GND
2
H OUT
3
STATUS
LED
JP1 JP3
RH OUT
0V / GND
24 V AC/DC ±10%
ø14 x 157
(ø0.55 x 6.2)
47 (1.9) 91 (3.6)
68 (2.7)
ø14 (0.6)
74.5 (2.9)
54 (2.1)
ø16 (0.62)
5
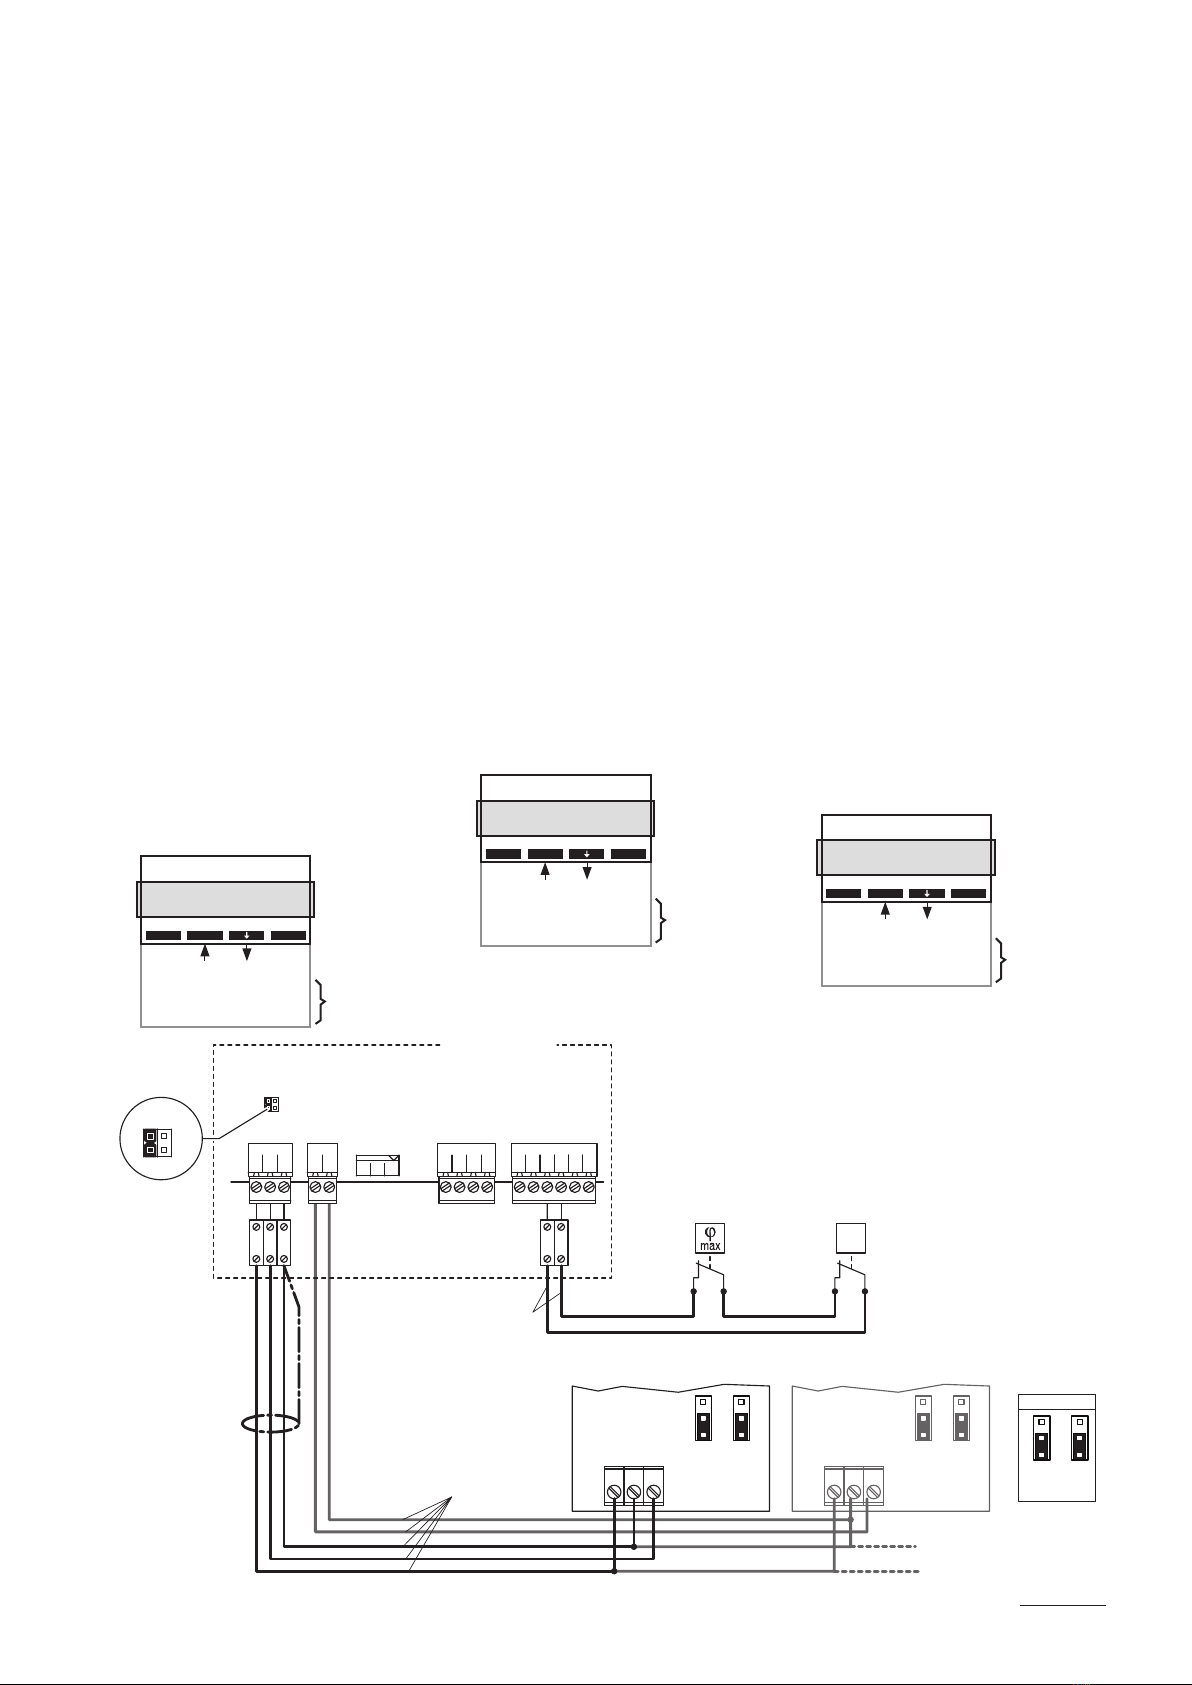
7 Anschluss des NDC an
Nordmann-Geräte
7.1 Anschluss des NDC an den
Nordmann AT4
Der Kanalfeuchtefühler Nordmann NDCwird
an die entsprechenden Klemmen im Steuer-
kasten des Gerätemoduls A angeschlossen.
Die Spannungsversorgung des NDCerfolgt
über den Anschluss V+ des Nordmann AT4
oder über eine externe 24V AC/DC Span-
nungsquelle.
Hinweis: Bei einer Regelung mit Begren-
zung der Zuluftfeuchte wird ein zweiter Ka-
nalfeuchtefühler Nordmann NDC(Signal Z)
gemäss dem untenstehenden Schema an-
geschlossen.
1. Den NDCgemäss dem untenstehenden
Schema an die entsprechenden Klemmen
im Steuerkasten des Gerätemoduls Aan-
schliessen.
2. Auf dem Leistungsprint des NordmannAT4
einen Jumper auf JP3-24 V stecken und
den Jumper auf JP3-5V (falls vorhanden)
entfernen.
3. Das Ausgangssignal des NDCmit den
Jumpern JP1 und JP3 auf dem Steuerprint
des NDCauf “0-10V” einstellen.
4. Den NordmannAT4 in Betrieb nehmen und
in der Einstellebene der Gerätesoftware
die Parameter “Regelung” auf “Int(PI)”
und “Regelsignal” auf “0-10V” sowie
“Sollwert” auf den gewünschten Feuch-
tesollwert einstellen (siehe Betriebsanlei-
tung zum Nordmann AT4).
Hinweis: Bei Bedarf auch noch die Pa-
rameter für die Begrenzung (Signal Z)
einstellen.
7 Connecting the NDC to
Nordmann units
7.1 Connecting the NDC to the
Nordmann AT4
The Nordmann NDCduct humidity sensor is to
be connected to the appropriate terminal block
located inside the control box of unit moduleA.
The voltage supply of the NDCis established
via the V+ terminal of the NordmannAT4 or an
external 24V AC/DC voltage supply.
Note: In case of humidity control with limit-
ation of the supply air humidity, a second
Nordmann NDCduct humidity sensor (signal
Z) is to be connected according to the wiring
diagram below.
1. Connect the NDCto the respective termi-
nals inside the control box of unit module
A (see wiring diagram below).
2. On the power board of the NordmannAT4:
set a Jumper on JP3-24V and remove the
Jumper on JP3-5V (if a jumper is set).
3. Set the output signal of the NDCto “0-10V”
using the Jumpers JP1 and JP3 on the
control board of the NDC.
4. Set the Nordmann AT4 into operation,
go to the setup level of the unit software
and set the parameters “Hum.Control”
to “Int (PI)”, “Controlsign.” to “0-10V”
and “Hum.Setpoint” to the desired value
(refer to the Nordmann AT4 operating
instructions).
Note: also set the limitation parameters
(signal Z), if needed.
7 Raccordement du NDC aux
appareils Nordmann
7.1 Raccordement du NDC
au Nordmann AT4
La sonde d’humidité pour gaine Nordmann
NDCse branche aux bornes correspondantes
dans le boîtier de commande du module
d’appareilA. L’alimentation de tension du NDC
est établi via le borne V+ du Nordmann AT4
ou par une alimentation électrique 24 VAC/
VDC externe.
Nota: en cas d’une régulation d’humidité avec
limitation du taux d’humidité de l’air d’alimen-
tation, une deuxième sonde d’humidité pour
gaine Nordmann NDC(signal Z) doit être rac-
cordé selon le schéma électrique ci-dessous.
1. Brancher le NDCselon le schéma élec-
trique ci-dessous aux bornes correspon-
dantes dans le boîtier de commande du
module d’appareil A.
2. A la platine de puissance du Nordmann
AT4: installer un cavalier sur JP3-24 V et
enlever le cavalier de JP3-5V (si présent).
3. Régler le signal de sortie du NDCà
“0-10V” utilisant les cavaliers JP1 et JP3
sur la platine de commande du NDC.
4. Mettre en service le Nordmann AT4,
accéder au plan de réglage du logiciel et
régler les paramètres “Rég.hygromèt” sur
“Int.(PI)”, “SigRégulatio” sur “0-10V” ainsi
que le “PointConsign” à la valeur hygro-
métrique de désirée (voir les instructions
d’exploitation Nordmann AT4).
Remarque: au besoin, régler également les
paramètres pour la limitation (signal Z).
Y
Z
Z-Begr.Max :90%rF
Z-Begr.Min :70%rF
Z-Begr.Sign.:0-10V
Z-Begrenzung:Ein
Integr.-Zeit:8min
Regeleinst.
Regelung :Int.(PI)
Regelsignal :0-10V
Sollwert :Set
SignalQuelle:Analog
P-Band :18%rF
Esc Set
Y
Z
Limit Max :90%rH
Limit Min :70%rH
Limitsignal :0-10V
Lim. Control:On
Integr.-Time:8min
Controls
Hum.Control :Int.(PI)
Controlsign.:0-10V
Hum.Setpoint:Set
SignalSource:Analog
P-Band :18%rF
Esc Set Y
Z
Limite maxi :90%Hr
Limite min :70%Hr
Limit.signal:0-10V
Limiteur :EnMarche
Temps intégr:8min
Entr.Consig.
Rég.hygromèt:Int.(PI)
SigRégulatio:0-10V
PointConsign:Set
SourceSignal:Analog
P-Band :18%rF
Esc Set
NDC (Signal Z)
Sicherheitskette
Safety circuit
Chaîne de sécurité
min. Querschnitt pro Litze 1 mm2
min. cross section per wire 1 mm2
Section min. par fil 1 mm2
∆p
Strömungswächter
Air flow monitor
Contôleur flux d’air
24 VDC
24 VAC/VDC
200-240V / 50...60 Hz
Nordmann AT4
NDC (Signal Y)
max. Querschnitt pro Litze 0.5 mm2
max. cross section per wire 0.5 mm2
Section max. par fil 0.5 mm2
Leistungsprint Module A
Power board Module A
Platine de puissance Module A
***
0...10V
PEPESC2SC1NL1
X1
CONT. SIGN.
GNDINV+
X10
JP3
24V 5V
MAIN SUPPLYMODULE B
PEP1NP
X6
LIM. SIGN.
GNDIN EXT. SUP.
5V GND 24V
X11
X14
GND
IN
V+
SC2
SC1
XE2XE4
24V AC/DC
0V/GND
H OUT
JP1
2
3
1
JP3
2
3
1
***
1 2 3
24V AC/DC
0V/GND
H OUT
JP1
2
3
1
JP3
2
3
1
***
1 2 3 JP1
2
3
1
JP3
2
3
1
JP3
24V 5V
Feuchtewächter
Humidity monitor
Contrôleur d'humidité
6
7.2 Anschluss des NDC
am Nordmann RC4/DC4
Der Kanalfeuchtefühler NDCwird an die
entsprechenden Klemmen auf dem Leistungs-
print des Nordmann RC4/DC4 angeschlossen.
Die Spannungsversorgung des NDCerfolgt
über den Anschluss V+ des Nordmann RC4/
DC4 oder eine externe 24V AC/DC Span-
nungsquelle.
Hinweis: Bei einer Regelung mit Begrenzung
der Zuluftfeuchte wird ein zweiter Kanal-
feuchtefühler NDC(Signal Z) gemäss dem
untenstehenden Schema angeschlossen.
1. Den NDCgemäss dem untenstehenden
Schema an die entsprechenden Klemmen
auf dem Leistungsprint im Gerät anschlie-
ssen.
2. Auf dem Leistungsprint des Nordmann
RC4/DC4 einen Jumper auf JP2 (24 V)
stecken und den Jumper auf JP1 (falls
vorhanden) entfernen.
3. Das Ausgangssignal des NDCmit den
Jumpern JP1 und JP3 auf dem Steuerprint
des NDCauf “0-10V” einstellen.
4. Den Nordmann RC4/DC4 in Betrieb neh-
men und in der Einstellebene der Gerä-
tesoftware die Parameter “Regelung” auf
“Int.(PI)” und “Regelsignal” auf “0-10V”
sowie “Sollwert” auf den gewünschten
Feuchtesollwert einstellen (siehe Betriebs-
anleitung zum Nordmann RC4/DC4).
Hinweis: Bei Bedarf auch noch die Pa-
rameter für die Begrenzung (Signal Z)
einstellen.
7.2 Connecting the NDC
to the Nordmann RC4/DC4
The NDCduct humidity sensor is to be
connected to the appropriate terminal block
located on the driver board of the Nordmann
RC4/DC4. The voltage supply of the NDC
is established via the V+ terminal of the
Nordmann AT 4 or an external 24V AC/DC
voltage supply.
Note: In case of humidity control with limitation
of the supply air humidity, a second NDCduct
humidity sensor (signal Z) is to be connected
according to the wiring diagram below.
1. Connect the NDCto the respective termi-
nals on the power board of the unit (see
wiring diagram below).
2. On the power board of the Nordmann
RC4/DC4: set a Jumper on JP2 (24 V) and
remove the Jumper on JP1 (if a jumper is
set).
3. Set the output signal of the NDCto “0-10V”
using the Jumpers JP1 and JP3 on the
control board of the NDC.
4. Set the Nordmann RC4/DC4 into operation,
go to the setup level of the unit software
and set the parameters “Hum.Control”
to “Int.(PI)”, “Controlsign.” to “0-10V”
and “Hum.Setpoint” to the desired value
(refer to the Nordmann RC4/DC4 operating
instructions).
Note: also set the limitation parameters
(signal Z), if needed.
7.2 Raccordement du NDC
au Nordmann RC4/DC4
La sonde d’humidité pour gaine NDCse
branche aux bornes correspondantes de la
platine de puissance du Nordmann RC4/
DC4. L’alimentation de tension du NDCest
établi via le borne V+ du Nordmann RC4/DC4
ou par une alimentation électrique 24 VAC/
VDC externe.
Nota: en cas d’une régulation d’humidité avec
limitation du taux d’humidité de l’air d’alimen-
tation, une deuxième sonde d’humidité pour
gaine NDC(signal Z) doit être raccordé selon
le schéma électrique ci-dessous.
1. Brancher le NDCselon le schéma élec-
trique ci-dessous aux bornes correspon-
dantes de la platine de puissance dans
l’appareil.
2. A la platine de puissance du Nordmann
RC4/DC4: installer un cavalier sur JP2
(24 V) et enlever le cavalier de JP1 (si
présent).
3. Régler le signal de sortie du NDCà
“0-10V” utilisant les cavaliers JP1 et JP3
sur la platine de commande du NDC.
4. Mettre en service le Nordmann RC4/DC4,
accéder au plan de réglage du logiciel et
régler les paramètres “Rég.hygromèt”
sur “Int.(PI)”, “SigRégulatio” sur “0-10V”
ainsi que le “PointConsign” à la valeur
hygrométrique de désirée (voir instructions
d’exploitation de Nordmann RC4/DC4).
Remarque: au besoin, régler également
les paramètres pour la limitation (signal Z).
CONT.SIGNLIM.SIGN
V+ LIMGND
GNDCTRL
X1 X4 X6
CTRL V+
1 21 21 2 3
GND
BASIC
0-10V
On/Off
24V
5V
PRO
JP4
JP3
JP2
JP1
LIMGND SC1SC2
SAFETY
SC1SC2
24V
5V
JP2
JP1
Nordmann RC4/DC4
Leistungsprint
Power board
Platine de puissance
PWR
MAIN SUPPLY
X9
LN PE
X8
NL SW N SWL
NDC (Signal Z)
Sicherheitskette
Safety circuit
Chaîne de sécurité
min. Querschnitt pro Litze 1 mm2
min. cross section per wire 1 mm2
Section min. par fil 1 mm2
∆p
Strömungswächter
Air flow monitor
Contôleur flux d’air
24 VDC
24 VAC/VDC
200-240V / 50...60 Hz
NDC (Signal Y)
max. Querschnitt pro Litze 0.5 mm2
max. cross section per wire 0.5 mm2
Section max. par fil 0.5 mm2
***
0...10V
24V AC/DC
0V/GND
H OUT
JP1
2
3
1
JP3
2
3
1
***
1 2 3
24V AC/DC
0V/GND
H OUT
JP1
2
3
1
JP3
2
3
1
***
1 2 3 JP1
2
3
1
JP3
2
3
1
Feuchtewächter
Humidity monitor
Contrôleur d'humidité
Y
Z
Z-Begr.Max :90%rF
Z-Begr.Min :70%rF
Z-Begr.Sign.:0-10V
Z-Begrenzung:Ein
Integr.-Zeit:8min
Regeleinst.
Regelung :Int.(PI)
Regelsignal :0-10V
Sollwert :Set
SignalQuelle:Analog
P-Band :18%rF
Esc Set
Y
Z
Limit Max :90%rH
Limit Min :70%rH
Limitsignal :0-10V
Lim. Control:On
Integr.-Time:8min
Controls
Hum.Control :Int.(PI)
Controlsign.:0-10V
Hum.Setpoint:Set
SignalSource:Analog
P-Band :18%rF
Esc Set Y
Z
An.Limit.max:90%Hr
An.Limit.min:70%Hr
An.Limit.sig:0-10V
An.Limiteur :EnMarche
Temps intégr:8min
Entr.Consig.
Rég.hygromèt:Int.(PI)
SigRégulatio:0-10V
PointConsign:Set
SourceSignal:Analog
P-Band :18%rF
Esc Set

© Nordmann Engineering Ltd., Printed in Switzerland
Technische Änderungen vorbehalten
Technical modifications reserved
Sous réserve de modifications techniques

Manufacturer:
Nordmann Engineering Ltd.
www.nordmann-engineering.com, info@nordmann-engineering.com
NORDMANN
ENGINEERING
NORDMANN
ENGINEERING
Dampfluftbefeuchter econoVap
Reg.No. 40002-2
Table of contents
Other Nordmann Engineering Accessories manuals


