manuals.online logo
Brands
  1. Home
  2. •
  3. Brands
  4. •
  5. NORMBAU
  6. •
  7. Bathroom Fixture
  8. •
  9. NORMBAU NY.925.260 Manual

NORMBAU NY.925.260 Manual



4


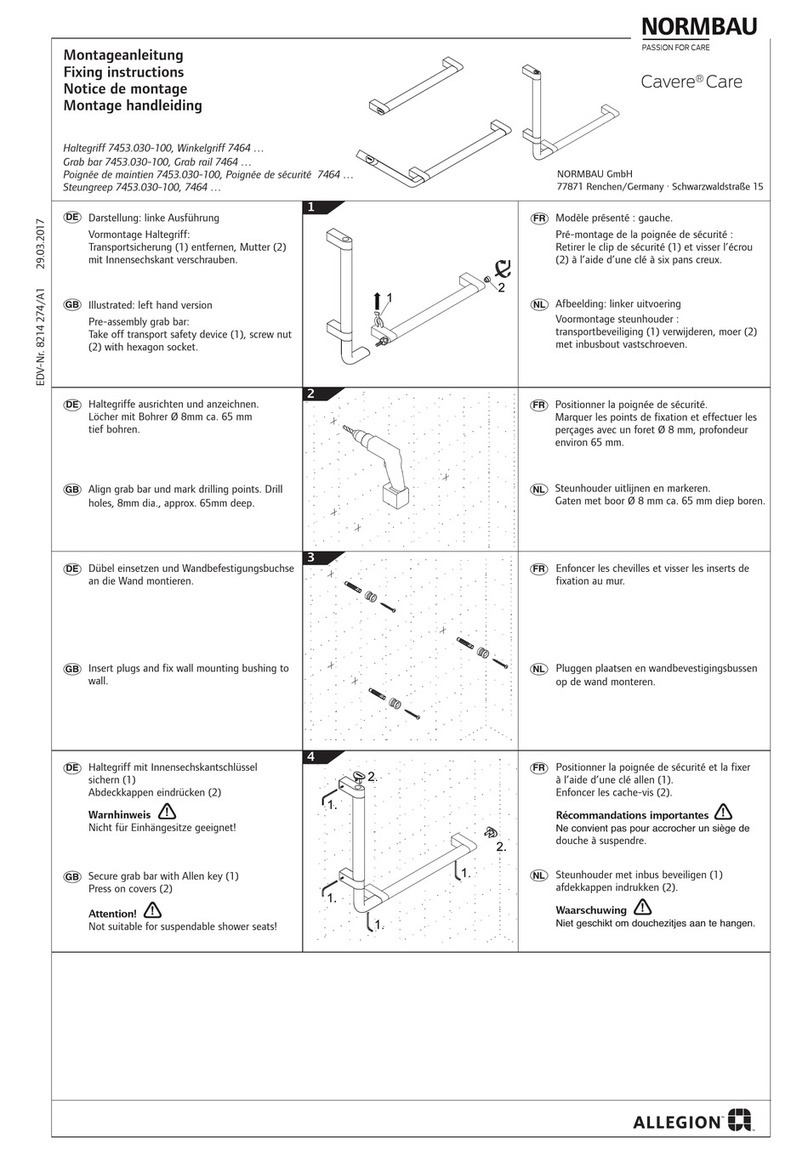
Befestigungspunkte markieren, Anreiss-
schablonen abnehmen und Dübellöcher
Ø 8 mm ca. 65 mm tief bohren.
Mark fixing points, take template off
and drill holes, 8mm dia., approx.
65mm deep.
Marquer les points de fixation, retirer
les gabarits et percer les trous Ø 8 mm,
profondeur environ 65 mm.
Bevestigingsplaatsen markeren,
montage-tape vanwijderen en
boorgaten voor Ø 8 mm pluggen ca.
65 mm inboren.
Schutzpapier der Klebestreifen
entfernen.
Take off protective film from the
adhesive tape.
Enlever la bande de protection des
parties autocollantes.
Beschermfolie von de montage-tape
verwijderen.

Ablage ausrichten, an die Wand
drücken und wegziehen, so dass die
Anreisschablone (1) an der Wand
kleben bleibt.
Adjust bathroom shelf, press it on the
wall and take it off so that the
templates (1) stick to the wall.
Positionner la console contre le mur en
appuyant afin que les gabaits de
perçage (1) restent collés au mur.
etrirer la console.
Planchet uitmeten, op de wand
plaatsen en wegtrekken, zodat
de monate-tape (1) op de wand
blijft kleven.
Spax-Schraube per Hand in Unterteil (2)
kurz eindrehen, Gummidichtung (3)
eindrücken und Unterteile herraus-
ziehen.
Insert the wood screws by hand into
the bottom part (2). Press the rubber
part (3) in and take bottom part off.
Visser légèrement à la main les vis
à bois sur les supports muraux (2),
appuyer sur le bouton en caoutchouc
(3) sur la partie inférieure et retirer
en même temps les supports muraux.
Spax-schroeven met de hand in het
montagedeel (2) kort erin draaien,
gummi-afdekking (3) indrukken en
montagedeel eruit trekken.
Anreisschablone (1) in die Unterteile
(2) stecken und Unterteile an der
Wand noch verschiebbar anschrauben.
Insert template (1) into the bottom
parts (2) an screw them to the wall
so that they can still be adjusted.
Glisser les supports muraux sur les
gabarits et les visser au mur, sans
serrer les vis.
Montage-tape (1) in de montagedelen
(2) plaatsen en montagedelen op de
muur verschuifbaar aandraaien.
5
2
(1
3
DE
GB
FR
NL
EDV-Nr. 8214 090/A1 27.04.2017
FR
FR
FR
FR
NL
NL
NL
NL
Montageanleitung
Fixing Instructions
Notice de montage
Montage handleiding
Ablage NY.925.260
Bathroom shelf NY.925.260
Consoles NY.925.260
Planchet NY.925.260
DE
DE
DE
DE
GB
GB
GB
GB
NO MBAU GmbH
77871 enchen/Germany · Schwarzwaldstraße 15
Diebstahlsicherung
Innensechskantschlüssel SW3 in die
Bohrung an der Unterseite einstecken
und im Uhrzeigersinn bis zum
Anschlag eindrehen.
Anti-theft device
Put the Allan key SW3 in the respective
holes at the bottom part and turn it
clockwise to the stop.
Antivol
Introduire la clé alène dans les perçages
des boutons caoutchouc sous la console,
et la tourner dans le sens des aiguilles
d´une montre.
Diefstalbeveiliging
Imbussleutel SW3 in boringen aan de
onderzijde plaatsen en tot de aanslag
draaien.
Ablage aufstecken und ausrichten.
Gummidichtungen an der Unterseite
eindrücken, Ablage abziehen und
Unterteile fest anschrauben.
Put the bathroom shelf on and adjust it.
Press the rubber part at the bottom side
and take the bathroom shelf off.
Screw the bottom parts tightly.
Positionner la console sur les supports
muraux. etirer la console en pressant
en même temps les deux boutons en
caoutschouc, puis serrer les vis.
Planchet erop plaatsen en richten.
Gummi-afdekking aan de onderzijde
indrukken, planchet eraf trekken en
montagedelen vastschroeven.
Ablage bis zum Einrasten aufstecken.
Let the bathroom self snap in.
Fixer la console en appuyant jusqu´à
l´enclenchement.
Planchet over de montagedelen plaatsen.
Demontage
Diebstahlschutz lösen (s. o.)
Gummidichtungen an der Unterseite
eindrücken und dabei Ablage abziehen,
Unterteil abschrauben.
Dismounting
Loosen the anti-theft device (see above).
Press rubber parts at the bottom side and
take the bathroom shelf off.
Unscrew the bottom part.
Démontage
Déverrouiller l´antivol (voir ci-dessus).
Presser en même temps les deux boutons
caoutchouc en retirant la console.
Dévisser les supports muraux.
Demontage
Diefstalbeveiliging ontgrendelen. (zie
boven) Gummiafdekking aan de
onderzijde indrukken en tevens
de planchet verwijderen.
Montagedeel eraf schroeven.
7
6
8
GB
DE
DE
DE
DE
GB
GB
GB
FR
FR
FR
FR
NL
NL
NL
NL

This manual suits for next models

1

Other NORMBAU Bathroom Fixture manuals

NORMBAU Nylon Care 300 Manual

NORMBAU

NORMBAU Nylon Care 300 Manual

NORMBAU Cavere Care Manual

NORMBAU

NORMBAU Cavere Care Manual

NORMBAU Cavere FlexCare Manual

NORMBAU

NORMBAU Cavere FlexCare Manual

NORMBAU cavere 7488 Series User manual

NORMBAU

NORMBAU cavere 7488 Series User manual

NORMBAU Cavere Care Manual

NORMBAU

NORMBAU Cavere Care Manual

NORMBAU Inox Care 2053 030 User manual

NORMBAU

NORMBAU Inox Care 2053 030 User manual

NORMBAU Cavere 700.447 Series Manual

NORMBAU

NORMBAU Cavere 700.447 Series Manual

NORMBAU Cavere Care Manual

NORMBAU

NORMBAU Cavere Care Manual

NORMBAU Inox Care 2050 010 Manual

NORMBAU

NORMBAU Inox Care 2050 010 Manual

NORMBAU CAVERE CARE 7525 400 Manual

NORMBAU

NORMBAU CAVERE CARE 7525 400 Manual

NORMBAU Cavere Care 7464 Series Manual

NORMBAU

NORMBAU Cavere Care 7464 Series Manual

NORMBAU Nylon Care 300 Manual

NORMBAU

NORMBAU Nylon Care 300 Manual

NORMBAU Inox Care 2053 030 Manual

NORMBAU

NORMBAU Inox Care 2053 030 Manual

NORMBAU ALLEGION Cavere 700.844 Series Manual

NORMBAU

NORMBAU ALLEGION Cavere 700.844 Series Manual

NORMBAU Verso Care 3501 410 User manual

NORMBAU

NORMBAU Verso Care 3501 410 User manual

Popular Bathroom Fixture manuals by other brands

Luxury Spas E-35 instruction manual

Luxury Spas

Luxury Spas E-35 instruction manual

Nadoli DS623648C-CL manual

Nadoli

Nadoli DS623648C-CL manual

JADO Wynd 816/989 Series installation instructions

JADO

JADO Wynd 816/989 Series installation instructions

CLEOPATRA Easyfill Installation and user manual

CLEOPATRA

CLEOPATRA Easyfill Installation and user manual

Gessi INCISO 58023 manual

Gessi

Gessi INCISO 58023 manual

Gessi 26812 Bath Mixing Program

Gessi

Gessi 26812 Bath Mixing Program

ZURN TEMP-GARD III Z7300 Series Operation / installation instruction

ZURN

ZURN TEMP-GARD III Z7300 Series Operation / installation instruction

Kermi Decor V Series Instructions for installation and use

Kermi

Kermi Decor V Series Instructions for installation and use

Nadoli DN5138BK quick start guide

Nadoli

Nadoli DN5138BK quick start guide

Santec ESTATE Series installation instructions

Santec

Santec ESTATE Series installation instructions

Kesseböhmer TurnLine 009142 Mounting instruction

Kesseböhmer

Kesseböhmer TurnLine 009142 Mounting instruction

Triton Eva instructions

Triton

Triton Eva instructions

Sanela SLVN 04 Mounting instructions

Sanela

Sanela SLVN 04 Mounting instructions

Glacier bay HD59302-2704 installation instructions

Glacier bay

Glacier bay HD59302-2704 installation instructions

Brizo 696367 Series quick start guide

Brizo

Brizo 696367 Series quick start guide

VINNOVA Bilbao 701272G installation instructions

VINNOVA

VINNOVA Bilbao 701272G installation instructions

Anzzi STARLET SP-AZ036 install guide

Anzzi

Anzzi STARLET SP-AZ036 install guide

Toto YH150RS instruction manual

Toto

Toto YH150RS instruction manual

manuals.online logo
manuals.online logoBrands
  • About & Mission
  • Contact us
  • Privacy Policy
  • Terms and Conditions

Copyright 2025 Manuals.Online. All Rights Reserved.