Nortek 2GIG GC3 User manual

2GIG®Security & Automation System
GC3 Fingertip Guide
10004644 D

Copyright © 2018 Nortek Security & Control LLC.
2
Copyright © 2018 Nortek Security & Control LLC. All Rights Reserved. U.S. Patent D727,857. Australian Patent No. 357098. Additional Patents Pending.
The 2GIG, GC3, GoControl, and Linear logos are registered trademarks of Nortek Security & Control LLC in the United States and/or other countries. Other Nortek Security
& Control trademarks may also appear in these materials. Other names or brands may be claimed as the property of others. For more information, contact your 2GIG alarm
dealer for pricing or visit www.nortek.com, www.nortekcontrol.com, or www.2gig.com.
Information in this document is subject to change without notice. The availability of particular products, services, and features may vary by region. Please check with your local
dealer for further details and availability of language options.
No part of this publication may be reproduced, stored in a retrieval system, or transmitted in any form or any means electronic or mechanical, including photocopying and
recording for any purpose other than the purchaser's personal use without the written permission of Nortek Security & Control.
Nortek Security & Control
5919 Sea Otter Place, Suite 100
Carlsbad, CA 92010
USA
800-421-1587
Contents
Welcome to the GC3 System. . . . . . . . . . . . . . . . . . . . . . . . . . . . . . . . . . . . . . . . . . . . . . . . . . . . . . . . . . . . . . . . . . . . . 3
About this Guide. . . . . . . . . . . . . . . . . . . . . . . . . . . . . . . . . . . . . . . . . . . . . . . . . . . . . . . . . . . . . . . . . . . . . . . . . . . . . . . . . . . . . . . . . . . . . . . . . . . . . 3
Support Services . . . . . . . . . . . . . . . . . . . . . . . . . . . . . . . . . . . . . . . . . . . . . . . . . . . . . . . . . . . . . . . . . . . . . . . . . . . . . . . . . . . . . . . . . . . . . . . . . . . . 3
Home Screen. . . . . . . . . . . . . . . . . . . . . . . . . . . . . . . . . . . . . . . . . . . . . . . . . . . . . . . . . . . . . . . . . . . . . . . . . . . . . . . . . . 3
Emergency and Home Button . . . . . . . . . . . . . . . . . . . . . . . . . . . . . . . . . . . . . . . . . . . . . . . . . . . . . . . . . . . . . . . . . . . . . . . . . . . . . . . . . . . . . . . . . . 3
Home Button/Indicator . . . . . . . . . . . . . . . . . . . . . . . . . . . . . . . . . . . . . . . . . . . . . . . . . . . . . . . . . . . . . . . . . . . . . . . . . . . . . . . . . . . . . . . . . . . . . . . . 3
Burglary Protection . . . . . . . . . . . . . . . . . . . . . . . . . . . . . . . . . . . . . . . . . . . . . . . . . . . . . . . . . . . . . . . . . . . . . . . . . . . . 4
Arm the System (Stay Mode) . . . . . . . . . . . . . . . . . . . . . . . . . . . . . . . . . . . . . . . . . . . . . . . . . . . . . . . . . . . . . . . . . . . . . . . . . . . . . . . . . . . . . . . . . . . 4
Arm the System (Away Mode) . . . . . . . . . . . . . . . . . . . . . . . . . . . . . . . . . . . . . . . . . . . . . . . . . . . . . . . . . . . . . . . . . . . . . . . . . . . . . . . . . . . . . . . . . . 5
Bypass Sensors . . . . . . . . . . . . . . . . . . . . . . . . . . . . . . . . . . . . . . . . . . . . . . . . . . . . . . . . . . . . . . . . . . . . . . . . . . . . . . . . . . . . . . . . . . . . . . . . . . . . . 5
Disarm the System . . . . . . . . . . . . . . . . . . . . . . . . . . . . . . . . . . . . . . . . . . . . . . . . . . . . . . . . . . . . . . . . . . . . . . . . . . . . . . . . . . . . . . . . . . . . . . . . . . . 6
Disarm the System from Away Mode . . . . . . . . . . . . . . . . . . . . . . . . . . . . . . . . . . . . . . . . . . . . . . . . . . . . . . . . . . . . . . . . . . . . . . . . . . . . . . . . . . . . . 6
In the Event of a Burglary Alarm. . . . . . . . . . . . . . . . . . . . . . . . . . . . . . . . . . . . . . . . . . . . . . . . . . . . . . . . . . . . . . . . . . . . . . . . . . . . . . . . . . . . . . . . . 6
If You Need to Use the Duress Code . . . . . . . . . . . . . . . . . . . . . . . . . . . . . . . . . . . . . . . . . . . . . . . . . . . . . . . . . . . . . . . . . . . . . . . . . . . . . . . . . . . . . 7
Fire and Emergency Protection . . . . . . . . . . . . . . . . . . . . . . . . . . . . . . . . . . . . . . . . . . . . . . . . . . . . . . . . . . . . . . . . . . 7
In the Event of a Fire Alarm . . . . . . . . . . . . . . . . . . . . . . . . . . . . . . . . . . . . . . . . . . . . . . . . . . . . . . . . . . . . . . . . . . . . . . . . . . . . . . . . . . . . . . . . . . . . 7
Manual Alarms . . . . . . . . . . . . . . . . . . . . . . . . . . . . . . . . . . . . . . . . . . . . . . . . . . . . . . . . . . . . . . . . . . . . . . . . . . . . . . . . . . . . . . . . . . . . . . . . . . . . . . 8
Security Codes . . . . . . . . . . . . . . . . . . . . . . . . . . . . . . . . . . . . . . . . . . . . . . . . . . . . . . . . . . . . . . . . . . . . . . . . . . . . . . . . 8
Types of Security Codes . . . . . . . . . . . . . . . . . . . . . . . . . . . . . . . . . . . . . . . . . . . . . . . . . . . . . . . . . . . . . . . . . . . . . . . . . . . . . . . . . . . . . . . . . . . . . . 8
Change the Master User or Duress Code . . . . . . . . . . . . . . . . . . . . . . . . . . . . . . . . . . . . . . . . . . . . . . . . . . . . . . . . . . . . . . . . . . . . . . . . . . . . . . . . . 9
Create a User Code . . . . . . . . . . . . . . . . . . . . . . . . . . . . . . . . . . . . . . . . . . . . . . . . . . . . . . . . . . . . . . . . . . . . . . . . . . . . . . . . . . . . . . . . . . . . . . . . . . 9
Edit a User Code . . . . . . . . . . . . . . . . . . . . . . . . . . . . . . . . . . . . . . . . . . . . . . . . . . . . . . . . . . . . . . . . . . . . . . . . . . . . . . . . . . . . . . . . . . . . . . . . . . . . 10
System Tests. . . . . . . . . . . . . . . . . . . . . . . . . . . . . . . . . . . . . . . . . . . . . . . . . . . . . . . . . . . . . . . . . . . . . . . . . . . . . . . . . . 10
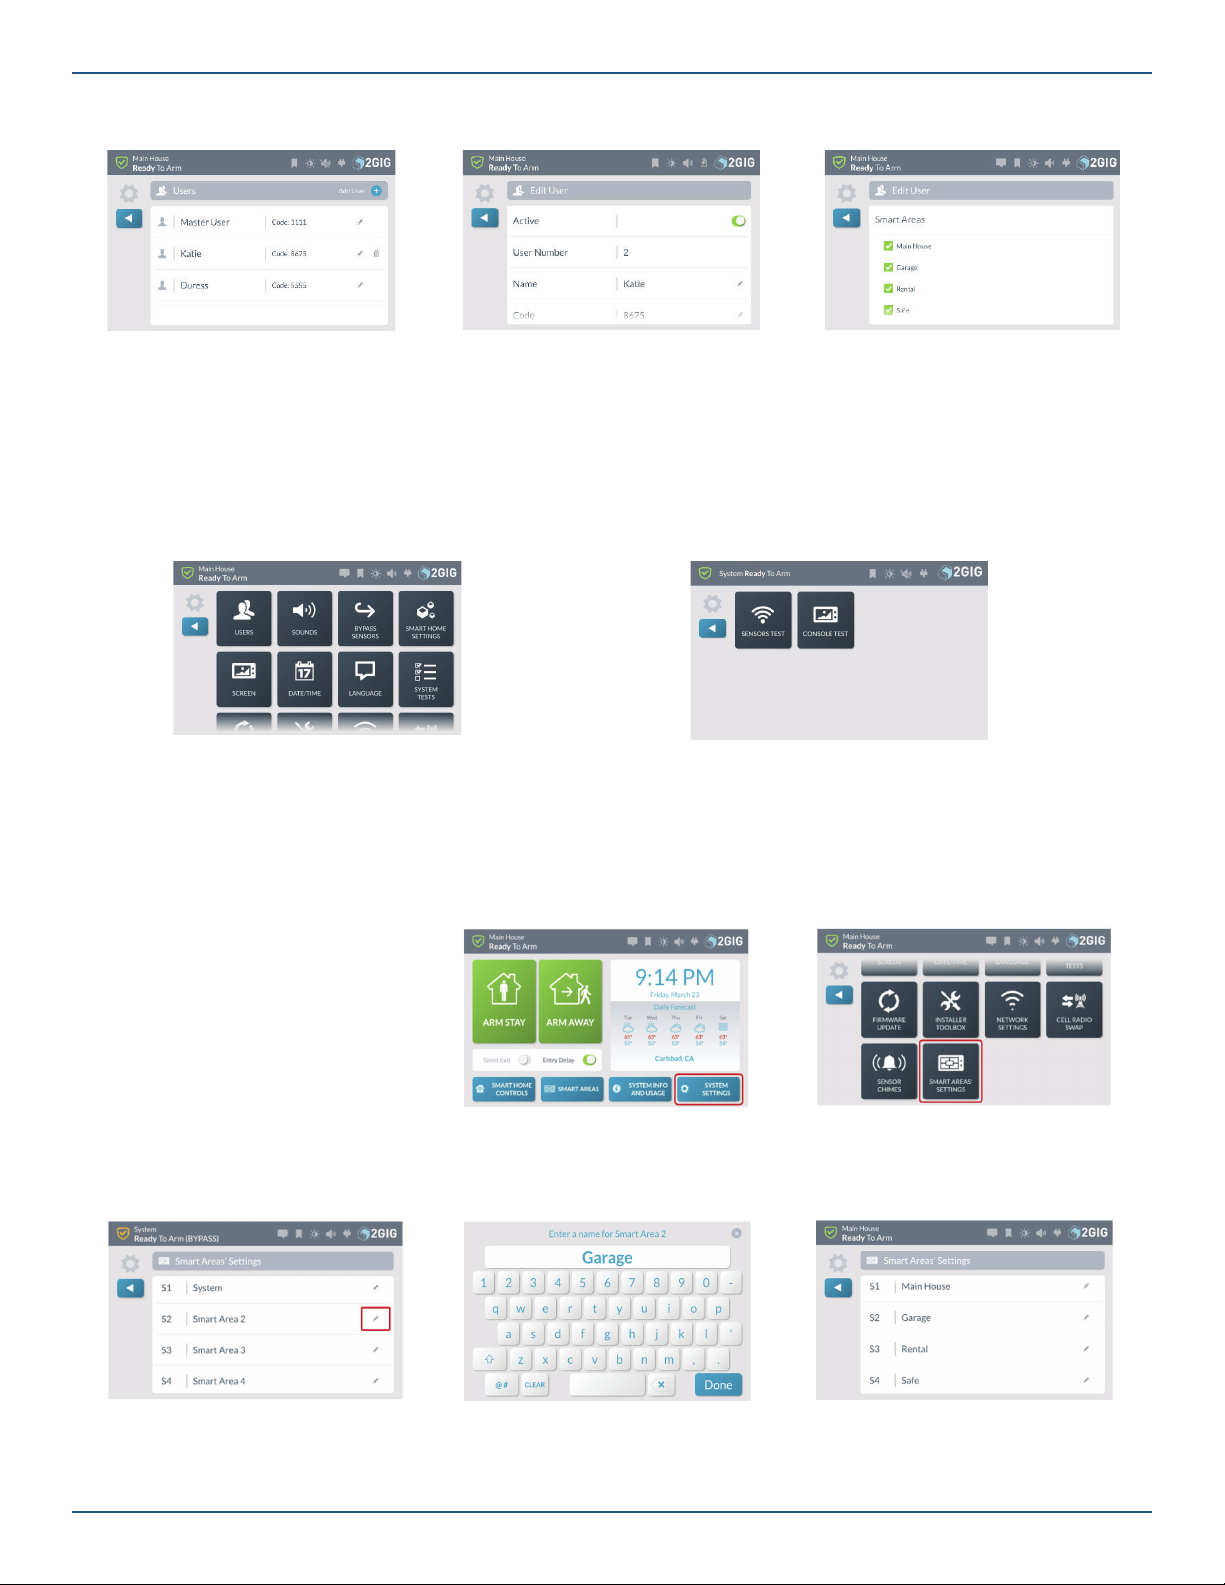
Smart Areas Settings . . . . . . . . . . . . . . . . . . . . . . . . . . . . . . . . . . . . . . . . . . . . . . . . . . . . . . . . . . . . . . . . . . . . . . . . . . . 10
View Smart Areas . . . . . . . . . . . . . . . . . . . . . . . . . . . . . . . . . . . . . . . . . . . . . . . . . . . . . . . . . . . . . . . . . . . . . . . . . . . . . . 11
Set Sensor Chimes. . . . . . . . . . . . . . . . . . . . . . . . . . . . . . . . . . . . . . . . . . . . . . . . . . . . . . . . . . . . . . . . . . . . . . . . . . . . . 11
Network Settings . . . . . . . . . . . . . . . . . . . . . . . . . . . . . . . . . . . . . . . . . . . . . . . . . . . . . . . . . . . . . . . . . . . . . . . . . . . . . . 12
Limited Warranty . . . . . . . . . . . . . . . . . . . . . . . . . . . . . . . . . . . . . . . . . . . . . . . . . . . . . . . . . . . . . . . . . . . . . . . . . . . . . . 13
Waste Electrical and Electronic Equipment (WEEE) Statement . . . . . . . . . . . . . . . . . . . . . . . . . . . . . . . . . . . . . . . . . . . . . . . . . . . . . . . . . . . . . . . . 13
WARNINGS . . . . . . . . . . . . . . . . . . . . . . . . . . . . . . . . . . . . . . . . . . . . . . . . . . . . . . . . . . . . . . . . . . . . . . . . . . . . . . . . . . . 13
Limitations of Alarm Products . . . . . . . . . . . . . . . . . . . . . . . . . . . . . . . . . . . . . . . . . . . . . . . . . . . . . . . . . . . . . . . . . . . . . . . . . . . . . . . . . . . . . . . . . . . 13
Risk of Noise Induced Hearing Loss . . . . . . . . . . . . . . . . . . . . . . . . . . . . . . . . . . . . . . . . . . . . . . . . . . . . . . . . . . . . . . . . . . . . . . . . . . . . . . . . . . . . . 13

Copyright © 2018 Nortek Security & Control LLC. 3
Welcome to the GC3 System
This Quick Reference guide shows system owners how to use the basic features of the 2GIG GC3 Security & Automation System. For more in-depth
information, download the GC3 User Guide from 2gig.com/dealers or visit http://www.2gig.com.
About this Guide
This guide is designed for use by home and business owners of the 2GIG GC3 Security & Automation System from Nortek Security & Control. It is
recommended that the GC3 Panel and all associated sensors and peripherals be professionally installed by an authorized 2GIG alarm dealer. For
regulatory compliance, professional installation is required. For a list of dealers in your area, visit http://www.nortekcontrol.com.
Support Services
If you require technical assistance with the system, contact your 2GIG alarm dealer or visit your alarm dealer's website.
Home Screen
To wake the touchscreen, tap any area of the screen display or press the Home button on the right-side of the panel. The touchscreen goes into sleep
mode after one (1) minute of inactivity. To change this setting to between 30 seconds and 10 minutes, tap System Settings, enter the Master User
Code, tap Screen, and then change the Screen Timeout setting.
Home Screen Elements:
»Arming Features: Tap Arm Stay or Arm Away to arm the system
and use the slide controls to turn the Silent Exit and Exit Delay
features ON/OFF. See “Burglary Protection” on page 4.
»System Status: Reveals the system state. For example: System
Ready to Arm, System Not Ready to Arm, and so on.
»System Icons: Indicate system information. See "System Icons"
on page 4.
»System Logo: Tap and enter the Duress Code to transmit a user
duress report to the Central Station. See "If You Need to Use the
Duress Code" on page 7.
»Date/Time: Shows the system date/time.
»Current Weather, Daily Forecast, and Hourly Forecast:
Requires an active account with a Remote Service Provider that
supports weather forecasts and weather service alerts.
Emergency and Home Button
Emergency Button/Indicator
Press this button as the first step to manually trigger an alarm. See “Manual Alarms” on
page 8. During regular operations, the Alarm button changes states as follows:
»SOLID: Lights solid WHITE to indicate it is available for use.
»BLINKING: Blinks WHITE during an emergency alarm.
Home Button/Indicator
Press this button to wake the touchscreen or to return to the Home screen. During system
operations, the Home button changes states as follows:
»SENSOR STATUS: Lights solid GREEN when all sensors are closed (System
Ready to Arm). Turns OFF when any sensor is open (System Not Ready to Arm).
»ARMING STATUS & ALARM MEMORY: Solid RED during the Exit Delay
countdown and when armed. Blinks RED during the Entry Delay countdown,
during an alarm, and after an alarm (System Armed).
»POWER OUTAGE: Flashes during a power outage when running on backup
battery. Flashes GREEN when all sensors are closed (System Ready to Arm).
Flashes ORANGE when one or more sensors are open (System Not Ready to
Arm). Solid RED during Exit Delay countdown and when Armed.

Copyright © 2018 Nortek Security & Control LLC.
4
System Icons
The status bar that appears on the top of the Home screen and on most system menus reveals a variety of icons providing system information and
access to different functions.
Table 1-1 System Icons
y
Burglary Protection
To detect an intrusion, ensure the GC3 Panel is in the System Ready to Arm state (see "Bypass Sensors" on page 5). Then, arm the system.
Arm the System (Stay Mode)
Apply this mode when people and/or pets will be staying inside. Typically, this mode arms the premises' perimeter zones (for example, doors and
windows) and leaves the interior zones (for example, motion detectors) disarmed.
To arm the system:
1 2 3
IMPORTANT: Consult your installer to determine if the Quick Exit feature is enabled on your system. When Quick Exit is allowed and
the system is armed in Stay Mode, you have the option of tapping the Quick Exit button on the System Armed screen to start the Exit
Delay countdown. This gives you time to exit the premises without having to disarm the system. At the end of the countdown, the system
automatically re-arms itself in Stay Mode.
Tap Arm Stay. The system announces,
“Arming Stay.”
During the countdown, you have the option to
tap Silence which will extend the length of the
timer and silence the audible countdown.
After the countdown expires, the system is
armed. The system announces, “System
Armed Stay.”

Copyright © 2018 Nortek Security & Control LLC. 5
Arm the System (Away Mode)
Apply this mode when people and pets will be leaving the premises. Typically, the installer configures the system so this mode arms both the perimeter
zones (for example, doors and windows) and the interior zones (for example, motion detectors).
To arm the system:
1
Tap Arm Away.
2
Exit the premises before the audible Exit
Delay countdown expires. During the
countdown, you can tap Silence which
will extend the length of the timer and
silence the audible countdown.
3
After the Exit Delay expires, the
system announces, “System Armed
Away.”
NOTE: Consult your installer to determine if the Auto Stay feature is enabled. For compliance with ANSI/SIA CP-01-2010, when Auto
Stay is enabled and you arm the system in Away Mode, you must exit the premises through an Exit/Entry door. If no one exits out
through an Exit/Entry door by the end of the Exit Delay countdown, the system automatically arms itself in Stay Mode. For more in-depth
information, see the GC3 User Guide.
NOTE: Consult your installer to determine if the Exit Delay Restart feature is enabled. When this feature is enabled, if you exit and then
re-enter the premises before the Exit Delay countdown expires, the Exit Delay countdown restarts one time before the system arms. For
compliance with ANSI/SIA CP-01-2010, this feature is enabled by default. For more in-depth information, see the GC3 User Guide.
Bypass Sensors
When you open a protected door or window, the System Not Ready to Arm message appears and reveals the zone in YELLOW on the Sensors Not
Ready list. Before you can arm the system, place the system into the Ready to Arm state by (1) walking to the sensor and closing it, or (2) bypassing the
sensor.
To bypass the open sensors:
1
Review the Sensors Not Ready list
and close any desired sensors. If
you want to bypass the sensors in
the list, tap Bypass All.
2
Enter a valid user code. If the installer
enabled the Quick Bypass feature, you
are NOT prompted for your code and will
skip this step.
3
The system bypasses the sensor. You have
the option to tap yellow bubble ( ) to view
the sensor(s) in the Bypassed Sensors list.

Copyright © 2018 Nortek Security & Control LLC.
6
Disarm the System from Away Mode
To disarm the system from Away mode:
1 Enter the premises through a designated Entry Delay sensor-protected door.
2Enter your code to disarm the system.
NOTE: Consult your installer to determine the length of the Entry Delay feature. For compliance with ANSI/SIA CP-01-2010, the default setting
is 30 seconds. For more in-depth information, see the GC3 User Guide.
In the Event of a Burglary Alarm
Sensors have been installed to protect perimeter doors and windows for the premises. Motion detectors may also be installed to protect interior areas.
Each sensor is programmed to alert the system to react in a specific way should its protection zone be violated.
When the system is armed, it initiates the following sequence of events when a protected zone is violated:
1. For instant sensors, the alarm siren immediately sounds and continues to sound until a User Code is entered or for the amount of time specified
by the Burglary Bell Cutoff Time setting. The factory default setting is four (4) minutes. Consult your installer to determine the cutoff time for your
system.
2. For delayed sensors, the system immediately starts the Entry Delay countdown to allow time to disarm the system. At the end of the countdown,
the alarm siren sounds and will continue to sound until a User Code is entered or for the amount of time specified by the Burglary Bell Cutoff
Time setting. For compliance with ANSI/SIA CP-01-2010, the factory default setting for this countdown is 30 seconds. This is designed to
reduce the transmission of false alarm reports. Consult your installer to determine the length of your system’s countdown.
3. After the report is received by the Central Station, an operator will respond per the terms defined in your individual Service Agreement with your
2GIG alarm dealer. For more in-depth information about specific alarm protocols, contact your alarm dealer.
If You Want to Cancel/Silence a False Burglary Alarm
In the event of a false alarm (for example, if you enter the home while it is armed and do not disarm the system before the countdown expires), you can
silence the alarm and cancel the alarm report using one of these options:
»If you disarm the system BEFORE the countdown expires, the system silences the alarm siren and does not transmit an alarm report to the
Central Station.
»If you disarm the system AFTER the Abort Window Dialer Delay countdown expires, the system silences the alarm siren and transmits
an alarm cancellation report to the Central Station. For a cancellation report to be transmitted, you must disarm the system before the Alarm
Cancel Time expires. For compliance with ANSI/SIA CP-01-2010, the factory default setting is five (5) minutes. Consult your installer to
determine the setting for your system.
Disarm the System
When the system is armed, it is actively protecting the premises. When you no longer want the system to protect the premises, you can disarm the
system.
Disarm the System from Stay Mode
To disarm the system from Stay mode:
1
At the Security or Menu screen, tap Disarm.
2
Enter your code to disarm the system.
TIP: If a false burglary alarm is activated while the system is armed (for example, someone inadvertently opens a protected door/
window) and you want to cancel or silence the alarm, see “If You Want to Cancel/Silence a False Burglary Alarm “ on page 6.

Copyright © 2018 Nortek Security & Control LLC. 7
If You Need to Use the Duress Code
In the event that you find yourself needing to transmit a user duress report to the Central Station (for example, being held by an unwanted intruder
against your will), use the steps below to input your system’s unique Duress Code. This notifies the Central Station that you are in a duress situation
without alerting the intruder that you have contacted your provider for assistance. To learn how to create a unique Duress Code for your system, see
“Change the Master User or Duress Code” on page 9.
To use your system's unique Duress Code:
1
If the system is armed, tap Disarm. If the system is disarmed, tap
the system logo in the top right corner.
2
Enter the Duress Code.
After the duress report is received by the Central Station, an operator will respond per the terms defined in your individual Service Agreement with your
2GIG alarm dealer. For more in-depth information about specific duress situation protocols, contact your alarm dealer.
NOTE: For compliance with ANSI/SIA CP-01-2010, the Duress Code must be a unique code. For more in-depth information, see the GC3 User
Guide.
In the Event of a Burglary Alarm (continued)
Cross Sensor Zone
A cross sensor zone is comprised of two wireless sensors and both sensors must be tripped within a programmed period of time before the system
activates an alarm. For compliance with ANSI/SIA CP-01-2010, if only one of the sensors in the cross sensor zone is tripped within the programmed
period of time, the system automatically transmits a trouble report to the Central Station but does not activate an alarm.
Swinger Shutdown Count
The swinger shutdown count defines the maximum number of times a zone’s sensor can activate (i.e., “trip”) an alarm during a single arming session.
After the sensor trips an alarm for the count, the sensor cannot set off an alarm until eight (8) hours passes or until the system is disarmed and then
rearmed. For compliance with ANSI/SIA CP-01-2010, the default swinger shutdown count must be set to two (2) trips.
Fire and Emergency Protection
Smoke and Carbon Monoxide (CO) detectors may be installed to protect the occupants of the dwelling from harmful, and possibly deadly effects of
smoke, heat, and fire-related dangers. The system’s fire and emergency protection features are always protecting the premises.
See “Warnings” on page 13.
NOTE: A professional installer must ensure that all Smoke/Heat alarms and CO detectors are installed in compliance with all national, regional,
and local laws, statutes, and guidelines.
In the Event of a Fire Alarm
In the event an installed fire protection zone detects an issue, the following will occur:
1. The alarm siren immediately sounds and continues to sound until a User Code is entered or for the amount of time specified by the Fire Bell
Cutoff Time setting. The factory default setting is four (4) minutes. Consult your installer to determine the cutoff time that has been configured
for your system.
2. After the report is received by the Central Station, an operator will respond per the terms defined in your individual Service Agreement with your
2GIG alarm dealer. For more in-depth information about specific alarm protocols, contact your alarm dealer.
If a fire alarm is activated, the system emits a warning siren and immediately reports a fire to the Central Station. To protect yourself and occupants do
the following:
1. If flames or smoke are present, yell “Fire!” to alert all occupants of a fire.
2. Immediately evacuate all occupants from the premises and remain at a safe distance away from the premises.
DANGER: To protect yourself and others from serious injury and/or death, do NOT reenter the premises until it has been deemed safe
by emergency officials.
3. Dial 9-1-1 (or your region’s emergency services number) to report the situation to authorities. Always wait to call from a safe location.
NOTE: It is important to establish and practice an Escape Plan with all members of your household in the event of a fire. For more in-
depth information, see the GC3 User Guide.

Copyright © 2018 Nortek Security & Control LLC.
8
Manual Alarms
You can notify the Central Station of an emergency event by manually activating the alarm at the GC3 Panel. For compliance with ANSI/SIA CP-01-
2010, the Alarm button on the GC3 Panel is designed with a double-action trigger. This means you must first press the Alarm button on the panel and
then touch and hold the appropriate alarm button on the touchscreen. This reduces the risk of inadvertently transmitting a false alarm to the Central
Station.
To activate a manual alarm:
1
Press the Alarm button on the GC3 Panel.
2
Touch and hold the Panic, Fire, or Emergency
button for two (2) seconds.
NOTE: Consult your installer to determine if one or more Wireless Keypads, Wireless 4-Button Key Fob Remotes, or Panic Button Remotes
have been configured to trigger alarms on your system when the appropriate button or button-combination is pressed. If configured to trigger
alarms, the remote will transmit an alert to the system. The system then transmits the appropriate report to the Central Station. For more
in-depth information, see the GC3 User Guide.
Security Codes
The system supports a total of 101 unique security codes, which includes the types of security codes detailed below and one (1) Installer Code which is
reserved for use by 2GIG alarm dealers and their professional installers.
Types of Security Codes
The system supports three (3) types of security codes:
»Master User: You are provided one (1) Master User Code for accessing the
System Settings and, depending how the installer configures your system,
other PIN-protected features. The factory default setting for the four-digit code
is: 1111. You should always change the default code to a unique one. See
“Change the Master User or Duress Code” in the next section.
»User: You can create up to 98 unique user access codes. This is the code that
occupants use to arm and/or disarm the system. See “Create a User Code” on
page 9.
»Smart Areas: If Smart Areas are enabled, user can be assigned to one or
more areas.
»Duress: You are provided one (1) Duress Code. See “If You Need to Use
the Duress Code” on page 7. Some 2GIG alarm dealers and/or installers
change this to their own default code. To protect your system, the person
who knows the Master User Code should always change the default code to
a unique one that is known only by trusted system users. See “Change the
Master User or Duress Code” in the next section.

Copyright © 2018 Nortek Security & Control LLC. 9
Change the Master User or Duress Code
The Master User Code provides users with the ability to access the System Settings menu and, depending on your system configuration, may also
provide access to other pin-protected features. The Duress code lets users send a silent duress report to the Central Station. See "If You Need to Use
the Duress Code" on page 7.
IMPORTANT: When customizing codes for your system, ensure they are simple enough to remember, but not something that can be
easily guessed or discovered by an intruder. For example, do not use the dwelling’s physical address, telephone digits, birth dates, or
birth years. Codes should only be given to trusted individuals. For example, in a residential installation the primary homeowner may know
the Master User Code, while family members and/or legal occupants may only know their individual user code and the Duress Code.
To change the Master User or Duress code:
1Tap System Settings, enter the system’s Master User Code, and then tap the Users menu. Next, continue with these steps:
2
At the Users screen, tap the pencil icon
next to Master User or Duress.
3
At the Edit Master User or Edit
Duress User screen, tap the pencil
icon next to Code.
4
At the Enter a Code for the User
screen, input a unique four-digit code
and tap Next. Then, confirm the code
and tap Done.
Create a User Code
If you know the system’s Master User Code, you can create individual user codes for people who need system access.
To create a user code:
1Tap System Settings, enter the system’s Master User Code, and then tap the Users menu. Next, continue with these steps:
2
At the Users screen, tap Add User.
3
Enter a name for the new user and tap
Next.
4
Enter a unique code and tap Next. Then
enter the code again to confirm it and
tap Done.
TIP: The holder of the Master User Code can also create user code access schedules for users who only need access to a dwelling
during certain hours. For example: au pairs, housekeepers, and personal assistants. For more in-depth information, see the GC3
User Guide.

Copyright © 2018 Nortek Security & Control LLC.
10
Edit a User Code
Once a user has been created, you can adjust that users access to the system or individual areas.
1
User Selection Screen.
2
Top of User Edit Screen
3
Scroll Down Section 2 on Edit User
Screen.
System Tests
To ensure continued protection and proper system operations, it is important to perform a sensor and console test on a weekly basis.
To perform System Tests:
1 Enter the Master User Code to access the System Settings menu.
2
Tap System Tests.
3
Tap one of these buttons to choose the test type:
Sensor Test: Tests signals between the Control Panel and installed sensors.
Console Test: Tests the function of the GC3 Panel’s audio and buttons.
Smart Areas Settings
Smart Areas allow homeowners to create
up to 4 independently controllable and
manageable areas (Examples: Main
House, Garage for package delivery, Room
Rental, Gun Safe, In-Law Suite).
Flexible user interface limits control of the
Smart Areas at the user code level.
Note: Smart Areas must be enabled to
view Smart Areas tile on the home screen.
For more details, refer to the GC3 Users
Guide.
To set Smart Areas settings:
1
Home Screen: Select System
Settings.
2
Select Smart Areas’ Settings Tile.
3
Default List of Smart Areas Names:
Select the edit icon.
4
Type in new Smart Areas Name.
5
Edited Names.

Copyright © 2018 Nortek Security & Control LLC. 11
View Smart Areas
View and change state of Smart Areas.
1User presses SMART AREAS button.
3Smart Areas status.
2User enters code.
Smart Areas States:
1Disarmed Ready to Arm.
2Disarmed with Bypassed Zone.
3In Alarm.
4Armed Away.
Smart Areas Notes:
Set Sensor Chimes
To set individual chimes for each zone use the sensor chime menu.
1
Home Screen: Select System Settings.
2
Enter Master Code.
3
Press Sensor Chimes.
4
Select Zone to Adjust Chime.
5
Choose Desired Chime.

Copyright © 2018 Nortek Security & Control LLC.
12
Network Settings
To set network settings:
1
Home Screen: Select System Settings.
2
Select Network Settings Tile.
3
Select Wireless.
4
Select the Wireless Network.
5
Enter Password.
6
After connecting, the panel will show IP address.

Copyright © 2018 Nortek Security & Control LLC. 13
Limited Warranty
This product is warranted against defects in material and workmanship for three (3) years. This warranty extends only to wholesale customers who buy
directly from Nortek Security & Control LLC or through Nortek Security & Control’s normal distribution channels. Nortek Security & Control LLC does not
warrant this product to consumers. Consumers should inquire from their selling dealer as to the nature of the dealer’s warranty, if any.
There are no obligations or liabilities on the part of Nortek Security & Control LLC for consequential damages arising out of or in connection with use or
performance of this product or other indirect damages with respect to loss of property, revenue, or profit, or cost of removal, installation, or re-installation.
All implied warranties for functionality are valid only until the warranty expires. This Nortek Security & Control LLC Warranty is in lieu of all other
warranties, expressed or implied.
All products returned for warranty service require a Return Authorization Number (RA#). Contact Returns at 1-855-546-3351 for an RA# and other
important details.
Waste Electrical and Electronic Equipment (WEEE) Statement
This symbol on a product or on its packaging indicates that this product is not to be thrown away with everyday waste.
Instead, it is your responsibility to dispose of electrical and electronics equipment by handing it over to a designated collection
point for the recycling of waste electrical and electronic equipment (W.E.E.E.). The separate collection and recycling of your
waste electrical and electronic equipment at the time of disposal will help to conserve natural resources and ensure that it is
recycled in a manner that protects human health and the environment. For more information about where you can drop off your
waste equipment for recycling, please contact your local city office, or your household waste disposal service, or the shop where
you purchased the product.
WARNINGS
Limitations of Alarm Products
This product should be tested periodically to make sure it is working properly. The product, if used properly, may reduce the risk of burglary, robbery, and
other adverse events that have the potential to result in injury or loss of life; however, Nortek Security & Control is not an insurer. This product is neither
insurance nor a guarantee that such an event will be prevented, and users should protect themselves with proper insurance. Nortek Security & Control
makes no representation that this product cannot be compromised or circumvented, that it will provide an adequate warning, or that it will prevent any
personal injuries, property damage, or other losses. Like any alarm product, it may be bypassed, it is subject to compromise, and it may fail to warn for
a variety of reasons, including, but not limited to: improper installation or positioning; improper maintenance; tampering; dead or improperly installed
batteries; sensing limitations; component failures; receivers; intrusions may be outside of a product’s designated range and certain environmental
conditions may impact performance, and audible alarm signals may be outside of hearing range, muted by doors, walls, and floors, unheard by deep
sleepers or the hearing-impaired, or overwhelmed by other sounds.
Risk of Noise Induced Hearing Loss
The Alarm is equipped with a warning siren. Exposure to high sound levels or prolonged exposure to the warning siren can result in Noise Induced
Hearing Loss (NIHL)

Copyright © 2018 Nortek Security & Control LLC.
16
ALARM DEALER INFORMATION
Company Name:
Your Account Number:
Installation Date:
10004644 D
Other manuals for 2GIG GC3
2
Table of contents
Other Nortek Security System manuals