North Edge RANGE 5 User manual

North Edge Watch Product Manual
Range 5
Touchable built-in GPS Multi-functional Sports Watch
Dear customers,
Thank you so much for buying and using the North Edge
RANGE 5 watch.
The model is a rechargeable sports watch with built-in GPS,
and can be operated by touchable screen and three buttons
on the right, both operating ways can control the watch and
make the functions working separately.
The RANGE 5 screen is visible in outdoor sunlight, it has
1.2-inch semi-penetrating reflective color screen that would
not be full dark when standby. It will be even clearer and
brighter in strong sunlight. With its low power consumption,
it is truly a good choice for outdoor activities.
1.Content:
One watch
One charging clip
One instruction manual
- 1 -

2.Product features:
1.Bright screen
2.Full Touch operation
3.Dynamic heart rate
4.Built-in multi-satellite positioning reception system
5.Instant altitude
6.Instantaneous air pressure
7.Ambient temperature
8.Compass
9.real-time diving depth
10.50M waterproof
11.Instant latitude and longitude
12.Abdominal rhythm
13.Mobile messaging Data
14.Analysis of multiple motion modes
15.Outdoor track record
16.Low power consumption
3.Key operation:
1.Top Right “START” button: Start/enter
2.Middle “DOWN” button: page DOWN
3.Right Bottom “BACK” button: exit/return/power
- 2 -

4.When the watch is off, press the BACK button for 3 seconds,
and the screen turns on and enters the standby user interface
5.On standby status, press the BACK button for 3 seconds and
the screen turns off
6.When the watch appears abnormal or out of control, long
BACK button for 10 seconds can force the watch to restore original
settings.
4.Touch screen controls:
1.Scroll up and down, flip the page
2.Swipe left: start/enter
3.Swipe right: back
5.Charging instructions:
1.Press the charging clip lightly so that the contacts of the clip are
aligned with the charging port above the bottom of the watch.
In order to make full contact, the step under the clamp contact
must be wedged into the notch of the watch metal contact.
2.Once you have the clip in place, connect it to your computer or
phone’s power adapter using a USB charging cable.
3.The watch shows a red charging screen and when it is turned
on, it indicates that the watch has started being charged.
- 3 -

4.The little arrow on the battery icon on the dial disappears and
shows full battery with green, then the watch was fully charged,
the clip can be removed.
6.Waterproof instructions:
1.Please do not press the buttons under water. For diving mode,
Please use the buttons above water when start/end diving.
2.When wearing the watch, we can wash hands, face or swim or
dive under normal conditions.
3.In order to prevent watch rusting, after using in the sea or
corrosive liquid, please be sure to wipe the watch clean, do not
affect the normal service life of the watch.
4.It is not suitable using the watch in high temperature and high
humidity (such as: Hot Springs, sauna steam room, Hot Bath)
environment, nor place the watch in a humid and steam
environment for a long time.
5.In any waterproof grade, watches should not be used in warm
water/hot spring to avoid high temperature vapor seeping into
the waterproof parts of the watch and affecting the normal service
life of the watch.
- 4 -

7.HPlusFit download installation:
You can search for “HPlusFit” in any of the major application
markets or scan the following QR code to download an application
that matches your watch.
Before pairing your phone with Bluetooth, make sure it meets the
following requirements:
1.IOS must be 12.0 or above.
2.Android 5.0 or above and support Bluetooth 5.1 transport
protocol.
8.Pairing:
1.Run HPlusFit application.
2.Click on Me-my device, and searching for devices, there will be
a watch device called the NORTH EDGE_XXXX. The XXXX number
corresponds to the watch’s “Settings”-version SN number.
- 5 -

3.Click on the watch model to match.
4.The Bluetooth pairing takes only one time, and the watch will be
automatically connected to the phone once pairing successfully.
The iPhone pops up a notification whether to pair with the watch
and whether to allow the watch to receive notifications from the
phone.
5.If a watch cannot automatically connect to the phone after a
successful match, try unbinding the watch in the APP and ignoring
the watch in the Bluetooth settings of the phone; then reenter the
APP to bound watch.
6.If the above operations cannot solve problem for bounding,
long press the BACK button for 10 seconds to reset the watch,
and then enter HPlusFit APP binding watch again.
9.Sync with your phone:
The movement data of the watch will be transmitted to HPlusFit
via Bluetooth. The following points should be noted when
transmitting the data to HPlusFit:
1.Before uploading the motion data, you need to pair the watch
with the phone successfully.
2.Make sure the phone’s Bluetooth is enabled before uploading
the motion data.
3.By reading the watch’s data from your phone and running an
- 6 -

HPlusFit application, you can sync the data by pulling down and
refreshing it on the “Today” page.
4.The accuracy of pedometer data can be effectively improved by
faithfully filling in user configuration.
5.HPlusFit-Me-My information, editable user information.
6.Sex, age, height, and weight make differences in walking data
and calorie consumption data.
7.Sitting for a long time is harmful to health. The function of the
long-sitting reminder can monitor the long-sitting time and give
vibration reminder. The switch : HPlusFit-Me-My device-more-
Sedentary reminder.
10.Heart rate measurements indicate:
One, heart rate measurement in healthy mode
1.The optical heart rate sensor is located on the back of the watch
2.Clean and dry your wrists of sweat or sunscreen.
3.Wear your watch close to the wrist bone, make sure it is snug
against the bone and does not move when you move.
4.Go to watch health-heart rate measurement page.
5.Place it for 10-15 seconds to measure your heart rate, indicating
your current heart rate.
6.Heart rate measurements in the healthy mode show changes in
heart rate over 12 hours period as well as current measured heart
- 7 -

rate values. The measurements will be displayed in the HPlusFit-
today’s heart rate section when synchronized.
7.Heart rate unit of measure: beats per minute (BMP).
Two, heart rate measurement in Exercise Mode
1.The optical heart rate sensor is located on the back of the watch.
2.Clean and dry your wrists of sweat or sunscreen.
3.Wear your watch close to the wrist bone, make sure it is snug
against the bone and does not move when you move.
4.Once you’re in motion mode, select the type of motion, swipe
left or click OK to start motion/ GPS positioning and measure your
heart rate.
5.Place for 10-15 seconds to measure your heart rate, indicating
your current heart rate.
6.Complete GPS positioning and heart rate measurement, swipe
right/press the BACK button to continue/stop/discard the exercise
data and heart rate data.
7.The heart rate data measured in the exercise mode can be
viewed in the watch’s exercise history data, or through the
HPlusFit-exercise record when synchronized with phone.
8.Heart rate unit of measure: beats per minute.
Three, if the heart rate data is abnormal or not displayed,
try the following actions.
- 8 -

1.Clean and dry your wrists of sweat or sunscreen.
2.Please check the optical heart rate sensor on the back of the
watch for scratches or flashes.
3.Try wearing it on your other wrist and measure your heart rate
again.
11.Backlight:
1.In the dark environment, if you need to enhance the brightness
of screen, press any key can open the backlight, continue to swipe
the screen to keep backlight on.
2.In the “Settings” of watch or the APP, there are options for
automatically turning on the backlight by rotating arm during
6:00pm to 12:00pm. In original setting, it is off. If you need this
function, you can turn it on.
3.The backlight dwell time after the stop operation can be set in
Me-My device-more- screen saver time in HPlusFit.
4.Excessive use of backlight will affect standby time.
12.Vibration:
The watch’s vibrating reminder can be turned on or off in “settings”.
- 9 -
13.Dials
1.Time setting: the watch connects to the
phone to get the instant date time.
2.In pursuit of maximum standby time,
the dial with seconds is only displayed for
five seconds when activated.
3.The pedometer/distance/calorie count
displayed on the dials will be reset to zero
the next day. Historical data can be viewed
in the “Today” section of HPLUSFIT under
pedometer/sleep/heart rate.
4.In the dial interface, side-to-side swipe
can switch dial.
- 10 -
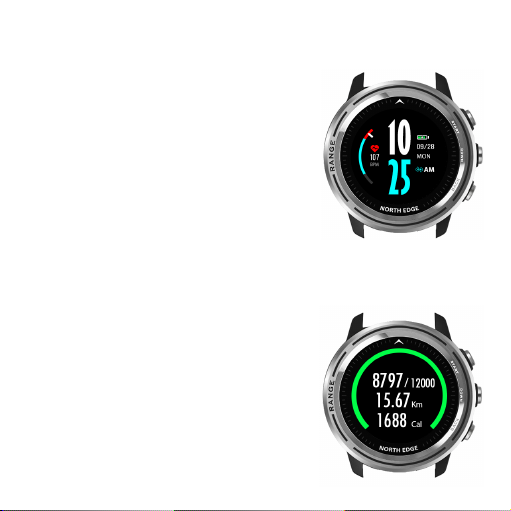
14.My Day
1.Pick pedometer data , exercise distance,
exercise calories today in this section. Goal
12,000 steps can be set in HPlusFit-Me-My
device-more-My goal. The watch alerts
you when you’ve achieved the goal.
2.Pedometer/distance/calorie count for
today will be reset to zero the next day.
Historical data can be viewed in the “Today”

section of HPlusFit under pedometer/sleep/heart rate. Data storage
time can be more than one year.
- 11 -
15.Good Health
1.To master your heart rate/sleep status,
swipe left/press START to enter the health
interface heart rate-sleep.
2.In HPlusFit APP, Me-my device-all-day
heart rate is used to confirm whether to
turn on the all-day heart rate monitor or
not.
3.Heart rate measurements in health mode
show changes in heart rate over 33 hours
as well as current measured heart rate
values. The measurements will be displayed
in the HPlusFit-today’s heart rate section
when synchronized.
4.Heart rate unit of measure: beats per minute.
5.Wearing the watch while you are asleep to monitor sleep state
according to the heart rate and movements, and identify how long
for deep sleep and light sleep. The today-sleep section of HPlusFit
tracks sleep by date.

- 12 -
16.Breathe
1.The deeper the breath, the more active
the lungs, and the more efficient the alveoli
are at exchanging oxygen and carbon
dioxide, giving the muscles enough energy
to keep moving.
2.In contrast to shallow breathing, deep
“Belly breathing” , which involves the
abdomen and diaphragm, makes it more
active. On the one hand, it removes the
metabolized carbondioxide more
thoroughly,
and on the other hand, it increases the
capacity of the body when
breathing in, allow the inhaled oxygen to
penetrate the alveoli,
increasing the efficiency of blood oxygen
exchange. At the same
time, this deep muscle breathing helps you focus more on your
core muscles, making your running form and movement less likely
to be distorted by increased intensity or distance.
3.Use the breath-in-breath-out rhythm to help you adjust your
abdominal breathing.
- 13 -
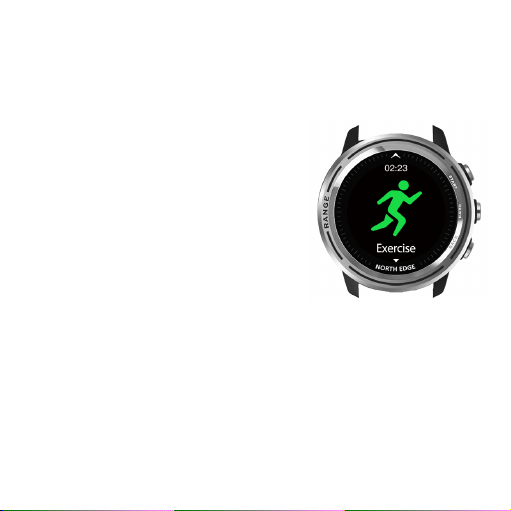
17.Exercise
1.Scroll up/down from the dial to find the
Sports type selection screen. Swipe left/
press Start button to enter the menu and
choose walk -outdoor -running-
mountaineering-cycling-swimming-indoor
running-diving-free exercise-historical
data.
2.If satellite positioning is not required,
the motion program interface can be
swipe left/pressing the START button to
start.
3.To pause a motion, swipe right or press
BACK to continue/stop/discard the motion
record.
4.Please start the dive above water. Once
the diving finished, please return to the
water surface and press BACK button to stop. The touch screen
is turned off while running dive mode to prevent accidental touch
underwater.Please do not press the buttons under water.

- 14 -
18.Sports mode:
1.When using the three outdoor sports
programs of running, climbing and cycling,
please search for GPS and other satellite
signals in the open wild area and wait for
the satellite positioning successfully
because the GPS signal cannot pass
through the conductor, GPS function
determines the accuracy of motion data.
2.The green heart rate is the instantaneous
heart rate value. The green bar above the
heart rate indicates the strength of the
GPS signal, and the black bar is the
strongest when it covers four bars. The
blinking dot on the right indicates that the
watch is searching for GPS signal.
3.The display mode of the data can be
changed by moving the interface up and
down:
Walking: real-time heart rate, stride frequency, time worked
out, number of steps worked out, current time, day and week,
interval of heart rate during exercise, distance worked out, calories
burned.

- 15 -
Outdoor running: real time heart rate, cadence, time worked
out, number of steps worked out, location, latitude and longitude,
current time, day and week, interval of heart rate during exercise,
distance worked out, calories burned, speed, pace
Mountaineering: real-time dynamic heart rate, stride frequency,
exercise time, exercise steps, air pressure, altitude, exercise distance,
calories burned, exercise heart rate interval, location, current time,
day and week
Cycling: speed, pace, elapsed time, real time heart rate, location
latitude and longitude, current time, day of the week, interval of
heart rate during exercise, distance worked, calories burned
Swimming: real-time dynamic heart rate, calories burned,
exercise time, current time, days, weeks, interval heart rate during
exercise
Indoor running: real-time heart rate, stride frequency, time
worked out, number of steps worked out, current time, day and
week, interval of heart rate during exercise, distance worked out,
calories burned
Diving: depth of dive (m) , time of dive, underwater temperature,
interval of heart rate during exercise, current time, day, week
Free Exercise: real-time dynamic heart rate, calories burned,
exercise time, current time, days, weeks, interval heart rate during
exercise

- 16 -
Historical data, a record of successful movements will be
displayed in a list form in the watch’s movement-historical data.
When the watch is connected to HPlusFit Bluetooth, the record
of the successful exercise will be available in chronological order
in HPlusFit-exercise. Click on a single piece of data to view the
data. The track will be visible on a map during outdoor running/
hiking/cycling.
4, HPlusFit-Me-my device-more-my goals can set specific goals
for each activity, such as 30 minutes or 5KM, and will be alerted
when the goals are achieved.
19.Settings:
1.Vibration Switch: turn on /off watch
vibration.
2.Wrist: Options for automatically turning
on the backlight by rotating arm during
6:00pm to 12:00pm. In original setting,
it is off. If you need this function, you can
turn it on.
3.Height correction:
The sensor measures the relative
height caused by the motion. It occurs
when the air pressure changes in real time.

- 17 -
Using Scenario: if you are climbing a mountain or taking an
elevator, measure the relative height created by the climb by
setting the height to zero at the foot of the mountain or at the
beginning of the climb.
Click on the GPS correction, you need connect to the outdoor
GPS signal in order to successfully obtain absolute height. When
entering outdoor activities such as running, climbing or cycling,
the altimeter will be connected to the GPS signal and the absolute
height of the location will be obtained by GPS rectification.
4.GPS: the combination of GPS, beidou, and GLONASS satellites,
depending on the area in which they are located.
5.Resume factory settings: confirm whether factory original settings
need to be resumed.
6.Shutdown: confirm whether shutdown is required.
7.Version: HPlusFit QR code, watch SN Bluetooth number, software
version.
20.Outdoors:
To know environmental changes well, we can start with a
comprehensive data graph.
From the outdoor interface, Swipe left/press START to enter the
compass-timing mode-altimeter-barometer-temperature interface.
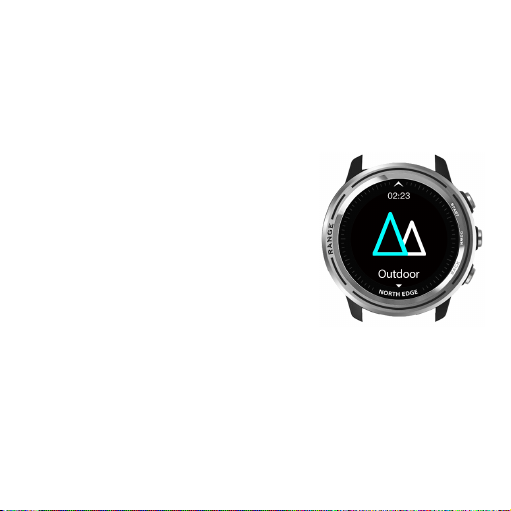
- 18 -
The sensor collects changes in temperature, pressure and altitude
at all times.
There are some discrepancies when the air pressure and altitude
are affected by the pressure and temperature.
1.Compass: Hold the strap and let the dial
mark “8” in the air to correct the compass.
Enter the compass: the central number
represents the angle between the direction
of the Red Arrow and due North direction.
2.Timing mode
Stopwatch: Enter Stopwatch Mode to
turn on/Stop the timer, and reset the data.
Countdown: can be set by the default
time to start/Stop Countdown, can also be
customized to set the countdown time. The
watch vibrates at the end of the countdown.
3.Altimeter: A Graphic Representation of the change in altitude of
the environment over the last 4 hours. Unit: Meter.
4.Barometer: a graph showing the pressure changes in the
environment for the last 12 hours. Unit: hpa.
5.Temperature: plot the change in ambient temperature over the
last 12 hours. Unit: degrees centigrade.

- 19 -
When the watch is worn on wrist, it is easily affected by the body
temperature and higher than the environmental temperature. To
accurately measure the ambient temperature, leave the watch on
the table for 10-15 minutes.
21.Message Notification:
When the mobile phone message alert is
enabled, the mobile phone message will
be displayed on watch, and the message
exits by right-swiping.
Three messages can be stored in the
message record, scroll up and down.

- 20 -
Exemption Clause
1.The heart rate data obtained through Range 5 smart sports
watch would be for reference only and cannot be used as a
professional device for medical and diagnostic purposes or for
special purposes.
2.The heart rate data collected by Range 5 smartwatch may not
be complete accurate due to interference with environmental
signals, posture, climate changes and changes in personal physical
condition.
3.The picture in this brochure shows the product with a Silver Circle
in order to explain the product structure more clearly. It is not the
object that show the product does not match the picture.
22.Specifications:
Table of contents
Other North Edge Watch manuals


