North Edge APACHE-46 User manual

INSTRUCTION MANUAL
N
E
W
LIGHT
BARO


A . Features
B . Mode and Function
C. Specification
Manual
8.The second time setting
9.Altitude measurement mode
10.Atmospheric pressure measurement mode
1
2
3
3
5
5
6
7
8
9
9
11
12
15
1.Time and date setting
2.Pedometer Mode
3. Review records
5. Chronograph mode
4. Alarm mode
6.Countdown timer mode
7.Metronome mode
11.Compass mode
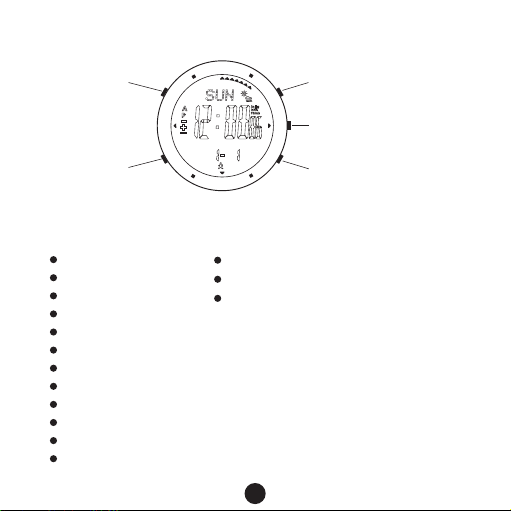
LIGHT/SELECT
(button A)
MODE/SET
(button B)
(button E) UP/BARO
(button D)COMP
(button C) DOWN/ALTI
A . Features
N
S
E
w
LIGHT
BARO
ALTI
MODE
12 / 24 Hourly format Pedometer
EL backlight Compass
The second time Pacer
Display low battery
Alarms(2 alarms and hourly chime).
Time:hour, minute, second, week, month, day.
Year from 2000 to 2099 fully automatic calendar.
Air pressure measurement (300~1100mbar/8.859~32.484inHg)
Height measurement (-698~+9164m/-2246~+30067F)
Temperature measurement (10 ~ + 60 ℃ / 14 ~ 140 ℉)
Countdown timer(99hours59 minutes 59.99 seconds)
Chronograph function:99 hours 59min59.99seconds(100 group for Lap)
1
B . Mode and Function
Metronome modeThe second time mode
CompassAltitude
measurement
Atmospheric pressure
measurement
N
S
E
W
LIGHT
BARO
ALTI
MODE
B B B B
BB
B
E C D
B
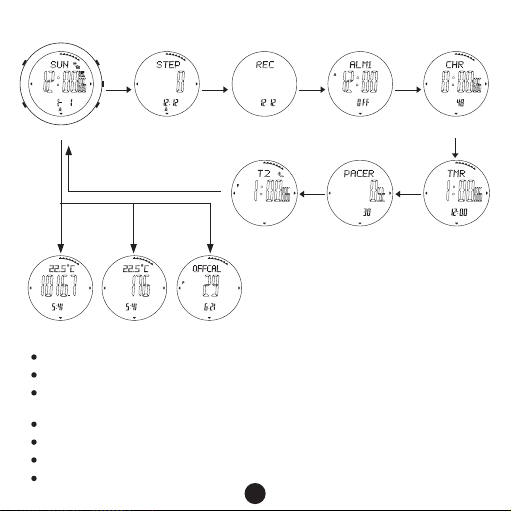
Timekeeping mode Pedometer mode Record mode Alarm mode Chronograph mode
Countdown timer mode
Press button A in any mode, EL illuminates for 3 seconds.
Press button B to choose modes.
In timekeeping mode, keep pressing button E for 2s to shift: week—temperature—
altitude curve—sea level atmospheric curve.
In timekeeping mode, press C to enter Altitude measurement mode directly.
In timekeeping mode, press D to enter compass measurement mode directly.
In timekeeping mode, press E to enter Atmospheric pressure measurement mode directly.
After enter the above mode, press B to exit and return to timekeeping mode.
2
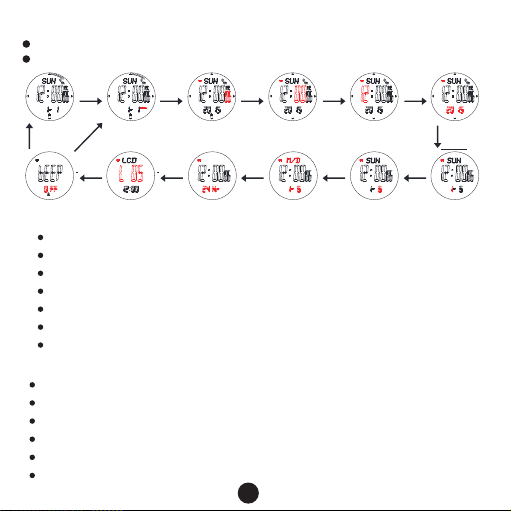
1.Time and date setting
In timekeeping mode, keep pressing button B for 2s,the Second flashes, entering setting mode.
Press button B to set the flashing items.
Timekeeping
mode
“HOLD”Flash
B
Set Second Set Minute Set Hour Set Year
Set MonthSet Date
Set M/D format
Set 12/24H
Set LCD resolution
BEEP on/off
B B B B
B
BBBBB
B
Press E to increase the value, press and hold E to advance quickly.
Press C to decrease the value, press and hold C to decrease quickly.
When the Second flashes, press E OR C to reset
Press E/C to shift between 12/24 hours format
Resolution level:1-10,press E /C to increase or decrease
Keep pressing B for 2s to exit.
It will exit setting mode when no any key pressing for 1 minute.
2.Pedometer Mode
range : 0 ~ 999999 Step
calories:0.0 ~ 99999.9 Kcal
mileage:0.00 ~ 9999.99 KM or 0.00 ~ 9999.99 Mile
exercise time: 0 ~ 24H
in the pedometer mode, keep pressing C for 2s to turn on/off the pedometer
The pedometer symbol will display when the meter is on
3
Keep pressing
button B for 2s

press E to shift among these items:step→mileage→calories→exercise time→step
Step Mileage Calories Exercise timer
E E E
Set the pedometer
In pedometer mode, keep pressing button B for 2s,the unit flashes, entering setting mode
Press button B to set the flashing items: unit→step distance→weight
B B B
B
Pedometer mode Set unit Step distance Weight
Press E /C to shift the unit of metric and English
Press E to increase the value, press and hold E to advance quickly.
Press C to decrease the value, press and hold C to decrease quickly
Input your weight:20 ~ 200 kg or 44 ~ 441 lbs(default value75 kg or 165 lbs)
Step distance:30 ~ 180 cm or 2 ~ 71 inch(default value 70 cm or 28 inch)
Keep pressing B for 2s to exit.
It will exit setting mode when no any key pressing for 1 minute.
4

3. Review records
4. Alarm mode
In the record mode, press C to review the latest 7 days record
In the day record, you can shift the data for the following items by pressing E
If no data recorded on that day, pressing C/E is useless
History record
review mode
12.17 12.18 12.23
C C C
Pedometer Mileage Calories Exercise timer
E E E
In alarm mode, press button E to shift among these items: AL1->AL2->Chime->AL1
Press C to turn on/off the alarm or hourly chime
In alarm mode, keep pressing button B for 2s,the Minute flashes, entering setting mode
Press B to move the setting items:
5

5. Chronograph mode
Alarm mode Set HourSet Minute
B B
The maximum timing range is 99 hours 59 minutes and 59.99 seconds.
In this mode, press E to start or stop .Press C key to reset when it stop.
Split time record: When the chronograph is running, press C to choose the LAP,15s
later it will display the time of chronograph, then second pressing C to choose the
next LAP, you can stop it by pressing E. keep pressing B for 2 seconds to enter LAP
record mode, C/E to review LAP
When LAP have been reach to 100,and you want to go on counting, press E/C to
overlay it to the last LAP
In the LAP mode, press B for 2s to exit and return to chronograph mode
When the chronograph is running, press B to enter other mode, but the chronograph
still running background
When the chronograph stop, it will return to timekeeping mode 5 min later
6
Press E to increase the value, press and hold E to advance quickly.
Press C to decrease the value, press and hold C to decrease quickly
Keep pressing B for 2s to exit.
It will exit setting mode when no any key pressing for 1 minute.
When the alarm is on, it will sound BB—BB for 20s once it's the alarm time, the sign
will will be flashing. Press any button to stop it
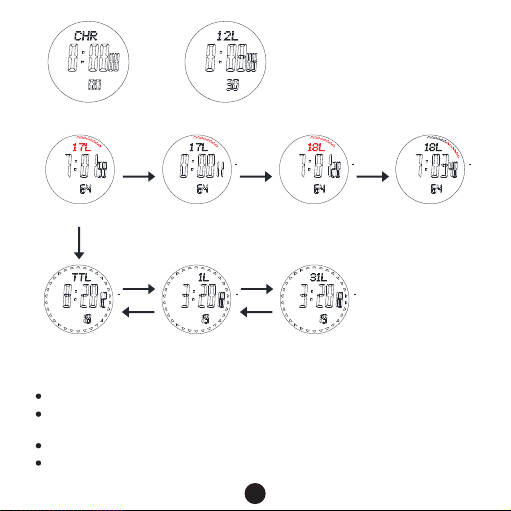
Running Display Running Pause
LAP Total time ALP 1 ALP 31
C10S later E
E
C
E
C
Press B for 2S
Chronograph mode Review LAP
6、Countdown timer mode
The maximum countdown range is: 99 hours, 59 minutes and 59.99 seconds.
In the countdown timer mode, press button E to run/stop, press button C to return
your setting value when it stop.
When countdown to 0, the alarm will sound BB.BB.BB..for 30 seconds.
Set the counting down timer: In the counting down mode, press and hold button
B for 2 seconds, Hour flashes, entering counting down setting mode.
7
Table of contents
Other North Edge Watch manuals


