North49 VINTAGE IRON SYNERGY BOTTLE ROCKET 2021 User manual

\\ . C R4 ,<-
:
VINTAGE
IRON
2021
NORTH49
RANCS
SYNERGY BOTTLE ROCKET
Owners Manual
Models
SYNERGY BOTTLE ROCKET X 350W, 36V 7.5AH LI -ION BATTERY
Please read before operating your new bike
ORIGINAL INSTRUCTIONS

CONGRATULATIONS!
Congratulations on your purchase of your new SYNERGY
BOTTLE ROCKET, and welcome to the ever-growing
electric family! You are now part of a worldwide community
of riders seeking adventure and excitement on two wheels.
We sincerely thank you for helping support our dream of
bringing affordable and one-of-a-kind e-bikes to the world
- for any rider, any situation, and any journey. Whether it’s
a trip up the mountains, across the beach, or down the coast,
let us help you get there in style.
Please read this manual from beginning to end prior to taking_your new SYNERGYBOTTLE
ROCKET for a ride. Our safety warnings are to be followed for rider benefit.
--FRAME NUMBER--
Pleas e take a moment to record your SYNERGY BOTTLE ROCKET frame
nu1nber, located at the underside of the bottom bracket.
In addition, it is wise to register these numbers with your insurance
company
and your local police station in the event of loss or theft. Hold
into your
sales receipt/invoice for further proof of ownership.
Write down this nun1ber here in the manual in case your SYNERGY
BO TT LE ROCKET is stolen or lost. It starts wi h a WMAB, followed byi
numerical sequence.
Owner's Name
Frame Number
Color
Date of Purchase
Happy riding!

Table of
Contents
Foreword------------------------------------ 2
Frame Number----------------------------- 3
Table of Contents ----------------------------4
Safety Tips ------------------------------------5
Getting to Know your Bike -----------------6
What's in the Box -------------------------- 7
Computer Display----------------------------8
How to Operate the Bike ---------------------9
Technical Specifications -------------------
10
Battery and Charging -----------------
10.1
Before you Ride: Checklist ------------------
11
Troubleshooting 12
Warranty Information--------------------- 13
SAFETY
FIRST
If
you are unfamiliar with any aspect of this manual, it is advised that you take your
SYNERGY BOTTLE ROCKET, and this manual to a local bike shop for inspection, assembly,
and instructions.
It is extremely important that you follow the safety guidelines contained in this manual to
ensure maximum safety for as well as maximum durability of the SYNERGY
BOTTLE
ROCKET.
Before you ride your SYNERGY BOTTLE ROCKET for the first time, please be sure
that it
has been correctly assembled. You will find step-by-step instructions in this manual. But
if for any reason you are not certain, please bring to your nearest bike shop.
Key assembly steps that must be completed with absolute certainty (to ensure secure
fastening) are pedals, saddle height, handlebars (both rotation and height), and wheels.
Please ensure all bolts (including the front/rear wheels, saddle bolt and brake rotors) are
properly tightened. Certain components must be tightened to exact specifications using a
torque wrench for safety assurance: Fixed front wheel axle nut: , Fixed rear wheel axle
nut:
, Handlebar bolts: Handlebar stem bolt:
Bar end bolts:
Saddle bolt:
Test your brakes prior to using the SYNERGY BOTTLE ROCKET every time. In wet or icy
conditions, use extra caution.
Check your tire pressure frequently. They should be pumped to bar ( PSI). Low tire
pressure will result in damage to tires and rims.
Always wear a helmet when riding any bike or e-bike.
Please observe all traffic regulations and other applicable laws.
DO NOT DRINK AND RIDE. Even a small amount of alcohol can impair judgement and lower
your ability to remain safe.
All riders of the SYNERGY BOTTLE ROCKET must be at least 16 years old.
The SYNERGY BOTTLE ROCKET is designed to be ridden by a single person. Total
recommended weight of the rider, including gear, is150kg (330lbs)
7&8
5
11
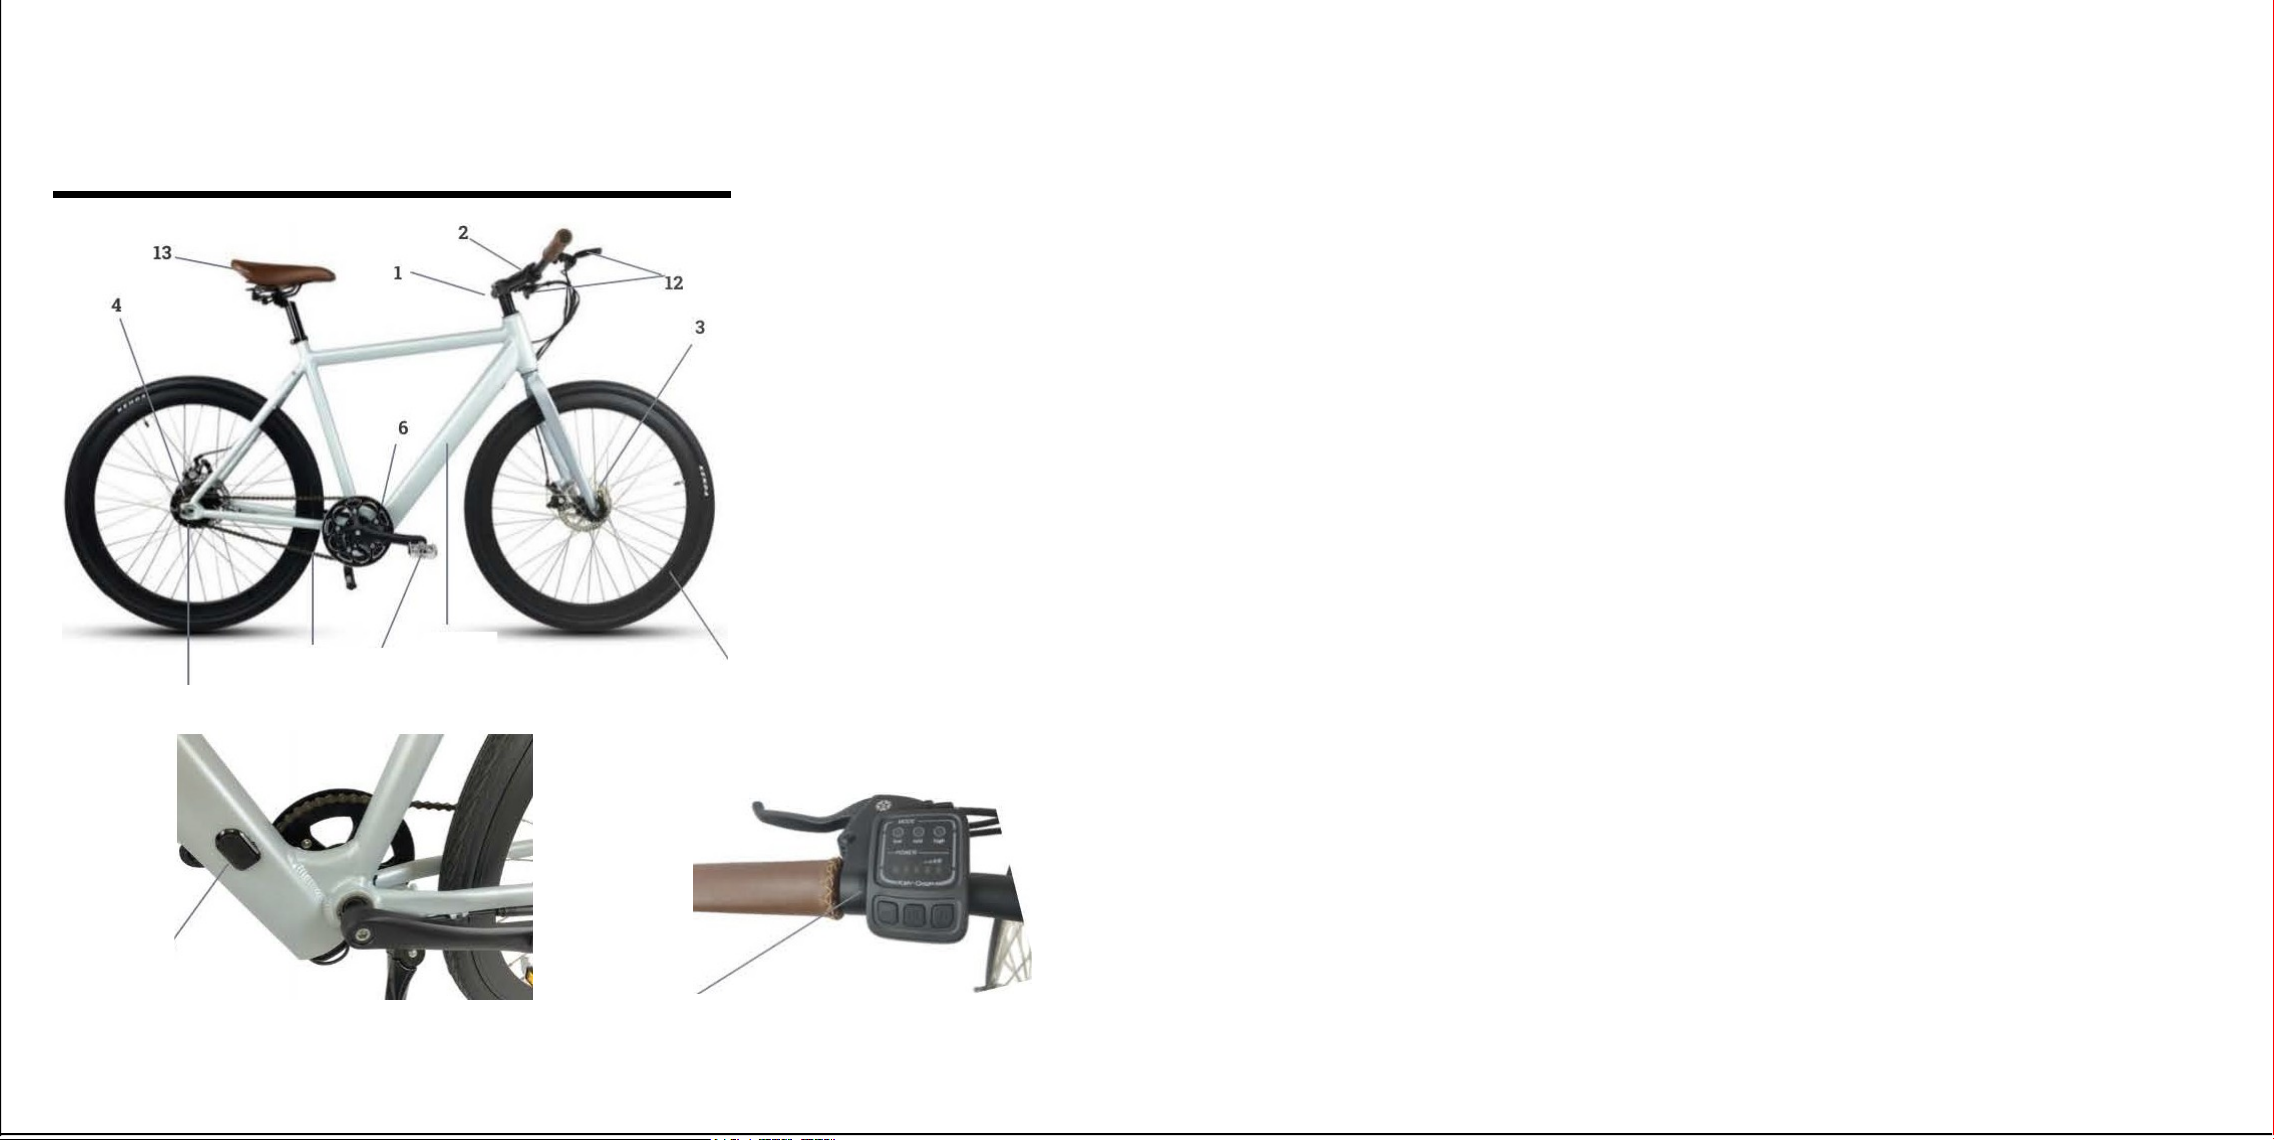
GETTING TO KNOW
YOUR BOTTLE ROCKET
[1] Handlebar
[2] Display
[3]
Disc Brakes
[4] Rear Hub Motor
[5]
Chain
[6] Charge Port
[7] Battery Compartment
[8]
Controller
[9]
Rear Derailleur (not pictured)
[1OJ Tire
[11]
Pedals
[12]
Brake Levers
WHAT'S IN THE BOX
Before opening the packaging, please check to see if the
box has been compromised in any way that could impact
the contents.
Once you've confirmed that your SYNERGY BOTTLE
ROCKET box is in good condition, then it's time to open it!
Inside, you will find the following items:
[13]
Saddle
9
-
Bike Frame/Fork
-
Front Wheel
-
Handlebar/Stem
-
Left & Right Pedals
-
Wheel Reflectors
-Rear Wheel
-
Gears/Chain
-
Saddle/Seat Post
-
Battery
-
Battery Charger
Charge Port
2
Please contact us right away if something is
missing or appears to be damaged.
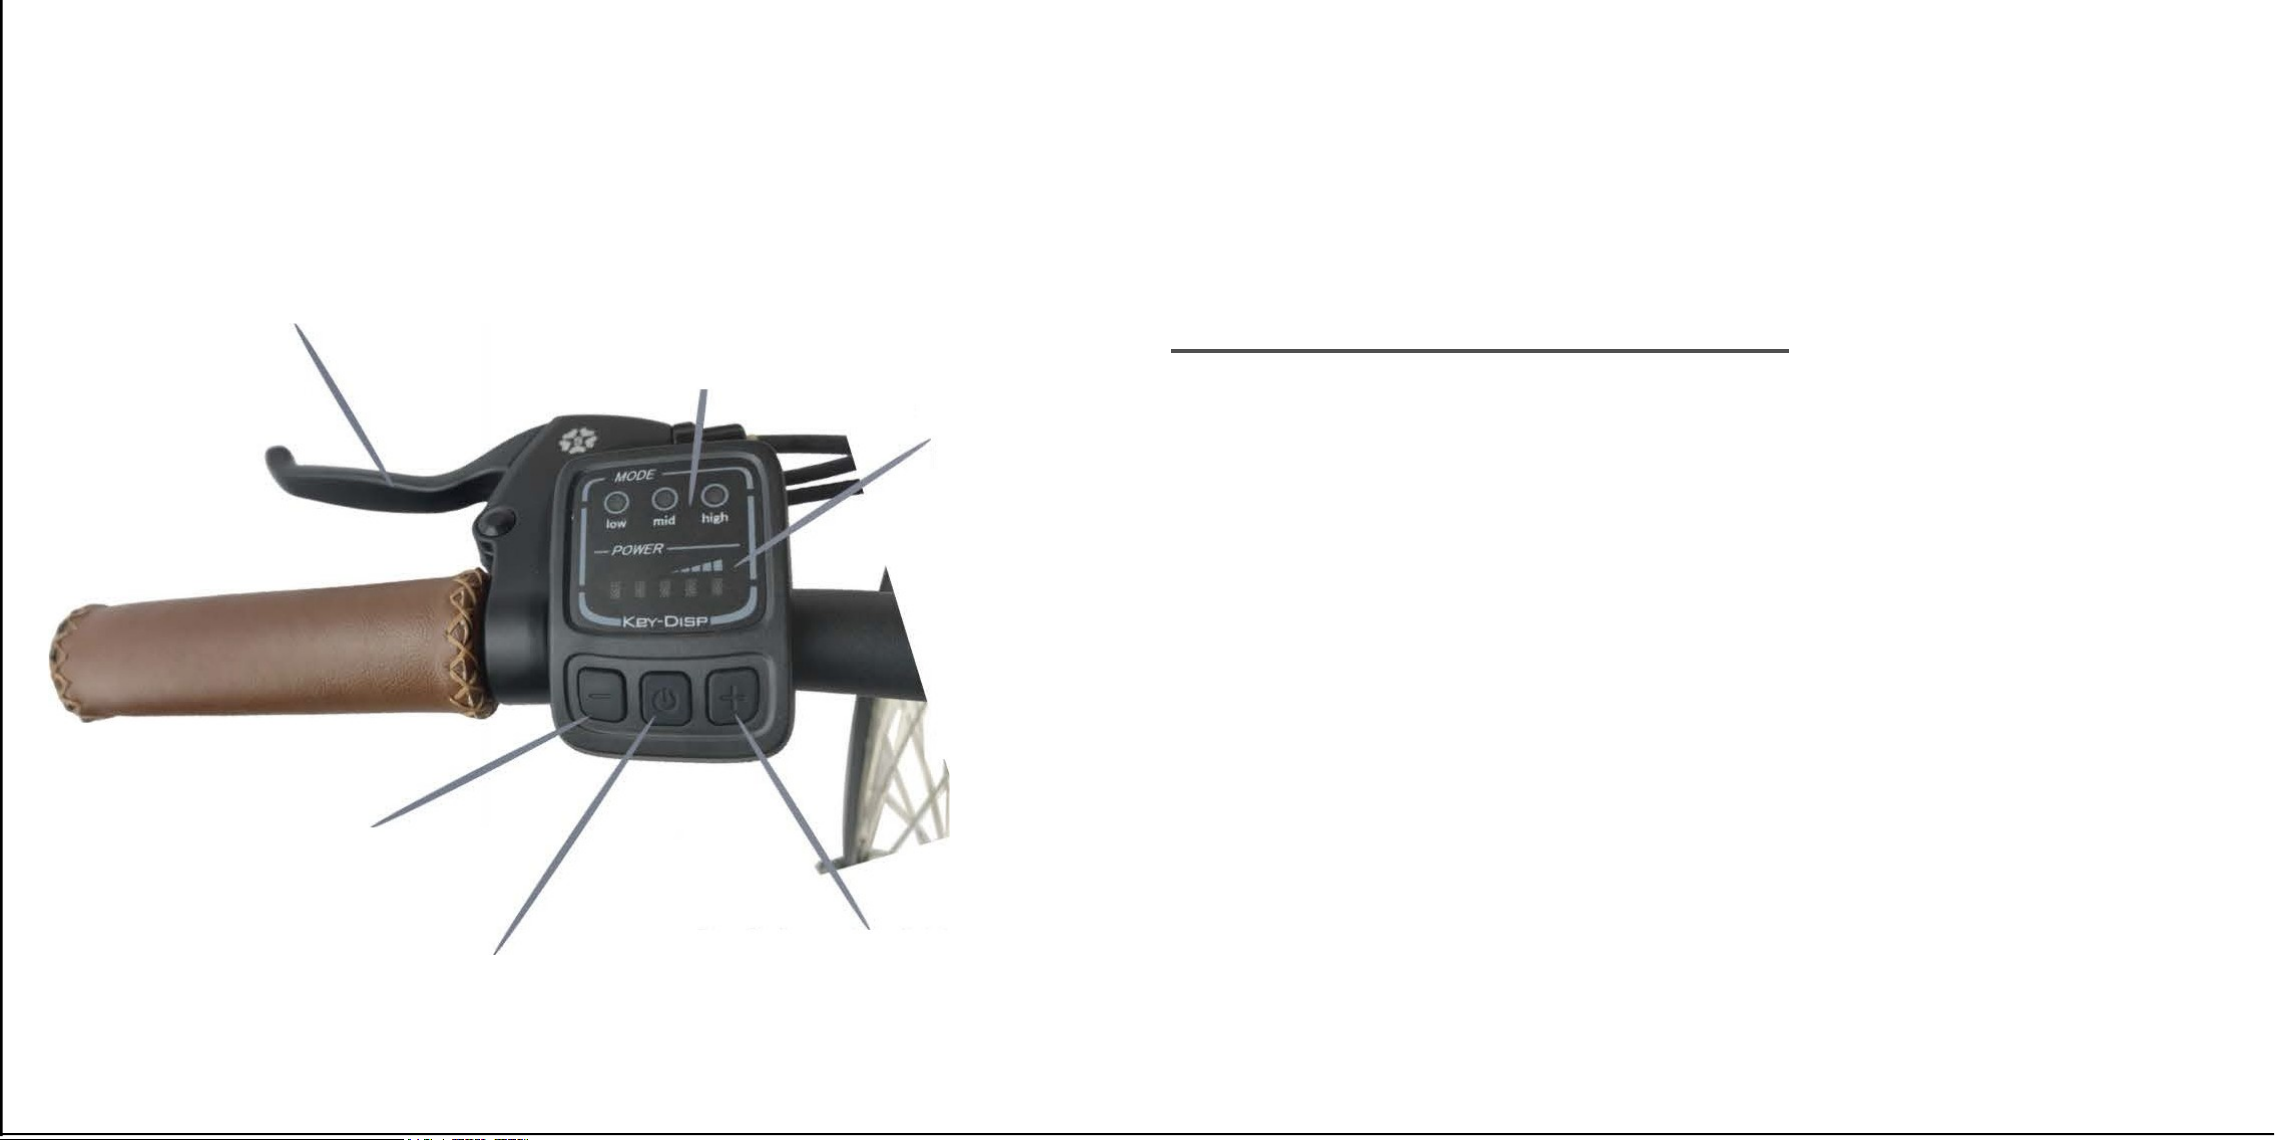
COMPUTER
DISPLAY
Pedal assist level indicator. This
HOW TO OPERATE THE
BOTTLE ROCKET
Once you've assembled your Synergy Kahuna and fully charged the battery
Brake lever
shows which mode of pedal
assist is currently being used
until the indicator light has turned green, you're ready to ride!
Just follow these simple steps and your off:
Battery life
indicator
Turn on the SYNERGY BOTTLE ROCKET by pressing and holding the power button in
the center of the black box display module. As soon as the display turns on, release the
button.
Pedal assist
DECREASE. Press to
decrease level of pedal
assist
ON/OFF Power switch
Pedal assist INCREASE.
Press to increase level of
You will notice "low, mid, high" on the top of the display. By pressing the
"+"
or "-", you
can set your pedal assist to your desired level, as these buttons increase and decrease
your pedal assist. The higher the level of pedal assist, the more assistance you will get
from the bike's motor.
When in the "low" pedal assist level, pressing the "- " once more will turn the pedal assist
level to 0, and the BOTTLE ROCKET will function like a normal non-motorized bike.
To start your ride, simply begin pedaling! It is recommended to begin pedaling in the
lowest level of pedal assist until you are used to the acceleration. Once you are
comfortable in the "low" setting, you can begin to pedal at a higher assist level.
When your ride is over, lower your pedal assist level back down to 0, and then press and
hold the power button on the display module. Once the indicator lights turn off, release
the
power button. The bike is now turned off.
pedal assist
If your battery is lower than
70%
charged, be sure to
charge it after your ride!
1
2
3
4
5

•
•
•
•
•
•
TECHNICAL SPECIFICATIONS
BEFORE YOU RIDE:
SIZE --
Overall Size (mm):
WEIGHT---
Max Loading (kg):
Net Weight (kg):
APPLICATION ---
Rider Age:
Road Usage:
MOTOR--
Motor Type:
Rated Output Power:
BATTERY ---
Battery Type:
Rated Voltage (V):
Battery Capacity (Ah):
CHARGER ---
Rated Power (W):
Input Voltage (V):
Output Voltage (V)
7710 x 40 x 980 mm
124KG
13KG
16 years or older
Bike Lane;
roadways
DC Brushless
350W
Lith ium Ion
36 V
7.5Ah
90W
100-240VAC
36V
ADDITIONAL FEATURES--
Charge Time:
Wheel Size:
Frame Material:
Suspension:
Brakes:
Throttle:
Rear Derailleur:
Waterproof Rating:
4-6
hours
Aluminum Alloy
None
Tektro Disc Brakes
None, pedal assis t only
7 speed shifter
IP65 {Splash Resistant)
Checklist
Ensure seat post is tightly fastened and adjusted to the correct
height for the rider
Check that the handlebar stem is tightly fastened
All additional bolts and fasteners are tightened (ex. Kickstand,
front and rear wheels, brake rotors)
Che ck for proper functioning of brakes and gears
Ensure the battery is correctly installed in the bike, and turned
on using the ON/OFF power button on the display module
•
The battery is fully charged
Rated Current: 2A
SPEED---
Top Speed (km/h): 32 km/ hr
Range (km): 25-35kms
Grade Ability;
Working Temperature:
Storage Temperature: -4 to +40 Celsius
The tires are not damaged, and the tire pressure is at
_
PSI
**NOTE: Some countries require bikes be equipped with a
bell. Be sure to check with your local authorities to learn if
you need to install one. **
BATTERY AND CHARGING
To
charge the battery:
Ensure the bike is turned OFF.
Plug
the charger first into the charge port on the left side
of the
down tube, and then plug into the electrical wall socket.
*Make sure the light turns GREEN when charger
is
plugged into the wall, and RED once the bike begins
charging. Once the light returns to solid GREEN, the bike
is
finished charging and may be unplugged.
To reach furthest distance on a charge,
it is
recommended to pedal the SYNERGY BOTTLE ROCKET in
the lowest pedal assist mode. This will help save battery.
The lifespan on this battery, when properly taken care of,
is between 400 and 600 charges.
WARNING: Do NOT take the battery apart. Do not burn,
puncture,
submerge in water, or damage battery in any way. Do NOT use
battery or charger if either appear to be damaged.
In case of noise, leakage, or irregular heat from battery, stop all
use immediately. Keep batt ery in a well-ventilated place, out
of direct sunlight. Store at above
o
degrees Celsius.

TROUBLESHOOTING WARRANTY
1.
VINTAGE IRON CYCLES AND NORTH 49 BRANDS
shall in its sole discretion determine whether any
damage, failure,malfunction, or other loss is due to a
cause that is covered by the SYNERGY BOTTLE
ROCKET product warranty.
TERMS OF WARRANTY
-
This warranty applies only to the original owner of
the SYNERGY BOTTLE ROCKET bike unless otherwise
determined by applicable mandatory legislation
-
Proof of purchase is required for all warranty claims
2.
LIMITED ONE YEAR COMPONENTS WARRANTY
Includes: forks, stem, handlebar, seat post, saddle,
brakes, cables, bottom bracket, crankset, pedals,
chain, rims, spokes, wheel hub, freewheel, cassette,
derailleur, shifter, motor, controller, wiring harness,
kickstand, and hardware
3.
This limited one year components warranty covers
replacement parts only and does NOT cover the cost
of shipping or installation of the replacement parts.
If you believe your SYNERGY BOTTLE ROCKET needs
service, or you are experiencing problems, bring your
bike to your nearest electric bike dealer for warranty
determination and assistance.
This warranty does NOT cover any damages or defects
resulting from failure to follow instructions inthe
owner's manual, acts of God, accident, misuse, neglect,
abuse, commercial use, modification, or impro per
assembly.
This warranty does NOT cover normal wear and
tear of the SYNERGY BOTTLE ROCKET or its
components (for example: tires, inner tubes,
brake pads, chains, etc.).
This warranty does NOT cover parts damaged by
an attempt ed repair unless performed by an
authorized SYNERGY bike repair center with
SYNERGY BOTTLE ROCKET advanced
knowledge.
This warranty does NOT cover any unauthorized
modifications done to the bike and/or its
components.
This warranty does NOT cover any water-
damage.
4.
LIMITED ONE YEAR BATTERY WARRANTY
Lithium Ion batteries are warranted to be free
from manufacturer defects in materials and/or
workmanship for a 1-year period from the date
of
original purchase. As it is impossible to know
how
a battery is cared for, we cannot warranty a
battery for diminishing lifetime or charge
capacity.
Problem:
Try this:
Seat post release is difficult lt to adjust
Lubricate the adjustment levers rot ation pivot point s. Open
and close repeatedly until pivot point loosens and you can
securely fasten the seat post
You experience a lack of braking power
Not enough brake fluid in the braking system (may be
caused by a leak, air contamination, etc.)
Brakes are squeaking
Rotor needs to be filed down, usually glazed over from debris
on the road; Rotor needs to be cleaned with rubbing alcohol.
Brake pads are worn out
Top Speed to low
Fully charge battery; check tire pressures
Power on, but motor not working
Reinstall battery/replace fuse/move black circular magnet
on inside of crank inbound so it makes contact with small
black rectangular magnet
Riding shorter distance per charge (less range) Check tire pressure: recharge battery and inspect charger for
damage; replace battery
Power and indicator lights are on, but pedal assist
does not engage
Controller needs to be replaced; motor needs to be replaced.
**Please Contact Us!**
You connect power to the charger but indicator light
does not come on
Check whether there is electricity to charger; if you have a
voltage meter, check the charger is producing correct current
You plug in charger to both bike and power outlet,
and the green light comes on instead of the red light
Check to see if battery is already fully charged; check
whether charger is plugged in correctly to both battery and
power outlet; check voltage of charger/batt ery; if "zero"
voltage on charger, replace charger; if "zero" voltage on the
battery, check the fuse

Table of contents


