Northland YEALINK T33G User manual

YEALINK T33G SIP PHONE
PHONE + VOICEMAIL
USER MANUAL

TABLE OF CONTENTS
CLICK ON ANY PAGE NUMBER TO RETURN TO THE TABLE OF CONTENTS
INSTALLING YOUR YEALINK T33W PHONE.............................................................................................
GETTING TO KNOW YOUR YEALINK PHONE .......................................................................................
QUICK REFERENCE GUIDE DEFINING SPECIFIC KEYS + FEATURES.
SCREENS AND ICONS.................................................................................................................................
MAIN SCREENS.
MENU SCREEN .............................................................................................................................................
PROGRAMMING MENUS + FEATURES.
PLACING AND ANSWERING CALLS ........................................................................................................
EXTENSION, EXTERNAL AND INTERCOM CALLS.
NAVIGATING A CONNECTED CALL ........................................................................................................
TRANSFER, TRANSFER TO VOICEMAIL, CONFERENCE + CALL PARK.
HISTORY + CONTACT LISTS........................................................................................................................
USING REDIAL + HISTORY TO MAKE CALLS
CONVENIENCE FEATURES ........................................................................................................................
PAGING, CALL PICK UP, DO NOT DISTURB, CALL FORWARD + HOT DESK
RINGS AND INDICATORS ..........................................................................................................................
INTERNAL AND EXTERNAL RINGS, ADJUST RING VOLUME + SET A RING TONE.
SETTINGS AND FEATURES..........................................................................................................................
SETTING + FEATURE DEFINITIONS
STATUS INDICATORS....................................................................................................................................
UNDERSTANDING STATUS BAR + BLF ICONS
YOUR VOICEMAIL ........................................................................................................................................
HOW TO SETUP, FORWARD CALLS TO VM, + ADMINISTER + RECORD GREETINGS.
UNDERSTAND COMMON COMMANDS, LOGIN, LEAVE VM MESSAGES + TRANSFER TO VM.
1
2
4
5
6
7
9
10
11
11
12
13
Need support? Connect with us at www.northland.net/support or
Dial 4357 (HELP) or 315-671-6262 to speak to a Northland Training Representative
1
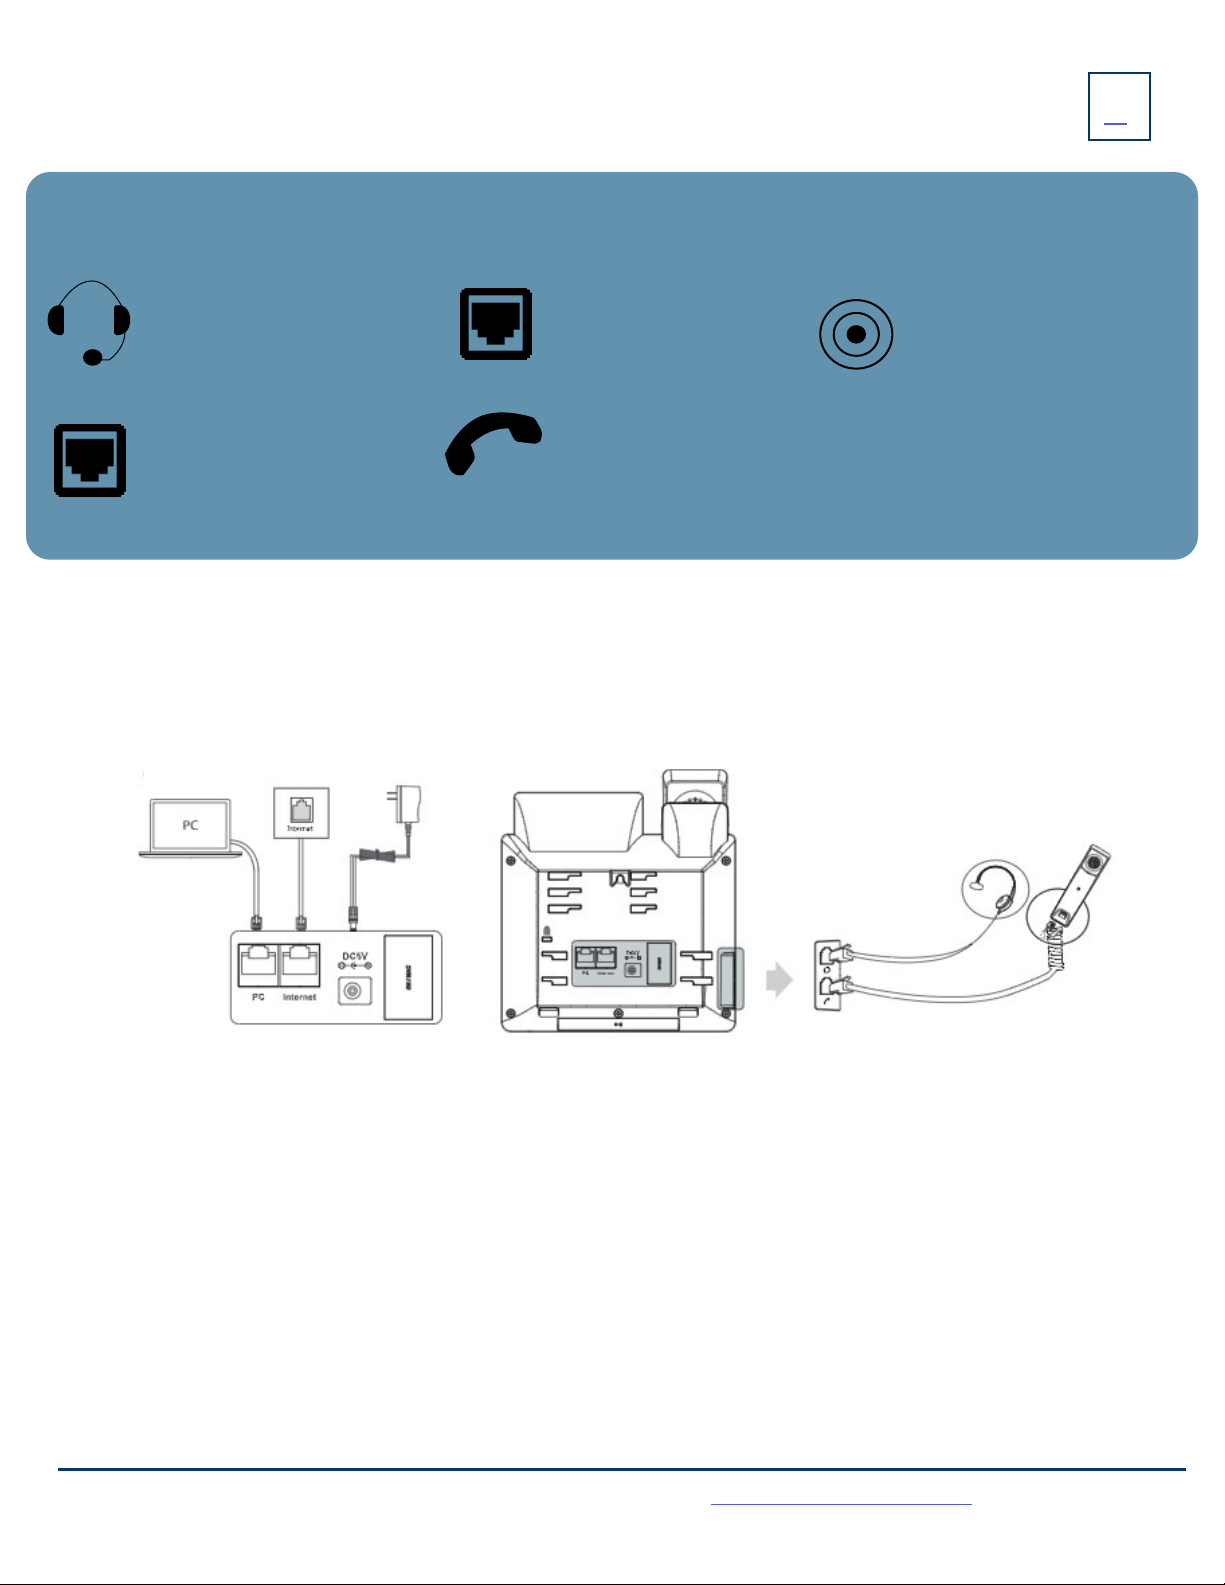
HANDSET: Plug your handset
into this port.
PC: Plug your
PC into this port if
your PC is connecting through your
phone.
INTERNET: Plug into this
port to connect to your
network.
DC5V: If your network does not
provide Power Over Ethernet
(P.O.E.), a separate power supply
will accompany your phone.
KEY:
HEADSET: Plug your head-
set into this port.
Need support? Connect with us at www.northland.net/support or
Dial 4357 (HELP) or 315-671-6262 to speak to a Northland Training Representative
INSTALLING YOUR YEALINK T33W PHONE
BACK OF THE PHONE

2
GETTING TO KNOW YOUR YEALINK T33G SIP PHONE
Need support? Connect with us at www.northland.net/support or
Dial 4357 (HELP) or 315-671-6262 to speak to a Northland Training Representative
NO. ITEM DESCRIPTION
1 POWER LED INDICATOR Indicates call status, message status and phone’s system status.
2 PHONE SCREEN Shows information about your phone, such as calls, messages, Softkeys, time and date.
3 LINE / FEATURE KEYS Access your phone lines and features.
4 SOFTKEYS Accesses the feature/function that appears on the display above them. Softkeys change
based on the state of the phone: idle, on a call, in a menu, etc.
5
NAVIGATION KEYS +Scroll through information or options displayed on the screen.
+Access History and Directory.
OK KEY Confirms actions or answers incoming calls.
X - CANCEL KEY Cancels actions, exits menus or rejects incoming calls.
6 MUTE KEY Toggles the microphone on/off.
7 HEADSET KEY Toggles the headset mode on/off.
8 MESSAGE KEY Accesses voicemail.
9REDIAL KEY Redials a previously dialed number.
10 SPEAKER Provides hands-free audio input/output.
11 VOLUME KEY Adjusts the volume of handset, headset or speaker.
12 KEYPAD Allows you to enter numbers, letters and special characters. If a menu item has an index
number, you can use the keypad to select the item.
13 SPEAKER Provides ringer and speaker audio output.
14 REVERSIBLE TAB Reverses to secure the handset in the cradle when the phone is mounted on a wall.
3
4
5
6
7
8
9
10
11
12
2
13
14

POWER LED INDICATOR
The power LED indicator (above the display on the right hand side) provides call, message and the phone’s status.
Solid red
Fast-flashing red
Slow-flashing red
Solid red for .5 seconds and off for .3 seconds
The phone is initializing.
The phone is ringing.
There are new voicemail messages.
The phone entered power-saver mode.
LINE KEY LED
The Line Key LED (on the display where you see your Subscriber telephone number) indicators
Solid green
Fast-flashing green
Slow-flashing green
Off
The phone is in use.
The phone is ringing.
There is a call on hold.
The line is idle.
3
Need support? Connect with us at www.northland.net/support or
Dial 4357 (HELP) or 315-671-6262 to speak to a Northland Training Representative

SCREEN + ICONS 4
Need support? Connect with us at www.northland.net/support or
Dial 4357 (HELP) or 315-671-6262 to speak to a Northland Training Representative
The user screens and icon indicators help you navigate and understand the information on the phone’s status. There are four Idle screens.
1
2
No. Name Description
1 Status Bar Displays the phone’s default subscriber account and phone status icons.
2 Date and Time Date and Time appears on all three idle screen in the same area.
3 Softkey Labels Commands that are activated by pressing the keys below them. These commands change
based on the phones state. ie: on a call.
4 Feature Status Icons Icons to indicate missed calls, new voicemails, etc.
5 Line Keys Used to make and receive calls.
6 More Key Scrolls to two additional pages of line/feature keys. Press the key to advance to the next
screen.
3
4
5
6
SECOND IDLE SCREEN
FIRST IDLE SCREEN
THIRD IDLE SCREEN
Displays the Call Park Keys. Displays the Intercom Key and available
keys that ca be programmed through
CommPortal.
FOURTH IDLE SCREEN
Displays the Logout Key and available
keys that can be programmed through
CommPortal.

5
Need support? Connect with us at www.northland.net/support or
Dial 4357 (HELP) or 315-671-6262 to speak to a Northland Training Representative
MENU SCREEN
No.Application Description
1 Status Provides the MAC, IP Address and firmware of the telephone.
2 Features Accesses DND and System Diagnostics.
3Directory Displays the Network Contacts.
4 History Displays recent call lists: All Calls, Placed Calls, Missed Calls and Received (answered) Calls.
5User Mode Used by the system administrator and requires an Admin Password.
6Advanced Used by the system administrator and requires an Admin Password.
7 Basic Basic phone settings suck as Time & Date format, display and sound settings, etc.
8 Message Displays message information (not content) and accesses the voicemail system.
1 2 3 4
56
To access the Menu Screen, press the Menu Softkey.
To access an item on the menu screen, scroll to the item and press the ENTER Softkey or the OK Key.
78

PLACING + ANSWERING CALLS
PLACE AN INTERCOM CALL: Automatically bypasses ringing and opens the speaker of the party you are calling.
+Scroll to and Press the INTERCOM Key.
+Enter an intercom (extension) number.
+Lift Handset or press the SEND Softkey.
+Party will hear warning tone and their speaker is open for you to speak or announce.
+For privacy, their microphone is automatically muted (they must unmute to speak).
+If the called party is on another call, their phone will ring.
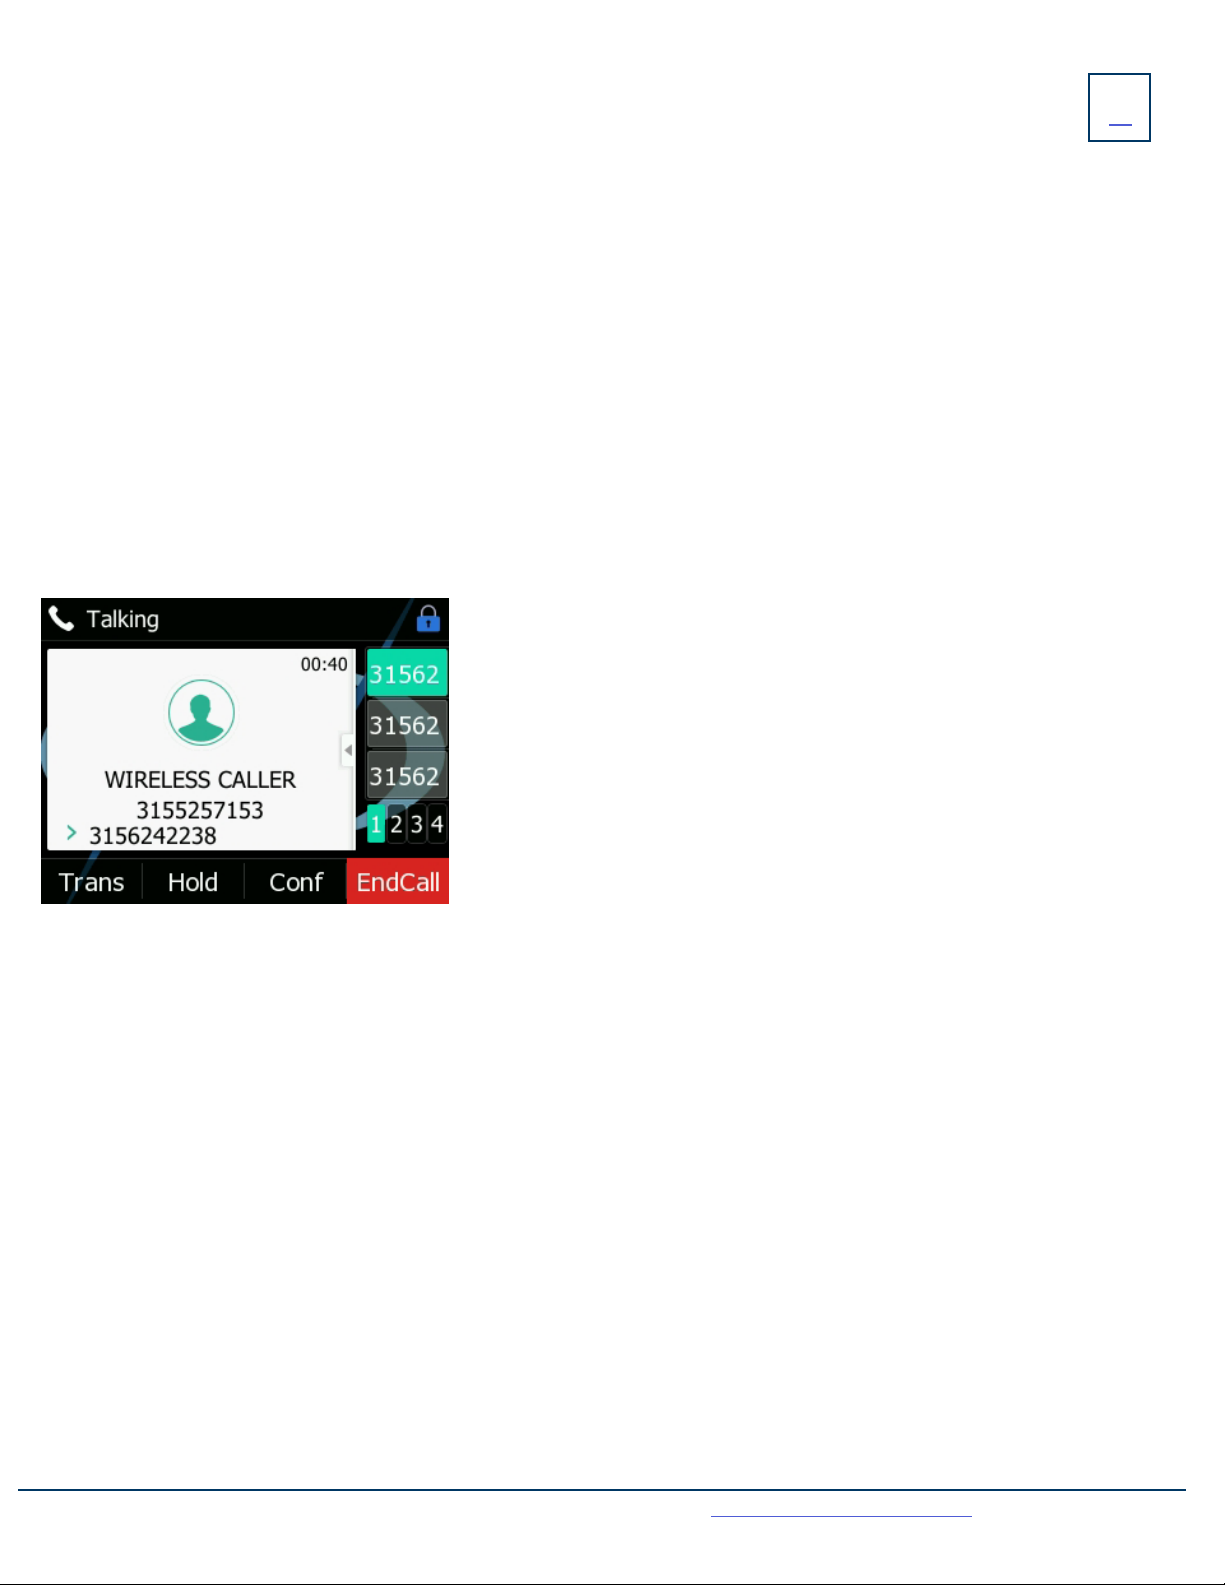
MANAGE MULTIPLE CALLS:
+PLACE A SECOND CALL: Press the Line Key, first call automatically holds and you hear dial tone, enter number.
+ANSWER A SECOND CALL: Hear Call Waiting Tone, caller ID of second call scrolls across the display (see below).
AA CALL:
ANSWER A CALL
+ Phone rings, indicator flashes, available commands appear on the
display.
+ Lift Handset or press SPEAKER Key or press the ANSWER Softkey.
+ TO QUIET A RINGING CALL: Press the SILENCE Softkey.
+ TO SEND RINGING CALL TO VOICEMAIL: Press the REJECT Softkey.
+TO FORWARD TO ANOTHER SUBSCRIBER: Press the FORWARD
Softkey, enter the extension number and press FORWARD again.
6
Need support? Connect with us at www.northland.net/support or
Dial 4357 (HELP) or 315-671-6262 to speak to a Northland Training Representative
PLACE A CALL
+ Internal: Enter EXTENSION number.
+External: Enter 1 and the 10-digit number.
+Lift Handset or press the Call Softkey.
Or press the Speaker Key.
+Press the Flashing LINE Key of the ringing call or
Press the ANSWER Softkey (first call automatically holds).
You are connected to second call.
+Press the REJECT Softkey to send the second call to voicemail.
+Press the END CALL Softkey to end the first call and answer the
second call.
+Press the TRANSFER Softkey to transfer the first caller to another
number and then press ANSWER to answer the second call.
Once you place the first call on hold and answer the second call, the Softkeys will change to allow you to toggle between calls.
+Press the SWAP Softkey to toggle between calls.
Caller ID of second call scrolls across display.
TRANSFER: Allows you to connect your call to someone else (with call on line)
Announced: Press the TRANSFER Softkey.
The current call is automatically placed on hold.
Enter the Number you are transferring to and press the SEND Softkey.
Wait for the person to answer, announce the call.
+COMPLETE TRANSFER: Press the TRANSFER Softkey, call is connected, hang up.
+TO RETURN TO HELD CALL: Press the END CALL Softkey and then press the RESUME Softkey.
Blind Transfer: Press the TRANSFER Softkey.
The current call is automatically placed on hold.
Enter the Number and press the B TRANSFER Softkey.
TRANSFER TO VOICEMAIL: Sends a caller directly to voicemail without ringing the phone.
+Press the TRANSFER Softkey or press the TRANSFER key on the phone.
+The current call is automatically placed on hold.
+Dial *99 and enter the EXTENSION Number.
+Press the B TRANSFER Softkey immediately.
7
NAVIGATING A CONNECTED CALL
SPEAKER: Press to make or answer any call without lifting the Handset.
+TO SWITCH TO SPEAKER FROM HEADSET/HANDSET: Press the SPEAKER Key, replace handset in cradle.
+ TO RESUME PRIVACY: Lift Handset or Press the HEADSET Key.
+TO END SPEAKERPHONE CALL: Press the END CALL Softkey.
MUTE: Turns off your Microphone (Speaker, Handset + Headset) to allow you to speak privately. The caller cannot over-
hear office/background noise or conversations.
+TO USE: Press the MUTE Key. A mute symbol appears on the display, speak privately.
+ TO RESUME CONVERSATION: Press the MUTE Key again.
HOLD: This is an exclusive hold to your telephone. No one else can retrieve it.
++TO HOLD A CALL: Press the HOLD Softkey or the HOLD Key on the phone.
++TO RETURN TO CALLER: Press the LINE Key or Press the RESUME Softkey or Press the HOLD Key again.
Need support? Connect with us at www.northland.net/support or
Dial 4357 (HELP) or 315-671-6262 to speak to a Northland Training Representative
IN CALL SCREEN
TRANSFER
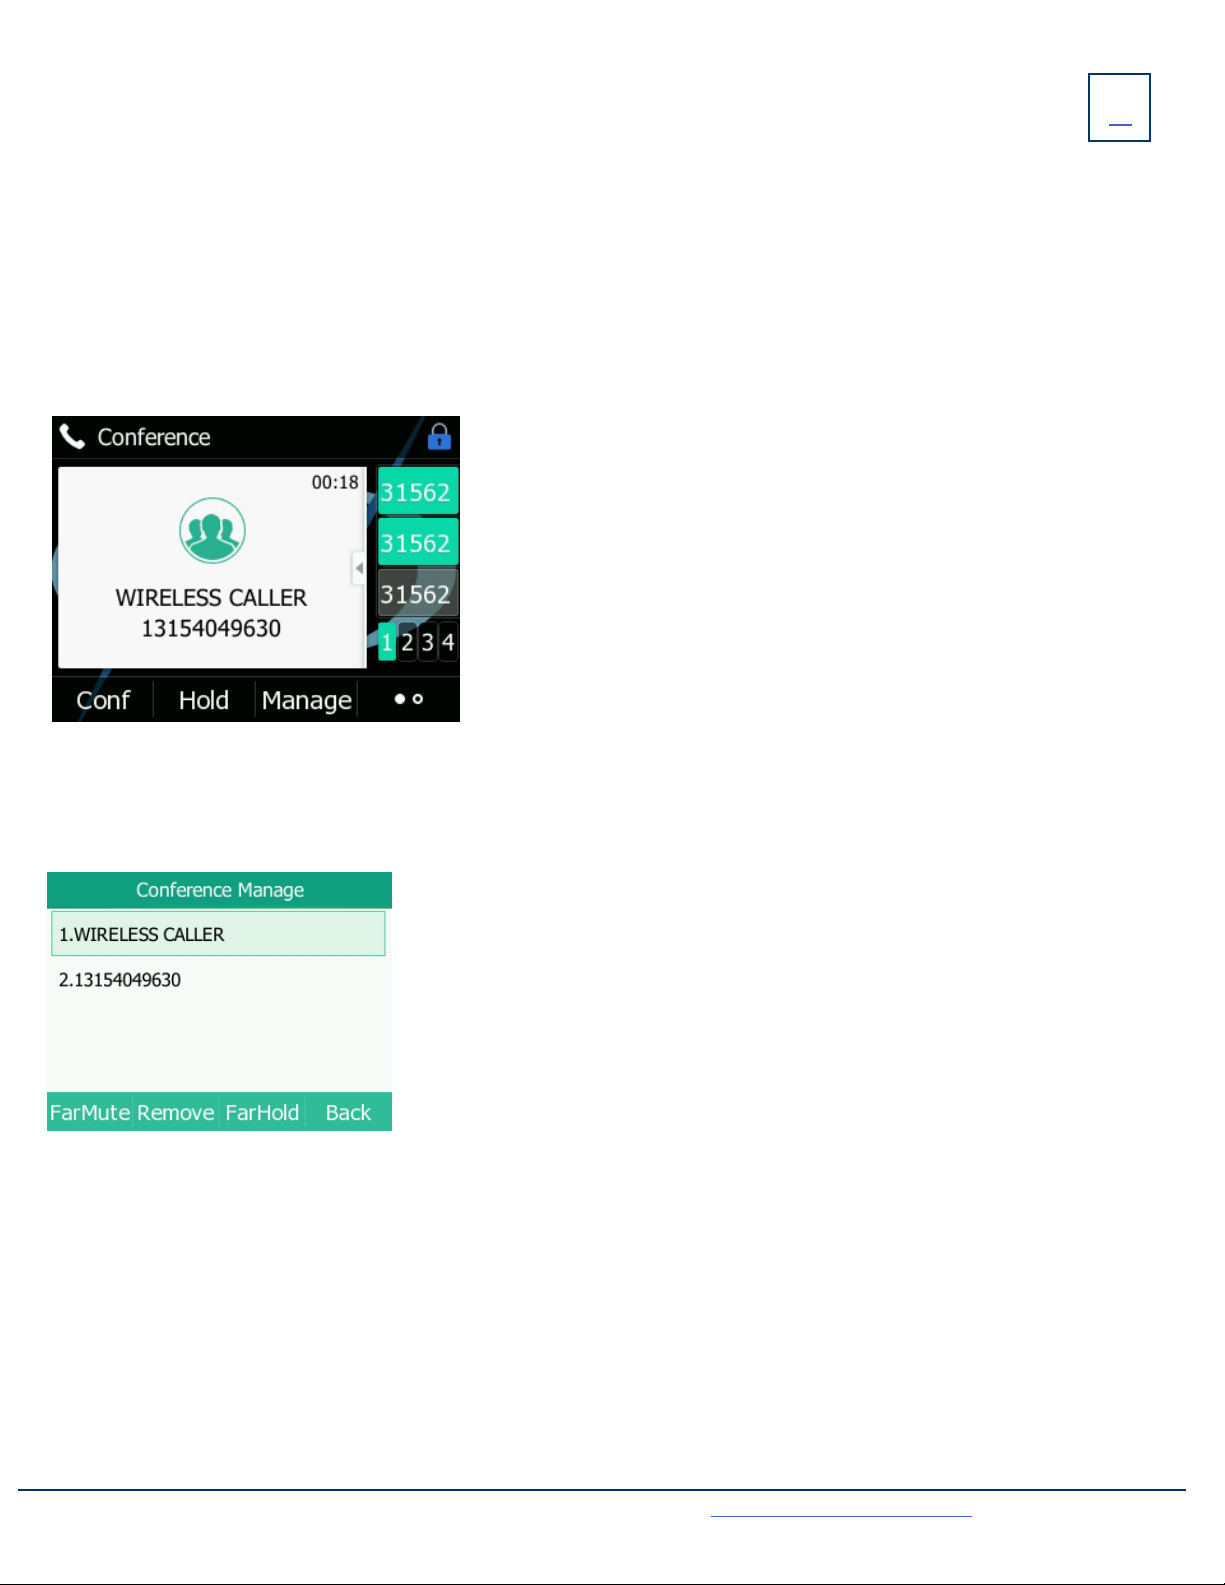
ADHOC CONFERENCE
ADHOC CONFERENCE allows you to do a multi-call conference (with call on line)
+Press the CONFERENCE Softkey. The first call automatically holds, listen for dial tone.
+Enter the second number (internal or external) and press the SEND Softkey.
IMPORTANT: Wait for answer and announce conference.
+Press the CONFERENCE Softkey again, all parties are connected.
8
Need support? Connect with us at www.northland.net/support or
Dial 4357 (HELP) or 315-671-6262 to speak to a Northland Training Representative
CALL PARK: Allows you to place a call on hold in the system and assign it to a Call Park Slot also referred to as an Orbit Code. The call
can be retrieved from any telephone in the system by pressing the associated Call Park Slot Key. You will need to press the MORE Key to
see the PARK Keys.
+ TO PARK: With caller on line, press an available Park Key, Park Key will flash red, advise person of Call Park Number.
+ TO RETRIEVE: Lift Handset, press the Applicable Park Key. You are now connected to the call.
+TO RETRIEVE ON SPEAKER: Press the Applicable Park Key.
NOTE: If parked call is not retrieved within a preprogrammed number of seconds, the call will “Callback” to the phone it was parked
from.
ADDITIONAL CONFERENCE TOOLS
+Press the CONFERENCE Softkey to add additional parties.
NOTE: Depending on your system there are limitations to how many parties
can be added.
+Press the HOLD Softkey to place all parties on hold.
+Press the MANAGE Softkey for more management tools.
(See screenshot below).
+Press the MORE Softkey for additional commands.
On the MORE Screen:
+To speak privately to one party, press the SPLIT Softkey.
This places all parties on hold. Highlight the party you wish speak privately
with and press the RESUME Softkey.
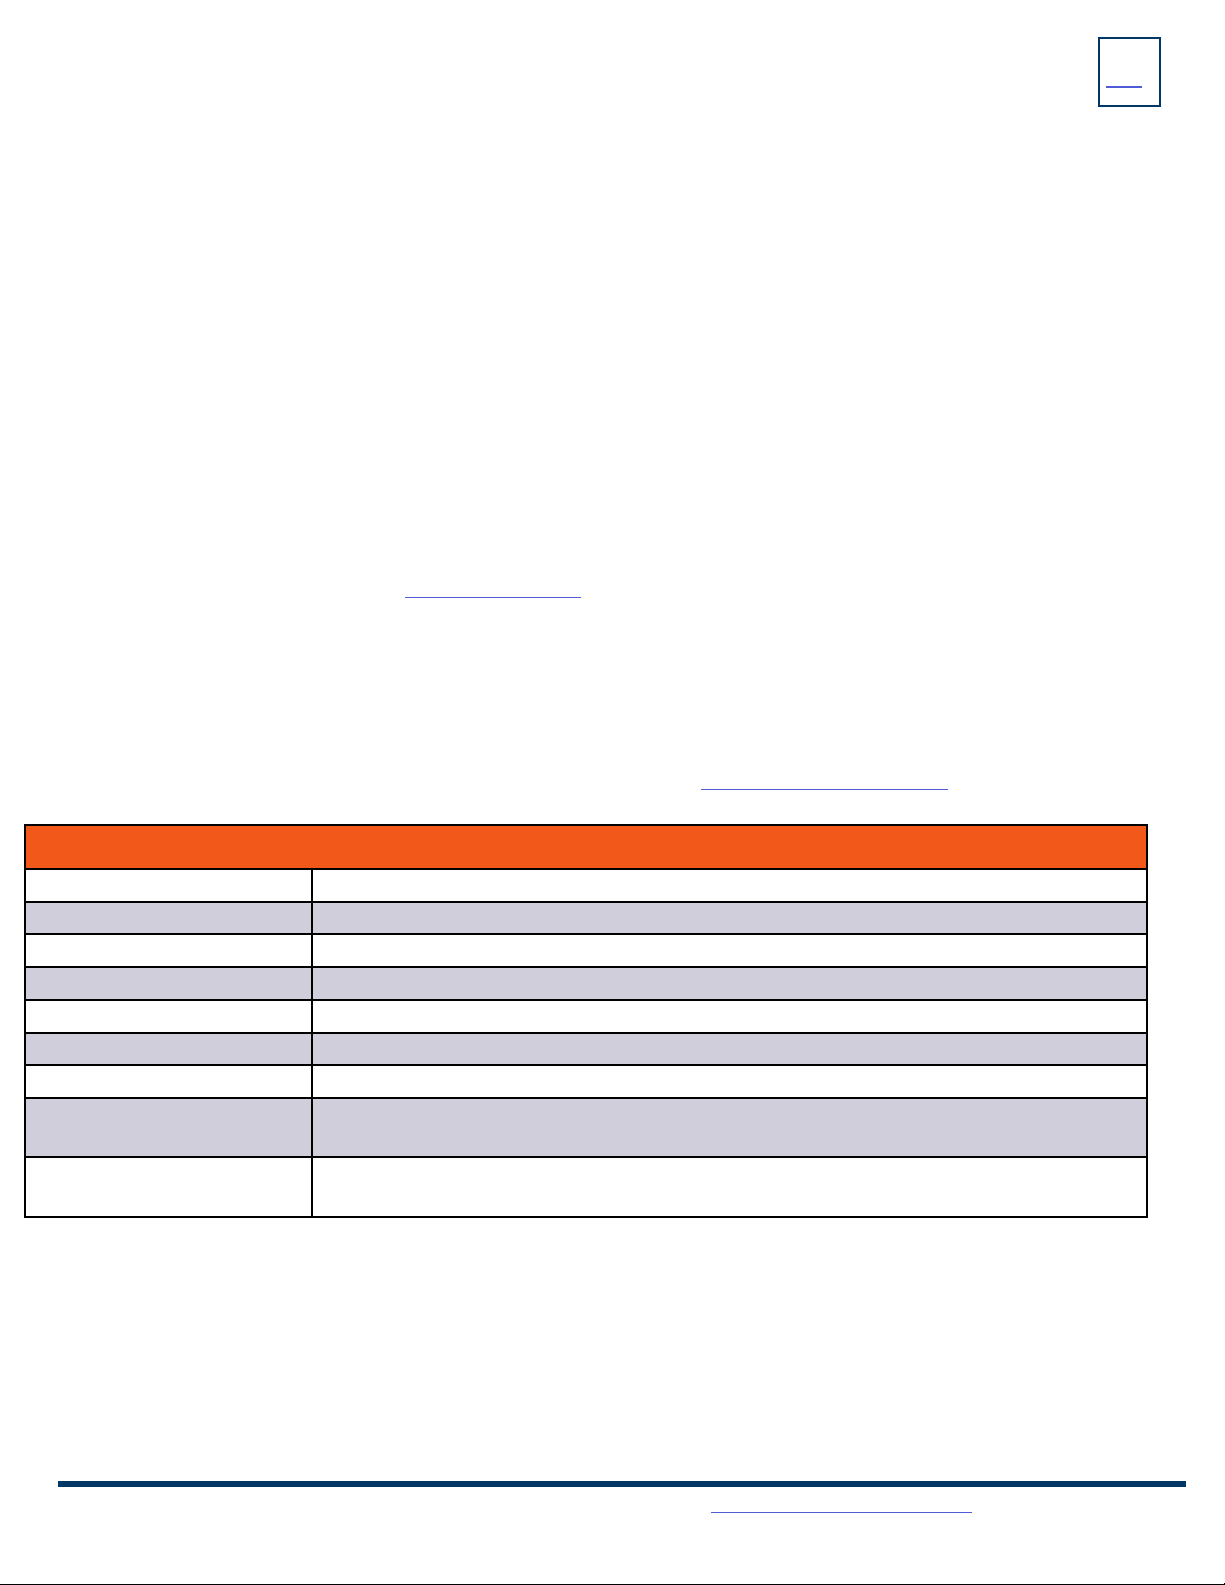
CONFERENCE MANAGEMENT
When you press the MANAGE Softkey, the CONFERENCE MANAGE Screen is displayed.
Scroll to the party you want to manage.
+Press the FAR MUTE Softkey to mute the highlighted party.
+Press the REMOVE Softkey to disconnect the highlighted party.
+Press the FAR HOLD Softkey to place the highlighted party on hold.
+Press the BACK Softkey to return to the previous screen.
This places all parties on hold. Highlight the party you wish speak privately
with and press the RESUME Softkey.
CALL PARK

9
Need support? Connect with us at www.northland.net/support or
Dial 4357 (HELP) or 315-671-6262 to speak to a Northland Training Representative
HISTORY: Displays a list of the last calls PLACED, MISSED AND RECEIVED. You can use these lists to make calls or view caller information.
.
+TO USE: Press the HISTORY Softkey. The display shows all recent calls. The default list displayed is ALL Calls. Use the NAVIGATION
Keys to scroll through the individual logs.
+TO CALL: Scroll to the number you wish to call and press the SEND Softkey.
+TO SEE CALL DETAILS: Press the OPTION Softkey and then select DETAIL.
+TO ADD TO YOUR CONTACTS: Press the OPTION Softkey and select ADD TO CONTACTS. Update any information and press the
SAVE Softkey.
HISTORY LISTS + CONTACTS LISTS
GETTING TO KNOW YOUR CONTACTS LISTS
+ TO PROGRAM: Press the CONTACTS Softkey.
Scroll to and select the list you want to add the contact to.
Press the OPTION Softkey.
Scroll to and select ADD.
Enter the contact’s information. You can program multiple numbers in one entry.
When complete, press the SAVE Softkey.
+TO SEARCH: Press the CONTACTS Softkey.
Tap SEARCH on the Contacts list you.
Begin spelling the name. Use the 0 as a space key. (As you enter letters, the system presents possible matches).
Highlight the name and press the CALL Softkey.
+TO EDIT OR DELETE A CONTACT: Press the CONTACTS Softkey.
Scroll the CONTACTS list the contact is in.
Press the SEARCH Softkey.
Begin spelling the name. Use the 0 as a space key. (as you enter letters, the system presents
possible matches).
Highlight the name and press the OPTION Softkey.
Scroll to and select the action you want to complete.
Complete the action and Press the SAVE Softkey when applicable.
NOTE: You can also add and edit contacts from the CommPortal User Interface.
+Press the BACK Softkey to return to the previous screen.
+Press the UPDATE Softkey to update contacts that were edited in CommPortal.
+Press the SEARCH Softkey to search for a contact.
+Press the ENTER Softkey to view the highlighted Contacts List.
NETWORK CONTACTS: The Network Contacts are located within the CONTACT Softkey. They are divided into three groups.
CONTACTS: All contacts programmed into your phone book by a system administrator or by you either in CommPortal, through the
Contacts Softkey or by saving from Call History Lists. These will import to your other Subscriber applications during the nightly reboot.
EXTENSIONS: All extensions in your business group.
MLHGS (MULTI-LINE HUNT GROUPS): If you are a member of a MLHG, the extensions will appear in this directory.
NOTE: The above Contacts can also be accessed through the DIRECTORY. The DIRECTORY is located on the MENU Screen.

10
KEY
FEATURE
Need support? Connect with us at www.northland.net/support or
Dial 4357 (HELP) or 315-671-6262 to speak to a Northland Training Representative
PAGING: Accesses telephone speakers to make an announcement
+TO USE: Lift Handset, press the PAGE Key, wait for tone, make announcement, press the END CALL Softkey, hang up.
GROUP PICK UP: Allows you to pick up another phone you hear ringing in your group (you must be programmed in a group by a System
Administrator).
+TO USE: Hear another phone ringing in your pre-programmed group.
Press the PICK UP Key or dial *11 to connect a call.
DIRECTED PICK UP: Allows you to pick up a “specific” extension you hear ringing.
+ TO USE: Hear another phone ringing that is not in your preprogrammed group.
Press the DIRECTED PICK UP Key or dial *12.
Enter the EXTENSION number you wish to pick up.
CONVENIENCE FEATURES
+Scroll to the fourth Line/Feature Screen.
+Press the LOG OUT Key.
+Press the OK Softkey to confirm. The phone will reboot and the
current subscriber will be logged out.
+When the phone completes the reboot, you will see a LOGIN
Softkey.
+Press the LOGIN Softkey and enter your subscriber number and
your EAS Password.
+When the phone comes back up, you will be logged in.
Use the LOG OUT key to log out of the phone.
DO NOT DISTURB (DND): Stops all tones and ringing to your phone and sends all calls to voicemail.
+TO USE: Press the DND Softkey. Your line key icons turn red and a DND icon appears in the Status bar.
+TO EXIT: Press the DND Softkey.
CALL FORWARD: Forwards your phone to ring at a different number.
+TO USE: Press the MENU Softkey.
Scroll to and select the FEATURES Icon.
Scroll to and select CALL FORWARD.
Select Always Forward, Forward on Busy or Forward on No Answer and press the arrow next to OFF.
Enter the contact information in the Forward to field.
If you would like to be able to dial a code to activate and deactivate the same forward again, enter a code.
If you choose the NO ANSWER FORWARD option, choose the desired ring time to wait before forwarding.
Tap the three dots in the top right of the display.
When all information is complete press the SAVE Softkey.
NOTE: You can program features such as DND and Call Forward on available keys. See the CommPortal User Manual for more
information.
HOT DESK: Allows you to log in/out of other telephones within your business group.
11
Need support? Connect with us at www.northland.net/support or
Dial 4357 (HELP) or 315-671-6262 to speak to a Northland Training Representative
RINGS
Your telephone rings differently for different types of calls.
EXTERNAL: Two short rings repeated (a new external call or a transferred external call).
INTERNAL: Single ring repeated.
ADJUST RING VOLUME
You can adjust the volume while phone is ringing or idle.
Leave handset in place
Press the PLUS/MINUS VOLUME CONTROL Key to adjust the ring volume when your phone is idle.
RING TONES
You can select from several preprogrammed ring tones so that your phone rings differently than someone who sits near you.
Ring Tones can be programmed through the CommPortal User Interface.
Refer to the CommPortal User Manual at www.northland.net.
RINGS + INDICATORS
The BASIC SETTINGS Icon on the MENU Screen consists of four areas of information: Status, Features, Basic Settings and Advanced
Settings (see below). Most of these settings are self-explanatory. Settings covered in this guide are indicated with an *.
For more information on other settings, please refer to the Yealink User Guide at https://support.yealink.com.
BASIC SETTINGS + FEATURES
Basic Settings
Language and Input Sets the default Language.
Time & Date Change the date and time format.
Display Settings for Backlight, wallpaper and screen saver.
*Sound Settings for ring tone, key tone, touch tone, etc.
Change PIN Changes the existing PIN.
Phone Lock Sets a pin to use to lock/unlock phone.
Bluetooth Toggles Bluetooth on/off and adds devices.
Reboot Performs a complete reboot. Restarts the device. Your system administrator may ask you to do
this.
Update Configuration When requested by a System Admin, this will apply changes to system settings without restarting
the device.
Need support? Connect with us at www.northland.net/support or
Dial 4357 (HELP) or 315-671-6262 to speak to a Northland Training Representative
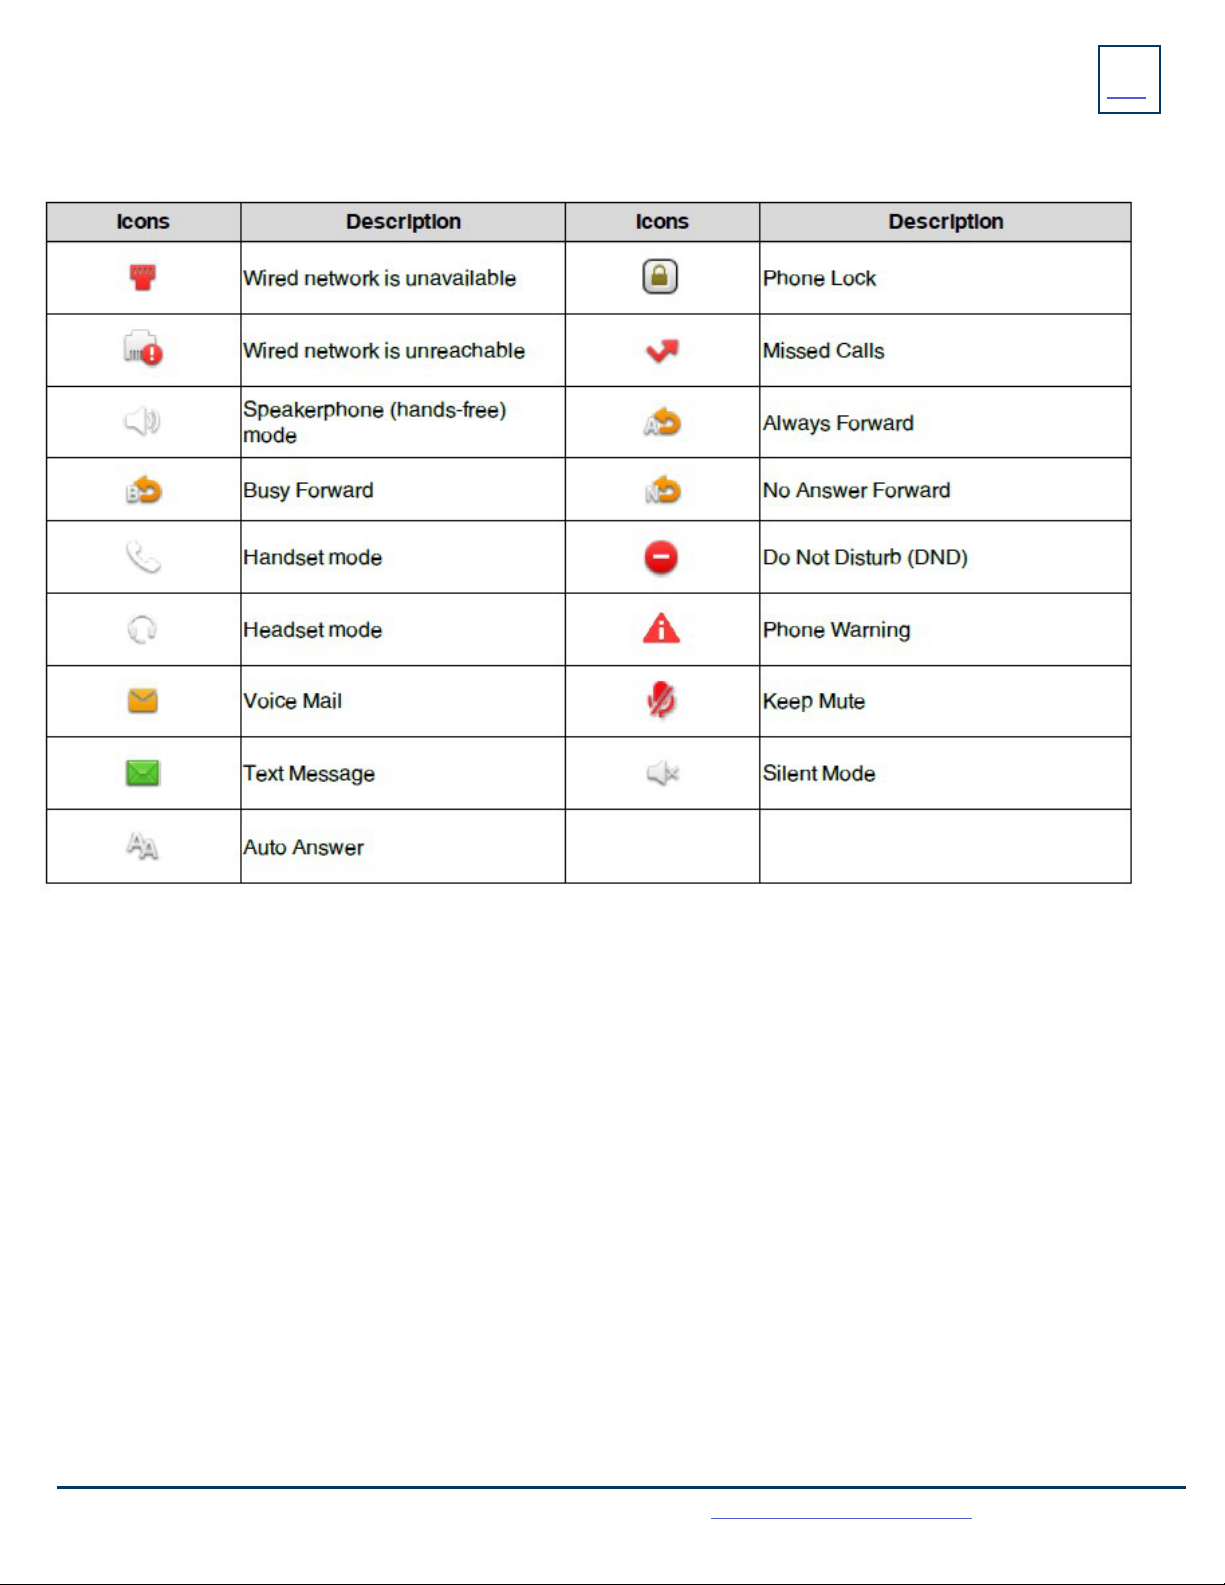
STATUS INDICATORS
STATUS BAR ICONS 12
The icons in the Status Bar help you easily get the current phone status, such as call and message status.

13
YOUR VOICEMAIL
VOICEMAIL: The voicemail system is voice prompted with easy to follow instructions and commands.
FIRST TIME VOICEMAIL SET UP
+Dial *99.
+Enter your 10 digit subscriber number and press #.
+Enter the EAS Pin that you were given by your System Administrator.
+ Follow the audio instructions to create a password, record your name + record your personal greeting.
NOTE: The above steps can also be completed in CommPortal. This is an important part of identifying you in the system.
There are multiple greeting types available for you to choose from:
+PERSONAL GREETING: Plays to everyone that calls you
+EXTENDED ABSENCE: Plays when you will be away from your office or phone for meetings/vacation, etc.
You can turn off message acceptance when using the extended absence greeting.
System will remind you extended absence greeting is playing.
+SYSTEM GENERATED: A synthesized greeting that’s set up to include your phone number or recorded name.
+BUSY: Plays when you have active calls on all available lines.
+OUT OF HOURS: Can be set to play outside of your normal business hours, weekends and holidays.
+FORWARDED TO VM: Plays when you have your phone set to forward to voicemail.
NOTES: Through the Self Service CommPortal, you are able to:
+ Use a wizard to set up your voicemail for the first time.
+Record and change greetings.
+Choose your voicemail to email options.
+Change your login for voicemail so you’re not required to enter your mailbox and pin each time you press the VM Softkey.
Need support? Connect with us at www.northland.net/support or
Dial 4357 (HELP) or 315-671-6262 to speak to a Northland Training Representative
14
Need support? Connect with us at www.northland.net/support or
Dial 4357 (HELP) or 315-671-6262 to speak to a Northland Training Representative
Log in to voicemail from any account phone or external phone to listen to message, work with personal greeting and other voicemail set-
tings.
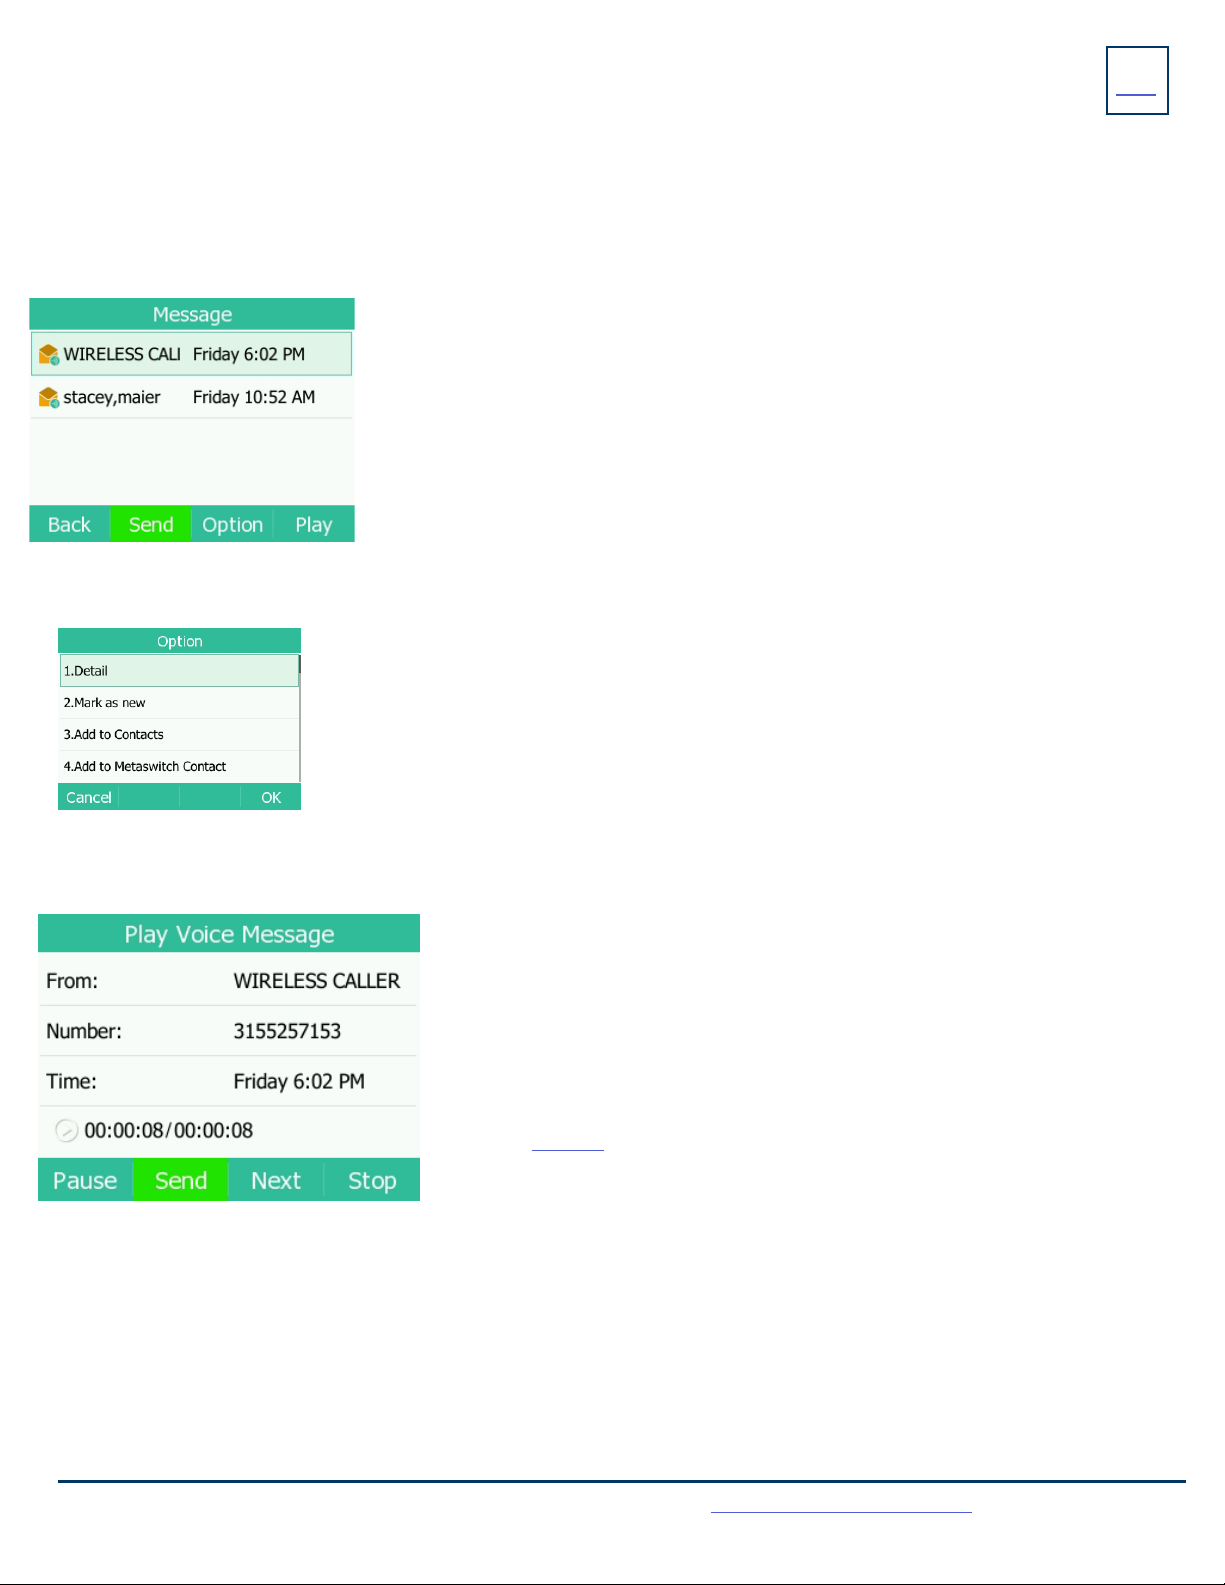
LOG IN FROM YOUR OWN PHONE (VISUAL VOICEMAIL):
+ Press the VOICEMAIL (Envelope) Key.
+Messages are displayed on the screen.
LOG IN FROM ANY EXTERNAL TELEPHONE:
+ Dial: 315-671-0031
+Enter your 10 digit telephone number and press the # key
+Enter your pin and press the # key.
+Press 1 to listen to your messages.
+ Press the BACK Softkey to return to the IDLE Screen.
+Press the SEND Softkey to call the party.
+Press the OPTION Softkey to see additional message options.
(See below).
+Press the PLAY Softkey to listen to the message.
MESSAGE OPTIONS + Select DETAIL to see the date, time and duration of the message and view other options such as CALL
and DELETE Softkeys.
+Scroll to and select MARK AS NEW to keep the message as new after you have listened to it.
If you have not listened to the message this option will read MARK AS READ.
+Scroll to and select ADD TO CONTACTS to add to your personal contacts list.
+Scroll to and select ADD TO METASWITCH CONTACTS to add to the Metaswitch Contacts list.
+Scroll to and select CALL VM to log into the voice prompted voicemail.
+Scroll to and select DELETE to delete the individual message.
+Scroll the and select DELETE ALL to delete all voicemail messages.
OPTIONS WHILE PLAYING A MESSAGE
LOG IN FROM ANY PHONE IN YOUR BUSINESS
GROUP:
+ Dial: *99
+Enter your 10 digit telephone number and press the # key
+Enter your pin and press the # key.
+Press 1 to listen to your messages.
+ Press the PAUSE Softkey to pause the message.
+Press the SEND Softkey to call the party.
+Press the NEXT Softkey to go to the next message.
+Press the STOP Softkey to stop the message and return the MESSAGE Screen.
NOTE: Only onscreen options can be used when listening to your messages
through the display.
To access more options you must log in using one of the methods below.
See page 15 for additional options.
LOG IN TO VOICEMAIL FROM ANY TELEPHONE

15
COMMON VOICEMAIL COMMANDS
YOUR VOICEMAIL
KEY
FEATURE
Need support? Connect with us at www.northland.net/support or
Dial 4357 (HELP) or 315-671-6262 to speak to a Northland Training Representative
NOTES: Star (*) will always back you up to the previous menu
Pound (#) will bypass a user’s personal greeting
WORK WITH GREETING SETTINGS
From the Main Menu, press 3 to work with Greetings. The following greeting settings are available.
Press 1 to work with the personal greeting
Press 2 to work with the extended absence greeting
Press 3 to choose a system generated greeting or to work with your recorded name
Press 5 to work with the greeting that plays when your phone is busy
Press 6 to work with your out of hours greeting (this allows to set a schedule for a greeting that plays outside
of your normal business hours). See also the CommPortal User Guide.
Press 9 to work with the greeting callers here when your phone is set to forward all calls to voicemail
WORK WITH TIMESAVER AND CONVENIENCE SETTINGS
From the Main Menu, press 4 to work with Settings. The following settings are available.
Press 1 to work with group lists - add / edit / delete group lists.
Press 2 to work with timesaver settings - turn autoplay on / off, work with Urgent Message settings and
change your message header and body settings.
Press 3 to work with Security – change the pin, set fast login or set skip pin.
Press 5 to work with Notifications - message waiting indicator, email notifications and phone notifications.
Press 6 for Additional Settings - Check the Operator number or turn Marketing broadcasts on / off.
Press 0 to hear helpful hints.
ADDITIONAL VOICEMAIL SETTINGS
There are additional voicemail settings available in the main menu. Some settings are only available when you log in through a
telephone. See page 14 for how to log in from any telephone. See the CommPortal User Guide for settings that are available
through CommPortal.
TRANSFER TO VOICEMAIL: Sends a caller directly to voice-
mail without ringing the phone.
+ Tap TRANSFER, call automatically held
+Press *99 and enter EXTENSION Number
+Tap TRANSFER and then tap TRANSFER again immediately
LEAVE A MESSAGE FOR ANOTHER USER WITHOUT RINGING
THE PHONE:
+Press *99
+Enter Extension Number and Press SPEAKER or tap AUDIO CALL.
Main Menu
1 Listen to messages
2 Send a message to another user
3 Work with personal greetings
4 Mailbox settings
5 Work with Reminder Messages
6 Access deleted messages
7 Switch Account (log into another account)
0Access Help
* Exit Voicemail or return to previous menu
Listening to Messages
1 Repeat
2 Save
3 Erase
4 Reply
5 Send a copy
6 Increases message volume
7 Slows the message playback down
8 Pause / Resume
9 Speeds the message playback up
# Next Message
11 Previous Message
77 Skip backward 5 seconds
99 Skip Forward 5 seconds
Table of contents
Other Northland IP Phone manuals


