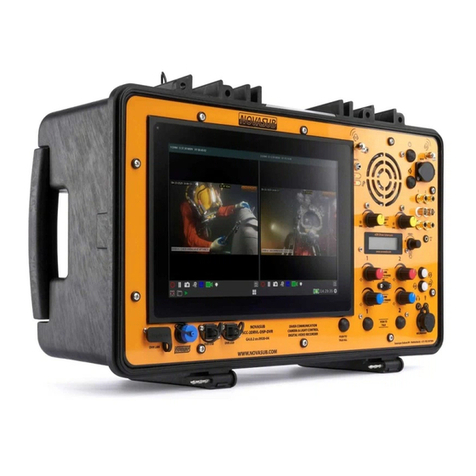
Novasub xDR-DSP User manual

xDR-DSP –Diver Intercom Manual
Operations Manual
xDR-DSP –Digital Diver Intercom radio with
DSP
NOVASUB standard digital 2 or 4 Diver Intercom
radio built in different Novasub Surface Control
configurations
xDR firmware: v0.12B39 and DSP firmware: v0.22
Build 39 Date: 30-08-2021
Seascape Subsea BV
De Hoogjens 22
4254 XW Sleeuwijk
The Netherlands
T. +31-183-307900
www.novasub.com
www.seascapesubsea.com

www.novasub.com
2 of 33
xDR-DSP –Diver Intercom Manual
Build 39 Date: 30-08-2021
Index
NEW & FIXED.....................................................................................................................................................................................3
ABBREVIATIONS ................................................................................................................................................................................4
INTRODUCTION .................................................................................................................................................................................5
DSP.....................................................................................................................................................................................................5
Features .............................................................................................................................................................................................5
Options...............................................................................................................................................................................................5
SPECIFICATIONS ................................................................................................................................................................................6
AUDIO SCHEMATICS ..........................................................................................................................................................................7
2DR audio flow...................................................................................................................................................................................7
4DR audio flow...................................................................................................................................................................................8
CONTROLS.........................................................................................................................................................................................9
AUDIO CONNECTIONS .....................................................................................................................................................................10
WIRELESS HEADSETS .......................................................................................................................................................................11
Control .............................................................................................................................................................................................11
Pairing ..............................................................................................................................................................................................11
MENU..............................................................................................................................................................................................12
Startup display .................................................................................................................................................................................12
Battery status...........................................................................................................................................................................12
Menu access and control.................................................................................................................................................................12
Menu control ...........................................................................................................................................................................12
Main Menu.......................................................................................................................................................................................13
Vol. Tender...............................................................................................................................................................................13
Vol. Ext. Speaker ......................................................................................................................................................................13
Comms Mode...........................................................................................................................................................................13
Main settings ...........................................................................................................................................................................14
Display settings ........................................................................................................................................................................14
Startup Function ......................................................................................................................................................................14
Main settings ...................................................................................................................................................................................15
Can hear selection....................................................................................................................................................................15
Diver 1......................................................................................................................................................................................16
Tender......................................................................................................................................................................................18
Wireless ...................................................................................................................................................................................20
Inputs .......................................................................................................................................................................................21
Outputs ....................................................................................................................................................................................22
Ext. Spk. Can Hear ....................................................................................................................................................................23
Reset Settings...........................................................................................................................................................................23
Prompt password.....................................................................................................................................................................23
Firmware version .....................................................................................................................................................................24
OPTIONAL & ACCESSORIES ..........................................................................................................................................................25
Wireless headsets ............................................................................................................................................................................25
Microphone .....................................................................................................................................................................................27
Headset............................................................................................................................................................................................29
Depth display hardware...................................................................................................................................................................31
DDG..........................................................................................................................................................................................31
PCBDDSI ...................................................................................................................................................................................31
HELP & SUPPORT.........................................................................................................................................................................32
WARRANTY .................................................................................................................................................................................33
Warranty Period...............................................................................................................................................................................33
Exclusions and Limitations...............................................................................................................................................................33
This Limited Warranty is not enforceable if item: ...........................................................................................................................33
Limitation of Liability .......................................................................................................................................................................33

www.novasub.com
4 of 33
xDR-DSP –Diver Intercom Manual
Build 39 Date: 30-08-2021
Abbreviations
Ah
Ampere per hour
Vdc
Volt DC
Vac
Volt AC
Vpp
Volt peak to peak
DSP
Digital signal processing
PTT
Push to Talk
2-wire (simplex)
Two wire used for communication. The Microphone and earphones of the diver share
the two wires in the umbilical.
4-wire (duplex)
Four wires used for communications. Two wires are used for the microphone and two
wires are used for the earphones.
Mic
Microphone (Diver, panel or headphone/set)
Head
Earphone (diver or headphone/set)
HS
Headset
WHS
Wireless Headset
H
Wireless Headset
D
Diver
T
Tender (operator/supervisor)
HD
Half Duplex (Diver is always heard, Tender needs to press PTT to talk to the diver)
FD
Full Duplex (Full open communication between divers and divers-Tenders)
Vol.
Volume (gain)
Int.
Internal
Ext.
External
SPK
Speaker
Aux
Auxiliary audio input or output
Rec
Output to recorder or Audio output
CW
Clock-wise
CCW
Counter clock-wise
FFM
Full Face Mask

www.novasub.com
5 of 33
xDR-DSP –Diver Intercom Manual
Build 39 Date: 30-08-2021
Introduction
The xDR Diver Intercom is a self-contained , Two / Four diver Intercom for a 2- or 4- wire communication between the
operator (Tender) and divers. The xDR can operate in half duplex/full duplex mode Tender to Diver and full duplex
between divers (round Robin). The Tender may choose to talk with the divers via the panel microphone, hand held Mic,
headset Mic and Table Mic, using the PTT button. When pressing the PTT the Tender will communicate in full duplex
mode with the diver (only in 4 wire mode). Each diver has a volume control from Diver to Tender and a volume control
from Tender to diver. Apart from the Internal speaker an external speaker can be connected with separate amplifier and
volume control.
The xDR Diver Intercom is the latest generation diver intercom radio based on an internal digital process based DSP
(Digital signal processing). The DSP makes the xDR a complete adjustable Diver Intercom in which you can select what
you want to hear on the outputs and each input and output can be set to the required levels. The advantage of this is that
the xDR can be adjusted to the levels of your connected devices, like diver communication helmets and mask
microphones and speaker. But also the connected audio recording devices, or the audio input devices, like a MP3 player.
The standard xDR is a 2 channel diver radio with a connection of two divers. Each has the Volume control to and from the
diver from the Tender. An overall Tender Volume control. A built in Speaker and Microphone for the Tender. Each diver a
PTT (Push-to Talk) switch and a PTT All switch.
The xDR has a 2 line, 16 characters transflective display. The display is used to scroll through the menu and adjust the
required settings. Without using the Menu settings, by default the xDR will work as a standard 2 Diver intercom as you will
be used too. Using the Menu you have access to an extensive settings menu in which you can configure and adjust the
audio and other settings to your needs.
DSP
DSP means in general Digital Signal Processing, the xDR has an audio DSP. With DSP the audio can be duplicated,
adjusted, filtered, amplified, suppressed, etc. This makes it possible to easily route and adjust the audio signals from and
to the inputs and outputs. Also each input and output can be set to a required gain level. Another advantage is that on
each output can selected what you would like to hear.
That means that you can select at each Diver what he/she may here, but also on any output or speaker/headset.
All audio inputs are analog signals which are first digitized before passed on to the DSP. The audio is digital send to an
output where it is converted to an analog signal.
Features
•Fully audio configurable, select on each Diver, Tender and output what it may hear
•Each Diver, input and output has a gain level adjustment
•Separate amplifiers for Divers, Internal speaker and External speakers
•Transformer Isolated on all Divers, inputs and outputs
•3,5 mm jacks to connect any media / gaming headset with mic
Options
•Wireless headsets (two or four) with PTT
•Wireless hand held speaker/Mic
•Rugged waterproof Single ear headset with PTT
•Hand held wired Mic with PTT
•Table Mic with PTT button per diver and PTT all button
•Diver light power supply and control (24 vdc max 30 watt)
•Depth sensor which displays diver depth, dive time and max. diving depth per diver
First please read this manual thoroughly to understand all possibilities

www.novasub.com
6 of 33
xDR-DSP –Diver Intercom Manual
Build 39 Date: 30-08-2021
Specifications
Electrical
Input Impedance (Each Input)
250 Ohms
Frequency Response
300 - 10000 Hz
Common Mode Rejection 40 dB Minimum
40 dB Minimum
Output Impedance
4 Ohm
Diver Mic Sensitivity (Input)
15 mVpp
Headset Mic
159 mVpp
Inputs audio (Aux&DVR in)
2,82 Vpp
Outputs Audio (Rec, Out & Aux)
2,82 Vpp
Headset speaker
1 watt audio
Diver Output Power (RMS @ 4 Ohm Load, 12 Vdc)
7 watt audio
Speaker Output Power (4 Ohm)
15 watt audio
Inputs and outputs Isolation
Transformer galvanic Isolated
Internal Power Supply Voltage
12-32vdc 6 watt
Power Drain
0.2 –0.5 Ah (12v)
External Power supply voltage
100-240 vac
Battery
Lead-acid or Li-Ion
Battery Life
Depending of system, min. 12 hrs
Charging time
Depending of system
Mechanical
Front Panel Material & finish
Aluminum epoxy print coated
Case / Box / Panel
Depending of system
Configuration
2 or 4 Diver
Protection
IP 54, protected against spraying water

www.novasub.com
7 of 33
xDR-DSP –Diver Intercom Manual
Build 39 Date: 30-08-2021
Audio schematics
The below schematics shows the route of the audio to and from the connected devices. The Diver and Tender
connections are digitized to and from an analog input/output. Each digital audio signal is being filtered, adjusted and
amplified before being routed to another input/output.
The explanation of the used pictograms in the audio flow diagram:
Internal Gain setting
in Menu
Isolator
Audio
isolator
Rotary switch for Menu &
General volume
Selected
+
-
Volume Diver 1
to Tender
Volume setting with
turn knob
7 watt
Amplifier
Microphone
Un selected
2DR audio flow
Two Diver audio flow diagram
Headset
Tender 1
InternalSpeaker
Tender
Panel Mic
Can hear selection:
Diver2
Tender 1
Wireless Headset1
Wireless Headset2
Aux in
Head gain
+
-
Volume
Tender to Diver +
-
Volume Diver 1
to Tender
+
-
Volume
Tender
Can hear selection:
Diver 1,2
Tender1
Wireless Headset1
Wireless Headset2
Aux in
External speaker
+
-
Volume Ext.
Speaker
Mic Gain
Panel
Headset T1
Mic
Mic Gain HS
Mic Gain
Mic
Head
Diver 1
Aux Gain
DSP
mixer /
Filter
Can hear selection:
Diver 1,2
Tender 1
Wireless Headset1
Wireless Headset2
Aux in
Isolator
Isolator
Isolator
DVR Gain
Isolator
Rec1
Volume
Isolator
Can hear selection:
Diver1
Tender 1
Wireless Headset1
Wireless Headset2
Aux in
Head gain
+
-
Volume
Tender to Diver
Mic Gain
Mic
Head
Diver 2
Isolator
Isolator
Can hear selection:
Diver 1,2
Tender 1
Wireless Headset1
Wireless Headset2
Aux in
BTEXT
BlueTooth add-on for 2x Wireless Headsets
Mic
Wireless Headset1
WH1 Can hear selection:
Diver 1,2
Tender 1
Wireless Headset2
Aux in
WHS1 Mic Gain
WH2 Can hear selection:
Diver 1,2
Tender 1
Wireless Headset1
Aux in
WHS2 Mic Gain
Mic
Wireless Headset2
+
-
Volume Diver 2
to Tender
Rec2
Volume
Isolator Can hear selection:
Diver 1,2
Tender 1
Wireless Headset1
Wireless Headset2
Aux in
Aux1
Volume
Isolator
Can hear selection:
Diver 1,2
Tender 1
Wireless Headset1
Wireless Headset2
Aux in
Aux2
Volume
Isolator
Can hear selection:
Diver 1,2
Tender 1
Wireless Headset1
Wireless Headset2
Aux in
Aux In
DVR In
15 watt
AUX2 out
AUX1 out
Rec2 out
Audio2 out
Rec1 out
Audio1 out
7 watt
15 watt
7 watt

www.novasub.com
8 of 33
xDR-DSP –Diver Intercom Manual
Build 39 Date: 30-08-2021
4DR audio flow
Four Diver audio flow diagram
Headset
Tender 1
Internal Speaker
Tender
Panel Mic
Can hear selection:
Diver2,3,4
Tender 1,2
Wireless Headset1
Wireless Headset2
Aux in
Head gain
+
-
Volume
Tender to Diver
+
-
Volume Diver 1
to Tender
+
-
Volume
Tender
Can hear selection:
Diver 1,2,3,4
Tender 2
Wireless Headset1
Wireless Headset2
Aux in
External speaker
+
-
Volume Ext.
Speaker
Mic Gain
Panel
Headset T1
Mic
Mic Gain HS
Headset
Tender 2
Headset T2
Mic
Mic Gain HS
Mic Gain
Mic
Head
Diver 1
Aux Gain
DSP
mixer /
Filter
Can hear selection:
Diver 1,2,3,4
Tender 1
Wireless Headset1
Wireless Headset2
Aux in
Can hear selection:
Diver 1,2,3,4
Tender 1,2
Wireless Headset1
Wireless Headset2
Aux in
Isolator
Isolator
Isolator
DVR Gain
Isolator
Rec1
Volume
Isolator
Can hear selection:
Diver1,3,4
Tender 1,2
Wireless Headset1
Wireless Headset2
Aux in
Head gain
+
-
Volume
Tender to Diver
Mic Gain
Mic
Head
Diver 2
Isolator
Isolator
Can hear selection:
Diver1,2,4
Tender 1,2
Wireless Headset1
Wireless Headset2
Aux in
Head gain
+
-
Volume
Tender to Diver
Mic Gain
Mic
Head
Diver 3
Isolator
Isolator
Can hear selection:
Diver1,2,3
Tender 1,2
Wireless Headset1
Wireless Headset2
Aux in
Head gain
+
-
Volume
Tender to Diver
Mic Gain
Mic
Head
Diver 4
Isolator
Isolator
Can hear selection:
Diver 1,2,3,4
Tender 1,2
Wireless Headset1
Wireless Headset2
Aux in
BTEXT
BlueTooth add-on for 2x Wireless Headsets
Mic
Wireless Headset1
WH1 Can hear selection:
Diver 1,2,3,4
Tender 1,2
Wireless Headset2
Aux in
WHS1 Mic Gain
WH2 Can hear selection:
Diver 1,2,3,4
Tender 1,2
Wireless Headset1
Aux in
WHS2 Mic Gain
Mic
Wireless Headset2
+
-
Volume Diver 2
to Tender
+
-
Volume Diver 3
to Tender
+
-
Volume Diver 4
to Tender
3/4CH Diver Intercomm
also has the option of
adding two extra
Wireless Headsets
3
4
Rec2
Volume
Isolator Can hear selection:
Diver 1,2,3,4
Tender 1,2
Wireless Headset1
Wireless Headset2
Aux in
Aux1
Volume
Isolator
Can hear selection:
Diver 1,2,3,4
Tender 1,2
Wireless Headset1
Wireless Headset2
Aux in
Rec3
Volume
Isolator Can hear selection:
Diver 1,2,3,4
Tender 1,2
Wireless Headset1
Wireless Headset2
Aux in
Rec4
Volume
Isolator Can hear selection:
Diver 1,2,3,4
Tender 1,2
Wireless Headset1
Wireless Headset2
Aux in
Aux2
Volume
Isolator
Can hear selection:
Diver 1,2,3,4
Tender 1,2
Wireless Headset1
Wireless Headset2
Aux in
Aux3
Volume
Isolator
Can hear selection:
Diver 1,2,3,4
Tender 1,2
Wireless Headset1
Wireless Headset2
Aux in
Aux4
Volume
Isolator
Can hear selection:
Diver 1,2,3,4
Tender 1,2
Wireless Headset1
Wireless Headset2
Aux in
Aux In
DVR In
15 watt
AUX4 out
AUX3 out
AUX2 out
AUX1 out
Rec4 out
Audio4 out
Rec3 out
Audio3 out
Rec2 out
Audio2 out
Rec1 out
Audio1 out
7 watt
15 watt
7 watt
7 watt
7 watt

www.novasub.com
9 of 33
xDR-DSP –Diver Intercom Manual
Build 39 Date: 30-08-2021
Controls
The xDR has standard controls which will be familiar to you using any other Diver Intercom. Each Diver has a Tender and
Diver Volume potentiometer knob and a PTT switch. There is also a PTT All push button, to speak to all Divers at once.
There is a general rotary switch which has as default selection the function of increasing and decreasing the Tender audio
Volume heard at the internal speaker and connected headset. There is an on/off switch for the internal speaker.
Function
Description
Rotary Switch
This switch has a rotation and push function. It is used to enter and scroll through the
Menu items. By default the switch is used to increase/decrease the value of the selected
startup function. By default the startup function is the Volume Tender.
Menu Display
This a 2 line, 16 character display showing the selected menu functions. The display is a
transflective LCD display with a back ground light. It can be used outdoor in full sunlight.
The contrast and background display light can be adjusted in the menu.
Diver Volume control
Each diver has 2 rotary potentiometer’s for adjusting the Tender to Diver volume and
Diver to Tender volume
•Volume Tender to Diver:
This is the volume of the Diver earphone speakers when the Tender speaks to
the Diver.
•Volume Diver to Tender:
This is Volume of the Diver Microphone speaking to the Tender
Panel Mic
On the panel between the Diver controls, the internal MIC is positioned. It is not needed
to place your mouth close to the Mic. Normal arm length distance is sufficient to pick-up
the Tender speaking volume.
PTT (Push-to-Talk)
Press the PTT to speak to the diver (only in HD mode), or PTT All to speak to all divers
at once.
Speaker
This a switch to switch the internal speaker On or Off the internal speaker. Depending on
the system this can be a rocker switch or a push latching switch.
Rotary
switch
Menu
Display
Diver
Volume
control
PTT
Buttons
Panel
Mic
Speaker
switch

www.novasub.com
10 of 33
xDR-DSP –Diver Intercom Manual
Build 39 Date: 30-08-2021
Audio Connections
The xDR has audio in- and output connections, these can vary with each system. The most common connections are
shown below:
Below is a list of al the connections that are possible on a system:
Audio
connections
Description
Connector
Audio Out 1
Rec Out 1
Audio out 1 and Rec out 1 have both the same selection of you want to hear on
these outputs and the same internal gain setting. Audio Out is standard isolated.
REC out is both isolated to the recorder as well if it is an output. By default Diver 1 &
Tender are selected to output
RCA
(Cinch)
(Phono)
Audio Out 2
Rec Out 2
Audio out 2 and Rec out 2 have both the same selection of you want to hear on
these outputs and the same internal gain setting. Audio Out is standard isolated.
REC out is both isolated to the recorder as well if it is an output. By default Diver 2
& Tender are selected to output
Aux Out 1
Aux Out 2
Aux Out 1 & 2 have each their own selection of to hear and both have their own
internal gain setting. Both outputs are isolated. By default Diver 1&2, Tender and
Aux are selected to output.
Aux In
Aux in can be used to input an audio source from any device, like a MP3 player or
Smartphone. This audio source can be selected in the Menu to hear at any output.
This means for example, that you can selected at the Diver can hear, and the diver
can hear music. If the Tender talks to the diver, the aux (music in this example) will
be muted.
Jack 3,5 mm
(mono/stereo)
DVR In
DRV In is an audio input which can be used to connect to a DVR or other output.
The sound of this output will be heard on the Internal speaker of the xDR radio. This
input will be internally used in all Novasub systems with a built in DVR recorder.
This input is isolated and has an internal gain setting.
RCA
(Cinch)
(Phono)
Headphone
Headphone connection of a standard headphone used with PC’s or other devices.
The volume control of the headphone is in parallel with the Internal speaker volume.
This is the Vol. Tender on the menu display, using the rotary switch
Jack 3,5 mm
(mono/stereo)
Microphone
Microphone input of a headset or other Mic input which is an Electret Microphone.
This input has an internal gain setting. When a microphone is plugged it, it is
detected and this switches automatically from the internal panel Mic.
Jack 3,5 mm
(mono)
Mic/Headset
This is a Novasub configured multipin connection used for a Table Microphone with
PTT buttons, hand held Mic with PTT button or rugged Mic/Headsets with PTT
button.
Bulgin
PX0412/08S
or Lumberg
0271-07
Note that when there is a microphone connected to either the multipin or the jack then the panel microphone
is disabled.
Audio Out
Cinch/RCA
connector
Aux Out
Cinch/RCA
connector
Headphone
Jack 3,5 mm
connector
Aux In
Jack 3,5 mm
connector
Microphone
Jack 3,5 mm
connector
Mic/headset with PTT
Bulging PX04 /
Lumberg connector

www.novasub.com
11 of 33
xDR-DSP –Diver Intercom Manual
Build 39 Date: 30-08-2021
Wireless Headsets
All systems that have the xDR-DSP installed have the possibility to integrate wireless headsets. Therefore the xDR-DSP
is sold in 3 different configurations:
The Bluetooth is controlled with the buttons on the panel, these can be seen below. If they blink green, then there is
nothing connected, if they blink blue then they are connected.
Control
The wireless headset has a few button on it, these are explained below:
Right earcup:
Volume UP
ON: Press and Hold (2 sec.) You will hear “Power On” and the battery status “Battery High
(medium,Low)” and when already paired with the SCC you will hear “Your device is
connected”
OFF: Press and Hold (2 sec.) You will hear “Power Off”
Volume DOWN
Left Earcup:
Volume Reduce. By Pressing you toggle between normal Volume and reduced Volume.
The last settings are stored in the memory at switch OFF
PTT button, press and Hold to speak. Only needed in All HD comms mode settings
Pairing
When connection between the headset and the system is lost, the headset needs to be paired with the system:
1. Switch the headset OFF
2. Press and hold the power button on the Headset until you hear “Two”, then release the button.
3. Press the wireless button on the panel for 4 seconds
4. The button will start blinking blue fast
5. If the button starts blinking blue slower, then the headset is connected. the headset will also say:
“Your device is connected”
With Wireless
The system incorporates buttons and antennas on the panel and the Bluetooth print is
installed. Headsets are sold alongside the system.
Without Wireless
There is nothing installed for wireless headsets. This cannot be incorporated later.
Prepared for Wireless
The system is prepared for the addition of wireless headsets. buttons and antennas are
installed but the Bluetooth print is not yet. This can be incorporated later.
Note that when the wireless antennas and buttons are installed it does not mean that the system supports wireless
headsets. It is possible it is only prepared for it.
If this is the case then Seascape Subsea can accommodate in adding the wireless headset functions.
Blinking
Blinking
Not connected, Headset can
either be OFF or not paired
Connected

www.novasub.com
12 of 33
xDR-DSP –Diver Intercom Manual
Build 39 Date: 30-08-2021
Menu
The xDR has a menu which can be accessed using the 2 line LCD display and the rotary encoder switch. By default the
xDR display shows the Vol. Tender, which is the audio volume of the Tender internal speaker and headset. By rotating the
encoder switch the Volume can be increased and decreased.
The xDR is based on an internal firmware for control and the DSP. Both can be updated. Please check the
www.novasub.com website regularly for any updates.
Startup display
When you switch on the xDR radio the display will show by startup display. By default this is the Volume Tender control.
That means when you use the rotary switch you will increase or decrease the Tender Volume. In the system configuration
with only a xDR Diver intercom, it will also show the internal battery status and lifetime.
In the menu you can select 3 of the below options you want to control in the Startup display
1. Vol. Tender : The Volume of the Tender, which is the volume of the internal speaker and headset
when connected. The scale is from 0 -100% of full power.
2. Vol. Ext. Speaker : The volume of the separate amplified external speaker. The scale is from 0 -100% of
full power.
3. Comms Mode : The type of comms modus settings
Battery status
When you have the external power connected the battery charging status is indicated with a small battery icon which is
filled to solid when the battery is full. When you disconnect the external power the battery remaining time is indicate in the
hours left. 10h means that the radio will operate for the next 10 hours.
Battery charging with 6 levels of charged
capacity. When solid filled, the battery is fully
charged
Battery discharging with indicating the
remaining time in hours, if less the 1 hour it will
show remaining minutes.
Menu access and control
The menu is accessed using the rotary switch at the right
side of the LCD display. To access the Menu you need to
press & hold the rotary switch longer than 1 second. If you
press & hold too short it will indicate this on the display.
You just press & hold again longer than 1 sec. to access
the menu.
The Menu has two levels, the Main menu for some general
controls and the Main settings.
Both can be set with a password protection. This can be
used in case you have set all internal settings correct and
want to avoid that the users alter these settings. This can
be set up in Password Prompt.
Menu control
The menu is fully controlled with the rotary switch. The switch has a rotating function, left and right. Which are clicks, each
click is one step. The switch also has a push function which you use to enter the menu, select, confirm and return in the
menu.
Vol. Tender
32
+
-
Vol. Tender
32 10h
+
-
+
-Rotate CW to
increase value
Rotate CCW to
decrease value
OK Press to enter,
select, confirm and
return
1S Press & Hold
for>1 sec.to
enter Menu
Rotary switch functions
Rotate CW to go
forward in Menu
Rotate CCW to go
backwards in Menu

www.novasub.com
13 of 33
xDR-DSP –Diver Intercom Manual
Build 39 Date: 30-08-2021
Main Menu
The Main Menu has 8 different pages where you scroll through using the rotary switch.
Press at a Main Menu display page and press once on rotary switch to enter this menu item
Rotate the rotary switch back and forwards to scroll through the menu and press is once at a display to select it. The last
page is to Exit this menu.
Vol. Tender
The Vol. Tender is the internal speaker and connected headset volume level. The level is adjusted
from 1-100% of the full output power. This Volume control is on top of the Diver to Tender Volume
control of each diver.
Vol. Ext. Speaker
-- MAIN MENU ---
Vol. Ext. Speaker
Vol. Ext. Speaker
XX
{Value 0-100}
Press to select
The Vol. Ext. Speaker is the external speaker volume level. The level is adjusted from 1-100% of
the full output power. This Volume control is on top of the Diver, Tender and other audio gains
selected. The external speaker has an independent amplifier of 15 watts.
Comms Mode
The Comms Mode is used to select when you want to operate half
duplex or full duplex and in hybrid mode with wireless headsets.
•All FD: All Full Duplex
In this mode you speak with the divers in a full duplex mode,
there is no need of using the PTT buttons. You can hear the
divers and the divers can hear you.
•All HD: All half duplex
You will always hear the divers, even when you speak to
him (only with 4 wire comms) but every Tender needs to
press a PTT button to speak to the divers.
•Tender HD/wHS FD: Tender (panel/wired headset) half
duplex & Wireless headset full duplex
The Tender needs to press the PTT to talk with the divers
and the wireless headset speaks to the divers without the
use of PTT button on the headset.
Type of comms D1
-- MAIN MENU ---
Type comms D1
Type comms D1
Novasub Type comms D1
Kirby Type comms D1
Interspiro Type comms D1
OTS Type comms D1
Custom
A quick access to select which type of
communication is used on the helmet or
FFM. Each system has different gain
settings for optimum use. We made a pre-
selected gain matching each brand of
communication unit.
Each predefined gain setting can be
adjusted in the menu at the diver settings
and will be stored in the memory. When you
use the reset settings it will jump back to the
factory settings.
Predefined settings are based on 4 wire
comms.
Novasub
Novasub brand comms set for Kirby helmets
Kirby
Kirby Morgan standard comms set for Kirby helmets
Interspiro
Interspiro comms set for Divator FFM
OTS
OTS comms set for FFM
Custom
Custom or other brand of comms set used in helmet or FFM
-- MAIN MENU ---
Vol. Tender -- MAIN MENU ---
Vol. Ext. Speaker -- MAIN MENU ---
Comms mode -- MAIN MENU ---
Main Settings > -- MAIN MENU ---
Display Setting > -- MAIN MENU ---
Startup Function -- MAIN MENU ---
Exit Menu
-- MAIN MENU ---
TypecommsD1
-- MAIN MENU ---
Vol. Tender
Vol. Tender
XX
{Value 0-100}
Press to select
-- MAIN MENU ---
Comms mode
Comms mode
AllFD Comms mode
allHD Comms mode
Tender HD/wHS FD

www.novasub.com
14 of 33
xDR-DSP –Diver Intercom Manual
Build 39 Date: 30-08-2021
Main settings
-- MAIN MENU ---
Main Settings >
This enters the Main setting menu, which will be further explained in chapter 9.4
It the password protection is activated you will need to enter the password by using the rotary
encoder, see chapter 9.4.99.4
Display settings
-- MAIN MENU ---
Display Setting >
Contrast
XX
{Value 0-64}
Display Settings
Contrast Display Settings
Backlight
Backlight
XX
{Value 0-25}
Display Settings
To main menu
In this page you can adjust the contrast and backlight of the display.
The display is a daylight display, that means the more daylight you
have, the better you will see the text. You only need backlight in
darker surroundings. By default the backlight display is set low.
Startup Function
-- MAIN MENU ---
Startup Function
Startup Function
Vol. Tender
Startup Function
Vol.Ext.Speaker Startup Function
Comms Mode
Here you select what you want to control with the rotary switch in the
standard display when you are not in the Main Menu.
•Vol. Ext. Speaker
This shows in the main display the volume of the external
speaker, increase and decrease the volume with the rotary
switch
•Vol. Tender
This shows in the main display the volume of the Tender,
which is the internal speaker & headset. Increase and
decrease the volume with the rotary switch
•Comms Mode
This shows in the main display the comms mode you
selected of Diver1. You can switch quickly to another type of
comms. This can be handy when you use different type of
comms systems on the helmet/FFM in your team. Note that
this feature only changes the gains to accommodate for a
different comms system and is does not change the wire
layout/wiring diagram.

www.novasub.com
15 of 33
xDR-DSP –Diver Intercom Manual
Build 39 Date: 30-08-2021
Main settings
In the main settings you can configure the diver, tender, in and output settings, as well system related settings.
The main settings can also be password protected if this is selected in the prompt password menu. The Main settings is
either for 2 or 4 divers, depending of the system hardware configuration. We will explain the 2 diver menu, as each diver
settings are the same.
The Main setting has 11 different pages where you scroll through using the rotary switch:
- MAIN SETTINGS
Wireless > - MAIN SETTINGS
Inputs >
- MAIN SETTINGS
Tender >
- MAIN SETTINGS
Diver 1 > - MAIN SETTINGS
Ouputs >
- MAIN SETTINGS
Prompt password> - MAIN SETTINGS
Firmware version
- MAIN SETTINGS
Reset settings - MAIN SETTINGS
To main menu
- MAIN SETTINGS
Ext. Spk. Can hear
- MAIN SETTINGS
Diver 2 >
-- MAIN MENU ---
Main Settings >
Press at a Main settings display page and press once on rotary switch to enter this menu item.
Rotate the rotary switch back and forwards to scroll through the menu and press is once at a display to select it.
In a 4CH xDR version you will also see Diver3, Diver 4 and Tender2 appear in the Main settings Menu.
Can hear selection
At different settings pages you will see the Can hear page. This page is a selection of audio sources which can be
selected for that specific output (listener), which can be a Diver, Tender, Wireless headset, or output.
Once you see below window you can scroll with the rotary switch to the source you want to select. The selected source
will be between these marks < >, when you press the rotary switch once you either select or deselect that source.
When you press at < >, you leave this window and go back to previous page.
Rec1Can hear
D1 D2 T1 H1 H2 AUX
Symbol
Full Name
Notes
D1
Diver 1
D2
Diver 2
D3
Diver 3
Only with 4Ch
D4
Diver 4
Only with 4Ch
T1
Tender 1
Panel mic or Headset mic
T2
Tender 2
Panel mic or Headset mic. Only with 4CH
H1
Wireless Headset 1
Only with Wireless Headset board
H2
Wireless Headset 2
Only with Wireless Headset board
H3
Wireless Headset 3
Only with 4Ch and with Wireless Headset board
H4
Wireless Headset 4
Only with 4Ch and with Wireless Headset board
AUX
Aux In

www.novasub.com
16 of 33
xDR-DSP –Diver Intercom Manual
Build 39 Date: 30-08-2021
Diver 1
These settings pages are the same for Diver 2, 3 and 4. But each Diver has its own settings which can be set.
The diver settings has 7 different pages where you scroll through using the rotary switch. The last page returns to Main
settings.
- MAIN SETTINGS
Diver 1 >
----Diver 1----
Can hear ----Diver 1----
2/4wire ----Diver 1----
Type comms ----Diver 1----
Micgain ----Diver 1----
Head gain ----Diver 1----
Show Depth ----Diver 1----
To main settings
----Diver 1----
VOX
Can Hear
----Diver 1----
Can hear
Can hear
D2 T1 H1 H2 AUX
At each diver you can select which audio source the diver will hear on his earphone.
See Chapter 9.4.1 Can hear selection for a full explanation of the can hear function.
2/4 wire
----Diver 1----
2/4wire
2/4wire
Four wire 2/4wire
Two wire
Select here the type of wired comms you use. When you use a 2 wire comms system,
you need to select the Two wire mode, else the diver will not hear the Tender.
When you have a 4 wire comms system, you need to select Four wire mode, else the
diver will also not hear the Tender.
Type of comms
----Diver 1----
Type comms
Typecomms
Novasub Typecomms
Kirby Type comms
Interspiro Typecomms
OTS Typecomms
Custom
Here you can select which type of communication
is used on the helmet or FFM. Each system has
different gain settings for optimum use. We made a
pre-selected gain matching each brand of
communication unit. Each predefined gain setting
can be adjusted in the menu at the diver settings
and will be stored in the memory. When you use
the reset settings it will jump back to the factory
settings. Predefined settings are based on 4 wire
comms.
This setting does not change the wire layout/wiring
diagram!
Novasub
Novasub brand comms set for Kirby helmets
Kirby
Kirby Morgan standard comms set for Kirby helmets
Interspiro
Interspiro comms set for Divator FFM
OTS
OTS comms set for FFM
Custom
Custom or other brand of comms set used in helmet or FFM

www.novasub.com
17 of 33
xDR-DSP –Diver Intercom Manual
Build 39 Date: 30-08-2021
Mic Gain
----Diver 1----
Micgain
MicGain
XX
{Value 0-100}
This setting is the gain (power) value for the diver microphone in the helmet or FFM. You can
increase or decrease the value to the optimum value. In this way you can level the gain
(volume) with the Tender gain (volume) to have both on the same loudness to the audio
outputs. This gain setting is before the volume control of the Diver To Tender Volume control
& Vol. Tender control on the panel.
This means that you have actually 3 steps of Volume settings.
The display shows the level (Black bars) of sound coming from the diver Mic and the set
value XX.
When the diver speaks into the MIC you will see the bars increasing from left to right. Adjust
the gain so that the level bars move past the middle of the screen.
+
-
Volume Diver 1
to Tender
Mic Gain
Mic
Head
Diver 1
Isolator
Headset
Tender 1
InternalSpeaker
+
-
Volume
Tender
15 watt
Isolator
Rec1
Volume
Audio1 out
Rec1 out
Diver 2,3&4
WHS & Aux Out
This diagram shows the
audio routing from the diver
Mic to the Tender and audio
outputs for recording.
Mic Gain is the first volume
control, this influence the
audio level going to the
Tender (internal speaker
and Headset), audio
recording, audio outs and
other divers.
The Volume to Tender and
Volume Tender only
influence the level of audio
to the internal speaker and
headset.
Head Gain
----Diver 1----
Head gain
Head Gain
XX
{Value 0-100}
This setting is the Gain (power) value to the diver earphones in the helmet or FFM.
You can increase or decrease the value to the optimum value. This gain setting is
after the volume control of the Tender to Diver control on the panel. Set the value
correct so that the diver can hear the Tender loud and clear. Set the Head Gain
level with the Tender To Diver volume in mid position. And make sure that the
Tender Panel Mic and headset Gain are also set correctly for other outputs.
Tender
PanelMic
Mic Gain
Panel
Headset T1
Mic
Mic Gain HS
Head gain
+
-
Volume
Tender to Diver
Mic
Head
Diver 1
Isolator
7 watt
Diver 2,3&4
This diagram shows the audio routing to the diver
headphones (earphones) from the Tender and
other divers. Head gain is the actual audio power
to the earphones of the diver. The audio level at
the diver is influenced by the Tender Mic Gain
panel and Mic Gain HS and the Volume Tender to
diver control. And last by the set Head gain.
Adjusting the levels of Mic gain panel and Mic
gain HS also influence the audio levels to audio
outs and other divers.
VOX
----Diver 1----
VOX
VOX
Enabled VOX
Disabled
This setting can enable or disable the VOX for each diver. VOX is a set microphone
sensitivity for which the microphone connection opens. This means that if this
function is enabled that you will only hear the microphone of the diver when the
diver is actually talking. This eliminates noises when there is no communication.

www.novasub.com
18 of 33
xDR-DSP –Diver Intercom Manual
Build 39 Date: 30-08-2021
Show Depth
----Diver 1----
Show Depth
Show Depth
off Show Depth
On
When the Novasub diver depth sensor data is available on the NovaBus you can
select on this page to view the diver depth and dive time in the default main display.
As soon as you rotate the rotary switch the display will jump to the set startup function
selected display, which by default is the Volume Tender. Depending on the type of
depth data system connected, the display will show the divetime and max depth. The
divetime start and stops automatic when diver is below 1 meter.
D1:0.00m 0:00:00
Max depth 00m
Depth display
Vol. Tender
32 10h
When you rotate switch, you enter the startup function
display, which is by default the Volume Tender.
Tender
These pages are for the Tender settings, in case of a 4 channel radio there will be also a Tender2 settings page.
The last page returns to Main settings.
- MAIN SETTINGS
Tender >
----Tender----
Can hear ----Tender----
Micgain Panel ----Tender----
Micgain HS ----Tender----
To main settings
Can hear
----Tender----
Can hear
Can hear
D1 D2 H1 H2 AUX
At the Tender you can select which audio source the Tender will hear at the panel speaker and
on his earphone of the connected headset. See Chapter 9.4.1 Can hear selection for a full
explanation of the can hear function.
Mic Gain Panel
----Tender----
Micgain Panel
MicGain Panel
XX
{Value 0-100}
This setting is the gain (power) value for the panel microphone built in the front panel. You can increase
or decrease the value to the optimum value. In this way you can level the gain with the Diver Mic gain to
have both on the same loudness to the audio outputs. This gain setting is before the volume control of
the Tender to Diver Volume control on the panel and final Head Gain to the Diver.
This means that you have actually 3 steps of Volume settings to the diver earphones.
The display shows the level (Black bars) of sound coming from the Panel Mic and the set value XX.
When the Tender speaks into the MIC you will see the bars increasing from left to right. Adjust the gain
so that the level bars move past the middle of the screen. Just speak at a normal arm length distance
from the panel. The Microphone is very sensitive and will pick-up all noise.
Tender
PanelMic
Mic Gain
Panel
Headset T1
Mic
Mic Gain HS
Head gain
+
-
Volume
Tender to Diver
Mic
Head
Diver 1
Isolator
7 watt
Diver 2,3&4
Isolator
Rec1
Volume
Audio1 out
Rec1 out
WHS & Aux Out
This diagram shows the audio routing from the
Tender to the Divers and audio outputs. Mic
gain panel is the actual audio level of the
panel mic to all listeners. The audio level at
the diver is influenced by the Tender Mic Gain
panel and Mic Gain HS and the Volume
Tender to diver control. And last by the set
Head gain. Adjusting the levels of Mic gain
panel and Mic gain HS also influence the
audio levels to audio outs and other divers.
Mic Gain Headset

www.novasub.com
19 of 33
xDR-DSP –Diver Intercom Manual
Build 39 Date: 30-08-2021
----Tender----
Micgain HS
MicGain HS
XX
{Value 0-100}
This setting is the gain (power) value for the connected headset microphone. The gain settings can be
set optimum for the type of headset or table mic connected to the MIC/Headset or MIC connectors.
The settings explanation is identical to 9.4.3.2 Mic Gain Panel (see above)

www.novasub.com
20 of 33
xDR-DSP –Diver Intercom Manual
Build 39 Date: 30-08-2021
Wireless
These settings will only work when the BTEXT print is installed internal on the xDR print. Most xDR Diver intercom units
are prepared with the wiring of antennas and control buttons for the use of the Bluetooth headsets. That means that an
BTEXT print can easily be installed post build along with the purchase of Bluetooth headsets WLHEADSET3.
- MAIN SETTINGS
Wireless >
---Wireless---
WHS1 can hear
WHS1 Can hear
D1 D2 T1 H2 AUX
---Wireless---
WHS1 Mic gain
WHS1 mic gain
XX
{Value 0-100}
---Wireless---
WHS2 can hear ---Wireless---
WHS2 Mic gain ---Wireless---
To main settings
4CH xDR will also show D3,D4&T2
Can Hear
---Wireless---
WHS1 can hear
WHS1 Can hear
D1 D2 T1 H2 AUX
At the WHS1 you can select which audio source the wireless headset will hear.
See Chapter 9.4.1 Can hear selection for a full explanation of the can hear function.
Mic Gain
---Wireless---
WHS1 Mic gain
WHS1 mic gain
XX
{Value 0-100}
This setting is the gain (power) value for the wireless headset. You can increase or decrease
the value to the optimum value. In this way you can level the gain (volume) with the Diver
Mic gain (volume) to have both on the same loudness to the audio outputs. This gain setting
is before the volume control of the Tender to Diver Volume control on the panel and final
Head Gain to the Diver. This means that you have actually 3 steps of Volume settings to the
diver earphones. The display shows the level (Black bars) of sound coming from the headset
and the set value XX.
When someone speaks into the headset you will see the bars increasing from left to right.
Adjust the gain so that the level bars move past the middle of the screen.
BTEXT
BlueTooth add-on for
2x Wireless Headsets
Mic
Wireless Headset1
Mic
Wireless Headset2
WHS 1Mic Gain
WHS 2Mic Gain
Head gain
+
-
Volume
Tender to Diver
Mic
Head
Diver 1
Isolator
7 watt
Diver 2,3&4
Isolator
Rec1
Volume
Audio1 out
Rec1 out
Aux Out
This diagram shows the audio
routing from the Wireless
headsets to the Divers and
audio outputs. The audio level
at the diver is influenced by the
WHS x Mic Gain, the Volume
Tender to diver control, and last
by the set Head gain.
Adjusting the levels of WHS x
Mic Gain also influence the
audio levels to audio outs and
other divers.
Table of contents
Other Novasub Intercom System manuals

