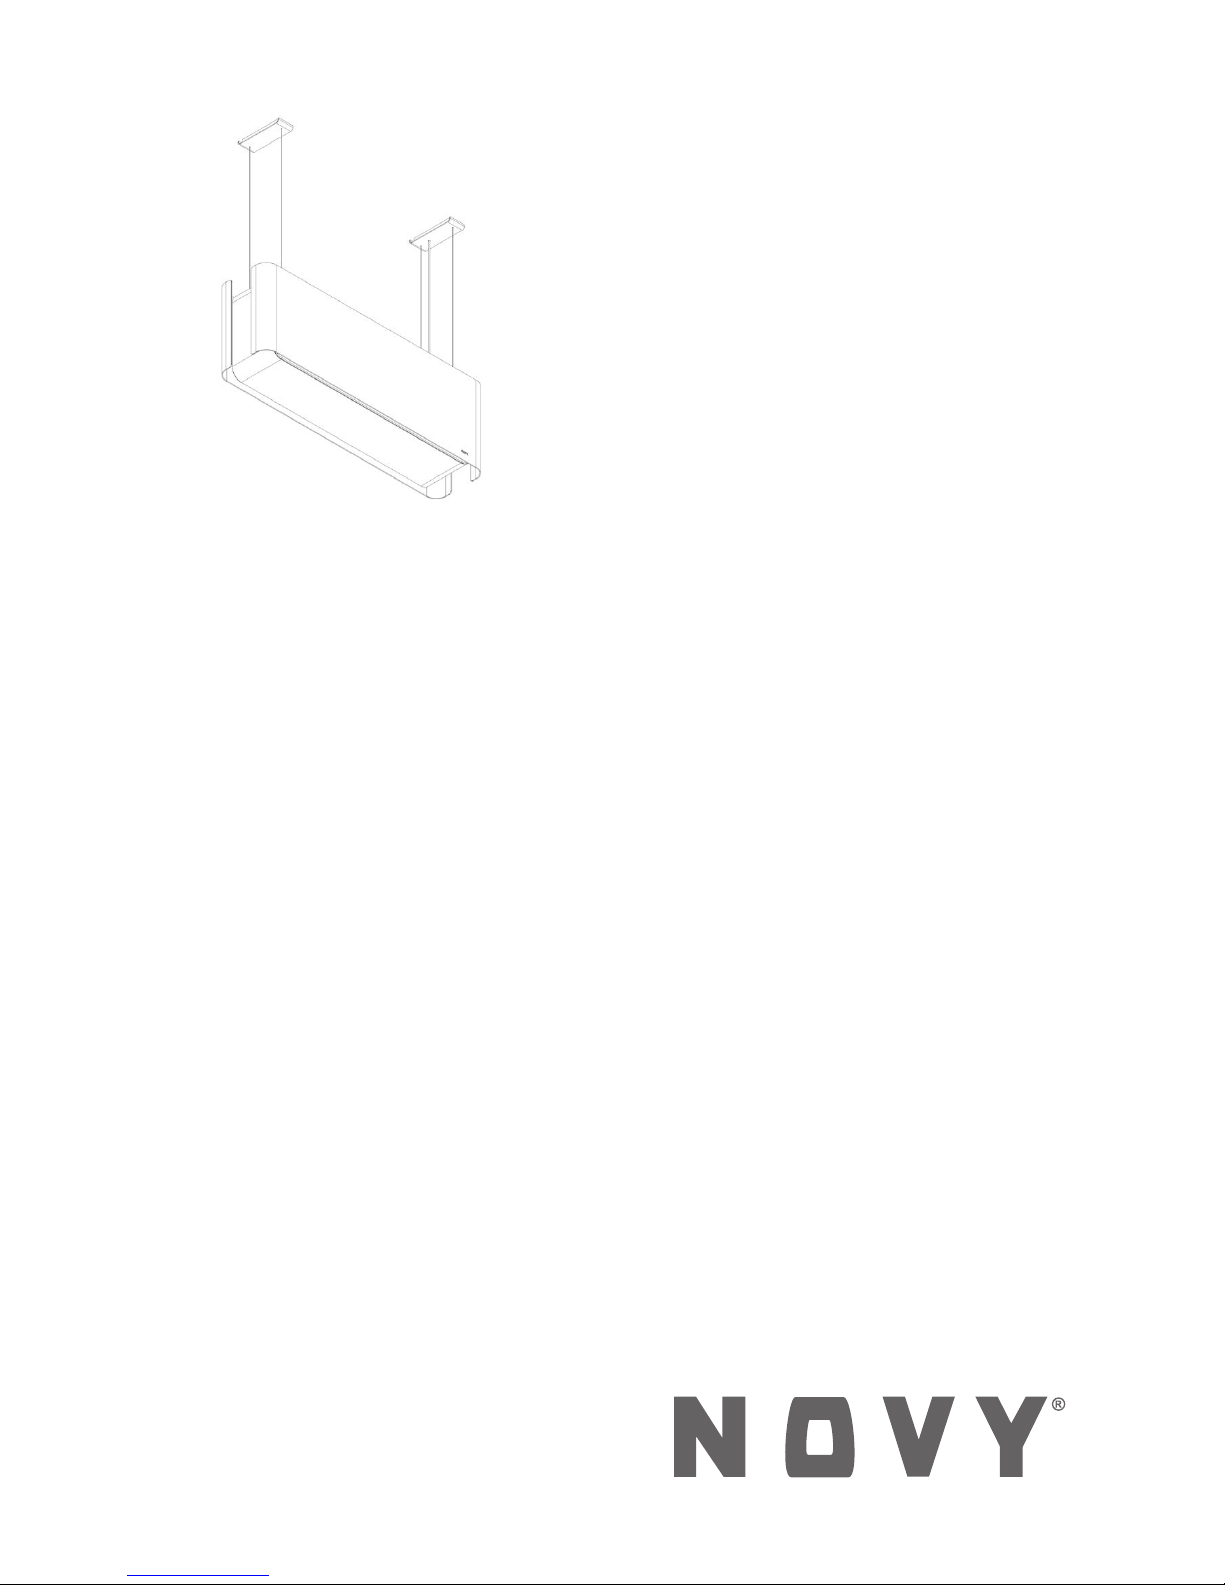
Novy 7550 User manual
NL Gebruiksaanwijzing en installatievoorschriften p. 2
FR Mode d’emploi et d’installation p. 6
DE Montage- und Bedienungsanleitung p. 10
EN Operating and installation Instructions p. 14
7550
7550_10508_GA1
EN 15
1. GENERAL INFORMATION
• Please read these operating instructions carefully.
They contain information about installation, opera-
tion, safety and maintenance you need to be aware
of.
• This hood is for domestic use only.
• Check the condition of the hood and the installation
material before installing. Carefully remove the hood
out of the packaging. Be careful not to use sharp
knives to open the box.
• Please keep these instructions to pass on to future
users.
• Disposal of transport packaging and old appliance.
Your new appliance was sent to you in protective
packaging. All utilised materials are environmentally
safe and recyclable. Please help us by disposing of
the packaging in an environmentally friendly manner.
• Old appliances are not worthless rubbish. Valuable
raw materials can be reclaimed by recycling old ap-
pliances. This appliance is identified according to
the European Directive 2002/96/EC on waste elec-
trical and electronic equipment. Please ask your
dealer or inquire at your local authority about current
means of disposal.
This manual makes use of a number of symbols. The
meaning of these symbols are given below.
Symbol Meaning Action
Indication Explanation of an
indication on the
hood
Warning This symbol indicates
an important tip or a
dangerous situation.
Follow this instruction to avoid injury and material
damage.
2. 2. SAFETY
2.1 Precautions before using
• Do not change or alter the appliance.
• The appliance must be grounded and connected
conforming to local standards.
• Do not use any extension cable to connect it.
2.2 Using the appliance
• Under no circumstances is it allowed to flambé
under the hood
• Deep frying under the hood is only allowed under
constant supervision.
• In case of fire always switch off the hood.
• Never extinguish burning fat or oil with water. Cover
the pot with a well fitting lid or a burnblanket.
• This appliance can be used by children aged from 8
years and above and persons with reduced physical,
sensory or mental capabilities or lack of experience
and knowledge if they have been given supervision
or instruction concerning use of the appliance in a
safe way and understand the hazards involved
• Activate the hood a few minutes prior to cooking.
• Switch the hood off 30 minutes after cooking is
finished. The delay function is set to 30 minutes. Use
the delay function.
• Avoid drafts under the hood surface.
• When cooking make sure pots are positioned
properly under the hood surface.
• When using induction: adapt the intensity of both
hob and hood to the lowest possible level in order to
avoid excessive creation of damp fumes.
2.3 Precautions not to damage the appliance
• The mounting instructions describe the correct
mounting method. Carefully read these instructions.
• Check the distance between the cooking surface
and the hood. The minimum and maximum heights
are indicated in the mounting instructions.
• Never use the hood without the fat filters in order to
prevent dirt and fat from further entering the hood,
which will eventually affect the performance and
functioning of the hood.
• Always stay around when you are frying, roasting,
grilling of deep-frying. Overheated oil and fat may
catch fire and damage the hood.
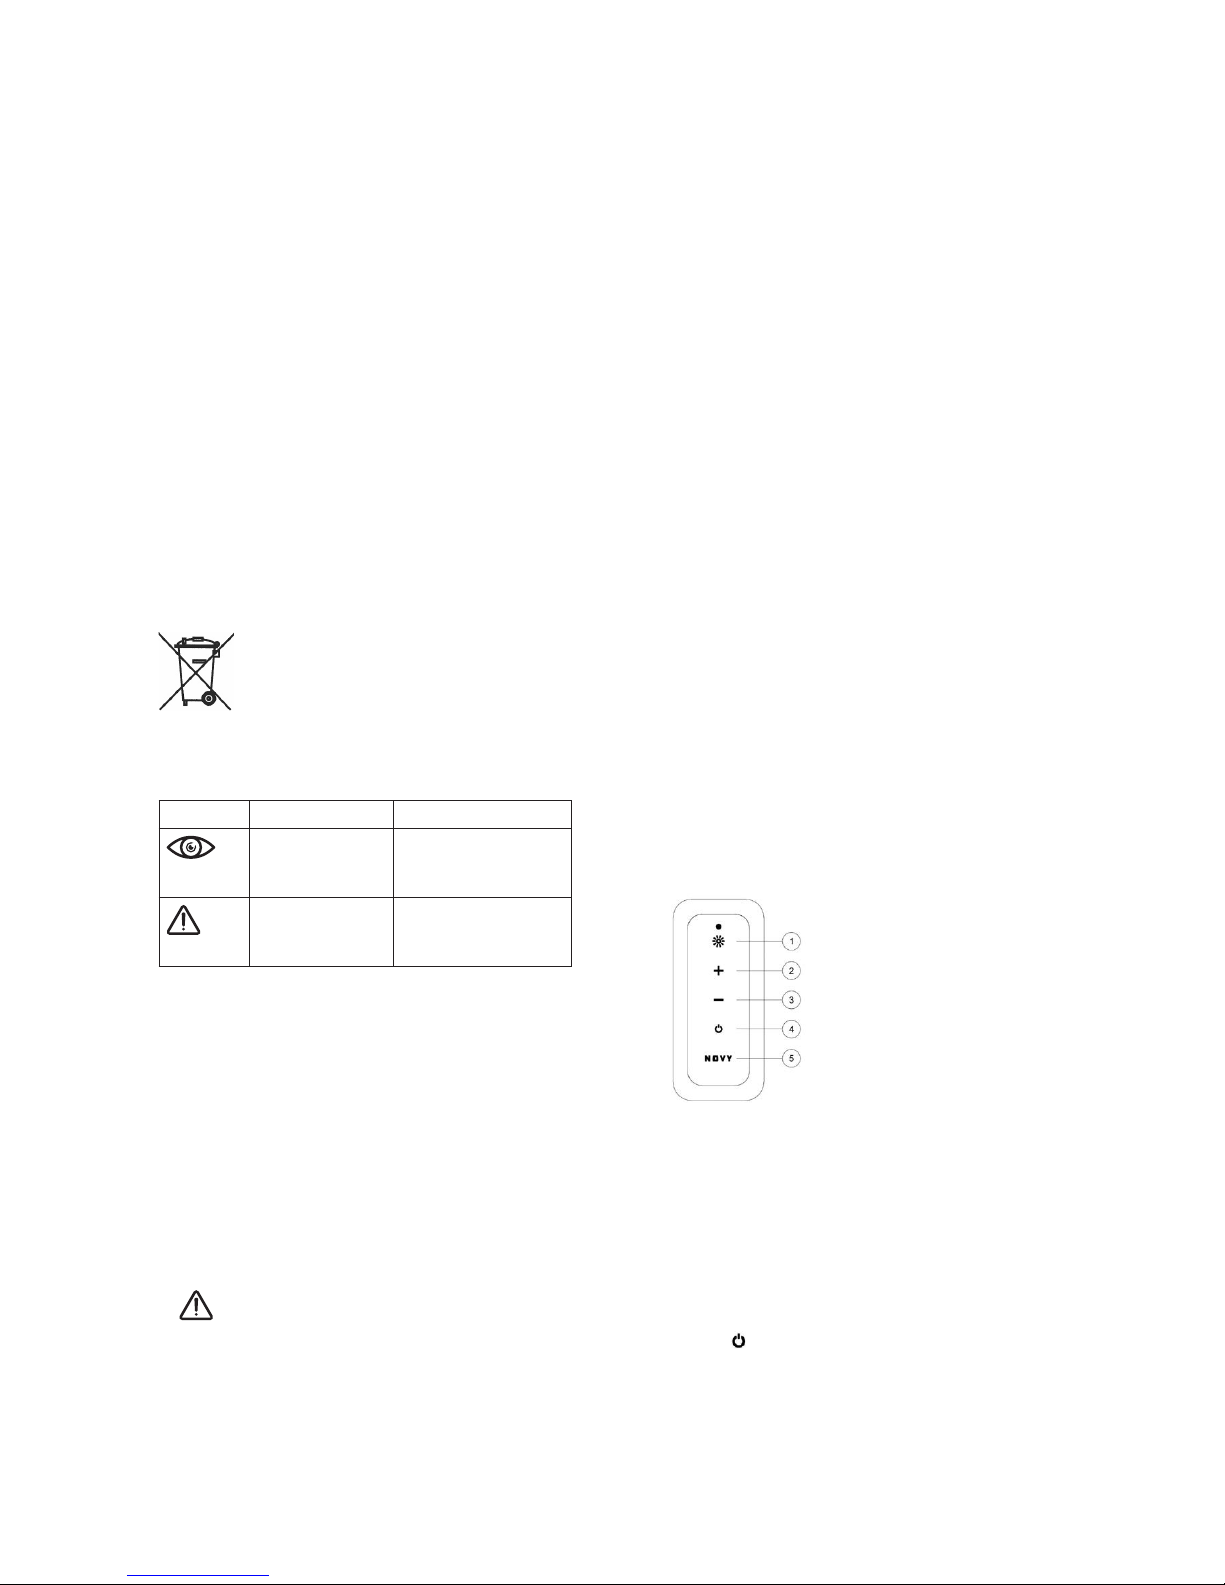
3. OPERATION
In order to turn on the hood, the on/off switch must
be activated first. This is disabled for servicing the
device. The knob is located at the top on the side of
the connection cable.
1)Lightingcookingmodeon/off
2) increase speed levels
3) decrease speed levels
4) switch on / off
5) Novy button: mood mode
lighting on/off
3.1 Extraction
Switch on - switch off
To switch the motor on push button 4. The hood will
always resume the level it was previously switched off
in (light and/ or motor).
Switch off with 30 minute delay
Press key once to set the run-out position. The ligh-
ting switches to atmosphere mode and the first white
engine speed LED flashes. The engine continues to run
for 30 minutes in post-ventilation mode. After this time,
the motor will switch off. The lighting will remain on in
the mood mode.

EN 16
Use the 30 minutes run-out time to make sure that
the monoblock filter can properly absorb the cooking
smells.
Switch off without delay
Push button twice.
Auto-Stop
To avoid that the hood will function during a too long
period, it will switch off automatically after 3 hours
(when no changes to the controls have been made).
Only the motor will turn off automatically. The lighting
will remain on in the mood mode.
Motor speed
In order to increase the speed of the motor, press the
button. In order to decrease the speed, press the
button . The motor speed can be set to 4 speeds.
You can select the required position depending on the
vapour production while cooking.
A self-rectifying thermal contact makes sure that
the motor is switched off when overheated. The motor
will switch on again after is has cooled down. The
cause of the overheating needs to be determined. This
may be, for example, that the contents of the pan have
caught fire, the motor fan is blocked or an object is
(partly) closing off the exhaust opening.
3.2 Lighting
With respect to the lighting you can choose between
the cooking mode and the mood mode.
Cooking mode
The cooking mode provides optimum lighting for
cooking. This mode has by default a maximum light
intensity at the bottom of the hood and a lower light
intensity on the sides. Press key or key to switch
the cooking mode on or off.
Cooking mode light intensity
When the cooking mode is active, you can dim
or intensify the light by pressing and holding key
. Release key when the required light intensity has
been reached.
You cannot fully dim the light of the cooking mode,
because then there will not be sufficient light to cook.
Change the colour temperature in the cooking mode
You can change the colour temperature into cold
light by simultaneously pressing keys and for 4
seconds. Release both keys when the required colour
temperature has been reached.
You can change the colour temperature into warm
light by simultaneously pressing keys and for 4
seconds. Release both keys when the required colour
temperature has been reached.
After having switched off the cooking mode, the last
set value will always be remembered. In this way your
preference will be used every time when switching on
the hood.
Mood mode
The mood mode provides optimum lighting for creating
a nice atmosphere. This mode has by default a lower
light intensity than the cooking mode both at the
bottom and along the sides of the hood. Press key 5 to
switch the mood mode on or off.
Mood mode light intensity
When the mood mode is active, you can dim or intensify
the light by pressing and holding key 5. Release key 5
when the required light intensity has been reached.
Change the colour temperature in the mood mode
You can change the colour temperature into cold
light by simultaneously pressing keys 5 and for 4
seconds. Release both keys when the required colour
temperature has been reached.
You can change the colour temperature into warm light
by simultaneously pressing keys 5 and and holding
them for 4 seconds. Release both keys when the
required colour temperature has been reached.
After having switched off the mood mode, the last set
value will always be remembered. In this way your
preference will be used every time when switching on
the hood.
3.3 Remote control
The remote control for hood is preinstalled and ready
for use.
If the set code disrupts other transmitters,
another code can be selected using the remote
control. There are 10 different codes in total.
Change the code
• First switch off the power supply of the hood. Do
this by deactivating and reactivating the on/off
switch. The set-up mode will now be active for 3
minutes. The new code must be set up within these
3 minutes.
• Simultaneously press and . The lamp on the re-
mote control flashes as many times as the selected
code. Repeat this step until you have reached the
required code (there are 10 code options in total).
• Press the key on the remote control within 10
seconds to confirm the settings. The cookerhood
and the remote control are now in line with each
other.
Change the batteries:
• For changing the batteries unscrew the plastic
cover, remove the old batteries and insert the new
ones. Pay attention to the polarity marking given in
the battery compartment (figure 4).
• Empty batteries are not to be disposed of in the
household refuse, but they are to be handed in as
chemical waste.

EN 17
Technical information:
- Power supply: (2xAAA) batteries
- Frequence: 433.92Mhz
- Numbre of codes: 10
- Worktemperature: 0-50°C
- Dimensions: 110 x 50 x 19mm
3.4 InTouch
The cooker hood features the InTouch function. If you
have a Novy induction plate with InTouch, you can ope-
rate the hood from the plate. Programming InTouch on
the induction plate.
Programming InTouch on the induction plate
The remote control must first work with the hood. If ne-
cessary, the remote control code can be changed, as
described in Section 3.3.
Connect the plate to the mains supply.
1. Touch simultaneously the keys and on the in-
duction plate until you hear a beep signal.
• The hob will now search for the hood code auto-
matically.
• WAIT until the hood lights flash, OR until you hear
a clicking sound eight times from the hood. (Be
patient, this may take a while)
2. Then touch any InTouch key, or or or on
the induction plate until you hear a beep signal. This
is the confirmation of the pairing of both devices.
Now you can operate the hood with the keys on the
induction plate.
4. MAINTENANCE
4.1. Grease filter
Maintenance of the grease filter
The cooker hood contains 4 metal grease filters. The
cooker hood has a cleaning indicator for the grease
filters.
Grease filter indication
Indication: green indicator lamp starts
burning.
After 20 cooking hours, an green lamp on the hood
indicates that the grease filter needs cleaning
Access to the filter
The two side panels can be opened.
Attention: hold the hood with one hand and
open the side panel with the other hand.
Remove the filter by taking hold of its hook and pulling
down.
Cleaning the filter:
• in the dishwasher
• manually: in a hot solution of water and a liquid de-
tergent. Rinse and allow to dry completely
The previous instructions need to be followed. If
not an increased fire hazard may occur.
After cleaning, place the grease filters back in the hood.
Do not use the hood without the grease filters.
Reset grease filter indication
When you replace the monoblock filters after cleaning,
press the [+] and [-] buttons simultaneously for 5
seconds to reset the cleaning indicator. If you don’t
reset, the green indication light will continu burn. We
advise you to clean your filter once a month for an
optimal operation.
4.2 Monoblock filters
In each grease filter there are 2 half round black mono-
block filters. Only use the Novy Monoblock recircula-
tion filter in the cooker hood.
Cleaning indication monoblock filter
Indication: orange indicator lamp starts
burning

After 200 cooking hours, an orange lamp on the hood
indicates that the monoblock filters need cleaning.
Remove the Monoblock recirculation filter
When you replace the monoblock filters after cleaning,
press the [+] and [-] buttons simultaneously for 5
seconds to reset the cleaning indicator.
If you do not do this, the green light will continue to
shine when you turn on the extraction hood.
Regenerate the Monoblock recirculation filter:
• The Monoblock can be regenerated up to 12 times.
This is done in the oven.
• Place the filter in the oven for 1 hour at 120°C. Pro-
vide sufficient fresh air in the room where the oven
has been placed, as smells can be released.
Smells can be released when baking certain kinds
of fish. The best solution for this is to immediately
regenerate the filter.
Place the Monoblock recirculation filter
Place the monoblock filters back in the openings
above the extraction hood. Slide the grates back into
place above the monoblock filters (with the grip turned
inward).
Reset the Monoblock recirculation indication
When you replace the monoblock filters after cleaning,
press the [+] and [-] buttons simultaneously for 5
seconds to reset the cleaning indicator.
If you do not do this, the orange light will continue to
shine when you turn on the extraction hood.
4.3 Maintenance of of the cookerhood
Use a soft, wet cloth and a mild detergent to clean the
hood. Then rub dry with a dry, soft cloth to avoid stains.
Clean the Hi-Macs light diffuser
Never use aggressive, abrasive detergents or
sponges.
Do not use an abrasive or scourer.
4.4 Technical problem
In the event of a malfunction, you can contact your
(kitchen) supplier and/or the Novy Customer Service
Department. In order for the Customer Service
Department to reply quickly and precisely you must to
tell them which type of extraction hood you have.
The model number can be found on a sticker on
the interior of the extraction hood.
This is visible as soon as you take the filter out
of the extraction hood.
You can write down the model number here:
Model number: ……………………….
EN 18
Other manuals for 7550
1
Table of contents
Other Novy Ventilation Hood manuals


Novy
Novy 828 User manual

Novy
Novy 780 Fusion+ User manual

Novy
Novy Panorama 1821 User manual

Novy
Novy Easy 1861 User manual

Novy
Novy 7510/15 User manual

Novy
Novy ONE POWER User manual

Novy
Novy Pureline Cubic 6831 User manual

Novy
Novy 661/15 User manual

Novy
Novy Pure'line Pro Compact 6910 User manual

Novy
Novy Panorama 1821 User manual


Popular Ventilation Hood manuals by other brands

Gorenje
Gorenje S3 IHGC963S4X manual

KOBE
KOBE ISX2136SQB-1 Installation instructions and operation manual

U.S. Products
U.S. Products ADVANTAGE-100H Information & operating instructions

Kuppersberg
Kuppersberg DUDL 4 LX Technical Passport

Framtid
Framtid HW280 manual

Thermador
Thermador HGEW 36 FS installation manual


