Nowsonic Roadtrip 508 User manual

C
www.nowsonic.com
Mobile PA system
User manual
Bedienungsanleitung
Mode d‘emploi
Instrucciones de uso
Instrukcja obsługi
RoadtRip 508
Roadtrip_508_Bedienungsanleitung_DINA4_V02.indd 3 31.07.13 11:15

User manual 4
Bedienungsanleitung 10
Mode d‘emploi 16
Instrucciones de uso 22
Podręcznik użytkownika 28
Roadtrip_508_Bedienungsanleitung_DINA4_V02.indd 3 31.07.13 11:15

4
www.nowsonic.com
ROADTRIP 508
User manual
GB
1) Read these instructions.
2) Keep these instructions.
3) Heed all warnings.
4) Follow all instructions.
5) Do not use this apparatus near water.
6) Clean only with dry cloth.
7) Do not block any of the ventilation openings! Install in
accordancewith the manufacturer’s instructions.
8) Do not install near any heat sources such as radiators, heat regis-
ters, stoves, or other apparatus (including amplifiers) that produce
heat.
9) Do not defeat the safety purpose of the polarized or grounding-
type plug. A polarized plug has two blades with one wider than
the other. A grounding type plug has two blades and a third
grounding prong. The wide blade or the third prong is provided
for your safety. If the provided plug does not fit into your outlet,
consult an electrician for replacement of the obsolete outlet.
10) Protect the power cord from being walked on or pinched, par-
ticularly at plugs, convenience receptacles, and the point where
they exit from the apparatus.
11) Only use attachments/accessories specified by the manufacturer.
12) Use only with a cart, stand, tripod, bracket, or
table specified by the manufacturer, or sold with
the apparatus. When a cart is used, use caution
when moving the cart/apparatus combination to
avoid injury from tip-over.
13) Unplug this apparatus during lightning storms or when unused
for long periods of time.
14) Refer all servicing to qualified service personnel. Servicing is
required when the apparatus has been damaged in any way, such
as power-supply cord or plug is damaged, liquid has been spilled
or objects have fallen into the apparatus, the apparatus has been
exposed to rain or moisture, does not operate normally, or has
been dropped.
WARNING:
To reduce the risk of fire or electric shock, do not expose this appara-
tus to rain or moisture.
Do not expose this equipment to dripping or splashing and ensure
that no objects filled with liquids, such as vases, are placed on the
equipment.
This apparatus must be earthed.
Use a three-wire grounding type line cord like the one supplied with
the product.
Be advised that different operating voltages require the use of diffe-
rent types of line cord and attachment plugs.
Always observe the local safety regulations.
This equipment should be installed near the socket outlet and
disconnection of the device should be easily accessible.
To completely disconnect this equipment from the AC Mains, dis-
connect the power supply cord plug from the AC receptacle.
Please follow all instructions of the manufacturer for installation.
Do not install in a confined space.
Do not open the unit - risk of electric shock.
CAUTION!
Please note: Changes or modifications to the device not expressly ap-
proved in this manual could void your authority to operate the inst-
rument.
The powered speaker system Roadtrip 508 is capable of generating
sound pressure levels (SPL) sufficient to cause permanent hearing da-
mage. Caution should be taken to avoid prolonged exposure to SPL
in excess of 90 dB.
Servicing
There are no user-serviceable parts inside.
All service must be performed by qualified personnel.
CAUTION: TO REDUCE THE RISK OF ELECTRIC SHOCK, DO NOT REMO-
VE THE COVER. NO USER SERVICEABLE PARTS INSIDE. REFER SERVICING
TO QUALIFIED PERSONNEL ONLY.
Warning: To reduce the risk of fire or electric shock, do not expose
the device to rain or moisture.
IMPORTANT SAFETY INSTRUCTIONS
The exclamation point within an equilateral triangle is inten-
ded to alert the user to the presence of important operating
and maintenance(servicing) instructions in the literature ac-
companying the product.
The lightning flash with an arrowhead symbol within an equi-
lateral triangle is intended to alert the user to the presence of
uninsulated“dangerous voltage”within the product’s enclosu-
re that may be of sufficient magnitude to constitute a risk of
electric shock to persons.
Roadtrip_508_Bedienungsanleitung_DINA4_V02.indd 4 31.07.13 11:15

5
www.nowsonic.com ROADTRIP 508
User manual
GB
Contents
Introduction
Features
Application
Features and Startup
Description of the Inputs
Description of the Multi Effects Processor
Description of the Outputs
Connection examples
Choosing the AMP MODE
Specifications
Scope of supply
Disclaimer
Servicing
Legal information
Introduction
Thank you very much for purchasing the Nowsonic Roadtrip 508! Roadt-
rip 508 is a self-contained, portable PA system featuring 8 input channels
with individual tone controls, an internal FX processor with 16 presets as
well as a Class D power amplifier to feed the integrated speakers. With
its lightweight and ergonomic design the Roadtrip 508 is perfect for si-
tuations where ease and portability are just as important as quality and
flexibility.
Please take your time to read these instructions carefully in order to ope-
rate Roadtrip 508 properly.
Please check the unit after unpacking for any damages. In case the
housing is visibly damaged, please do not operate the unit, but contact
your local dealer from whom you have purchased it.
Features
Roadtrip 508 has the following features:
3-way speaker system with integrated mixer and power amplifier
Maximum output 2 x 250 watts RMS
8 input channels for connecting up to 7 microphones, 3 instru-
ments or 8 line sources (7 x mono, 1 x stereo)
Stereo input channel for connecting an iPod or CD player
Mono channels with balanced inputs (XLR and 1/4“ TRS jack)
Internal Bluetooth receiver for wireless reception of audio signals
2 band equalizer per channel
Phantom power switchable for all microphone inputs
Integrated Multi-FX processor with 16 presets
Send control per channel for a monitor output
Balanced output (XLR) for connecting an external subwoofer
Compact and road-proof enclosure
Application
Roadtrip 508 is recommended for the following applications:
sound reinforcement for small concerts as a powered FOH system
sound reinforcement on stage as a powered multichannel
monitoring system
Combined use for active FOH and stage monitoring
Mixer and/or monitoring system for rehearsal and practicing at home
Features and Startup
Roadtrip 508 is divided into three areas:
8-in-2 mixer with 7 mono channels, one stereo input and an internal
FX processor
2-channel Class D power amplifier for driving the integrated 3-way
speakers and/or external monitors/subwoofer
Stereophonic 3-way speaker system
Roadtrip 508 is a self-contained system which integrates the mixer
and the Class D amplifier in the same enclosure while the separate
modules of the 3-way speaker system are mounted on the front and
back of the mixer/amplifier unit for transport. Before using Roadtrip
508 you first have to detach the speaker modules and hook up the
mixer/amplifier unit.
Proceed as follows:
1) Place Roadtrip 508 on solid ground.
2) Release the buttons on both sides of the handle on top of the
main module: Now you can remove the two speaker modules to
the side.
3) If required place the speaker modules and/or the mixer/amplifier
unit on speaker stands (not included): you will find a standard pole
socket (35 mm) on the bottom of every module.
4) Connect the LEFT/MAIN and RIGHT/MON outputs in the OUTPUTS
section of the mixer/amplifier unit with the jacks on the rear of the
speaker modules using the supplied speaker cables (5m).
NOTE: Route cables so that performers, production crew, and au-
dience will not trip and topple the speakers over.
5) Next connect your external sources like microphones, instruments
and/or line devices with the Combo and stereo inputs on the front
of the mixer/amplifier unit. Please note that the input cables are
not supplied with the unit.
6) Connect the mixer/amplifier unit with the mains outlet using the
supplied IEC power cord.
7) Make sure to completely turn down all volume controls on the
mixer/amplifier unit before powering up Roadtrip 508.
Roadtrip_508_Bedienungsanleitung_DINA4_V02.indd 5 31.07.13 11:15

6
www.nowsonic.com
ROADTRIP 508
User manual
GB
Description of the Inputs
Roadtrip 508 has 7 monophonic and one stereophonic input. The mono
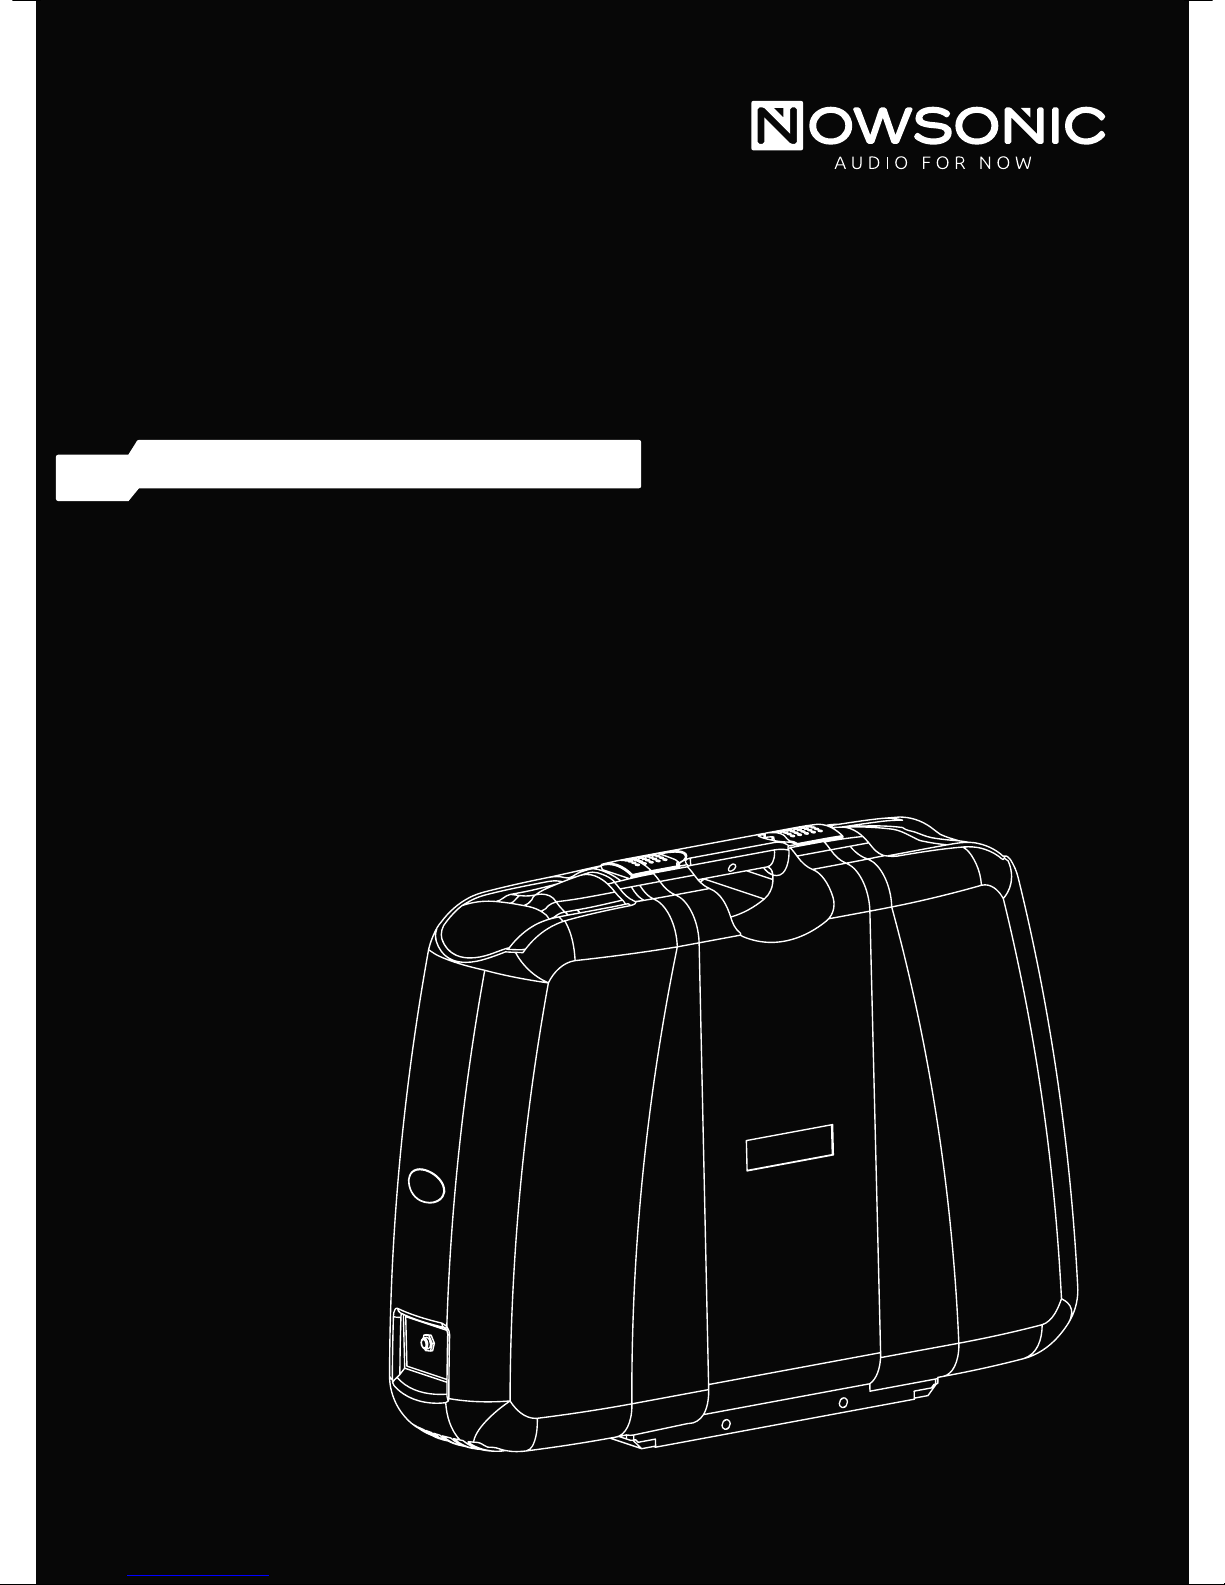
channels have the following controls:
1) The VOLUME control adjusts the gain of the corresponding chan-
nel in the LEFT/MAIN and RIGHT MON outputs and therefore the
balance between the inputs. The signal of the channel is always
routed to both outputs.
2) The HIGH and LOW controls adjust the amount of high and low fre-
quencies on the particular input. The cutoff frequency for the HIGH
shelf filter is 12kHz, the LOW filter works from 80Hz, the control
range is +/- 12dB each.
3) The FX control feeds the channel signal to the internal multi effects
processor.
4) The MON VOL control feeds the channel signal to the RIGHT/MON
output if the AMP MODE MAIN/MON was chosen in the Master
section.
The Combo sockets in the lower part of the mixer panel serve as the
inputs for the channels 1 to 7. Via the Combo sockets you can input
the following sources to the channels:
Channel Source Connector
1Device for audio playback
via Bluetooth, micropho-
ne or line signal
Internal Bluetooth receiver, XLR or
TRS jack via Combo socket
2 – 4 Microphone or line signal Combo socket, XLR or TRS jack
5 – 7 Microphone, line signal
or instrument
Combo socket, XLR or TRS jack
Channel 1 is equipped with a Bluetooth receiver for wireless reception
of audio data from any external devices like laptops and smartphones.
You can toggle between Bluetooth and the Mic/Line socket via the
button of the same name above the VOLUME control of channel 1.
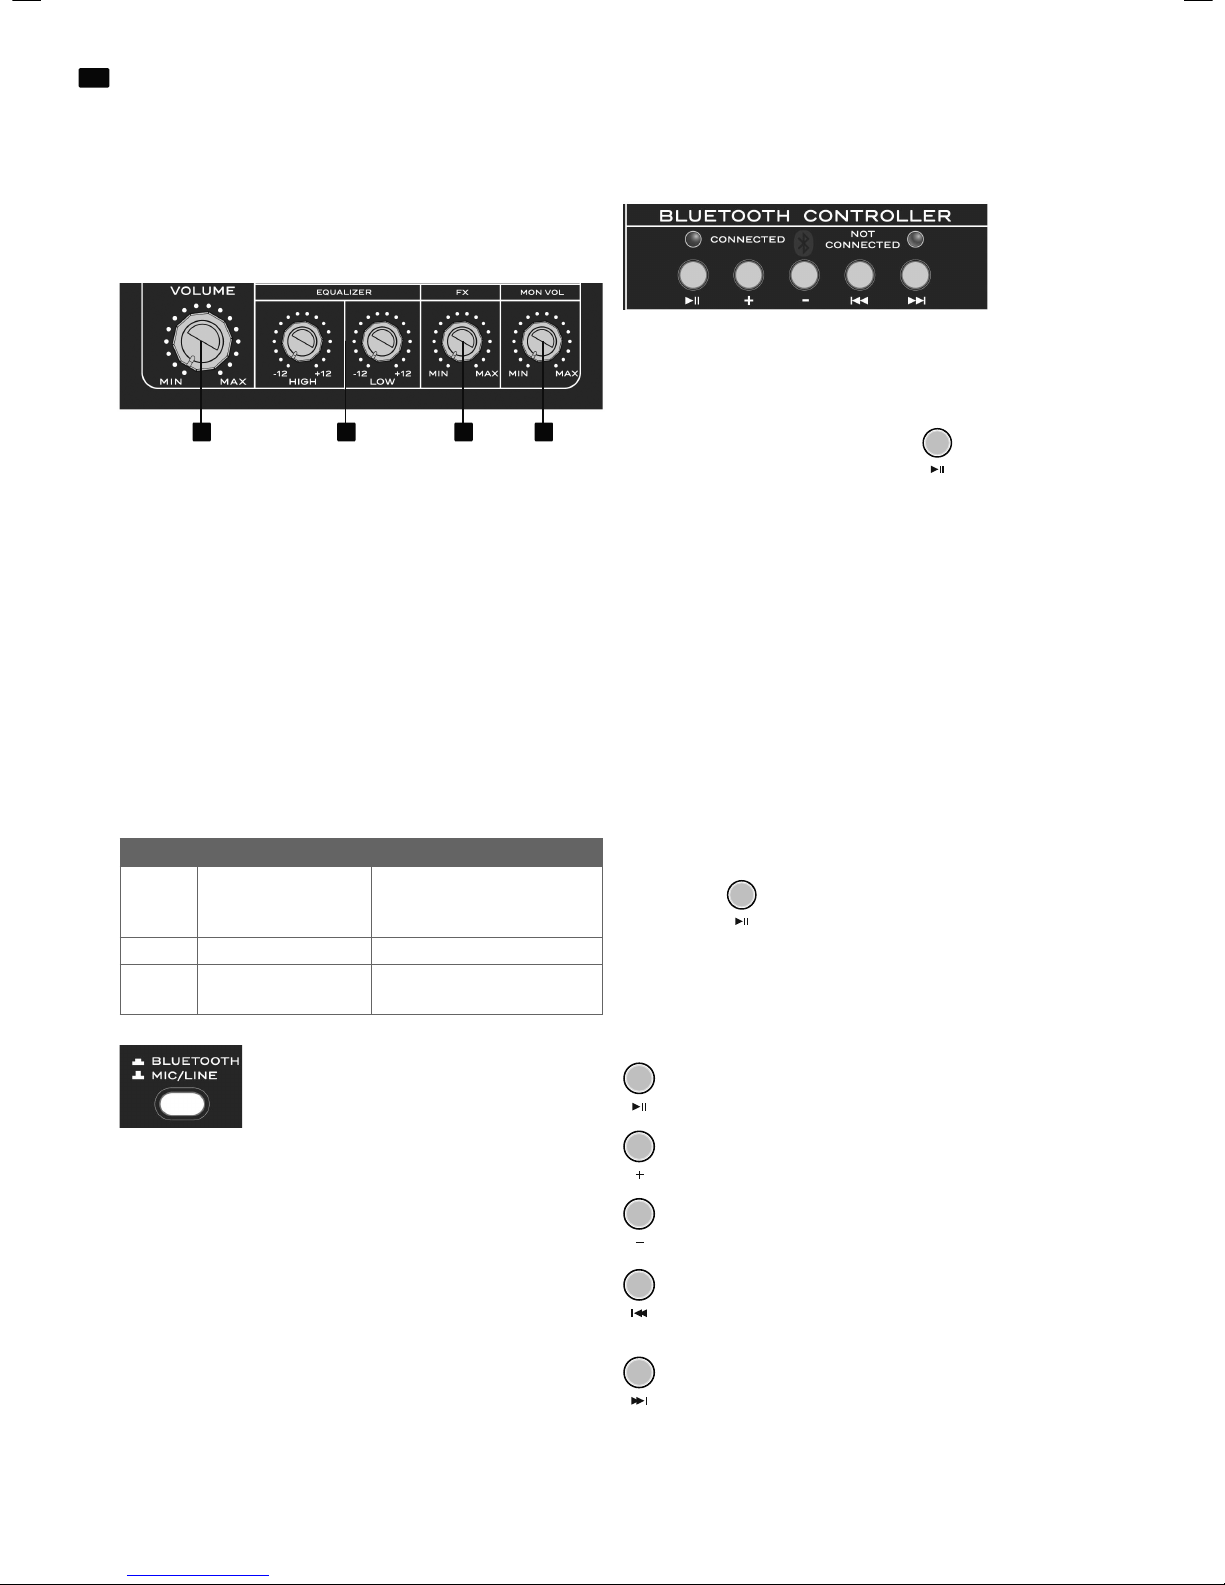
The communication between Roadtrip 508 and the external Blue-
tooth device is configured via the BLUETOOTH CONTROLLER panel. In
addition, you can control the transport of the device here. The panel
provides the following controls and indicators:
In order to receive the Bluetooth signal, you must first set up the con-
nection between Roadtrip 508 and the external device via the BLUE-
TOOTH CONTROLLER panel. Proceed as follows:
1) Place the external Bluetooth-enabled device next to Roadtrip 508
(<10m).
2) Press and hold the PLAY/PAUSE button for about
10 seconds
3) 3. Release the button, when you hear two beeps from Roadtrip
508: Now, the external device can find Roadtrip 508 and pair with
it. As soon as the connection is established, the CONNECTED LED is
permanently lit. If the connection failed, the NOT CONNECTED LED
lights up: in this case repeat the process.
If you want to disconnect the Bluetooth device from Roadtrip 508 (for
example to pair Roadtrip with another Bluetooth device), press the
PLAY/PAUSE button for 3 seconds: After the next beep the connection
is terminated.
NOTE: Roadtrip 508 can only be paired with a single Bluetooth device
at the same time. The distance from the Bluetooth source must not
exceed 10 meters. If no connection can be established, reduce the
distance and try again.
If Roadtrip 508 is powered down and up again, you must not perform
a new scan to pair with the Bluetooth device: Press and hold the PLAY/
PAUSE button for about 3 seconds.
After the beep, the connection with the Bluetooth device is re-esta-
blished.
When Roadtrip 508 is paired with the Bluetooth device, you can con-
trol the transport via the BLUETOOTH CONTROL panel. The following
functions can be controlled:
The PLAY/PAUSE button starts and pauses audio playback.
The VOLUME + button increases the volume of the
external device.
The VOLUME - button decreases the volume of the
external device.
Pressing the SKIP BACK button once skips to the beginning of
the current song. Press and hold the button to scroll back to the
beginning of the song.
Pressing the SKIP FORWARD button once skips to the beginning
of the next song. Press and hold the button to scroll forward to
the end of the current song.
1 2 3 4
Roadtrip_508_Bedienungsanleitung_DINA4_V02.indd 6 31.07.13 11:15

7
www.nowsonic.com ROADTRIP 508
User manual
GB
Description of the Inputs
Via the 1/8“ stereo mini socket (AUX 1, e.g. for connecting an iPod etc.)
or the two RCA sockets (AUX 2, e. g. for connecting an CD player etc.),
you can connect a stereophonic line source with channel 8 of Roadtrip
508. You can toggle between AUX 1 and AUX 2 via the button of the
same name besides the VOLUME control of channel 8.
1) AUX 1/AUX 2 button: This button toggles between the stereo mini jack
(AUX 1) and the stereo RCA inputs (AUX 2).
2) The VOLUME control adjusts the gain of the stereo channel signal in the
LEFT/MAIN and RIGHT MON outputs.
3) Stereo mini socket: Connect an external line source (e. g. an iPod) here
using a cable with 1/8“ TRS mini jack.
4) Stereo RCA sockets: Connect an external line source (e. g. a CD player)
here using a cable with RCA jacks.
Description of the Multi Effects Processor
Roadtrip 508 is equipped with a multi effects processor with 16 preset
algorithms. You can choose between various Reverb/Hall algorithms
(preset 1 to 8), Delays (preset 9 – 10), a Flanger (preset 11) and a Cho-
rus (preset 12), two effects combining Chorus and Reverb (preset 13
– 14), an effect for voice cancelation (cancelation of the mid signal,
preset 15) and a rotary speaker emulation (preset 16). The active preset
is fed via the FX controls per channel.
1) Preset selector: With this selector you can choose the desired algo-
rithm from the 16 presets.
2) FX ON/OFF button: This button enables the output of the multi
effect processor in the main bus. The corresponding LED lights red
when the processor is activated. In the OFF position the effect is
not audible in the main bus.
3) FX RETURN control: This knob controls the level of the effects pro-
cessor in the main buss and therefore the balance with the input
channels.
4) PARAMETER control: This control varies one specific parameter per
algorithm
Description of the Outputs
In the output section of Roadtrip 508 you set the operating mode and
control the output level of the Class D amplifier to the connected spea-
ker modules. The output level is displayed on the corresponding meters.
Via the 12 Volt Lamp BNC socket you can connect a goose-neck light
(not included) to illuminate the user panel of Road Trip in low light con-
ditions.
The speaker sockets as well as the mains socket and the power switch
are located on the rear of the mixer/amplifier unit. For hook up instruc-
tions refer to the next section
1) LOW CUT button: This button activates a 120Hz high pass filter.
The high pass filter eliminates low frequency noise in the main
buss and can protect the speaker from overload. The high pass
filter is especially useful for speech or vocal signals.
2) AMP MODE button: With this button you choose the desired rou-
ting in the main buss and at the same time toggle the routing in
the channels. For additional information refer to the next section.
3) LEFT/MAIN VOLUME and RIGHT/MAIN VOLUME controls: With
these two controls, you can individually adjust the level in the
main buss that is sent to the internal Class D power amplifier.
1
1
3
3
4
2
2
1
3
2
4
Roadtrip_508_Bedienungsanleitung_DINA4_V02.indd 7 31.07.13 11:15

8
www.nowsonic.com
ROADTRIP 508
User manual
GB
Connection examples
On the rear of the mixer/amplifier unit you will find the sockets for
connecting the speaker modules, the mains socket for the supplied
IEC mains cord as well as the POWER switch
The PRE AMP LEFT/RIGHT outputs allow for tapping the signal in the
main buss behind the LEFT/MAIN VOLUME and RIGHT/MAIN VOLUME
controls, but before the Class D amplifier. Use these outputs to feed
the main signal of Roadtrip 508 to a subsequent mixer or an additio-
nal PA.
If required, you can connect an external active subwoofer (not inclu-
ded) to the SUBWOOFER OUT XLR socket. Use the subwoofer ampli-
fier to balance the level of the subwoofer to the full range speakers.
The SPEAKER OUT outputs serve for connecting the speaker modules
(and additional monitors if required) to the internal Class D amplifier.
The configuration depends on the setting of the AMP MODE switch
on the front (see below).
NOTE: Please note that the impedance of all connected speakers must
be at least 4 ohm or higher. An impedance below 4 ohm can damage
the internal Class D amplifier. This will void the warranty.
If the fuse of Roadtrip 508 is blown, open the fuse holder and replace
it – depending on the mains voltage –with a fuse of the same type
and with the printed specifications.
Attach the power cord to the mains socket. Please make sure that the
voltage selector is set to the mains voltage in your country. Finally,
use the the POWER switch to turn Roadtrip 508 on or off
ANMERKUNG: Vor dem Ein- und Ausschalten sollten Sie die Regler
LEFT/MAIN VOLUME und RIGHT/MAIN VOLUME ganz herunter ziehen,
um Schäden an den Lautsprechern durch etwaige Ein- oder Ausschal-
timpulse zu vermeiden.
Choosing the AMP MODE
You can use Roadtrip 508 either for stereophonic sound reinforcement
or as a monophonic FOH system with an additional monitoring buss.
The selection is done via the AMP MODE switch on the front.
AMP MODE MAIN/MAIN: In this mode, the Roadtrip speaker modules
are connected to the LEFT/MAIN and RIGHT/MON sockets. Audio is
played in stereo, the level is controlled via the LEFT/MAIN VOLUME and
RIGHT/MAIN VOLUME controls.
AMP MODE MAIN/MON: In this mode, the Roadtrip speaker modules
are connected to both LEFT/MAIN sockets.You can connect additional
monitor wedges (not included) to the RIGHT/MON socket. The level
of the monophonic FOH speaker modules is controlled via the LEFT/
MAIN VOLUME control, while the level in the monitoring buss is set
via the RIGHT/MAIN VOLUME knob. The mix of the input channels in
the monitoring buss is set separately from the FOH level via the FX
controls in every channel.
Roadtrip_508_Bedienungsanleitung_DINA4_V02.indd 8 31.07.13 11:15

9
www.nowsonic.com ROADTRIP 508
User manual
GB
Specifications
Mixer:
Mono channel 7, 4 x Mic/Line, 3 x Mic/Line/Instrument
(via Combo sockets)
Stereo channel 1, LINE input (1/8" mini jack, 2 x RCA)
EQ input channel HIGH: +/-15dB, 10KHz, LOW: +/-15dB, 100Hz
Bluetooth short distance wireless data communication
technology to receive the audio signal from
your mobile phone, laptop, PDA, and other
Bluetooth devices
Pre-Amp output 2 x 1/4" TRS socket
REC output 2 x Cinch
AMP MODE LEFT + RIGHT / MAIN + MONITOR
SPEAKER output 4 x 1/4“ TS jack
Level meters 2 x 9 segment VU meter
0°~40°C at 95% humidity
Amplifier unit
Technology Class D with switch mode power supply
Maximum output 2 x 250 watts @ 4 ohm (1KHz, 1%THD)
Frequency response 20Hz – 20KHz
AC100V~AC240V 50Hz-60Hz
Speaker units
Design 3-way vented enclosure
Bass driver 2 x 6,5“ woofer with 1.35“ voice coil
Mid driver 2 x 3“ woofer with 0.75“ voice coil
High freq driver 1 x 1“ dome tweeter with 1“ voice coil
Coverage 100° x 80° (h x v)
Impedance 8 ohm
Frequency response 75Hz – 20KHz (-10dB)
SPL 90dB 1 W/1 m
Material black polypropylene, metal grille
Handle 1 x on the top
Pole holder 1 x on the bottom
General
Power supply 230VAC / 120VAC (switchable), 50/60Hz
Power consumption 300 watts
Dimensions System: 730 x 215 x 555 mm
Speaker: 535 x 215 x 275 mm
Mixer/amplifier unit: 730 x 215 x 360 mm
Weight System: 22.5 kg
Speaker: 8 kg
Mixer/amplifier unit: 6.5 kg
Scope of supply
Roadtrip 508 1 pc
Power cord: 1 pc
Speaker cable (5m): 2x
Disclaimer
Nowsonic has taken all possible steps to ensure that the information
given here is both correct and complete.
In no event can Nowsonic accept any liability or responsibility for any
loss or damage to the owner of the equipment, any third party, or any
equipment which may result from use of this manual or the equip-
ment which it describes.
Servicing
If you have any question or encounter technical issues with your
Roadtrip 508, please first contact your local dealer from whom you
have purchased the device.
In case servicing is required, please contact your local dealer. Other-
wise you may contact us directly. Please find our contact data on our
website under www.nowsonic.com.
NOTE: We take great care in packing the device in a well protected
box at the factory, so any shipping damage is very unlikely. Howe-
ver, should this happen please contact your supplier immediately to
report the damage. We recommend to keep the original packing ma-
terials in case you need to ship or transport the device at a later date.
Legal information
Copyright for this user manual © 2013: Nowsonic
Product features, specifications and availability are subject to change
without prior notice.
Edition v1.0, 07/2013
IMPORTANT!
MAKE SURE THAT THE VOLTAGE SELECTOR ON THE REAR IS
SET TO THE CORRECT MAINS VOLTAGE BEFORE CONNECTING
THE POWER CORDTO THE MAINS OUTLET.
IMPROPER SELECTION CAN RESULT IN DAMAGE TO THE UNIT
THAT WILL NOT BE COVERED UNDER THE WARRANTY.
Roadtrip_508_Bedienungsanleitung_DINA4_V02.indd 9 31.07.13 11:15

10
www.nowsonic.com
ROADTRIP 508
Bedienungsanleitung
DE
1) Lesen Sie diese Anleitung.
2) Bewahren Sie diese Anleitung auf.
3) Beachten Sie alle Warnungen.
4) Befolgen Sie alle Anweisungen.
5) Betreiben Sie dieses Gerät nicht in unmittelbarer Nähe von Wasser.
6) Verwenden Sie zum Reinigen des Geräts ausschließlich ein
trockenes Tuch.
7) Halten Sie die Lüftungsschlitze frei! Folgen Sie bei der Installation
den Anweisungen des Herstellers.
8) Stellen Sie das Gerät nicht in der Nähe von Heizkörpern, Wärme-
speichern, Öfen oder anderer Wärmequellen auf.
9) Kleben Sie in keinem Fall den Schutzkontakt des Steckers ab. Ein
verpolungssicherer Stecker besitzt zwei Kontakte, von denen ein
Kontakt breiter ist als der andere. Ein Schukostecker besitzt zwei
Kontakte und einen dritten Erdungskontakt. Der breitere Kontakt
des verpolungssicheren Steckers bzw. der Erdungskontakt des
Schukosteckers dient Ihrer Sicherheit. Sollte der Stecker des mitge-
lieferten Netzkabels nicht in Ihre Steckdose passen, besorgen Sie
sich im Fachhandel ein passendes Kabel.
10) Treten Sie nicht auf das Kabel, knicken Sie das Kabel nicht und
behandeln Sie Stecker und Buchsen besonders vorsichtig.
11) Verwenden Sie ausschließlich Zubehör, das
vom Hersteller für das Gerät vorgesehen ist.
12) Verwenden Sie nur Ständer, Stative oder
Tische, die den Anforderungen des Herstellers
entsprechen oder die zum Lieferumfang des Ge-
räts gehören. Seien Sie beim Transport vorsichtig, um Verletzungen
durch verrutschende oder fallende Gegenstände zu vermeiden.
13) Ziehen Sie während eines Gewitters den Netzstecker; ziehen
Sie den Netzstecker auch, wenn Sie das Gerät längere Zeit nicht
verwenden.
14) Wenden Sie sich im Service-Fall an qualifiziertes Personal. Lassen
Sie das Gerät von einem Fachmann überprüfen, wenn z.B. Netzkabel
oder -stecker beschädigt sind, wenn Flüssigkeit oder Gegenstände
in das Gehäuse gelangt sind, das Gerät Regen oder Feuchtigkeit aus-
gesetzt war, das Gerät fallen gelassen wurde, nicht ordnungsgemäß
funktioniert oder anderweitig beschädigt wurde.
WARNUNG:
Verringern Sie die Gefahr von Feuer und elektrischen Stromschlägen,
indem Sie das Gerät nicht Regen oder Feuchtigkeit aussetzen.
Stellen Sie keine Behälter mit Flüssigkeiten auf das Gerät, da diese
umkippen könnten und Wasser in das Gerät gelangen könnte.
Dieses Gerät muss geerdet sein.
Verwenden Sie ein geschirmtes Netzkabel mit drei Leitern wie das
mit dem Gerät ausgelieferte Netzkabel.
Beachten Sie, dass bei unterschiedlichen Betriebsspannungen unter-
schiedliche Netzkabel und/oder Netzstecker benötigt werden.
Beachten Sie zu jeder Zeit Ihre lokalen Sicherheitsvorschriften. Stellen
Sie sicher, dass die für die Monitore ab Werk eingestellte Werte (siehe
Aufkleber auf der Rückseite) mit Ihrer lokalen Netzspannung überein
stimmen.
Stellen Sie das Gerät in der Nähe einer Netzsteckdose auf. Die Steck-
dose sollte immer leicht zugänglich sein.
Um das Gerät völlig stromlos zu machen, ziehen Sie den Netzstecker
aus der Steckdose.
Befolgen Sie bei der Aufstellung immer alle Hinweise des Herstellers.
Betreiben Sie das Gerät nicht unter beengten Platzverhältnissen.
Öffnen Sie das Gerät nicht – Gefahr eines Stromschlags.
VORSICHT!
Beachten Sie, dass alle Änderungen oder Modifikationen am Gerät, die
nicht ausdrücklich in diesem Handbuch eingeräumt werden, Ihre Be-
rechtigung zum Betrieb dieses Gerät aufheben können.
Das aktive Lautsprechersystem Roadtrip 508 kann unter Umständen
einen Schalldruckpegel erzeugen, der zu Hörschäden führen kann.
Vermeiden Sie es, sich dauerhaft einem Schalldruckpegel von 90 dB
oder höher auszusetzen.
Wartung
Es befinden sich keine vom Anwender zu wartenden Teile im Gerät.
Lassen Sie das Gerät nur von qualifiziertem Fachpersonal reparieren.
VORSICHT: ZUM SCHUTZ VOR STROMSCHLÄGEN DARF DAS GEHÄUSE
NICHT GEÖFFNET WERDEN. ES BEFINDEN SICH KEINE VOM ANWENDER
TAIUSCHBAREN BAUTEILE IM GERÄT. WENDEN SIE SICH IM SERVICE-
FALL AN QUALIFIZIERTES FACHPERSONAL.
Warnung: Zum Schutz vor Brand oder Stromschlag darf dieses Gerät
weder Regen noch Feuchtigkeit ausgesetzt sein.
WICHTIGE SICHERHEITSHINWEISE!
Das Ausrufezeichen innerhalb eines gleichseitigen Dreiecks
soll den Anwender auf wichtige Bedienungs- sowie Service-
hinweise in den dazugehörigen Handbüchern aufmerksam
machen.
Das Blitzsymbol innerhalb eines gleichseitigen Dreiecks soll
den Anwender auf nicht isolierte Leitungen und Kontakte
im Geräteinneren hinweisen, an denen hohe Spannungen
anliegen, die im Fall einer Berührung zu lebensgefährlichen
Stromschlägen führen können.
Roadtrip_508_Bedienungsanleitung_DINA4_V02.indd 10 31.07.13 11:15

11
www.nowsonic.com ROADTRIP 508
Bedienungsanleitung
DE
Inhalt
Einleitung
Merkmale
Anwendungsbereich
Funktionen und Inbetriebnahme
Beschreibung der Eingänge
Beschreibung des Multieffektprozessors
Beschreibung der Ausgänge
Anschlussbeispiele
Wahl des AMP MODES
Spezifikationen
Lieferumfang
Haftungsausschluss
Service
Rechtliche Hinweise
Einleitung
Vielen Dank, dass Sie sich für Nowsonic Roadtrip 508 entschieden ha-
ben. Roadtrip 508 ist ein in sich geschlossenes, tragbares PA-System
mit 8 Eingangskanälen mit individueller Klangregelung, einem inter-
nen Multieffekt-Prozessor mit 16 Presets sowie einer Class-D-Endstufe
zu Betrieb der integrierten Lautsprecher. Mit seinem geringen Ge-
wicht und dem ergonomischen Design ist Roadtrip 508 die perfekte
Wahl für kleinere Beschallungsaufgaben, wo neben Qualität und Flexi-
bilität auch der mobile Aspekt eine große Rolle spielt.
Bitte nehmen Sie sich Zeit und lesen Sie diese Bedienungsanleitung
sorgfältig durch, damit Sie Roadtrip 508 richtig in Betrieb nehmen
können.
Bitte überprüfen Sie das Gerät nach dem Auspacken auf etwaige Schä-
den: Sofern Schäden am Gehäuse sichtbar sind, nehmen Sie das Ge-
rät bitte nicht in Betrieb, sondern wenden sich sofort an Ihren lokalen
Händler, bei dem Sie das Gerät gekauft haben.
Merkmale
Roadtrip 508 bietet folgende Merkmale:
3-Wege Lautsprecher-System mit integriertem Mixer
und Leistungsverstärker
Maximale Ausgangsleistung 2 x 250 Watt RMS
8 Eingangskanäle zum Direktanschluss von bis zu 7 Mikrofonen,
3 Instrumenten oder 8 Line-Quellen (7 x mono, 1 x stereo)
Stereo-Eingangskanal zum Anschluss eines iPods oder CD-Players
Monokanäle mit symmetrischen Eingängen (XLR und 6,3 mm
TRS-Klinke)
Integrierter Bluetooth-Receiver für den Funk-Empfang von Audio-
Signalen
2 Band-Equalizer pro Kanal
Phantomspeisung für alle Mikrofoneingänge schaltbar
Integrierter Multieffektprozessor mit 16 Presets
Send-Abgriff pro Kanal für einen Monitor-Ausgang
Symmetrischer Ausgang (XLR) zum Anschluss eines externen
Subwoofers
Kompaktes und Road-taugliches Gehäuse
Anwendungsbereich
Roadtrip 508 empfiehlt sich für folgende Anwendungsbereiche:
Beschallung kleinerer Konzerte als aktive FOH-Anlage
Beschallung der Bühne als aktives mehrkanaliges Monitorsystem
Kombinierter Einsatz für die aktive FOH- und Bühnen-Monitorbe-
schallung
Mischer und/oder Abhörsystem für den Proberaum oder das Üben
zuhause
Funktionen und Inbetriebnahme
Roadtrip 508 untergliedert sich in drei Bereiche:
8-in-2-Mischpult mit 7 Mono- sowie einem Stereo-Kanal und einem
internen Effektprozessor
Zweikanaliger Class D Leistungsverstärker zur Ansteuerung der
integrierten 3-Wege-Lautsprecher und/oder externer 8 Ohm Laut-
sprecher/Subwoofer
Stereophones 3-Wege-Lautsprechersystem
Roadtrip 508 ist ein in sich geschlossenes System, d. h., dass der Mixer
und der Class-D-Verstärker in einem gemeinsamen Gehäuse verbaut
sind, während die 3-Wege-Lautsprechersysteme für den Transport als
separate Module an der Vorder- und Rückseite der Mixer-/Verstärker-
einheit angebracht sind. Um Roadtrip 508 zu verwenden, müssen Sie
Lautsprechermodule zuerst abnehmen und die Mixer-/Verstärkerein-
heit verkabeln.
Gehen Sie dazu wie folgt vor:
1) Stellen Sie Roadtrip 508 auf einem festen Untergrund ab.
2) Öffnen Sie die Schnappverschlüsse, die sich auf beiden Seiten
des zentralen Tragegriffs auf der Oberfläche des Hauptmoduls
befinden: Nun können Sie die beiden Lautsprechermodule seitlich
abnehmen.
3) Falls notwendig befestigen Sie die Lautsprechermodule und/oder
die Mixer-/Verstärkereinheit auf (optional erhältlichen) Lautspre-
cherstativen: Alle Module bieten dafür auf der Unterseite genormte
Stativöffnungen (35 mm).
4) Verbinden Sie die Ausgänge LEFT/MAIN und RIGHT/MON im
Abschnitt OUTPUTS der Mixer-/Verstärkereinheit über die mitgelie-
ferten Lautsprecherkabel (5 Meter) mit den Klinkeneingängen der
Lautsprechermodule.
ANMERKUNG: Achten Sie darauf, dass die Kabel so verlegt sind, dass
weder die Künstler noch technische Mitarbeiter oder Zuschauer über
die Kabel stolpern und die Lautsprecherstative dadurch umwerfen
können.
5) Verkabeln Sie nun externe Quellen wie Mikrofone, Instrumente
und/oder Line-Geräte mit den Combo- und Stereo-Eingängen auf
der Vorderseite der Mixer-/Verstärkereinheit: Etwaige Anschlusska-
bel sind nicht im Lieferumfang enthalten.
6) Schließen Sie die Mixer-/Verstärkereinheit nun mit dem mitgeliefer-
ten Kaltgerätenetzkabel am Stromnetz an.
7) Stellen Sie sicher, dass alle Lautstärkeregler an der Mixer-/Verstärke-
reinheit vollständig heruntergezogen sind, bevor Sie Roadtrip 508
über den Netzschalter einschalten.
Roadtrip_508_Bedienungsanleitung_DINA4_V02.indd 11 31.07.13 11:15

12
www.nowsonic.com
ROADTRIP 508
Bedienungsanleitung
DE
Beschreibung der Eingänge
Roadtrip 508 verfügt über insgesamt sieben monophone Eingangska-
näle sowie über einen Stereo-Eingang. Die Mono-Kanäle sind funktional
wie folgt aufgebaut:
1) Mit dem Regler VOLUME steuern Sie das Kanalsignal in den
Ausgängen LEFT/MAIN und RIGHT MON und damit das Verhältnis
der Eingänge untereinander aus. Das Kanalsignal liegt immer an
beiden Ausgängen an.
2) Über die Regler HIGH und LOW passen Sie den Klang des Ein-
gangssignals an. Die Einsatzfrequenz für den Shelving-Filter HIGH
liegt bei 12 kHz, der Filter LOW setzt bei 80 Hz an, der Regelbereich
beträgt jeweils +/- 12 dB.
3) Mit dem Regler FX speisen Sie das Kanalsignal anteilig auf den
internen Multieffektprozessor.
4) Mit dem Regler MON VOL steuern Sie das Kanalsignal auf den Aus-
gang RIGHT/MON aus, sofern Sie im Master den AMP MODE MAIN/
MON gewählt haben.
Als Eingänge für Kanäle 1 bis 7 dienen die Combo-Buchsen im unteren
Bereich der Mixer-Oberfläche. Über die Combo-Buchsen können die
Kanäle wie folgt belegt werden:
Kanal Quelle Anschluss
1Gerät zur Audiowieder-
gabe über Bluetooth,
Mikrofon oder Line-Signal
Integrierter Bluetooth-Empfänger,
Combo-Buchse XLR oder TRS-Klinke
2 – 4 Mikrofon oder Line-Signal Combo-Buchse XLR oder TRS-Klinke
5 – 7 Mikrofon, Line-Signal
oder Instrument
Combo-Buchse XLR oder TRS-Klinke
Kanal 1 integriert einen Bluetooth-Empfänger, der für den drahtlosen
Empfang von Audiodaten von externen Geräten wie Laptops oder
Smartphones konfiguriert werden kann. Die Quellenumschaltung
zwischen Bluetooth und der Mic/Line-Buchse erfolgt über den gleich-
namigen Schalter oberhalb des VOLUME-Reglers in Kanal 1.
Über das Bedienfeld BLUETOOTH CONTROLLER können Sie die Verbin-
dung zwischen Roadtrip 508 und dem externen Gerät einrichten und
die Wiedergabefunktionen des Geräts steuern. Das Bedienfeld bietet
folgende Bedienelemente und Anzeigen:
Um das Bluetooth-Signal empfangen zu können, müssen Sie die Ver-
bindung zwischen Roadtrip 508 und dem externen Gerät über das
Bedienfeld BLUETOOTH CONTROLLER einrichten. Gehen Sie dazu wie
folgt vor:
1) Platzieren Sie das externe Bluetooth-fähige Gerät in der Nähe von
Roadtrip 508 (< 10 m).
2) Drücken und halten Sie die Taste PLAY/PAUSE für etwa 10
Sekunden gedrückt.
3) Wenn Roadtrip 508 zwei akustische Signale ausgibt, lassen Sie die
Taste los: Das externe Gerät kann Roadtrip 508 nun finden und sich
„paaren“. Wenn die Verbindung eingerichtet ist, leuchtet die LED
CONNECTED durchgehend. Sofern die Verbindung nicht eingerich-
tet werden konnte, leuchtet die LED NOT CONNECTED: In diesem
Fall wiederholen Sie den Vorgang.
Wenn Sie die Verbindung zwischen Roadtrip 508 und dem Bluetooth-
Gerät beenden möchten (um beispielsweise Roadtrip mit einem an-
deren Bluetooth-Gerät zu„paaren“), drücken Sie die Taste PLAY/PAUSE
für 3 Sekunden: Nach einem erneuten akustischen Signal wird die Ver-
bindung getrennt.
ANMERKUNG: Roadtrip 508 kann immer nur mit einem Bluetooth-
Gerät verbunden sein. Der Abstand zur Bluetooth-Quelle darf maximal
10 Meter betragen. Sofern keine Verbindung hergestellt werden kann,
verringern Sie den Abstand und versuchen Sie es erneut.
Wenn Sie Roadtrip 508 aus- und wieder einschalten, muss Roadtrip
508 keine Suche mehr durchführen, um sich mit dem Bluetooth-Gerät
zu„paaren“: Drücken und halten Sie die Taste PLAY/PAUSE
für etwa 3 Sekunden. Nach dem akustischen Signal
wird die Verbindung mit dem Bluetooth-Gerät erneut eingerichtet.
Wenn Roadtrip 508 mit dem Bluetooth-Gerät verbunden ist, können
Sie die Transportfunktionen über das Bedienfeld BLUETOOTH CONTROL
fernsteuern. Folgende Funktionen stehen zur Verfügung:
Mit der Taste PLAY/PAUSE starten und pausieren Sie die
Audiowiedergabe.
Mit der Taste VOLUME + heben Sie die Lautstärke im externen
Gerät an.
Mit der Taste VOLUME - senken Sie die Lautstärke im externen
Gerät ab.
Durch einmaliges Drücken der Taste SKIP BACK springen Sie
zum Anfang des aktuellen Songs. Drücken und halten Sie die
Taste, um zum Song-Anfang zu spulen.
Durch einmaliges Drücken der Taste SKIP FORWARD springen
Sie zum Anfang des nächsten Songs. Drücken und halten Sie die
Taste, um zum Song-Ende zu spulen.
1 2 3 4
Roadtrip_508_Bedienungsanleitung_DINA4_V02.indd 12 31.07.13 11:15

13
www.nowsonic.com ROADTRIP 508
Bedienungsanleitung
DE
Beschreibung der Eingänge
Der Kanal 8 von Roadtrip 508 kann mit einer stereophonen Line-Quel-
le angesteuert werden, die Sie wahlweise über die 3,5 mm Stereo-Mi-
niklinkenbuchse (AUX 1, z. B. für iPod o.ä.) oder an den beiden Cinch-
Buchsen (AUX 2, z. B. CD-Spieler o.ä.) anschließen. Die Umschaltung
zwischen AUX 1 und AUX 2 erfolgt über die gleichnamige Taste neben
dem VOLUME-Regler von Kanal 8.
1) Schalter AUX 1/AUX 2: Mit diesem Schalter wählen Sie die Stereo-
Miniklinkenbuchse (AUX 1) oder die Stereo-Cinch-Eingänge (AUX 2) an.
2) Mit dem Regler VOLUME steuern Sie das stereophone Kanalsignal
in den Ausgängen LEFT/MAIN und RIGHT MON aus.
3) Stereo-Miniklinkenbuchse: Hier schließen Sie eine externe Line-
Quelle (z. B. einen iPod) über ein Kabel mit 3,5 mm TRS-Miniklin-
kenstecker an.
4) Stereo-Cinch-Buchsen: Hier schließen Sie eine externe Line-Quelle
(z. B. einen CD-Spieler) über ein Kabel mit Cinch-Steckern an.
Beschreibung des Multieffektprozessors
Roadtrip 508 integriert einen Multieffektprozessor mit 16 Preset-Algo-
rithmen. Zur Auswahl stehen verschiedene Reverb-/Hall-Algorithmen
(Preset 1 bis 8), Delays (Preset 9 – 10), Flanger (Preset 11) und Chorus
(Preset 12), zwei Kombinationseffekte aus Chorus und Reverb (Preset
13 – 14), ein Effekt zur Unterdrückung der Gesangsstimme (Auslö-
schung des Mittensignals, Preset 15) sowie die Emulation eines Leslies
(Preset 16). Die Ansteuerung des gewählten Presets erfolgt pro Kanal
über den Regler FX.
1) Preset-Wahlschalter: Mit diesem Wahlschalter wählen Sie den
gewünschten Algorithmus unter den 16 Presets aus.
2) Taste FX ON/OFF: Mit dieser Taste aktivieren Sie den Ausgang
des Multieffektprozessors im Summenbus. Die zugehörige LED
leuchtet rot, wenn der Prozessor aktiv ist. In der Stellung OFF ist der
Effekt in der Summe nicht hörbar.
3) Regler FX RETURN: Mit diesem Regler steuern Sie den Effektprozes-
sor auf den Summenbus und damit im Verhältnis zu den Eingangs-
kanälen aus.
4) Regler PARAMETER: Mit diesem Regler können Sie jeweils einen
Parameter pro Algorithmus variieren.
Beschreibung der Ausgänge
In der Ausgangs-Sektion von Roadtrip 508 wählen Sie den Betriebsmo-
dus aus und steuern die interne Class-D-Leistungsendstufe auf die an-
geschlossenen Lautsprechermodule aus. Der Ausgangspegel wird auf
den zugehörigen Pegelanzeigen dargestellt. Über den BNC-Anschluss
12 Volt LAMP können Sie eine (optional erhältliche) Schwanenhalslam-
pe anschließen, um die Bedienoberfläche von Roadtrip bei ungünstigen
Lichtverhältnissen zu beleuchten.
Die Anschlüsse für die Lautsprecher befinden sich ebenso wie die Netz-
buchse und der POWER-Schalter auf der Rückseite der Mixer-/Verstär-
kereinheit. Die Verkabelungsmöglichkeiten werden im folgenden Ab-
schnitt genauer besprochen.
1) Taste LOW CUT: Mit dieser Taste aktivieren Sie einen Hochpassfilter
bei 120 Hz. Der Hochpassfilter eliminiert tieffrequente Störsignale
im Summenbus und kann die Lautsprechermodule vor Überlas-
tung schützen. Speziell im Betrieb mit Sprach- oder Gesangssigna-
len empfiehlt es sich, den Hochpassfilter zu aktivieren.
2) Schalter AMP MODE: Mit diesem Schalter wählen Sie das ge-
wünschte Routing in der Summe und schalten damit die Abgriffe
in den Kanälen um. Weitere Informationen dazu halten Sie im
nächsten Abschnitt.
3) Regler LEFT/MAIN VOLUME und RIGHT/MAIN VOLUME: Mit diesen
beiden Reglern steuern Sie den Summenbus individuell auf den
internen Class-D-Leistungsverstärker aus.
1
1
3
3
4
2
2
1
3
2
4
Roadtrip_508_Bedienungsanleitung_DINA4_V02.indd 13 31.07.13 11:15

14
www.nowsonic.com
ROADTRIP 508
Bedienungsanleitung
DE
Anschlussbeispiele
Auf der Rückseite der Mixer-/Verstärkereinheit befinden sich die Buch-
sen zum Anschluss der Lautsprechermodule, die Netzbuchse für das
mitgelieferte Netzkabel sowie der POWER-Schalter.
Über die Ausgänge PRE AMP LEFT/RIGHT können Sie das Signal im
Summenbus hinter den Reglern LEFT/MAIN VOLUME und RIGHT/
MAIN VOLUME, jedoch vor der Class-D-Endstufe abgreifen. Verwen-
den Sie diese Ausgänge, um das Summensignal von Roadtrip 508
auf einen nachfolgenden Mixer oder eine weitere PA zu speisen.
An der symmetrischen XLR-Buchse SUBWOOFER OUT können Sie
bei Bedarf einen externen aktiven Subwoofer (nicht im Lieferumfang
enthalten) anschließen. Die Aussteuerung in Bezug auf die Fullran-
ge-Lautsprecher nehmen Sie am Verstärker des Subwoofers vor.
Die Ausgänge SPEAKER OUT dienen zum Anschluss der Lautspre-
chermodule (sowie bei Bedarf weiterer Monitore) an der internen
Class-D-Endstufe. Die Belegung hängt von der Stellung des Schal-
ters AMP MODE auf der Vorderseite ab (siehe weiter unten).
ANMERKUNG: Beachten Sie, dass die Impedanz der angeschlossenen
Lautsprecher wenigstens 4 Ohm oder höher betragen muss. Bei ei-
ner Impedanz < 4 Ohm kann die interne Class-D-Endstufe beschädigt
werden und die Garantie erlischt.
Über den Sicherungshalter ersetzen Sie die Sicherung von Roadtrip
508, sofern diese durchgebrannt sein sollte. Verwenden Sie abhän-
gig von der gewählten Netzspannung in jedem Fall eine Sicherung
vom selben Typ mit den dort vermerkten Spezifikationen.
An der Netzbuchse schließen Sie das mitgelieferte Netzkabel an.
Achten Sie darauf, dass der VOLTAGE SELECTOR daneben auf die
Netzspannung in Ihrem Land eingestellt ist. Mit dem POWER-
Schalter schalten Sie Roadtrip 508 schließlich ein und aus.
ANMERKUNG: Vor dem Ein- und Ausschalten sollten Sie die Regler
LEFT/MAIN VOLUME und RIGHT/MAIN VOLUME ganz herunter ziehen,
um Schäden an den Lautsprechern durch etwaige Ein- oder Ausschal-
timpulse zu vermeiden.
Wahl des AMP MODES
Roadtrip 508 lässt sich wahlweise für die stereophone Beschallung
oder als monophone FOH-Lösung mit einem Monitorweg betreiben.
Die Auswahl erfolgt über den Schalter AMP MODE auf der Vorderseite.
AMP MODE MAIN/MAIN: In diesem Modus schließen Sie die Lautspre-
chermodule von Roadtrip an den Buchsen LEFT/MAIN und RIGHT/
MON an. Die Audiowiedergabe erfolgt stereo und wird über die Regler
LEFT/MAIN VOLUME und RIGHT/MAIN VOLUME ausgesteuert.
AMP MODE MAIN/MON: In diesem Modus schließen Sie die Lautspre-
chermodule von Roadtrip an den beiden Buchsen LEFT/MAIN an. Die
Buchsen RIGHT/MON können nun zum Anschluss zusätzlicher (nicht
im Lieferumfang enthaltener) Monitorboxen genutzt werden. Die Aus-
steuerung der monophonen FOH-Lautsprechermodule erfolgt über
den Regler LEFT/MAIN VOLUME, während Sie die Lautstärke im Moni-
torweg über den Regler RIGHT/MAIN VOLUME steuern. Die Mischung
der Eingangskanäle im Monitor nehmen Sie unabhängig von der FOH-
Lautstärke über die Regler MON VOL pro Kanal vor.
Roadtrip_508_Bedienungsanleitung_DINA4_V02.indd 14 31.07.13 11:15

15
www.nowsonic.com ROADTRIP 508
Bedienungsanleitung
DE
Spezifikationen Lieferumfang
Roadtrip 508: 1x
Netzkabel: 1x
Lautsprecherkabel (5 Meter): 2x
Haftungsausschluss
Nowsonic hat höchstmögliche Sorgfalt darauf verwendet, alle in die-
sem Handbuch enthaltenen Informationen so korrekt und vollständig
wie möglich wiederzugeben.
Nowsonic übernimmt keinerlei Haftung oder Verantwortung für Ver-
luste oder Schäden, die dem Eigentümer des Geräts, Dritten oder an
anderen Geräten durch die Informationen in diesem Handbuch oder
das darin beschriebene Gerät entstehen.
Service
Wenn Sie Probleme oder technische Fragen zu Roadtrip 508 haben,
wenden Sie sich bitte zuerst an Ihren lokalen Händler, bei dem Sie das
Gerät gekauft haben.
Bei einem Service-Fall wenden Sie sich bitte ebenfalls an Ihren lokalen
Händler. Andernfalls können Sie uns auch direkt kontaktieren. Sie fin-
den unsere Kontaktdaten auf unserer Webseite unter
www.nowsonic.com.
ANMERKUNG: Das Gerät wurde ab Werk so verpackt, dass ein ausrei-
chend hoher Schutz gegen Transportschäden besteht. Sofern es den-
noch zu einem Transportschaden gekommen sein sollte, wenden Sie
sich bitte unmittelbar an den Lieferanten, der das Gerät an Sie ausge-
liefert hat, und zeigen Sie den Schaden an. Wir möchten Ihnen emp-
fehlen, das originale Verpackungsmaterial für den Fall aufzubewahren,
das Sie das Gerät zu einem späteren Zeitpunkt verschicken müssen.
Rechtliche Hinweise
Copyright für diese Bedienungsanleitung © 2013: Nowsonic
Produktmerkmale, Spezifikationen und die Verfügbarkeit können
ohne vorherige Ankündigung geändert werden.
Ausgabe v 1.0, 07/2013
Mixer:
Mono-Kanal 7, 4 x Mic/Line, 3 x Mic/Line/Instrument
(jeweils Combo-Buchse)
Stereo-Kanal 1, LINE-Eingang (3,5 mm Mini-Klinke,
2 x Cinch)
EQ Eingangskanal HIGH: +/- 15 dB, 10 kHz,
LOW: +/- 15 dB, 100 Hz
Bluetooth Technologie zur Funkübertragung von Daten
über kurze Distanzen, Empfang der Audioda-
ten von einem Mobiltelefon, Laptop, PDA und
anderen Bluetooth-Geräten
Pre-Amp-Ausgang 2 x 6,35 mm TRS-Klinke
REC-Ausgang 2 x Cinch
AMP-Modus LEFT + RIGHT / MAIN + MONITOR
SPEAKER-Ausgang 4 x 6,3 mm TS-Klinke
Pegelanzeigen 2 x VU-Meter mit jeweils 9 LED-Segmenten
0°~40°C at 95% humidity
Verstärker-Einheit
Technologie Class D mit Schaltnetzteil
Maximale
Ausgangsleistung
2 x 250 Watt @ 4 Ohm (1 kHz, 1% THD)
Frequenzgang 20 Hz – 20 kHz
AC100V~AC240V 50Hz-60Hz
Lautsprecher-Einheiten
Bauform 3-Wege Bassreflexgehäuse
Bass-Treiber 2 x 6,5“ Woofer mit 1,35“ Schwingspule
Mitten-Treiber 2 x 3“ Woofer mit 0,75“ Schwingspule
Hochton-Treiber 1 x 1“ Hochtontreiber mit 1 “ Schwingspule
Abstrahlwinkel 100° x 80° (Horizontal x Vertikal)
Impedanz 8 Ohm
Frequenzgang 75 Hz – 20 kHz (-10 dB)
Schalldruckpegel 90 dB, 1 W 1 m
Material Schwarzes Polypropylen, Metallgitter
Tragegriff 1 x auf der Oberseite
Ständerflansch 1 x auf der Unterseite
Allgemein
Stromversorgung 230 VAC / 120 VAC (umschaltbar),
50/60 Hz
Leistungsaufnahme 300 Watt
Abmessungen System: 730 x 215 x 555 mm
Lautsprecher: 535 x 215 x 275 mm
Mixer-/Verstärkereinheit: 730 x 215 x 360 mm
Gewicht System: 22,5 kg
Lautsprecher: 8 kg
Mixer-/Verstärkereinheit: 6,5 kg
WICHTIG!
STELLEN SIE DEN VOLTAGE SELECTOR AUF DER RÜCKSEITE IN
JEDEM FALL AUF DIE KORREKTE NETZSPANNUNG EIN, BEVOR
SIE DAS NETZKABEL MIT DEM STROMNETZ VERBINDEN.
EINE UNGEEIGNETE EINSTELLUNG KANN ZU SCHÄDEN
AM GERÄT FÜHREN UND IST NICHT DURCH DIE GARANTIE
ABGEDECKT.
Roadtrip_508_Bedienungsanleitung_DINA4_V02.indd 15 31.07.13 11:15

16
www.nowsonic.com
ROADTRIP 508
Mode d‘emploi
FR
1) Lisez ces indications.
2) Conservez ces indications.
3) Respectez tous les avertissements.
4) Suivez toutes les instructions.
5) N‘utilisez pas cet appareil avec de l‘eau à proximité.
6) Nettoyez-le uniquement avec un chiffon sec.
7) N‘obstruez aucune ouverture de ventilation ! Installez-le conformé-
ment aux instructions du fabricant.
8) N‘installez pas l‘appareil près de radiateurs, bouches de chauffage,
poêles ou autres sources de chaleur.
9) Ne neutralisez jamais la broche de terre. Une fiche polarisée possè-
de deux broches, l‘une plus large que l‘autre. Une fiche de terre a
deux broches identiques et une troisième broche pour la mise à la
terre. La broche plus large de la fiche polarisée ou la troisième bro-
che de la fiche de terre servent à votre sécurité. Si la fiche du câble
d‘alimentation fourni n‘entre pas dans votre prise, procurez-vous
un câble approprié chez un revendeur spécialisé.
10) Évitez de marcher sur le cordon d‘alimentation et de le plier, et
soyez particulièrement délicat avec les fiches et les prises.
11) N‘utilisez que des accessoires conçus pour l‘appareil par le
fabricant.
12) Utilisez-le uniquement avec un support,
trépied ou table répondant aux spécifications du
fabricant ou fourni avec l‘appareil. Soyez prudent
lors du transport pour éviter toute blessure due
au glissement à ou la chute d‘objets.
13) Débranchez le cordon d‘alimentation en cas d‘orage ou de non
utilisation prolongée.
14) Confiez toute réparation à des techniciens de maintenance quali-
fiés. Faites-le vérifier par un technicien, par exemple si le cordon ou
la fiche d‘alimentation est endommagé, si du liquide a été renversé
sur l‘appareil ou si des objets sont tombés dedans, si l‘appareil a
été exposé à la pluie ou à l‘humidité, s‘il ne fonctionne pas norma-
lement, ou s‘il est endommagé.
AVERTISSEMENT:
Réduisez le risque d‘incendie ou d‘électrocution en n‘exposant pas le
produit à la pluie ni à l‘humidité.
Ne placez pas d‘objet rempli de liquide sur l‘appareil, car il pourrait se
renverser et le liquide pénétrer dans l‘appareil.
Cet appareil doit être mis à la terre.
Utilisez un câble d‘alimentation blindé à trois conducteurs comme
celui fourni avec l‘appareil.
Notez qu‘en fonction de la tension d‘alimentation nécessaire, les cor-
dons et/ou fiches d‘alimentation nécessaires sont différents.
Respectez toujours les réglementations de sécurité locales.
Placez l‘appareil à proximité d‘une prise de courant. La prise doit tou-
jours être facilement accessible.
Pour totalement isoler l‘appareil du secteur, débranchez le cordon
d‘alimentation de la prise.
Suivez toujours toutes les instructions du fabricant pour l‘installation.
Ne faites pas fonctionner l‘appareil dans un espace confiné.
N‘ouvrez pas l‘appareil – Risque d‘électrocution.
ATTENTION!
Notez que tous les changements ou modifications apportés à l‘appareil
qui ne sont pas expressément indiqués dans le présent mode d‘emploi
peuvent annuler votre droit à utiliser cet appareil.
La sonorisation Roadtrip 508 est capable de produire un niveau de pres-
sion sonore qui peut endommager votre audition. Évitez l‘exposition
prolongée à un niveau de pression sonore de 90 dB ou plus.
Entretien
Aucune pièce de l‘appareil n‘est réparable par l‘utilisateur.
Confiez toute réparation à un technicien qualifié.
CAUTION: POUR ÉVITER TOUT CHOC ÉLECTRIQUE, NE PAS OUVRIR LE
BOÎTIER. AUCUN COMPOSANT DE L‘APPAREIL N‘EST REMPLAÇABLE PAR
L‘UTILISATEUR. CONFIEZ TOUTE RÉPARATION À DES TECHNICIENS DE
MAINTENANCE QUALIFIÉS.
Avertissement : pour se protéger d‘un incendie ou d‘une électrocuti-
on, cet appareil ne doit pas être exposé à la pluie ni à l‘humidité.
DIRECTIVES DE SÉCURITÉ IMPORTANTES
Le point d‘exclamation dans un triangle équilatéral sert à pré-
venir l‘utilisateur de la présence d‘instructions importantes de
fonctionnement et de maintenance (entretien) dans les docu-
ments accompagnant l‘appareil.
Le symbole d‘éclair à tête de flèche dans un triangle équila-
téral sert à prévenir l‘utilisateur de la présence dans l‘enceinte
du produit d‘une tension dangereuse non isolée d‘une gran-
deur suffisante pour constituer un risque d‘électrocution pour
les personnes.
Roadtrip_508_Bedienungsanleitung_DINA4_V02.indd 16 31.07.13 11:15

17
www.nowsonic.com ROADTRIP 508
Mode d‘emploi
FR
Sommaire
Introduction
Caractéristiques
Domaine d‘application
Fonctions et mise en service
Description des entrées
Description du processeur multi-effet
Description des sorties
Exemples de branchement
Choix du mode d‘amplification (AMP MODE)
Caractéristiques techniques
Contenu
Clause de non responsabilité
Maintenance
Mentions légales
Introduction
Merci beaucoup d‘avoir choisi le Roadtrip 508 Nowsonic. Le Roadtrip 508
est un système de sonorisation autonome et portable avec 8 canaux
d‘entrée à réglages individuels de tonalité, un processeur multi-effet
interne à 16 préréglages et un amplificateur de classe D pour le fonc-
tionnement des enceintes intégrées. Grâce à son faible poids et à son
design ergonomique, le Roadtrip 508 est le choix idéal pour les petites
applications de sonorisation dans lesquelles l‘aspect mobile joue un rôle
majeur en plus de la qualité et la flexibilité.
Veuillez prendre le temps de lire attentivement ce mode d‘emploi afin
de pouvoir assurer une mise en service correcte du Roadtrip 508.
Veuillez contrôler tout éventuel dommage de l‘appareil au déballage : si
le boîtier présente des dommages visibles, ne mettez pas l‘appareil en
service mais contactez immédiatement le revendeur chez qui vous avez
acheté l‘appareil.
Caractéristiques
Le Roadtrip 508 offre les caractéristiques suivantes:
Enceintes 3 __voies avec table de mixage et amplificateur de puis-
sance intégrés
Puissance de sortie maximale 2 x 250 watts RMS
8 canaux d‘entrée pour la connexion directe d‘un maximum de
sept micros, 3 instruments ou 8 sources de niveau ligne (7 canaux
mono, 1 canal stéréo)
Canal d‘entrée stéréo pour brancher un iPod ou un lecteur de CD
Canaux mono à entrées symétriques (XLR et jack 6,35 mm TRS)
Récepteur Bluetooth intégré pour la réception sans fil de signaux
audio
Égaliseur 2 bandes par canal
Alimentation fantôme commutable sur toutes les entrées micro
Processeur multi-effets intégré avec 16 présélections
Départ d‘écoute de contrôle par canal pour une sortie vers des
retours de scène
Sortie symétrique (XLR) pour le branchement d‘un caisson de
graves externe
Boîtier compact et adapté aux déplacements
Domaine d‘application
Le Roadtrip 508 est recommandé pour les applications suivantes:
Sonorisation active de façade pour petits concerts
Système actif de retour multicanal pour la scène
Utilisation combinée comme sonorisation active de façade et de
retour de scène
Table de mixage et/ou système d‘écoute de contrôle pour salle de
répétition ou la pratique à la maison
Fonctions et mise en service
Le Roadtrip 508 comprend trois sections :
Table de mixage 8 entrées/2 sorties avec 7 canaux mono et un stéréo
ainsi qu‘un processeur d‘effets interne
Amplificateur de puissance deux canaux de classe D pour piloter les
enceintes intégrées à 3 voies et/ou un caisson de graves/enceinte 8
ohms externe
Système stéréo à enceintes 3 voies
Le Roadtrip 508 est un système intégré, c‘est-à-dire que la table de
mixage et l‘amplificateur de classe D se trouvent dans un boîtier com-
mun, tandis que les enceintes 3 voies sont des modules séparés fixés
pour le transport à l‘avant et à l‘arrière de l‘unité console/amplificateur.
Pour utiliser le RoadTrip 508, vous devez d‘abord retirer les modules
d‘enceintes et brancher l‘unité console/amplificateur.
Procédez comme suit :
1) Installez le Roadtrip 508 sur une base solide.
2) Ouvrez les attaches qui se trouvent des deux côtés de la poignée
centrale de transport au-dessus du module principal : maintenant,
vous pouvez retirer les deux modules latéraux qui constituent les
enceintes.
3) Si nécessaire, montez les enceintes et/ou l‘unité console/ampli-
ficateur sur des pieds d‘enceinte (en option) : tous les modules
disposent en face inférieure d‘une embase standardisée (35 mm).
4) Reliez les sorties LEFT/MAIN et RIGHT/MON de la section OUTPUTS
(sorties) à la prise jack d‘entrée des enceintes au moyen du câble
d‘enceinte fourni (5 mètres).
REMARQUE : assurez-vous que les câbles sont disposés de manière à
ce qu‘aucun artiste, technicien ou spectateur ne se prenne les pieds
dedans et que les pieds d‘enceinte ne soient pas renversés.
5) Branchez maintenant les sources externes comme les micropho-
nes, instruments et/ou appareils de niveau ligne aux entrées mixtes
et stéréo en face avant de l‘unité console/amplificateur : tous les
câbles de connexion ne sont pas fournis.
6)Branchez ensuite l‘unité console/amplificateur à la prise électrique
avec le cordon d‘alimentation CEI fourni.
7)Assurez-vous que toutes les commandes de volume sont au mini-
mum sur l‘unité console/amplificateur avant d‘allumer le Roadtrip
508 au moyen de son interrupteur d‘alimentation.
Roadtrip_508_Bedienungsanleitung_DINA4_V02.indd 17 31.07.13 11:15

18
www.nowsonic.com
ROADTRIP 508
Mode d‘emploi
FR
Description des entrées
Le Roadtrip 508 dispose d‘un total de sept canaux d‘entrée monopho-
niques et d‘une entrée stéréo. Les canaux mono ont les fonctionnalités
suivantes :
1) Avec la commande Volume, vous contrôlez le niveau du signal du
canal dans les sorties gauche (LEFT/MAIN) et droite (RIGHT MON)
et donc la balance entre les entrées. Le signal de canal est toujours
envoyé aux deux sorties.
2) Avec les commandes HIGH (aigus) et LOW (graves), ajustez le son
du signal d‘entrée. La fréquence d‘action du filtre en plateau HIGH
est à 12 kHz, le filtre LOW intervient à 80 Hz, la plage de réglage
étant dans les deux cas de +/-12 dB.
3) Avec la commande FX, vous réglez la quantité de signal du canal
qui est envoyée au processeur multi-effet interne.
4) Avec la commande MON VOL, vous envoyez le signal du canal à
la sortie RIGHT/MON, si vous avez choisi le mode d‘ampli (AMP
MODE) MAIN/MON dans la section Master.
Les prises mixtes XLR/jack en bas de la table de mixage sont les ent-
rées pour les canaux 1 à 7. Les canaux peuvent être assignés comme
suit aux prises mixtes :
Canal Source Connexion
1Dispositif de lecture
audio via Bluetooth,
microphone ou signal de
niveau ligne
Récepteur Bluetooth intégré, XLR ou
jack TRS (prise mixte)
2 – 4 Microphone ou signal de
niveau ligne
XLR ou jack TRS (prise mixte)
5 – 7 Microphone, signal de ni-
veau ligne ou instrument
XLR ou jack TRS (prise mixte)
Le canal 1 intègre un récepteur Bluetooth, qui peut être configuré
pour la réception sans fil de données audio venant de périphériques
externes tels que des ordinateurs portables ou des smartphones. Le
choix de la source entre Bluetooth et prise micro/ligne (Mic/Line) se
fait par le sélecteur ainsi nommé au-dessus de la commande VOLUME
du canal 1.
Avec le panneau de commande BLUETOOTH CONTROLLER, vous pou-
vez établir la connexion entre le Roadtrip 508 et le périphérique exter-
ne, et contrôler les fonctions de lecture du périphérique. Le panneau
de commande offre les commandes et indicateurs suivants :
Pour recevoir le signal Bluetooth, vous devez établir la connexion ent-
re le Roadtrip 508 et le périphérique externe via le panneau de com-
mande BLUETOOTH CONTROLLER. Procédez comme suit :
1) Placez le périphérique externe compatible Bluetooth près du
Roadtrip 508 (<10 m).
2) Maintenez la touche LECTURE/PAUSE pressée pendant envi-
ron 10 secondes.
3) 3. Quand le Roadtrip 508 bipe deux fois, lâchez la touche : le
périphérique externe peut maintenant trouver le Roadtrip 508 et «
s‘appairer ». Lorsque la connexion est établie, le voyant CONNEC-
TED s‘allume fixement. Si la connexion ne peut être établie, le voy-
ant NOT CONNECTED s‘allume : dans ce cas, répétez la procédure.
Si vous voulez mettre fin à la connexion entre le Roadtrip 508 et le
périphérique Bluetooth (par exemple, pour « appairer » le Roadtrip
avec un autre périphérique Bluetooth), pressez la touche LECTURE/
PAUSE pendant 3 secondes : après un autre bip sonore, la liaison sera
coupée.
REMARQUE : le Roadtrip 508 ne peut être connecté qu‘à un péri-
phérique Bluetooth à la fois. La distance de la source Bluetooth ne
doit pas dépasser 10 mètres. Si aucune connexion ne peut être établie,
réduisez la distance et essayez de nouveau.
Lorsque vous éteignez puis rallumez le Roadtrip 508, il n‘a plus à effec-
tuer de recherche pour « s‘appairer » avec le périphérique Bluetooth
: Maintenez la touche PLAY/PAUSE fpressée pendant
environ 3 secondes.
Après le bip sonore, la connexion avec le périphérique Bluetooth est
rétablie.
Quand le Roadtrip 508 est appairé avec l‘appareil Bluetooth, vous pou-
vez contrôler les fonctions de transport via le panneau de commande
BLUETOOTH CONTROL. Les fonctions suivantes sont disponibles :
Avec la touche LECTURE/PAUSE, lancez la lecture audio et
mettez-la en pause.
Avec la touche VOLUME +, montez le volume de l‘appareil externe
Avec la toucheVOLUME –, baissez le volume de l‘appareil externe.
En appuyant une fois sur la touche de retour, vous sautez au
début du morceau en cours. Maintenez cette touche pressée
pour reculer vers le début du morceau.
En appuyant une fois sur la touche d‘avance, vous sautez au dé-
but du morceau suivant. Maintenez cette touche pressée pour
avancer vers la fin du morceau.
1 2 3 4
Roadtrip_508_Bedienungsanleitung_DINA4_V02.indd 18 31.07.13 11:15

19
www.nowsonic.com ROADTRIP 508
Mode d‘emploi
FR
Description des entrées
Le canal 8 du Roadtrip 508 peut recevoir une source stéréophonique
de niveau ligne, que vous branchez au choix au mini-jack 3,5 mm sté-
réo (AUX 1, par exemple pour un iPod ou équivalent) ou aux deux
prises RCA (AUX 2, par exemple pour un lecteur de CD ou équivalent).
Le choix entre AUX 1 et AUX 2 se fait avec le sélecteur de même nom
à côté de la commande VOLUME du canal 8.
1) Sélecteur AUX 1/AUX 2 : avec ce sélecteur, vous choisissez l‘entrée sur
mini-jack stéréo (AUX 1) ou sur prises RCA stéréo (AUX 2).
2) Avec la commande VOLUME, vous contrôlez le niveau du signal du
canal stéréophonique dans les sorties gauche (LEFT/MAIN) et droite
(RIGHT MON).
3) Prise mini-jack stéréo : ici, vous branchez une source externe de niveau
ligne (par exemple un iPod) au moyen d‘un câble à fiche mini-jack 3,5
mm TRS.
4) Prise RCA stéréo : ici, vous branchez une source externe de niveau ligne
(par exemple un lecteur de CD) au moyen d‘un câble à fiches RCA.
Description du processeur multi-effet
Le Roadtrip 508 intègre un processeur multi-effet avec 16 algorithmes
préréglés. Différents algorithmes sont disponibles pour des effets de
réverbération (Presets 1 à 8), retards (Presets 9 – 10), flanger (Preset 11)
et chorus (Preset 12), deux combinaison d‘effets chorus et réverbéra-
tion (Presets 13 – 14), un effet de suppression de la voix (effacement
du signal central, Preset 15) et l‘émulation d‘une cabine Leslie (Preset
16). Le contrôle du niveau de Preset sélectionné se fait par canal avec
la commande FX.
1) Sélecteur de Preset : avec ce sélecteur, choisissez l‘algorithme
souhaité parmi les 16 Presets.
2) Touche FX ON/OFF : avec cette touche, activez la sortie du proces-
seur multi-effet dans le bus de sommation. Le voyant correspon-
dant est rouge lorsque le processeur est activé. En position OFF,
l‘effet n‘est pas audible dans le signal de sommation.
3) Commande FX RETURN : avec cette commande, commandez le
retour du processeur d‘effet dans le bus de sommation et donc la
balance avec les canaux d‘entrée.
4) Commande PARAMETER : avec cette commande, vous pouvez
modifier un paramètre pour chaque algorithme.
Description des sorties
Dans la section Sorties du Roadtrip 508, vous sélectionnez le mode de
fonctionnement et contrôlez l‘étage de puissance interne de classe D pour
les enceintes connectées. Le niveau de sortie est affiché sur les indicateurs
de niveau associés. Vous pouvez brancher une lampe col de cygne (en
option) au connecteur BNC 12 V LAMP pour éclairer l‘interface utilisateur
du Roadtrip en cas de mauvaises conditions d‘éclairage.
Les prises pour les enceintes sont situées, comme la prise d‘alimentation
et l‘interrupteur d‘alimentation POWER, à l‘arrière de l‘unité console/amp-
lificateur. Les options de câblage sont détaillées dans la section suivante.
1) Touche LOW CUT : appuyez sur cette touche pour activer un filtre
passe-haut à 120 Hz. Le filtre passe-haut élimine les bruits de basse
fréquence dans le bus de sommation stéréo et peut protéger les
enceintes d‘une surcharge. Il est particulièrement recommandé
d‘activer le filtre passe-haut sur la voix, pour les paroles comme
pour le chant.
2) Sélecteur AMP MODE : avec ce sélecteur, choisissez le routage
souhaité dans le bus de sommation, changeant ainsi ce qui est pris
dans les canaux. Pour plus d‘informations, voyez la section suivante.
3) Commandes LEFT/MAIN VOLUME et RIGHT/MAIN VOLUME : avec
ces deux commandes, contrôlez individuellement le volume des
deux côtés du bus de sommation stéréo dans l‘amplificateur de
puissance interne de classe D.
1
1
3
3
4
2
2
1
3
2
4
Roadtrip_508_Bedienungsanleitung_DINA4_V02.indd 19 31.07.13 11:15

20
www.nowsonic.com
ROADTRIP 508
Mode d‘emploi
FR
Exemples de branchement
À l‘arrière de l‘unité console/amplificateur se trouvent les prises ser-
vant à connecter les enceintes, la prise électrique pour le cordon
d‘alimentation fourni ainsi que l‘interrupteur d‘alimentation.
Avec les sorties de préampli PRE AMP LEFT/RIGHT, vous pouvez
prendre le signal dans le bus de sommation stéréo après les com-
mandes LEFT/MAIN VOLUME et RIGHT/MAIN VOLUME, mais avant
l‘étage d‘amplification de classe D. Utilisez ces sorties pour envoyer le
signal de sommation du Roadtrip 508 à un mélangeur placé en aval
ou à une autre sonorisation.
À la prise XLR symétrique SUBWOOFER OUT, vous pouvez brancher si
besoin est un caisson de graves actif externe (non fourni). Réglez sur
son propre amplificateur le volume du caisson de graves par rapport
aux enceintes large bande.
Les sorties SPEAKER OUT permettent de brancher les modules
d‘enceintes (de même, si besoin est, que d‘autres moniteurs) à
l‘amplificateur interne de classe D. Leur affectation dépend de la posi-
tion du sélecteur AMP MODE sur le panneau avant (voir ci-dessous).
REMARQUE : sachez que l‘impédance des enceintes connectées doit
être d‘au moins 4 ohms. Avec une impédance inférieure à 4 ohms,
l‘amplificateur interne de classe D peut être endommagé et la garan-
tie invalidée.
Dans le porte-fusible, remplacez le fusible du Roadtrip 508 s‘il a grillé.
Utilisez toujours en fonction de la tension du secteur choisie un
fusible du même type ayant les spécifications indiquées.
Branchez le câble d‘alimentation fourni à la prise d‘alimentation.
Assurez-vous que le sélecteur de tension VOLTAGE SELECTOR est
bien réglé sur la tension du réseau électrique de votre pays. Utilisez
l‘interrupteur d‘alimentation POWER pour allumer et éteindre le
Roadtrip 508.
REMARQUE: avant d‘allumer et d‘éteindre, baissez au minimum les
commandes de volume LEFT/MAIN VOLUME et RIGHT/MAIN VOLUME
pour éviter aux enceintes des dommages causés par les pics de mise
sous ou hors tension.
Choix du mode d‘amplification (AMP MODE)
Le Roadtrip 508 peut aussi bien fonctionner comme sonorisation
stéréophonique que comme sonorisation de façade monophonique
avec retour de scène. Le choix se fait avec le sélecteur AMP MODE en
face avant.
AMP MODE MAIN/MAIN: dans ce mode, connectez les enceintes
Roadtrip aux prises LEFT/MAIN et RIGHT/MON. La reproduction audio
se fait en stéréo, et sera contrôlée par les commandes LEFT/MAIN VO-
LUME et RIGHT/MAIN VOLUME.
AMP MODE MAIN/MON: dans ce mode, connectez les enceintes Roadt-
rip aux deux prises LEFT/MAIN. Les prises RIGHT/MON peuvent désor-
mais servir à connecter des enceintes de retour (moniteurs) supplé-
mentaires (non fournies). Le volume des enceintes monophoniques
de façade se règle avec la commande LEFT/MAIN VOLUME, tandis que
vous contrôlez le volume des retours avec la commande RIGHT/MAIN
VOLUME. Le mixage des canaux d‘entrée dans les retours de scène se
fait indépendamment du volume envoyé en façade à l‘aide de la com-
mande MON VOL de chaque canal.
Roadtrip_508_Bedienungsanleitung_DINA4_V02.indd 20 31.07.13 11:15

21
www.nowsonic.com ROADTRIP 508
Mode d‘emploi
FR
Caractéristiques techniques Contenu
Roadtrip 508 : 1
Câble d‘alimentation : 1
Câble d‘enceinte (5 mètres) : 2
Clause de non responsabilité
Nowsonic a veillé avec le plus grand soin à ce que toutes les infor-
mations contenues dans ce mode d‘emploi soient aussi précises et
complètes que possible.
Nowsonic n‘assume aucune responsabilité en cas de perte ou dom-
mage, subi par le propriétaire de l‘appareil, par d‘autres appareils ou
par des tiers, découlant des informations contenues dans ce mode
d‘emploi ou du matériel décrit ici.
Maintenance
Si vous avez des questions ou des problèmes techniques concernant
le Roadtrip 508, veuillez d‘abord contacter le revendeur chez qui vous
avez acheté l‘appareil.
Pour toute réparation, veuillez également contacter votre revendeur.
Si cela n‘est pas possible, vous pouvez aussi nous contacter directe-
ment. Nos coordonnées se trouvent sur notre site Web
www.nowsonic.com.
REMARQUE: l‘appareil a été emballé à l‘usine de façon à assurer un
niveau de protection suffisamment élevé contre les dommages dus
à l‘expédition. S‘il a néanmoins été endommagé pendant le transport,
veuillez contacter directement le vendeur qui vous a livré l‘appareil
et lui indiquer les dommages. Nous vous recommandons de con-
server les emballages d‘origine au cas où vous auriez besoin un jour
d‘expédier l‘appareil.
Mentions légales
Ce mode d‘emploi est sous copyright © 2013 : Nowsonic
Les fonctionnalités, caractéristiques techniques et disponibilité du
produit peuvent être modifiées sans préavis.
Édition v1.0, 07/2013
Table de mixage :
Canal mono 7 ; 4 de niveau micro/ligne, 3 de niveau
micro/ligne/instrument (tous sur prise mixte
XLR/jack)
Canal stéréo 1, entrée de niveau ligne (mini-jack 3,5 mm, 2
prises RCA)
Égaliseur de canal d'entrée HIGH : +/-15 dB, 10 kHz, LOW : +/-15 dB, 100 Hz
Bluetooth Technologie pour la transmission de données
sans fil sur de courtes distances, la réception
des données audio à partir d'un téléphone
mobile, ordinateur portable, assistant person-
nel (PDA) et d'autres appareils Bluetooth
Sorties de préampli 2 prises jack 6,35 mm 3 points (TRS)
Sorties d'enregistrement 2 prises RCA
Mode d'ampli Gauche + Droite/Façade + Retours de scène
Sorties pour enceintes 4 prises jack 6,35 mm 2 points (TS)
Indicateurs de niveau 2 VU-mètres avec chacun 9 segments à DEL
0°~40°C at 95% humidity
Unité d'amplification
Technologie Classe D avec alimentation à découpage
Puissance de sortie maxi-
male
2 x 250 watts sous 4 ohms (1 kHz, DHT 1 %)
Réponse en fréquence 20 Hz – 20 kHz
AC100V~AC240V 50Hz-60Hz
Enceintes
Type Enceintes 3 voies bass-reflex
Haut-parleur de graves 2 woofers de 16,5 cm avec bobine acoustique
de 34 mm
Haut-parleur de médiums 2 woofers de 7,6 cm avec bobine acoustique
de 19 mm
Haut-parleur d'aigus 1 moteur de compression HF de 25 mm avec
bobine acoustique de 25 mm
Angle de diffusion 100° x 80° (horizontal x vertical)
Impédance 8 ohms
Réponse en fréquence 75 Hz – 30 kHz (-10 dB)
SPL max. 90 dB 1w/1 m
Matériau Polypropylène noir, treillis métallique
Poignée 1 sur le dessus
Surface de pose 1 sur le dessous
Générales
Alimentation électrique CA 230 V/CA 120 V (commutable), 50/60 Hz
Puissance consommée 300 watts
Dimensions Système : 730 x 215 x 555 mm
Hautparleur : 535 x 215 x 275 mm
Unité console/amplificateur :
730 x 215 x 360 mm
Poids Système : 22,5 kg
Hautparleur : 8 kg
Unité console/amplificateur : 6,5 kg
IMPORTANT !
AVANT DE BRANCHER LE CORDON D‘ALIMENTATION AU
SECTEUR, VÉRIFIEZ TOUJOURS QUE LE SÉLECTEUR VOLTAGE
SELECTOR EST RÉGLÉ SUR LA TENSION CORRECTE.
UN MAUVAIS RÉGLAGE PEUT CAUSER À L‘APPAREIL DES
DOMMAGES QUI NE SONT PAS COUVERTS PAR LA GARANTIE.
Roadtrip_508_Bedienungsanleitung_DINA4_V02.indd 21 31.07.13 11:15
Table of contents
Languages:
Other Nowsonic Speakers manuals
Popular Speakers manuals by other brands

WorkPro
WorkPro CSR-208 user manual

Kruger&Matz
Kruger&Matz DISCOVERY XL owner's manual

Silvercrest
Silvercrest SLB 1.2 D2 operating instructions

dB Technologies
dB Technologies CROMO 8+ Brochure & specs

IMG STAGE LINE
IMG STAGE LINE MIRA-1/1 instruction manual

Silvercrest
Silvercrest SBLS 20 A1 operating instructions