Noztek Pro User manual

© Noztek.com 2018. All rights reserved.
1

© Noztek.com 2018. All rights reserved.
Warranty / Safety 3
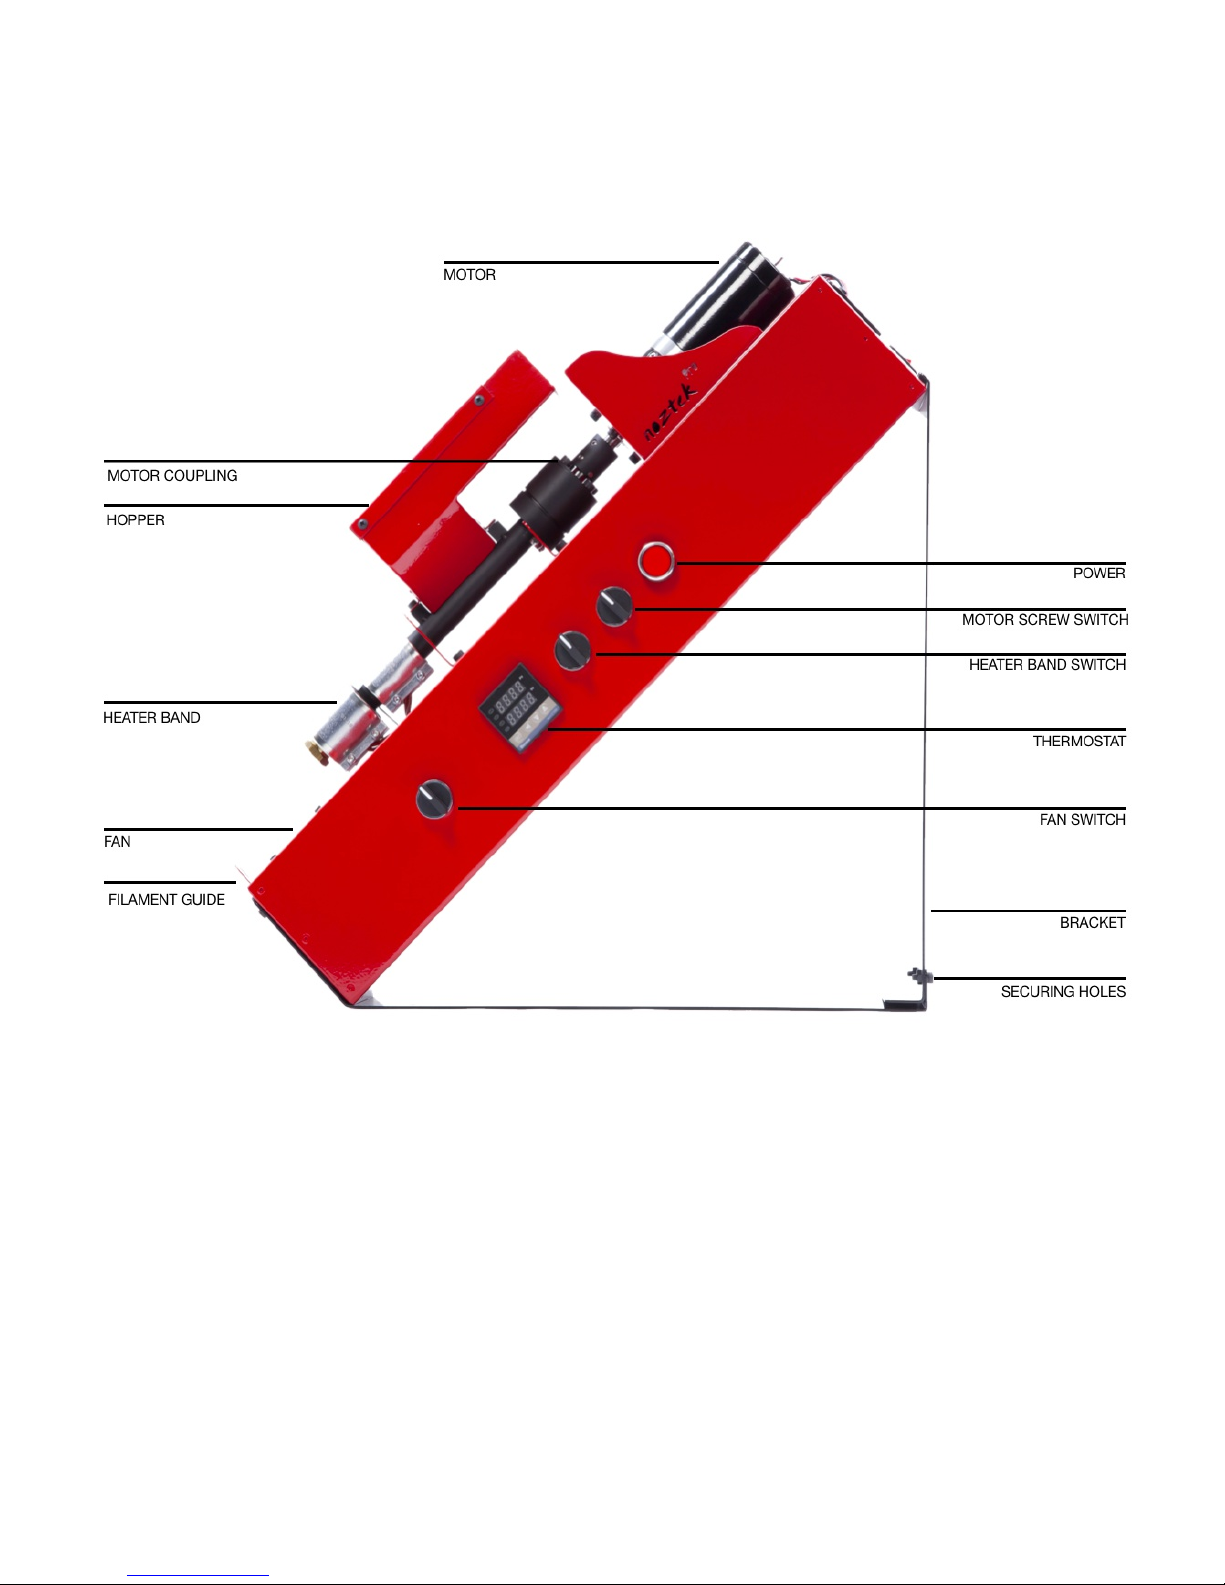
Diagram / Introduction 4
Quick-start Guide / Power Switch / Bracket
Operation Guide 6
Changing the nozzle/Colour mixing/Maintenance/Lubrication/Barrel Jam 7
Contact Noztek 8
2

© Noztek.com 2018. All rights reserved.
WARRANTY
• Equipment manufactured by Noztek carries the standard machine tool guarantee of freedom
from defects in workmanship and material for one year from date of shipment.
• TO INSURE THAT YOUR WARRANTY IS HELD IN EFFECT, PROPER OPERATION PROCE-
DURES MUST BE OBSERVED.
• NOTE: READ THE SAFETY PRECAUTIONS BEFORE OPERATING THIS MACHINE.
SAFETY
1. Know your equipment
2. Carefully read the instruction manual.
3. Learn the use and limitations of the equipment.
• DO NOT operate or use this equipment for any purpose other than its intended use.
• DO NOT modify this equipment.
• DO NOT perform adjustments or maintenance while system is operating or energize
• Do not clean the equipment with flammable solvents.
• Do not wash down the equipment with water. This could cause an electrical hazard.
• Do not probe into extruder vent with the machine running. Never Use a metal probe in the vent
area. The screw may shear the probe, causing extensive damage to the barrel and screw. A
wooden probe is recommended.
• A face shield, insulated gloves, etc. should be worn around the extruder during operation.
They must be worn when adjusting the die, cleaning the screw, etc. The extruder temperatures
are extremely hot.
• The feed hopper must be installed on the extruder feed section at all times when in operation
• Never put hands in the feed section or vent to remove material.
• Do not switch on the motor until the recommended temperature has been reached
3
© Noztek.com 2018. All rights reserved.
INTRODUCTION
The Noztek desktop extruder has been designed to produce high quality ABS and PLA filament
for use with 3D printers. For best results we recommend using extrusion grade polymer pellets.
4

© Noztek.com 2018. All rights reserved.
QUICK START GUIDE
First attach the hopper; the bolts are located in the bolt holes in the barrel. Then attach the 4
degree bracket (if using). There are six bolts, two for either end and two which connect the
bracket together.
Before you turn on the motor, switch on the heater element, let it reach your desired temperature
then wait 1 minutes for the barrel, screw and nozzle to thoroughly heat up. (DO NOT SWITCH
ON THE SCREW UNTIL THE DESIRED TEMPERATURE HAS BEEN REACHED AND MAIN-
TAINED FOR AT LEAST 1 MINUTES). Add your pellets, then turn on the motor, pull the fila-
ment through the guide and switch on the fan. Switch on the heater (middle switch) and you will
see the temperature gauge lower LED, above this is the current temperature.
To change the temperature setting, press the set button and use the up/down buttons to adjust
the temperature, then press the set button again.
POWER SWITCH
Your Noztek Pro features an illuminated on/off switch. In an emergency simply push the button
and the Noztek Pro will completely switch off.
BRACKET
If you are using the 4 degree bracket it is very important that the extruder is secured to a work-
bench using the mounting holes in the bottom of the bracket.
5

© Noztek.com 2018. All rights reserved.
OPERATION GUIDE
·Remove the unit from the packaging
·If you are using the 4 degree bracket, secure the extruder to a bench using the mount-
ing holes.
·Plug the extruder into mains power.
·Switch on the heater element and adjust the temperature gauge to the desired setting.
For ABS we recommend between 180 – 200 degrees Celsius and PLA between 16 -17 c. To
adjust the heat setting press the set key once, the temperature LED will then flash, then the click
up or down key to adjust. When you reach the desire temperature click the set button to engage.
Let the extruder barrel heat fully, this should take about 1 minutes.
·Once the required temperature has been reached, fill the hopper with resin pellets.
·Switch on the screw motor (Do not switch on the motor until the recommended tempera-
ture has been reached).
·Switch on the fan
·After a few minutes you will see plastic filament starting to extrude, carefully feed this
through the guide. This filament will be hot so use heat resistant gloves
·Extrude approximately m of filament, switch off the motor, cut off the excess material
then restart the motor. This should help to eliminate any air bubbles and metal particles in the
system.
·Adjusting the temperature also affects the tolerance of the filament. The higher the tem-
perature, the thinner the filament. The lower the temperature, the thicker the filament. Make
these adjustments in degree celsius increments.
·If the extruder is left unattended for any period of time we recommend using a mains
timer switch.
6

© Noztek.com 2018. All rights reserved.
CHANGING THE NOZZLE
Before attempting this operation please use insulated gloves. To switch between nozzle sizes to
heat up the unit to17 c. Unscrew the nozzle, clean off any excess plastic from the internal
threads, then screw on new nozzle.
COLOUR MIXING
Adding colours is simple. Mix the natural and the colorant at the given ratio, then pour it into the
hopper. It will take 10-20 minutes to see changes in the colour. It is also possible to mix col-
orants to create new colours. For example, mix blue and yellow make green.
MAINTENTANCE
Regular cleaning of your plastic extrusion tooling during the disassembly process lengthens tool-
ing life, helps reduce waste and helps maintain tighter tolerances for your final product. Use a
wire brush and fine metal pick to clean the threads and the screw assembly
LUBRICATION
The thrust bearing assembly will require occasional lubrication; this is a relatively simple opera-
tion, simply unscrew the brass grease nipple and squirt a 2 second burst of a lubricant like
WD40 Lithium Grease. For optimal performance we recommend this procedure is carried out ev-
ery 100 hours of operation.
BARREL JAM
Depending on what type of resin you are using, you may experience a barrel jam. If at any time
during extrusion the motor starts to labour and slow right down then you should switch off the
motor immediately. A good way to free the jam is to turn the temperature up to say 230-240c and
leave this for 1 – 20 minutes, then switch on the motor again; this should allow the screw to ro-
tate again. Also using a blow torch to heat the barrel just past the hopper will usually release any
solidified plastic and free the screw.
7

© Noztek.com 2018. All rights reserved.
CONTACT NOZTEK
Please see our FAQ help section on our website at www.noztek.com for further troubleshooting.
If the answer to your quey is not found here, please contact the Noztek expert team directly.
Noztek Ltd
Unit C3 Dolphin Industrial Estate Evershed Way, Shoreham by Sea West
Sussex
BN43 6QB ENGLAND
44 (0) 203 384 6208
www.noztek.com
8
Table of contents


