n+ Mercedes-Benz Formula E Team User manual

Riding your bike is only
a few steps away.
For your convenience, your n+ Mercedes-Benz Formula E Team E Bike
is delivered to you mostly assembled.
This User Manual contains a few steps in completing the assembly of
your bike. Make sure you read your User Manual prior to commencing
assembly and riding.
If you need support with assembly, please scan the below QR code for
our global service centres or head to nplusbikes.com to search for a
centre near you.
Make sure you read your n+Mercedes-Benz EQ eBike User Manual
prior to commencing assembly and riding.
For peace of mind, your n+ Mercedes-Benz EQ eBike comes with a 5
year frame warranty, and 2 year warranty on parts. You can nd your
warranty outline in section 6.
WARNING: This warranty does not cover incorrect assembly or installation of parts.
To nd a recommended service centre near you, please head to nplusbikes.com, or
alternatively a local reputable bike shop.
Search to scan for a servicing centre near you.
2

Powering your ride
n+EQ Power Pack Battery Life Indicator Enviolo Mid-Drive Motor for ecient riding and
50/50 weight distribution
Intelligent Sensor intuitively reads
your pedal power and matches it with
seamless power distribution
3

Setting up your bike
Make sure you read your n+Mercedes-Benz EQ eBike
User Manual prior to commencing assembly and
riding.
For peace of mind, your n+ Mercedes-Benz EQ eBike
comes with a 5 year frame warranty, and 2 year
warranty on parts. You can nd your warranty outline
in section 6.
WARNING: This warranty does not cover incorrect assembly
or installation of parts. To nd a recommended service centre
near you, please head to nplusbikes.com, or alternatively a local
reputable bike shop.
1/ Your n+ Formula E Team eBike
2/ Assembly
3/ Comfort features
3.1 Saddle and seat adjustment
3.2 Handlebar adjustment
3.3 Other modications
4/ Riding your bike
4.1 Pedal powered assist mode
4.2 Pedal mode
4.3 Gradient selector
5/ Safety & disclaimer
5.1 Safe riding
5.2 Dierent riding conditions
5.3 Disclaimer
5.4 Liabilities
6/ Warranties
7/ Warnings
9
9
9
10
10
10
11
11
12
12
13
14
2.1 Unboxing your bike
2.2 Turning the power o
2.3 Front Wheel
2.4 Handlebars
2.5 Pedals
2.6 Saddle seat
2.7 Reectors
2.8 Inating tires
2.9 Checking brake calipers
2.10 Charging your n+EQ Power Pack
5
6
6
6
6
7
7
7
8
8
8
4

1. Saddle/Seat
2. Seatpost Support
3. Power Button
4. Stem Cap
5. Handlebars
6. Head Tube
7. Front Brake Disc
8. Brake Caliper
9. Pedals
10. Motor
11. Chain Stay
12. Kick Stand
13. n+EQ Power Charging Point
14. Seat Stay
15. n+EQ Power Pack Removal Clip*
16. Seatpost (also n+EQ Power Pack)
*please note some models have a tab located on the battery instead of a battery removal clip
1/ Your n+ Formula E Team eBike
Brake Lever Gradient Selector
Cockpit
1
2
3
4
5
6
7
8
9
10
11
12
13
14
1516
L
R
1/ Your n+ Formula E Team eBike
5

2/ Assembly
2/ Assembly
To maintain safety, compliance and warranty
requirements it is recommended to have this bike
assembled by a skilled bicycle mechanic.
2.1 Unboxing your bike
a. With the box standing up lengthways, use a small
knife to safely cut the tape. Be careful not to cut
into the box itself.
b. Gently li your bike by its frame or wheels.
c. Remove the 2 x small parts boxes containing:
• n+EQ Power Pack charging adaptor & chord.
• 15mm combination spanner.
• 3 way hex key (4, 5, 6mm hex key).
• Additional User Manuals.
• Pedals.
• Reectors.
d. Gently remove the packaging around your bike by
hand.
2.2 Power
Check your bike is not on (you will nd the power
button underneath the top tube of the bike). A dimming
red ashing light indicates the bike is o.
2.3 Front wheel
The front wheel is installed to the front forks with two
(2) 15mm nuts and two washers.
a. Loosen the nuts on both sides of the wheel so you
have approximately 15mm clearance on either
side.
b. Remove the front brake insert from the brake
caliper. Be very careful not to squeeze the brake
levers while doing this.
c. Carefully li the front of the bike (this is best
done with your legs either side of the frame facing
forwards), and guide your wheel (brake disc facing
out on the same side as your kick stand) onto your
front fork so that the axle grooves align with the
end of the grooves in the forks.
d. Check that your brake disc sits comfortably within
the brake caliper pads and there is room for the
wheel to spin freely.
e. Ensure the nut and washer remain on the outside
of the forks before tightening. Alternate sides as
you increase the torque on both axle nuts so that
they are being tightened equally. Check the wheel
is still centred before moving on to the right side.
f. Use the spanner to tighten both sides to 45 Nm.
g. Now fold down the bike stand, the bike should now
rest on the stand.
2.4 Handlebars
The handlebars are installed onto the stem with the
handlebar stem clamp.
a. Remove the four (4) M5 hex bolts (using the 4mm
hex tool) on the front hex plate of the handlebar
stem.
6

b. Gently li the handlebars and untwist and unwind
any crossed cables and wires.
c. Position the handlebars against the hex plate and
tighten the bolts, keeping the stem in line with the
front wheel.
d. Check that the gaps in the hex plate are even
between the top and bottom as you are tightening.
Once the handlebars are installed the fork stem clamp
will need to be aligned and tightened.
e. Orientate the handlebar stem perpendicular to the
front wheel, remove the rubber grommet inside the
head tube cap bolt and lightly tighten.
f. Tighten the four (4) bolts xing the stem cap to the
vertical tube.
g. Ensure the forks still rotate smoothly but without
any play in the forks in a forwards and backwards
direction, then replace the rubber grommet.
h. Check the handlebars are positioned correctly
then tighten the two (2) M5 screws (with the
4mm hex tool) to 5-7 Nm torque.
i. Check your brake levers and grips are secure
and if loose, tighten bolts and screws using the
supplied tool set.
2.5 Pedals
Pedals are in their own small separate box. Pedals are
side dependent so that the right-hand pedal tightens
in a clockwise direction and the le-hand pedal
tightens in an anti-clockwise direction.
a. You will notice your pedals have printed symbols on
them. L = le pedal and R = right pedal.
b. The le pedal goes onto the le side (same side as
the kick stand). Grab the included wrench spinning
in an anti clockwise direction to tighten.
c. Now x the right pedal to the crank, spinning the
wrench in a clockwise direction.
d. Tighten the pedals to 30 Nm torque.
2.6 Saddle/Seat
a. Loosen the cam lock by ipping the lever and
unscrewing and slide onto the seat post.
b. Straighten the saddle so it is in line with the top
tube.
c. Then screw to tighten the cam lock so the seat is
secure and will not move around while riding.
2.7 Adding reectors
Reectors should be mounted on the bike in order to
comply with bicycle and rider safety laws.
a. Find the white reector in your accessories box,
loosening the screw, x to the handlebars using a
Phillips head screwdriver.
b. Install the red reector to the rear of the bike on
the right or le seat stay, xing it to higher up so
it is positioned near the bottom of the seat post
(refer to same method as step (a).
2/ Assembly
7

2.8 Inating tires
a. Remove the cap from the tire valve, twist the tire
valve and inate using a pump with Presta valve
attachment (recommended 70-80psi, minimum
65psi, maximum 85psi).
b. Tighten the tire valve, and place the cap back on.
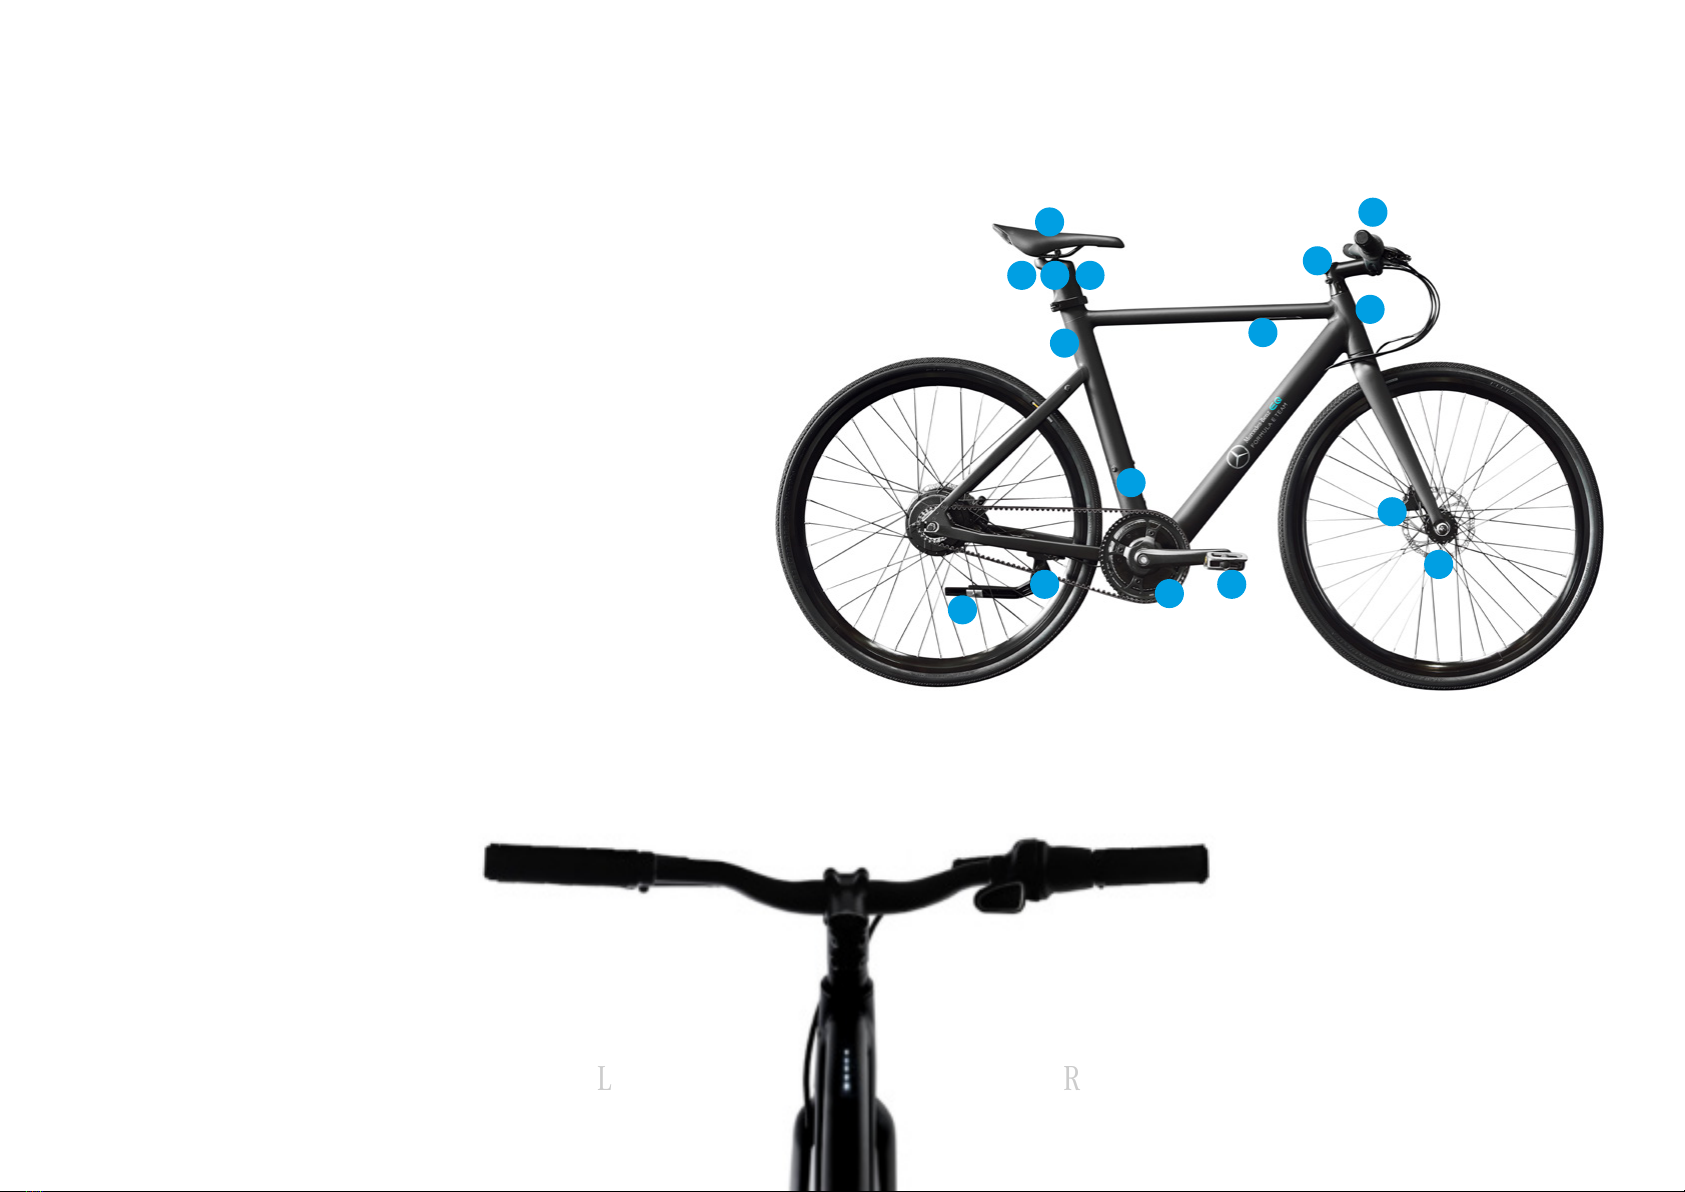
2.9 Check brake calipers
a. Spin your front wheel to ensure it is rolling
smoothly. If there is too much tension (resulting in a
slow/tight turn) you can loosen the two (2) x 5mm
caliper bolts, then squeeze the brake lever into
alignment (right brake lever on your handlebars)
before tightening the bolts again.
2.10 Charging your n+ Mercedes EQ
bike
Your electric bike comes shipped at approximately
20% charge and your bike must be charged before
rst use. Your battery sits securely and seamlessly in
your seatpost.
Your battery range is 60km, however this can vary due
to wind/weather conditions, riding terrain and rider’s
style/weight.
You have two (2) charge options:
1. Connecting your charger directly to your bike: To
charge, simply connect your n+EQ Power Adaptor
into a powerpoint then connect to the charging
point (you can nd this in the seat post down the
bottom of the tube. Refer to YOUR BIKE diagram at
the start of this manual).
2. Removing your battery and using the charging
adaptor. To charge, remove seat post support
by ipping the cam lock and wriggling the saddle
up in a vertical direction. Once the seat post has
been removed you can pull the tab on the top of
the battery to release it from the seatpost (please
note some earlier model allocations have a battery
removal clip axed to the saddle rails for easy
battery removal). Once you have completed the
charge and are ready to ride, place the battery back
into position, lining the pins up inside the seatpost.
You do not need to remove your battery for charging.
When the battery is charging the RED charging light
will be on, when the battery has been fully charged the
light will change to GREEN.
Battery care: Please do not leave your battery on
charge for extended periods of time, as this can
reduce its life cycle. It is also recommended that you
replace your battery aer 500 charge cycles.
Powering on and off: Your n+ Mercedes-Benz EQ
eBike comes with a master ON/OFF Switch located
underneath the battery indicator panel on the frame.
To turn on, simply press the button once (the button
will be ush against the frame).When the bike is not
being used, it is best to turn the switch to the OFF
position which can be activated by pressing the
button once.
n+ Power Pack lndicator: The battery indicator will
display a fraction of the remaining battery life via
the ve LED lights mounted on the frame. When the
battery is low the last light will ash and change RED to
indicate the battery is low and needs to be recharged.
2/ Assembly
8

3.1 Adjusting your saddle & seat position
Small changes in saddle position can have a substantial
eect on performance and comfort. To nd your best
saddle position, make only one adjustment at a time.
Forward and back adjustment: The saddle can
be adjusted forward or back to help you achieve a
customised t for your position on the bike. Ask your
dealer to set the saddle for your optimal riding position
and to show you how to make this adjustment. If you
choose to make your own front and back adjustment,
make sure that the clamp mechanism is clamping on
the straight part of the saddle rails and is not touching
the curved part of the rails, and that you are using the
recommended torque on the clamping fastener(s).
Saddle angle adjustment: This can be adjusted to
suit your comfort. Although standard positioning is
horizontal; some riders like the saddle nose angled
up or down just a little. Your dealer can adjust saddle
angle or teach you how to do it. If you choose to make
your own saddle angle adjustment, make sure that the
clamp mechanism is clamping on the straight part of
the saddle rails and is not touching the curved part
of the rails, and that you are using the recommended
torque on the clamping fastener(s).
To adjust the seat forward (shorter reach) or so it is
further back (for an extended reach).
a. Remove the seat and seatpost support (ipping
and unscrewing the cam lock and removing the
seat unit).
b. Loosen the M6 mounting screw underneath the
saddle using the 5mm hex tool.
c. Loosen the 2nd screw securing the seatpost
support to the saddle slightly so there is a little
tension, being careful not to lose the bottom seat
retainer during this process.
d. Adjust your seat to the preferable position, then
reinstall the seat and seatpost support using the
screws.
e. Twist and secure the cam lock.
3.2 Adjusting your handlebars
You can adjust your handlebars to suit your riding
style by loosening the hex plate bolts slightly, sitting
on your bike and adjusting the angles and position to
suit you.
a. Loosen the four (4) bolts slightly in the hex plate
keeping a slight tension on the screws so the
handlebars stay attached.
b. Angle the bars to a comfortable position.
c. Tighten the bolts in a cross hatch pattern
(diagonally) to secure.
3.3 Other modications for comfort
The angle of the brake and shi control levers and
their position on the handlebars can be changed to
suit. Ask your dealer to make the adjustments for
you. If you choose to make your own control lever
angle adjustment, be sure to re-tighten the clamp
fasteners to the recommended torque as outlined in
the Appendix of this manual.
3/ Comfort features
3/ Comfort features
9

Riding your n+ Mercedes EQ Team Bike
Your bike can be operated in two (2) modes: Pedal
assist or pedal only.
You can also adjust the gradient or assist level by
using the gradient selector located on the handlebar.
4.1 Pedal powered assist mode
Make sure your bike power is turned ON. Aer 2
revolutions your bike will start to “assist you”. Your
bike is equipped with pedal assist torque sensing
technology that senses the torque / power input and
seamlessly matches it with electric motor assistance.
As you pedal harder, the power-assist performs faster.
You will notice when you reduce your pedalling eorts,
the power assistance behaves accordingly.
4.2 Pedal mode
To ride as an ordinary bike, simply switch the
power button to OFF position. Do not remove any
componentry to ride your bike in ordinary unassisted
mode as this can damage your bike and motor.
4.3 Gradient selector
If you are riding hills/increasing gradients you can
adjust the controls on your handlebar.
To ride your bike
• Ensure your bike is charged.
• Turn your bike’s power on.
• Select gradient (please note when your bike is
stationary you will only be able to select 60% of the
available range.) Once you start pedalling, you will
be able to select a higher or lower range.
• Start pedalling and aer 2 revolutions your bike’s
power assist mode will commence.
• Select the appropriate gradient level.
Troubleshooting
• If your motor does not “assist” you aer 2
revolutions:
• Check battery is fully charged (lights).
• Check that the cylindrical (1 centimetre) silver
sensor on your rear wheel spokes is lined up
with the sensing unit attached to your rear
chain stay.
• You can test this by turning on your bike, and
rolling your bike forward and backwards with
your hands placed on the saddle (please do not
touch the pedals). A red light should come on
indicating that the sensor is activated.
4/ Riding your bike
4/ Riding your bike
10

5.1 Safe riding
First journey: For your rst ride select an environment
free from hazards or distractions. Riding an eBike
is dierent to a standard bicycle and requires that
you be familiar with the power on/o switch, torque
sensing and assist, gears and braking.
Rules and regulations: Always abide by the road
rules and respect other road and path users. Your
n+ Mercedes-Benz Formula E Team E Bike is
manufactured to have a maximum assisted powered
speed of 25 km/ph. (32km/h for select countries).
Check your state and local laws for eBike laws and
statutes.
Ride at an appropriate speed in accordance with the
terrain, the conditions, local regulations and your
abilities. Please ensure you are wearing adequate
protection including a compliant helmet.
Headphones and technology: Do not ride with
headphones or while operating a mobile phone.
Lights: Always ride with operational and adequate
lights and that they are not obscured or covered.
Minors: This bike is not intended for minors in
accordance with local eBike regulations. If you are
a parent or guardian, you are responsible for the
activities and safety of your child/dependent, and that
includes making sure that the bicycle is properly tted
to the child, that it is in good repair and safe operating
condition, that you and your child have learned and
understand the safe operation of the bicycle, and
that you and your child have learned, understand
and obey not only the applicable local motor vehicle,
bicycle and trac laws, but also the common sense
rules of safe and responsible bicycling. You should
read this manual, as well as review its warnings and
the bicycle’s functions and operating procedures with
your child, before letting your child ride the bicycle.
5.2 Dierent riding conditions
Your bike is designed for pavement and gravel roads.
Wet weather impairs traction, braking and visibility,
both for the bicyclist and for other vehicles sharing the
road. The risk of an accident is dramatically increased
in wet conditions.
Under wet conditions, the stopping power of your
brakes (as well as the brakes of other vehicles sharing
the road) is dramatically reduced and your tires do
not grip as eectively. This makes it harder to control
speed and easier to lose control. To make sure that
you can slow down and stop safely, ride with caution
and apply your brakes earlier and more gradually than
you would under normal, dry conditions.
Although the motor is protected, DO NOT ride your
eBike through deep water, which could damage the
motor, battery, or motor controller. Do not expose
the battery to extended periods of wet or hot
temperature/weather when not riding. Make eorts
to protect electrical connections from excess water.
Do not wash your eBike with water; only use a dry or
damp cloth to clean the frame and parts.
5/ Safety & disclaimer
11

5.3 Disclaimer
There are risks associated in riding a bicycle which
cannot be predicted or avoided. To the maximum extent
permitted by law, N Plus Holdings Pty Ltd (trading as
n+ bikes) and its associates, limit any liability for any
loss caused by use of the bike or any products listed in
this manual. It is the owners responsibility to ensure
you are riding a bike compliant within your location
and jurisdiction. For details of the full legal terms
between you as customer and n+ bikes please see:
https://nplusbikes.com/pages/terms-of-service.
5.4 Liability
1. Our liability for negligence, other than for gross
negligence, shall be limited to the maximum extent
permitted at law.
2. We shall not be liable (on whatever legal grounds)
for damages which may not reasonably be foreseen,
considering the type of the relevant Order and
Goods and assuming normal use of the Goods. The
foregoing limitations of liability shall not apply in
cases of wilful misconduct or gross negligence.
3. Except as specied by consumer laws, damage
claims of the Consumer based on obvious defects
of the Goods are excluded, unless the Consumer
reports the defect within 14 days aer the delivery
of the Goods.
4. Whilst every eort has been made to ensure the
information contained within this user manual
is correct, n+ bikes makes no warranty as the
accuracy, comprehensiveness, or correctness of
any material, and provides all material on an “as
is” basis.
n + bikes, including our partners, directors, ocers,
shareholders, employees, agents, contractors, and
other third parties associated with running the
Website, to the maximum extent permitted by law,
disclaim all liability and responsibility for any loss or
damage that might be suered by you or any third
party caused by the Website or the Goods sold on it
including, without limitation, loss or damage suered
as a result of negligence.
5/ Safety & disclaimer
12

For peace of mind, your n+ Mercedes-Benz EQ eBike
comes with a 5 year frame warranty, and 2 year
warranty on parts.
Your warranty does not cover incorrect assembly or
installation of parts. To nd a recommended service
centre near you, please head to nplusbikes.com, or
alternatively a local reputable bike shop with the
necessary technical support for your requirements.
Warranty Part** Warranty/
Guarantee Period*
Alloy Frame 5 years
Carbon Frame 3 years
Forks 2 years
Wheel rims/hubs 2 years
Bars/ stems/ seatposts/ seat clamp 2 years
Brake levers/ calipers/ cranks*** 2 years
Batteries/ controllers/ motors 2 years
Headset 2 years
Exclusions
The above warranty, or any implied warranty, does not
cover:
• Normal wear and tear on parts such as
tires, chains, brakes, motor, cables, gears
and wheels in situations where there are no
assembly or material defects.
• Bicycles serviced by other than a qualied
bicycle service centre.
• Additional costs of transport, duties, and
assembly/disassembly.
• *** All parts not specically above mentioned
are subject to wear or are consumables and
are not covered by warranty including tires,
spokes, bearings, brake pads, chains, belts,
sprockets, bottom brackets, painted surfaces,
saddles, handlebar tape, rubber inserts,
bolts, threads, sliding bearing surfaces, non-
rechargeable batteries, and pedals.
• If a bike has had any modications from the
original condition.
• Third party components such as SRAM,
Enviolo, Gates and Shimano (please refer to
their manufacturer warranties).
• Use of the bicycle for abnormal, competitive
and/or commercial activities or for the
purposes other than those for which the eBike
was designed.
• Damage caused by failing to follow the n+ user
manual, guides and website information.
• Paint nish and decal damage resulting from
taking apart in competitions, jumping, downhill
and/or training for such activities or events or
because of exposing the bike to, or riding the
bike in, severe conditions or climates.
6/ Warranties
6/ Warranties
13

• WARNING: Do not modify, tamper or interfere with
any electronics as this will void your warranty and
result in serious accidents or death.
• WARNING: Do not interfere with any componentry
including levers as this can result in malfunction
and injury or death.
• WARNING: Failure to wear a helmet whilst riding
can result in serious injury or death.
• WARNING: Do not put your hands near the discs
or wheels while they are rotating or directly aer
braking as this can injure or maim.
• WARNING: Reectors are not a substitute for
required lights. Riding at dawn, at dusk, at night or
at other times of poor visibility without an adequate
bicycle lighting system and without reectors is
dangerous and may result in serious injury or death.
• WARNING: Do not remove the front or rear reectors
or reector brackets from your bicycle. They are
an integral part of the bicycle’s safety system.
Removing the reectors reduces your visibility to
others using the roadway. Being struck by other
vehicles may result in serious injury ordeath.
• WARNING: Failure to conrm compatibility, properly
install, operate, and maintain any component or
accessory can result in serious injury or death.
• WARNING: This bike is not intended for minors
in accordance with local eBike regulations. If you
are a parent or guardian, you are responsible for
the activities and safety of your child/dependent,
and that includes making sure that the bicycle
is properly tted to the child, that it is in good
repair and safe operating condition, that you and
your child have learned and understand the safe
operation of the bicycle, and that you and your
child have learned, understand and obey not only
the applicable local motor vehicle, bicycle and
trac laws, but also the common sense rules of
safe and responsible bicycling. You should read
this manual, as well as review its warnings and
the bicycle’s functions and operating procedures
with your child, before letting your child ride
the bicycle.
• WARNING: Changing the components on your bike
with other than genuine replacement parts may
compromise the safety of your bicycle and may
void the warranty. Check with your dealer before
changing the components on your bike.
• WARNING: If your bicycle does not t properly, you
may lose control and fall.
• WARNING: Aer any saddle adjustment, be sure
that the saddle adjusting mechanism is properly
seated and tightened before riding. A loose saddle
clamp or seat post clamp can cause damage to the
seat post or can cause you to lose control and fall.
A correctly tightened saddle adjusting mechanism
will allow no saddle movement in any direction.
Periodically check to make sure that the saddle
adjusting mechanism is properly tightened.
• WARNING: If your saddle causes you pain,
numbness, or other discomfort,stop riding until
you see your dealer about saddle adjustment or a
dierent saddle.
• WARNING: Be aware that adding aerodynamic
extensions to handlebars will change the steering
and braking response of the bicycle.
7/ Warnings
7/ Warnings
14

• WARNING: Always tighten fasteners to the correct
torque. Bolts that are too tight can stretch and
deform. Bolts that are too loose can move and
fatigue. Either mistake can lead to failure of the
bolt, causing you to lose control and fall.
• WARNING: An insuciently tightened stem clamp
bolt, handlebar clamp bolt or bar end extension
clamping bolt may compromise steering action,
which could cause you to lose control and fall.
Place the front wheel of the bicycle between your
legs and attempt to twist the handlebar/stem
assembly. If you can twist the stem in relation to
the front wheel, turn the handlebars in relation to
the stem, or turn the bar end extensions in relation
to the handlebar, the bolts are insuciently
tightened.
• WARNING: Do not expose your battery to high
temperatures. Do not leave or charge your eBike
battery outside, in a car or inside a garage if it is hot
out. Heat is by far the largest factor when it comes
to reducing lithium-ion battery and exposure to
heat can cause injury.
• WARNING: Riding with improperly adjusted brakes
or worn brake pads is dangerous and can result in
serious injury or death.
• WARNING: Wet weather impairs traction, braking
and visibility, both for the bicyclist and for other
vehicles sharing the road. The risk of an accident is
dramatically increased in wet conditions.
• WARNING: Never inate a tire beyond the maximum
pressure marked on the tire’s sidewall or the wheel
rim. If the maximum pressure rating for the wheel
rim is lower than the maximum pressure shown on
the tire, always use the lower rating. Exceeding the
recommended maximum pressure may blow the
tire o the rim or damage the wheel rim, which
could cause damage to the bike and injury to the
rider and bystanders. The best and safest way to
inate a bicycle tire to the correct pressure is with
a bicycle pump which has a built-in pressure gauge.
• WARNING: Applying brakes too hard or too
suddenly can lock up a wheel, which could cause
you to lose control and fall. Sudden or excessive
application of the front brake may pitch the rider
over the handlebars, which may result in serious
injury or death.
• WARNING: Correct tightening force on fasteners –
nuts, bolts, screws – on your bicycle is important.
Too little force, and the fastener may not hold
securely. Too much force, and the fastener can
strip threads, stretch, deform, or break.
• WARNING: Riding with an improperly tightened
seat post can allow the saddle to turn or move and
cause you to lose control and fall.
• CAUTION: Be careful not to damage the disc,
calliper or brake pads when re-inserting the disc
into the calliper. Never activate a disc brake’s
control lever unless the disc is correctly inserted
in the calliper.
• WARNING: If you can fully close the cam lever
without wrapping your ngers around the seat post
or a frame tube for leverage, and the lever does
not leave a clear imprint in the palm of your hand,
the tension is insucient. Open the lever; turn the
tension adjusting nut clockwise a quarter turn;
then try again.
7/ Warnings
15

Appendix A: Parts Torque Specications
Pedals 30 Nm
Rear wheel nut tension 50 Nm
Front wheel nut tension 45 Nm
Crank bolts 40.3 Nm
Front + rear brake calliper 6-8 Nm
Control clamp 4 Nm
Brakes 4-5 Nm
Shier 3-4 Nm
Brake disc 9 Nm
Calliper mount 6-8 Nm
Disc mounting bolts (6 M5 bolts) 4 Nm
16
Table of contents