NRS APPROACH 100 User manual

Thank you for purchasing an Approach raft, purpose-built for adventure anglers.
APPROACH 100
RAFT
- (1) Approach 100 Raft
(1) Approach 100 Dropstitch Floor
(2) Floor Straps
- (1) NRS Super 2 HP Pump
- (1) Repair Kit
- (1) Owner’s Manual
STANDARD FRAME
1. (2) Slot Rail
2. (1) 34” Approach Foot Bar w/ (2) T-Slot Nuts + (2) 3/4” Bolts + (2) Washers
2.1 Intermediate Pulley
3. (1) Dry Box + (4) 5/8” Bolts + (4) T-Slot Nuts + (4) 1-1/4” Washers (large)
4. (2) Straight Rod Tube
5. (2) Bow Rod Tube Bracket + (2) 3/4”Bolts + (2) T-Slot Nuts + (2) Washers + (2) Screws
6. (2) Stern Rod Tube Combo Bracket + (2) 3/4” Bolts + (2) T-Slot Nuts + (2) Screws + (2) Washers
7. (4) Frame Coupler
8. (2) Stern Rod Tube
9. (1) Anchor Tube - Right + (1) U-Bolt + (2) Nuts + (2) Washers
9.1 (1) Pulley Bracket
10. (1) Anchor Tube - Left + (1) U-Bolt + (2) Nuts + (2) Washers
10.1 (1) Anchor Eye Bolt
11. (1) Motor Mount + (2) Mounting Plates + (1) Connector Plate + (2) 1-1/2” Screws
12. (1) Oar Mount w/ SpinLock + (2) 3/4”Bolts + (2) T-Slot Nuts + (2) Washers
13. (1) Oar Mount + (2) 3/4”Bolts + (2) T-Slot Nuts + (2) Washers
14. (2) NRS Atomic Oar Locks + Springs + Washers + Split Ring
15. (40‘) 3/8“ Anchor Rope
16. (4) 1” NRS Straps - 3’ Length
17. (1) 1“ NRS Strap - 4’
TOOLS REQUIRED
- Socket Wrench
- 1/2” Socket (included on provided NRS Frame Tool)
- 3/8” Socket
- #3 Phillips Screwdriver
- Tape Measure
Scan this code to find video
assembly instructions as
well as added tips how-tos.
APPROACH ASSEMBLY INSTRUCTIONS
14
16 16
7
89
7
15
17
3
5
16
7
7
9
8
1
1
2
2.1
4
6
6
8
9.1
10.1
10
11 15
13 12
5
4

ASSEMBLY INSTRUCTIONS
NOTE: A tube of Thread Lock has been included for assembly purposes.
Thread Lock can be applied to any bolt or screw to prevent unwanted
loosening over time.
1. Position Slot Rails
a. Place the (2) Slot Rails centered on top of the straight tube section
on each side of the raft.
2. Attach 34” Foot Bar
a. Slide a T-Slot Nut into the slots of each of the Slot Rails
approximately 2” from the front end.
b. Place the Foot Bar on top of the Slot Rails with the fitting thru
holes and T-Slot Nuts aligning, and the bent bar dipping toward
the raft floor.
i. The rectangular boss on the Slot Pro fittings should fit into the
slot on the side rails.
c. Attach the Foot Bar to the Side Rails with 3/4” bolts and washers
and tighten with 1/2” socket wrench.
i. COMPLETELY tighten bolts. The Foot Bar should be located the
same distance from the front of each Side Rail.
3. Attach Bow Rod Tube Brackets
a. Slide a T-Slot Nut into the slots at the front of each Slot Rail.
b. Place the Bow Rod Tube Brackets on each at the front of each
Slot Rail.
c. Align the T-Slot Nuts in each side rail with the Rod Tube Bracket
thru holes.
d. Attach the Rod Tube Brackets to the Side Rails with (2) 3/4” bolts
and (2) washers and a 1/2” socket wrench.
DO NOT completely tighten.
4. Attach Dry Box
a. Slide (4) T-Slot Nuts into each of the slots at the back of each Slot
Rail (8 total – 4 each side).
i. Position (2) T-Slot Nuts in each Slot Rail forward towards the
Foot Bar.
ii. Position (2) T-Slot Nuts in each Slot Rail towards the center of
the Slot Rail.
b. Place the Dry Box on top of the Slot Rails at the center.
c. Align the back (2) T-Slot Nuts in each side rail with the Dry Box
thru holes.
d. Attach the Dry Box to the Side Rails with (4) 5/8” bolts and (4)
1-1/4” large washers and a 1/2” socket wrench.
DO NOT completely tighten.
5. Attach Oar Mount with SpinLock
a. Place the Oar Mount w/Spin on the Slot Rail – Right
approximately 10” to 12” in front of the Dry Box.
b. Align the (2) T-Slot Nuts in the side rail (in front of the Dry Box)
with the Oar Mount thru holes.
c. Attach the Oar Mount to the Side Rail with (2) 3/4” bolts and (2)
washers and a 1/2” socket wrench. DO NOT completely tighten.
6. Attach Oar Mount
a. Place the Oar Mount on the Slot Rail – Left approximately 10” to
12” in front of the Dry Box (the two Oar Mounts should be aligned
across on the Slot Rails).
b. Align the (2) T-Slot Nuts in the side rail (in front of the Dry Box)
with the Oar Mount thru holes.
c. Attach the Oar Mount to the Side Rail with (2) 3/4” bolts and (2)
washers and a 1/2” socket wrench. DO NOT completely tighten.
7. Attach Stern Rod Tube Combo Brackets
a. Slide (1) T-Slot Nut into each slot at the back of each Slot Rail (2
total – 1 each side).
b. Place the Stern Rod Tube Combo Brackets one each at the back
of the Slot Rail.
c. Align the T-Slot Nuts in each side rail with the Rod Tube Combo
Bracket thru holes.
d. Attach the Rod Tube Combo Brackets to the Side Rails with (2)
3/4” bolts and (2) washers and a 1/2” socket wrench. DO NOT
completely tighten.
8. Attach Straight Rod Tubes
a. Place the Straight Rod Tubes one each on top of the Slot Rails.
b. Align the Straight Rod Tube thru holes with the thru holes in the
Rod Tube Brackets.
c. Attach the Straight Rod Tubes to the Brackets with 1/2” screws
and a #3 Philips screwdriver.
i. COMPLETELY tighten screws.
9. Tighten all bolts on Side Rail components
a. Firmly secure all components attached to the Side Rail by
tightening-down all assembly bolts.
10. Attach Bow Rod Tubes
a. Slip (1) Frame Coupler over the front of each Straight Rod Tube.
b. Attach the (2) Bow Rod Tubes by slipping the Frame Coupler half-
way onto the tube.
i. Use the Frame Coupler window to make sure the Bow Rod
Tube and Straight Rod Tube connect at the center of the Frame
Coupler. DO NOT completely tighten.
c. Slip (1) Frame Coupler over the front end of a Bow Rod Tube.
d. Connect the (2) Bow Rod Tube ends by slipping the Frame
Coupler half-way onto each tube.

i. Use the Frame Coupler window to make sure the Bow Rod
Tubes are centered in the Frame Coupler.
DO NOT completely tighten.
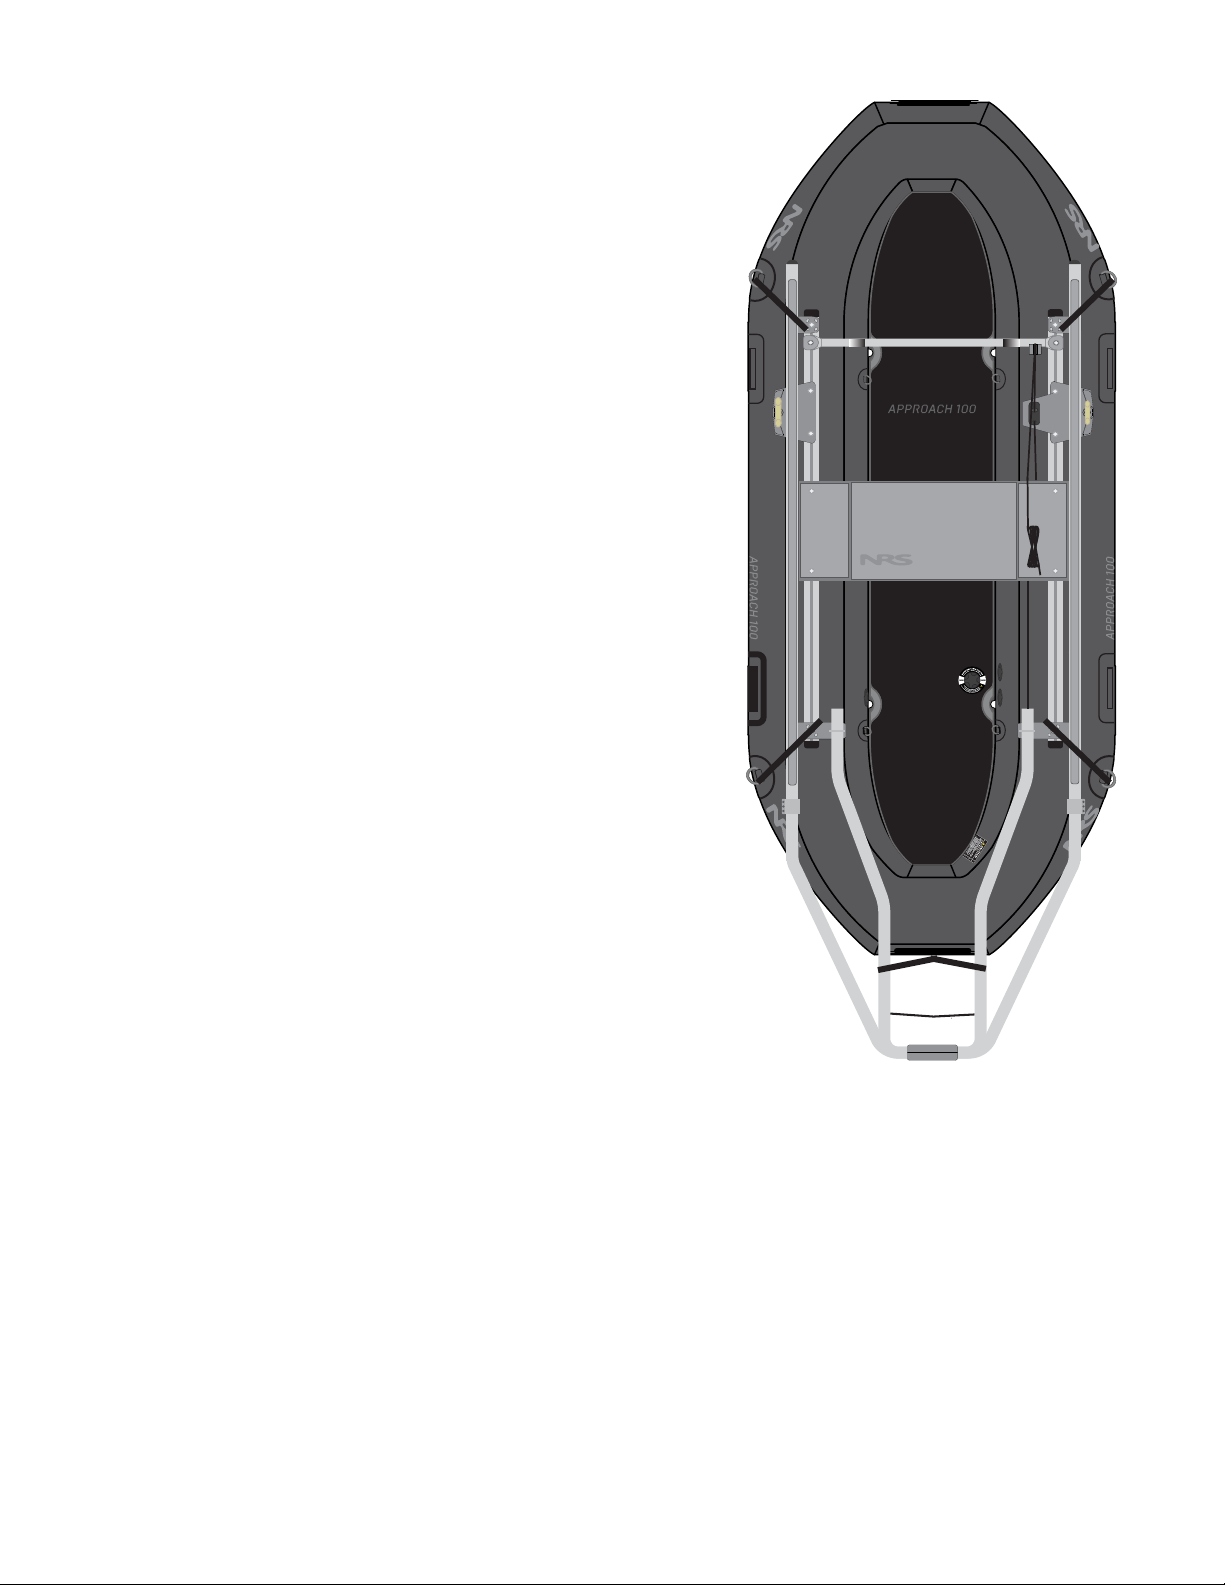
11. Attach Anchor Tube – Right
a. Insert Anchor Rope through the pulley-end of the Anchor Tube –
Right and completely run through the tube.
b. Attach the Anchor Tube – Right to the Stern Rod Tube Combo
Bracket.
i. Assemble with a U-Bolt under the bottom side of the Anchor
Tube (open end with the anchor rope) and the threads running
up through the Rod Tube Combo Bracket.
ii. Place washers on the threaded ends of the U-Bolt and loosely
tighten nuts with a 1/2” socket wrench.
DO NOT COMPLETELY tighten.
12. Attach Anchor Tube - Left
a. Attach the Anchor Tube – Left to the Stern Rod Tube Combo
Bracket.
i. Assemble with a U-Bolt under the bottom side of the Anchor
Tube (open end with the anchor rope) and the threads running
up through the Rod Tube Combo Bracket.
ii. Place washers on the threaded ends of the U-Bolt and loosely
tighten nuts with a 1/2” socket wrench.
DO NOT COMPLETELY tighten.
13. Connect Anchor Tubes
a. Slip (1) Frame Coupler over the back end of an Anchor Tube.
b. Connect the (2) Anchor Tube ends by slipping the Frame Coupler
half way onto each tube.
i. Use the Frame Coupler window to make sure the Anchor Tubes
are centered in the Frame Coupler.
DO NOT completely tighten.
14. Attach Stern Rod Tubes
a. Slip (1) Frame Coupler over the back of each Straight Rod Tube (2
total – 1 each side).
b. Attach the (2) Stern Rod Tubes by slipping the Frame Coupler
half-way onto the tube.
i. Use the Frame Coupler window to make sure the Stern Rod
Tube and Straight Rod Tube connect at the center of the Frame
Coupler. DO NOT completely tighten.
c. Slip (1) Frame Coupler over the back end of a Stern Rod Tube.
d. Connect the (2) Stern Rod Tube ends by slipping the
Frame Coupler half-way onto each tube.
i. Use the Frame Coupler window to make sure the Stern Rod
Tubes are centered in the Frame Coupler.
DO NOT completely tighten.
15. Attach Connector Plate
a. Remove all (4) bolts on the (2) Frame Couplers at the frame stern.
b. Attach all (4) bolts connecting the (2) Frame Couplers with the
Connector Plate. COMPLETELY tighten all (4) bolts.
16. Attach Motor Mount
a. Assemble the (2) Motor Mount Plates over the center of the
Anchor Tubes and Stern Rod Tubes.
i. Attach the Motor Mount Plate with the (2) 1-1/2” screws with a
#3 Phillips screwdriver. The screw heads should be outside of
the stern frame. COMPLETELY tighten screws.
17. Tighten Frame Couplers
a. COMPLETELY tighten all (2) Frame Couplers on the raft frame with
a 1/2” socket wrench.
18. Attach Straps – Side Tubes
Use (4) 3’ NRS HD Tie-Down Straps to secure the Approach frame to the
Raft through the (4) side tube D-rings.
a. Feed the end of the NRS Strap underneath the Side Rail, around
the Bracket, and back through the D-ring on the side of the raft
tube.
b. Run the strap end up to the locking cam of the strap. Press down
on the thumb lever to open the cam and run the strap through from
the bottom side.
c. Pull down on the strap to tighten.
d. Repeat steps a. through c. until the frame is secured through all (4)
D-rings.
e. Firmly pull down on each NRS Strap to secure the frame to the raft.
The frame should be center on top of the tubes.
19. Attach Straps – Back Frame
Use (1) 4’ NRS HD Tie-Down Strap to secure the Approach frame to the raft
through the back D-ring.
a. Feed the end of the NRS Strap over an Anchor Tube on one side
of the stern, down through the D-ring on the stern raft tube, and
back over the other Anchor Tube.
b. Run the strap end up to the locking cam of the strap. Press down
on the thumb lever to open the cam and run the strap through from
the bottom side.
c. Pull down on the strap to tighten.
d. Repeat steps a. through c. until the frame is secured through all (4)
D-rings.
e. Firmly pull down on each NRS Strap to secure the frame to the raft.
The frame should be center on top of the tubes.

20. Install Anchor Rope
a. Run the Anchor Rope end inside the raft underneath the Dry Box
towards the SpinLock anchor cam lock.
b. Thread the Anchor Rope through the SpinLock anchor cam lock
towards to anchor Intermediate Pulley on the Foot Bar.
c. Run the Anchor Rope around the Intermediate Pulley on the Foot
Bar and back towards to rower seat position.
d. Tie o the Anchor Rope end outside at the stern of the raft frame.
i. Use an anchor hitch knot to secure the end of the Anchor Rope
to the frame.
e. Pull the free end of the Anchor Rope inside the raft until the rest
of the rope is inside on the floor of the raft.
21. Attach Rod Tube Loops
a. Run the bungee loop down through one of the holes on the
Straight Rod Tube, back up through the other hole on the
Straight Tube, and back through the middle of the two bungee
cords at the pull tab.
b. Pull on the Bungee Rope tab to secure the Rod Tube Loop.
c. Repeat for all Rod Tube Loops.
22. Attach Rod Tube Trim
a. Attach Rod Tube Trim around the curved edges at both end of the
Straight Rod Tube slots.
b. Secure the trim in place by firmly pressing into place.
1638 South Blaine St., Moscow ID 83843 | p: 800.677.4327 | f: 208.883.4787 | e: [email protected] | nrs.com
Other NRS Boat manuals