NRS CATCH THE ADVENTURE SLIPSTREAM 120 User manual

Thank you for purchasing a Slipstream raft, purpose-built for adventure anglers.
SLIPSTREAM 120
STANDARD PACKAGE PARTS
1. Side Rail – Right
1.1 Pulley Bracket
1.2 Remote Bracket with Anchor Cleat + (1) LoPro + (1) U-Bolt + (2) 5/16" Washers +
(2) 5/16" Lock Nuts
2. Side Rail – Left
3. Foot Bar + (2) LoPros + (2) U-Bolts + (4) 5/16" Washers + (4) 5/16" Lock Nuts
4. Rower Cross Bar + (2) LoPros + (2) U-Bolts + (4) 5/16" Washers + (4) 5/16" Lock Nuts
5. Front Rail – Right + (1) LoPro + (1) U-Bolt + (2) 5/16" Washers + (2) 5/16" Lock Nuts
6. Front Rail – Left + (1) LoPro + (1) U-Bolt + (2) 5/16" Washers + (2) 5/16" Lock Nuts
7. (4) Frame Couplers + (8) 5/16"-18 x 1" Bolts + Washers
8. (2) Angler Thigh Hooks
9. Front Angler Seat Bar + (2) LoPros + (2) U-Bolts + (4) 5/16" Washers + (4) 5/16" Lock Nuts
10. Back Thigh Hook Bar – Right + (2) LoPros + (2) U-Bolts + (4) 5/16" Washers + (4) 5/16" Lock Nuts
11. Back Thigh Hook Bar – Left + (2) LoPros + (2) U-Bolts + (4) 5/16" Washers + (4) 5/16" Lock Nuts
12. Back Rail – Right
10.1 Pulley Bracket
10.2 Anchor Eye Bolt
13. Back Rail – Left
14. Back Angler Seat Bar + (2) LoPros + (2) U-Bolts + (4) 5/16" Washers + (4) 5/16" Lock Nuts
15. (2) 8" Oar Mounts + (2) U-Bolts + (4) 5/16" Washers + (4) 5/16" Lock Nuts
16. (2) Atomic Oar Locks + (4) Washers + (2) Springs + (2) Split Rings
17. (3) Universal Seat Mounts + (6) U-Bolts + (12) 5/16" Washers + (12) 5/16" Lock Nuts
18. (2) Folding Swivel Angler Seat + (8) 1/4"-20 x 1" Bolts + (8) 1/4" Lock Nuts + (16) 1/4" Washers
19. Low Back Rower Seat + (4) 5/16"-18 x 1-1/4" Bolts & (4) 5/16" Lock Washers
Also included:
(4) NRS 4' HD Tie Down Straps
(1) NRS Super 2 HP Pump
(1) Repair Kit
TOOLS REQUIRED
Socket Wrench 7/16" Open End Wrench
1/2" Socket Allen Wrench
7/16" Socket Phillips Screwdriver
Tape Measure Bubble Level
Scan this code to
find video assembly
instructions as well as
added tips how-tos.

DELUXE PACKAGE PARTS
1. Side Rail – Right
1.1 Pulley Bracket
1.2 Remote Bracket with Anchor Cleat + (1) LoPro + (1) U-Bolt + (2) 5/16" Washers +
(2) 5/16" Lock Nuts
2. Side Rail – Left
3. Foot Bar + (2) LoPros + (2) U-Bolts + (4) 5/16" Washers + (4) 5/16" Lock Nuts
4. Rower Cross Bar + (2) LoPros + (2) U-Bolts + (4) 5/16" Washers + (4) 5/16" Lock Nuts
5. Front Rail – Right + (1) LoPro + (1) U-Bolt + (2) 5/16" Washers + (2) 5/16" Lock Nuts
6. Front Rail – Left + (1) LoPro + (1) U-Bolt + (2) 5/16" Washers + (2) 5/16" Lock Nuts
7. (4) Frame Couplers + (8) 5/16"-18 x 1" Bolts + Washers
8. (2) Angler Thigh Hooks
9. Front Angler Seat Bar + (2) LoPros + (2) U-Bolts + (4) 5/16" Washers + (4) 5/16" Lock Nuts
10. Back Thigh Hook Bar – Right + (2) LoPros + (2) U-Bolts + (4) 5/16" Washers + (4) 5/16" Lock Nuts
11. Back Thigh Hook Bar – Left + (2) LoPros + (2) U-Bolts + (4) 5/16" Washers + (4) 5/16" Lock Nuts
12. Back Rail – Right
10.1 Pulley Bracket
10.2 Anchor Eye Bolt
13. Back Rail – Left
14. Back Angler Seat Bar + (2) LoPros + (2) U-Bolts + (4) 5/16" Washers + (4) 5/16" Lock Nuts
15. (2) 8" Oar Mounts + (2) U-Bolts + (4) 5/16" Washers + (4) 5/16" Lock Nuts
16. (2) Atomic Oar Locks + (4) Washers + (2) Springs + (2) Split Rings
17. (3) Universal Seat Mounts + (6) U-Bolts + (12) 5/16" Washers + (12) 5/16" Lock Nuts
18. (2) Folding Swivel Angler Seat + (8) 1/4"-20 x 1" Bolts + (8) 1/4" Lock Nuts +
(16) 1/4" Washers
19. Low Back Rower Seat + (4) 5/16"-18 x 1-1/4" Bolts & (4) 5/16" Lock Washers
20. Rod Holder
20.1 Straight Rod Tubes
20.1.1 (2) Rod Holder Pegs + (2) U-Bolts + (4) 5/16" Washers + (4) 5/16" Lock Nuts
20.2 (2) Bent Rod Tubes
20.3 (2) Frame Couplers + (4) 5/16"-18 x 1" Bolts + Washers
Also included:
(4) NRS 4' HD Tie Down Straps
(1) NRS Super 2 HP Pump
(1) Repair Kit
(1) 30' Anchor Line
(1) 2:1 Anchor Assist Pulley
(3) Clamp-It Drink Holders
(2) Oar Shafts + Oar Stops
(2) Oar Blades
TOOLS REQUIRED
Socket Wrench 7/16" Open End Wrench
1/2" Socket Allen Wrench
7/16" Socket Phillips Screwdriver
Tape Measure Bubble Level
Scan this code to
find video assembly
instructions as well as
added tips how-tos.

ASSEMBLY INSTRUCTIONS
1. Assemble Side Rail – Right
a. Run the anchor line through the Side Rail – Right slot and out the
back end of the rail. NOTE: Deluxe package includes anchor line.
b. Slip the anchor Pulley Bracket over the front end of the Side Rail
– Right and slide down until centered with the slot.
c. Assemble the Pulley Wheel onto the anchor Pulley Bracket and
securely tighten down the bolt with an Allen wrench.
i. The anchor line should be running over and around the pulley
wheel on the Pulley Bracket.
2. Position Side Rails
a. Place the (2) Side Rails on top of the straight side tubes on each
side of the raft.
i. The Side Rail – Right, with the anchor Pulley Bracket and
Remote Bracket, should be assembled on the rower’s right-
hand side with the slot oriented to the inside of the boat and
slightly angled upward.
1. If assembling a Deluxe Package, do NOT remove the anchor
rope from the Pulley
2. If assembling your own anchor rope, feed the rope through
the Pulley Bracket slot into the Side Rail and run the rope out
the long end of the rail.
ii. The Side Rail – Left, with no slot, should be assembled on the
rower’s left-hand side.
3. Attach Foot Bar
a. Place the Foot Bar on top of the Side Rails approximately 4" to
6" from the front end of the Side Rails with the bent portion
dipping toward the raft floor.
i. Assemble the Foot Bar on top of the Side Rails with the U-Bolts
on the underneath side of the rail and the threads running
through the (2) LoPro holes.
ii. Place washers on threaded ends of the U-Bolts and loosely
tighten nuts onto the LoPros with a 1/2" socket wrench. Do NOT
completely tighten.
4. Attach Remote Bracket
a. Place the Remote Bracket on top of the Side Rail – Right directly
behind the slot and anchor Pulley Bracket.
i. Assemble the Remote Bracket on top of the Side Rail with the
U-Bolt on the underneath side of the rail and the threads
running through the (2) bracket holes.
ii. Place washers on threaded ends of the U-Bolts and securely
tighten down the nuts with a 1/2" socket wrench.
5. Attach Front Rail – Left
a. Loosen the bolts on the Frame Coupler and slip it onto the front
end of the Side Rail – Left with the bolt heads facing up and on
the outside of the Side Rail.
i. Use the slotted window in the Frame Coupler to position the
Side Rail in the middle of the Frame Coupler.
b. Connect the Front Rail – Left to the Side Rail – Left using the
Frame Coupler.
i. Orient the Front Rail so the bend follows the raft tube and
the LoPro on the end of the front rail is directed straight
toward the back of the raft.
ii. Use the slotted window in the Frame Coupler to position the
Front Rail in the middle of the Frame Coupler.
1. The ends of the Side Rail and Front Rail should touch
and be visible in the slotted window of the Frame Coupler.
2. Tighten down the Frame Coupler bolts with a 1/2" socket
wrench to keep the Front Rail in position. Do NOT
completely tighten.
6. Attach Front Rail – Right
a. Loosen the bolts on the Frame Coupler and slip it onto the front
end of the Side Rail – Right with the bolt heads facing up and on
the outside of the Side Rail.
i. Use the slotted window in the Frame Coupler to position the
Side Rail in the middle of the Frame Coupler.
b. Connect the Front Rail – Right to the Side Rail – Right using the
Frame Coupler.
i. Orient the Front Rail so the bend follows the raft tube and the
LoPro on the end of the front rail is directed straight toward the
back of the raft.
ii. Use the slotted window in the Frame Coupler to position the
Front Rail in the middle of the Frame Coupler.
1. The ends of the Side Rail and Front Rail should touch and be
visible in the slotted window of the Frame Coupler.
2. Tighten down the Frame Coupler bolts with a 1/2" socket
wrench to keep the Front Rail in position. Do NOT
completely tighten.
7. CHECKPOINT – The ends of the LoPros on both Front Rails should
be parallel to one another pointing toward the back of the raft. Adjust
Front Rails as needed to accommodate the Front Angler
Thigh Hook.
8. Attach Front Angler Thigh Hook
a. Use (2) U-Bolts to secure the Front Angler Thigh Hook to the
(2) LoPros on the Front Rails.
i. Assemble the Angler Thigh Hook with the U-Bolts on the front
side of the hook and the threads running through the (2) LoPro
holes.
1. Center the Angler Thigh Hook on the LoPro fittings.
ii. Place washers on threaded ends of the U-Bolts and loosely
tighten nuts onto the LoPros with a 1/2" socket wrench. Do NOT
completely tighten.
1. Rotate the Angler Thigh Hook until it is parallel with the raft
floor.
iii. Firmly tighten the LoPro nuts with a 1/2" socket wrench to
secure the Angler Thigh Hook.

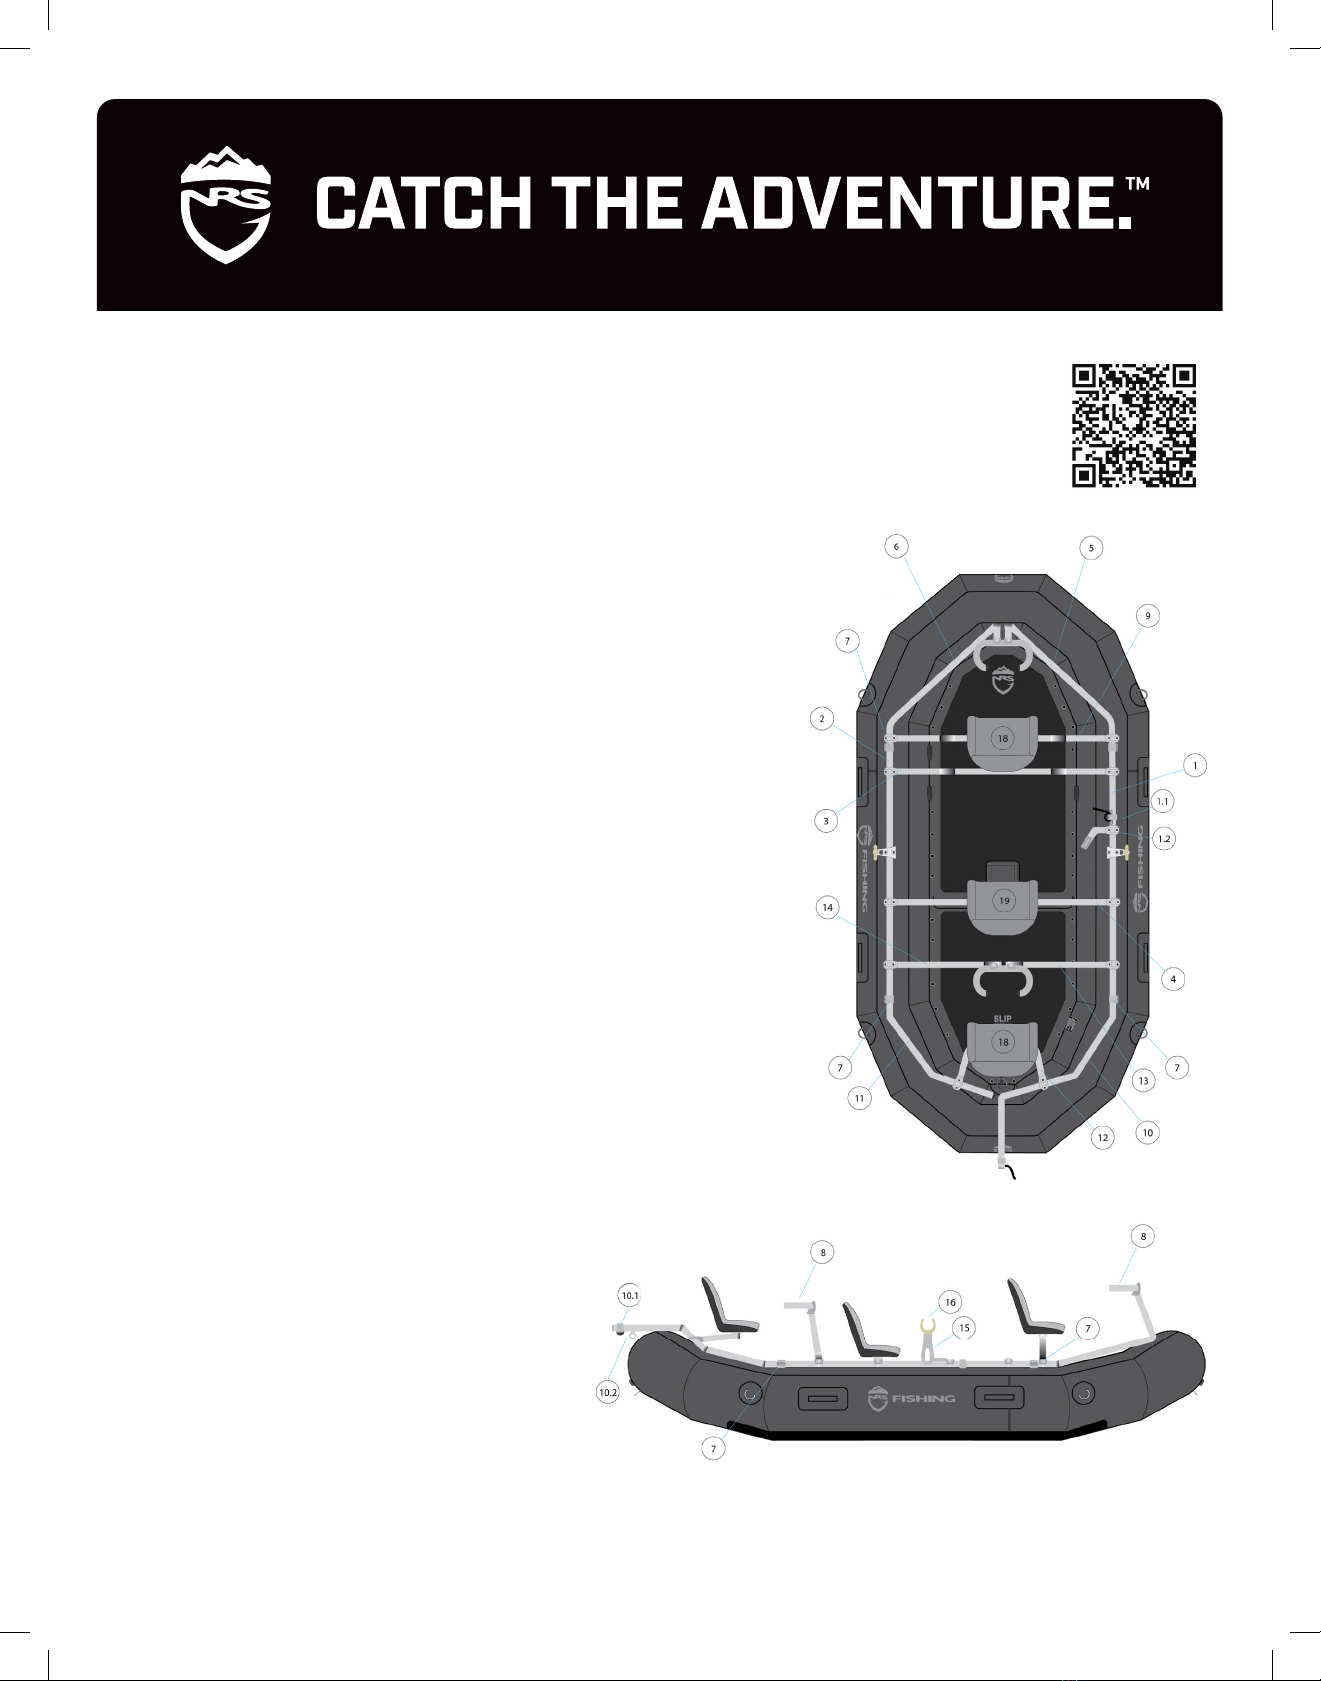
9. Attach Front Angler Seat Bar
a. Place the Front Angler Seat Bar on top of the Side Rails in front of
the Frame Couplers with the bend facing up.
i. Assemble the Angler Seat Bar on top of the Side Rails with the
U-Bolts on the underneath side of the rail and the threads
running through the (2) LoPro holes.
ii. Place washers on threaded ends of the U-Bolts and loosely
tighten nuts onto the LoPros with a 1/2" socket wrench. Do NOT
completely tighten.
10. Attach Rower Seat Cross Bar
The Rower Seat Cross Bar should be a straight bar connecting both
Side Rails.
a. Place the Rower Seat Cross Bar on top of the Side Rails
approximately 34" back from the Foot Bar.
i. Assemble the Rower Seat Cross Bar on top of the Side Rails
with the U-Bolts on the underneath side of the rail and the
threads running through the (2) LoPro holes.
ii. Place washers on threaded ends of the U-Bolts and loosely
tighten nuts onto the LoPros with a 1/2" socket wrench. Do NOT
completely tighten.
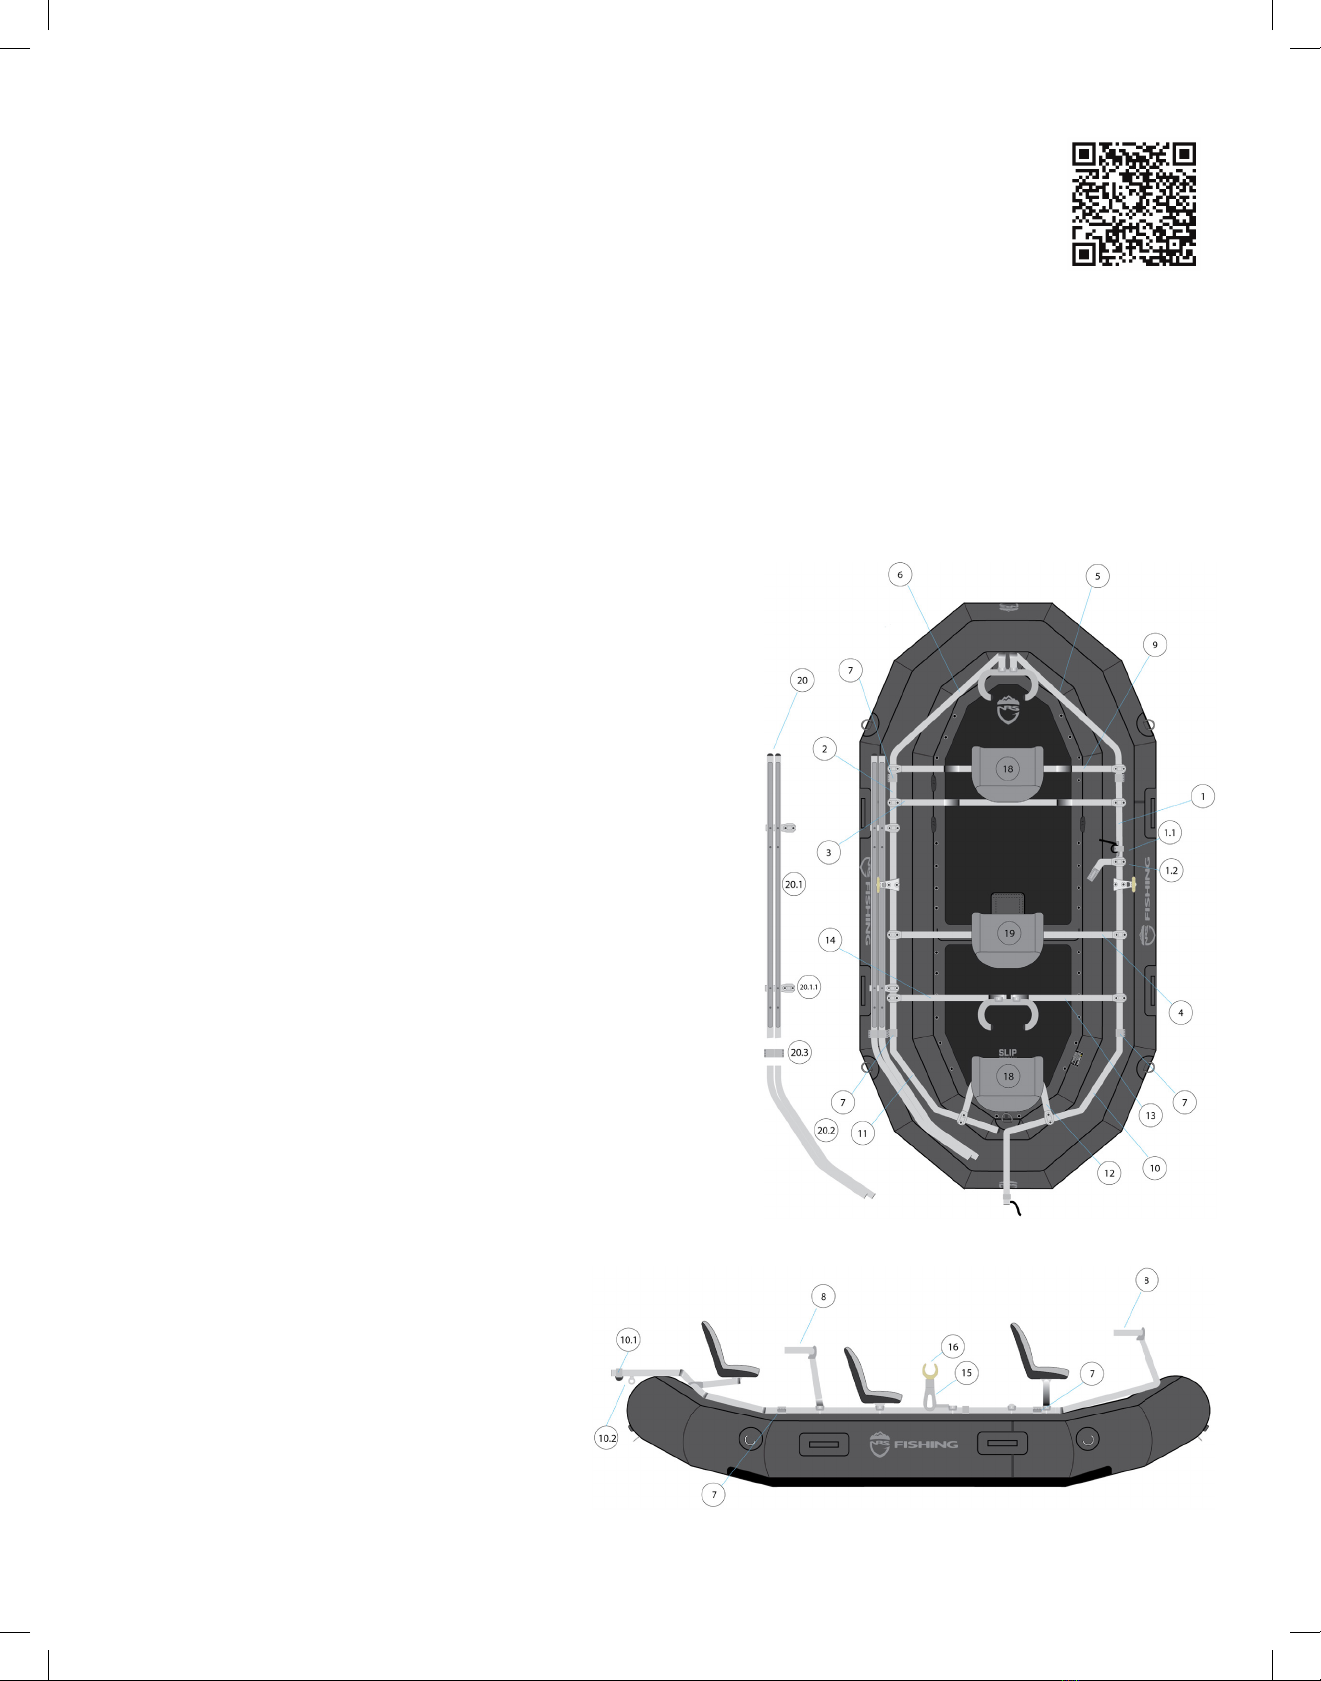
11. Attach Back Rail – Right
a. Run the anchor line at the back end of the Side Rail – Right
through a Frame Coupler.
b. Continue running the anchor line through the front end of the
Back Rail and out the slot at the back end of the rail. NOTE: Deluxe
package includes anchor line.
c. Loosen the bolts on the Frame Coupler and slip it onto the back
end of the Side Rail – Right with the bolt heads facing up and on
the outside of the Side Rail.
i. Use the slotted window in the Frame Coupler to position the
Side Rail in the middle of the Frame Coupler.
d. Slip the Back Rail into the Frame Coupler on the Side Rail –
Right.
i. Orient the Back Rail so the bend follows the raft tube and the
back anchor mast extends horizontally o the back center of
the raft.
ii. Use the slotted window in the Frame Coupler to position the
Back Rail in the middle of the Frame Coupler.
1. The ends of the Side Rail and Back Rail should touch and be
visible in the slotted window of the Frame Coupler.
2. Tighten down the Frame Coupler bolts with a 1/2" socket
wrench to keep the Back Rail in position. Do NOT completely
tighten.
12. Attach Back Pulley Bracket
a. Slip the anchor Pulley Bracket over the back end of the Back Rail
– Right and slide down until centered with the slot.
b. Assemble the Pulley Wheel onto the anchor Pulley Bracket and
securely tighten down the bolt with an Allen wrench.
i. The anchor line should be running over and around the pulley
wheel on the Pulley Bracket.
13. Attach Back Rail – Left
a. Loosen the bolts on the Frame Coupler and slip it into the back
end of the Side Rail – Left with the bolt heads facing up and on
the outside of the Side Rail.
i. Use the slotted window in the Frame Coupler to position the
Side Rail in the middle of the Frame Coupler.
b. Slip the Back Rail into the Frame Coupler on the Side Rail – Left.
i. If assembling a Deluxe Package do NOT remove the anchor
rope from the Back Rail.
ii. If assembling your own anchor rope, feed the rope through the
open end of the rail and run the rope out the Pulley Bracket slot
at the other end of the rail.
iii. Orient the Back Rail so the bend follows the raft tube and the
back anchor mast extends horizontally o the back center of
the raft.
iv. Use the slotted window in the Frame Coupler to position the
Back Rail in the middle of the Frame Coupler.
1. The ends of the Side Rail and Back Rail should touch and be
visible in the slotted window of the Frame Coupler.
2. Tighten down the Frame Coupler bolts with a 1/2" socket
wrench to keep the Back Rail in position. Do NOT completely
tighten.
14. Attach Back Angler Seat Bar
a. Place the Back Angler Seat Bar on top of the Back Rails centered
and angled upward.
i. Assemble the Rower Seat Cross Bar on top of the Side Rails
with the U-Bolts on the underneath side of the rail and the
threads running through the (2) LoPro holes.
ii. Place washers on threaded ends of the U-Bolts and loosely
tighten nuts onto the LoPros with a 1/2" socket wrench. Do NOT
completely tighten.
15. Attach Back Thigh Hook Bar – Right
a. Place the Thigh Hook Bar – Right on top of the Side Rail – Right
approximately 4" to 6" from the back end of the Side Rail with the
long pipe section parallel with the floor and the short pipe section
angled upward.
i. Assemble the Thigh Hook Bar on top of the Side Rails with the
U-Bolts on the underneath side of the rail and the threads
running through the (2) LoPro holes.
ii. Place washers on threaded ends of the U-Bolts and loosely
tighten nuts onto the LoPros with a 1/2" socket wrench. Do NOT
completely tighten.
16. Attach Back Thigh Hook Bar – Left
a. Place the Thigh Hook Bar – Left on top of the Side Rail – Left
approximately 4" to 6" from the back end of the Side Rail with the
long pipe section parallel with the floor and the short pipe section
angled upward.
i. Assemble the Thigh Hook Bar on top of the Side Rails with the
U-Bolts on the underneath side of the rail and the threads
running through the (2) LoPro holes.
ii. Place washers on threaded ends of the U-Bolts and loosely

tighten nuts onto the LoPros with a 1/2" socket wrench. Do NOT
completely tighten.
17. CHECKPOINT – The ends of the LoPros on both Back Thigh Hook
Bars should be parallel to one another pointing upward and toward
the back of the raft. Adjust Back Thigh Hook Bars as needed to
accommodate the Back Angler Thigh Hook.
18. Attach Back Angler Thigh Hook
a. Use (2) U-Bolts to secure the Back Angler Thigh Hook to the
(2) LoPros on the Back Thigh Hook Bars.
i. Assemble the Angler Thigh Hook with the U-Bolts on the front
side of the hook and the threads running through the (2) LoPro
holes.
1. Center the Angler Thigh Hook on the LoPro fittings.
ii. Place washers on threaded ends of the U-Bolts and loosely
tighten nuts onto the LoPros with a 1/2" socket wrench. Do NOT
completely tighten.
1. Rotate the Angler Thigh Hook until it is parallel with the raft
floor.
iii. Firmly tighten the LoPro nuts with a 1/2" socket wrench to
secure the Angler Thigh Hook.
19. Firmly tighten bolts with a 1/2" socket wrench
a. Firmly tighten the LoPro nuts on the Front Angler Seat Bar.
b. Firmly tighten the bolts on the front (2) Frame Couplers
connecting the Side Rails and Front Rails.
c. Firmly tighten the LoPro nuts on the Foot Bar.
d. Firmly tighten the LoPro nuts on the Rower Seat Cross Bar.
e. Firmly tighten the LoPro nuts on the Back Thigh Hook Bars.
f. Firmly tighten the bolts on the back (2) Frame Couplers
connecting the Side Rails and Back Rails.
g. Firmly tighten the LoPro nuts on the Back Angler Seat Bar.
20. Attach Oar Mounts
a. Attach the Oar Mounts on top of each of the (2) Side Rails
approximately 12" to 16" in front of the Rower Seat Cross Bar. The
exact position is dependent on rower’s arm length.
b. The U-Bolts will secure around the rails from the bottom side of
the rail with the threads running through the (2) Oar Mount holes.
c. Place washers on threaded ends of the U-Bolts and loosely
tighten nuts onto the LoPros with a 1/2" socket wrench. Do NOT
completely tighten.
d. Rotate the Oar Mount so the top (area with oar lock mount hole)
is in the horizontal position. Firmly tighten the LoPro nuts on the
Oar Mounts to secure in place.
21. Assemble Oar Locks
a. Slip the Oar Lock shaft into the hole at the top of the Oar Mount.
b. Add a washer on the Oar Lock shaft at the bottom of the Oar
Mount hole.
c. Add the spring on the Oar Lock shaft below the washer.
d. Add another washer underneath the spring and place the split ring
through the hole in the bottom of the Oar Lock shaft.
NOTE: The spring is held in place between the (2) washers with the
split ring.
22. Attach Universal Seat Mounts on (2) Angler Seat Bara and Rower
Seat Cross Bar
a. Center the Universal Seat Mount on top of the Seat Bar.
b. While holding the Universal Seat Mount in place, use your other
hand to place U-Bolts from underneath the seat bar with the
threads running through the Universal Seat Mount holes.
c. Place washers on the threaded ends of the U-Bolts and loosely
tighten nuts onto the LoPros with a 1/2" socket wrench. Do NOT
completely tighten.
i. Adjust the Universal Seat Mount to a level position. Verify level
with a bubble level.
d. Firmly tighten the nuts on the Universal Seat Mount to secure in
place.
23. Attach Folding Angler Swivel Seat on (2) Angler Seat Bars
a. Align the Folding Angler Swivel Seat base holes with the
Universal Seat Mount holes.
b. Place a washer on the 1/4"x20 x 1" bolt and feed from the top
through the mounting hole. Repeat for all (4) bolts.
c. Place a washer on the 1/4"x20 x 1" bolt underneath the Universal
Seat Mount. Using two hands, hold the 1/4" bolt head in place with
an 7/16" open end wrench and loosely tighten the 1/4" nut onto the
bolt with a 7/16" socket wrench. Repeat for all (4) bolts.
d. Firmly tighten the (4) 1/4" nuts to secure the Folder Angler Swivel
Seat to the Universal Seat Mount.
24. Attach the Low Back Rower Seat on Rower Seat Cross Bar
a. Align the (4) holes on the bottom side of the Low Back Rower
Seat with the Universal Seat Mount Holes.
b. Place a 5/16" lock washer on the 5/16"-18 x 1-1/4" bolt and thread
into the seat base from underneath the Universal Seat Mount.
Repeat for all (4) bolts.
c. Firmly tighten the (4) 5/16" nuts to secure the Low Back Rower
Seat to the Universal Seat Mount using a 1/2" socket wrench.
25. Secure Frame To The Raft
Use (4) NRS HD Tie Down Straps to secure the Slipstream Frame to the Raft
through the (4) D-rings—2 toward the bow and 2 toward the stern.
a. Feed the end of the NRS Strap underneath the Side Rail and then
run the same end through the D-ring on the side of the raft tube.
b. Run the strap end up to the locking cam of the strap. Press down
on the thumb lever to open the cam and run the strap through
from the bottom side.
c. Pull down on strap to tighten.
d. Repeat steps a. to c. until the frame is secured through all four
D-rings.
e. Firmly pull down on each NRS Strap to secure the frame to the raft.
The frame should be centered on top of the tubes.
DELUXE PACKAGE ACCESSORIES
1. Attach the Rod Holders
a. Attach the Rod Holder Pegs to the Straight Rod Tubes with the

1638 South Blaine St., Moscow ID 83843 | p: 800.677.4327 | f: 208.883.4787 | e: [email protected] | nrs.com
1/4"-20 screws and a Phillips screwdriver.
b. Place the Straight Rod Tubes on top of the Side Rail – Left with
the U-Bolts on the underneath side of the rail and the threads running
through the (2) Rod Holder Peg holes.
c. Position Rod Holder Pegs anywhere along the Side Rail. We suggest
positioning the front Rod Holder Peg 10" to 12" behind the front
Coupler on the Side Rail.
d. Place washers on threaded ends of the U-Bolts and firmly tighten nuts
onto the Rod Holder Peg with a 1/2" socket wrench.
e. Loosen the bolts on the (2) Frame Couplers and slip them onto the
open (back) ends of the Straight Rod Tubes with the bolt heads of
the Couplers facing up and on the outside of the Rod Tube. Position the
Couplers so that you have access to all the bolts.
i. Use the slotted window in the Frame Coupler to position the
Straight Rod Tube in the middle of the Frame Coupler.
f. Slip the Bent Rod Tubes into the Frame Couplers on the Straight Rod
Tubes.
i. Orient the Bent Rod Tubes so the bend follows the raft tube.
ii. Use the slotted window in the Frame Coupler to position the Bent
Rod Tube in the middle of the Frame Coupler.
1. The ends of the Straight Rod Tube and Bent Rod Tube should
touch and be visible in the slotted window of the Frame Coupler.
2. Firmly tighten down the Frame Coupler bolts using a 1/2" socket
wrench to secure the Rod Tubes.
NOTE: The Rod Tubes are designed to carry rods up to 9’ length. Use the
bungee cord to secure the rod by stretching it over and around the fishing
reel connected to the rod.
NOTE: The mounting orientation of the Rod Tubes can be adjusted to have
rod(s) accessible by the back angler.
2. Attach Anchor Assist Pulley
a. Using the tag end of the anchor line, tie a knot (e.g. bowline knot) to
secure the anchor line to the eye bolt on the anchor frame mast.
b. Swivel the two sides of the pulley open so the anchor line can fit
between the two sides.
c. Place the pulley onto the anchor line and close the two sides keeping
the anchor line in between. The pulley wheel should be resting on top
of the anchor line.
3. Attach Clamp-It Drink Holders
a. The ClampIT snaps tight on our 1-5/8" diameter frame pipe and is easily
removed with the flip of the lever.
Table of contents
Other NRS Boat manuals