NRX EVO 500EH User manual

USER GUIDE
NRX EVO 500EH
www.nrx-telecom.com

1. INSTALLATION
1.1 TelephoneConnection
1.2 ConnectingAWirelessHeadset
1.3 TelephoneSet-Up
2. OPERATION
2.1 Dialling
2.2 VolumeControl
2.3 TelephoneRinger
2.4 DirectMemoryButtons
2.5 Phonebook
2.6 CallerID
2.7 Privacy(MutingtheMicrophoneduringConversation)
2.8 Redial/AutoRedial
2.9 PauseButton
2.10 RecallFacility
2.11 DualHeadsetFacility
2.12 Speakerphone/On-HookDialling
2.13 ReceiverVolume
2.14 HeadsetStand(Option)
2.15 HearingAidCompatibility
3. WALLMOUNTINGTHEUNIT
4. APPROVEDUSE
5. NUMBEROFPHONESTHATCANBECONNECTED
Contents
The layout of your NRX EVO 500EH
1
Number Keypad
Recall Button
Mute Button
Message Waiting/
Ring Indicator
Wall Mount Tab
Tone Button
Volume Step Up/Step Down
Control Buttons
Redial/Auto Redial
Button
Speaker/Headset
Button
Jog Wheel
(Press To Enter)
Pause Button
Delete Button
Cancel Button
Shift Button
Menu Button
Program Button
Memory Buttons Headset Mic
TX Volume
HEADSET MIC
TX VOLUME
HICOM SENS IMPEDANCE
HIGH
LOW
SW1 SW2 SW3
600
900
COMPLEX
SP/OHD
SP
OHD
Handset
Socket
12
ABC 3
DEF
6
MNO
5
JKL
4
GHI
8
TUV
7
PQRS 9
WXYZ
0
R
P
C

3
1. INSTALLATION
1.1TelephoneConnection
•
otherend tothesocketlocatedin thebottomofthephone.
Replacethehandsettothecradle.
NOTE: You will need to remove the wall mount
brackettoaccessthissocket.
•Connect the small plug (RJ-11) of the telephone line
cordtothesocketatthe backoftheunitandtheotherplug
tothetelephonesocketatthewall.
NOTE: If the RJ-11 to RJ-11 line cord is used, please
ensurethattheBlueplugisconnectedtothewallsocket.
•Connect the AC adaptor into a standard 220-240VAC
mainssocketandthepowersocketatthebackoftheNRX
EVO500EH.
•The display will show 00-00-00.After about 4 seconds
thedisplaywillshowTOTAL:00 NEW:00
•If you have subscribed to a Caller ID Service, the time
Connect one end of the coil cord to the handset and the
Installation & Telephone Set-Up
and date will be automatically updated when the first
callisreceived.Otherwise,itisnecessarytosetthetime
and date manually, please refer to the Telephone Setup
Menu.
•
In caseofpower failureoraccidental unpluggingofthe
AC adaptor, the built-in EEPROM will retain all the
telephone's memory including phone book and CID
records.
1.2ConnectingAWirelessHeadset
The NRX EVO 500EH has an electronic hookswitch
interface, located at the rear of the telephone. This
allows wireless headset products from Plantronics, GN
Netcom(Jabra)andSennheisertobeconnectedtothe
telephone and control the line without the need for a
handsetlifterproduct.
•Plantronics
UsingthePlantroniccablesuppliedwiththeNRX EVO
500EH, plug the round plug into the 'Handset Lifter'
port located at the bottom of your Plantronics headset
base and the RJ45 plug into the 'E.H.S' port on the back
ofthetelephone.
2
Telephone Set-Up
Connect the 'Telephone Cable Port' on the headset base
to one of the headset ports located on the left side of the
telephone using the cable provided with your headset
product.
For operation of your Plantronics headset, please refer
totheuserguidethatwassuppliedwiththeproduct.
The NRX EVO 500EH replicates the operation of the
handset lifter allowing control of a phone call by the
'CallControlButton'locatedontheheadset.
You can also control the headset with the
'Speaker/Headset' button on the telephone. i.e If you
have answered an incoming call using the 'Call Control
Button' on the headset, you can press the
'Speaker/Headset' button on the telephone to end the
callandturnofftheheadset.
•GNNetcom(Jabra)
Using the GN cable supplied with the NRX EVO
500EH, plug the end with a white band close to the
plastic plug into the 'RHL/AUX' port located at the
bottom of your GN headset base and other end plugs
intothe'E.H.S'portonthebackofthetelephone.
Connect the 'Telephone Port' on the headset base to one
of the headset ports located on the left side of the
telephone using the cable provided with your headset
product.
NOTE: If your GN headset model has multiple
hookswitch modes, please ensure the base is set to 'GN
RHL'-Refertotheuserguidesuppliedwithyourheadset.
The NRX EVO 500EH replicates the operation of the
handset lifter allowing control of a phone call by the 'Talk
Button' located on the headset. Once the line has been
seized by the headset, the 'Speaker/Headset' button on the
telephone is disabled until the call is completed by
pressingthe'TalkButton'ontheheadset again.
•Sennheiser
To connect a Sennheiser wireless headset to the NRX
EVO 500EH, the Sennheiser TCI-01 connection box is
required.
Connect the TCI-01 to the Sennheiser headset base with
the cable supplied using the DW Com port, then connect
to the telephone using the GN cable supplied with the
phone. Theendwithawhitebandclosetotheplasticplug
connects to the 'HL1 port' on the TCI-01 and other end
plugsintothe'E.H.S'portonthebackofthetelephone.

5
The NRX EVO 500EH replicates the operation of the
handsetlifterallowing control ofaphonecall by the'Talk
Button' located on the headset. Once the line has been
seizedby theheadset,the'Speaker/Headset'button onthe
telephone is disabled until the call is completed by
pressingthe'TalkButton'ontheheadset again.
1.3 TelephoneSet-Up
In standby mode, press the MENU button twice, the
displaywillshowSYSTEM.
Turning the jog wheel will switch among the various
setting modes of the Main System Menu loop as shown
below:
•SetTime
Scroll to 'SETTIME' on the System Menu and then press
the Jog Wheel. Turn the Jog Wheel to the desired time
and date pressing the wheel for confirmation after setting
HOUR,MINUTE,DATE&MONTH.
•Set Recall
Scroll to 'SET RECALL' on the System Menu and then
Installation & Telephone Set-Up
4
Telephone Set-Up
press the Jog Wheel. Scroll to TBR (Timed Break
Recall) or EARTH (Earth Recall) then press the Jog
Wheeltoconfirm.
IfTBRisselected,afterpressingtheJogWheelyouwill
need to select the TBR timing (100ms to 1200ms).
Once again press the Jog Wheel to confirm your
selection. The standard setting for the UK is normally
100ms.
NOTE: By default your NRX EVO 500EH is factory
setatTBR100ms.
•LCDContrast
Scroll to 'LCD CONTRAST' on the System Menu and
then press the Jog Wheel. Select the desired LCD
contrast then press the Jog Wheel again. The default
settingis3.
•MessageWaitingType
Scroll to 'MESSAGE WAITING' on the System Menu
options and then press the Jog Wheel. Scroll to one of
theFollowingoptionsthenpresstheJogWheel:
?LINEREVERSAL
?90VDC
?HIPATH
?AT&T/ALCATEL
?ERICSSONMD-110
?FSKMWI
If Line Reversal is selected - Select Polarity Normal,
Polarity Reversal or OFF and then press the Jog Wheel
again. This should be set to OFF if Line Reversal is not
required.
For the other message waiting options - Select ON or
OFFandthenpress the JogWheel. They should be setto
OFF if not required. If Siemens Hipath or Ericsson MD-
110 is selected the Ringer Sensitivity switch (SW1) on
the base of the telephone should be set ‘Low’. At all
othertimesthisshouldbeswitchto‘High’.
•DialMode
Scroll to 'DIAL MODE' on the System Menu and then
press the Jog Wheel. Select either Tone or Pulse
dialling then press the Jog Wheel again.
The default setting for the telephone is Tone dialling.
DIAL MODE
SET RECALL
LCD CONTRAST
SECURITY
MODE
SET TIME
MESSAGE
WAITING
AREA CODE TIME MODE
PABX PREFIX
AUTOREDIAL
MODE
CLIP MODE
NEW ZEALAND
CLID
HS Auto Answer

7
•Time Mode
Scroll to 'TIME MODE' on the System Menu and then
press the Jog Wheel. Select either 24 Hour or 12 Hour
time format and then press the Jog Wheel again.
The default setting for the telephone is 24 Hour format.
•Area Code
1. Scroll to 'Area Code' on the System Menu and then
press the Jog Wheel.
2. If no area code is programmed into the unit then
'ADD AREA CODE ?' will be displayed on the screen.
3. Press the Jog Wheel again.
4. You will now be prompted to 'ENTER AREA
CODE'.
5. Enter using the keypad then press Jog Wheel.
If you select 'Area Code' from the system menu when
an area code has already been programmed into the unit
then 'CHG AREA CODE' appears on the display
together with the area code already entered.
- To change the code press the Jog Wheel, enter new
code using the keypad then press the Jog Wheel again.
- To delete the code press the Jog Wheel twice.
Telephone Set-Up & Operation
?PABX Prefix - To allow Caller ID numbers to be
stored into the Phonebook with the correct prefix to
allow direct dialling
1. Scroll to 'PABX Prefix' on the System Menu and
then press the SELECT button.
2. If no PABX Prefix is programmed into the unit then
'ADD PABX CODE ?' will be displayed on the screen.
3. Press the Jog Wheel again.
4. You will now be prompted to 'ENTER PABX
CODE'.
5. Enter using the keypad then press the Jog Wheel.
If you select 'PABX Prefix' from the system menu
when a PABX Prefix has already been programmed
into the unit then 'CHG PABX CODE' appears on the
display together with the code already entered.
- To change the code press the Jog Wheel, enter the
new code using the keypad then press the Jog Wheel
again.
- To delete the code press the Jog Wheel twice.
•New Zealand CLID - This will automatically add
a Zero to the Caller ID number when the number is
8 digits or more.
Scroll to 'New Zealand CLID' on the System Menu
And then press the Jog Wheel. Turn to the desired
6
Operation
setting'ON'or'OFF'thenpresstheJogWheeltoconfirm.
•ClipMode
Scroll to 'CLIP MODE' on the System Menu and then
press the Jog Wheel. Turn the Jog Wheel to the desired
setting 'FSK MODE' or 'DTMF MODE' and press the
wheeltoconfirm.
•AutoredialMode
To set the Autoredial parameters, scroll to 'Autoredial
Mode' on the System Menu and then press the Jog wheel
to set the number of times the telephone will autoredial
and the frequency of the redials, pressing the wheel to
selecteachtime.
•SecurityMode
The NRX EVO 500EH can be put into a security mode
that is designed to protect the user if using telephone
banking or other similar services. After the initial
number has been dialled, if there is a delay of more than 5
seconds then further numbers are entered e.g Your
banking password, then a will appear on the screen
instead of the number. The additional numbers will also
notbestoredintheLastNumberRedialmemory.
To set the security mode, scroll to 'Security Mode' on the
System Menu and then press the Jog Wheel. Select
'Security ON' or 'Security OFF' and press the Jog Wheel
again.
•HSAutoAnswerMode
The NRX EVO 500EH has a headset auto answer
facility. Scroll to 'HSAutoAnswer' on the system menu
then press the Jog Wheel. Select the desired setting
'ON'or'OFF' then press the JogWheelagain. Whenthis
facilityisturnedonandaheadsetisconnected,thephone
will automatically answer any new calls and connect
themtotheheadset.
2. OPERATION
2.1 Dialling
Liftthehandsetanddialthenumber.
Toterminateaphonecall,simplyreplacethehandset.
2.2VolumeControl
HandsetorHeadsetmode:
Duringthecall,pressingvolumebuttonsoncewill
*

9
decrease or increase the volume level respectively.
?There are 4 levels for handset or headset receivers.
?The volume level, steps from 1 to 4 and will be
showed on the LCD when adjusting.
- Volume 1 is the lowest level
- Volume 4 is the highest level
On Hook Dialling mode:
?During the call, pressing the volume buttons once
will decrease or increase the volume level
respectively.
?There are 8 levels for the speaker.
?The volume level, steps from 1 to 8, will be showed
on the LCD when adjusting.
- Volume 1 is the lowest level
- Volume 8 is the highest level
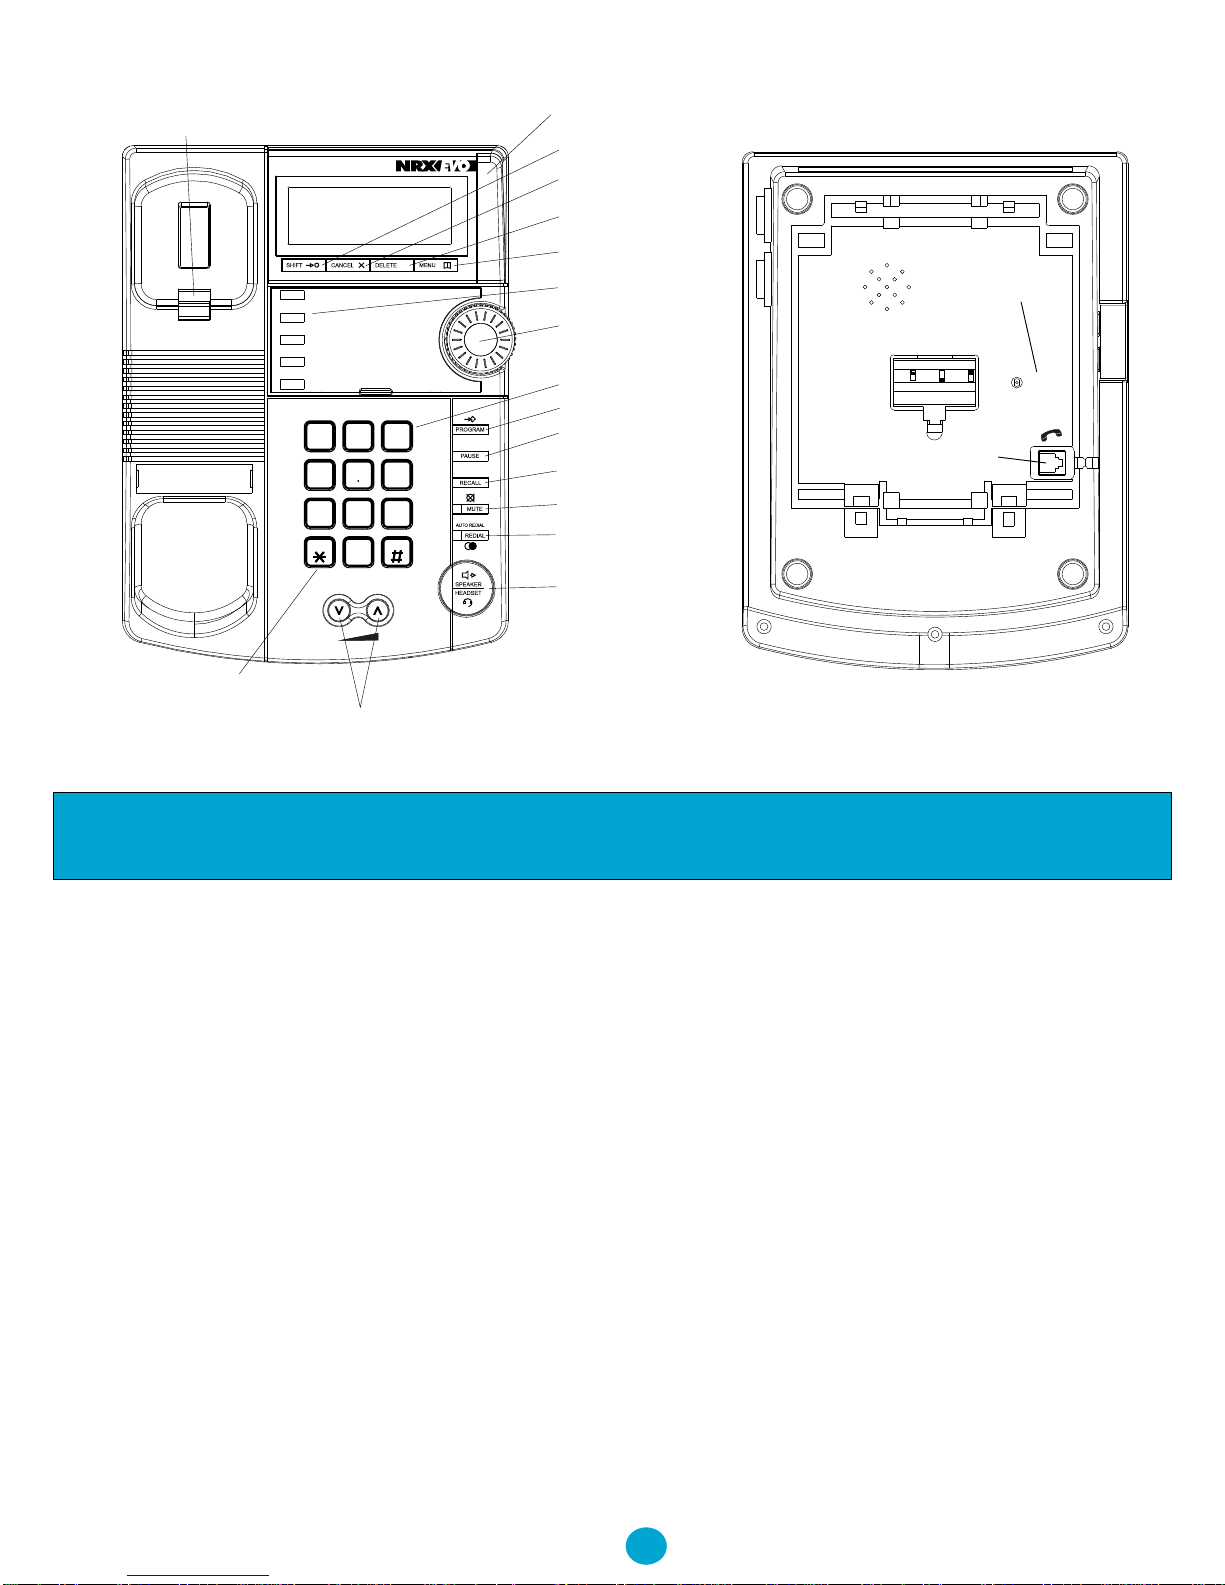
2.3 Telephone Ringer
The ringer volume and pitch can be adjusted via the
two slide switches on the right side of the NRX EVO
500EH.
Theringervolume can besettoOff,LoworHighlevels
depending on the position of the switch. There is an
LED ring indicator inside the red lens. This indicator is
independent of the ringer volume switch position.
Operation
While the phone is ringing, you can adjust the ringer
tone of your telephone by moving the ringer pitch
switch.
2.4 DirectMemoryButtons
5one-touchspeeddialnumbersand5two-touchspeed
dial numbers can be programmed into the memory of
yourphone.
Each memory location can store a maximum 32 digits
phonenumberandamaximum15lettersforname.
1. Press the Jog Wheel.
2. Enter the phone number using the keypad
3. Press the Jog Wheel
4. Enter the memory name using the keypad
i.e To enter 'A' press the 2 button once, to enter 'B'
press the 2 button twice etc.
5. Press then memory button (Use the SHIFT button
to access the second bank of memories). During the
memory storage procedure, you may wish to press
the PAUSE button to insert a pause between
numbers. A “P” will show on the LCD to indicate a
2 second pause in the dialling sequence. Each pause
counts as one digit.
Therearefour differentways todiala stored speed dial
8
Operation
number,dependingonyourpreference.
1. Pick up the handset and press the desired memory
button
2. Press the SPEAKER/HEADSET button and then
press the desired memory button.
3. Press the desired memory button and check the
LCD shows the correct information. Press the
SPEAKER/HEADSET button. (Predialing mode)
4. Press the desired memory button and check the
LCD shows the correct information. Pick up the
handset. (Handset Predialing mode).
If the one-touch or two touch memory button pressed
hasnotbeenstoredwithanumber,theLCDwillshow--
-------------- and EMPTYand no dialling action will be
made.
2.5 Phonebook
The NRX EVO 500EH can store up to 200 of your
frequentlyusednamesandnumbers.
To add a contact in the Phone Book:
1. Press MENU button once and the display will
show PHONE BOOK XX, where XX denotes the
number of phone book records stored.
2. Press the Jog Wheel and the display will show
ADD CONTACT?. Press the Jog Wheel again will
enter the editor mode.
3. Enter the desired number using keypad. When
number is displayed correctly, (up to 32 digits can be
stored). Press Jog Wheel to end the number entry and
start name entry.
4. Use the keypad letter to enter the name, press the
key until the correct letter is displayed. When correct
letter is displayed, move on to the next letter if it is
on another key. If you want to enter two successive
letters that are on the same key, you can turn the Jog
Wheel to move the cursor or wait for 2 seconds after
the first letter has been shown and the cursor moves
to the next space.
At the end of the name entry (maximum 15 letters),
press Jog Wheel to save this record. The display will
enter the editor mode again.
If you want to add another record to the phone book,
repeat step 3 & 4. Up to 200 phone book records are
allowed. If the entering action has been completed,
press CANCEL key twice.
If the total stored number of records has reached 200,
the display will show PHONE BOOK FULL. It will

11
It will not be possible to add another record without
deletion of existing records.
To copy a CLID record into the Phone Book:
1. Press the menu scroll buttons to select a desired
CLID record.
2. Press SELECT button to enter the editor mode.
3. Use menu scroll buttons or DELETE button to
edit the number, if necessary. Press the SELECT
button will leave the editing of the CLID number and
enter into the CLID name editing mode.
4. Use the keypad to enter the name then press the
SELECT button again to save the record into phone
book.
If the total stored number of records has reached 200,
the display will show PHONE BOOK FULL. It will
not be possible to add another record without deletion
of existing records
To copy the last dialled number into the Phone Book:
1.Press REDIAL/PAUSE button, the last number
dialled will be showed on the LCD.
2. Press SELECT button to enter the editor mode.
3. Turn the Jog Wheel and use the DELETE button
Operation
to edit the number, if necessary. Press Jog Wheel
again.
4. Use the keypad to enter the name and then press
the Jog Wheel.
To review the Phone Book:
Press MENU button once and the display will show
PHONE BOOK XX, where XX denotes the
number of phone book records stored. Use the menu
scroll buttons to scroll through the phone book
records. The records will be displayed in alphabetical
order.
To search for a specific record:
Press MENU button once the display will show
PHONE BOOK XX. Use the keypad to enter the
contact name or the starting letter of the name then
press the Jog Wheel.
The number and the name of the first matched record
will be displayed.
To dial a number in the phone book:
When a record is showing on the LCD, pick up
handset or press the SPEAKER/HEADSET button.
10
Operation
The desired number will be dialled.
To delete a number in the phone book:
1. Press MENU button once the display will show
PHONE BOOK XX.
2. Search for the record you want to delete until it is
shown on the display.
3. Press the DELETE button once, and the display
will show DELETE ?,
4. Press the Jog Wheel once to confirm.
2.6 Caller ID
To make use of these features, you must first
subscribe to Caller ID Service.
?99 Caller ID records
When you use this telephone with the Caller ID
service, the NRX EVO 500EH enables you to see the
less the call is blocked or is from a silent number)
when the phone rings. Up to 99 most recent received
calls' records, together with their time and the date
information, are stored. Each call is numbered in the
call history, number of the calling party (unless the
call is blocked or is from a silent number) when the
phone rings. Up to 99 of the most recent received
calls records, together with their time and the date
information, are stored. Each call is numbered in the
call history,
?New call notification
When a new call is received, the time, date and
calling number of this call will be displayed between
the first and second ring. The NEW CALL LCD
icon will appear when the phone has received a new
CLID. It will remain on until all new call
information in the call history has been reviewed.
?New call review
To review the new calls:
1. Turn the Jog Wheel to review the new calls
2. When all new calls have been reviewed, the NEW
CALL icon will disappear.
?Caller ID record summary
The display will show the Caller ID's record
summary as TOTAL:XX, where XX is the total
number of calls stored in the memory. The display
will also show the number of new calls received as
NEW:YY, where YY is the number of new calls.

13
?Call review
To review all the calls in the CLID call log, turn the
Jog Wheel.
?Deletingacallfromthecallhistory
It is possible to delete a call in the call log by turning
the Jog Wheel until the screen displays the
information you wish to delete. Press the DELETE
button once, the displayed call record will be deleted
and the next CLID information will be displayed on
the screen.
?Speed dialling from the Caller ID call log
Turn the Jog Wheel to scroll through the call log.
When the desired number is shown, press the
SPEAKER/HEADSET button or pick up the
handset. The telephone will dial the displayed call log
number.
2.7 Privacy (Mute)
Press the MUTE button to turn off the transmission
of the speech to the telephone line from the handset
microphone in handset mode or headset microphone
in headset mode or base microphone in speakerphone
Operation
mode. Press the MUTE button again to resume the
conversation with the calling party.
2.8 Redial/Auto Redial
To redial the last dialled number, pick up the handset
or press the SPEAKER/HEADSET button, then
press the REDIAL button. The telephone will
automatically redial the last number dialled.
Alternatively, press the REDIAL button while the
NRX EVO 500EH is off-line, the display will show
the last dialled number and its call duration. Pick up
the handset or press the SPEAKER/HEADSET
button, the telephone will automatically dial the last
number dialled.
To enter Auto Redial mode, press the Redial button
twice, the LED will light to confirm you have enter
Auto Redial mode. The phone will now keep
redialling the last dialled number (as setup in the
system menu) until the call is connected or the
maximum number of attempts is exceeded.
2.9 Pause
If the PAUSE button is pressed between numbers, a
“P” will show on the LCD to indicate a 2 second
pause in the dialling sequence.
12
Operation
2.10 Recall Facility
The NRX EVO 500EH has a Recall facility which is
used to access network/PBX services.
To use this facility pick up the handset or press the
SPEAKER/HEADSET button then press the
RECALL button.
See Telephone Set-Up for Recall types available and
set-up.
2.11 DualHeadsetFacility
The NRX EVO 500EH comes fitted with two headset
ports. These are located on the left side of the cabinet
and allow a supervisor headset to also be connect to the
phonefortrainingormonitoringpurposesifrequired.
and allow a supervisor headset to also be connect to the
phonefortrainingormonitoringpurposesifrequired.
The‘SPEAKER/HEADSET’buttonenablesyoutouse
the telephone without lifting the handset. Connect a
headset and by simply pressing the ‘SPEAKER/
HEADSET’ button once, you will be connected to the
line. Pressing the ‘SPEAKER/HEADSET’ button
again will disconnect the telephone line and terminate
thecall.
During a headset (handsfree) conversation, lifting the
handset will switch the unit to the handset mode. The
headset will be disabled and the handset should be
used for conversation instead. The headset mode will
be activated again by pressing the ‘SPEAKER/
HEADSET’buttonandreplacingthehandset.
TheNRXEVO500EHisdesignedtoworkwithawide
varietyofdifferentheadsets. The headset microphone
sensitivity can be adjusted via a rotary control located
onthebaseoftheunit.
2.12 Speakerphone/OnHookDialling
The 'SPEAKER/HEADSET' button allows the user to
operatethetelephonewithoutliftingthehandset.Press
the 'SPEAKER/HEADSET’button once, then operate
the telephone as normal. Communication with the
party at the other end of the telephone line is possible
using the built in Microphone and Speaker. It is
possible to switch from Handset to Speaker during a
call, by pressing the 'SPEAKER/HEADSET' button
thenreplacingthehandset. Thespeakerphone

15
microphone can be disabled by a switch located on the
base of the telephone. Switching this to ‘OHD’ will
allow the user to dial a number by pressing the
‘SPEAKER/HEADSET’ button but the handset will
needtobeusedoncethecallhasbeenconnected.
NOTE: Speakerphone/OHD can only be used when a
headsetisnotconnectedtothetelephone.
2.13 ReceiverVolume
It is possible to adjust the receiver volume on the
telephone handset by pressing the volume
buttons.
2.14HeadsetStand(Option)
The NRX EVO 500EH is fitted with a headset stand
socket at the back of the telephone. An optional NRX
EVO Headset stand can be purchased that when fitted
not only provides a convenient place to store your
headset, but also gives light indication of when the
telephoneisringingand‘InUse’.
2.15 Hearing Aid Compatibility
The handset receiver is hearing aid compatible.
Operation
3. WALL-MOUNTINGTHEUNIT
The NRX EVO 500EH can be wall mounted using the
wallmountbracketinstalledonthebottomoftheunit.
-Dismountthewallmountbracketfromtheunit.
- Placing the wall mount bracket to the required
positiononthewall
- Drill two holes on the wall according to the distance
asmarkedbytwomountingholes.
- Install the two screws supplied with the unit in the
wall.
- Re-install the wall mount bracket to the bottom
cabinetforthewallmountposition.
- Position the wall mount slots on the bracket of the
unit
over the two screws on the wall. Pull down and lock
intoplace.
- Beneath the earpiece section of the cradle you will
find a small tab. Pull this up to form the hook for the
handset.
- When you are on the telephone, you sometimes need
to put the handset down for a moment. There is a
specialhookattheback(top)oftheunitsothatyoucan
hang the handset on the unit, when it is wall-mounted,
withoutterminatingthecall.
14
Approved Use
4. APPROVEDUSE
The NRX EVO 500EH can be connected to the
Public Switched Telephone Network (PSTN) and
compatible to PABX's but not connected in the
following manner: -
1. As an extension to a payphone.
2. On shared service line or 1+1 carrier system.
NetworkCompatibility
The NRX EVO 500EH has been approved persuant to
European harmonized standards:
Health & Safety:
EN60950-1:2001 (+A11:2004)
EN50371:2002
Electromagnetic Compatibility:
EN55022:2006 emissions
EN55024:1998 + A1:2001 immunity.
Telecom:
ES 203021 Parts 1, 2 & 3
TBR38
5. THE NUMBER OF TELEPHONES THAT
MAY BE CONNECTED
If you connect too many telephones to your line they
may not ring correctly. To determine the number of
telephones that can be satisfactorily connected to
your line, add together the ringer equivalent
numbers (RENs) of all the equipment you wish to
connect. If this number exceeds four, your
telephones may not ring. Your NRX EVO 500EH
telephone has an REN of one (1). BT telephones
have an REN of one unless otherwise marked.
6. WARRANTY
Trojan Telecom has built the NRX EVO 500EH
telephonetoahighstandard.Ourwarrantyreflectsour
belief that during it’s working life you should not
experienceanymechanicalfailures.
Trojan Telecom will at all times use a sensible and
supportive attitude towards warrantable returns,
working with you in identifying ‘no fault found’.
The following terms and conditions apply:
1) Where we find a genuine warranty failure, Trojan
Telecom will replace the faulty instrument with a
one-for-one replacement.

17
2) It is the responsibility of the user to return the
faulty telephone to Trojan Telecom. We ask you to
cover this cost and we will return your replacement
telephone at our expense.
3) We reserve the right to repair the faulty item or
replace it with a similar telephone of the same make.
4) Discontinued models under warranty will be
replaced with a similar or more featured telephone.
5) We reserve the right to charge for items considered
to be chargeable under fair wear and tear.
6) User misuse or any modification carried out to the
NRX EVO telephone by the customer is not
considered a manufacturing fault or component
defect. Therefore it is not covered by the warranty.
7) Accidental damage such as liquid spillage or user
damage will not be covered under the terms of the
warranty.
8) When returning the telephone please ensure you
fully complete the returns authorisation form, failure
to do so could cause you unnecessary delay.
Warranty
16
Warranty
Trojan Telecom's full liability will extend to the cost of repair
or complete replacement of the returned item only.
Returns Authorisation Form
Customer Details:
Address: ............................
...........................................
...........................................
Tel No: ...................
Fax No: ..................
Account No: ........................
Date Of Purchase Model No. Details Of Fault
The terms of this warranty do not effect your
statutory rights.
Warranty applies to UK customers only.
Faulty units should be returned to our service centre
at the following address, together with the completed
return form on the opposite page.
SERVISCOMM
UNIT 2, RED BARNES WAY
McMullen Road, Darlington
DL1 2RR UK

REF: ENGEVO500151008
Ist Floor
Amphenol Complex
Thanet Way
Whitstable
Kent
CT5 3JF
ENGLAND
Tel: (+44) (0)1227 275357 Fax: (+44) (0)1227 272932
e-mail: [email protected]
Other manuals for 500EH
1
Table of contents
Other NRX EVO Telephone manuals