NSS SIDEWINDER 30 User manual

OPERATION INSTRUCTIONS
SIDEWINDER 30 SWEEPER
Original Instructions

OPERATION INSTRUCTIONS
SIDEWINDER 30 SWEEPER
9
10
12
13
14
15
Important components
1. Push Handle
2. Waste Bin
3. Waste Bin Handle
4. Disc Brush Height Adjustment
5. Carrying Handle
6. Disk Brush
7. Side Guide Roller
8. Running Wheel
9. Fine Dirt Sweeping Roller
10.
Machine Number
11.Angled Wheel
12.Sweeping lip
13.Sweeping Plate
14.Clutch
15.Toothed Sleeve
11
2
1
3
5
6
7
8
FIGURE 1
2
2
3
3
1
1
4

OPERATION INSTRUCTIONS
SIDEWINDER 30 SWEEPER
IMPORTANT SAFETY INSTRUCTIONS
WARNING: Failure to observe these instructions can cause
personal injury to machine operator or bystanders.
WARNING: Fire or explosion hazard. NEVER operate this machine in an explosive
atmosphere (grain dust, flammable liquids or fumes, etc.).
WARNING: Fire or explosion hazard. NEVER use flammable liquids, (gas, kerosene,
solvents, or thinners) to clean the floor. NEVER use this machine to pick up anything that
is burning or smoking, such as cigarettes, matches, or hot ashes.
INTENDED USE
The Sidewinder 30 Sweeper is intended for commercial use, sweeping floors in an indoor/outdoor environment.
NSS does not recommend using these machines for any other purpose.
FOR SAFETY
•ALWAYS read and understand all instructions
before operating or servicing machine.
•ALWAYS use this machine ONLY as described in
this manual.
•NEVER attempt to operate this machine unless you
have been trained in its operation.
•NEVER allow an untrained person to operate this
machine.
•NEVER sweep up toxic, carcinogenic or unhealthy
substances or other hazardous materials.
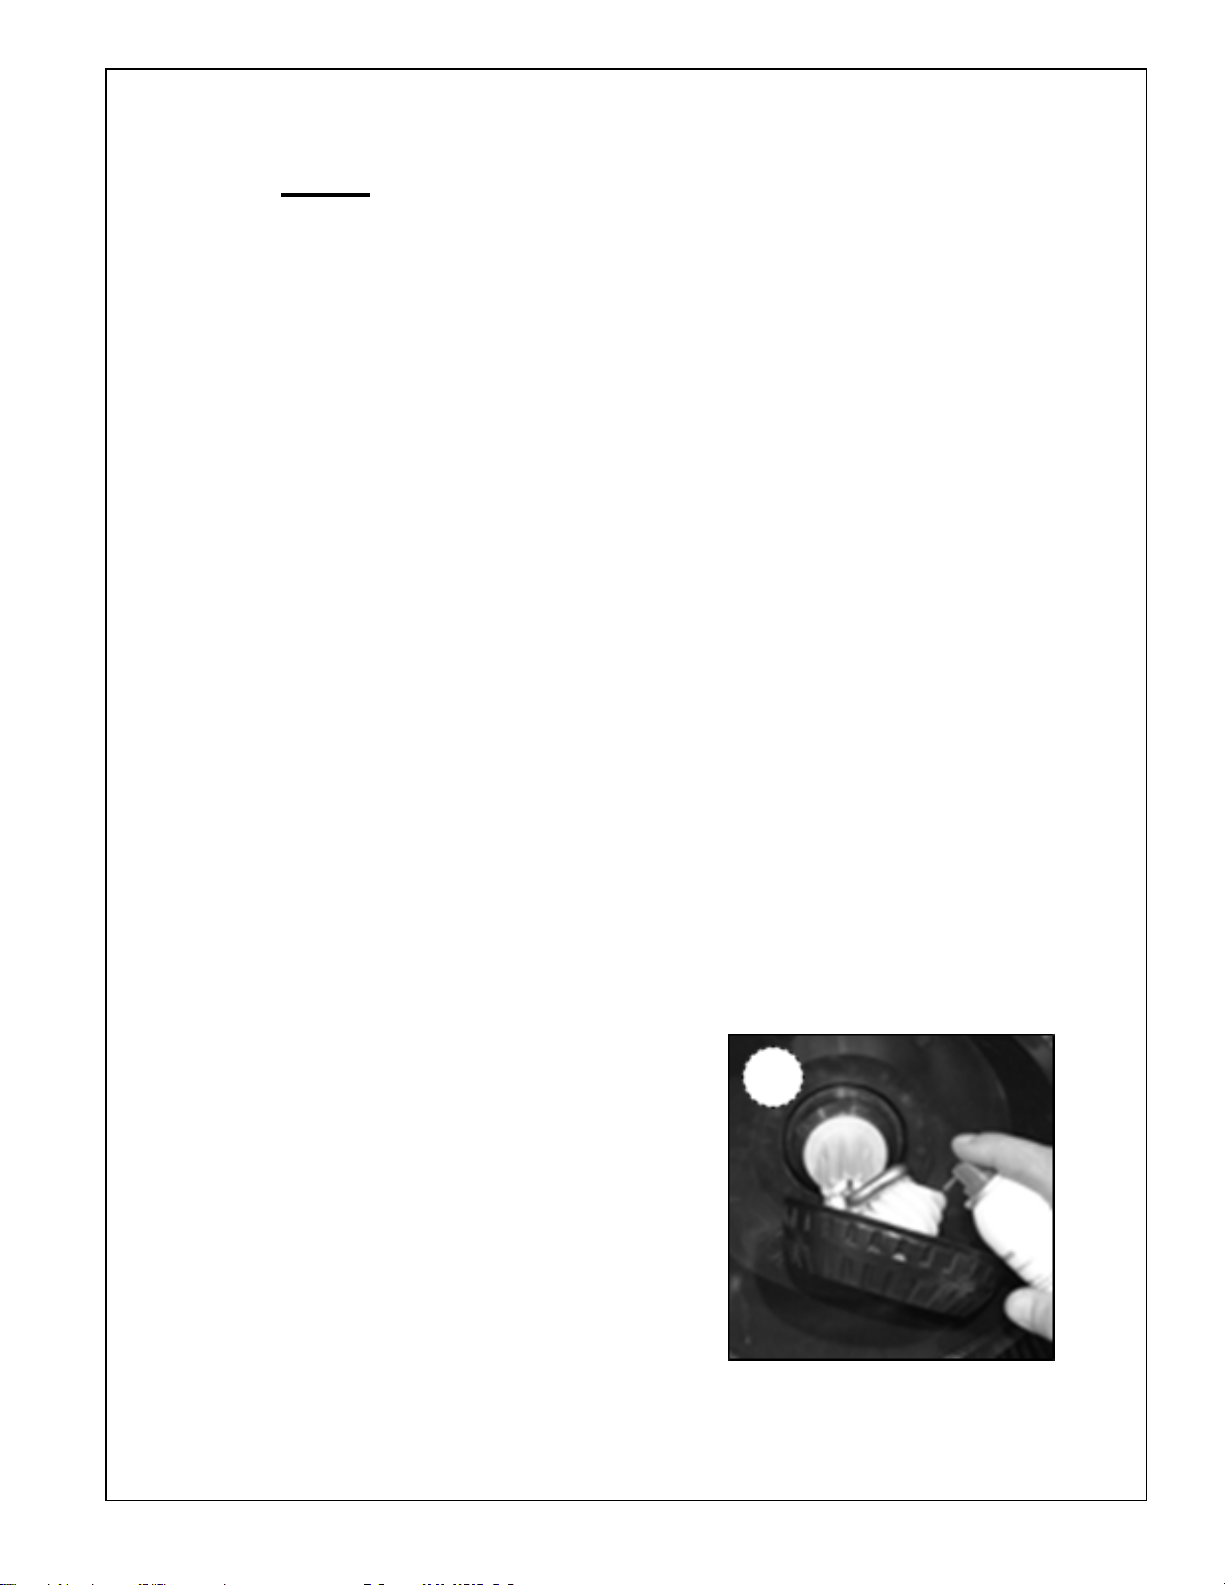
•ALWAYS wear suitable gloves when removing
glass or metal splinters from the dirt collector.
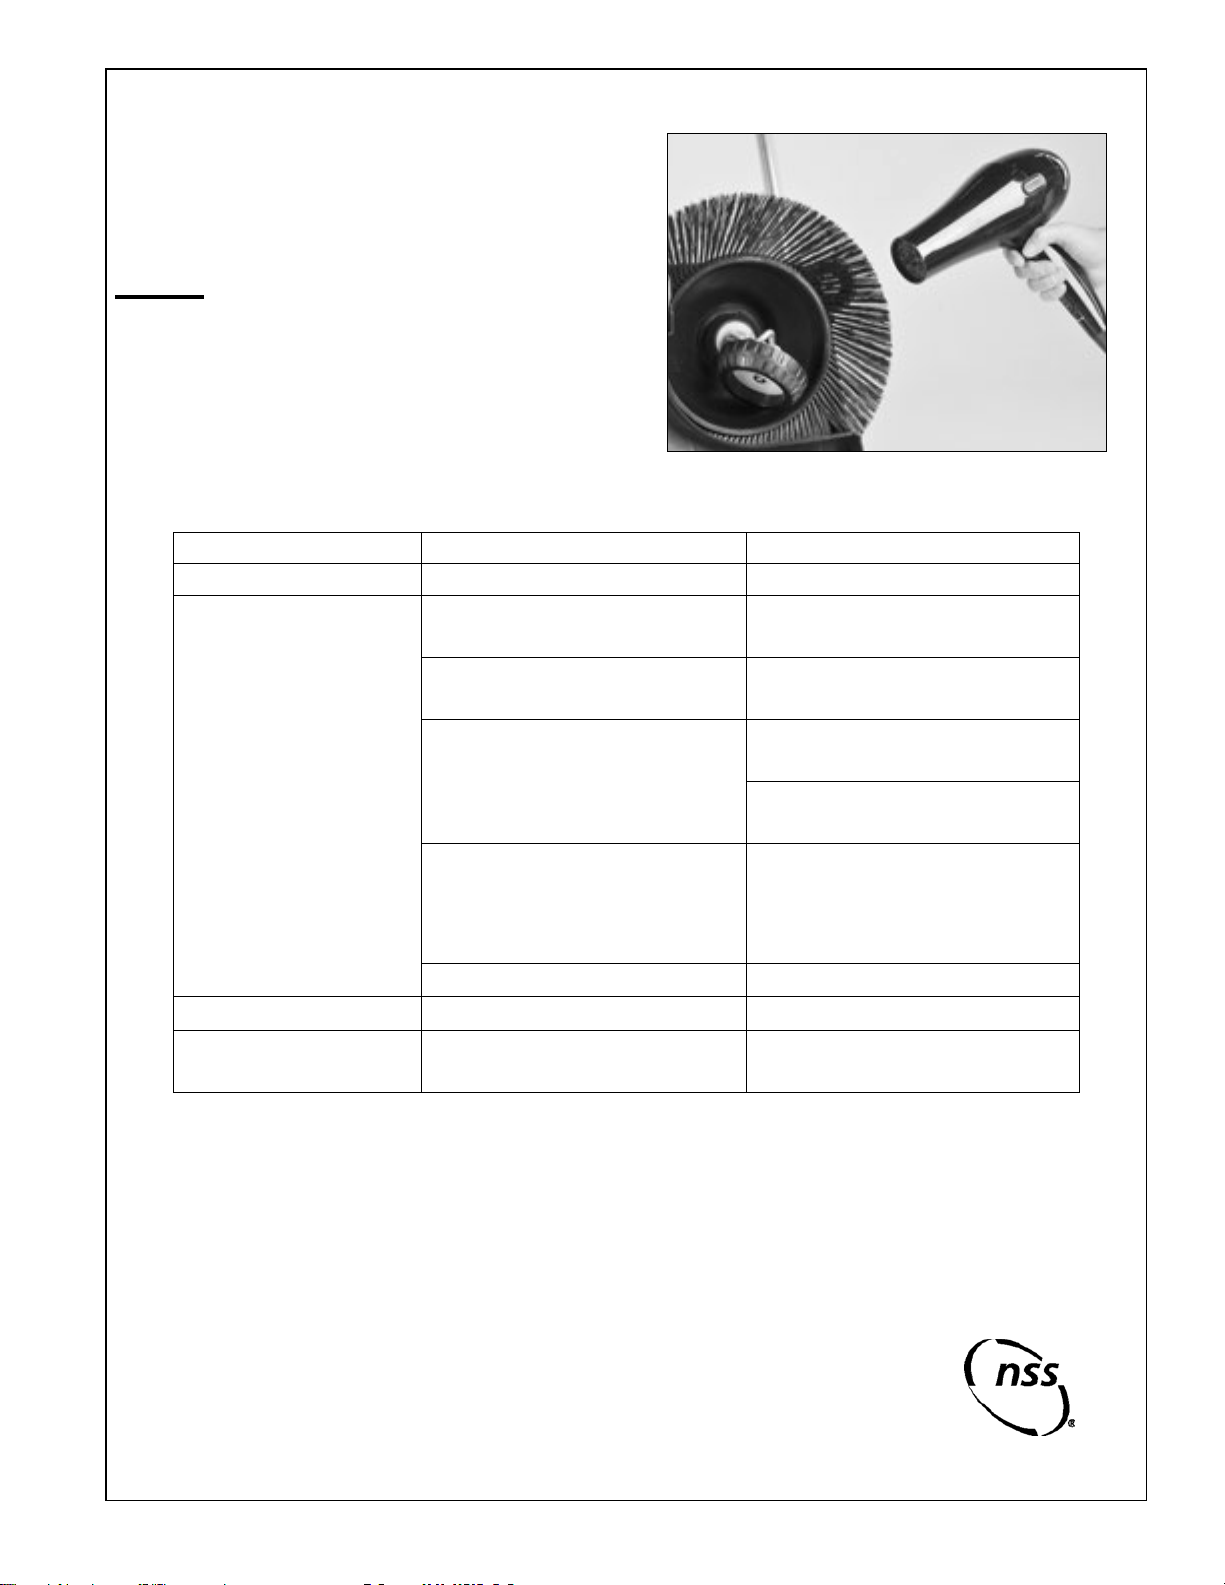
•ALWAYS oil gearings, couplings points or other
internal parts as recommended.
•NEVER attempt to operate this machine if it is not
working properly or has been damaged in any
manner.
•NEVER drop or insert any object into any machine
opening.
•NEVER allow this machine to be used as a toy.
Close attention is necessary when used by or near
children.
•ALWAYS keep face, fingers, hair or any other body
part or loose clothing away from any machine
opening or moving part (revolving brush).
•NEVER expose the machine to rain, snow, or
extreme temperatures.
•NEVER use this sweeper for liquid or wet pickup.
•ALWAYS empty the refuse container after use.
•ALWAYS store this machine indoors in a dry, cool
area (not below 32°F [0°C]) when not in use.
GENERAL INFORMATION
•Now that the machine is unpacked remember to
recycle all packing materials.
•Inspect the machine for damage or missing
components. If damage is found, contact the
freight company to file a claim.
ASSEMBLY
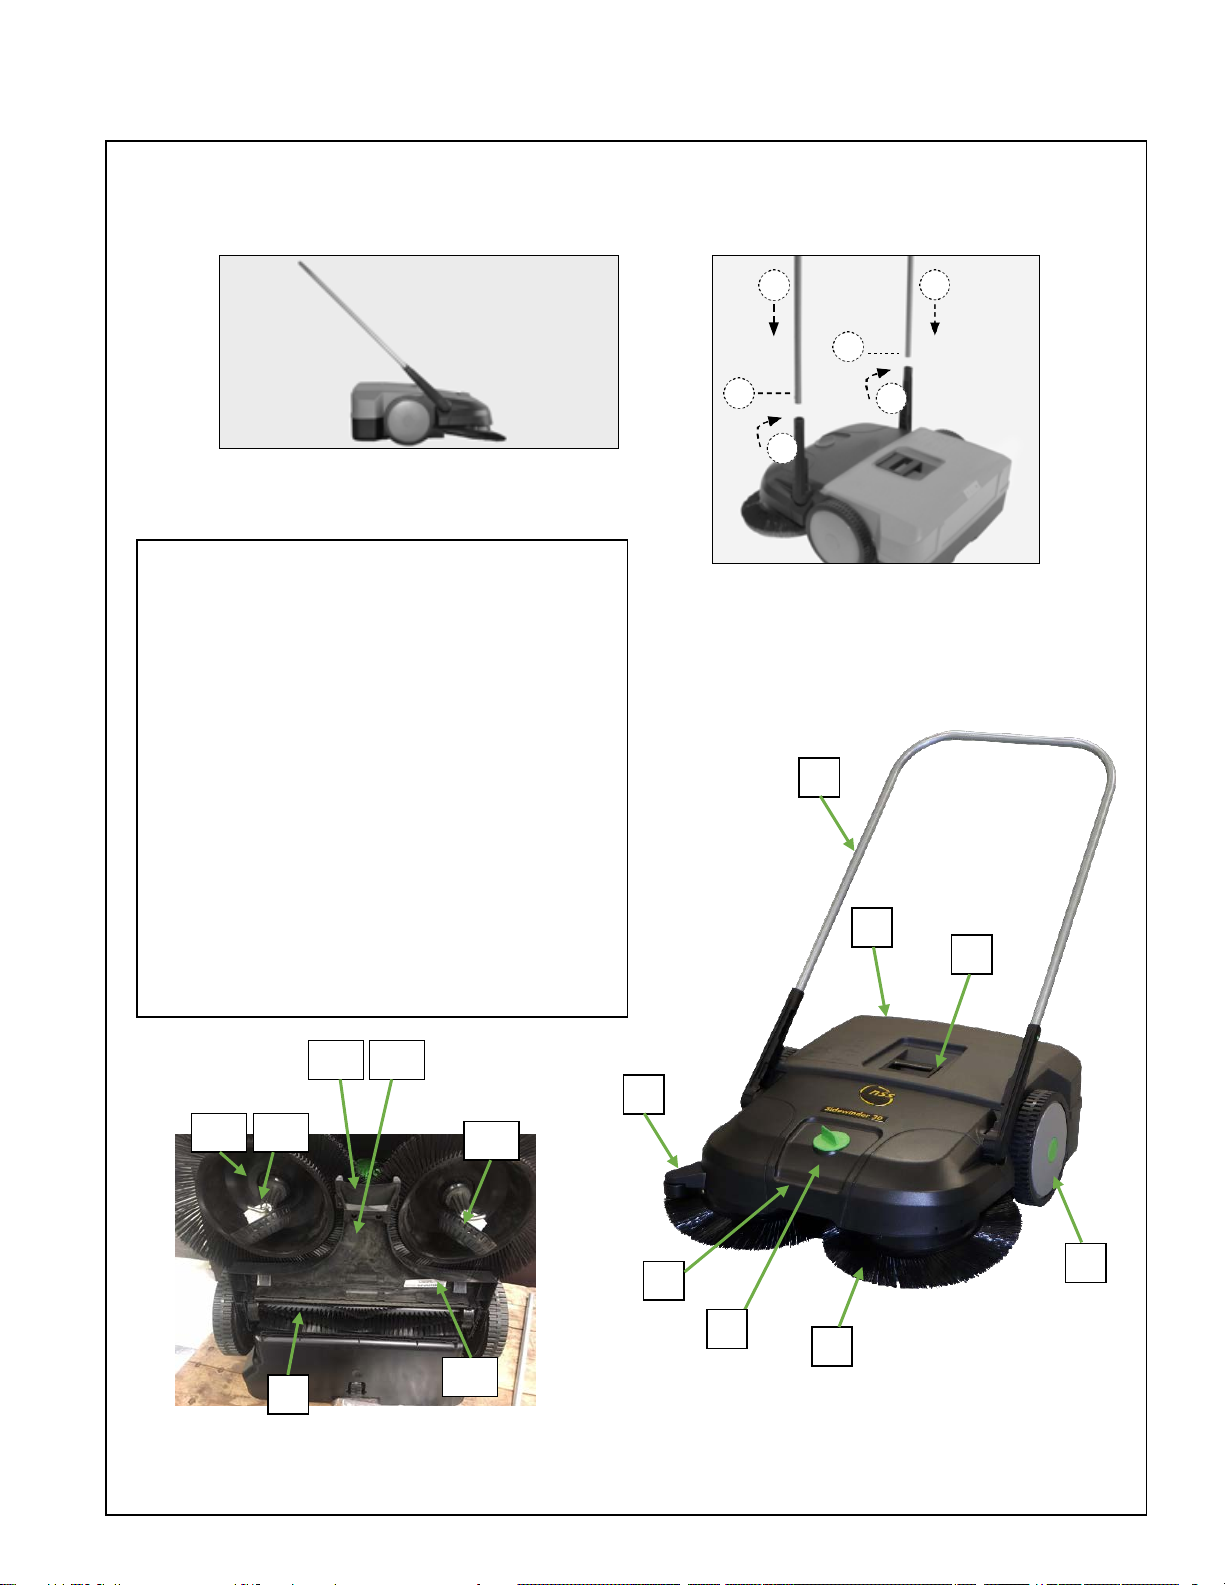
Mounting the pushing handle (Figure 1)
•Unpack the sweeper and place it on a flat
surface.
•Remove the refuse container and unpack the
parts packed inside it.
•Check that all parts and the instructions have
been removed from the carton.
•Engage handle fittings (1) in frame by pushing
gently into the base one at a time
•Turn handlefittings(1)sothattheyare
positioned
vertically upwards
(2).
•Presslockingsprings(3)onpush handle(2).
•Push the push handle (2) simultaneously into the
two handle fittings (1).
•Engage push handle in handle fittings byknocking
gently.
Machine Operation
•Check the Sweeper (see Maintenance)
•
Adjust thesweeper
(see Adjusting the sweeper)
•Guidethepushhandlewithboth hands.
•Pushthesweeperforwardatnormal walking pace.
•Emptythewastebinasrequired
Adjusting thesweeper Height adjustment
•Donotpressthediscbrushesontothe
ground too
firmly.
•Anexcessivecontactpressurewillnot achieve a

better cleaning result but will increasethewear.
•Anexcessivecontactpressurewill increasethe
pushingresistance.
NOTE
•Theknobforheight adjustmentofthe disc brushes
is located in the middle of thefront section.The
height adjustment knob allows the height of the disc
brushestobeadjustedtothegroundto
be swept.
•Adjusttotherequiredlevel(1):
•
Level 1–2: for all flat, hard surfaces
(e.g. asphalt, concrete, slabs…)
•
Level 3–4:for dampleaves, sand,
unevensurfaces
(e.g. washed concrete slabs)
•
Level 5–8: for heavysoiling and very
unevensurfaces
Todothis,turntheknob(2)anti-clock-
wise or clockwise to the desired
position.
MAINTENANCE
Routine maintenance is critical to ensure proper
machine operation and cleaning performance.
Perform all maintenance procedures as follows:
Daily Maintenance
•Inspect for any damage.
•The dirt collector must be emptied after each use
in order to provide efficient pickup.
•Remove any hair, fiber or other materials that may
have built up on the rotating brushes and the drive
components after each use.
•Clean the brush drives
•Recommendation: apply a thin coating of silicone
spray to the brush drives
Regular Maintenance
•Clean the unit with a dry cloth, including the inside
of the dirt collector.
•Check the condition of the sweeper.
•Check toensurethatthepushhandleis securely
attachedtothesweeper.
•Checkconditionofwastebinandensure that it is
securelyattached.
•Checkthediscbrushesandfinedirt sweeping
rollerforstuckpartsand embeddeddirt–
bristlesmustmove freely.
•Check the disc brushes and fine dirt sweeping
rollerforwound-upthreads andstring–removeif
necessary.
Cleaning
•Wearsturdyglovesinordertoavoid cut injuries,
e.g. due to glass shards, metalorothersharp-
edgedmaterials.
•Cleanthesweepertoremovedustand dirt.
•Donotusegreaseremoversforcleaning.
•Donotuseaggressivedetergents.
•Donotclean witha high-pressure cleaner.
•Protectbearingsagainstmoisture
•Protectbearingsagainstmoisture.
•Donotspray-cleanwithwateror
immerse in water.
•Donotcleanthe discbrushesandfine dirt
sweepingrollerwithcompressed air.The hardair
jetcoulddamagethe bristles.
•Clean plastic parts with a damp cloth.
Spraying the brush drives with lubricant
•Use only silicon lubricant spray.Useofotheroilsor
greasescan impair functioning of the brush drives.
•Positionthesweepersothatitis vertical.
•Apply a thin coating of silicon lubricant spray to the
gearing ofthebrushdrives(1).
•
Remove excess lubricant.
•
Recommendation: every 8 hoursor operation or as
required.
1

SAVE THESE INSTRUCTIONS
Straightening bristles
•Danger of fire!
•Do not use naked flames or burners to heat the
bristles.
•Do not use a heat gun. The brushes maymeltdueto
theexcessivelyhot
NOTE
Bent bristles can be straightened again by heating with a
hot-air blower.
Heat the bristles using a hot-air blower(e.g.hairdryer).
Thebristleswill
straighten themselves
.
Troubleshooting
Repair service for this machine must be performed by an NSS authorized service center. Repairs performed by an
unauthorized company will void the machine warranty. If you require assistance finding an authorized service
center, contact NSS Enterprises.
Problem
Cause
Remedy
Sweeper moves
sluggishly
ordoesnotrun
smoothly
Sweeper dirty
Clean the sweeper
(see Cleaning the sweeper)
Brushes blocked
Eliminate blockage
(see Eliminating blockages)
Brush drives dirty
Clean the brush drives
(see
Cleaning the sweeper)
Lubricate brush drives with lubricant
spray
•
Heightadjustmentissettoo low
•
Contact pressure of disc
brushesistoohigh
Adjust height
(see Height adjustment)
Disc brushes do not rotate
Contact Service
Brushes are bent
Improper storage
Straighten brushes
Inadequate sweeping
performance
Sweeping lip is missing, loose or
heavily worn
Replace sweeping lip
Table of contents
Other NSS Blower manuals