manuals.online logo
Brands
  1. Home
  2. •
  3. Brands
  4. •
  5. Numark
  6. •
  7. Baby Swing
  8. •
  9. Numark MONTEREY 3-SEAT SWING/DAYBED User manual

Numark MONTEREY 3-SEAT SWING/DAYBED User manual

1
MONTEREY COLLECTION 3-SEAT SWING/DAYBED
ASSEMBLY INSTRUCTIONS
088-1517-8 (SC-392GS)
Please read and understand this manual before any assembly. Before
beginning assembly of product, make sure all parts are present.
Compare parts with packaging contents list. IF any part is missing,
or if you have any questions, contact the vendor’s customer
service department at 1-877-729-8315.
2
Name Part # Qty. Illustration Part # Qty. Illustration
M6x25
M6x30
M6x36
M8x15
M8x35
M8x60
M8x75
M6
M8
M6
M8
M6x12
Packaging content
1
2
3
4
5
6
7
8
9
10
11
12
13
14
15
16
17
18
19
20
21
22
2
2
2
2
2
1
1
1
1
1
1
4
1
4
2
1
1
2
1
1
2
2
Large canopy
Small canopy
Net panels
Pillows
Small canopy
frame bars
Leg posts
Leg posts
Side panels
Long top
crossbars
Short top
crossbars
Rear leg
crossbar
Right arm
Left arm
Front seat
support bar
Rear seat
support bar
Seat and
back
Hanging
bars
Large
canopy frame
Canopy
frame bars
Small
canopy frame
Cushion
Pillows
A
B
C
D
E
F
G
H
I
J
K
L
M
N
O
P
Q
R
4
2
4
2
4
8 + 1
4
2
4
6
4
22
2
2
4
1
1
1
3
Assembly instruction
(A)
(O)
(1)
(A) x 4
(O) x 4
Insert an bolt (A) through the U-shaped bracket (O), and secure into the leg top (1).
Do not tighten. Repeat for the remaining 3 legs.
1
(F) x 4
(L) x 4
2
(3)
(2)
(1)
(F) (L)
Attach the side panel (3) with 2 legs (1 & 2) by inserting an bolt (F) through an metal
washer (L), through the hole of the side panel (3), and secure into the leg (1).
Make sure the arrow “↑” is pointing up. Repeat procedure for the other leg (2).
Do not tighten completely. Repeat procedure for the other side panel.
4
(E) x 4
(L) x 4
3
Assembly instruction
(G) x 4
(J) x 4
4
(L) x 8
(L)
(L)
(G)
(J)
(5)
(4)
(1)
(4)
(4)
(E)
(L)
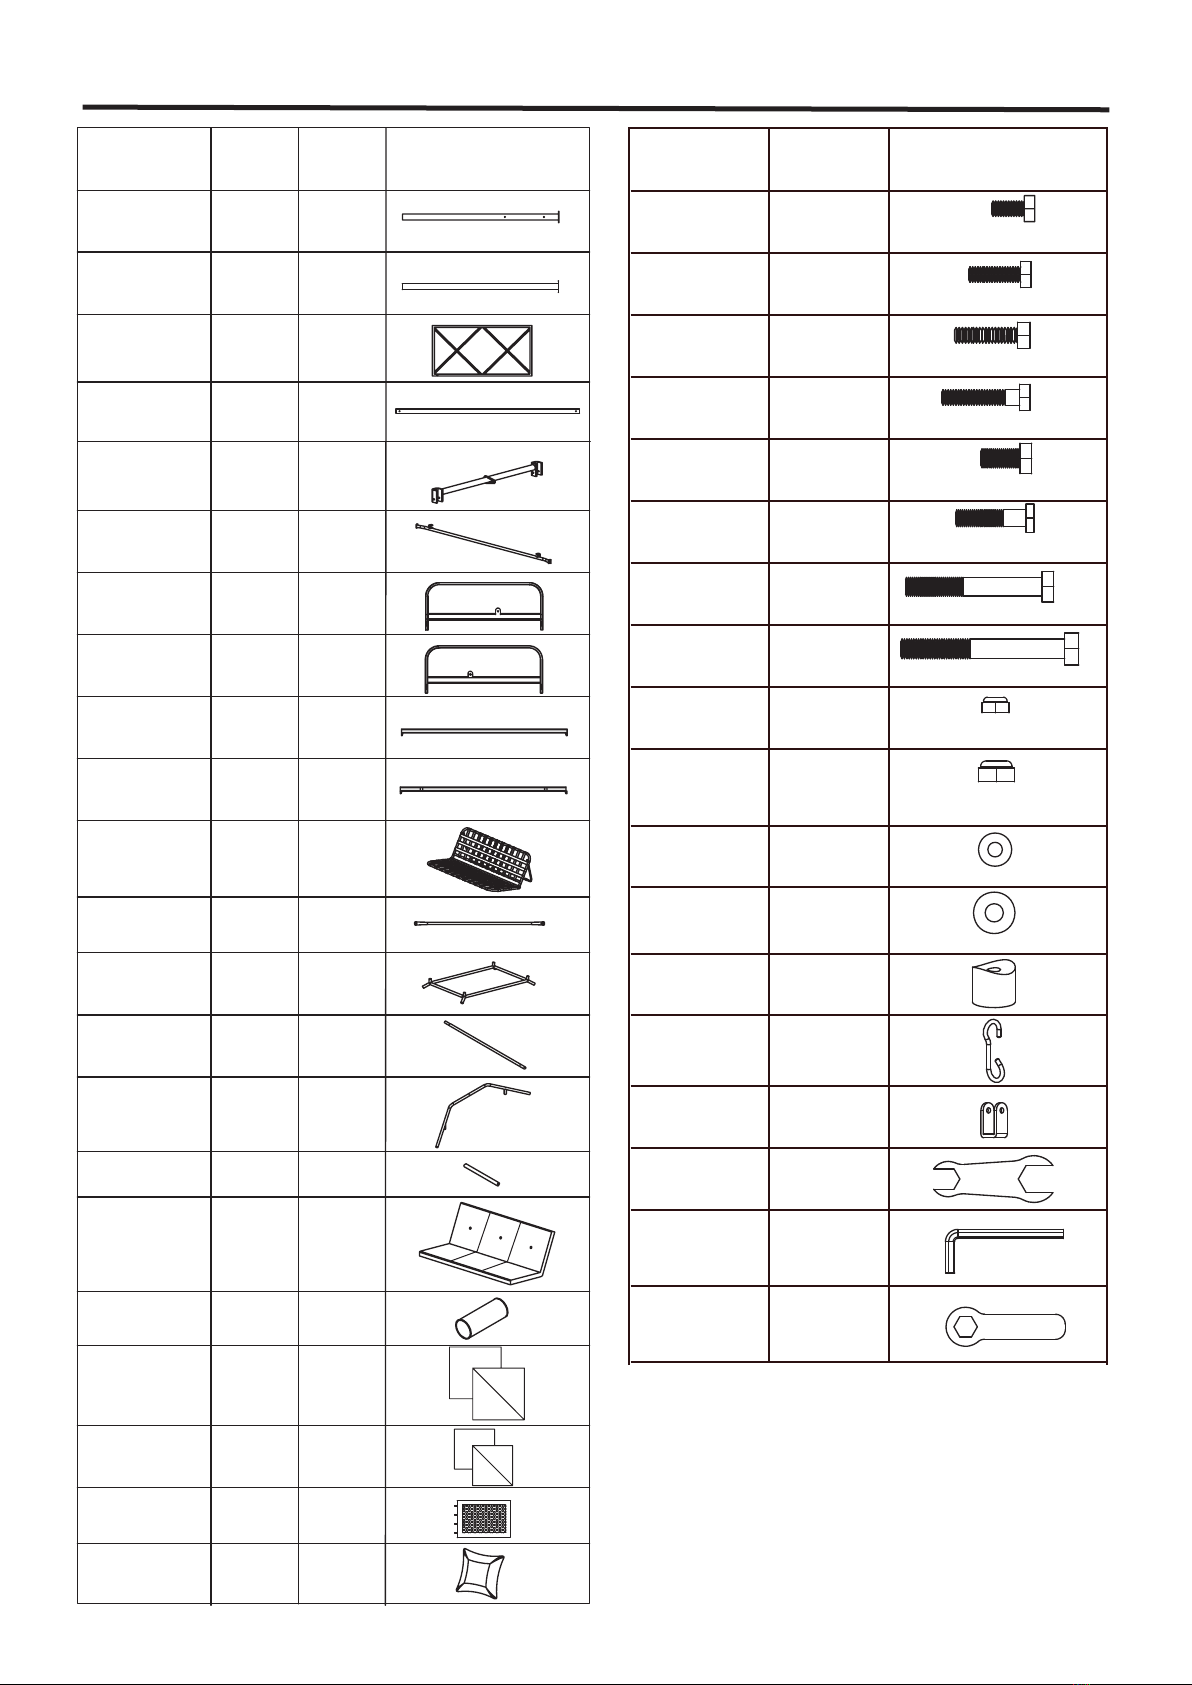
Insert two long top crossbars (4) into the holes at the top of each leg. Line up the holes.
For each hole insert an bolt (E) through an metal washer (L), through the leg, and secure
into the long top crossbar (4). Do not tighten completely. Repeat procedure for the other
long top crossbar.
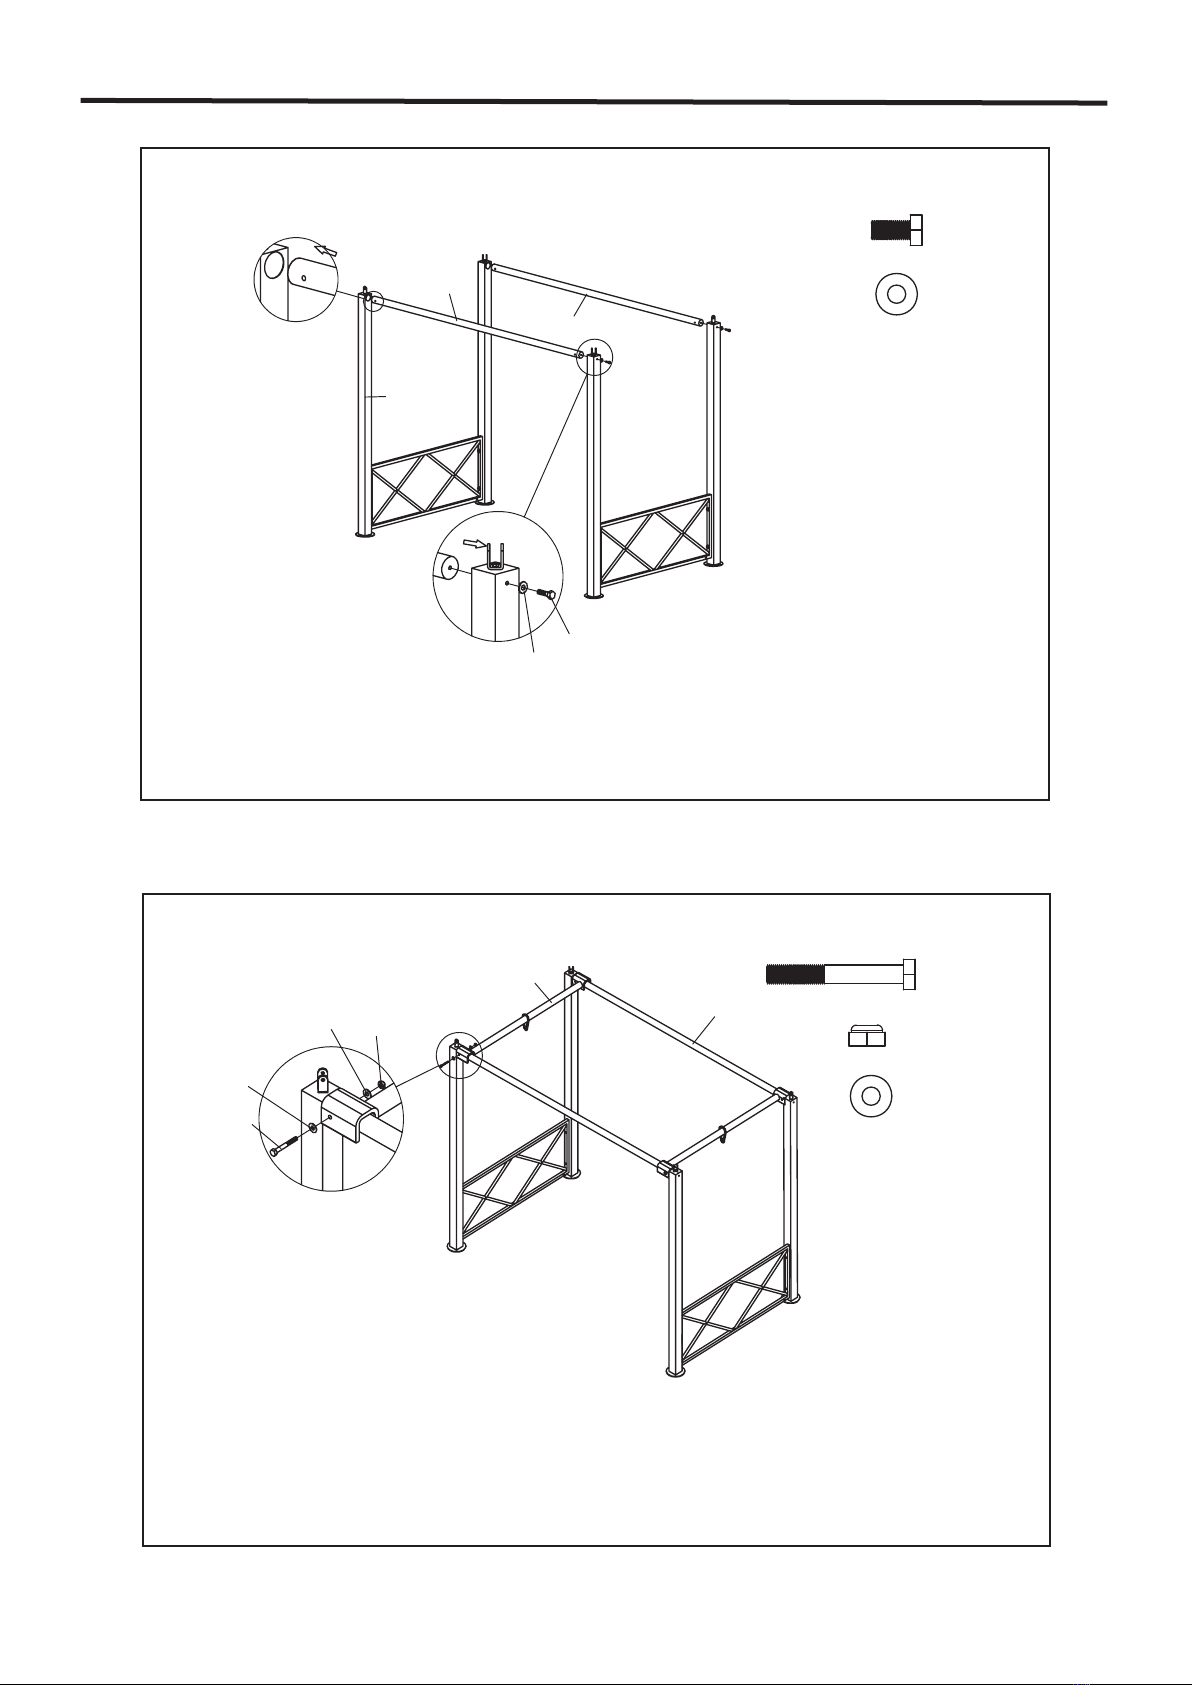
Fix a short top crossbar (5) onto the long top crossbar (4). Make sure the U-shaped brackets
of the short top crossbar (5) are facing down. Line up the holes, for each hole insert an
bolt (G) through an metal washer (L), through the long top crossbar (4), short top crossbar (5),
(the bracket of the short top crossbar (5)), and another metal washer (L), then secure with
an nut (J). Do not tighten completely. Repeat procedure for the other side.
5
(D) x 2
(K) x 2
5
(10)
(7)
(10)
(9)
FRONT
(7)
(8)
Assembly instruction
6
(6)
(3)
(D)
(K)
Place the rear leg crossbar (6) between the side panel (3), line up the holes, insert an
bolt (D) through an metal washer (K), through the side panel (3), and secure into the
rear leg crossbar (6). Do not tighten completely. Repeat procedure for the other side.
Tighten all bolts in the whole frame.
Lay out the right arm (7), left arm (8), front seat support bar (9) and rear seat support
bar (10). Make sure that the labels marked “Front’’ on the arms and seat support bars
are all facing the front edge of the seat. Attach the seat support bars to the arms by
pressing the tabs on the ends of the seat support bars down into the brackets on the arms.
Make sure they are securely seated.
6
(H)
(L)
(M)
(J)
(11)
(H) x 2
(J) x 2
7
Assembly instruction
8
(10)
(11)
(L) x 2
(M) x 2
Unfold the seat and back (11) and lay it on top of the frame. Line up the holes in the
arms (7 & 8) with the holes in the side tubes of the seat and back (11). Insert an bolt (H)
(from outside to inside) through the bracket of the arm, through a plastic washer (M),
through the side bar on the seat and back, through an metal washer (L) and an nut (J).
Do not tighten completely. Repeat procedure for the other side. Then securely tighten
the bolts and nuts.
Raise the back side of the seat and back (11) and fasten the U-shaped bracket of the
back support tube to the rear seat support bar (10) as per the drawing.
7
(N) x 2
9
(19)
TOP
(12)
(12)
(N)
(13)
(14)
(14)
(13)
(13)
(14)
Assembly instruction
10
Attach the hanging bars (12) to the arms by sliding the bottom hole in the bars over the
pins on the outside of the arms. Position the bars so that the end labeled “TOP” is up
and facing toward the swing seat. At each end of the seat assembly, bring together
the holes in the top ends of the hanging bars and thread them on to an “S” hook (N).
Hang the “S” hooks and seat and back from the loops on the short top crossbar.
Insert a large canopy frame bar (14) into the large canopy frame (13) as per drawing.Place
the large canopy (19) over the assembled canopy frame (13 & 14) spread to the
location as per drawing.
8
(B)
(K)
(16)
(20)
(19)
(15)
(16)(15)
11
Assembly instruction
(B) x 2
(K) x 2
12
(15)
(13)
(13)
(15)
(15)
Insert the small canopy frame into the large canopy frame as per drawing.
Insert an bolt (B) through the metal washer (K), and secure into the Small canopy
frame bars (16). Tighten all bolts.
9
(C) x 4
(I) x 4
13
Assembly instruction
14
(17)(18)(22)
(19)
(20)
(C)
(I)
(14)
(19)
(20)
(14)
Place the assembled canopy top frame on the assembled swing frame. Insert an bolt (C)
through one side of the U shaped bracket at the top of the leg, through the canopy
frame bar (14), through the other side of the U shaped bracket, and secure with an nut (I).
Do not completely tighten. Repeat procedure for the remaining 3 canopy frame bars (14).
Tighten all bolts.
10
Assembly instruction
15
16
Your swing is ready for use!
Guarantee
This product is guaranteed for a period of one (1) year against defects in workmanship and materials.
Should this product become defective within the stated warranty period, return it to the store with proof
of purchase, and it will be replaced or repaired free of charge.
(21)
To convert the swing into a hanging bed, release the back support tube from the rear
seat support bar (6) and fasten it to the U-shaped bracket on the rear leg crossbar (6).
When used as a bed, the seat assembly should be secured by these holders and not
allowed to swing.

Popular Baby Swing manuals by other brands

Hartman Dubai 69804012 quick start guide

Hartman

Hartman Dubai 69804012 quick start guide

Fisher-Price Y5708 quick start

Fisher-Price

Fisher-Price Y5708 quick start

Kinderkraft FINIO user manual

Kinderkraft

Kinderkraft FINIO user manual

HI-FLYER HF14 user manual

HI-FLYER

HI-FLYER HF14 user manual

Sunset Swings 422L Assembly & operation manual

Sunset Swings

Sunset Swings 422L Assembly & operation manual

stilum simius 3 Maintenance instructions

stilum

stilum simius 3 Maintenance instructions

Fisher-Price Y8641 manual

Fisher-Price

Fisher-Price Y8641 manual

Kids II ingenuity Inlighten Cradling Swing Twinkle... manual

Kids II

Kids II ingenuity Inlighten Cradling Swing Twinkle... manual

Outdoor Play 2006834 instruction manual

Outdoor Play

Outdoor Play 2006834 instruction manual

Canvas SYDNEY 088-2214-2 Assembly instructions

Canvas

Canvas SYDNEY 088-2214-2 Assembly instructions

Coccolle Velio manual

Coccolle

Coccolle Velio manual

PATIOJOY HW69619 manual

PATIOJOY

PATIOJOY HW69619 manual

Zest Miami Assembly instructions

Zest

Zest Miami Assembly instructions

All Things Cedar PS48U manual

All Things Cedar

All Things Cedar PS48U manual

Trigano HALI manual

Trigano

Trigano HALI manual

Wunderwiege KLAMMA User instructions

Wunderwiege

Wunderwiege KLAMMA User instructions

Sunset Swings 422P Assembly & operation manual

Sunset Swings

Sunset Swings 422P Assembly & operation manual

Chad Valley Pink 366/6881 Assembly & user instructions

Chad Valley

Chad Valley Pink 366/6881 Assembly & user instructions

manuals.online logo
manuals.online logoBrands
  • About & Mission
  • Contact us
  • Privacy Policy
  • Terms and Conditions

Copyright 2025 Manuals.Online. All Rights Reserved.