Nuovo Easy-Print 10 Series User manual

Nuovo
Representation of Nuovo
Representation of Nuovo AG:
General office:
Nuovo BV
Dorpsstraat 84
NL-5471 NA LOOSBROEK
Ph: 0031 (0) 413 229180
Fax: 0031 (0) 413 229158
Email info@nuovo.net
www.nuovo.net
Advice
Sales
Service
Customer Service

Nuovo
Operating instructions for use
EASY-PRINT Sprinter R5/R6, Series 10
Table of Contents
1 Introduction.......................................................................................................................... 2
2 Identification ........................................................................................................................ 2
3 Safety instructions............................................................................................................... 3
3.1 Proper use...................................................................................................................................................... 3
3.2 Location of instructions for use ...................................................................................................................... 3
3.3 User requirements / Operating personnel ...................................................................................................... 3
3.4 Performance of work on the machine ............................................................................................................ 3
3.5 Dangers in case of non-compliance with safety instructions.......................................................................... 3
4 Setup and adjustment of the machine ............................................................................... 4
4.1 Place of use of the machine........................................................................................................................... 4
4.2 Electrical connection ...................................................................................................................................... 4
5 Description of the machine................................................................................................. 4
5.1 Function.......................................................................................................................................................... 4
5.2 Electrical system ............................................................................................................................................ 4
5.3 Protective cover.............................................................................................................................................. 4
6 User manual ......................................................................................................................... 5
6.1 Machine description ....................................................................................................................................... 5
6.2 Power on / Power off ...................................................................................................................................... 5
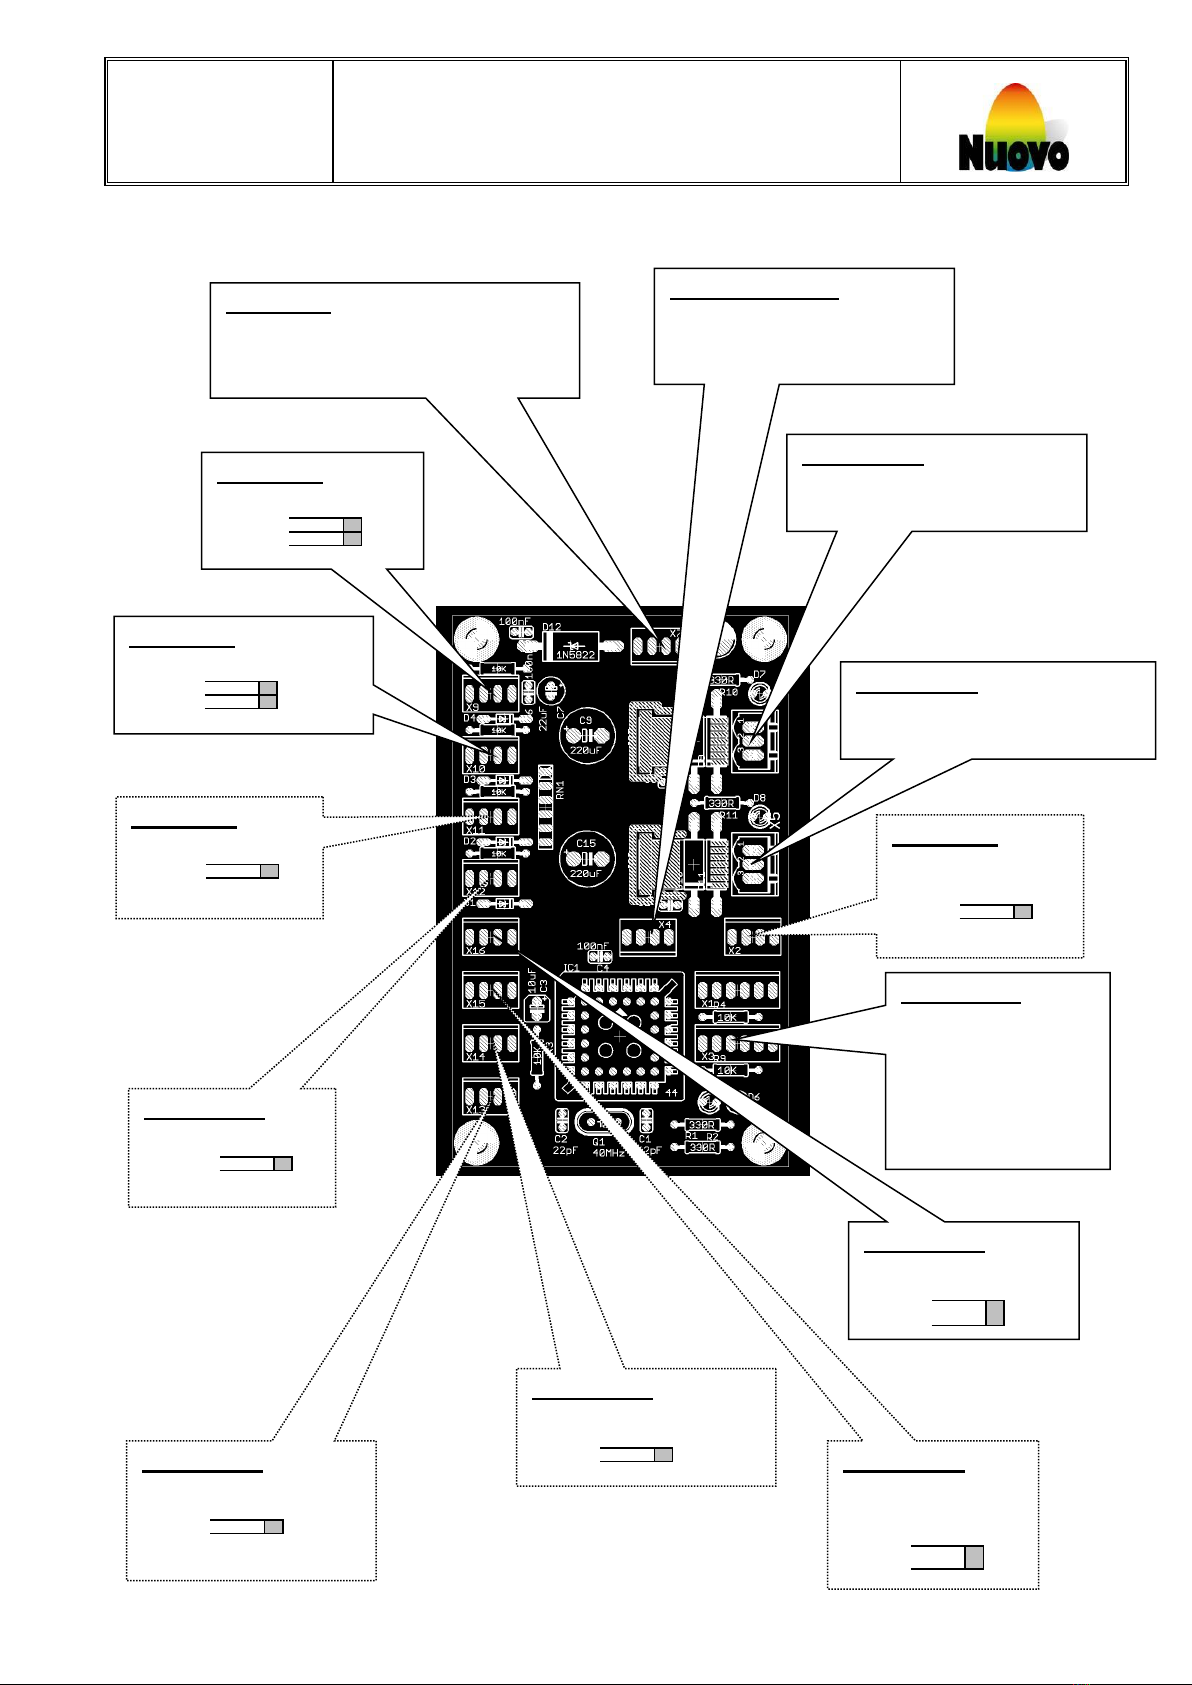
6.3 Electrical overview EasyUnit10 ...................................................................................................................... 7
6.4 Electrical connection power supply ................................................................................................................ 8
6.5 Positioning the imprint heads ......................................................................................................................... 8
6.6 Assembling and disassembling the ink reservoir ........................................................................................... 8
6.7 Stamping bar, complete ................................................................................................................................. 9
6.8 Service bracket............................................................................................................................................... 9
6.9 Parking station for individual ink reservoirs .................................................................................................... 9
7 Trouble Shooting ............................................................................................................... 10
8 Cleaning, Maintenance, Repair......................................................................................... 10
8.1 Cleaning ....................................................................................................................................................... 10
8.2 Maintenance................................................................................................................................................. 10
8.3 Repair........................................................................................................................................................... 10
9 Packing, Transport, Storage............................................................................................. 11
9.1 Packing......................................................................................................................................................... 11
9.2 Transport ...................................................................................................................................................... 11
9.3 Storage......................................................................................................................................................... 11

Nuovo
Operating instructions for use
EASY-PRINT Sprinter R5/R6, Series 10
1
10 Disposal........................................................................................................................... 11
11 General technical data ................................................................................................... 11
12 Spare parts ...................................................................................................................... 12
12.1 Disposable ink reservoir ............................................................................................................................... 12
12.2 Stamping bar, complete ............................................................................................................................... 13
12.3 Parking station.............................................................................................................................................. 13
12.4 Easy-Print spare parts.................................................................................................................................. 14
12.5 L-Brackets .................................................................................................................................................... 15

Nuovo
Operating instructions for use
EASY-PRINT Sprinter R5/R6, Series 10
2
Introduction
Dear Customer,
Please read the following notes:
Please comply with these Instructions before operating the machine into operation. Be familiar with all
settings and their functions.
Comply with these instructions for use and maintenance. They are a requirement for many years of trouble
free use of the machine. You will find information on this in these Instructions for use.
Maintenance and repair work should be performed only by qualified technical personnel.
The machine may be used and maintained only by persons who are familiar with it and have been instructed
on the dangers.
Any use other than stamping eggs is considered as improper. The manufacturer will not be liable for resulting
damages.
The relevant accident prevention regulations as well as the generally-recognized rules of safety and industrial
medicine are to be complied with. Unauthorized changes to the machine will exclude any liability of the
manufacturer for damages resulting from them.
Delivery of replacement parts requires an order specifying serial number and year of installation, number or
name of the spare part, method of shipping an address.
In our efforts to improve the quality of our products continuously, we retain the right to make improvements
without changing the Instructions for use. For information on dimensions, weights, materials, performance and
item names, we must retain the right to make necessary deviations for us. In the case of electrical drawings, the
particular plan which is delivered with the machine will be valid.
We wish you great success with this machine from Nuovo.
2 Identification
The EASY-PRINT is identified with a tag indication serial number and the year the machine was built.

Nuovo
Operating instructions for use
EASY-PRINT Sprinter R5/R6, Series 10
3
3 Safety instructions identification
3.1 Proper use
The EASY-PRINT is an egg imprinting machine.
Any other use or use beyond this is not permitted.
If the EASY-PRINT is used for purposes other than those listed, the manufacturer or supplier will not be liable for
any resulting damage. The user alone will bear such risks.
The EASY-PRINT is built in accordance with the applicable state-of-the-art of technology and the recognized
safety regulations.
3.2 Location of instructions for use
The Instructions for use should be available to supervisory and maintenance personnel in plants.
3.3 User requirements / Operating personnel
The EASY-PRINT is to be operated only by trained and instructed personnel. The minimum age permitted legally
is to be observed.
In principle, personnel for training, practical training or instruction or found in a general apprenticeship are to be
placed under constant supervision of an experienced person.
The responsibilities of the personnel for operation, set-up, maintenance and repair are to be established clearly.
In addition, it is to be ensured that only personnel authorized to do so operate the machine.
3.4 Performance of work on the machine
The personnel authorized to work on the machine must read and understand these Instructions for Use before
starting.
Generally applicable, statutory and other binding regulations for accident prevention and environmental
protection in the particular country where the machine is operated will apply in addition to these Instructions for
use.
3.5 Dangers in case of non-compliance with safety instructions
Non-compliance with the safety instructions can result in danger for persons as well as for the environment and
the machine itself.
Non-compliance with the safety instructions can lead to the loss of all entitlements to compensation for
damages.
In particular, non-compliance can involve the following dangers, for example:
Failure of important functions of the machine
Failure of prescribed methods for maintenance and upkeep of the machine
Endangering of persons through electrical, mechanical and thermal effects
KEEP CHILDREN AWAY FROM THE SYSTEM!

Nuovo
Operating instructions for use
EASY-PRINT Sprinter R5/R6, Series 10
4
4 Setup and adjustment of the machine
4.1 Place of use of the machine
The EASY-PRINT is to be set up in safe surroundings without interference in a usual room for machines
(industrial operation, agricultural operation).
The machine should be operated in a dry environment.
The machine must be accessible from at least one side.
The EASY-PRINT should be operated as horizontally as possible at an ergonomic working height.
The machine may not be located in rooms where acids or similar chemicals are stored in any case.
4.2 Electrical connection
Make sure signal, power supply and especially the ground are in order.
The EASY-PRINT has to be wired for the type off packer it is going to be used on.
Power supply unit: 110/230 Volt and 50/60 Hertz.
For improper installation and/or connection, we decline any responsibility.
Caution:
Components within the machine are under high voltage. Only remove the cover when the power
supply has been disconnected.
An incorrect or malfunctioning power supply can lead to overload of the circuits and damage to the
machine.
5 Description of the machine
5.1 Function
The EASY-PRINT serves for the stamping of eggs in the foodstuffs industry. It is performed with screen printing
using approved food grade ink. The way the machine is designed (patented) makes sure that all imprints made
are of the highest quality.
5.2 Electrical system
The system must be connected correctly to the original Diamond-Stamper harness and the internal wiring
Of the EASY-PRINT must be set to the correct type of packing lane.
5.3 Protective cover
Caution: Before opening the electrical cabinet, pull the main plug out.

Nuovo
Operating instructions for use
EASY-PRINT Sprinter R5/R6, Series 10
5
6 User manual
6.1 Machine description
The picture below shows the EASY-PRINT.
6.2 Power on / Power off
Advice
To turn off the machine, close the protective cover [OFF] and then turn off the machine using the power switch.
The protective cover must be closed [OFF] to operate the machine. If the power switch is turned on with the
protective cover open [ON] the machine will not operate and the green LED will not illuminate. To activate the
machine close [OFF] the protective cover and reopen again [ON].
As soon as the safety-lid [5] is opened the machine automatically stops.
5
7
1
6
4
2
1. Power switch
2. Lever for opening and closing the protective cover (sealing off lid)
3. Ink-reservoir with rubber stamping pad
4. Inch button for single stroke
5. Safety-Lid
6. Rubber spring
7. Stamping bar
1
2
5
3
7
1. Power switch.
2. Open the protective cover. [ON]
The machine will make a single stroke.
3. Clean the rubber ink pads and the
protective cover with a paper tissue.

Nuovo
Operating instructions for use
EASY-PRINT Sprinter R5/R6, Series 10
6
Green LED information
1. LED flashes regular The machine has the status 'READY FOR OPERATION'.
2. LED flashes fast A stamping stroke (circuit) is carried out.
The motor rotates.
3. LED flashes 2 times The machine is switched on and is waiting for open and close
the protective cover. (sealing off lid)
4. LED flashes 3 times The safety-lid is open and/or the protecting cover is closed. [OFF]
(Motor is off, and the sensor is inactive)
For stamping close the safety-lid and/or open the protecting cover. [ON]
5. LED flashes 4 times Motor is blocked. (and/or no signal by the index sensor)
Remove blockage, or adjust index sensor. (sensor inside Easy-Print)
Turn off the machine and start it again.

Nuovo
Operating instructions for use
EASY-PRINT Sprinter R5/R6, Series 10
7
6.3 Electrical overview EasyUnit10
Input X0:
Start-Sensor
Pin 1: +24VDC
Pin 2: Signal
Pin 3: GND
Pin 4: +5VDC
Input P0:
Power supply +24VDC
Pin 1: +24VDC
Pin 2: GND DC
In-/Output C0:
Serial data cable (TTL)
Pin 1: RXD
Pin 2: TXD
Pin 3: GND
Pin 4: +5VDC
Input X1:
Index-Sensor
Pin 1: +24VDC
Pin 2: Signal
Pin 3: GND
Pin 4: +5VDC
Output X7:
Conveyor belt
ON/OFF
Pin 1: -
Pin 2: Signal
Pin 3: GND
Pin 4: +5VDC
Output X3:
Sealing-off lit
Pin 1: +24VDC
Pin 2: Signal
Pin 3: GND
Pin 4: +5VDC
Output X6:
5VDC for Egg counter
Pin 1: -
Pin 2: Signal
Pin 3: GND
Pin 4: +5VDC
Output X4:
5VDC LED (green)
Pin 1: -
Pin 2: Signal
Pin 3: GND
Pin 4: +5VDC
Output X5:
5VDC LED (red)
Pin 1: -
Pin 2: Signal
Pin 3: GND
Pin 4: +5VDC
Input X2:
Safety-Guard
Pin 1: +24VDC
Pin 2: Signal
Pin 3: GND
Pin 4: +5VDC
Output A0:
Stamper-Motor 24VDC
Pin 1: Power output A
Pin 2: Power output B
Output A1:
Conveyor belt-Motor 24VDC
Pin 1: Power output A
Pin 2: Power output B
Input X10:
Selector switch for
Setting delay time
Pin 1: D0
Pin 2: D1
Pin 3: D2
Pin 4: D3
Pin 5: GND
Pin 6: +5VDC
Input X8:
Button for
manual start
Pin 1: Signal
Pin 2: GND
Pin 3: Signal
Pin 4: GND

Nuovo
Operating instructions for use
EB EASY-PRINTER
Eggland’s Best, Inc. Operating Standards Manual- EB Easy Printer Manual 16/001
Confidential. Do not reproduce without permission December 6, 2016
8
A Potentiometer for adjustment DC voltage
(Default settings 24 Volt)
6.6 Electrical connection power supply
A

Nuovo%%
%Operating%Instructions%for%Use%
EB%EASY9PRINT%sprinter%R6%%!
!
!
!
!
8!
6.5$$Electrical$overview$Easy2unit$ORIGINAL$MODEL$“PA”$%
!
!
!
!
!
!
!
!
!
!
!
!
!
!
!
!
!
!
!
!
!
!
!
!
!
!
!
!
!
!
!
!
!
!
!
!
input X9:
Startsignal
Pin 1: +24VDC
Pin 2: Signal
Pin 3: GND
Pin 4: +5VDC
!
input X7:
Power supply +24VDC and +5VDC
Pin 1: +24VDC
Pin 2: -
Pin 3: GND
Pin 4: +5VDC
In-output X4:
Serial data cable
Pin 1: RXD
Pin 2: TXD
Pin 3: GND
Pin 4: +5VDC
!
Input X10:
Index-Sensor
Pin 1: +24VDC
Pin 2: Signal
Pin 3: GND
Pin 4: +5VDC
Input X13:
!
Input X12:
Sealing-off lit
Pin 1: +24VDC
Pin 2: Signal
Pin 3: GND
Pin 4: +5VDC
Output X14:
output X16:
5VDC LED (green)
Pin 1: -
Pin 2: Signal
Pin 3: GND
Pin 4: +5VDC
output X15:
Input X11:
Safety guard
Pin 1: +24VDC
Pin 2: Signal
Pin 3: GND
Pin 4: +5VDC
!
Output X6:
Stamper-Motor 24VDC
Pin 1: Leistungsignal A
Pin 2: Leistungsignal B
!
Output X5:
!
Input X3:
Selector switch for
setting delay time
Pin 1: D0
Pin 2: D1
Pin 3: D2
Pin 4: D3
Pin 5: GND
Pin 6: +5VDC!
Input X2:
Button for
Manuell start
Pin 1: Signal
Pin 2: GND
Pin 3: Signal
Pin 4: GND

Nuovo%%
%Operating%Instructions%for%Use%
EB%EASY9PRINT%sprinter%R6%%!
!
!
!
!
9!
6! Potentiometer!for!adjustment!DC!voltage!
!(default!settings!!5V!and!24!Volt)!
!
!
!
!
6.6!!Electrical!connection!power!supply!ORIGINAL!MODEL!“PA”!
!
*****GENERATE!5!VDC!&!24!VDC******%
!
!
!
!
!
!
!
%
%
%
%
%
%
%
%
%
%
%
%
%
%
%
%
%
%
%
%
%
%
%
%
%
%
%
%
%
%
%
%
%
%
%
%
%
6
.
.!

! !
!
EasyPrint!10er!Conexion!on!Diamond!Packers!
!
!
!
!
AP!85!PACKER!
SECTOR!GEAR!PACKER!

Nuovo
Operating instructions for use
EASY-PRINT Sprinter R5/R6, Series 10
8
A Potentiometer for adjustment DC voltage
(Default settings 5V and 24 Volt)
6.4 Electrical connection power supply
6.5 Positioning the imprint heads
To position the stamp to the centre of the eggs, release the fixing bolts [1] and centre the imprint heads.
6.6 Assembling and disassembling the ink reservoir
To detach the ink-reservoir, hold the spring, turn the ink reservoir anti-clockwise and remove.
To install the ink-reservoir, turn it counter-clockwise
until it snaps into place.
1
A
Fixing bolts
1
2

Nuovo
Operating instructions for use
EASY-PRINT Sprinter R5/R6, Series 10
9
6.7 Stamping bar, complete
To change, clean or maintain the stamps, the entire stamping-bar can be removed from the EASY-PRINT
machine.
To remove the stamping-bar from the EASY-PRINT machine:
1. Move the lower part of the bar in direction of the arrows number [1].
2. Move the complete bar in direction on the arrows number [2].
6.8 Service bracket
The service-tool set to position [3] is used to service/park or refill the imprint heads. (Optional)
To use the service mounting tool to store printer assemblies, place the printer head bar into the slot as shown
[4].
6.9 Parking station for individual ink reservoirs
The individual ink reservoirs can be parked. (Optional)
3
4
2
1

Nuovo
Operating instructions for use
EASY-PRINT Sprinter R5/R6, Series 10
10
7 Trouble Shooting
If malfunctions occur, the following list facilitates the recognition of the causes of malfunctions.
Before the elimination of malfunctions and repairs, the safety regulations are to be followed.
When the EASY-PRINT is ready for operation the green led is on.
Malfunction
Problem
Action
EASY-PRINT does not
operate. LED not
illuminated.
Main power to packer is switched off.
EASY-PRINT is switched off.
Connector is not plugged in.
- Switch on main power to grader.
-Switch machine on.
-Plug in connector.
EASY-PRINT does not
operate.
The protective cover is closed [OFF] or
not completely opened.
Cover has to be closed [OFF] when the
EASY-PRINT is switched on.
- Open the protective cover
completely. [ON]
EASY-PRINT does not
operate.
Safety lid is not completely closed.
- Close safety-lid.
More information about the status of the green LED can be found on page 6.
Caution:
The wires in the control box are under high voltage. Open the electrical cabinet only when the main
plug has been pulled out.
8 Cleaning, Maintenance, Repair
8.1 Cleaning
Clean machine periodically, at least weekly, depending on the accumulation of dirt.
Before cleaning, the machine power switch must be in the off position.
The power supply plug has to be pulled out of the socket.
Never submerge the machine in water or in other liquids.
Cleaning personnel are to be instructed on approved procedures.
8.2 Maintenance
With careful monitoring and maintenance of the machine, disassembly will be necessary only to replace worn
parts. If other malfunctions nevertheless occur, the causes are to be determined first.
Before maintenance, the machine is to be switched off properly.
8.3 Repair
In case of malfunctions, due to a defective device component the main switch must be turned off.
Before repair, the machine is to be switched off and disconnected from the power supply.
Never put a damaged device into operation.
Reaching into the device with any object or opening the machine by unauthorized persons is dangerous.
Mechanical and electrical repairs or changing parts on the machine and controller shall be performed only by
technical personnel of the authorized service centre or by trained maintenance engineers. No other person may
perform repairs or change parts on the machine.
Spare parts must comply with the technical requirements established by the manufacturer. Original spare parts
are to be used as listed in section 12 ‘Spare Parts’.
Caution: The following is to be observed when opening the control housing cover:
Open the cover only after the main plug has been pulled out.

Nuovo
Operating instructions for use
EASY-PRINT Sprinter R5/R6, Series 10
11
9 Packing, Transport, Storage
9.1 Packing
Check the scope of the delivery. In case of missing parts, please contact customer service at your nearest
service centre without delay.
Please dispose of the packing material properly.
9.2 Transport
The EASY-PRINT can be transported in any vehicle.
The load is to be secured reliably.
When lifting machines, pay attention to the centre of gravity.
The machine should be transported upright.
To avoid any damage to the machine (scratches, etc.), pay attention to proper packing (foam or similar).
Even for very small changes of location, the machine is to be separated from all external power supplies. Before
starting the machine again, connect properly to the mains.
When starting again, proceed only in accordance with the Instructions for use.
9.3 Storage
The machine should be stored in a dry area at a moderate temperature.
After lengthy storage of the machine, all internal parts must be inspected for corrosion or other damage before
operating. Clean or replace defective or corroded components.
10 Disposal
At the end of its lifetime, the machine is to be disposed of in accordance with national regulations.
We recommend contacting a specialized company to take care of disposal.
11 General technical data
Egg-Stamper:
Stamp head mounting
For 5 or 6 stamps produced
Quantity Stamp head holder
1
Stamp ink
Food grade ink
Control:
Print software
EasyUnit10 V01.00 FET2, Firmware V00.50 or higher
System
Microprocessor
Control voltage Us
1 x 110/230 V / 50/60HZ
Control element
Main switch, Single stroke button, Sealing cap aprox. Switch, Safety-Lid aprox.
Switch, aprox. Index.
Machine dates:
measurements in mm
(length x width x height)
approximately 500 x 250 x 250 mm
Weight
approximately 16 kg

12.2$Ink(reservoir,$complete!(03123)!
!
!
!Part!name! ! ! !!Part!number!
J! Ink!reservoir! ! ! ! 03109!
K! Perforated!washer! ! ! 03110!
L! Foam!(d=30,!h=10)! ! ! 03111!
M! Pad,!with!logo! ! ! ! 03112!
N! Ring!RFS! ! ! ! 03115!

Nuovo
Operating instructions for use
EASY-PRINT Sprinter R5/R6, Series 10
12
12 Spare Parts
12.1 Disposable ink reservoir
12.2 Stamping bar, complete
12.3 Parking station
R
S
Part name Part number
R Stamping-Bar Standard 200301
RStamping-Bar Q-Lock 200306
SService / parking station 03132
T
Part name Part number
TParking station, 6fold 03133
Part name Part number
S Disposable ink reservoir 76510
T Rubber boot 03119
GMilking Grease 03191
Ink kit 10 stamps, 250ml ink 77*10
Ink kit 12 stamps, 250ml ink 77*12
( * - Replace with corresponding ink color )
Available ink colors:
1 Red (light) Nuovo 75
6 Red (regular) Nuovo 68
2 Red (dark) Nuovo 94
3 Green Nuovo 28 (6.1)
4 Blue Nuovo 89
5 Black Nuovo 81
S
T
G
This manual suits for next models
1
Table of contents
Other Nuovo Printer manuals