Ingredients Cut food
into
Quantity Steam
time
Chicken 1cm
diced
100g 20 min
Broccoli 1cm
diced
100g 15 min
Zucchini 1cm
diced
100g 20 min
Beef 1cm
diced
100g 20 min
Sting beans (fresh) 1cm
diced
100g 20 min
Peaches 1cm
diced
100g 15 min
Pork 1cm
diced
100g 20 min
Carrot 0.5cm
diced
100g 20 min
Bananas 1cm
diced
100g 15 min
Horse meat 1cm
diced
100g 20 min
Sweet peas (fresh) Whole100g 20 min
Plums 1cm
diced
100g 15 min
Lamb 1cm
diced
100g 20 min
Squash 1cm
diced
100g 20 min
Apples 1cm
diced
100g 15 min
Ham 1cm
diced
100g 20 min
Beans Whole100g 25 min
Pears 1cm
diced
100g 15 min
Veal 1cm
diced
100g 20 min
Potato 1cm
diced
100g 25 min
Oranges 1cm
diced
100g 15 min
Fish (salmon, sole,
cod, trout, etc)
1cm
diced
100g 20 min
Chickpea Whole100g 20 min
COOKING TIME FOR
BASIC INGREDIENTS
IMPORTANT COOKING TIPS
Do not overll the steam tank, it’s
normal for a little water to spray
into the bowl, but an over-full
steam tank will spray too much
water into the bowl and may pop
the steam tank lid open .
Cut ingredients to approximately
IMPORTANT
INFORMATION
STEAMING TIME
* Please refer to measuring bottle
~10 minutes
~20 minutes
~15 minutes
~25 minutes
Cooking timeWater Quantity
Timer Table
60ml*
140ml*
100ml*
180ml*
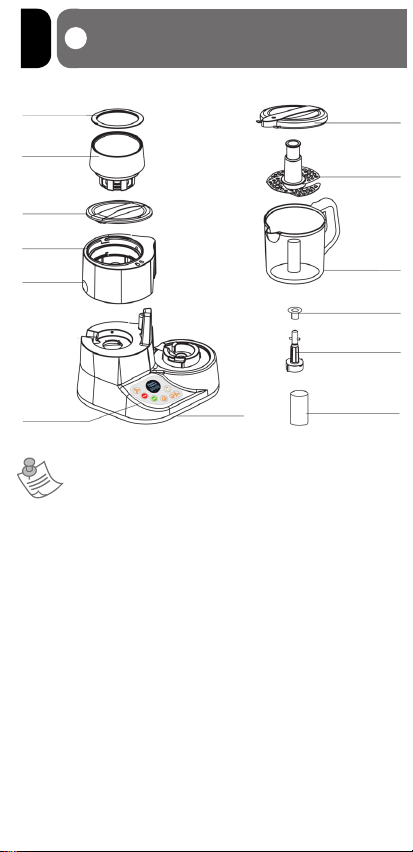
HOW TO USE THE BOTTLE WARMER
Add water
(as per detailed
table below)
1Insert the bottle
holder into the
water tank
2Insert the bottle
and start to warm
3
1.
2.
3.
4.
5.
6.
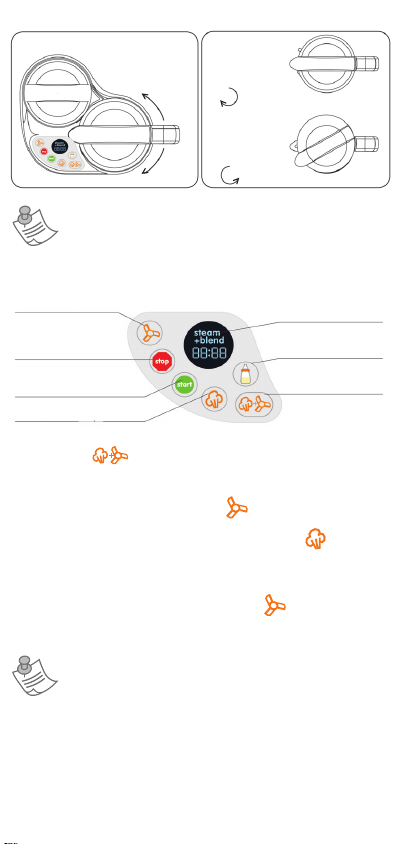
Insert the plug into wall outlet, the blue light will illuminate
Add between 12-20ml of clean tap water into steam tank (please follow the guideline table)
Place the baby bottle or jar into the bottle holder, then cover with the adaptor ring .
Press the “bottle button”; on LCD will lights “Bottle”
Press “start button to turn on heater. The word bottle” on LCD screen will ash repeatedly when
heater is on.
When the water is evaporated the thermostat will detect the rise in temperature and turn off the
heater. LCD will turn off when water is gone.
A full guideline table shown below:
Start
temp
5°C
5°C
5°C
5°C
5°C
5°C
5°C
5°C
Start
temp
Final
temp
37°C
37°C
37°C
37°C
70°C
70°C
70°C
70°C
Final
temp
Water
needed
17ml
12ml
16ml
20ml
42ml
38ml
40ml
45ml
Water
needed
Bottle
milk
240ml
120ml
200ml
Jar
240ml
120ml
200ml
Jar
Bottle
milk
Heat time
6 min
4 min
5 min
6 min
10 min
8 min
9 min
8 min
Heat time
Remember the ideal feeding temperature is just 37°C (same as breast milk from mum).
Always check the temperature of the baby milk and food before feeding your baby.
0.5 to 1cm pieces before placing them in bowl;
smaller pieces of food steam and blend more
thoroughly, ensuring proper food texture for your
baby to easily swallow and digest.
CLEANING AND MAINTENANCE
Always unplug the appliance before cleaning.
Clean the appliance before and after use.
Bowl, Blade and Bowl Lid are top shelf dishwasher safe* and can also be hand washed with
warm, soapy water. Never use abrasive pads to clean machine parts.
Never put the Driveshaft in the dishwasher.
Do not submerge steam tank or base in water.
Base and Driveshaft should be wiped with damp cloth only.
We recommend regular cleaning of the Steam Tank to prevent damage to the machine from
mineral deposits. The frequency of cleaning will depend on the type of water you are using and
how much mineral deposit build up forms.
To clean the tank ll it with a solution of 1/2 vinegar and 1/2 distilled water. Leave it overnight,
then empty the tank, ll it with water and “steam” for at least 15 minutes. Empty the tank and
rinse with pure water.
Empty any remaining water and rell with puried water before steaming new recipes.
Never use a chemical descaler in the machine.
To remove the unwanted water from steam tank, open the steam tank lit, allow water to cool,
press steam tank release button and lift steam tank from base; slowly pour water from steam
tank
NOTE
Clean periodically limestone into
the steam tank by using vinegar
After washing, do not let the knife
shelf are wet as this may oxidize
and contaminate the food prepared
with the appliance
ATTENTION
REMOVING THE WATER TANK
To remove the steam tank from
the main unit, press the Steam
Tank Release button on the back.
Steam Tank
Release Button
ATTENTION
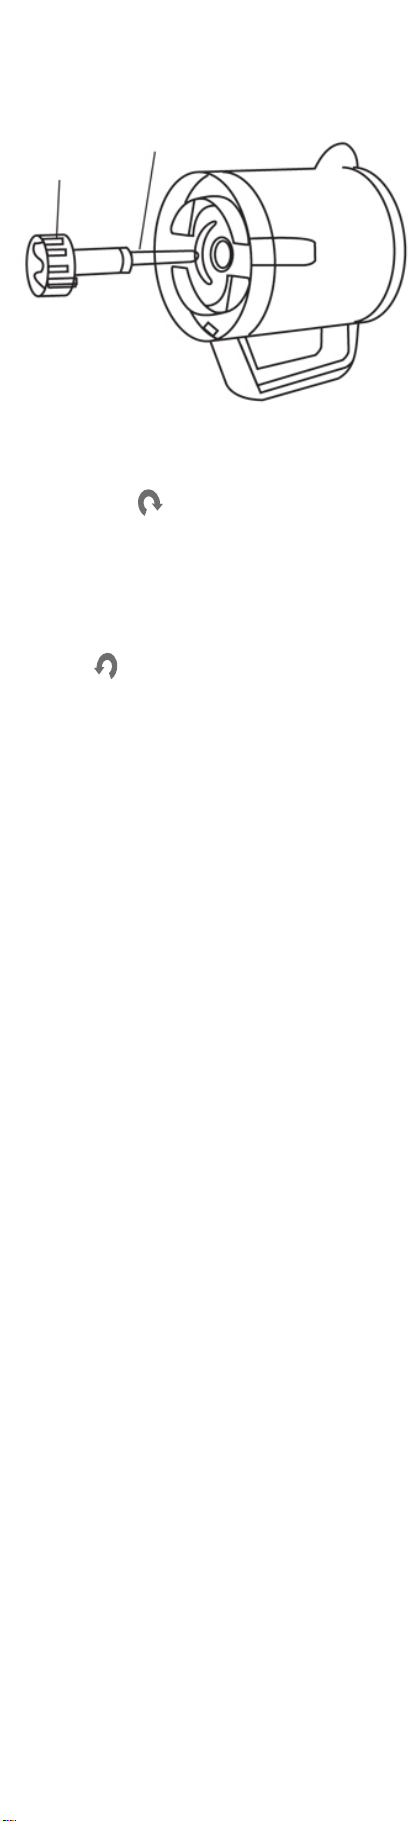
REMOVING AND
REPLACING THE
DRIVESHAFT
TROUBLESHOOTING
Remove driveshaft from bowl before cleaning
in dishwasher. See illustration
To remove Driveshaft, turn Knob on bottom of
bowl clockwise and pull out.
Wipe drive shaft with damp cloth.
Never put driveshaft in dishwasher. Do not
misplaceDriveshaft Gasket while cleaning.
To replace the Driveshaft after cleaning, insert
into hole inbottom of bowl and turn counter-
clockwise to lock inplace.
Always make sure driveshaft is properly
inserted and lockedinto place to prevent
damage to bowl.
Drive shaft
Knob
Problem Possible causes Possible solutions
Machine will not
start
Steam tank is dry (machine will beep
rapidly 5 times to indicate that the
steam tank is dry)
Add water to steam tank
Safety tab on bowl lid is not fully
inserted into base
Make sure bowl lid is turned clockwise
as far as possible and safety tab on
bowl lid is fully inserted into base
Machine is unplugged Insert the plug into the electrical outlet
Final puree
consistency isn’t
smooth
Raw food isn’t diced nely enough
before steaming
Dice food into approximately ½ to ¼
pieces, before placing in bowl
Low water content of raw food Add additional water, formula breast
milk or other liquid after steaming and
blend longer
Machine stops
during operation
Steam tank is dry (machine will beep
rapidly 5 times to indicate that the
steam tank is dry)
Add water to steam tank
Safety tab on bowl lid is not fully
inserted into base
Make sure bowl lid is turned counter-
clockwise as far as possible and
safety tab on bowl lid is fully inserted
into base
Cannot remove
blade from
driveshaft
Blade is in dropped position with
driveshaft pins locked in place
Lock bowl back onto machine
Gently pull up on ceter blade column
while twisting clockwise
Scaling in steam
tank
Mineral rich water used persistently Remove heater guard and wipe damp
cloth
SAFETY SYSTEM
lf the Bowl Lid is opened or the Bow is
removed from the base during operation, the
machine
will automalically shut off and beep rapidly.
If the lid and Bowl are replaced within 10
seconds after removal, the machine will
resume operation, otherwise it will return o
standby mode.
Overheating Protection: lf the steam Chamber
runs dry during operation, the heater will shut
off and the machine will beep rapidly 5 times.
Add water to Steam Tank to resume operation.
WARRANTY - TERMS AND CONDITIONS
The product is guaranteed 24 months (legal guarantee) against defects in materials or manufacturing
starting from the date stated in the receipt. Excluded from the legal guarantee of 24 months are the
parties identied as “consumable” (e.g., batteries, brush heads or parts subject to wear).
The legal guarantee of 24 months is void if:
1.
2.
3.
The product has undergone aesthetic damage due to improper use not in accordance with
instructions in the manual.
This product has been modied and/or tampered with.
The cause of the failure was due to poor maintenance of the individual components and/or
accessories and/or supplies (e.g. oxidation and/or scaling due to the retention of water or other
liquids, sediment blocking the sensor, leak of corrosive liquid from batteries.)
1.
2.
3.
4.
5.
The following is excluded from the legal guarantee of 24 months:
Costs related to replacements and/or repair of parts subject to wear or costs for ordinary
maintenance of the product.
The costs and risks involved in transporting the product to and from the store where you
purchased or otherwise authorized collection centre to receive the products under warranty.
Damage caused by or resulting from improper installation or improper use not in accordance with
the directions in the instruction manual.
Damage due to natural disasters, accidental events or adverse conditions not compatible with the
product.
Defects that have a negligible effect on product performance.
The manufacturer, distributor and all the parties involved in the sale do not assume any liability
for losses and economic damage from any malfunction of the product. In accordance with current
regulations the manufacturer, distributor and all the parties involved in the sale are not responding
in any case for damages, including direct, indirect ones, loss of net income, loss of savings and
additional damage and other details consequences going beyond the damage caused by the breach
of warranty, contract, strict liability, wrongdoing or due to other causes, resulting from the use or
inability to use the product and/or paper and electronic documents, including the lack of service.
TECHNICAL
SPECIFICATIONS
Model:
Power input:
Frequency power input:
Power rate:
1960
220-240 VAC
50/60 Hz
400 Watt
Imported and distributed by:
Anteprima Brands International Ltd.
Malta-Europe
www.nuvitababy.com
WARNING: The symbol on this
product means that it’s an electronic
product and following the European
directive 2000/96/CE the electronic
products have to be dispose on
your local recycling centre for safe
treatment.