manuals.online logo
Brands
  1. Home
  2. •
  3. Brands
  4. •
  5. Nuvo
  6. •
  7. Keypad
  8. •
  9. Nuvo NV-P20 Series User manual

Nuvo NV-P20 Series User manual

Doc #1507255 Rev A 20160611
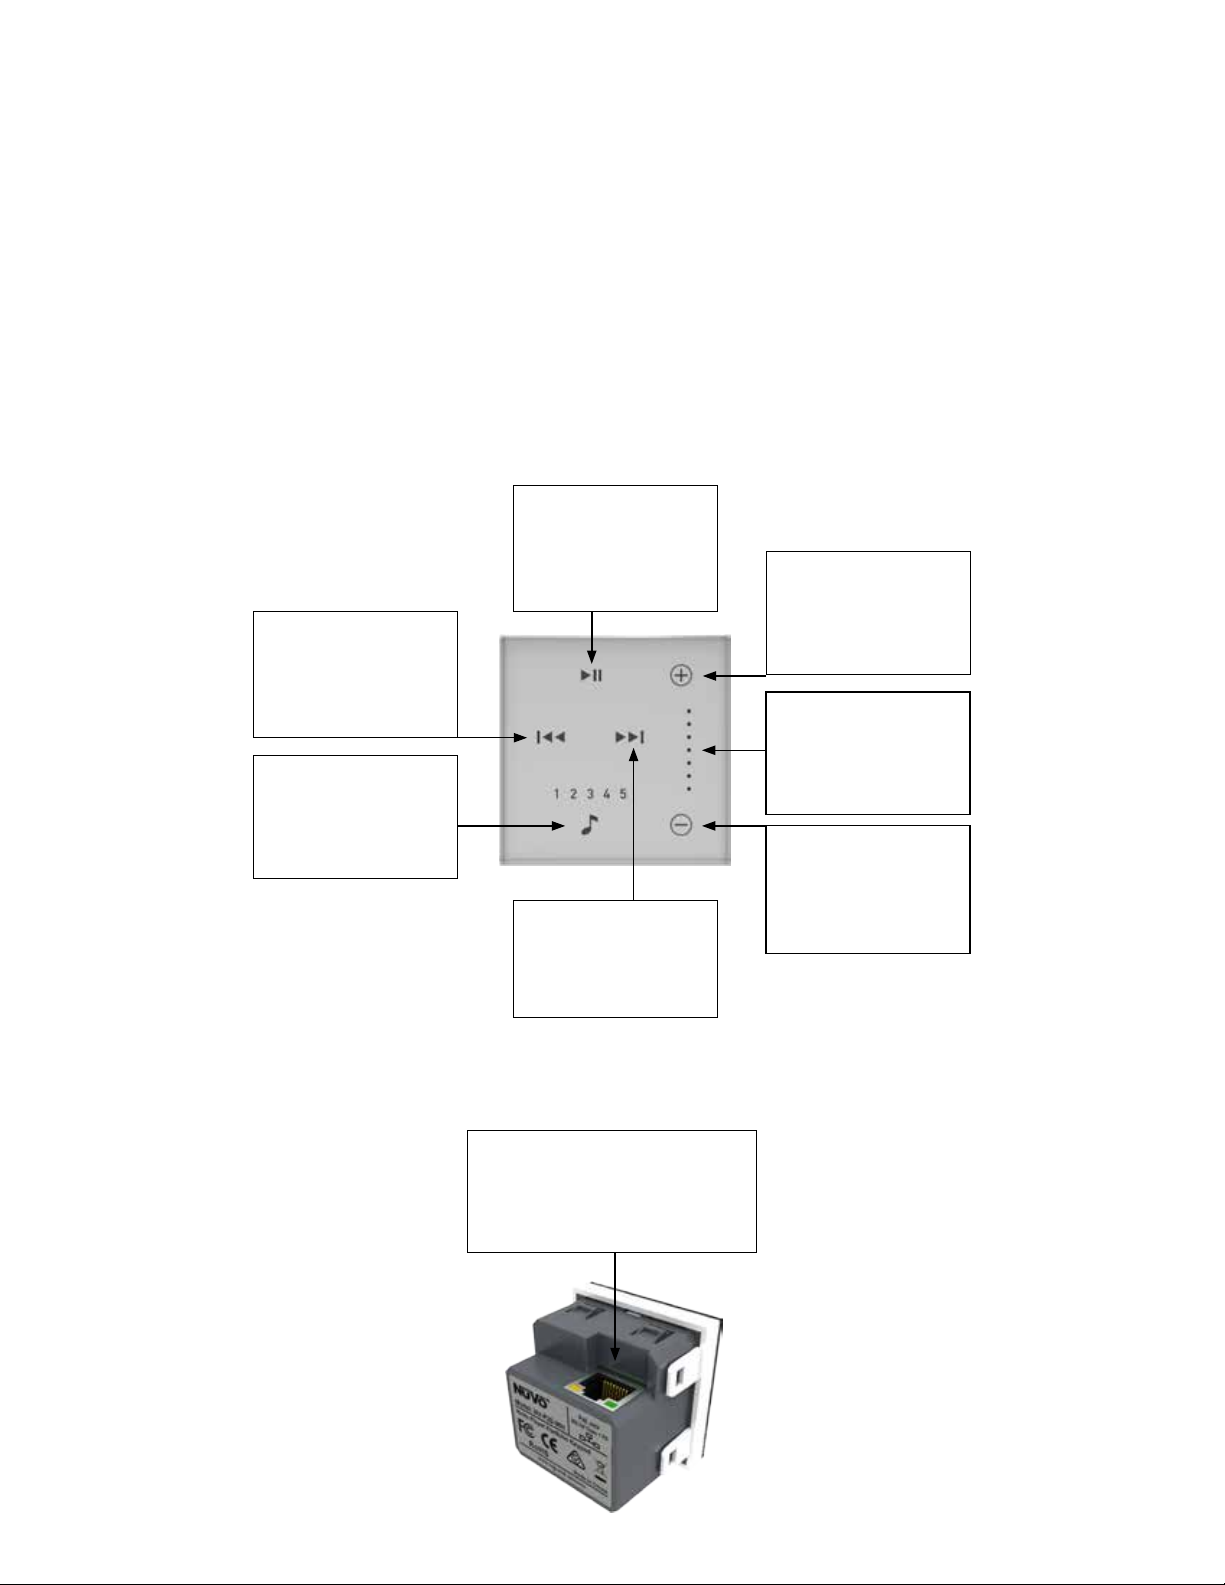
This instruction sheet covers the installation of the NV-P20-XX models listed above. The Nuvo P20 keypad provides instant access to
core features such as volume control, mute, skip tracks, play / pause and access to the top 5 favorites without needing to use the app on
a phone or tablet. This keypad features capacitive touch control and is fully backlit with white LED. The Nuvo P20 keypad is powered by a
single 802.11af POE (Power Over Ethernet) connection that would be supplied from a compatiable POE switch or injector.
Doc. n° 1507255 Rév. A 20160611
Cette fiche d’instructions décrit la procédure d’installation des modèles NV-P20-XX énumérés ci-dessus. Le clavier Nuvo P20 vous
permet d’accéder instantanément à des fonctions clés comme le réglage du volume, le mode muet, le passage des pistes, le mode
Lecture / Pause, ainsi qu’à cinq préréglages favoris sans que vous ayez besoin d’utiliser l’application sur un téléphone ou une tablette.
Ce clavier dispose de commandes tactiles capacitives et d’un système de rétro-éclairage par DEL blanches. Le clavier Nuvo P20 est
alimenté par une connexion 802.11af POE (Power Over Ethernet) unique, fournie par un interrupteur ou un injecteur POE compatible.
Dok. Nr. 1507255 Rev. A 20160611
In dieser Gebrauchsanweisung wird die Installation der oben genannten Modelle NV-P20-XX erläutert. Mit der Nuvo P20 Tastatur
haben Sie sofortigen Zugriff auf wichtige Funktionen, wie beispielsweise die Steuerung der Lautstärke, die Stummschaltung, das
Wechseln zwischen Titeln, die Play- und Pausefunktion sowie das Abspielen von 5 Favoriten, ohne dass Sie dafür Ihr Smartphone oder
Tablet bedienen müssen. Die Tastatur verfügt über eine kapazitive Touch-Steuerung und eine weiße LED-Hintergrundbeleuchtung. Die
Stromversorgung der Nuvo P20 Tastatur erfolgt über eine einzelne Power-Over-Ethernet-Verbindung (802.11af PoE), die über einen
kompatiblen PoE-Switch oder PoE-Injektor hergestellt wird.
Doc #1507255 Rev A 20160611
Questo foglio illustrativo riguarda l’installazione dei modelli NV-P20-XX elencati sopra. Il tastierino Nuvo P20 offre l’accesso istantaneo
a funzionalità fondamentali quali controllo del volume, disattivazione audio, salto traccia, riproduzione/pausa e l’accesso ai principali
5 preferiti senza che sia necessario utilizzare l’app su un telefono o un tablet. Il tastierino presenta controlli touch capacitivi ed è
completamente retroilluminato con LED bianchi. Il tastierino Nuvo P20 è alimentato da un singolo collegamento 802.11af POE
(Power Over Ethernet, alimentazione via Ethernet) fornito da un interruttore o iniettore POE compatibile.
Doc #1507255 Rev A 20160611
Estas instruções abrangem a instalação dos modelos NV-P20-XX acima indicados. O teclado Nuvo P20 oferece um acesso instantâneo
às principais funcionalidades, tais como controlo de volume, sem som, mudar de faixa, reproduzir / pausar e aceder aos 5 favoritos
sem precisar de utilizar a aplicação num telemóvel ou tablet. Este teclado possui um controlo de toque capacitivo e é totalmente
retroiluminado com LED branco. O teclado Nuvo P20 é alimentado por uma ligação única de 802.11af POE (Power Over Ethernet) que
pode ser fornecida por um injetor ou switch de POE compatível.
N.° de doc. 1507255 Rev. A 20160611
En esta hoja de instrucciones se describe la instalación de los modelos NV-P20-XX mencionados anteriormente. El teclado P20 Nuvo
proporciona acceso instantáneo a funciones básicas tales como control de volumen, silenciamiento, saltar pistas, reproducción /
pausa y a los 5 primeros favoritos sin necesidad de utilizar la aplicación en un teléfono o tableta. Este teclado cuenta con control táctil
capacitivo y está retroiluminado completamente con LED blanco. La alimentación del teclado P20 Nuvo se obtiene mediante una sola
conexión de alimentación a través de Ethernet (POE, Power Over Ethernet) 802.11af que se suministra desde un interruptor o inyector
POE compatible.
Instruction sheet for Nuvo Living Light POE Keypad NV-P20-LLN, NV-P20-LLNT, NV-P20-LLNL and
Arteor NV-P20-ARWH, NV-P20-LLNL
Fiche d’instructions pour les claviers POE Living Light NV-P20-LLN, NV-P20-LLNT, NV-P20-LLNL et
Arteor NV-P20-ARWH, NV-P20-LLNL de Nuvo
Gebrauchsanweisung für die Nuvo Living Light POE Tastaturen NV-P20-LLN, NV-P20-LLNT,
NV-P20-LLNL und Arteor NV-P20-ARWH, NV-P20-LLNL
Foglio illustrativo del tastierino Nuvo Living Light POE NV-P20-LLN, NV-P20-LLNT, NV-P20-LLNL e
Arteor NV-P20-ARWH, NV-P20-LLNL
Instruções do Teclado Nuvo Living Light POE NV-P20-LLN, NV-P20-LLNT, NV-P20-LLNL e
Arteor NV-P20-ARWH, NV-P20-LLNL
Hoja de instrucciones para el teclado con alimentación a través de Ethernet e iluminación viva
Nuvo NV-P20-LLN, NV-P20-LLNT, NV-P20-LLNL y Arteor NV-P20-ARWH, NV-P20-LLNL
NV-P20-XXX features Fig 1, Fig 2,
Play / Pause
Lecture / Pause
Play / Pause
Riproduzione/Pausa
Reproduzir / Pausar
Reproducir / pausar
Skip Back
Saut arrière
Zurück
Brano precedente
Para a frente
Saltar hacia atrás
Favorites
Favoris
Favoriten
Preferiti
Favoritos
Favoritos
Volume Up
Volume +
Lauter
Volume Su
Aumentar volume
Subir volumen
Skip Forward
Saut avant
Vor
Brano successivo
Para trás
Saltar hacia adelante
Volume Down
Volume -
Leiser
Volume Giù
Diminuir volume
Bajar volumen
Volume Indicator
Indicateur de volume
Lautstärkeanzeige
Indicatore del volume
Indicador de volume
Indicador de volumen
802.11af POE Network Connection
Connexion réseau POE 802.11af
Anschluss für 802.11af PoE-Netzwerk
Collegamento rete 802.11af POE
Ligação de rede 802.11af POE
Conexión de red POE 802.11af
Fig 1 / Schéma 1 / Abb.1 / Fig 1 / Fig 1 / Fig 1
Fig 2 / Schéma 2 / Abb.2 / Fig 2 / Fig 2 / Fig 2
NV-P20-XXX avec fig. 1, fig. 2
Abb. 1 und 2 zeigen NV-P20-XXX.
Caratteristiche NV-P20-XXX Fig. 1, Fig. 2,
Funcionalidades do NV-P20-XXX Fig. 1, Fig. 2,
Funciones del teclado NV-P20-XXX Fig. 1, Fig. 2,
This installation assumes the Player Portfolio system is already installed. If not, please refer to the Player Portfolio manual to install all
of the zones before keypads are added. Once all the zones have been added follow the steps below to bind a keypad with a zone.
Important: The P20 Keypad requires a single Power Over Ethernet (802.11af POE) connection and needs to be connected to the same
network, or subnet, of the zone it is intended to control.
Adding a Keypad to the Nuvo Player System
Ajout d’un clavier au Player System de Nuvo
Hinzufügen einer Tastatur zum Nuvo Player System
Aggiunta di un tastierino al sistema Nuvo Player
Adicionar um teclado ao Sistema de leitor Nuvo
Agregado de un teclado al Sistema reproductor Nuvo
Cette installation suppose que le système Player Portfolio est déjà installé. Si ce n’est pas le cas, veuillez vous reporter au manuel
du Player Portfolio pour installer toutes les zones avant l’ajout des claviers. Une fois toutes les zones ajoutées, suivez les étapes
ci-dessous pour lier un clavier à une zone.
Important: le clavier P20 nécessite une connexion Power Over Ethernet unique (POE 802.11af), et doit être connecté au même réseau
ou sous-réseau que la zone qu’il doit contrôler.
Für die Installation der Tastatur muss bereits das Player Portfolio System installiert sein. Falls das Player Portfolio System noch
nicht installiert ist, installieren Sie zunächst alle Zonen gemäß den Anweisungen im Player Portfolio Handbuch, bevor Sie die Tastatur
hinzufügen. Wenn alle Zonen hinzugefügt wurden, befolgen Sie die unten beschriebenen Schritte, um die Tastatur mit einer Zone zu
verbinden.
Wichtig: Die P20 Tastatur benötigt eine einzelne Power-Over-Ethernet-Verbindung (802.11afPoE) und muss an das Netzwerk oder
Unternetzwerk der entsprechenden zu steuernden Zone angeschlossen werden.
Questa installazione presume che il sistema Player Portfolio sia già installato. Se così non è, fare riferimento al manuale di Player
Portfolio per installare tutte le zone prima che vengano aggiunti i tastierini. Una volta che tutte le zone sono state aggiunte, seguire i
passi riportati sotto per associare un tastierino a una zona.
Importante: il tastierino P20 richiede un singolo collegamento Power Over Ethernet (802.11af POE) e deve essere collegato alla stessa
rete, o sottorete, della zona che deve controllare.
Esta instalação pressupõe que o sistema Player Portfolio já está instalado. Caso não esteja, consulte o manual do Player Portfolio para
instalar todas as zonas antes de adicionar os teclados. Depois de adicionar todas as zonas, siga os passos abaixo para associar um
teclado a uma zona.
Importante: o teclado P20 requer uma ligação única de Power Over Ethernet (802.11af POE) e precisa de estar ligado à mesma rede ou
subrede da zona que se pretende controlar.
Esta instalación supone que el sistema Player Portfolio ya está instalado. De lo contrario, consulte el manual de Player Portfolio para
instalar todas las zonas antes de agregar teclados. Una vez que se han agregado todas las zonas, siga los pasos que se detallan a
continuación para vincular un teclado con una zona.
Importante: El teclado P20 requiere un sola conexión de alimentación a través de Ethernet (POE 802.11af) y necesita estar conectado a
la misma red o subred de la zona que pretende controlar.
Fig 3 / Schéma 3 / Abb.3 / Fig 3 / Fig 3 / Fig 3
Fig 4 / Schéma 4 / Abb.4 / Fig 4 / Fig 4 / Fig 4
STEP 1: Navigate to the Settings menu by pressing the gear icon at the bottom of the home page.
(Fig. 3)
ÉTAPE 1: naviguez jusqu’au menu Paramètres en appuyant sur l’icône en forme d’engrenage en
bas de la page d’accueil (fig. 3).
SCHRITT1: Tippen Sie unten im Bildschirm auf das Zahnrad, um zum Einstellungsmenü zu
gelangen (Abb. 3).
FASE 1: andare nel menu Settings (Impostazioni) premendo l’icona a forma di ingranaggio in fondo
alla pagina iniziale (Fig. 3).
PASSO 1: Vá até ao menu Definições, pressionando o ícone de roda dentada na parte inferior da
página inicial. (Fig. 3)
PASO 1: Vaya al menú Settings (Ajustes) presionando el icono de engranajes en la parte inferior de
la página principal. (Fig. 3)
STEP 2: Select “Add a component.” (Fig. 4)
ÉTAPE 2: sélectionnez «Ajoutez un composant.» (fig. 4).
SCHRITT2: Wählen Sie „Add a NuVo component“ (Eine Komponente hinzufügen) aus (Abb. 4).
FASE 2: selezionare “Add a component” (Aggiungere un componente). (Fig. 4)
PASSO 2: Selecione “Adicionar um componente”. (Fig. 4)
PASO 2: Seleccione “Add a component” (Agregar un componente). (Fig. 4)
Fig 5 / Schéma 5 / Abb.5 / Fig 5 / Fig 5 / Fig 5
STEP 3: Select “Keypad” (Fig 5)
ÉTAPE 3: sélectionnez «Clavier» (fig. 5).
SCHRITT3: Wählen Sie „Keypad“ (Tastatur) aus (Abb. 5).
FASE 3: selezionare “Keypad” (Tastierino) (Fig. 5)
PASSO 3: Selecione “Teclado”. (Fig. 5)
PASO 3: Seleccione “Keypad” (Teclado). (Fig. 5)
Fig 6 / Schéma 6 / Abb.6 / Fig 6 / Fig 6 / Fig 6
Fig 8 / Schéma 8 / Abb.8 / Fig 8 / Fig 8 / Fig 8
STEP 5: Look for the LEDs to have a breathing motion. If the LEDs are not breathing, select “The
LED’s are not breathing” at the bottom of the screen. (Fig. 6 & Fig 7). If the LED’s are breathing
select “Next” (Fig 8)
ÉTAPE 5: vérifiez qu’il y a un mouvement de respiration au niveau des DEL. Si les DEL ne respirent
pas, sélectionnez «Les DEL ne respirent pas» en bas de l’écran (fig.6 et fig.7). Si les DEL respirent,
sélectionnez «Suivant» (fig. 8)
SCHRITT5: Überprüfen Sie, ob die LEDs nacheinander aufleuchten. Wenn die LEDs nicht
nacheinander aufleuchten, tippen Sie auf „The LED’s are not breathing“ (Die LEDs leuchten nicht
nacheinander auf) (Abb. 6 und Abb. 7). Wenn die LEDs nacheinander aufleuchten, tippen Sie auf
„Next“ (Weiter) (Abb. 8).
FASE 5: assicurarsi che i LED si accendano e spengano a impulsi. Se i LED non si illuminano
correttamente, selezionare “The LED’s are not breathing” (I LED non si illuminano a impulsi) in fondo
alla schermata. (Fig. 6 e Fig. 7). Se i LED si illuminano a impulsi, selezionare “Next” (Avanti) (Fig. 8)
PASSO 5: Verifique se os LED estão iluminados. Se não estiverem, selecione “Os LED não estão
iluminados” na parte inferior do ecrã. (Fig. 6 e Fig. 7). Se os LED estiverem iluminados, selecione
“Seguinte”. (Fig. 8)
PASO 5: Determine si los LED tienen un movimiento intermitente. Si los LED no son intermitentes,
seleccione “The LED’s are not breathing” (Los LED no son intermitentes) en la parte inferior de la
pantalla. (Fig. 6 y Fig. 7). Si los LED son intermitentes, seleccione “Next” (Siguiente). (Fig. 8)
Fig 7 / Schéma 7 / Abb.7 / Fig 7 / Fig 7 / Fig 7
Fig 9 / Schéma 9 / Abb.9 / Fig 9 / Fig 9 / Fig 9
STEP 6: Push the VOLUME UP and VOLUME DOWN keys simultaneously to bind the keypad to the
system. (Fig. 9)
ÉTAPE 6: appuyez sur les touches VOLUME + et VOLUME - en même temps pour lier le clavier au
système (fig. 9).
SCHRITT6: Halten Sie die Tasten LAUTER und LEISER gleichzeitig gedrückt, um die Tastatur mit
dem System zu verbinden (Abb. 9).
FASE 6: premere i tasti VOLUME SU e VOLUME GIÙ simultaneamente per associare il tastierino al
sistema. (Fig. 9)
PASSO 6: Prima, em simultâneo, os botões AUMENTAR VOLUME e BAIXAR VOLUME para associar
oteclado ao sistema. (Fig. 9)
PASO 6: Pulse las teclas de SUBIR VOLUMEN y BAJAR VOLUMEN simultáneamente para vincular el
teclado al sistema. (Fig. 9)
Fig 11 / Schéma 11 / Abb.11 / Fig 11 / Fig 11 / Fig 11
STEP 8: If the connection is successful “Keypad added” will be displayed, and it will show the as-
sociated zone. Press “Done” (Fig. 11)
ÉTAPE 8: si la connexion est établie, la notification «Clavier ajouté» apparaîtra, et la zone
associée sera affichée. Appuyez sur «Terminé» (fig. 11).
SCHRITT8: Bei erfolgreicher Verbindung wird „Keypad added“ (Tastatur hinzugefügt) zusammen
mit der ausgewählten Zone angezeigt. Tippen Sie dann auf „Done“ (Fertig) (Abb. 11).
FASE 8: se il collegamento viene completato con successo, verrà visualizzato “Keypad added”
(Aggiunto tastierino) e verrà mostrata la zona associata. Premere “Done” (Fatto) (Fig. 11)
PASSO 8: Se a ligação for bem-sucedida, a mensagem “Teclado adicionado” será apresentada, bem
como a zona associada. Prima “Concluído”. (Fig. 11)
PASO 8: Si la conexión es exitosa, se mostrará “Keypad added” (Teclado agregado) y la zona
asociada. Pulse “Done” (Listo). (Fig. 11)
Fig 10 / Schéma 10 / Abb.10 / Fig 10 / Fig 10 / Fig 10
STEP 7: Select the Zone that the keypad is to be associated with. (Fig. 10)
ÉTAPE 7: sélectionnez la zone à laquelle le clavier doit être associé (fig. 10).
SCHRITT7: Wählen Sie die Zone aus, mit der die Tastatur verbunden werden soll (Abb. 10).
FASE 7: selezionare la zona da associare al tastierino (Fig. 10).
PASSO 7: Selecione a Zona à qual o teclado deve estar associado. (Fig. 10)
PASO 7: Seleccione la zona a la cual el teclado debe asociarse. (Fig. 10)
Technical Specifications / Caractéristiques techniques / Technische Daten /
Specifiche tecniche / Especificações técnicas / Especificaciones técnicas
Power / Alimentation / Leistung /
Potenza / Alimentação / Alimentación
Ethernet / Ethernet /
Ethernet / Ethernet
802.11af Class 1 / 802.11af Catégorie 1 / 802.11af, Klasse 1 /
802.11af Classe 1 / 802.11af Class 1 / 802.11af Clase 1
10 / 100BaseT Minimum / Minimum 10 / 100BaseT /
10 / 100 Base-T (Minimum) / Minimo 10 / 100BaseT /
Mínimo 10 / 100BaseT / 10 / 100BaseT mínimo
Country of Origin
Pays d’origine
Herstellungsland
Paese di origine
País de origem
País de origen
China
Chine
China
Cina
China
China
Compliance
Conformité
Einhaltung von Richtlinien
Conformità
Conformidade
Conformidad
US:FCC CFR Title 47 Part 15, Subpart B; CANADA:ICES-003;
EUROPE:CISPR13; EUROPE: 55020; AUSTRALIA / NEW ZEALAND:
C-TICK standard AS / NZS CISPR13; RoHS (Restriction of
Hazardous Substances Directive 2002 / 95 / EC)
États-Unis:FCC CFR Titre 47 Partie 15, Sous-partie B;
CANADA:ICES-003; EUROPE:CISPR13; EUROPE: 55020;
AUSTRALIE / NOUVELLE-ZÉLANDE: norme C-TICK AS / NZS
CISPR13;RoHS (Directive 2002 / 95 / CE relative à limitation de
l’utilisation de certaines substances dangereuses)
USA: FCC CFR Title 47, Part 15, Subpart B; KANADA: ICES-
003; EUROPA: CISPR13; EUROPA: 55020; AUSTRALIEN /
NEUSEELAND: C-TICK Standard AS / NZS CISPR13; RoHS
(Richtlinie 2002 / 95 / EG zur Beschränkung der Verwendung
bestimmter gefährlicher Stoffe in Elektro- und Elektronikgeräten)
USA: FCC CFR Titolo 47 Parte 15, sottoparte B; CANADA:
ICES-003; EUROPA: CISPR13; EUROPA: 55020; AUSTRALIA/
NUOVA ZELANDA: Standard C-TICK AS/NZS CISPR13; RoHS
(Restrizione delle sostanze pericolose, direttiva 2002/95/CE)
EUA:FCC CFR Title 47 Part 15, Subpart B; CANADÁ:ICES-003;
EUROPA:CISPR13; EUROPA: 55020; AUSTRÁLIA / NOVA
ZELÂNDIA: C-TICK standard AS / NZS CISPR13;RoHS (Restriction
of Hazardous Substances, Diretiva relativa à restrição do uso de
determinadas substâncias perigosas em equipamentos elétricos
eeletrónicos, 2002 / 95 / CE)
EE. UU.: FCC CFR Título 47, Parte 15, Subparte B; Canadá:
ICES-003; EUROPA: CISPR13; EUROPA: 55020; AUSTRALIA /
NUEVA ZELANDA: estándar C-TICK AS / NZS CISPR13; RoHS
(Directiva 2002 / 95 / CE de Restricción de sustancias peligrosas)
Operating Temperature / Température de fonctionnement /
Betriebstemperatur / Temperatura di funzionamento /
Temperatura de funcionamento / Temperatura de funcionamiento
0° - 40°C, 32° - 104°F / 0° - 40 °C, 32 ° - 104 °F /
0° – 40°C / 0 - 40 °C, 32 - 104 °F /
0° - 40°C, 32° - 104°F / 0 °C - 40 °C, 32 °F - 104 °F
Humidity / Humidité /
Luftfeuchtigkeit / Umidità /
Humidade / Humedad
70% Non-Condensing / 70% (non condensée) /
70%, nicht kondensierend / 70% non condensante /
70% sem condensação / 70 % sin condensación
Country of origin: / Pays d’origine : / Herstellungsland: /
Paese di origine: / País de origem: / País de origen:
Made in China • Fabriqué en Chine • Hergestellt in China
Prodotto in Cina • Fabricado na China • Hecho en China
Doc #1507255 Rev A 20160611

This manual suits for next models

5

Popular Keypad manuals by other brands

Targus NW627S Frequently asked questions

Targus

Targus NW627S Frequently asked questions

US Automatic 050500 manual

US Automatic

US Automatic 050500 manual

Paradox DigiplexNE DGP2-641 Reference and installation manual

Paradox

Paradox DigiplexNE DGP2-641 Reference and installation manual

Contro l4 C4-KCB-XX installation guide

Contro l4

Contro l4 C4-KCB-XX installation guide

Delta K-10V user manual

Delta

Delta K-10V user manual

Doorentryonline SK401-E user manual

Doorentryonline

Doorentryonline SK401-E user manual

Paradox Digiplex DGP2-648 user manual

Paradox

Paradox Digiplex DGP2-648 user manual

Borglocks Marine Grade BL4401MG Pro Parts List, Installation and General Information

Borglocks

Borglocks Marine Grade BL4401MG Pro Parts List, Installation and General Information

C & K Systems System 236i user manual

C & K Systems

C & K Systems System 236i user manual

Paradox Digiplex DGP-641 Reference and installation manual

Paradox

Paradox Digiplex DGP-641 Reference and installation manual

Paradox 1686V user guide

Paradox

Paradox 1686V user guide

Workrite UB2100FT25 user guide

Workrite

Workrite UB2100FT25 user guide

Paradox 1686V user guide

Paradox

Paradox 1686V user guide

Paradox Esprit+ 642 user manual

Paradox

Paradox Esprit+ 642 user manual

Paradox Spectra 1641 Installer's guide

Paradox

Paradox Spectra 1641 Installer's guide

IDS 805 Installer manual

IDS

IDS 805 Installer manual

Shimadzu UV-VIS user guide

Shimadzu

Shimadzu UV-VIS user guide

NAPCO Gemini GEM-P816 installation instructions

NAPCO

NAPCO Gemini GEM-P816 installation instructions

manuals.online logo
manuals.online logoBrands
  • About & Mission
  • Contact us
  • Privacy Policy
  • Terms and Conditions

Copyright 2025 Manuals.Online. All Rights Reserved.