NVK TC-20 User manual

DOGTRAINING
COLLAR
NVK
Manual

COMPONENTS
Product Manual
Long Contact
Points
Charging Wrist Strap
Handheld Remote
Test Light Tool
( Components
refer to Page10 for more information )
789
1
7 8 9

OVERVIEW
14
Static
Warning
Vibration
Wrist Strap Clip
LED Indicator
Digital Display
Beep Tone
Adjustable vibration
ON & OFF Switch
(Level Regulator)
Static Stimulation
Static +10% Boost
Static Level
Vibration Level
Pairing /
Channel Select
0
Vibration Level
Battery Status
( Receiver )
Handheld Remote
2

OVERVIEW
ON& OFF Switch
Magnetic Charging Port
Contact Points
3

4
This is the safety alert symbol. It is used to alert you to potential injury hazards.
Obey all safety messages that follow this symbol to avoid possible injury.
WARNING indicates a hazardous situation which, if not avoided, could
result in serious injury.
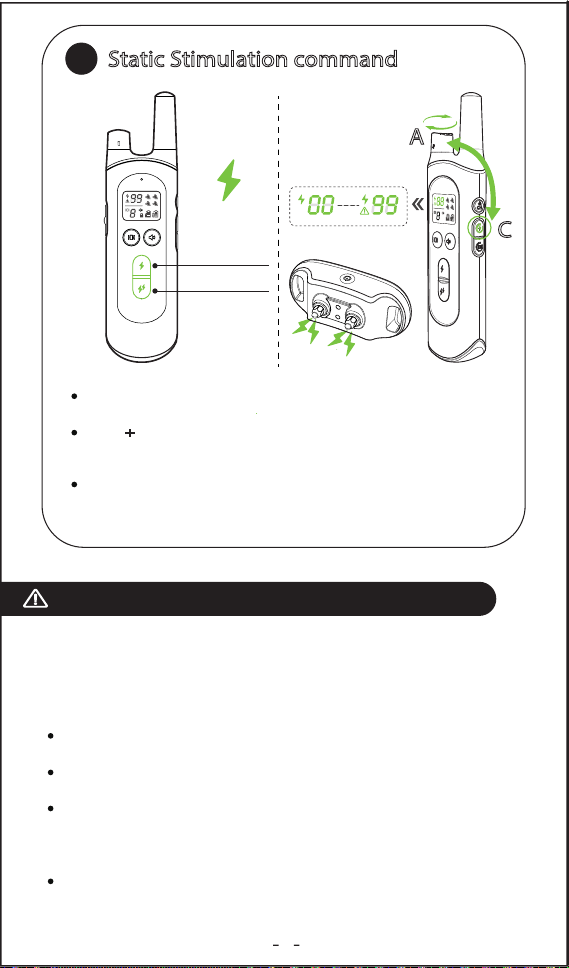
Risk of skin damage. Please read and follow the instructions in this manual. Proper t
of the collar is important. A collar worn for too long or made too tight on the pets neck
may cause skin damage. Ranging from redness to pressure ulcers; this condition is
commonly known as bed sores.
Not for use with aggressive dogs. Do not use this product if your dog is prone to
aggressive behavior. Aggressive dogs can cause severe injury to their owners and
others. If you are not sure that this product is right for your dog, please talk to your
veterinarian or a certied trainer.
CAUTION, used without the safety alert symbol, indicates a hazardous
situation, which, if not avoided, could result in harm to your pet.
Important Safety Information
CAUTION
Avoid leaving the collar on the dog for more than 12 hours per day.
Possible reposition the collar on the pet's neck every 1 to 3 hours.
Check the t to prevent excessive pressure; follow the instructions in this manual.
Never connect a leash to the electronic collar; it will cause excessive pressure on the
contact points.
When using a separate collar for a leash, don't put pressure on the electronic collar.
Wash the dog's neck area and the contacts of the collar weekly with a damp cloth.
Check the contact area daily for signs of a rash or a sore.
If a rash or sore is found, discontinue use of the collar until the skin has healed.
If the condition persists beyond 48 hours, see your veterinarian.
WARNING
Safety during on-leash training. It is vitally important that you and your dog remain
safe while learning during on-leash training. Your dog should be on a strong leash,
long enough for him to attempt to chase an object, but short enough for him not to
reach a road or other unsafe area. You must also be physically strong enough to
restrain your dog when he tries to chase.
This pet training device is not a toy, keep away from children.
CAUTION, used with the safety alert symbol, indicates a hazardous
situation, which, if not avoided could result in minor or moderate injury.
CAUTION

1
2
Magnetic charging port
When charging is completed,the green light will appear.
Note: The Contact Points must have direct contact with Dog’s
skin on the underside of neck. Check the tightness of the Collar
by inserting one nger snugly between the collar and neck.
Charge the Collar
and Remote
Fit the Receiver Collar
5

3
4
Press the button to
turn on the Receiver,
the green LED ashes.
When not using the collar, turn it o to increase the battery life.
Long press the button 3 secs to turn o the Receiver.
Security Keypad:lock or unlock
Rotating the regulator
A to turn on the
remote.
To turn the Remote
and Receiver on
A
Keypad Lock
6

5
6
Delivers a beep tone with non-adjustable volume to the collar.
Delivers vibration to the collar. Vibration Intensity adjustment: Press
and hold the vibration Level button B, at the same time, rotating the
level regulator A of the remote.
Beep Tone command
Vibration command
B
A
7

7
Static
Static
How to find the Best Static Level for Your Dog ?
Very Important: Always start at the lowest level and choose the level
that is best for your dog.
Have 1 to 99 dierent Stimulation Levels. Follow the steps below to
nd the best Level:
Step 1: Starting at Level 10 on the Digital Display, press the static
button to see dog’s reaction.
Step 2: Move up through the Stimulation levels until your pet
reliably responds to the Stimulation.
Step 3: If your dog continues to show no response at Level 50, check
the t of the Receiver Collar. If your dog has long or thick hair,
change to a longer set of Contact Points, or dog’s hair will need to
be trimmed around the Contact Points.
If all of these steps have been done and dog continues to show no
reaction, see the
“How to Use Test Light Tool”
section.
+
Static button: Delivers currently selected level Static stimulation
to the collar.
Static + button: That is 10% higher than the currently selected
level. Some consumers would like to instant access to a higher
setting where the dog may not respond to lower levels.
Static Intensity adjustment: Press and hold the static Level
button C, at the same time, rotating the level regulator A of the
remote.
Static Stimulation command
C
A
8

Main Features
Vibration, Tone and Static training model
9 adjustable vibration level and 99 adjustable static level
Dual batteries status display for Remote and Receiver
Receiver collar IPX7 waterproof (Remote non-waterproof)
Remote range 1000-1600 feet
Long life Lithium Polymer battery
Big digital display
Support maximum 4 receiver collars with one remote
Magnetic charging port
00-99
0 - 9
300-450M
9

A : Static function test
1. Make sure the Remote and Receiver Collar on.
2. Hold the Test Light tool contacts to the Contact Points.
3. Press a Static button on the Remote Transmitter. The Test Light
will be lighted.
B: As a tool to tighten or loosen the contact points
For dog with shorter coats, use 2pcs shorter contact point. Or
install the conductive Silicone onto the contact point to make it
softer. It may better to your dog’s skin.
For dog with thicker coats, use 2pcs longer contact points. Or
install the conductive Silicone.
How to Use Test Light Tool
Long Contact Points
Install the conductive Silicone
10

If you wan to eliminating unwanted behavior – For examples
barking. Please follow these training steps.
1. Put a separate non-metallic collar on your dog’s neck above the
Receiver Collar, and attach a 8-10 foot leash. (Note: Be sure the
extra collar does not put pressure on the Contact Points.)
2. Hold the leash and the Remote Transmitter
3. Choose your pet’s Recognition Level.
4. As soon as your pet is barking, press the Stimulation button and
give the command“No” or “No barking.”
5. Release the Stimulation button immediately once your dog stop
barking, and verbally praise him.
6. If your pet ignores the stimulation, increase the Intensity Level
by 3 to 5.
7. Practice this exercise in several dierent areas.
Training Tips
11

Pairing
Press and hold
5 Secs
The green light will ash fast.
1. Make sure the Receiver is turned o.
2. Press and hold Switch for 5 secs until the green light is ashing fast.
3. Press the remote Pairing/Channel Select button D to paring the receiver.
4. Pairing successful: the receiver will beep and the green light
ash slowly.
( Notes : You may skip this step because the set is already paired by
factory setting. )
D
12

Two,Three, Four Receiver System
Receiver:
1. Make sure the Receiver is turned o.
2. Press and hold Switch for 5 secs until the green light ashes fast.
Remote:
3. Press and hold channel button D, at the same time, rotating the level
regulator A to select the dog icon. (For examples Dog 2, the Dog2 icon
will ash.)
4. Press the remote Pairing/Channel Select button D to paring the receiver.
Part I : Pairing 2nd , 3rd, or 4th Receiver.
(Note:You should buy an additional receiver collar.)
( Note: Please skip this step if you only use one receiver. This setting
only for multiple receiver with one remote. )
Part III:
Reset all paired receiver collar.
Able to train 4 dogs at the same time.
Press and hold channel button D, at the same time, rotating the level
regulator A to select the dog to train.
Make sure the remote is“ON” .
Press and hold Static level button C and Vibration level button B, at the
same time, turning the regulator switch A OFF to ON. All paired receiver will
be removed and the dog 1 icon will ash.
Pairing the receiver again.
Press and hold Turn o Turn on
Press and hold
4
D
A
A
C
B
13
Part II : Receiver Switching:

How to change the longer prongs for this collar? I don’t think they are
getting through my Labs thick hair.
Answer:
Just part the hair or trim it a bit. I have a dog with very thick neck of
hair. I parted it with my hands . Just be sure remote is o then start on
low setting and work your way up. If no response repeat steps of
working prongs thru hair remember to turn o or lock remote.
Question & Answer
1. My pet is not responding when I press a beep vibration or static
button.
• Check the Receiver Collar if it is On.
• Please check to see if the battery is low in either the Remote
Transmitter or Receiver Collar.
• Verify the Receiver Collar is delivering Stimulation to your pet by
placing the Test Light, enclosed in your kit, on the Receiver Collar.
• Increase the correction level. Refer to “Find the Best Stimulation
Level For Your dog”.
• Make sure the Receiver Collar’s Contact Points are placed snugly
against your pet’s skin.
2. The Receiver Collar will not turn on.
• Make sure the Receiver Collar has been charged.
3. The Receiver Collar is not responding to the Remote Transmitter.
• Verify the Receiver Collar has been turned on.
Troubleshooting
14

040.-TC20-NVKUS-01
• Reorient or relocate the receiving antenna.
• Increase the separation between the equipment and the receiver.
• Connect the equipment to an outlet on a circuit dierent from that to
which the receiver is connected.
• Consult customer care, the dealer, or an experienced radio/TV
technician for help.
FCC Statement
This device complies with part 15 of the FCC Rules. Operation is subject
to the following two conditions:
(1) This device may not cause harmful interference, and (2) this device
must accept any interference received, including interference that may
cause undesired operation.
CAUTION: Modication or changes to this equipment not expressly
approved by Radio Systems Corporation may void the user’s authority
to operate the equipment.
NOTE: This equipment has been tested and found to comply with the
limits for a Class B digital device, pursuant to part 15 of the FCC Rules.
These limits are designed to provide reasonable protection against
harmful interference in a residential installation. This equipment
generates, uses, and can radiate radio frequency energy and, if not
installed and used in accordance with the instructions, may cause
harmful interference to radio communications. However, there is no
guarantee that interference will not occur in a specic installation. If
interference does occur to radio or television reception, which can be
determined by turning the equipment o and on, the user is encour-
aged to try to correct the interference by one or more of the following
measures:
Compliance
15
Table of contents
Popular Pet Care Product manuals by other brands

MICROPOINT
MICROPOINT qLabs Vet user manual

INVISIBLE FENCE
INVISIBLE FENCE Safe Dog Monitor Installation and training manual

Super Pet
Super Pet CritterTrail Extreme Challenge Habitat user manual

Suncast
Suncast DCW13624 owner's manual

PawHut
PawHut D30-756V00 manual

Petsafe
Petsafe Deluxe Outdoor Bark Control PBC00-12788 Operating and training guide