NZXT Z370 ATX Instruction Manual

ESPAÑOL
Z370 ATX MOTHERBOARD
N7
Z370 ATX MOTHERBOARD
USER GUIDE

N7
N7

Z370 ATX MOTHERBOARD
ENGLISH
Z370 ATX MOTHERBOARD
TABLE OF CONTENTS
1 PREFACE.................................................................
2 PRODUCT INFORMATION
2.1 Package Contents...............................................
2.2 Specifications....................................................
3 COMPONENTS & PORTS
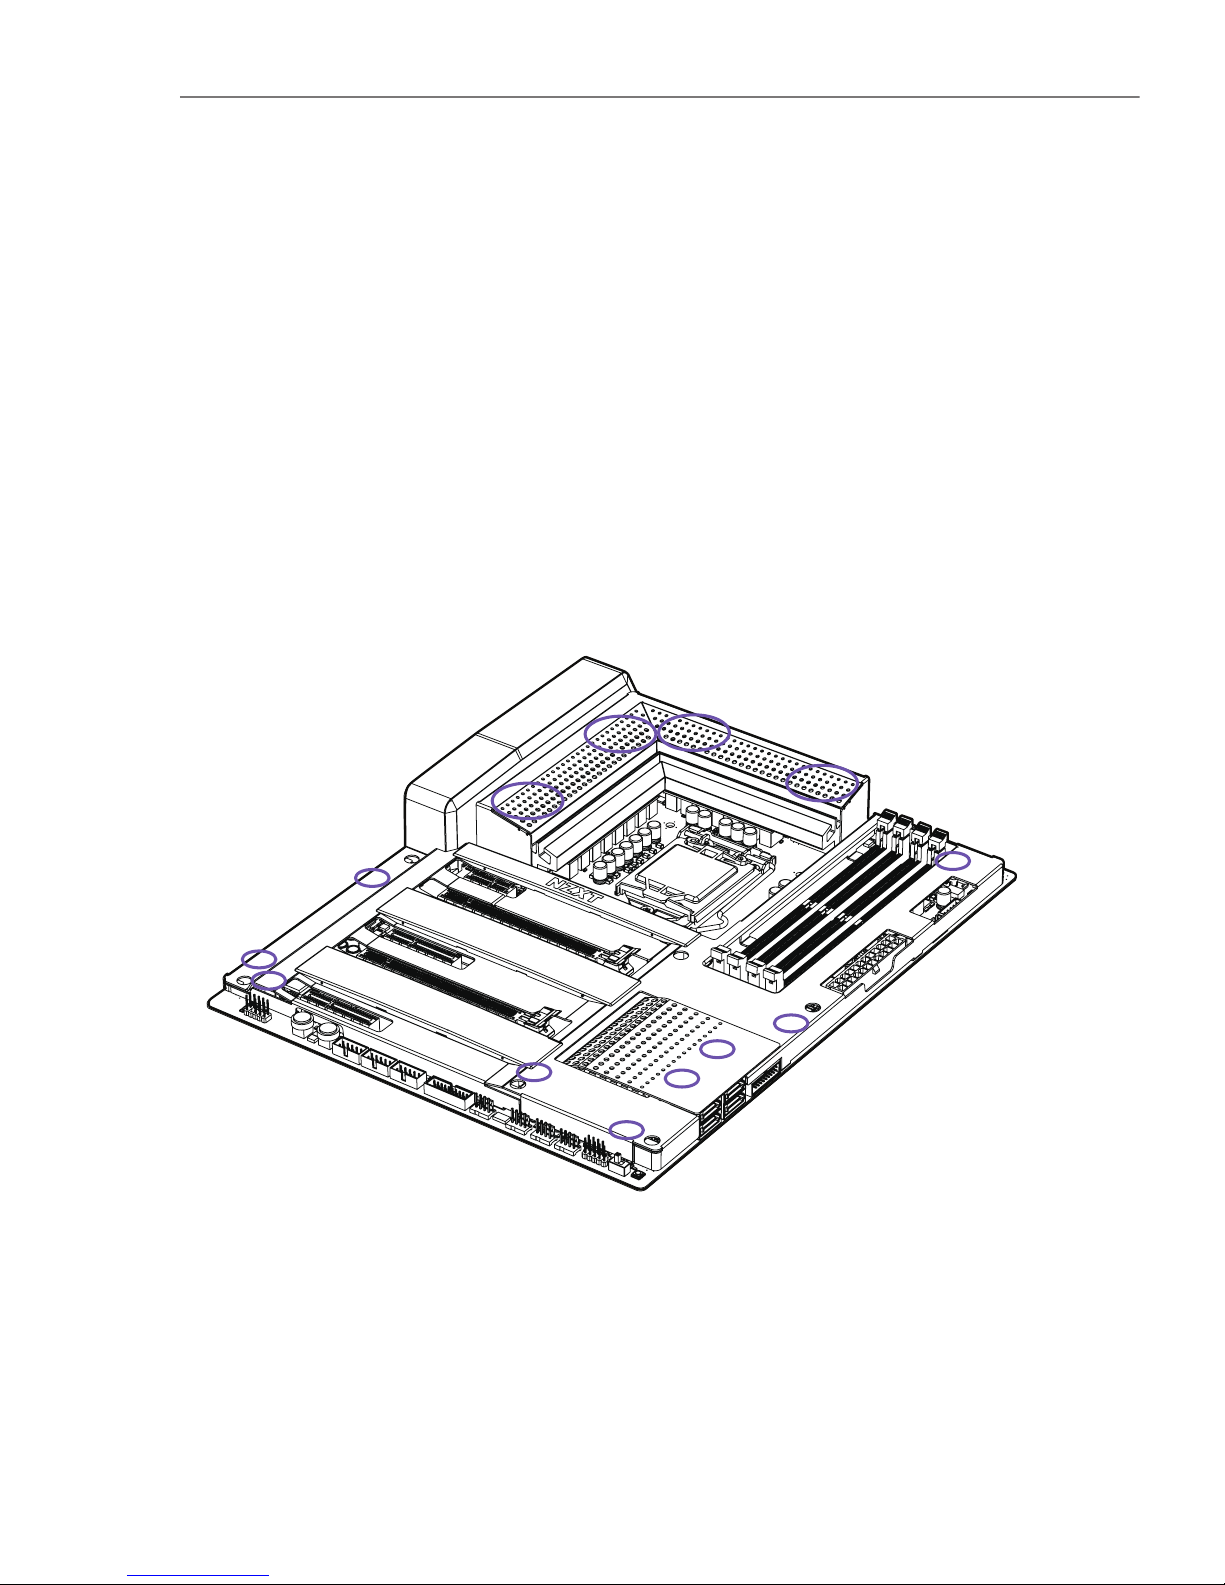
3.1 Covers................................................................
3.2 Ports Overview....................................................
3.3 Rear I/O..............................................................
3.4 CPU Socket.........................................................
3.5 DIMM Slots.........................................................
3.6 PCI Express Expansion Slots................................
3.7 SATA Connectors.................................................
3.8 M.2 Slots............................................................
3.9 Power Connectors...............................................
3.10 USB 2.0 & 3.0 Connectors...................................
3.11 Front Panel Audio Connector..............................
3.12. Front Panel Connector......................................
3.13. Fan Connectors................................................
3.14. LED Connectors................................................
3.15. Buttons & Switches..........................................
4 REGULATORY NOTICES..............................................
5 SUPPORT AND SERVICE............................................
6 REGULATORY NOTICES..............................................
7 BATTERY INFORMATION.............................................
8 WEEE STATEMENT.....................................................
1
2
3
6
8
10
12
14
15
17
18
20
21
22
22
23
23
24
A-1
A-4
A-6
A-7
A-8

N7
N7

Z370 ATX MOTHERBOARD
ENGLISH
1. PREFACE
A. Copyright©NZXT, Inc. All Rights Reserved.
This manual including all illustrations and screen captures, is protected under
international copyright laws, with all rights reserved.Neither this manual, nor any
of the material contained herein, may be reproduced without written consent of
the author.
B. Disclaimer
The information in this document is subject to change without notice. The man-
ufacturer makes no representations or warranties with respect to the contents
hereof and specifically disclaims any implied warranties of merchantability or fit-
ness for any particular purpose.The manufacturer reserves the right to revise this
publication and to make changes from time to time in the content hereof without
obligation of the manufacturer to notify any person of such revision or changes.
C. Trademark Recognition
Product names used in this manual are the properties of their respective owners
and are acknowledged.
D. Safety Precaution
Follow these safety precautions when installing the motherboard:
It is recommended to wear a grounding strap attached to a grounded device to
avoid damage from static electricity.
Discharge static electricity by touching the metal case of a safely grounded ob-
ject before working on the motherboard.
Leave components in the static-proof bags.
Always remove the AC power by unplugging the power cord from the power out-
let before installing or removing the motherboard or other hardware compo-
nents.
•
•
•
•
1

N7
2. PRODUCT INFORMATION
2.1 PACKAGE CONTENTS
• N7 Z370 Motherboard
• N7 Cover Pieces
• Motherboard User Guide
• I/O Shield
• 4x SATA Cables
• SLI Bridge Connector
• 2x LED Strips
• 2x 500mm LED Connection Cables
• 2x 300mm LED Extension Cable
2

Z370 ATX MOTHERBOARD
ENGLISH
2.2 SPECIFICATIONS
• LGA socket 1151 for Intel® 8th Generation Core™ i7/i5/i3 Processors
• Support Intel 14nm CPU
• Support Intel Turbo Boost Technology 2.0
Intel® Z370
4x DIMM, Max. 64GB, DDR4
Multi-VGA output support: HDMI/DisplayPort 1.2 ports
Intel®Z370 Express Chipset
• 3866(O.C.)/ 3733(O.C.)/ 3600(O.C.)/ 3466(O.C.)/ 3400(O.C.)/ 3333(O.C.)/ 3300(O.C.)/
3200(O.C.)/ 3000(O.C.)/ 2800(O.C.)/ 2666(O.C.)/ 2400(O.C.)/ 2133 MHz Non-ECC,
Un-buffered Memory
• Dual-channel memory architecture
• Support Intel® Extreme Memory Profile (XMP)
• DisplayPort with max. resolution of 4096x2304@60Hz
• HDMI™ with max. resolution of 4096x2160@24Hz
• Maximum shared memory of 1024MB
• 1x M.2 type 2242/2260/2280 (PCIe 3.0 x4 & SATA mode)
• 1x M.2 type 2242/2260/2280 (PCIe 3.0 x4 mode only)
• 4x SATA 6Gb/s ports
• Supports NVIDIA® 2-Way SLI™ Technology
• Supports AMD 2-Way CrossFireX™ Technology
CPU & Socket
Chipset
Memory
Multi-GPU Support
Integrated Graphics
Storage
Support RAID 0/1/5/10
Supports Intel® Smart Response Technology
Intel® Rapid Storage Technology
Intel® Optane Memory Ready
LAN
Intel®I219-V Gigabit LAN
3

N7
Audio
Expansion Slots
Rear I/O
Operating System
Form Factor
Realtek®ALC1220 Codec
7.1-Channel High Definition Audio, 32-bit / 192KHz DAC
Microsoft® Windows®10 64-bit
ATX
• 5x USB 2.0 Ports
• 4 x USB 3.1 Gen 1 Ports
• 1x Display Port 1.2
• 1x HDMI™ 1.4b
• 1x Clear CMOS Button
• 1x LAN (RJ45) Port
• 1x Optical S/PDIF Out Port
• 1x 7.1-Channel Audio Jacks
• 2x PCI-e 3.0 x16 (x16 or dual x8)
• 2x PCI-e 3.0 x4
• 1x PCI-e 3.0 x1
4

Z370 ATX MOTHERBOARD
ENGLISH
Internal I/O
• 1x 24-pin EATX Power Connector
• 1x 8-pin ATX 12V Power Connector
• 1x 4-pin CPU_FAN Connector
• 1x 4-pin AIO_PUMP connector
• 1x 4-pin W_PUMP connector
• 6x 4-pin SYS_FAN Connectors
• 3x USB 2.0 Header (support up to 6 USB 2.0 ports)
• 2x USB 3.1 Gen 1 header (support up to 4 USB 3.1 Gen 1 ports)
• 4x SATA 6Gb/s Connectors
• 1x M.2 Socket 3 with M Key, (PCIe 3.0 x4 & SATA mode)
• 1x M.2 Socket 3 with M Key, (PCIe 3.0 x4 mode only)
• 2x LED Connectors
• 1x Noise Detection Module
• 1x Front Panel Audio Connector
• 1x Power Button
• 1x Reset Button
• 1x ROM Backup Button
• 1x Dual BIOS Switch
5

N7
3. COMPONENTS & PORTS
3.1 COVERS
Introduction
The cover pieces are latched onto the motherboard through multiple points. When
installing and removing, please pay close attention to these points and apply an
even force to prevent damage.
6

Z370 ATX MOTHERBOARD
ENGLISH
Exploded View
7

N7
3.2 PORTS OVERVIEW
Designed in California
MODEL: N7-Z37XT
VERSION: 1.0
N7 Z370
LGA 1151
M2_2
PCIEX1_1
PCIEX16_1
PCIEX4_1
PCIEX16_2
PCIEX4_2
USB2_1
POWERRESET
USB2_2 USB2_3 USB3_1 SYS_FAN1W_PUMP SYS_FAN2 SYS_FAN3 F_PANEL ROM_BACKUP
DUAL BIOS
USB3_2
CPU_FAN AIO_PUMPSYS_FAN6SYS_FAN5SYS_FAN4
ATX_12V
REAR_AUDIO
CLR_CMOS_BTN
HDMI_DP_SPDF
USB2_R
USB3_R
USB_LAN
KM_USB
SATA 3/4 SATA 1/2
ATX_POWER
LED1
LED2
A1 B1 A2 B2
M2_1
BATTERY
224222602280
224222602280
FRONT_AUDIO
5
6
7
9
10
11
22
23
24
25
26
27
28
8
4
2 31
30
1213141617 1518
19
2021
29
FIRST
8

Z370 ATX MOTHERBOARD
ENGLISH
CPU Socket LGA 1151 socket for Intel 8th Generation processor
LED1 4-pin LED header
SATA 1-4 Serial ATA 6Gbps connectors
SYS_FAN 1-3
W_PUMP
4-pin fan connectors
4-pin connector for water pump
POWER Power button
PCIEX16_2 PCI Express x16 Gen3 slot for GPU
M2_1
M.2 Socket 3 with M key, supports type
2242/2260/2280 storage devices (Supports PCIE
mode)
CPU_FAN
AIO_PUMP
4-pin CPU fan connector
4-pin AIO pump connector
ATX_POWER 24-pin ATX power connector
ROM_BACKUP BIOS ROM backup button
M2_2
M.2 Socket 3 with M key, supports type
2242/2260/2280 storage devices (Supports
PCIE & SATA mode)
RESET Reset button
PCIEX1_1 PCI Express x1 Gen3 slot
LED2 4-pin LED header
Noise Detection Module Digital noise detection module for CAM
Dual BIOS Switch Dual BIOS switch, toggle to the left for default
USB3_1 Front panel USB 3.1 Gen 1 header
FRONT_AUDIO Front panel audio connector
PCIEX4_1 PCI Express x4 Gen3 slot
ATX_12V 8-pin +12V power connector
DIMM A1-B2 288-pin DDR4 memory slots
USB3_2 Front panel USB 3.1 Gen 1 header
Front Panel Connectors Front panel switches and LED connectors
USB2_1-3 Front panel USB 2.0 headers
PCIEX4_2 PCI Express x4 Gen3 slot
Battery
PCIE16_1
Battery
PCI Express x16 Gen3 slot for GPU
SYS_FAN 4-6 4-pin fan connectors
1
5
9
13
17
21
25
2
6
10
14
18
22
3
7
11
15
19
23
27
29
4
8
12
16
20
24
26
28
30
No. Port Name Description
9

N7
3.3 REAR I/O
USB 2.0 x 2
HDMI 1.4b port
USB 2.0 x 2
Clear CMOS button
USB 2.0 x 1
Audio Ports
A. Center and Subwoofer
B. Rear Surround
C. Side Surround
D. Line-in
E. Front Left and Right
F. Microphone
Optical SPDIF Out port
USB 3.1 Gen 1 x 4
DisplayPort port
RJ45 LAN port
1
5
9
2
6
10
3
7
4
8
No. Port Name
763
4 5 9
21 8
10
10

Z370 ATX MOTHERBOARD
ENGLISH
11

N7
The surface of the LGA 1151 CPU has two notches and a golden triangle to assist in
correctly lining up the CPU for placement within the socket.
• Push down on the retention arm and outwards to release.
• Flip open the latch and place the CPU making sure the triangle and the notches on
the CPU matches the corner as indicated.
Installation
Introduction
3.4 CPU SOCKET
12

Z370 ATX MOTHERBOARD
ENGLISH
• Close the latch and push down on the retention arm to lock it into place.
• The plastic protective cap will automatically become loosen.
• Apply thermal paste as needed and install your CPU cooler.
• Always unplug the power cord from the power outlet before installing or removing the CPU.
• Please retain the CPU protective cap after installing the CPU.
• Confirm that the CPU heatsink has been mounted properly before booting.
• Whenever the CPU is not installed, always protect the CPU socket pins by covering the socket with the plastic
protective cap.
• Please refer to the CPU cooler manufacturer’s instructions to install your cooler.
Note
13

N7
The DIMM slots are located here. Please see the diagram for recommended memory
configuration.
•Push the release lever as indicated.
•Match the memory with the middle notch and align into the DIMM slots.
•Push the memory into the DIMM slot firmly until the level has been locked automat-
ically.
Insert memory modules in the B1 slot first.
Note
Introduction
Installation
A1 B1 A2 B2
(Populate B1 First)
3.5 DIMM SLOTS
14

Z370 ATX MOTHERBOARD
ENGLISH
See the diagram below for the list of slots. Please install graphics cards using the
PCIEX16_1 first then the PCIEX16_2.
For power supply recommendations for SLI configurations, please refer to the user
guide of your graphics card to make sure you meet all the system requirements.
To install SLI graphics cards:
•Turn off your computer and disconnect the power cord, install two graphics cards
into the PCIEX16_1 and PCIEX16_2 slots.
Introduction
Multi-Graphic Cards Installation
PCIEX1_1:
PCIEX16_1:
PCIEX4_1:
PCIEX16_2:
PCIEX4_2
PCIe 3.0 x1 slot
PCIe 3.0 x16 slot
PCIe 3.0 x4 slot
PCIe 3.0 x8 slot
PCIe 3.0 x4 slot
3.6 PCI EXPRESS EXPANSION SLOTS
15

N7
Note
• For a single PCIe x16, please use PCIEX16_1.
• When adding or removing expansion cards, always turn off the power supply and unplug the power supply
power cable from the power outlet. Read the expansion card’s documentation to check for any necessary
additional hardware or software changes.
•Connect the two cards together using the SLI Bridge Connector.
•Connect all PCIe power connectors of the graphics cards.
•Reconnect the power cord, power up the computer and install the drivers and soft-
ware included in your graphics card package.
16
This manual suits for next models
1
Table of contents
Other NZXT Motherboard manuals