Oase Solarsafe 17 User manual

Solarsafe
17 / 41
D Gebrauchsanweisung
GB Operating instructions
F Notice d'emploi
NL Gebruiksaanwijzing
E Instrucciones de uso
P Instruções de uso
I Istruzioni per l'uso
DK Brugsanvisning
N Bruksanvisning
S Bruksanvisning
FIN Käyttöohje
H Használati utasítás
PL Instrukcja obsługi
CZ Návod k použití
SK Návod na použitie
SL Navodilo za uporabo
HR Upute za upotrebu
RO Indica
ţ
ii de utilizare
BG
Упътване
за
употреба
UA
нструкції
з
використання
RUS
Руководство
по
эксплуатации
RC
使⽤说明书
JP
取扱説明書
T305 880 590 01/ID 26906/05A

2
Technische Daten
DTyp Abmessungen Gewicht Betriebsspannung Speicherkapazität Ausgangsstrom Solarmodulleistung
GB Type Dimensions Weight Operating voltage Charging capacity Output voltage Solar module capacity
FType Dimensions Poids Tension de service Capacité d'accumulation Courant de sortie Puissance du module solaire
NL Type Afmetingen Gewicht Bedrijfsspanning Opslagcapaciteit Uitgangsstroom Vermogen zonnecelmodule
ETipo Dimensiones Peso Tensión de servicio Capacidad de almacenamiento Corriente de salida Potencia del módulo solar
PTipo Dimensões Peso Tensão de serviço Capacidade Corrente de saída Potência do módulo solar
ITipo Dimensioni Peso Tensione d'esercizio Capacità accumulatore Corrente di uscita Potenza del modulo solare
DK Type Dimensioner Vægt Driftsspænding Lagerkapacitet Udgangsstrøm Solmoduleffekt
NType Mål Vekt Driftsspenning Lagringskapasitet Utgangsstrøm Solcelleytelse
STyp Mått Vikt Driftspänning Kapacitet Utgångsström Solarmodulens effekt
FIN Tyyppi Mitat Paino Käyttöjännite Varauskapasiteetti Lähtövirta Aurinkomoduulin teho
HTípus Méretek Súly Üzemi feszültség Tárolókapacitás Kimeneti áram Solarmodulteljesítmény
PL Typ Wymiary Ci
ęż
ar Napi
ę
cie robocze Pojemno
ść
akumulatora Pr
ą
d wyj
ś
ciowy Moc ogniw słonecznych
CZ Typ Rozm
ě
ry Hmotnost Provozní nap
ě
tí Akumula
č
ní kapacita Výstupní proud Výkon solárního modulu
SK Typ Rozmery Hmotnost’ Prevádzkové napätie Akumula
č
ná kapacita Výstupný prúd Výkon solárneho modulu
SL Tip Dimenzije Teža Obratovalna napetost Kapaciteta akumulatorja Izhodni tok Mo
č
solarnega modula
HR Tip Dimenzije Masa Radni napon Kapacitet Izlazna struja Snaga solarnih modula
RO Tip DimensiuniMas
ă
Tensiune de lucru Capacitate de acumulare Curent de ie
ş
ire Puterea modulului solar
BG
Тип Размери Тегло Работно
напрежение Капацитет
на
паметта Изходен
ток мощно т
UA
Тип Розміри Вага Робоча
напруга Ємні ть
акумулятора Вихідний
трум Потужні ть
онячного
модуля
RUS
Тип Размеры Ве Рабочее
напряжение Емко ть Выходной
ток Мощно ть олнечного
модуля
RC
型号 尺⼨ 重量 运⾏电压 存储器容量 出⼝电流 太阳能板的功率
JP
機種
寸法 重量 作動電圧 充電許容量 出⼒電流 ソーラー
モジュール出⼒
Solarmax 17 360 x 360 x 270 mm 7,5 kg DC 12 V 17 Ah max. 7,5 Amax.70 W
41 16 kg 41 Ah

3
12345
DHaube Statusanzeige Batteriehalterung Batterie Anschlussstecker
GB Hood Status indicator Battery holder Battery Connection plug
FCouvercle Témoin lumineux Elément de fixation de la
batterie Batterie Fiche de raccordement
NL KapStatusindicatie Accuhouder Accu Aansluitstekker
ECubierta Lámpara de estado Compartimiento de la
batería Batería Clavija de conexión
PCobertura LED do estado
operacional Compartimento da
bateria BateriaFicha de conexão
ICalotta Indicatore della funzione
d'esercizio Portabatteria Batteria Connettore
DK Kappe Statusvisning Batteriophæng Batteri Tilslutningsstik
NDeksel Statusindikator Batteriholder Batteri Tilkobling
SKåpa Statusindikering Batterihållare Batteri Anslutningskontakt
FIN Kupu Tilanäyttö Akun kiinnitin Akku Liitospistoke
HBurkolat Állapotjelz
ő
Akkufoglalat Akku Csatlakozó dugó
PL Osłona Wy
ś
wietlacz stanu Uchwyt akumulatora AKumulator Wtyczka podł
ą
czeniowa
CZ Kryt Ukazatel stavu Držák baterie Baterie P
ř
ipojovací konektor
SK Kryt Ukazate
ľ
stavu Držiak batérie Batéria Pripojovací konektor
SL Pokrov Prikaz statusa Držalo akumulatorja Akumulator Priklju
č
ni vti
č
HR poklopac pokaziva
č
statusa drža
č
akumulatora akumulator priklju
č
ni utika
č
RO Capac Indicator de stare Suport baterie Baterie Fi
şă
de conectare
BG
кожух Показание
на
статуса Поддържане
на
акумулатора Акумулатор Свързващ
щекер
UA
Кришка ндикатор
стану Кріплення
для
батареї Батарея З
'
єднувальний
штекер
RUS
Кожух Индикация
статуса Крепление
батареи Батарея Соединительный
штекер
RC
外罩 状态显⽰灯 电池⽀架 电池 连接插头
JP
フード ステータス表示 バッテリーホルダー バッテリー コンタクトプラグ
3
2
1
5
4

E
D
C
B
A
E
D
C


OASE GmbH
Tecklenburger Str. 161
D - 48477 Hörstel
www.oase-pumpen.com
Typ
Pos 17 41
126915 26915
227186 27187
327193 26962
426914 26914
535373 35373
1
2
3
5
4

5
Hinweise zu dieser Betriebsanleitung
Vor der ersten Benutzung lesen Sie bitte die Gebrauchsanweisung und machen sich mit dem Gerät vertraut. Beachten
Sie unbedingt die Sicherheitshinweise für den richtigen und sicheren Gebrauch.
Bestimmungsgemäße Verwendung
Die Baureihe Solarsafe 17/41, im weiteren Gerät genannt, ist ausschließlich zur Stromversorgung für unsere Solarsets
zu verwenden und darf nur in Verbindung mit unserem Solarmodul geladen werden.
Nicht bestimmungsgemäße Verwendung
Es können bei nicht bestimmungsgemäßer Verwendung und unsachgemäßer Behandlung Gefahren von diesem Gerät
für Personen entstehen. Bei nicht bestimmungsgemäßer Verwendung erlischt die Haftung unsererseits sowie die allge-
meine Betriebserlaubnis.
CE-Herstellererklärung
Im SinnederEG-Richtlinie EMV-Richtlinie (89/336/EWG) sowie der Niederspannungsrichtlinie (73/23/EWG) erklären wir
die Konformität. Folgende harmonisierte Normen wurden angewandt: EN 60335-1, EN 55014.
Unterschrift:
Sicherheitshinweise
Die Firma OASE hat dieses Gerät nach dem aktuellen Stand der Technik und den bestehenden Sicherheitsvorschriften
gebaut. Trotzdem können von diesem Gerät Gefahren für Personen und Sachwerte ausgehen, wenn diese unsach-
gemäß bzw. nicht dem Verwendungszweck entsprechend eingesetzt werden oder wenn die Sicherheitshinweise nicht
beachtet werden.
Aus Sicherheitsgründen dürfen KinderundJugendliche unter16JahrensowiePersonen,diemöglicheGefahren
nicht erkennen können oder die nicht mit dieser Gebrauchsanweisung vertraut sind, dieses Gerät nicht benut-
zen!
Bitte bewahren Sie diese Gebrauchsanweisung sorgfältig auf! Bei Besitzerwechsel geben Sie die Gebrauchsanweisung
weiter. Alle Arbeiten mit diesem Gerät dürfen nur gemäß der vorliegenden Anleitung durchgeführt werden.
Die Kombination von Wasser und Elektrizität kann bei nicht vorschriftsmäßigem Anschluss oder unsachgemäßer Hand-
habung zu ernsthafter Gefahr für Leib und Leben führen.
Das Gerät darf nicht im oder unter Wasser betrieben werden und darf nur mit dem Solarmodul geladen werden. Öffnen
Sie niemals das Gehäuse des Gerätes oder dessen zugehörige Teile, wenn nicht ausdrücklich in der Gebrauchsanwei-
sung darauf hingewiesen wird. Vergleichen Sie die elektrischen DatenderStromversorgung mitdemTypenschild auf der
Verpackung bzw. auf dem Gerät. Bei Fragen und Problemen wenden Sie sich zu Ihrer eigenen Sicherheit an einen Elek-
trofachmann! Verlegen Sie die Anschlussleitung geschützt, so dass Beschädigungen ausgeschlossen sind.
Aufstellen
Das Gerät wird waagerecht betrieben!
Inbetriebnahme
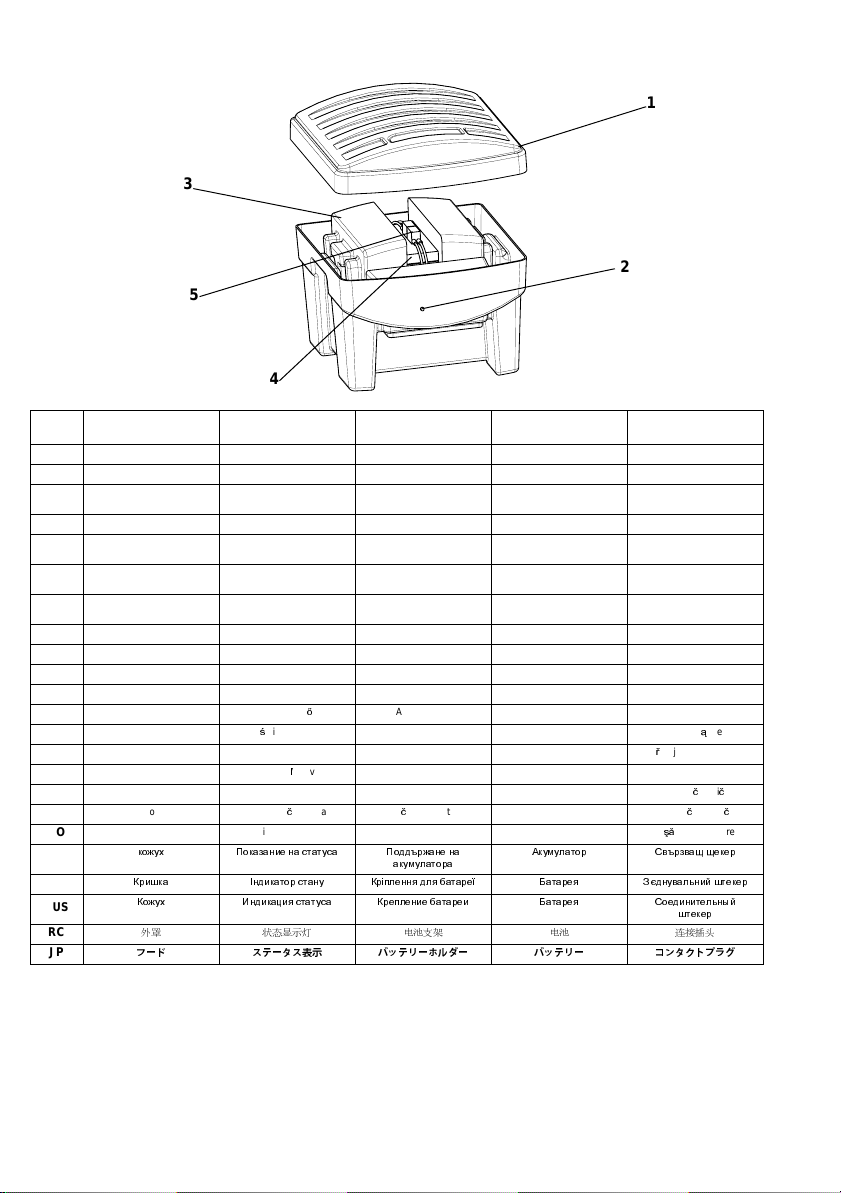
Zur Inbetriebnahme Batterie anschließen. Dazu Haube abnehmen und die Anschlussstecker miteinander verbinden. Die
Batterie ist bei Auslieferung vollständig geladen und betriebsbereit. Befolgen Sie zuvor folgende Arbeitsschritte: An das
Gerät ist vor dem Einschalten das OASE-Solarmodul anzuschließen (A/B). Die Statusanzeige (2) an der Stirnseite zeigt
den Betriebszustand an, grün blinkend = Akku wird geladen und ist betriebsbereit, gelb blinkend = Akku wird nicht
geladen, ist aber noch betriebsbereit, rot blinkend = Akku ist entladen und muss geladen werden.
Das Gerät verfügt über 2 Ein- und 3 Ausgänge, die gegen Verwechseln gesichert sind. An den Anschlüssen (A/B) kann
je ein OASE-Solarmodul angeschlossen werden. Der Anschluss (C) liefert direkte Energie über die Solarmodule, wäh-
rend gleichzeitig mit der überschüssigen Energie die Ladung der Batterie erfolgt. Anschluss (D) dient zur direkten Ab-
nahme aus der Batterie und sorgt für eine absolut gleichmäßige Leistung des Verbrauchers. Anschluss (E) arbeitet mit
einer Dämmerungsautomatik für Verbraucher, die sich in den Abendstunden automatisch einschalten sollen. Auch das
Ausschalten erfolgt automatisch nach 6 Stunden. Die Ausgänge D und E sind bei rot leuchtender Lampe abgeschaltet
und gegen Tiefentladung gesichert.
Wichtig! Der Akku darf nicht kurzgeschlossen werden!
Elektrischer Anschluss
Der elektrische Anschluss ist gemäß der Anschlussbelegung (A/B = Solarmodul, C/D/E = Verbraucher) durchzuführen.
Für alle Installationen gilt die VDE 0100 Teil 702. Abweichung der Nennspannung +6% und -10%. Alle Leistungsdaten
sind dem Typenschild zu entnehmen. Alle Arbeiten am Gerät sind im stromlosen Zustand auszuführen.
Reinigung
Reinigen Sie das Gerät mit einem weichen Tuch.
Verschleißteile
Die Batterie ist ein Verschleißteil.
Lagern/Überwintern
Lagern Sie das Gerät trocken und frostfrei. Batterie nur im geladenen Zustand überwintern lassen.
Entsorgung
Ein verbrauchter oder defekter Akku gehört nicht in den Hausmüll. Bringen Sie verbrauchte oder defekte Akkus zu Ihrem
Fachhändler oder zu einer örtlichen Sammelstelle.
D

6
Störungen
Information about this operating manual
Please read the operating instructions and familiarise yourself with the unit prior to using it for the first time. Adhere to
the safety information for the correct and safe use of the unit.
Intended use
The Solarsafe 17/41 series, in the following text termed unit, is exclusively intended for the power supply to Oase Solar
sets and must only be charged in conjunction with Oase Solar modules.
Use other than that intended
Danger to persons can emanate from this unit if it is not used in accordance with the intended use and in the case of
misuse. If used for purposes other than that intended, our warranty and operating permit will become null and void
CE Manufacturer's Declaration
We declare conformity in the sense of the EC directive, EMC directive (89/336/EEC) as well as the low voltage directive
(73/23/EEC). The following harmonised standards apply: EN 60335-1, EN 55014.
Signature:
Safety information
OASE has manufactured this unit according to the highest quality standards and the valid safety regulations. Despite the
above, hazards for persons and assets can emanate from this unit if it is used in an improper manner or not in accordance
with its intended use, or if the safety instructions are ignored.
For safety reasons, children and young persons under 16 years of age as well as persons, who cannot recognise
possible danger or who are not familiar with these operating instructions, are not permitted to use the unit!
Please keep these operating instructions in a safe place! Also hand over the operating instructions when passing the unit
on to a new owner. Ensure that all work with this unit is only carried out in accordance with these instructions.
The combination of water and electricity can lead to danger for life and limb, if the unit is incorrectly connected and
misused.
Never operate the unit when submersed or standing in water; only charge it using the Solar module. Never open the unit
housing or its attendant components, unless this is explicitly mentioned in the operating instructions. Compare the
electrical values of the power supply with those on the type plate on the packing or on the unit itself. For your own safety,
consult a qualified electrician when you have questions or encounter problems! Protect the connection cable when
burying to avoid damage.
Installation
The unit is operated in horizontal position!
Start-up
Connect the battery prior to starting. For this purpose, remove the hood and join the connection plugs. When delivered,
the battery is fully charged and operational. Prior to this observe the following operating steps: Prior to switching on,
connect the OASE Solar module to the unit (A/B). The status indicator (2) at the front shows the operating condition,
flashinggreen = the accumulator is being charged and operational, flashing yellow = the accumulator is not being charged
but operational, flashing red = the accumulator is discharged and needs recharging.
The unit has 2 inputs and 3 outputs which are different connections to avoid confusion. One OASE Solar module each
can be connected to the input connections (A/B). Connection (C) directly supplies energy via the Solar modules, whilst
the excess energy is used at the same time to charge the battery. Connection (D) is used for direct consumption from the
battery and ensures an absolutely consistent performance of the electrical consumer. Connection (E) operates with an
automatic twilight system for those electrical consumers which are to switch on during the evening hours. Switching off
after 6 hours is also automatic. The outputs D and E are switched off when the lamp is red and protected from deep
discharge.
Important! Do not short-circuit the accumulator!
StörungUrsache Abhilfe
LED blinkt nicht mehr Akku vollkommen entladen
Akku ist defekt Solarpanel oder Ladegerät anschließen
Akku austauschen
Akku ist nicht lange nutzbar Akku wird nicht voll
Akku ist defekt
längere Zeit bei ausreichend Sonne aufladen
Ladegerät anschließen
Akku austauschen
LED zeigt bei Sonneneinstrah-
lung keine grün blinkende LED Elektronik defekt Reparatur
Beleuchtungsausgang wird
nicht aktiviert Solarmodule werden künstlich beleuchtet Solarmodule gegen Lichtquelle abschirmen
GB
D

7
Electrical connection
Carry out the electrical connection in accordance with the connection assignment (A/B = Solar module, C/D/E = electrical
consumer). The VDE 0100, part 702, are valid for all installations. Deviations from the rated voltage +6% and -10%.
Please refer to the type plate for all capacity and performance data. Carry out all work on the unit when isolated.
Cleaning
Clean the unit with a soft cloth.
Wearing parts
The battery is a wear part.
Storage/Over-wintering
Store the unit dry and frost protected. Only shut down battery over the winter in a charged condition.
Disposal
Do not dispose of a used or defective accumulator with the household garbage. Take used or defective accumulators to
your specialist dealer or to a local collection point.
Malfunctions
Remarques relatives à cette notice d'emploi
Avant la première utilisation, lire attentivement cette notice d'emploi et se familiariser avec l'appareil. Respecter
impérativement les indications de sécurité relatives à une utilisation correcte et en toute sécurité.
Utilisation conforme à la finalité
La série Solarsafe 17/41, dénommée ci-après "appareil", est destinée uniquement à l'alimentation en courant de nos kits
solaires et ne peut être chargée qu'à l'aide de notre module solaire.
Utilisation non conforme à la finalité
En cas d'utilisation non conforme à la finalité et de manipulation non appropriée de cet appareil, des risques pour les
personnes peuvent en résulter. Toute utilisation non conforme à la finalité entraîne l'annulation de notre responsabilité
ainsi que de l'autorisation d'exploitation générale.
Déclaration du fabricant CE
Nous déclarons la conformité par rapport à la directive CE concernant la compatibilité électromagnétique (89/336/CEE)
ainsi que par rapport à la directive basse tension (73/23/CEE). Les normes harmonisées suivantes ont été appliquées :
NE 60335-1, NE 55014.
Signature :
Indications de sécurité
La société OASE a construit cet appareil selon l'état actuel des connaissances techniques et les consignes de sécurité
en vigueur. Toutefois des dangers pour les personnes et les biens peuvent émaner de cet appareil lorsque celui-ci est
utilisé de manière non appropriée voire non conforme à sa finalité ou lorsque les informations de sécurité ne sont pas
respectées.
Pour des raisons de sécurité, les enfants et les mineurs de moins de 16 ans ainsi que les personnes n'étant pas
en mesure de reconnaître les dangers ou n'ayant pas pris connaissance de cette notice d'emploi ne sont pas
autorisés à utiliser cet appareil !
Prière de conserver soigneusement cette notice d'emploi ! Lors d'un changement de propriétaire, transmettre également
cette notice d'emploi. Tous les travaux effectués avec cet appareil devront être exécutés conformément aux directives
ci-jointes.
La combinaison d'eau et d'électricité peut entraîner des dangers sérieux pour la santé et la vie des personnes lors d'une
utilisation avec des raccordements non conformes ou une utilisation inappropriée.
L'appareil ne doit en aucun cas être utilisé dans ou sous l'eau et ne peut être chargé qu'à l'aide du module solaire. Ne
jamais ouvrir le carter de l'appareil ou des parties y appartenant si cela n'est pas expressément indiqué dans la notice
d'emploi. Comparer les données électriques du réseau d'alimentation avec celles indiquées sur la plaque signalétique de
l’emballage ou sur l'appareil. En cas de questions et de problèmes, prière de vous adresser à un électricien et ce, pour
votre propre sécurité ! Protéger le câble de raccordement afin qu'il ne soit pas endommagé.
Trouble shooting Cause Remedy
LED stopped flashing Accumulator completely discharged
Accumulator is defective Connect Solar panel or charging unit
Replace accumulator
Short accumulator operating life Accumulator does not fully charge
Accumulator is defective
Allow charging for an extended time in sufficient sunlight
Connect the charging unit
Replace accumulator
In sunlight, the LED does not
flash green Electronics defective Contact Oase technical support
Lighting output is not activated Solar modules are artificially illuminated Screen Solar modules from light sources
F
GB
This manual suits for next models
1
Table of contents
Other Oase Inverter manuals
Popular Inverter manuals by other brands

SMA
SMA SUNNY BOY 3000TL Single Tracker installation manual

Sealey
Sealey PP40PLUS manual

Briggs & Stratton
Briggs & Stratton 7000 Rated Watts Home Standby Generator Operator's manual

Hoymiles
Hoymiles HME-1500-AU Quick installation guide

Mission Critical
Mission Critical Xantrex Freedom XC 2000 - 230V manual

Siemens
Siemens SINAMICS G120 operating instructions