Observer OB-EW-001 User manual

USER MANUAL
Unlimited Electric Wheelchair
OB-EW-001
www.observer-mobilityproduct.com 1

C O N T E N T S
1. INTRODUCTION…………………………………………………..….. 3
2. OPERATION…………………………………………………….…….. 4~6
3. PG Controller Operation……………………………….….………..... 7~19
4. ASSEMBLY……………………………………………………...…….. 20~23
5. BATTERIES AND CHARGING…………………………………….… 24~27
6. CARE AND MAINTENANCE………………………………………… 28~33
7. WARRANTY…………………………………………………………… 34~36
8. APPENDIXI-SPECIFICATIONS……………………………………... 37
www.observer-mobilityproduct.com 2

INTRODUCTION
Safety
Welcome to Observer. The electric wheelchair you have purchased combines
the high technology of optics electrics and machine. Our patented aclinic
equipment will adjust your body centre of gravity to keep the level as same as
the terrain. Our electric wheelchair also can climb the angle up to 36 degree. It
offers you 100% safety when you drive on any terrain. It’s safe, comfort, and
styling in mind. We are confident that our electric wheelchair will offer you the
most convenience in House, public location, open space ect.
Read and follow all instructions, and notes in this manual before attempting to
operate your power wheelchair for the initial driving. Failure to follow the
instructions in this manual and those located on your power wheelchair can
lead to personal injury or damage to the power chair including voiding the
warranty.
Purchaser’s Agreement
By accepting delivery of this product, you promise that you will not change,
alter, or modify this product or remove of render inoperable or unsafe any
guards, or other safety features of this product; fail, refuse, or neglect to install
any retrofit kits from time to time provided by Observer to enhance or preserve
the safe use of this product.
Feedback
We want to hear your questions, comments, and suggestions about our
product. We would also like to hear about the safety and reliability of your new
buying of our power wheelchair,
The service you received from your authorized agent. You can send us
E-mail or refer to our website FAQ section. Welcome your feedbacks. Hope to
communicate with you often.
www.observer-mobilityproduct.com 3

OPERATION
The basic demand to user:
1. The user must be having physique, intellect and ability of strain that can
operate the electric wheelchair safely. The person who ill with vision or mental
retardation, please consult the doctor or cure doctor at first.
2. The user should keep the torso balance, and can bear jolt the cave and
convex roadway, the torso muscle intensity scarcity hour, should consider
carrying the safety belt, or using the suitable body to accept to give the system,
for example, the back packing sheet, body packing sheet etc.
3. The person who have the pain of neck or neck stiff, The user can’t see the
back situation when the wheel chair go back, can add rear view mirror.
4. The user must hold enough knowledge of the technology of the electric
wheelchair, and have confidence to driving, and crossing, and overcome the
rugged roadway by oneself, and then can use the electric wheelchair to activity
in outdoor by oneself.
Operation Remark:
1. To read and follow all instructions and notes in this manual before
attempting to opearte your power wheelchair for the first time.
2. This power wheelchair is the monopoly product, please do not rebuild for
other usages.
3. Before formal using, please practice at open space to be familiar with all of
functions.
4. In case of danger, while driving the power wheelchair, do not use mobile
phone, laptop or other radio tramsmitter etc.
5. If meet following conditions while driving, please keep away from or
accompany with a nurse. Such as: the heavy traffic, muddy road, serious
uneven road or rubble land, narrow lane, snowy roads, freezing surface,
ditch withour protective guard, and at a bad weather (raining, sonowing,
thick fog, strong wind etc.)
6. While go on or go down stairs or slope, please operatate at slow speed for
driving carefully.
7. While turning left & right, 360°revolving or turning at any angle, must be
operatated at slow speed in order to protect the motors for lift extension,
reduce the noisy, and prevent damage of components.
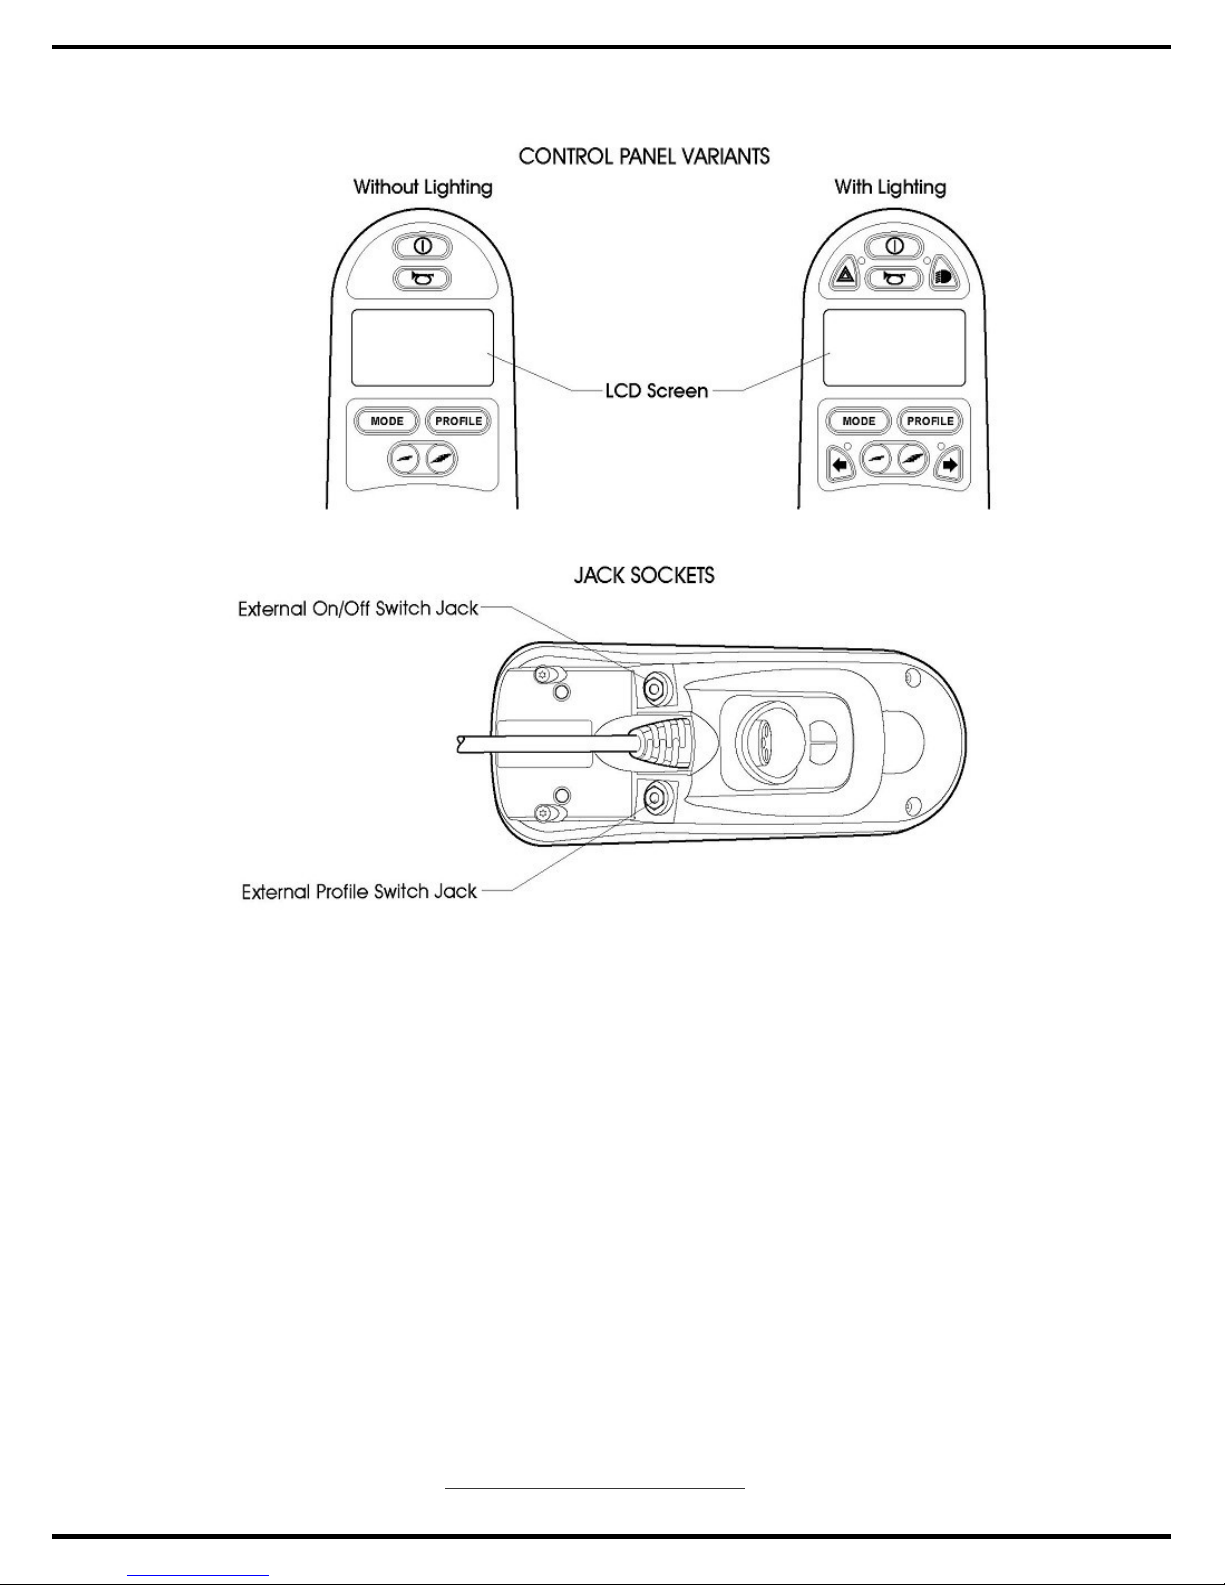
8. The controller of electric wheelchair is the key part of the whole body.
www.observer-mobilityproduct.com 4

Please do not try to open it for repairing or do other things for changing it,
which can damage the controller and make the maintain ineffective. The
controller surface should be cleaned by dry soft cloth. To use the controller
under the condition of over-heating, over-loading and extremely wet should
be forbidden absolutely.
9. Do not try to open, repair or change the motor, which can damage it and
make the maintain ineffective. Water inflow should be forbidden absolutely,
while the power wheelchair crossing 100 mm, the motor can be soaked; it
will cause the permanent damage of motor.
How to operate the gradienter switch˛Just following the instruction as
belows (based on the controller equip at the right side):
www.observer-mobilityproduct.com 5

How to adjust the width and height of the armrest that you need˛Just
following the easy instruction as belows:
www.observer-mobilityproduct.com 6

PG Controller Operation
The joystick controls may be customised and may be one of a number of
different models depending upon users requirements. This manual
contains information on the standard joystick control.
1. Joystick power
If the power wheelchair begins to move in an unexpected manner, immediately
release the joystick and turn the wheelchair off. Unless the joystick is damaged,
this should stop your power chair.
If the joystick is not in the neutral(centre) position when you turn on the power,
you may cause a fault int the system. Releasing the joystick and turning the
power off and on again will reset the system.
WARNING ! Always turn the power off when you are stationary to
prevent unexpected movement.
2. Rain and Water
The joystick hand control unit IS NOT WATERPROOF. The joystick module is
splash proof but may be permanently damaged if water transgresses the
rubber seals (thhis damage is not covered under warranty).
We recommend carrying a plastic bag large enough to cover the joystick
module and the user’s hand, in case of rain.
3. Controller program
The controller program affects speed, acceleration, deceleration, and braking.
The drive mode settings are preset at the factory.
WARNING ! Do not attempt to reprogram your chair. Only the power
chair manufacturer, an authorised representative of the manufacturer, or
a trained service technician should program the controller.
www.observer-mobilityproduct.com 7

4. Operating Conditions
Your control system uses industrial-grade components throughout, ensuring
reliable operation in a wide range of conditions. However, you will improve the
reliability of the control system if you keep exposure to extreme conditions to a
minimum.
Do not expose your control system or its components to damp for prolonged
periods. If the control system becomes contaminated with food or drink clean it
off as soon as possible.
5. Cleaning
Clean the control system and the joystick with a cloth dampened with diluted
detergent. Be careful when cleaning the joystick and screen. Never use
abrasive or spirit-based cleaners.
6. Controls
The R-net control system has two versions of Joystick Module – with and
without lighting control. Most of the controls are common to both however, the
lighting buttons are only included on the Joystick Module with lighting control.
Each of the controls is explained within this section.
www.observer-mobilityproduct.com 8

6.1 Joystick
The primary function of the joystick is to control the speed and direction of the
wheelchair. The further you push the joystick from the center position the faster
the wheelchair wil move. When you release the joystick the brakes are
automatical y applied.
If the wheelchair is fitted with actuators, the joystick can also be used to move
and select actuators, refer to section 5.5 for moredetails.
6.2Buttons
www.observer-mobilityproduct.com 9

6.2.1 On/Off Button
The On/Off button applies power to the control system electronics, which in
turn supply power to the wheelchair’s motors. Do not use the On/Off button to
stop the wheelchair unless there is an emergency. (If you do, you may shorten
the life of the wheelchair drive components).
6.2.2 HornButton
The Horn will sound while this button is depressed.
6.2.3 Speed Decrease Button
This button decreases the maximum speed setting.
Depending on the way the control system has been programmed a momentary
screen may be displayed when the button is pressed.
Refer to section 5 for details of the momentary screen.
6.2.4 Speed Increase Button
This button increases the maximum speed setting.
Depending on the way the control system has been programmed a momentary
www.observer-mobilityproduct.com 10

screen may be displayed when the button is pressed.
Refer to section 5 for details of the momentary screen.
6.2.5 ModeButton
The Mode button allows the user to navigate through the available operating
Modes for the control system. The available modesare dependent on
programming and the range of auxiliary output devices connected to the
control system.
6.2.6 Profile Button
The Profile button allows the user to navigate through the available Profiles for
the control system. The number of available Profiles is dependent on how the
control system is programmed.
Depending on the way the control system has been programmed a momentary
screen may be displayed when the button is pressed.
Refer to section 5 for details of the momentary screen.
6.2.7 Hazard Warning Button and LED
This button activates and de-activates the wheelchair’s hazard lights. Depress
the button to turn the hazards on and depress the button again to turn them off.
When activated the hazard LED and the indicator LEDs will flash in sync with
the wheelchair’s indicators.
6.2.8 Lights Button and LED
This button activates and de-activates the wheelchair’s lights. Depress the
button to turn the lights on and depress the button again to turn them off.
When activated the lights LED will illuminate.
6.2.9 Left Indicator Button and LED
This button activates and de-activates the wheelchair’s left indicator. Depress
the button to turn the indicator on and depress the button again to turn it off.
When activated the left indicator LED will flash in sync with the wheelchair’s
indicator(s).
www.observer-mobilityproduct.com 11

6.2.10 Right Indicator Button and LED
This button activates and de-activates the wheelchair’s right indicator. Depress
the button to turn the indicator on and depress the button again to turn it off.
When activated the right indicator LED will flash in sync with the wheelchair’s
indicator(s).
6.2.11 External On/Off Switch Jack
This allows the user to turn the control system on and off using an external
device, such as a buddy button.
6.2.12 External Profile Switch Jack
This allows the user to select Profiles using an external device, such as a
buddy button.
To change the Profile whilst driving simply press the button.
If the control system is set to latched drive or actuator control operation, then
the polarity of the jack input is reversed to effect a fail safe system; meaning
this input will provide an External Profile Switch function and an Emergency
Stop Switch function.
The Joystick Module is supplied with rubber bungs that must be
inserted into the Jack Socket when no external device is connected.
6.3 LCD Screen
The status of the control system can be understood by observing the LCD
screen. The control system is on when the screen is backlit.
Refer to section 5 for details on screen symbols.
6.4 Charger Socket
This socket should only be used for charging or locking the wheelchair. Do not
connect any type of programming cable into this socket.
Refer to section 13 for more details on charging.
This socket should not be used as a power supply for any other electrical
device. Connection of other electrical devices may damage the control system
www.observer-mobilityproduct.com 12

or affect the E.M.C. performance of the wheelchair.
The control system’s warranty will be voided if any device other than a
battery charger supplied, with the wheelchair, or the lock key is
connected into this socket.
7 LCD Screen
The status of the control system can be understood by observing the LCD
screen.
Screen Symbols
The Drive screen for the R-net has common components, which will always
appear, and components that will only appear under certain conditions. Below
is a view of a typical Drive screen in Profile 1.
7.1 Top Bar
7.1.1 Battery Indicator
This displays the charge available in the battery and can be used to alert the
user to the status of the battery.
Steady
This indicates that all is well.
Flashing Slowly
The control system is functioning correctly, but you should charge the battery
as soon as possible.
www.observer-mobilityproduct.com 13

Stepping Up
The wheelchair batteries are being charged. You will not be able to drive the
wheelchair until the
charger is disconnected and you have switched the control system off and on
again.
7.2 Base Bar
7.2.1 Current Profile
The currently selected Profile is shown in numeric form.
7.3 Main Screen Area
7.3.1 Profile Name
This is a text string that displays the name of the currently selected Profile.
7.3.2 Clock
This displays the current time in a numeric format.
The clock is user adjustable. Adjustable options are:
•ҏVisibility, whether the clock is displayed on screen.
•ҏThe display format, 12 or 24 hour.
•ҏThe time, the user can adjust the time.
These adjustments are made within the Settings Menu. Refer to section 8 for
details.
7.3.3 Speed Indicator
www.observer-mobilityproduct.com 14

This displays the current speed setting.
The speed setting is adjusted using the Speed Buttons.
7.3.4 Maximum Speed Indicator
This displays the current maximum speed setting.
7.3.5 Digital Speed Display
This displays the actual speed of the wheelchair derived from the motors. The
display can be set to mph or km/h.
7.4 Locking the Control System---Keypad Locking
To lock the wheelchair using the keypad;
•ҏWhile the control system is switched on, depress and hold the On/Off
button.
•ҏAfter 1 second the control system will beep. Now release the On/Off
button
•ҏDeflect the joystick forwards until the control system beeps.
•ҏDeflect the joystick in reverse until the control system beeps.
•ҏRelease the joystick, there will be a long beep.
•ҏThe wheelchair is now locked.
The following screen will be displayed, the next time the Control System is
switched on.
www.observer-mobilityproduct.com 15

To unlock the wheelchair:
•ҏIf the control system has switched off, press the On/Off button.
•ҏDeflect the joystick forwards until the control system beeps.
•ҏDeflect the joystick in reverse until the control system beeps.
•ҏRelease the joystick, there will be a long beep.
•ҏThe wheelchair is now unlocked.
8 Settings Menu
The Settings Menu allows the user to adjust the CJSM display in terms of clock
adjustment and display format, the brightness of the backlight, the background
color and the behavior of the odometer. The menu is accessed by depressing
the Speed Down and Speed Up buttons simultaneously. A typical Settings
Menu display would be as below.
Each of the menu items are described in the following sections.
8.1 Set Time
A right joystick deflection will enter a clock adjustment screen in which further
joystick deflections are used to set the time.
8.2 Display Time
This sets the format of the time display or turns it off.
The options are 12hr, 24hr or Off. Left and right joystick deflections are used to
change between the options.
www.observer-mobilityproduct.com 16

8.3 Distance
This sets the functionality of the odometer and a screen as below will appear.
Total Distance This is a value held in the Power Module and relates to
the total distance driven using that Power Module.
Trip Distance This is a value held in the CJSM and relates to the total
distance driven since the last reset.
Display Distance Sets whether Total Distance or Trip Distance appears as
the odometer display on the CJSM.
Clear Trip Distance A right joystick deflection will clear the Trip Distance
value.
Exit A right joystick deflection will return to the Settings Menu.
8.4 Backlight
This sets the intensity of the LCD backlight.
The adjustable range is 0% to 100% in steps of 10%. Adjustments are made
with left and right joystick deflections.
8.5 Background
This sets the color of the screen background. Blue is the standard, but in very
bright sunlight then a white background will make the display more visible.
The options are Blue, White and Auto. Left and right joystick deflections are
used to change between the options.
Blue means the background will be blue in al Profiles.
White means the background will be white in all Profiles.
Auto means the color will be set by the programmable parameter, Background,
which can be set to be different across the Profiles. For example, blue for the
slower Profiles that are for indoor use and white for the faster Profiles intended
www.observer-mobilityproduct.com 17

for outdoor use.
For more details of the parameter, Background, refer to the relevant section in
the Programming chapter.
8.6 IR Setup
IR Set up allows the user access the Omni IR (Infra Red) menus. For full
details on how to learn, delete and use the IR functions available please refer
to the R-net Omni Technical Manual SK78813.
8.7 Exit
Exits the Settings Menu back to normal operation.
9 Battery Charging
To charge the wheelchair batteries connect the charger plug into the battery
charger socket on the R-net JSM. You will not be able to drive the wheelchair
when the charger is connected.
To connect the charger plug, ensure the single pin is at the bottom, as shown
in the following illustration, then offer the charger plug to the R-net in a
horizontal orientation. The molded guide on the R-net will help you to locate
the plug. Ensure the plug ispushed fully in position.
www.observer-mobilityproduct.com 18

10 Getting Ready to Drive
Operate the On/Off switch. The screen will go through an initializing process
then show the base screen as follows.
In the case on an LED Joystick Module the battery gauge will illuminate.
Check that the Speed Setting is at a level that suits you.
Push the joystick to control the speed and direction of the wheelchair.
If you push the joystick before or just after you switch the control system
on, the screen will flash the joystick displaced screen. You must release
and center the joystick to resume normal operation. If you do not release
the joystick within five seconds the wheelchair will not be able to move,
even if you release the joystick and push it again. The screen will display
the diagnostic screen at this time. You can reset this condition by
switching the control system off and on again.
www.observer-mobilityproduct.com 19

ASSEMBLY
Components Illustration
www.observer-mobilityproduct.com 20
Table of contents
Other Observer Wheelchair manuals