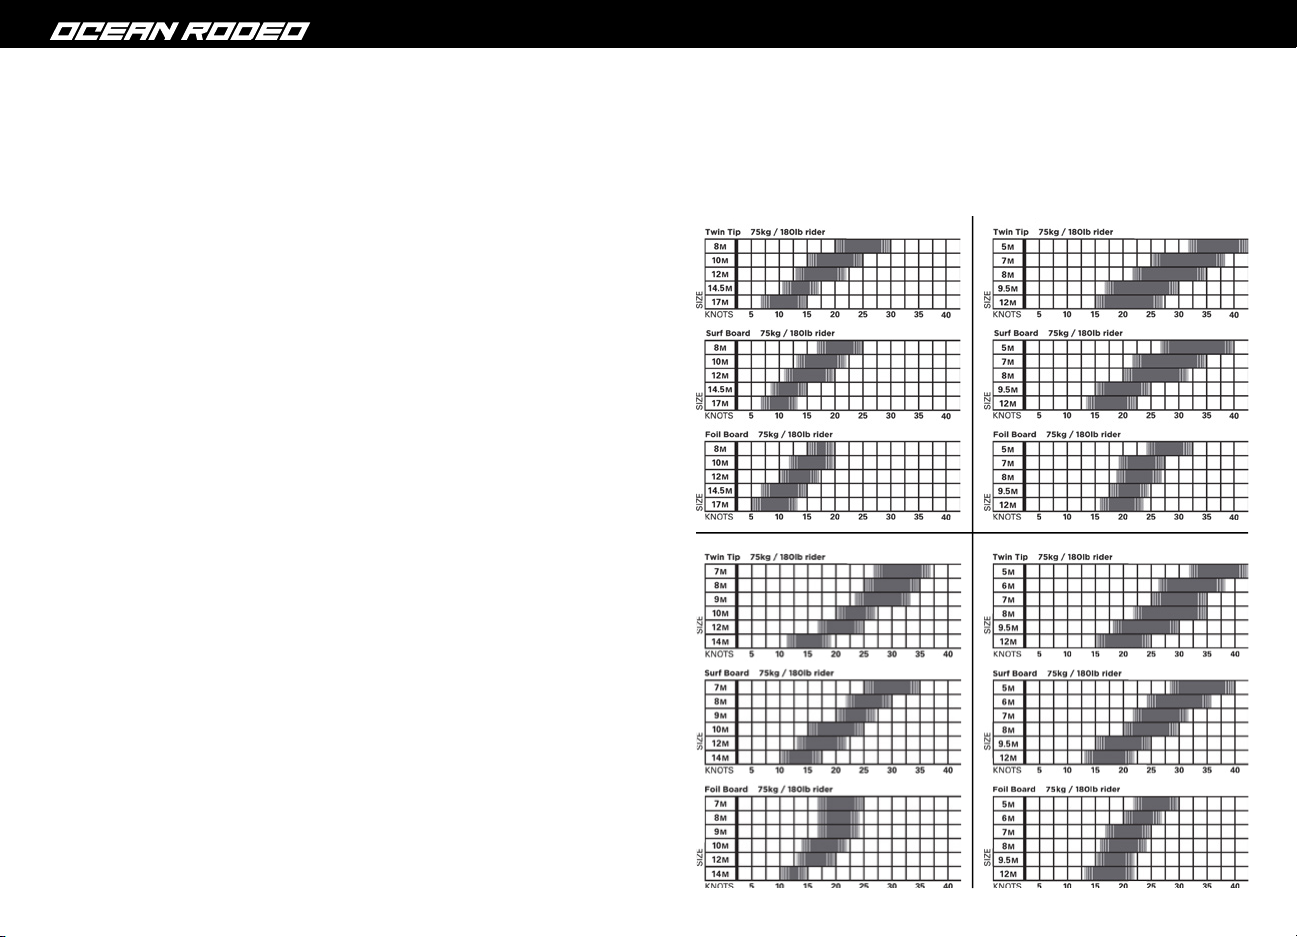
Ocean Rodeo FLITE User manual

KITE MANUAL
1
KITE MANUAL

KITE MANUAL
2 3
IMPORTANT NOTICE
This is not a kiteboarding instruction manual!
Reading this manual does not eliminate the need for professional instruction in the
sport of traction kiting. The user is therefore advised to obtain such instruction in
addition to familiarizing himself or herself with the information contained in this
manual prior to flying this or any other power traction kite. Competent instruction
may be obtained through an authorized Ocean Rodeo dealer or local professionally
qualified kiteboarding school. For information on lessons in your area go to
www.oceanrodeo.com/kiteboarding/L2K
Important!
A user manual and release of liability agreement is included with each new
kite. Read it. (Release of liability is printed at inflation point on leading edge
tube.) Replacement manuals may be obtained from the Ocean Rodeo website:
www.oceanrodeo.com. If additional outfitting is required use manufacturer’s
approved materials only. Do not impair or remove any safety release systems.
The user of this product acknowledges both an understanding and an as-
sumption of the risk involved in kite powered sports.
INTRODUCTION
Congratulations on purchasing an Ocean Rodeo kite. We trust that you will find it to
be a superior product. Our kites are the result of years of passionate R&D mixed with
technical expertise. Enjoy!
A label showing your serial number is sewn at the underside of the leading edge
center strut.
TABLE OF CONTENTS
IMPORTANT NOTICE ............................................................................................................
SAFETY WARNING ...............................................................................................................
SELECTING KITE SIZE ..........................................................................................................
SELECTING A LOCATION .....................................................................................................
ASSEMBLY OF KITE ..............................................................................................................
USE THE CORRECT KITE CONTROL BAR ..........................................................................
LINE MANAGEMENT ............................................................................................................
ATTACHING FLYING LINES TO YOUR OCEAN RODEO SLE KITE ...................................
ADJUST KITE TURNING SPEED BY BACK LINES ............................................................
KITE CARE AND MAINTENANCE .......................................................................................
WARRANTY ............................................................................................................................
3
4
5
6
7
9
10
11
15
16
17
18

KITE MANUAL
4 5
SELECTING KITE SIZE
Many factors can affect your decision of which size of kite to use. Body weight, wind
conditions, kiting ability, line length, board type and size, etc should all be considered.
When in doubt ask someone who is capable or, if there is no one to ask, err on the
side of caution with a smaller sized kite!
SAFETY WARNING
Kite powered sports can be very dangerous and physically demanding.
The user of this product should understand that participating in kite
powered sports may involve serious injury or death and agrees to
observe the following safety precautions:
• Get instruction specic to the type of kite
power craft.
• Obtain rst aid training and carry rst aid
and safety / rescue devices.
• Consult your physician prior to beginning
kite powered sports training.
• Always wear a nationally approved
personal flotation device when using a
kite on water.
• Always wear a helmet.
• Dress appropriately for weather
conditions; cold water and/ or cold
weather can result in hypothermia.
• Check your equipment prior to each use
for signs of wear or failure.
• Never kite alone.
• Do not kite in overpowered, gusty wind
conditions.
• Do not kite in offshore wind conditions.
• Before launching from an unfamiliar site
be aware of any dangers (rocks, reefs,
currents, changeable weather, etc).
• Scout unfamiliar sites before launching.
• Never launch from an area with any
obstacles closer than 2
line lengths downwind (people, rocks, etc).
• Do not kite near power lines!
• Do not ask a non-kiter to assist in the
launching or landing of a kite.
• Always use the kite with a functioning
safety system.
• Always prevent kites from inadvertently
launching on land by weighting with sand,
gravel, etc.
• Always announce when you are going to
launch your kite so people can be
prepared to move in the event of a gust or
a problem.
• Disable an unattended kite by: removing
the lines, placing the kite leading edge
down, facing the wind; and weighting with
sand, gravel, etc.
• Do not exceed your kiting ability. Be
honest with yourself.
• You must not use alcohol or mind altering
drugs prior to using this product.
FLITE PRODIGY
RAZOR ROAM

KITE MANUAL
6 7
ASSEMBLY OF KITE
Your kite has a single point, speed inate / deate system to allow for quick and easy
inflation.
Important!
• Before you inate your kite make sure you have a suitable “anchor” to
weigh down your kite (sand, fine gravel, weight bag, etc).
• Before connecting the hose to the valve, make several pumps to clear any
debris (sand, stones, etc) Debris in the bladder can cause small punctures.
• When pumping up a kite for its rst time inate slowly, making sure the inner
bladder is filling up all corners of the strut.
• Under inated kites can cause kite distortion in some conditions.
• Over inating a kite can damage your struts & leading edge tube.
3. Make sure lower (dump) valve is fully
closed and the upper (inflate) valve is
open. Connect pump and inflate until
leading edge is firm and maintains it’s
shape. Note: If it is very easy to bend
the wing tips in, the leading edge is
under-inflated. Do not over inflate!
1. Select an area free of obstruction, the
same or larger than the span of your kite.
Avoid areas with sharp objects (thorns,
sharp stick, etc).
2. Unroll the kite completely and attach
the pump leash to the kite.
SELECTING A LOCATION
Safe site criteria:
The site for your kiteboarding must meet the following criteria to ensure your safety
and that of others:
• No power lines within 3 line lengths (100 meters) of beach
• No trees 1 line length (30 meters) from beach
• Free from beach obstructions: logs, boulders, slippery seaweed, etc.
Ideal site conditions:
• Side shore wind
• Smooth, steady moderate strength wind (8-15 knots)
• Wide sandy beach
• Shallow water close to shore
• Large area of beach downwind free from obstructions
• A clear bottom free of rocks, corals, excessive seaweeds, etc
Organize a kitesurfing area:
• A take off area
• A water entry area
• A landing area

KITE MANUAL
8 9
USE THE CORRECT KITE CONTROL BAR
SAFETY WARNING!
All 2018 Kites use a single front line ag out system. Its is crucial that the bar you
are using utilizes this system in order to achieve maximum de-power if the trim loop
release is activated. Using control bars that do not offer single front line ag out (some
older Ocean Rodeo bars or other brands) will not allow the user to access maximum
de-power when the trim loop release is activated and could result in serious injury or
death.
Line Lengths And Tuning :
All lines must be of equal length when measured from bar to end of lines with the
center line un-cleated and fully extended. (If using the a back line trim system the bar
should be set to full power.) With all lines equal the kite will perform well.
Note:
• When wingtips are parallel you kite will y well.
Wingtips parallel.
• If the wingtips angle inwards towards rear of kite, the rear lines are shorter than the
front lines the kite will be prone to stalling! This will look like the 2nd kite pictured
bellow.
Line length can affect turning and power of kite. Optimum line lengths are 15m to 25m.
Shorter lines increase kite turn response but reduce the power window of the kite.
Conversely, longer lines decrease turn response but increase the power window of
the kite.
Back corners pull inward.
4. Make sure top cap is free of sand and
screw it closed “snug”, yet not so tight
you wont be able to unscrew later.
5. We recommended that you isolate the
air in your struts. After the kite is inflated
Pinch clamps to seal off the struts.
6. Holding kite at center of leading edge
rotate so that kite sits leading edge down
and into the wind. Use a weight to hold
down the leading edge of the kite.
Helpful Tip: We recommend using a
bag that contains sand, fine gravel, etc
for weighting the kite. This reduces your
kite’s exposure to abrasion.
7. To deflate use the deflate dump valve.
First unscrew the top cap, as this will
make setup faster next time. Unscrew
lower cap to release air. Store with
both caps screwed in place, otherwise
damage to the valves can occur.

KITE MANUAL
10 11
ATTACHING FLYING LINES TO YOUR OCEAN RODEO SLE KITE
1. Before you attach your lines, have your kite pumped up leading edge down and
weighted with sand or gravel.
2. Your SLE kite has two front line attachments, supported by line bridles and two back
line attachments located at the very tip of the leading edge tube.
3. With the front attachment points free from their Velcro storage tabs, pull the
connectors forward so that the bridles are in clear view. Make sure the bridles are
free and clear with no twists and any pulleys are free and clear of debris.
4. Attach your flying lines to the kite using a larks head connection.
Note:
If you are using an Ocean Rodeo control bar from 2017 or older; extra bridle adapters
are required in order to make the connections. These adapters can be purchased from
a dealer or directly from Ocean Rodeo.
Important!
Its is absolutely crucial that the bar you are using utilizes a single front line
flag out system.
LINE MANAGEMENT
Kite line management is a very personal thing. Stored incorrectly they can cause
hours of frustration in tangles. Attached to the kite incorrectly they can create a
dangerous situation for you and others. Develop a line storage strategy that works for
you and do it the same way every time!
Here’s what works for us:
• Don’t be a kook! Have your kite pumped up and your suit and harness on before
laying out your lines! Be considerate of others and recognize that tangles and
confusion can result from lines left un-attended!
• Place the loose end of your lines near the center of the leading edge tube
• Unwind your lines walking upwind
• Identify lines at bar end and work your way down to the kite separating the lines
• Before attaching any lines to the kite physically separate the left front and rear, right
front and rear.
• Lift your kite over the separated lines, leaving enough line length behind the kite so
you do not have to drag the bar to make contact with the pigtails on the kite.
• When storing lines re-wind in a gure 8 pattern around the bar ends to avoid twisting
the line set.
Helpful Tips:
• Put some weight on your bar to stop dragging as you untangle your lines.
• Stand between the front lines and separate the front and back lines between
your fingers
• Carefully work your way towards kite. If your lines are severely twisted, work in short
segments starting near the loose end working away from the bar.
• Always remove seaweed from lines as it dries and can cause tangles.
• Be sure there are no knots in your flying lines as they create a
weak point!

KITE MANUAL
12 13
BACK LINE BACK LINEFRONT LINEFRONT LINE
2018 (or newer) OR KITE with 2017 (or older) OR BAR
In order to use a 2017 or older Ocean Rodeo bar you must rst install the OR Bar Bridle
Adapter Kit (which can be purchased from a dealer or directly from Ocean Rodeo) to
the bridles on the kite. This will change the bridles so that the front attachments have
knots and the back attachments have loops. Thus making it compatible with the older
model bars.
Attach the OR Bar Bridle Adapters to the front and back bridle attachments on the kite
using a loop to loop connection. When connecting the flying lines to the adapters use
a larks head knot.
BACK LINE BACK LINEFRONT LINEFRONT LINE
USING 2018 (or newer) OR KITE with 2018 (or newer) OR BAR
Pigtails on front and back ying lines should all be the same length (20cm). These will
stay attached to your flying lines with a loop to loop connection. When connecting the
pigtails to the kite use a larks head knot.
Note:
For 2018 kites we have changed the bridles on our kites so that the front attachments
have loops and the back attachments have knots. This has been done so that our kites
will match the industry standard.
KITE
BAR
20cm PIGTAILS BAR BRIDLE ADAPTERS
KITE
BAR

KITE MANUAL
14 15
ADJUST KITE TURNING SPEED BY BACK LINES
• Moving back line bridle back towards the trailing edge (A) will increase turning input
and decrease bar pressure.
• By moving back line bridle forward (B) you will slow the turn input and increase bar
pressure.
ADJUST KITE TUNING OPTIONS
The Ocean Rodeo Razor has the option to fine tune the kites handling for different
riding styles.
• By moving this bridle attachment back (C) you will decrease the depower range and
decrease bar pressure. This provides the maximum slack in the kite for unhooked
tricks.
• By moving this bridle attachment forward (D) you will increase the depower range
and increase bar pressure. This provides maximum power delivery.
A
C
D
B
2017 (or older) OR KITE with 2018 (or newer) OR BAR
In order to use a 2017 or older Ocean Rodeo kite with a 2018 or newer OR bar you must
first install the OR Kite Bridle Adapter Kit (which can be purchased from a dealer or
directly from Ocean Rodeo) to the bridles on the kite. This will change the bridles so
that the front attachments have loops and the back attachments have knots. Thus
making it compatible with the 2018 or newer OR bars.
Attach the OR Kite Bar Adapters to the front and back bridle attachments using loop to
loop connections.
BACK LINE BACK LINEFRONT LINEFRONT LINE
KITE BRIDLE ADAPTERS
KITE
BAR
20cm PIGTAILS

KITE MANUAL
16 17
ADJUST KITE POWER INPUT
The wingtip bridle contains two different attachment knots.
• Connecting to knot E) allows for more depower and is suitable for novice riders.
• Connecting to knot (F) will provide more power and is suitable for more advanced
riders
VARIABLE LINE LENGTHS
Maximize the performance of your kite by using variable line lengths.
• 17m - Faster turning & smaller power strokes.
• 20m - Good overall length.
• 22 - 25m - Allows for more power, big lofty jumps & improves light wind riding
E
F
KITE CARE AND MAINTENANCE
Proper care and maintenance will provide you with many years of enjoyment from
your Ocean Rodeo kite. Important things to remember include:
• Keep your kite out of the sun when not in use.
• Deate the leading edge and roll the kite when left on
the beach to eliminate flutter damage.
• Dry the kite after using, as failure to do so can cause
mildew and color bleeding.
• Rinse the kite with fresh water after extended salt
water use.
• Check on the inside of the leading edge tube (where the
canopy material sews on) for rocks, etc.
• Inspect the kite regularly for small tears, loose stitching
and general wear, and have repaired as soon as possible.
• Beware of heat in vehicles if storing your kite with
struts inflated. Excessive heat can damage valves on the
kite bladder.
• Check bridles for wear.
• Check pulleys for wear and rinse to remove salt
and sand.

18
KITE MANUAL
2018
WARRANTY
All standard Ocean Rodeo products are covered by a One Year Warranty offered to the
original purchaser on workmanship, with a One Year Warranty on materials. Warranty
is limited to the repair or replacement of Ocean Rodeo product at our option. The
warranty does not cover damage caused by normal wear and tear, fading, misuse or
negligence including, but not limited to punctures, sun exposure, seam failure due to
over inflation, damage in the sun, damage caused by use in waves or shore break and
damage caused by anything other than defects in material and workmanship. This
warranty is invalid if unauthorized repairs have been carried out. Repairs or alterations
not covered by warranty will be billed to the customer. Factory seconds and clear out
products sold at a discount carry no warranty.
Ocean Rodeo also offers an unconditional, 60 Day Satisfaction Guarantee on every
product we sell. If for any reason you are unsatisfied with your purchase, you can
return it to your original point of purchase for a full refund within the 1st 60 days.
This offer is valid only with participating retailers, current season product, and is
offered only to the original purchaser. For orders placed online, your refund will not
include shipping charges, though almost everything bought online ships for free within
NA and Europe. This offer is also only valid for non-professional users. If your compa-
ny or organization is considering Ocean Rodeo equipment for your fleet or school, get
in touch with us to talk about how we support professional buyers and their clients.
This isn’t a demo program! Customers found to repeatedly take advantage of this offer
will be disqualified from further returns. If you simply want to demo some gear, get in
touch with your local retailer and they will gladly get you out on the water to try before
you buy.

20
oceanrodeo.com
NAToll Free 1-888-544-4969
INT +1 (778) 734-2696
FAX +1 (778) 725-0375
This manual suits for next models
3
Table of contents
Other Ocean Rodeo Aircraft manuals

Ocean Rodeo
Ocean Rodeo SLE Series User manual

Ocean Rodeo
Ocean Rodeo Control User manual

Ocean Rodeo
Ocean Rodeo ALUULA User manual

Ocean Rodeo
Ocean Rodeo Stick-Shift Gen 2 User manual

Ocean Rodeo
Ocean Rodeo SHIFT GEN 3 User manual

Ocean Rodeo
Ocean Rodeo ALUULA G Series Setup guide

Ocean Rodeo
Ocean Rodeo Stick-Shift User manual

Ocean Rodeo
Ocean Rodeo Go Joe User manual