Ocean Rodeo ALUULA User manual

KITE MANUAL

1 2
Kite Manual
TABLE OF CONTENT
RELEASE OF LIABILITY......................................................
SAFETY WARNING..............................................................
SELECTING A LOCATION..................................................
INFLATING YOUR KITE......................................................
USING THE CORRECT CONTROL BAR........................
LINE MANAGEMENT............................................................
ATTACHING THE FLYING LINES.....................................
ADJUST KITE TURNING SPEED......................................
ADJUST KITE TURNING OPTIONS.................................
ADJUST KITE POWER INPUT..........................................
VARIABLE LINE LENGTHS................................................
KITE CARE AND MAINTENANCE...................................
WARRANTY............................................................................
2
3
4
5
9
10
11
14
14
15
15
15
17
RELEASE OF LIABILITY
The user understands that the use of this product and any of it’s components involves
certain inherent risk, dangers, and hazards which can result in serious injury and death.
By inflating and/or using this product, the user agrees to have read and understood the
entire product’s user manual, including all instructions and warnings contained within, prior
to using the product in any way. You additionally agree that you will ensure any additional
or subsequent user of this product will read and understand the entire user manual,
including all instructions and warnings contained within, prior to allowing that person to use
this product.
Any and all users of this product must fully understand and agree to these terms. If you are
unwilling to be bound by theses terms, return the product (before use) for a full refund.
IMPORTANT NOTICE
This is not a kiteboarding instruction manual! Reading this manual does not eliminate the
need for professional instruction in the sport of traction kiting. The user is therefore advised
to obtain such instruction in addition to familiarizing him/herself with the information
contained in this manual prior to flying this or any other power traction kite.
Competent instruction may be obtained through an authorized Ocean Rodeo kiteboarding
school or any other local professionally qualified kiteboarding school. To find an instructor
near you visit oceanrodeo.com/dealer-finder
IMPORTANT! A user manual and release of liability agreement is included with each
new kite. Read it. (Release of liability is also printed at inflation point on the leading
edge tube.) Replacement manuals may be obtained from oceanrodeo.com.
If additional outfitting is required use manufacturer’s approved materials only. Do not
impair or remove any safety release systems. The user of this product acknowledges
both an understanding and an assumption of the risk involved in kite powered sports.

3 4
Kite Manual
SAFETY WARNING
Kite powered sports can be very dangerous and physically demanding. The user of this
product should understand that participating in kite powered sports may involve serious
injury or death and agrees to observe the following safety precautions:
• Get instruction specific to the type of kite power craft.
• Obtain first aid training and carry first aid and safety / rescue devices.
• Consult your physician prior to beginning kite powered sports training.
• Always wear a nationally approved personal flotation device when using a kite on water.
• Always wear a helmet.
• Dress appropriately for weather conditions; cold water and/ or cold weather can result in
hypothermia.
• Check your equipment prior to each use for signs of wear or failure.
• Never kite alone.
• Do not kite in overpowered, gusty wind conditions.
• Do not kite in offshore wind conditions.
• Before launching from an unfamiliar site be aware of any dangers (rocks, reefs, currents,
changeable weather, etc).
• Scout unfamiliar sites before launching.
• Never launch from an area with any obstacles closer than 2 line lengths downwind
(people, rocks, etc).
• Do not kite near power lines!
• Do not ask a non-kiter to assist in the launching or landing of a kite.
• Always use the kite with a functioning safety system.
• Always prevent kites from inadvertently launching on land by weighting with sand,
gravel, etc.
• Always announce when you are going to launch your kite so people can be prepared to
move in the event of a gust or a problem.
• Disable an unattended kite by: removing the lines, placing the kite leading edge down,
facing the wind; and weighting with sand, gravel, etc.
• Do not exceed your kiting ability. Be honest with yourself.
• You must not use alcohol or mind altering drugs prior to using this product.
SELECTING A LOCATION
Safe site criteria:
The site for your kiteboarding must meet the following criteria to ensure your safety and
that of others:
•Nopowerlineswithin3linelengths(100meters)ofbeach
•Notrees1linelength(30meters)frombeach
•Freefrombeachobstructions:logs,boulders,slipperyseaweed,etc.
Ideal site conditions:
•Sideshorewind
•Smooth,steadymoderatestrengthwind(8-15knots)
•Widesandybeach
•Shallowwaterclosetoshore
•Largeareaofbeachdownwindfreefromobstructions
•Aclearbottomfreeofrocks,corals,excessiveseaweeds,etc
Organize a kitesurfing area:
•Atakeoffarea
•Awaterentryarea
•Alandingarea

5 6
Kite Manual
INFLATING YOUR KITE
Your kite has a single point, speed inflate / deflate system to allow for quick and easy
inflation.
1. Select an area free of obstruction, the same or larger than the span of your kite. Avoid
areas with sharp objects (thorns, sharp stick, etc).
2. Unroll the kite completely and attach the pump leash to the kite.
Important!
• Before you inflate your kite make sure you have a suitable “anchor” to weigh down
your kite (sand, fine gravel, weight bag, etc).
Before connecting the hose to the valve, make several pumps to clear any debris
from the hose. (sand, stones, etc) Debris in the bladder can cause small punctures.
• Whenpumpingupakiteforitsfirsttimeinflateslowly,makingsuretheinner
bladder is filling up all corners of the struts and leading edge.
• Under inflated kites can cause kite distortion in some conditions.
• Over inflating a kite can damage your struts & leading edge tube.
3. Make sure lower (dump) valve is fully closed and the upper (inflate) valve is open.
Connect pump and inflate until leading edge is firm and maintains it’s shape.
Note:
If it is very easy to bend the wing tips in, the leading edge is under-inflated. Do not over
inflate!
4. Make sure top cap is free of sand and screw it closed “snug”, yet not so tight you wont
be able to unscrew later.

7 8
Kite Manual
5.Werecommendedthatyouisolatetheairinyourstruts.Afterthekiteisinflated,simply
pinch clamps to seal off the struts. This can be done without removing the EVA cover.
6. Holding kite at center of leading edge rotate so that kite sits leading edge down and into
the wind. Use a weight to hold down the leading edge of the kite.
Helpful Tip:
Werecommendusingabagthatcontainssand,finegravel,etcforweightingthekite.This
reduces your kite’s exposure to abrasion.
7. To deflate use the deflate dump valve. Unscrew lower cap to release air. Store with both
caps screwed in place, otherwise damage to the valves can occur.
Sizes 4 - 9M 8psi
Sizes 10 - 12M 7psi
Sizes1 4.5 - 17M 6 psi
Sizes 4 - 5M 10 psi
Sizes 6 - 10M 9 psi
Sizes 12 - 14.5M 8psi
Size 17M 7 psi
Generic PSI rating for Dacron framed kites
Generic PSI rating for ALUULA framed kites

9 10
Kite Manual
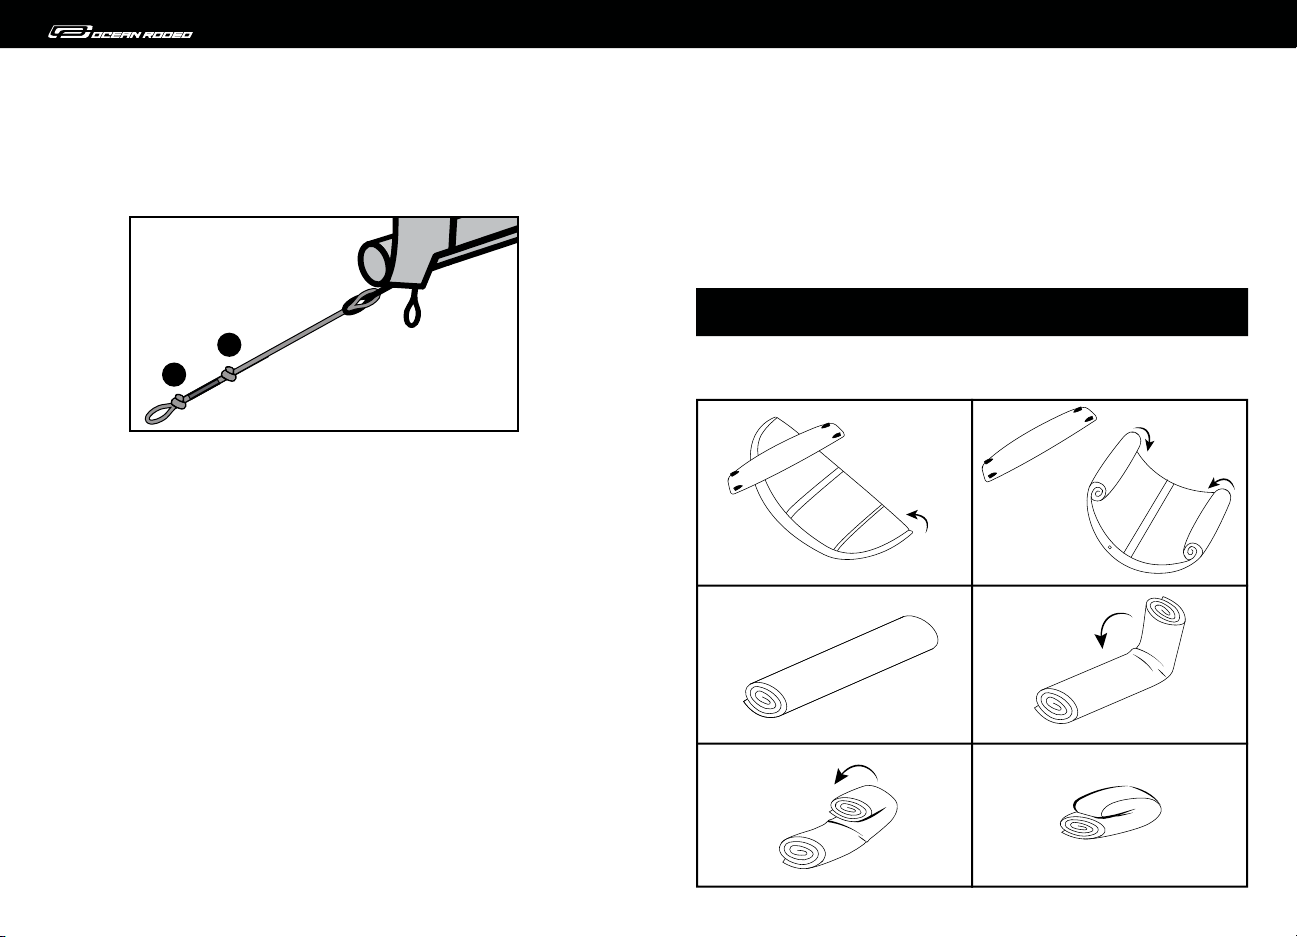
Wingtips parallel. Back corners pull inward.
LINE MANAGEMENT
Kite line management is a very personal thing. Stored incorrectly they can cause hours of
frustration in tangles. Attached to the kite incorrectly they can create a dangerous situation
for you and others. Develop a line storage strategy that works for you and do it the same
way every time!
Here’s what works for us:
• Don’t be a kook! Have your kite pumped up and your suit and harness on before laying
out your lines! Be considerate of others and recognize that tangles and confusion can
result from lines left unattended!
• Place the loose end of your lines near the center of the leading edge tube
• Unwind your lines walking upwind
• Identify lines at bar end and work your way down to the kite separating the lines
• Before attaching any lines to the kite physically separate the left front and rear, right
front and rear.
• Liftyourkiteovertheseparatedlines,leavingenoughlinelengthbehindthekitesoyou
do not have to drag the bar to make contact with the pigtails on the kite.
• Whenstoringlinesre-windinafigure8patternaroundthebarendstoavoidtwisting
the line set.
Helpful Tips:
• Put some weight on your bar to stop dragging as you untangle your lines.
• Stand between the front lines and separate the front and back lines between your fingers
• Carefully work your way towards kite. If your lines are severely twisted, work in short
segments starting near the loose end working away from the bar.
• Always remove seaweed from lines as it dries and can cause tangles.
• Be sure there are no knots in your flying lines as they create a weak point!
USING THE CORRECT KITE CONTROL BAR
Safety Warning!
Allpost2018Kitesuseasinglefrontlineflagoutsystem.Itsiscrucialthatthebaryouare
using utilizes this system in order to achieve maximum de-power if the trim loop release is
activated. Using control bars that do not offer single front line flag out (some older Ocean
Rodeo bars or other brands) will not allow the user to access maximum de-power when the
trim loop release is activated and could result in serious injury or death.
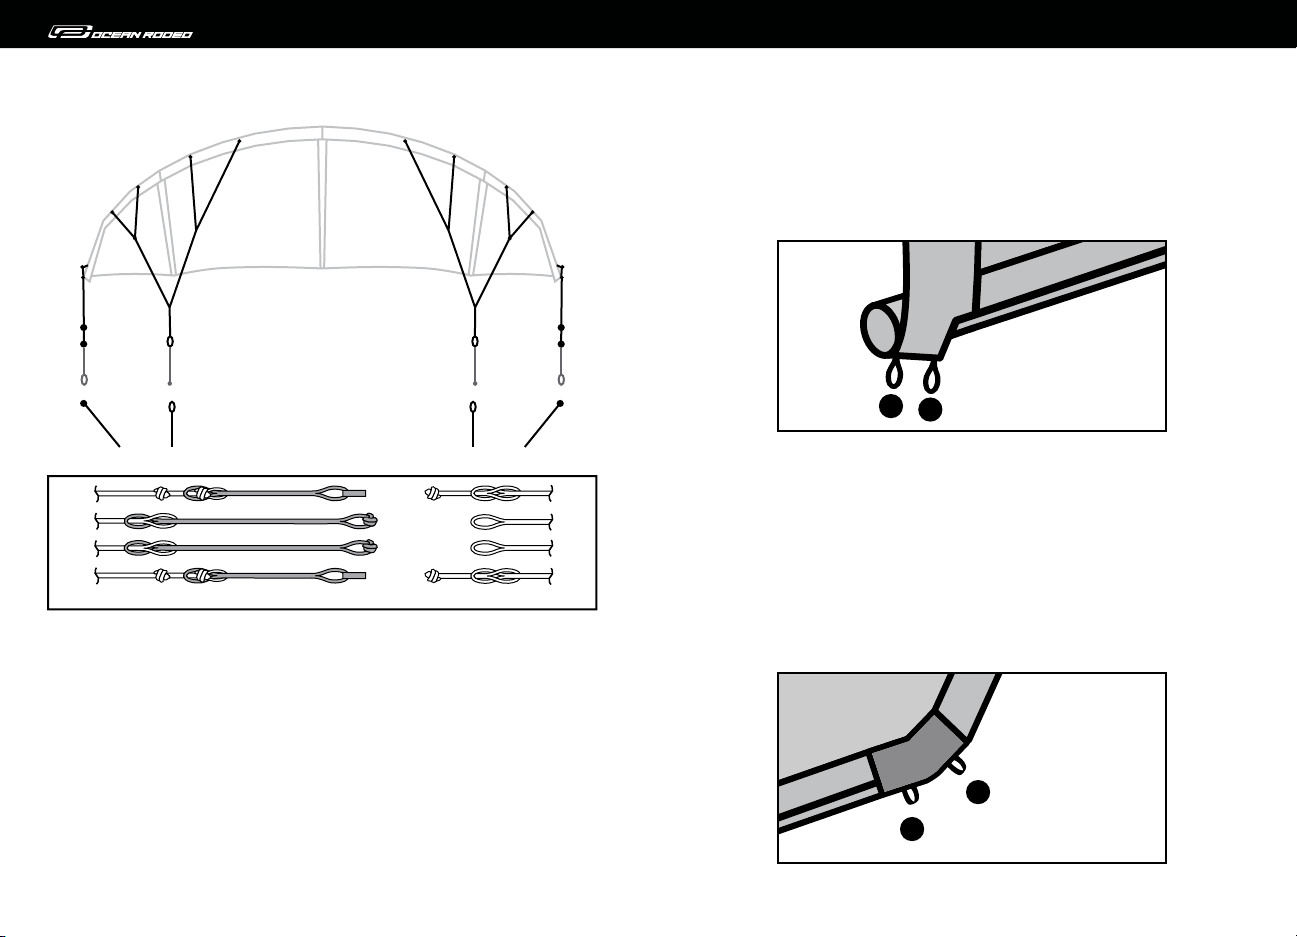
Line Lengths And Tuning :
All lines must be of equal length when measured from bar to end of lines with the center
line un-cleated and fully extended. (If using the a back line trim system the bar should be
settofullpower.)Withalllinesequalthekitewillperformwell.
Note:
• Whenwingtipsareparallelyoukitewillflywell.
• If the wingtips angle inwards towards rear of kite, the rear lines are shorter than the front
lines the kite will be prone to stalling! This will look like the 2nd kite pictured on page 9.
Linelengthcanaffectturningandpowerofkite.Optimumlinelengthsare15mto25m.
Shorter lines increase kite turn response but reduce the power window of the kite.
Conversely, longer lines decrease turn response but increase the power window of the kite.

11 12
Kite Manual
BACK LINE BACK LINEFRONT LINEFRONT LINE
2018 (or newer) OR BAR
Pigtails on front and back flying lines should all be the same length (20cm). These will stay
attachedtoyourflyinglineswithalooptoloopconnection.Whenconnectingthepigtailsto
the kite use a larks head knot.
Note:
In2018wehavechangedthebridlesonourkitessothatthefrontattachmentshaveloops
and the back attachments have knots. This has been done so that our kites will match the
industry standard.
KITE
BAR
20cm PIGTAILS
ATTACHING THE FLYING LINES
1. Before you attach your lines, have your kite pumped up leading edge down and weighted
with sand or gravel.
2. YourSLEkitehastwofrontlineattachments,supportedbylinebridlesandtwobackline
attachments located at the very tip of the leading edge tube.
3. WiththefrontattachmentpointsfreefromtheirVelcrostoragetabs,pulltheconnectors
forward so that the bridles are in clear view. Make sure the bridles are free and clear with
no twists and any pulleys are free and clear of debris.
4. Attach your flying lines to the kite using a larks head connection.
Note:
If you are using an Ocean Rodeo control bar from 2017 or older; extra bridle adapters are
required in order to make the connections. These adapters can be purchased from a dealer
or directly from Ocean Rodeo.
Important! Its is absolutely crucial that the bar you are using utilizes a single front line
flag out system.

13 14
Kite Manual
ADJUST KITE TURNING SPEED BY BACK LINES
• Moving back line bridle back towards the trailing edge (A) will increase turning input and
decrease bar pressure.
• By moving back line bridle forward (B) you will slow the turn input and increase bar
pressure.
ADJUST KITE TUNING OPTIONS
The Ocean Rodeo Razor has the option to fine tune the kites handling for different riding
styles.
• By moving this bridle attachment back (C) you will decrease the depower range and
decrease bar pressure. This provides the maximum slack in the kite for unhooked tricks.
• By moving this bridle attachment forward (D) you will increase the depower range and
increase bar pressure. This provides maximum power delivery.
A
C
D
B
BACK LINE BACK LINEFRONT LINEFRONT LINE
2017 (or older) OR BAR
In order to use a 2017 or older Ocean Rodeo bar you must first install the OR Bar Bridle
Adapter Kit (which can be purchased from a dealer or directly from Ocean Rodeo) to the
bridles on the kite. This will change the bridles so that the front attachments have knots and
the back attachments have loops. Thus making it compatible with the older model bars.
Attach the OR Bar Bridle Adapters to the front and back bridle attachments on the kite using
alooptoloopconnection.Whenconnectingtheflyinglinestotheadaptersusealarkshead
knot.
BAR BRIDLE ADAPTERS
KITE
BAR

15 16
Kite Manual
• Check on the inside of the leading edge tube (where the canopy material sews on) for
rocks, etc.
• Inspect the kite regularly for small tears, loose stitching and general wear, and have
repaired as soon as possible.
• Beware of heat in vehicles if storing your kite with struts inflated. Excessive heat can
damage valves on the kite bladder.
• Check bridles for wear.
• Check pulleys for wear and rinse to remove salt and sand.
Folding your kite:
Important! Never store kite wet.
ADJUST KITE POWER INPUT
The wingtip bridle contains two different attachment knots.
• Connecting to knot E) allows for more depower and is suitable for novice riders.
• Connectingtoknot(F)willprovidemorepowerandissuitableformoreadvancedriders
E
F
VARIABLE LINE LENGTHS
Maximize the performance of your kite by using variable line lengths.
• 17m-Fasterturning&smallerpowerstrokes.
• 20m - Good overall length.
• 22 - 25m - Allows for more power, big lofty jumps & improves light wind riding
KITE CARE AND MAINTENANCE
Proper care and maintenance will provide you with many years of enjoyment from your
Ocean Rodeo kite. Important things to remember include:
• Keep your kite out of the sun when not in use.
• Deflate the leading edge and roll the kite when left on the beach to eliminate flutter
damage.
• Dry the kite after using, as failure to do so can cause mildew and color bleeding.
• Rinse the kite with fresh water after extended salt water use.

17 18
Kite Manual
WARRANTY
AllstandardOceanRodeoproductsarecoveredbyaOneYearWarrantyofferedtothe
originalpurchaseronworkmanship,withaOneYearWarrantyonmaterials.Warrantyis
limited to the repair or replacement of Ocean Rodeo product at our option. The warranty
does not cover damage caused by normal wear and tear, fading, misuse or negligence
including, but not limited to punctures, sun exposure, seam failure due to over inflation,
damage in the sun, damage caused by use in waves or shore break and damage caused
by anything other than defects in material and workmanship. This warranty is invalid if
unauthorized repairs have been carried out. Repairs or alterations not covered by warranty
willbebilledtothecustomer.Factorysecondsandclearoutproductssoldatadiscountcarry
no warranty.
Ocean Rodeo also offers an unconditional, 60 Day Satisfaction Guarantee on every product
we sell. If for any reason you are unsatisfied with your purchase, you can return it to your
original point of purchase for a full refund within the 1st 60 days.
This offer is valid only with participating retailers, current season product, and is offered
onlytotheoriginalpurchaser.Forordersplacedonline,yourrefundwillnotincludeshipping
charges, though almost everything bought online ships for free within NA and Europe.
This offer is also only valid for non-professional users. If your company or organization is
considering Ocean Rodeo equipment for your fleet or school, get in touch with us to talk
about how we support professional buyers and their clients.
This isn’t a demo program! Customers found to repeatedly take advantage of this offer will
be disqualified from further returns. If you simply want to demo some gear, get in touch
with your local retailer and they will gladly get you out on the water to try before you buy.
06/2020

oceanrodeo.com
info@oceanrodeo.com
NA Toll Free 1-888-544-4969
INT +1 (778) 734-2696
Table of contents
Other Ocean Rodeo Aircraft manuals

Ocean Rodeo
Ocean Rodeo SHIFT GEN 3 User manual

Ocean Rodeo
Ocean Rodeo ALUULA G Series Setup guide

Ocean Rodeo
Ocean Rodeo Go Joe User manual

Ocean Rodeo
Ocean Rodeo Control User manual

Ocean Rodeo
Ocean Rodeo SLE Series User manual

Ocean Rodeo
Ocean Rodeo FLITE User manual

Ocean Rodeo
Ocean Rodeo Stick-Shift Gen 2 User manual

Ocean Rodeo
Ocean Rodeo Stick-Shift User manual
Popular Aircraft manuals by other brands

Cosmik Aviation
Cosmik Aviation EV-97 teamEUROSTAR UK Pilot operating handbook

DFE Ultralights
DFE Ultralights Ascender III-C 2001 Pilot operating handbook

SOCATA
SOCATA TB20GT Pilot's information manual

LZ design
LZ design FES-DIA-P1-102 manual

CAPITAL SPORTS
CAPITAL SPORTS Maliko Runner manual

MINICRAFT
MINICRAFT Bonanza F-33 instructions