Octane Fitness ZERO RUNNER ZR7000 Manual

CONSOLE GUIDE
&
SETUP INSTRUCTIONS–
SMART CONSOLE

ii

iii
TABLE OF CONTENTS
SMART CONSOLE GUIDE............................................................................................................. 1
Smart Console Features ......................................................................................................... 1
Touch Screen Navigation ...................................................................................................... 2
Home Screen............................................................................................................................ 2
Zero Runner Home Screen ................................................................................................ 3
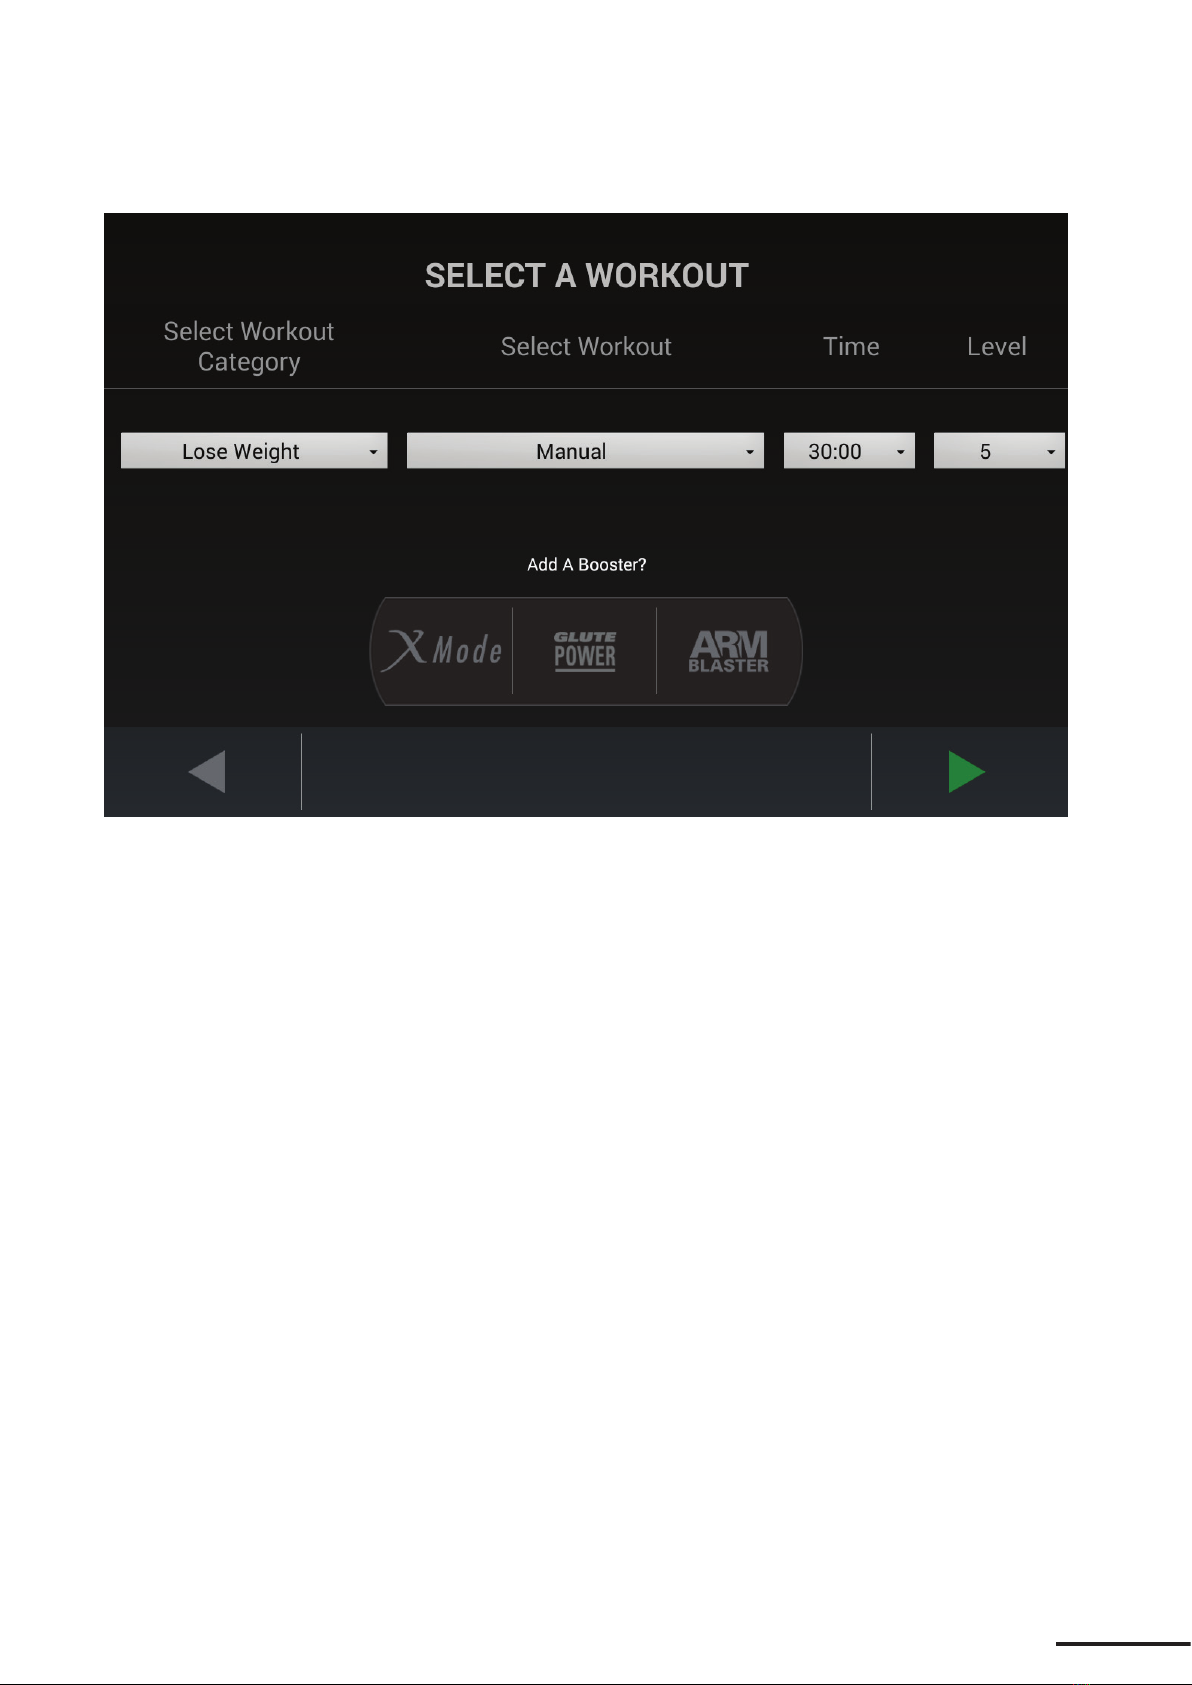
Select a Workout..................................................................................................................... 4
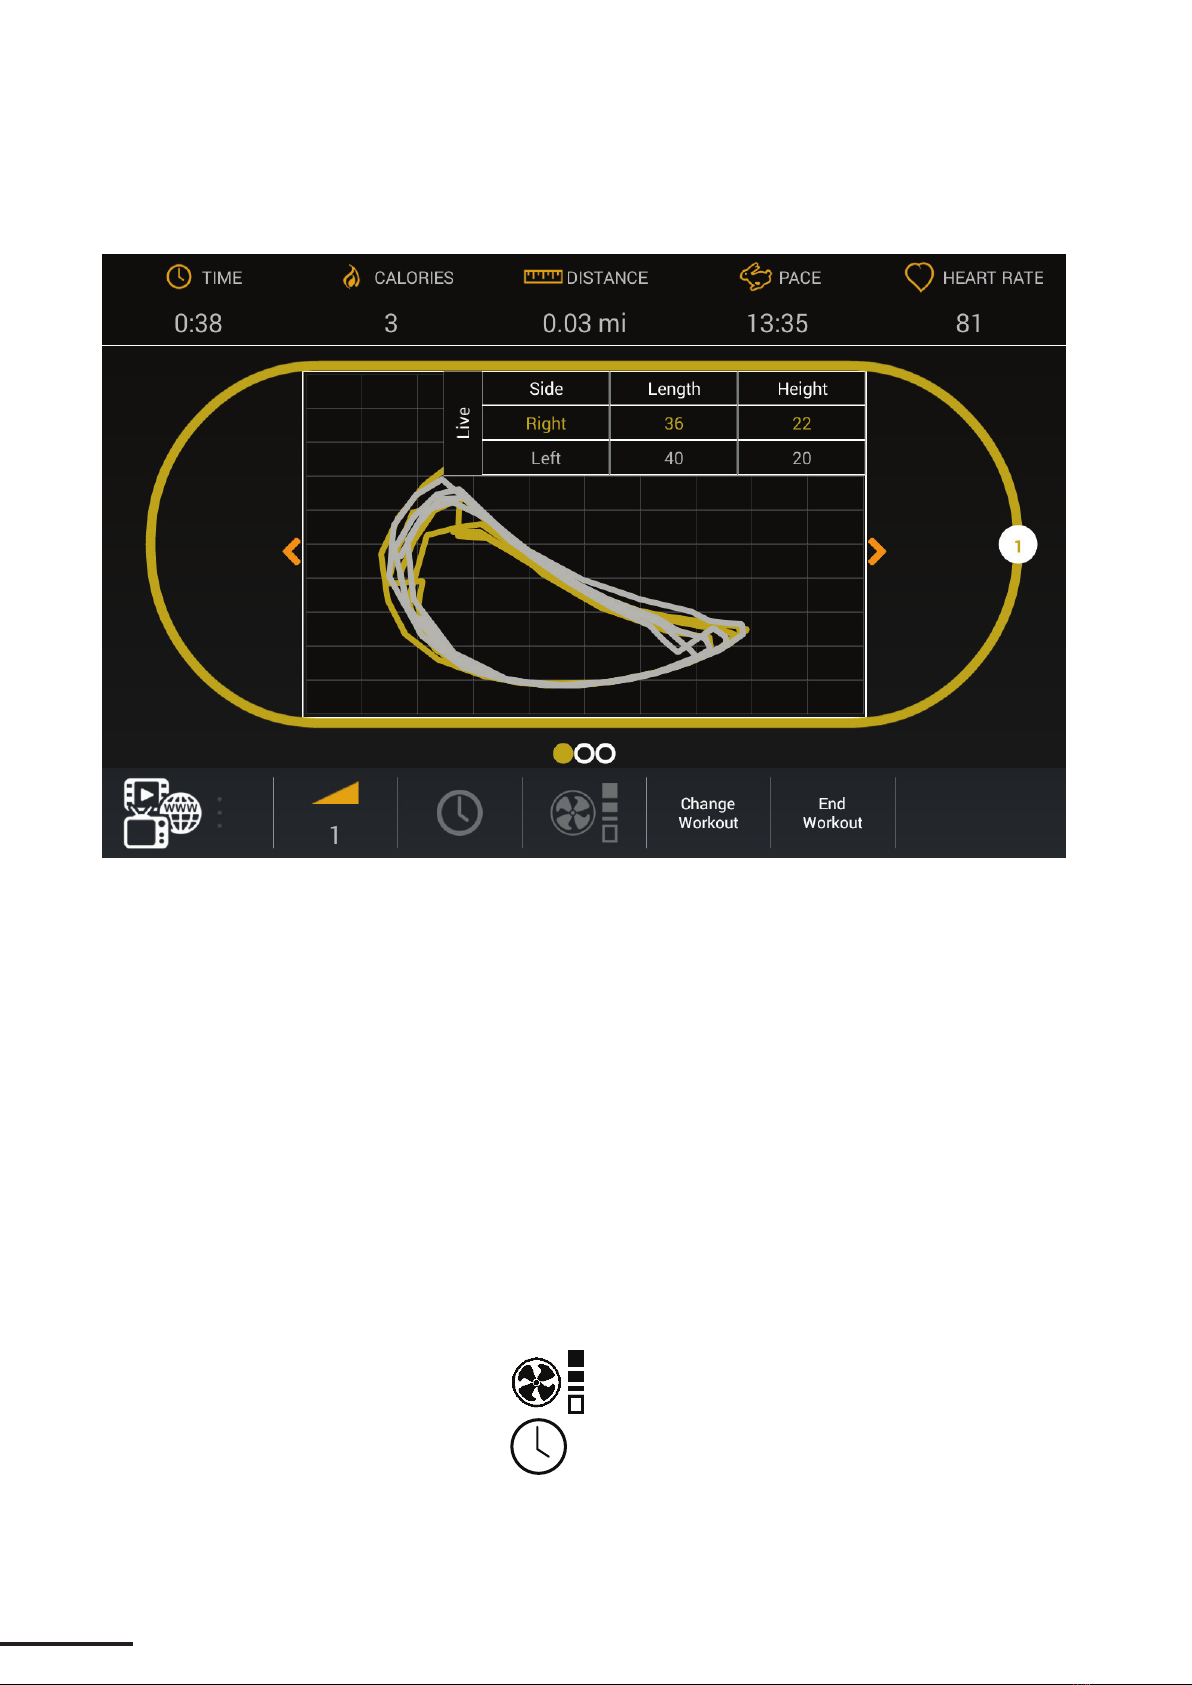
Workout Mode ......................................................................................................................... 5
Zero Runner Stride Trace................................................................................................... 7
Settings Mode.......................................................................................................................... 8
Entertainment Mode ............................................................................................................... 9
SMART CONSOLE SETUP AND ADMINISTRATION.............................................................. 10
Club Settings .......................................................................................................................... 11
Machine Settings .............................................................................................................. 11
Network Settings .............................................................................................................. 13
Internet Favorites ............................................................................................................. 14
User Management............................................................................................................. 16
Console Settings................................................................................................................ 17
Entertainment Setup ............................................................................................................. 19
TV Setup .............................................................................................................................. 19
Remote Update Setup ........................................................................................................... 21
System ................................................................................................................................. 21
Server .................................................................................................................................. 22
Video .................................................................................................................................... 23
Machine Information and Diagnostics ............................................................................. 24
Setting Up Multiple Units .................................................................................................... 25
Transferring All Settings ................................................................................................. 25
Transferring Settings from One Screen Only .............................................................. 26
ADDITIONAL SUPPORT INFORMATION.................................................................................. 28
• Cleaning and Maintenance............................................................................................. 28
• Advanced Diagnostics ..................................................................................................... 28
• Programs and Features .................................................................................................... 28
• Important Safety Information .......................................................................................... 28
• Customer Support.............................................................................................................. 28

1
SMART CONSOLE GUIDE
Get ready to Fuel Your Workout with the Octane Fitness elliptical cross trainer! The smart console offers a variety
of pre-programmed workouts managed by sophisticated electronics that will keep you interested and motivated.
Use this guide to become familiar with its features, data display and keypad buttons; then hop on, start pedaling,
choose your workout and adjust the settings. Enjoy!
Smart Console Features
The Octane Fitness smart console incorporates many features to enhance your workout experience:
• A 10.1” touch screen to guide you through your workouts and allow access to broadcast media and internet
entertainment options
• Convenient shelves and pockets for your phone, tablet, iPod®/MP3 and other electronic devices
• A USB charging port to keep your devices charged throughout your workout (may also be used for updating
software on some models)
• A 3-speed fan for cooling comfort
• C-SAFE input for intra-club networking.
iPod/MP3 or
Phone Holder
USB
Charging /
Maintenance
Port
3-Speed
Fan
iPod/MP3 or
Phone Holder
Shelf for
Tablet or Phone
10.1” Touch Screen
On/Off Switch
(on back)
C-SAFE Port
(on Console Back)
Audio
Jack

2
Touch Screen Navigation
Smart console navigation is similar to the way you use a tablet. Simply touch a button or drop down menu item to
select it. Green means “go”... touch a green Quick Start button to jump right into your workout, or touch the green
arrow on the Select Workout screen to get started with the settings you have chosen.
Home Screens
Note: Screen image may vary from illustration, depending upon product, available features and software version.
From the Home screen for all products except the Zero Runner, choose one of these options:
• Touch “How to Use” to see a tutorial video.
• Touch a Quick Start button to begin a preset workout.
• Touch “Select a Workout” to choose one of many workout options and settings. See below for more
information about this screen.
• Touch “O-E-E-O” on the Octane logo to access machine settings, network settings and other
administrative options. Refer to “Smart Console Setup and Administration” for more information about
these screens.
In some installations, the Home screen may be a video instead of the standard screen. If so, touch one
of the green buttons at the bottom of the video screen to start your workout, or touch the upper corners
on the screen in sequence —upper left, upper right, upper right, upper left—to access administrative
options.

3
Zero Runner Home Screen
Note: Screen image may vary from illustration, depending upon available features and software version.
The Zero Runner home screen includes a looping video showing you how to use the Zero Runner. From the Zero
Runner home screen, choose one of these options:
• Touch “How to Use” to see a more detailed tutorial video.
• Touch Quick Start to begin a preset workout.
• Touch “Select a Workout” to choose one of many workout options and settings. See below for more
information about this screen.
Touch the upper corners on the screen in sequence —upper left, upper right, upper right, upper left—to access
machine settings, network settings and other administrative options. Refer to “Smart Console Setup and
Administration” for more information about these screens.

4
Select a Workout
Note: Screen image may vary from illustration, depending upon product, available features and software version.
Set up all the elements of your workout. Here’s how:
1. Enter your age and weight in the pop-up window that appears first, then press the green arrow.
2. Choose one of the many available workouts:
a. Select a workout category
b. Select a workout
c. Set workout parameters (such as time, level, target heart rate)
3. Add one of the optional Octane-exclusive high-intensity interval training (HIIT) boosters. Simply touch
the button to add a booster to any program except an Octane Favorite. (Booster options and availability
vary by product. )
Descriptions of each program and the HIIT boosters are found in the Octane Fitness Program and
Features Guide (Part Number 110751-001), available online at www.octanefitness.com. Just navigate
to the page for your product and select the guide for online review or download.
4. Touch the green arrow to get started!

5
Workout Mode
Note: Screen image may vary from illustration, depending upon product, available features and software version.
Workout Mode features three display zones to maximize the workout experience:
The top of the smart console display highlights workout data:
Icon Description
Displays workout time, counting up from 0:00. Time can be increased or
decreased during your workout. The maximum time that users can set is 99:00.
When actual workout time is displayed, the timer goes up to 99:59, then the
display rolls over to 0:00. Refer to “Club Settings” to learn how to switch from a
“count up” to “count down” display.
Displays an estimate of the total calories burned during the workout, based on
the user’s entered weight. If no specific weight is entered, calories are based on
a 150 lb. (68 kg) user.
Displays an estimate of the distance you have traveled. Distance can be shown
in either miles (English) or kilometers (metric). When you first purchase your
elliptical the display will be in English. Refer to User Setup Functions to learn
how to switch from English to metric.
Displays your current speed in revolutions per minute (rpm).

6
Displays heart rate in beats per minute (BPM). Note: You must be wearing a
wireless heart rate transmitter or consistently grasping the contact heart rate
sensor grips on the stationary handlebars.
The bottom of the smart console display allows you to change various settings, depending upon the product:
Icon Description
Touch + or - to increase or decrease the resistance level (1-30), where 1 is
the lowest resistance level and 30 is the highest. (On the Zero Runner, use the
resistance lever on the top hoop to change resistance; current level is displayed
here.)
(XT-One,
XT4700)
Touch + or - to increase of decrease the stride length, the approximate
horizontal distance of the elliptical pattern in inches (English) or centimeters
(metric). The stride length ranges from 20 inches (51 cm) to 28 inches (71 cm).
(XT-One)
Touch + or - to increase or decrease the incline level (1-10), where 1 is the least
incline and 10 is the greatest incline.
(LX8000)
Touch + or - to increase or decrease the lateral width (1-10), where 1 is the
narrowest and 10 is the widest.
The center of the smart console display provides workout progress on a ‘racetrack’. Swiping with your finger
from left to right or right to left inside the racetrack gives you different views and options that vary according to
the product and your workout selections, and may include:
• Adding or changing your HIIT booster
• Varying your workout using Quick Start buttons (available on some products). Create your own
interval workout ‘on the fly’ by changing modes without resetting your cumulative workout data
• Displaying heart rate and workout summary data
From the Workout mode display you may move to Settings mode or Entertainment mode (if available for your
installation). Touch to select Settings mode or , or to select Entertainment
mode. (The icon varies depending upon whether your installation has TV, internet, or both enabled.)

7
Zero Runner: Stride Trace View
The unique Stride Trace is the primary view on the Zero Runner:
This view displays an approximation of the horizontal and vertical motion of each of your legs. On the ZR8000,
the left leg motion is shown in white, the right leg motion is shown in yellow. The ZR7000 displays a single
stride trace, in yellow. Everyone’s stride is different; the goal is to have the shape of your stride consistent
throughout your workout. You may use this screen to monitor major imbalances and aim to correct them.
To see length and height averages in the data table, touch the word “Live”. The display then toggles between
“live” and “average” data.
A tutorial screen overlays this view when you first see it; simply touch the “X” in the upper right corner to hide
the tutorial.
The following options are available:
• End workout—stop your program and move to a cool-down phase.
• Change workout—return to the Select Workout screen to select and start a different program. Your
workout data (total time, calories, distance, etc) will be reset when you begin the new program.
• Turn on and adjust the fan using the button.
• Adjust your workout time using the button (available in most programs).

8
Settings Mode
Note: Screen image may vary from illustration, depending upon product, available features and software version.
The following options are available:
• End workout—stop your program and move to a cool-down phase.
• Change workout—return to the Select Workout screen to select and start a different program. Your
workout data (total time, calories, distance, etc) will be reset when you begin the new program.
• Turn on and adjust the fan using the button.
• Adjust your workout time using the button (available in most programs).
Touch the product icon ( ) to return to Workout Mode.
(Icon varies by product; XT-One product icon illustrated.)

9
Entertainment Mode
(May not be available in all installations.)
Note: Screen image may vary from illustration, depending upon product, available features and software version.
These options may be available if your installation includes a personal viewing system with internet and/or
network access:
Icon Description
Power; touch to turn the PVS on or off.
Touch to access the internet for web browsing, streaming content, and other
options.
(TV Channel) Use - or + to change TV channels.
Touch to access the listing of TV channels available for viewing.
Use - or + to increase or decrease volume.
Touch to mute the audio, set Closed Captioning (on or off), or toggle the
audio source between the TV and the console.
Touch to return to Workout Mode.
(Icon varies by product; XT-One product icon illustrated.)

10
SMART CONSOLE SET-UP AND ADMINISTRATION
When you first power on the smart console, you will see a series of screens indicating that the various components
of the software are initializing. One screen will ask you to identify your machine type, then will continue initializing
the console. Should you see an error displayed on any of the launcher screens, please contact Octane Fitness
Customer Service at 888.OCTANE4 or 763.757.2662, extension 1. Live support is available Monday through Friday,
7:30 a.m. to 6 p.m. (United States Central Time).
Once initialized, the Octane Fitness Smart Console offers several administrative functions that enable you to
set your unit up to meet your specific needs and to keep your software up-to-date. Each administrative function
is accessed by touching a special sequence on the Home screen, then entering a password specific to the
administrative function you wish to perform, as described in the following sections.
On the Zero Runner and on products where the CROSS CiRCUIT video is the Home screen, touch the upper corners
of the screen in sequence —upper left, upper right, upper right, upper left—to activate the pop-up password
keypad, then enter the password for the function you need. On all other products, touch “O-E-E-O” on the Octane
Fitness logo, in that order, to activate the pop-up keypad.
Note: Screen image may vary from illustration, depending upon product, available features and software version.

11
Club Settings
Club Settings allows you to control the user experience by customizing smart screen display settings, workout
parameters and network access. To access Club Settings, access the pop-up password keypad, then enter the
password SETT (7388).
On each set of screens, when you have completed your selections, press “Save and Exit” to return to the Home
screen.
Machine Settings
Note: Screen image may vary from illustration, depending upon product, available features and software version.
Use the Machine Settings tab to set these attributes. Available attributes vary by product model, as noted.
Maximum
Workout Time
Touch the time display to set the maximum workout time for users to the value that is
best for your environment. The factory default setting is 99 minutes.
Clock Direction Set how you want the unit to track workout time: Count Up or Count Down. The factory
default setting is “Count Up”.
Warm-Up This feature may be set to “On” (to include a 3-minute warm-up in each workout)
or “Off”. Move the slider to your choice. The factory default setting for all models
excluding the Zero Runner is “ON”; the factory default setting for the Zero Runner is
“OFF”.
Units You may choose to have the weight and distance units displayed in “English” (pounds
and miles) or “Metric” (kilograms and kilometers). The factory default setting is
“English”.
System Language Choose one of several languages options for the console display, including all of the
administrative functions. The factory default setting is “ENGLISH. (Available in some
software versions.)

12
Language Toggle This setting allows users to touch a button on the Home screen and select the language of
their choice from the available language options. User selection of a different language
does not change the language for administrative or system screens; it changes only the
user view. The factory default setting is “OFF”. Set to “ON” to enable this feature and
show the Language button on the Home screen. (Available in some software versions.)
CROSS CiRCUIT
(excluding xR6000)
Select “OFF” to disable the CROSS CiRCUIT Pro programs (for use with the optional
CROSS CiRCUIT Pro Kit). Factory default is “ON”.
CROSS CiRCUIT
Attract Screen
(excluding Zero
Runner, xR6000)
When CROSS CiRCUIT is enabled, this setting allows you to change the Home screen
to a video highlighting the availability of CROSS CiRCUIT workouts. Set to “ON” if you
want to display this optional Home screen; factory default is “OFF”.
Default Stride
(XT-One, XT4700)
Set the default stride length of the unit to any value between 20” and 28” (51-71 cm) in
1/2” (1 cm) increments. The factory default setting is 24“ or 59 cm..
Default Incline
(XT-One only)
Set the default incline of the unit to any value between 1 (least incline) and 10
(steepest). For programs other than the preset Quick Start programs, the factory default
setting is 1.
Default Width
(LX8000 only)
Set the default lateral width of the unit to any value between 1 (narrowest) and 10
(widest). For programs other than the preset Quick Start programs, the factory default
setting is 1.
Stride Length
(XT3700 only)
The XT3700 features a mechanically adjustable stride linkage, either “JOGGING”
(shorter stride length) or “RUNNING” (longer stride length). The preferred length is
selected and set during installation, and the stride length in the console software must
be set to the same setting as the physical linkage. The factory setting is “RUNNING”;
if your machine is adjusted to Jogging stride at installation, this console setting
should also be set to “JOGGING”. You should not change it again unless the physical
configuration of the unit is also changed.
TV Set to “ON” if you have a Personal Viewing System (PVS) accessory attached. The
factory default setting is “OFF”.
900 MHz Set to “ON” if you have a 900 MHz audio accessory installed. The factory default
setting is “OFF”. (Available in some software versions.)
Touch Reset Machine Settings to restore original settings.
Use Import All Settings and Export All Settings to copy all the Club Settings to multiple units. Use Import
from USB and Export to USB for copying the settings on this screen only to multiple units. See “Setting Up
Multiple Units” for detailed instructions.
If you want to use custom TV or internet icons when setting up your TV or internet screens, insert a blank USB
device, and touch Format USB. This creates a directory structure into which you can place files containing icon
images that you may then select when setting up the internet or TV. Note: Only .jpg or .png file formats are
accepted, and icons that are not square will be truncated. For best results, icon should be at least 200
x 200 pixels.
Touch Save & Exit in the lower right corner to save your selections, or select another tab for more settings.

13
Network Settings
Note: Screen image may vary from illustration, depending upon product, available features and software version.
Use the Network Settings screen to enable Internet (network), club network (Ethernet) or WiFi for your users. Move
the slider to ON or OFF as desired for each setting. Factory default settings for all are “OFF”.
If “Network” is “ON”, either Ethernet or WiFi must also be set to “ON”.
For WiFi, you must also use the Setup button to select an available wireless network. Touch the network name,
and enter the password in the pop-up window. A confirmation window indicates a completed connection and
signal strength, and the network name and IP address are displayed on the Network Settings screen. To disconnect
from a network, touch the network name and touch ‘Disconnect” on the network connection status pop-up.
Note: Screen image may vary from illustration, depending upon product, available features and software version.

14
Touch Reset Network Settings to restore original settings.
Use Import All Settings and Export All Settings to copy all the Club Settings to multiple units. Use Import
from USB and Export to USB for copying the settings on this screen only to multiple units. See “Setting Up
Multiple Units” for detailed instructions.
If you want to use custom TV or internet icons when setting up your TV or internet screens, insert a blank USB
device, and touch Format USB. This creates a directory structure into which you can place files containing icon
images that you may then select when setting up the internet or TV. Note: Only .jpg or .png file formats are
accepted, and icons that are not square will be truncated. For best results, icon should be at least 200
x 200 pixels.
Touch Save & Exit in the lower right corner to save your selections, or select another tab for more settings.
Internet Favorites
Note: Screen image may vary from illustration, depending upon product, available features and software version.
Use this screen to define specific world wide web sites that your users may access, and to manage general internet
access.
The pre-populated list of popular sites is available to all users (unless you modify the list). The “Restricted”
slider controls the sites your users may access beyond those on the list displayed here. If you want your users to
have limited access to the internet, leave “Restricted”set to “ON” (the factory default). This allow users to see
only these sites that you have approved and disables any links from those sites to Internet sites that are not on
this list. To allow users to freely move from one site to others using links provided on the sites in your list, set the
“Restricted” slider to “OFF”. This allows users to move freely to sites not on this list using page links.
If you want to allow your users complete movement on the internet, set the “Restricted” slider to “OFF” and add
Google, Yahoo or any other site that offers internet searching as an approved site (see instructions for adding a
site below). A user may then use the search bar on that site to move freely to any other Internet site. In this mode,
there are no restrictions unless you have sites blocked with firewall security.

15
You may add, change or delete sites as you choose:
• To remove site access, touch the check box in the “Disable” column.
• To delete a site entirely, or to change the site name or icon, touch the site name in the list, then touch
“Delete” on the next screen, or change the information as desired and touch “Update”.
• To add a site, touch Add Website, and use the screen below to set up the new site.
Note: Screen image may vary from illustration, depending upon product, available features and software version.
Touch each data field (Website Name, Website URL) and use the pop-up keyboard to enter the information. Touch
Browse to select an icon to display with the new site listing. Touch Add to save the information or Cancel to
return to the Internet Favorites screen without adding the new site.
Touch Reset Internet Favorites to restore original settings.
Use Import All Settings and Export All Settings to copy all the Club Settings to multiple units. Use Import
from USB and Export to USB for copying the settings on this screen only to multiple units. See “Setting Up
Multiple Units” for detailed instructions.
If you want to use custom TV or internet icons when setting up your TV or internet screens, insert a blank USB
device, and touch Format USB. This creates a directory structure into which you can place files containing icon
images that you may then select when setting up the internet or TV. Note: Only .jpg or .png file formats are
accepted, and icons that are not square will be truncated. For best results, icon should be at least 200
x 200 pixels.
Touch Save & Exit in the lower right corner to save your selections, or select another tab for more settings.

16
User Management
Note: Screen image may vary from illustration, depending upon product, available features and software version.
Use the User Managment screen to enable the use of XID for the club. Move the slider to ON to enable. Factory
default setting is “OFF”.
Touch Reset User Settings to restore original settings.
Use Import from USB and Export to USB for copying the settings on this screen only to multiple units. See
“Setting Up Multiple Units” for detailed instructions.
Touch Save & Exit in the lower right corner to save your selections, or select another tab for more settings.

17
Console Settings
Note: Screen image may vary from illustration, depending upon product, available features and software version.
Use the Console Settings screen to change the time zone to match the installation location, set the console to time
out, or change the main screen background.
Time Zone Use the dropdown menu to select the time zone where the machine is installed. The
factory default setting is the first time zone in the list (Afghanistan Time).
Console timeout
duration
Use the dropdown menu to select the length of time you want the console to stay on
when it is not being used. Options include Never (always on), 30 seconds, 1 minute, 2
minutes, 5 minutes, 10 minutes or 30 minutes. The factory default setting is “Never”..
Other manuals for ZERO RUNNER ZR7000
2
This manual suits for next models
1
Table of contents
Other Octane Fitness Fitness Electronic manuals

Octane Fitness
Octane Fitness zr8000 Manual

Octane Fitness
Octane Fitness MAX Trainer MTX User manual

Octane Fitness
Octane Fitness ZERO RUNNER ZR7000 Manual

Octane Fitness
Octane Fitness PRO3700 User manual

Octane Fitness
Octane Fitness LX8000 Parts list manual

Octane Fitness
Octane Fitness XT Parts list manual

Octane Fitness
Octane Fitness PRO4700 Parts list manual

Octane Fitness
Octane Fitness xR6000 Manual

Octane Fitness
Octane Fitness PRO4700 Parts list manual

Octane Fitness
Octane Fitness 110455-001 User manual