OCULUS Pentacam User manual

OCULUS
PENTACAM®/
PENTACAM HR®
INSTRUCTION MANUAL
System for measuring and analysing the front part of the eye

i / iii Instruction Manual Pentacam® / Pentacam HR® (G/70700/0109/en)
Notes on this instruction manual
Thank you for your purchase and the trust you have placed in this OCULUS product. The
Pentacam®/ Pentacam HR®has been manufactured and tested according to strict qual-
ity criteria. You have selected a modern and well-engineered product.
To ensure safe operation, it is essential that you use the device correctly. For this reason
you should familiarise yourself thoroughly with the contents of this instruction manual
before operating the device. In particular, pay attention to the safety instructions.
The operating concept of both the Oculus Pentacam and Pentacam HR is basically
identical.
This instruction manual describes how to manage patient data, the default settings
of the Pentacam program and the measuring process.
Additional functions pertaining to the Pentacam HR (high resolution) are indicated
accordingly.
The Pentacam reference manual contains information supplementing the descrip-
tion of the operating concept.
Due to ongoing development, the diagrams shown may depict minor changes to the ac-
tual device delivered.
If you have any queries or would like additional information about your device, do not
hesitate to call or send us a fax. Our service team will gladly assist.
OCULUS Optikgeräte GmbH
OCULUS is certified according to DIN EN ISO 9001:2000 and 13485:2003, setting high
standards of quality where development, manufacture, quality assurance and service re-
garding the entire range of products are concerned.

Instruction Manual Pentacam® / Pentacam HR® (G/70700/0109/en) ii / iii
Table of Contents
1 Scope of Delivery......................................................................................................................................1
2 Safety instructions...................................................................................................................................2
2.1 Safety instructions concerning organisation .................................................................2
2.2 Pictogram definitions...............................................................................................................2
2.3 Safety instructions regarding the use of the Pentacam............................................3
3 Proper Usage..............................................................................................................................................4
4 Transportation and Disposal................................................................................................................4
4.1 Transport and storage instructions ....................................................................................4
4.2 Disposal of used devices .........................................................................................................5
5 Device Description ...................................................................................................................................6
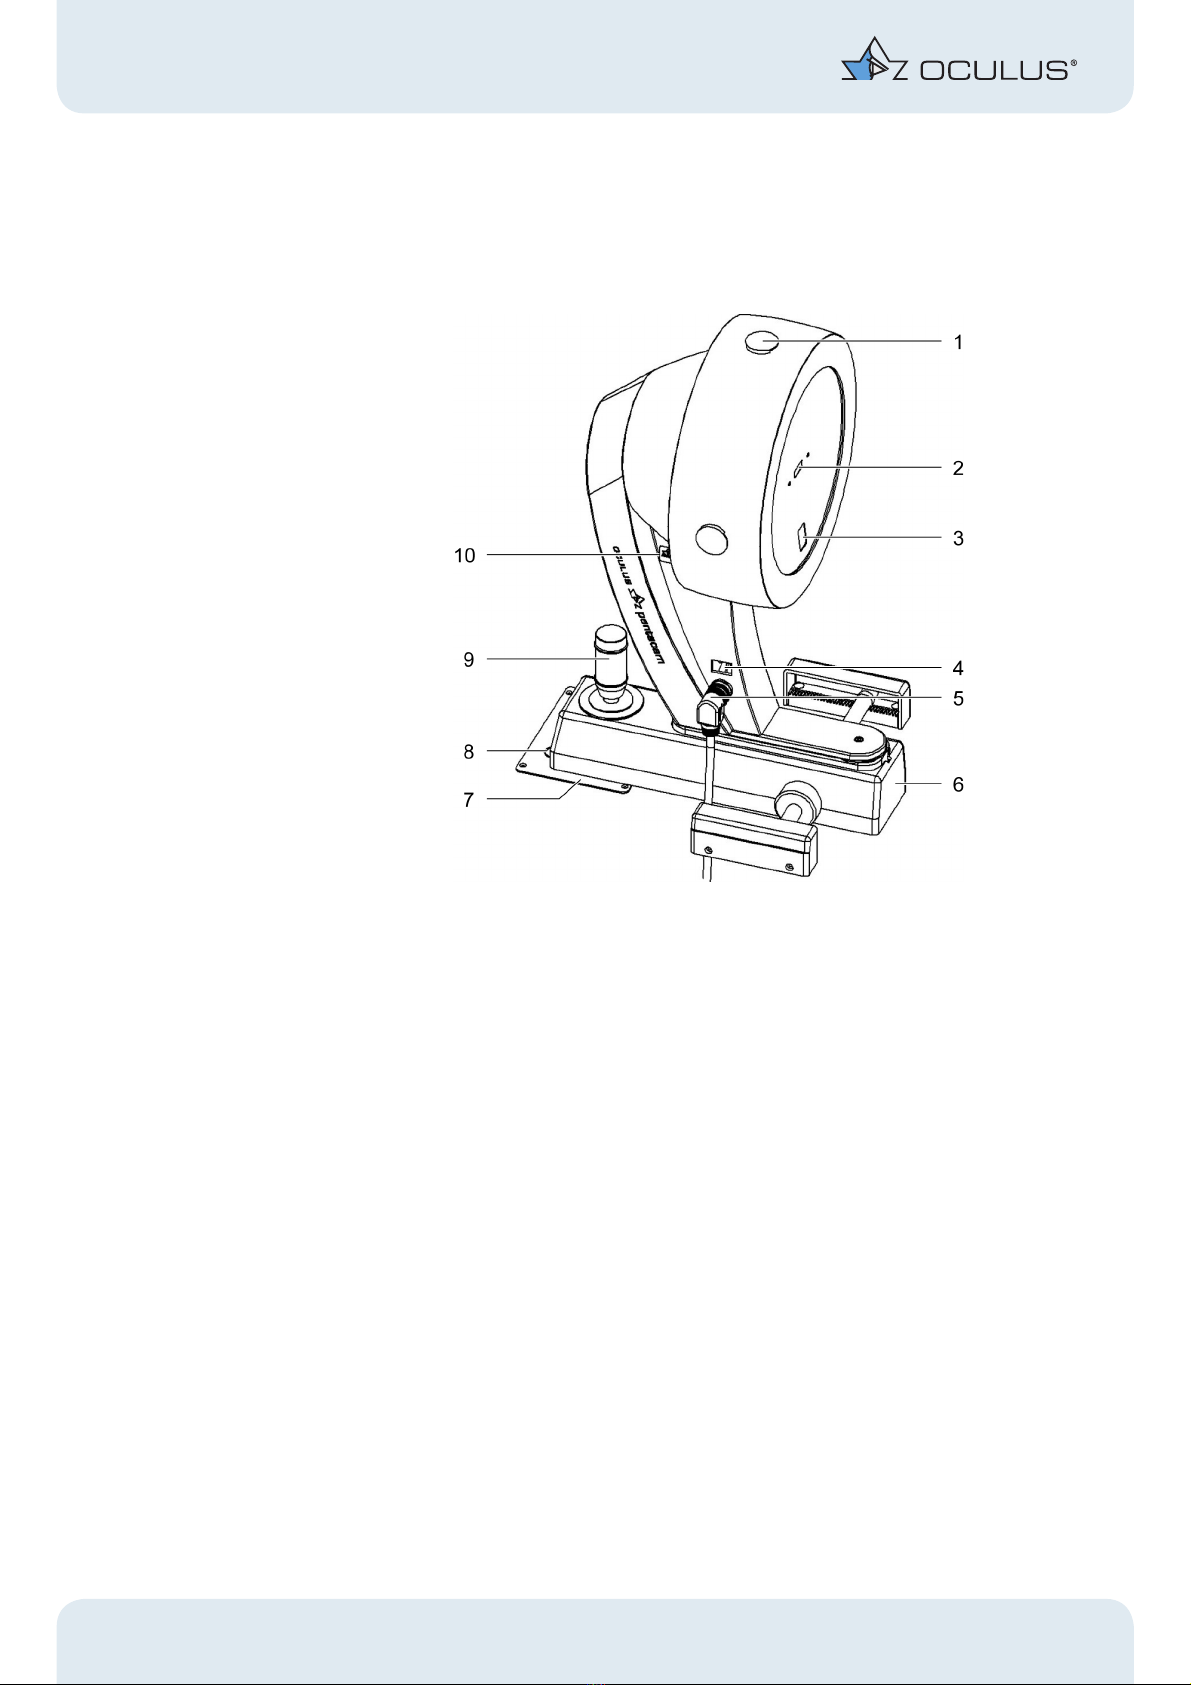
5.1 Overview of device components..........................................................................................6
5.2 How the Pentacam works.......................................................................................................6
6 Operation.....................................................................................................................................................7
6.1 First-time operation..................................................................................................................7
6.2 Daily operation............................................................................................................................7
6.3 Switching the Pentacam off..................................................................................................8
7 Patient Data Management ...................................................................................................................8
7.1 Starting Patient Data Management ...................................................................................8
7.2 Entering new patients..............................................................................................................9
7.3 Selecting existing patients .....................................................................................................9
7.4 Starting the Pentacam program ........................................................................................10
8 Pentacam Program................................................................................................................................10
9 Scan Menu ................................................................................................................................................11
9.1 Screen layout .............................................................................................................................11
9.1.1 Scheimpflug image settings.............................................................................12
9.1.2 Parameters applicable only to the Pentacam HR....................................13
9.2 Information for recording Scheimpflug images..........................................................14
10 Measuring Procedure............................................................................................................................15
11 Quality Specifications...........................................................................................................................19
12 Transferring Measurement Results.................................................................................................21
12.1 Exporting patient data ...........................................................................................................21
12.2 Importing patient data...........................................................................................................22
13 Test measurements with the Pentacam........................................................................................23
14 Troubleshooting......................................................................................................................................23
15 Cleaning and Care..................................................................................................................................24
15.1 Instructions for cleaning.......................................................................................................24
15.2 Sterilising and disinfecting...................................................................................................24
15.3 Cleaning .......................................................................................................................................24
16 Terms of Warranty and Servicing....................................................................................................25

iii / iii Instruction Manual Pentacam® / Pentacam HR® (G/70700/0109/en)
16.1 Terms of warranty................................................................................................................... 25
16.2 Assumption of liability for functions and damage.................................................... 25
16.3 Address of the manufacturer and service department............................................ 26
17 Declaration of Conformity................................................................................................................. 27
18 Technical Specifications / Minimum PC Requirements......................................................... 28

1 Scope of Delivery
Instruction Manual Pentacam® / Pentacam HR® (G/70700/0109/en) 1 / 29
1ScopeofDelivery
[We reserve the right to change the scope of delivery in line with ongoing technical
development]
Component Order number
Pentacam
Pentacam HR
70700
70900
Pentacam mounted on an x-y-z mobile unit 70518
Head and chin rest
Plate for mounting on a refraction unit or table
(Dimensions 28 cm x 36 cm)
70517-01-006
Power supply, input 100 V-240 V, output 24 V, 2.1 A, Hitron HES 49 05150150
USB cable 70900-07-001
Licence key (dongle) 70740
Testing log, electrical safety
Instruction Manual G / 70700
(HR): G / 70900
Dust protection cover 60100-5/1
Paper for chin support 65313
Software package and books
Windows(tm) software package and operating instructions
Dark sheet 027070000006
Standard software module Order number
Software module: Pachymetry 70721
Software module: Densitometry 70722
Software module: 3D chamber analysis 70723
Software module: Corneal topography, front and rear surface 70724
Optionally available modules Order number
Colour printer 70520
Simulation program for adjusting contact lenses 70726
Simulation program for fitting phakic IOLs, incl. age simulation
(Pentacam HR only)
70928

2 Safety instructions
2 / 29 Instruction Manual Pentacam® / Pentacam HR® (G/70700/0109/en)
2 Safety instructions
2.1 Safety instructions concerning organisation
The law requires that the manufacturer expressly informs the user about safety aspects
concerning the handling of the Pentacam® / Pentacam HR®. This chapter contains a
summary of the most important points regarding these safety matters.
Attention
Do not use the device if you have not understood the instruction manual.
ÎMake sure to keep this instruction manual in a safe place and available to operating
personnel at all times.
ÎObserve the legal regulations with regard to accident prevention.
The Pentacam is a high-quality technical product. To ensure that it functions correctly
and safely we recommend the following: Have the Pentacam checked by our service per-
sonnel or an authorised dealer every two years. If an error occurs which you are unable
to correct, label the device as "out of order" and contact our service department.
2.2 Pictogram definitions
Attention
Identifies a potentially dangerous situation which may cause minor injury or damage to
property.
Note
Instructions for use, and useful or important information.
☞
Note
Identifies important information about the product or on how to use it, which requires
special attention.

2 Safety instructions
Instruction Manual Pentacam® / Pentacam HR® (G/70700/0109/en) 3 / 29
2.3 Safety instructions regarding the use of the
Pentacam
☞
Note
Before you use the Pentacam for the first time you must be instructed either by us or an
authorised dealer.
Attention
No modifications may be made to this device without the permission of the
manufacturer.
ÎOnly operate the Pentacam using original accessory parts supplied by us, and when
the device is in technically correct working order.
ÎNever operate a Pentacam that is damaged. Should such a situation arise, contact
the supplier.
ÎDo not operate the devices included in the delivery in areas where explosions may
occur, where there are inflammable anaesthetics, volatile substances such as alcohol
or petrol nearby.
ÎDo not operate or store the Pentacam in damp rooms.
ÎKeep the Pentacam away from water that may drip, surge or splash and make sure
that no liquids can enter the Pentacam. Do not place any containers with liquid ei-
ther close to or on the Pentacam.
ÎWhen cleaning, use a damp cloth and make sure that no liquid enters the Pentacam.
ÎOnly operate the Pentacam in rooms used for medical purposes if VDE 0100 instal-
lation procedures have been observed.
ÎDo not force any plug connections.
If you are unable to make a plug connection, check whether the plug fits the socket.
If you detect damage to the connection, you should let our service personnel repair
the damage.
ÎWhen disconnecting electrical connections, pull on the respective plug instead of
the cable itself.
ÎDo not cover the ventilation openings.
Attention
Any additional equipment that is to be connected to either analogue or digital interfaces
must verifiably fulfil appropriate EN or IC specifications. Furthermore, all configurations
must comply with the IEC 601 - 1 system norm.

3 Proper Usage
4 / 29 Instruction Manual Pentacam® / Pentacam HR® (G/70700/0109/en)
Attention
If you connect the Pentacam with non-medical equipment (e.g. data processing equip-
ment) to a medical electrical system, doing so must not cause patient-relevant safety
levels to fall below IEC 601 - 1. If making this connection leads to the leakage current
threshold being exceeded, protective measures including a circuit breaker must be in
place.
3 Proper Usage
The OCULUS Pentacam is a measuring device for examining the front part of the eye and
may only be used for the purpose described in this instruction manual.
The OCULUS Pentacam is designed for use in clinics and by eye specialists and opticians.
It must be used in the area designated for carrying out examinations.
Only operate the Pentacam using original accessory parts supplied by us, and when the
device is in technically sound condition.
You must use the power supply belonging to the device in order to operate it. There is no
other method of connecting the device possible.
OCULUS guarantees that the Pentacam will function correctly only if no extra software
or programs (except for Microsoft updates and, if required, patient data management) are
installed on the laptop or desktop PC.
For this reason the device may only be operated by personnel instructed to do so, who,
with appropriate training, knowledge and practical experience, are able to ensure proper
handling of the device.
4 Transportation and Disposal
4.1 Transport and storage instructions
Note
Great care must be taken when transporting the Pentacam from one location to another.
ÎAvoid operating or storing the device next to heaters/radiators or in damp areas.
ÎCheck the Pentacam for damage every time it has been transported.

4 Transportation and Disposal
Instruction Manual Pentacam® / Pentacam HR® (G/70700/0109/en) 5 / 29
The requirements for transporting and storing the device according to IEC 601 - 1 are as
follows:
These levels apply in conjunction with the use of appropriate packaging and for a maxi-
mum period of 15 weeks.
4.2 Disposal of used devices
In accordance with Directive 2002/96/EC of the European Parliament and the Council of
27 January 2003, and in accordance with German law governing the circulation, return
and environmentally friendly disposal of used electrical and electronic devices, such ap-
pliances must be recycled and may not be discarded as household waste.
Ambient temperature: -40 °C to +70 °C
Relative humidity, including condensation: 10% to 100%
Air pressure: 500hPa to 1060hPa

5 Device Description
6 / 29 Instruction Manual Pentacam® / Pentacam HR® (G/70700/0109/en)
5 Device Description
5.1 Overview of device components
Fig. 5-1: Device components
5.2 How the Pentacam works
While rotating around the eye, the Pentacam creates Scheimpflug images of the front
part of the eye through varying axes. The images which this rotation produces are the
basis for calculating height data which is used to extrapolate all other results and to cre-
ate a 3D model.
The entire measuring process takes less than two seconds. Up to 25,000 (HR: 138,000)
genuine height values are measured and analysed. At the same time any eye movement
is recorded, which the 3D model takes into account.
When the PC has received the appropriate data record it calculates a 3D model of the
front part of the eye. The 3D model provides the basis for all subsequent analysis.
The topography of the front and rear surfaces of the cornea and the pachymetry are
calculated and displayed from limbus to limbus for the entire surface of the cornea.
1 Ventilation opening 6 Cross slide
2 Measuring window 7 Sliding plate
3 Camera opening 8 Circular markings on sliding plate
4 On/off switch with indicator light 9 Joystick
5 Y-cable connector 10 Nameplate

6 Operation
Instruction Manual Pentacam® / Pentacam HR® (G/70700/0109/en) 7 / 29
An analysis of the anterior chamber provides the basis for calculating the chamber angle,
chamber volume and chamber depth.
A rotatable 3D model displays the front and rear surfaces of the cornea, the iris and the
lens. Densitometry of the lens automatically produces quantified values.
The Scheimpflug images created during an examination are digitalised in the measuring
head and transmitted to the PC.
Colour images displayed on the screen show the results of the measurement.
A quality specification (QS) lets you gauge the quality of the measurement taken.
Attention
OCULUS Optikgeräte GmbH shall not be liable in any form for further use of the data
recorded by a Pentacam and for the evaluations it has calculated.
6Operation
6.1 First-time operation
Attention
Before you use the device for the first time, the OCULUS Pentacam examination area must
be installed and connected by our service personnel or an authorised specialist.
ÎWait approx. 3-4 hours after transport before operating the Pentacam. If the
Pentacam was stored in a cold room or vehicle during the cold time of the year, a
significant change in temperature may cause condensation to appear on optical
parts in the Pentacam.
6.2 Daily operation
If you move the Pentacam to another location, you must position it so that direct light
cannot influence measurements. As a rule you must ensure that any examination is con-
ducted without interference from reflections. For this reason you should operate the
Pentacam in a dark room.
As it is an optical device, the Pentacam demands careful handling. Avoid jolting, blows,
contamination or high temperatures.
ÎThe first step is to switch on the PC or laptop.
ÎThen switch on the Pentacam at the power supply (position ON). The LED on the
switch lights up in green.

7 Patient Data Management
8 / 29 Instruction Manual Pentacam® / Pentacam HR® (G/70700/0109/en)
6.3 Switching the Pentacam off
ÎClose the Pentacam program and Patient Data Management.
ÎShut down the Windows operating system.
ÎSwitch off the Pentacam at the power supply.
7 Patient Data Management
7.1 Starting Patient Data Management
After you have switched on the PC, it first loads the operating system. It then displays the
user interface for "Patient Data Management".
Fig. 7-1: Patient Data Management
ÎTo enter the Pentacam program, you must either enter a new patient (8) into the
"Patient" group box or select an existing patient (2) from the list.
1 "Functions" group box 5 [Import] button
2 Previous examinations 6 [Delete Patient] button
3 [Delete exam.] button 7 Patient list
4 [Export] button 8 "Patient" group box

7 Patient Data Management
Instruction Manual Pentacam® / Pentacam HR® (G/70700/0109/en) 9 / 29
7.2 Entering new patients
ÎTo enter a new patient in Patient Data Management, click [New].
ÎEnter the patient’s last name, first name and date of birth completely in the patient
window (8).
Fig. 7-2: Entering patients
ÎOptionally you can enter an ID number for the patient.
ÎTo accept the entries you have made, click [Save]. The patient you have just entered
now appears in the patient list.
ÎSelect this new patient from the patient list and start the Pentacam program
(sect. 7.4, page 10).
7.3 Selecting existing patients
The patient list on the left-hand side of the screen displays all previously examined
patients in alphabetical order.
ÎClick [Search] to quickly find the patient you require from the list.
ÎEnter the patient’s name or the first letter of the name in the "Last name" field.
ÎOptionally you can search for the patient by entering his or her ID number, assuming
that patient was assigned one when first entered.
ÎClick the appropriate entry in the list to transfer that patient’s name to the patient
window. This also brings up a list of any previous examinations for that patient in
the examination window (bottom right-hand side).
Extended patient search: [Extended] checkbox
ÎActivate the [Extended] checkbox.
The screen displays additional search parameters which reference previous examinations,
for example. The procedure is similar to entering a new patient name.
Fig. 7-3: Extended search

8 Pentacam Program
10 / 29 Instruction Manual Pentacam® / Pentacam HR® (G/70700/0109/en)
7.4 Starting the Pentacam program
Switching from Patient Data Management to the Pentacam program:
ÎAfter you have selected a patient: Start the Pentacam program by clicking
[Pentacam] (fig. 7-1, page 8).
ÎAlternately, you can start the program by double clicking the patient you have
selected.
8 Pentacam Program
Note
The Pentacam-Software is not to be used to dictate therapy without professional
correlation with other clinical findings and diagnostic tests.
Fig. 8-1: Pentacam program menu (upper section)
Loading previous examinations
ÎSelect the menu item [Examination] and click [Load].
The dialog box "Load Examination" appears.
ÎMake a selection by clicking the required examination.
ÎConfirm your selection by clicking [OK], or by double clicking.
The Pentacam program will load the examination you have selected.
Starting a measurement
ÎSelect the [Examination] tab and click [Scan].
The blue slit light is activated and the Scan menu (sect. , page 10) appears.
☞
Note
As this instruction manual focuses on the Pentacam operating concept, the description
of Pentacam program functions is limited to starting the measuring process and loading
previous examinations. The Reference manual contains detailed information on the
functions of the Pentacam program.

9 Scan Menu
Instruction Manual Pentacam® / Pentacam HR® (G/70700/0109/en) 11 / 29
9ScanMenu
☞
Note
Switching from the Pentacam program to the Scan menu:
ÎIn the Pentacam program (fig. 7-1, page 8) select the menu item [Examination] and
click [Scan].
9.1 Screen layout
Fig. 9-1: "Scan" screen ("HR" model)
The eye currently being examined is detected automatically and is displayed in the
"Eye" field (1).
The Pupil Image (2) shows the vertical / horizontal positioning of the Pentacam. The
object is to position the yellow dot marking the apex of the cornea in the centre of
1 "Eye" field 7 Adjustment window
2 Pupil image 8 Fixation Target (HR only)
3 "Image Options" area 9 [Quit] button
4 [Slit Light] checkbox 10 Scheimpflug Image
5 [Automatic Release] checkbox 11 "Orientation" field
6 [Start Scan] button

9 Scan Menu
12 / 29 Instruction Manual Pentacam® / Pentacam HR® (G/70700/0109/en)
the crosshairs. The blue dot marks the centre of the pupil, while the blue ring frames
the pupil.
You can set the type of image required for the respective examination in the "Image
Options" area (3) (sect. 9.1.1, page 12 and sect. 9.1.2, page 13).
Click the [Slit Light] checkbox (4) to activate/deactivate the blue light for illuminating
the eye.
Click the [Automatic Release] checkbox (5) to activate automatic measurement.
Clicking the [Start Scan] button (6) activates manual measurement. You can also use
the Return key.
Inside the adjustment window (7), there are arrows showing you the direction in
which you must move the Pentacam to activate automatic measurement (Automatic
Release).
The "Fixation Target" setting (8) is a parameter used only on the Pentacam HR
(sect. 9.1.2, page 13).
Click the [Quit] button (9) to abort the measurement.
The Scheimpflug image (10) shows the distance between Pentacam and patient. The
objective of this setting is to move the red dot on the front surface of the cornea so
as to coincide with the red line.
The "Orientation" field (11) shows the respective position of the camera and the eye,
which is currently being examined.
9.1.1 Scheimpflug image settings
You can set the number and type of images required for the respective examination in the
"Image Options" box (3).
"Scheimpflug Image" group box
If you activate this option, the camera records only one Scheimpflug image. You can
freely select the camera position you require by clicking the white rings in the
"Orientation" field (11).
"Enhanced Dynamic Scheimpflug Image" group box
Use this option to make the camera record either 5, 10 or 15 Scheimpflug images,
with the camera remaining in the same position. Image averaging is carried out on
the recorded images to minimise background noise. Only one Scheimpflug image is
displayed. You can freely select the camera position you require by clicking the white
rings in the "Orientation" field. This type of image is suitable for a purely densito-
metric assessment of the lens.
"3D Scan" group box
Use this option to select how many images you want the camera to record per scan.
The difference is in the duration of the examination and the number of measuring
points that are evaluated. A scan comprising 50 images takes longer, but assuming
good prior fixation of the patient it is the most accurate. This type of examination is
used for evaluating the cornea and anterior chamber.

9 Scan Menu
Instruction Manual Pentacam® / Pentacam HR® (G/70700/0109/en) 13 / 29
9.1.2 Parameters applicable only to the Pentacam HR
Note
The parameters described below apply only to the Pentacam HR.
The Pentacam HR has additional options for selecting image types. You can find these
exclusive parameters in the "Image Options" box (3).
"Cornea Fine" group box
Select this option for a more detailed image of the cornea.
The camera does not capture the deeper-lying layers of the front part. You can select
50 Scheimpflug images for a recording time of one second, or 100 Scheimpflug im-
ages for a recording time of two seconds.
"Multi Rotation" group box
If you select this option, the camera will record Scheimpflug images from
50 different positions while performing a full rotation twice around the eye.
"Accommodation" group box
If you select this option, the camera will take a total of 50 Scheimpflug images.
While the camera is recording the images, the "Fixation Target" shifts constantly
from -5 dpt to +2 dpt. The camera records the Scheimpflug images from a
pre-selected camera position.
[Enh. Dyn.] checkbox in the "3D Scan" group box
Activating the "Enh. Dyn." function prolongs the exposure time per Scheimpflug im-
age. The advantage is an accurate representation of phakic IOLs. If you select this
recording mode, colours and evaluations are neither calculated nor displayed.
"Fixation Target" slider
Use of the "Fixation Target" enables a better fixation of the patient. For this, the
active "Fixation Target" (8), i.e. the LED blinking red in the middle of the blue slit, can
be shifted in steps of 0.5 dpt. The object is to offset defects in the patient’s vision
and ensure a simpler method of fixation.

9 Scan Menu
14 / 29 Instruction Manual Pentacam® / Pentacam HR® (G/70700/0109/en)
9.2 Information for recording Scheimpflug images
Specific instructions for the Pentacam HR
Type of examination Examination mode Images Automatic measure-
ment
Notes
Topography 3D scan 25-50 Yes
Pachymetry 3D scan 25-50 Yes
Analysis of the anterior
chamber
3D scan 25-50 Yes Do not apply mydriatic drops.
Artificial lenses (gener-
al)
Enhanced dynamic
(for HR in the "3D scan"
examination mode)
15 Yes If the pupil is insufficiently dilated, apply
mydriatic drops
Use 3D scan for measurements.
Measuring functions 3D scan 25-50 Yes If the pupil is insufficiently dilated, apply
mydriatic drops
Densitometry 3D scan
Enhanced dynamic
25-50
5-15
No Use the same number of images to en-
able a progress check.
Type of examination Examination mode Images Automatic measure-
ment
Notes
IOLs, ICLs, PIOLs 3D scan for PIOLs, possi-
bly longer exposure
25-50 Yes If the pupil is insufficiently dilated, apply
mydriatic drops

10 Measuring Procedure
Instruction Manual Pentacam® / Pentacam HR® (G/70700/0109/en) 15 / 29
10 Measuring Procedure
Default settings
ÎStart the Scan menu (sect. , page 10).
ÎIf necessary make changes to the image options for the particular part of the front
of the eye that is to be examined.
ÎThe default settings in the "3D Scan" options are "25 images/1 second".
ÎAdjust the table height.
ÎAsk the patient to place his or her head on the chin and forehead rest.
Rough adjustment
ÎThe black ring marking between the chin rest and the forehead rest (1) should be
used for gauging the required height of the patient’s eyes.
ÎAdjust the patient’s eye level using the twist grip (2).
The patient is positioned correctly when chin and forehead touch the rests and the
eyes are level with the marking.
Fig. 10-1: Rough adjustment of the chin and forehead rest
1 Marking (black ring) 2 Twist grip

10 Measuring Procedure
16 / 29 Instruction Manual Pentacam® / Pentacam HR® (G/70700/0109/en)
ÎExample of a rough adjustment for the right eye: Move the cross slide (1) until the
marking at the end of the cross slide (4) roughly coincides with the circle R (3) on
the sliding plate.
Fig. 10-2: Markings on the cross slide
ÎLook at the patient’s eye you are examining from one side and make sure that the
blue slit light illuminates the cornea.
ÎIf necessary, adjust the position of the cross slide to the left or right.
Fig. 10-3: Slit light on the cornea
1 Cross slide 4 Marking on the cross slide
2 Left marking 5 Joystick
3 Right marking
Other manuals for Pentacam
1
This manual suits for next models
3
Table of contents