Figure 1 Figure 2
PARTS LIST
Refer to figure 1 and 2
NOMENCLATURE
ITEM
A
B
C
D
E
DESCRIPTION
Back
Arms
Metal legs
Glides
QTY.
1
1
2
2
4
ARTICLE
A
B
C
D
E
DESCRIPTION
Dossier
Seat
F
G
H
F
G
H
Casters
Metal leg screws - 1”
Back screws - 1 1/2”
4
12
4
Siège
Accoudoirs
Base métallique
Patins
QTÉ.
1
1
2
2
4
Se reporter aux figure 1 et 2
If any parts are missing, damaged or worn, stop using this chair.
Repair the chair with manufacturer supplied parts.
Ensure all screws are securely fastened. Do not use this chair
unless all bolts and parts are firmly tightened. Periodically check
that all scews remain tight. Keep Hex key in a safe place for future
use. Failure to secure screws or allowing screws to become loose
may result in personal injury. This chair is designed for seating
only. Do not stand on this chair. Do not use it as a step ladder. Do
not sit on the arm rest of this product.
This chair is for use by one person weighing 250 lbs. (114kg.) or less.
If you have any concerns about safety, withdraw from service until
repaired by authoried Global dealer.
For use on carpeted surfaces only. The dual wheel casters can
cause unexpected rolling or tipping on hard surfaces.
IMPORTANT: Read these instructions carefully before beginning
assembly. Failure to follow these instructions may result in serious
injury.
Carefully unpack all parts and identify them with the parts list before
attempting to assemble the chair.
Remove all cardboard and plastic covering from chair parts. Please
examine all packing material before discarding it.
IMPORTANT: Lire ces instructions attentivement avant de commencer
le montage du fauteuil. Si ces instructions ne sont pas suivies, il peut
en résulter des blessures graves.
Avant de commencer le montage, déballer soigneusement toutes les
pièces et les identifier en les comparant avec celles de la namenclature.
Retirer du siège tous les emballages en carton et en plastique. Examin-
er les emballages avec soin avant de s’en défaire.
En cas de pièces manquantes, endommagées ou usées, cesser
immédiatement d’utiliser ce fauteuil.
Réparer ce fauteuil uniquement avec des pièces d’origine fournies par
le fabricant. S’assurer que toutes les vis sont bien serrées. N’utiliser
ce fauteuil que lorsque toutes les vis et pièces sont solidement fixées.
Vérifiez périodiquement les vis et resserrez les à fond au besoin.
Rangez en lieu sûr la clé hexagonale pour utilisation ultérieure. Des
vis mal serrées peuvent provoquer des accidents entraînant des
blessures. Ce fauteuil est conçu uniquement pour servir de siège. Ne
pas se tenir debout sur ce fauteuil. Ne pas se servir de ce fauteuil
comme escabeau. Ne pas s’asseoir sur les accoudoirs de ce fauteuil.
Ce fauteuil ne doit être utilisé que par une personne dont le poids ne
dépasse pas 114 kg (250 lb).
Si l’utilisation de ce fauteuil semble présenter des dangers, ne pas
l’utiliser tant qu’il n’a pas été réparé par un distributeur Global agréé.
Utiliser sur surfaces à moquette seulement. Sur des surfaces dures, la
roulette double risque de causer un roulement ou basculement
inprévu.
Roulettes
Base métallique - 1 po
Vis de dossier - 1 1/2 po
4
12
4
II
J
K
J
K
Arm screws - 1 3/8”
Arm screws - 1/2”
Washers
4
2
8
Vis d’accoundoir - 1 3/8 po
Vis d’accoundoir - 1/2 po
Rondelle
4
2
LL
8
MM
11
AVERTISSEMENTWARNING
560 Supertest Road, Downsview, Ontario, Canada, M3J 2M, (416) 661-3660, Fax: (416) 661-4300
Printed in China / Imprimé en Chine
Revision: 06/05/18 (CS6)
00807OTG13050
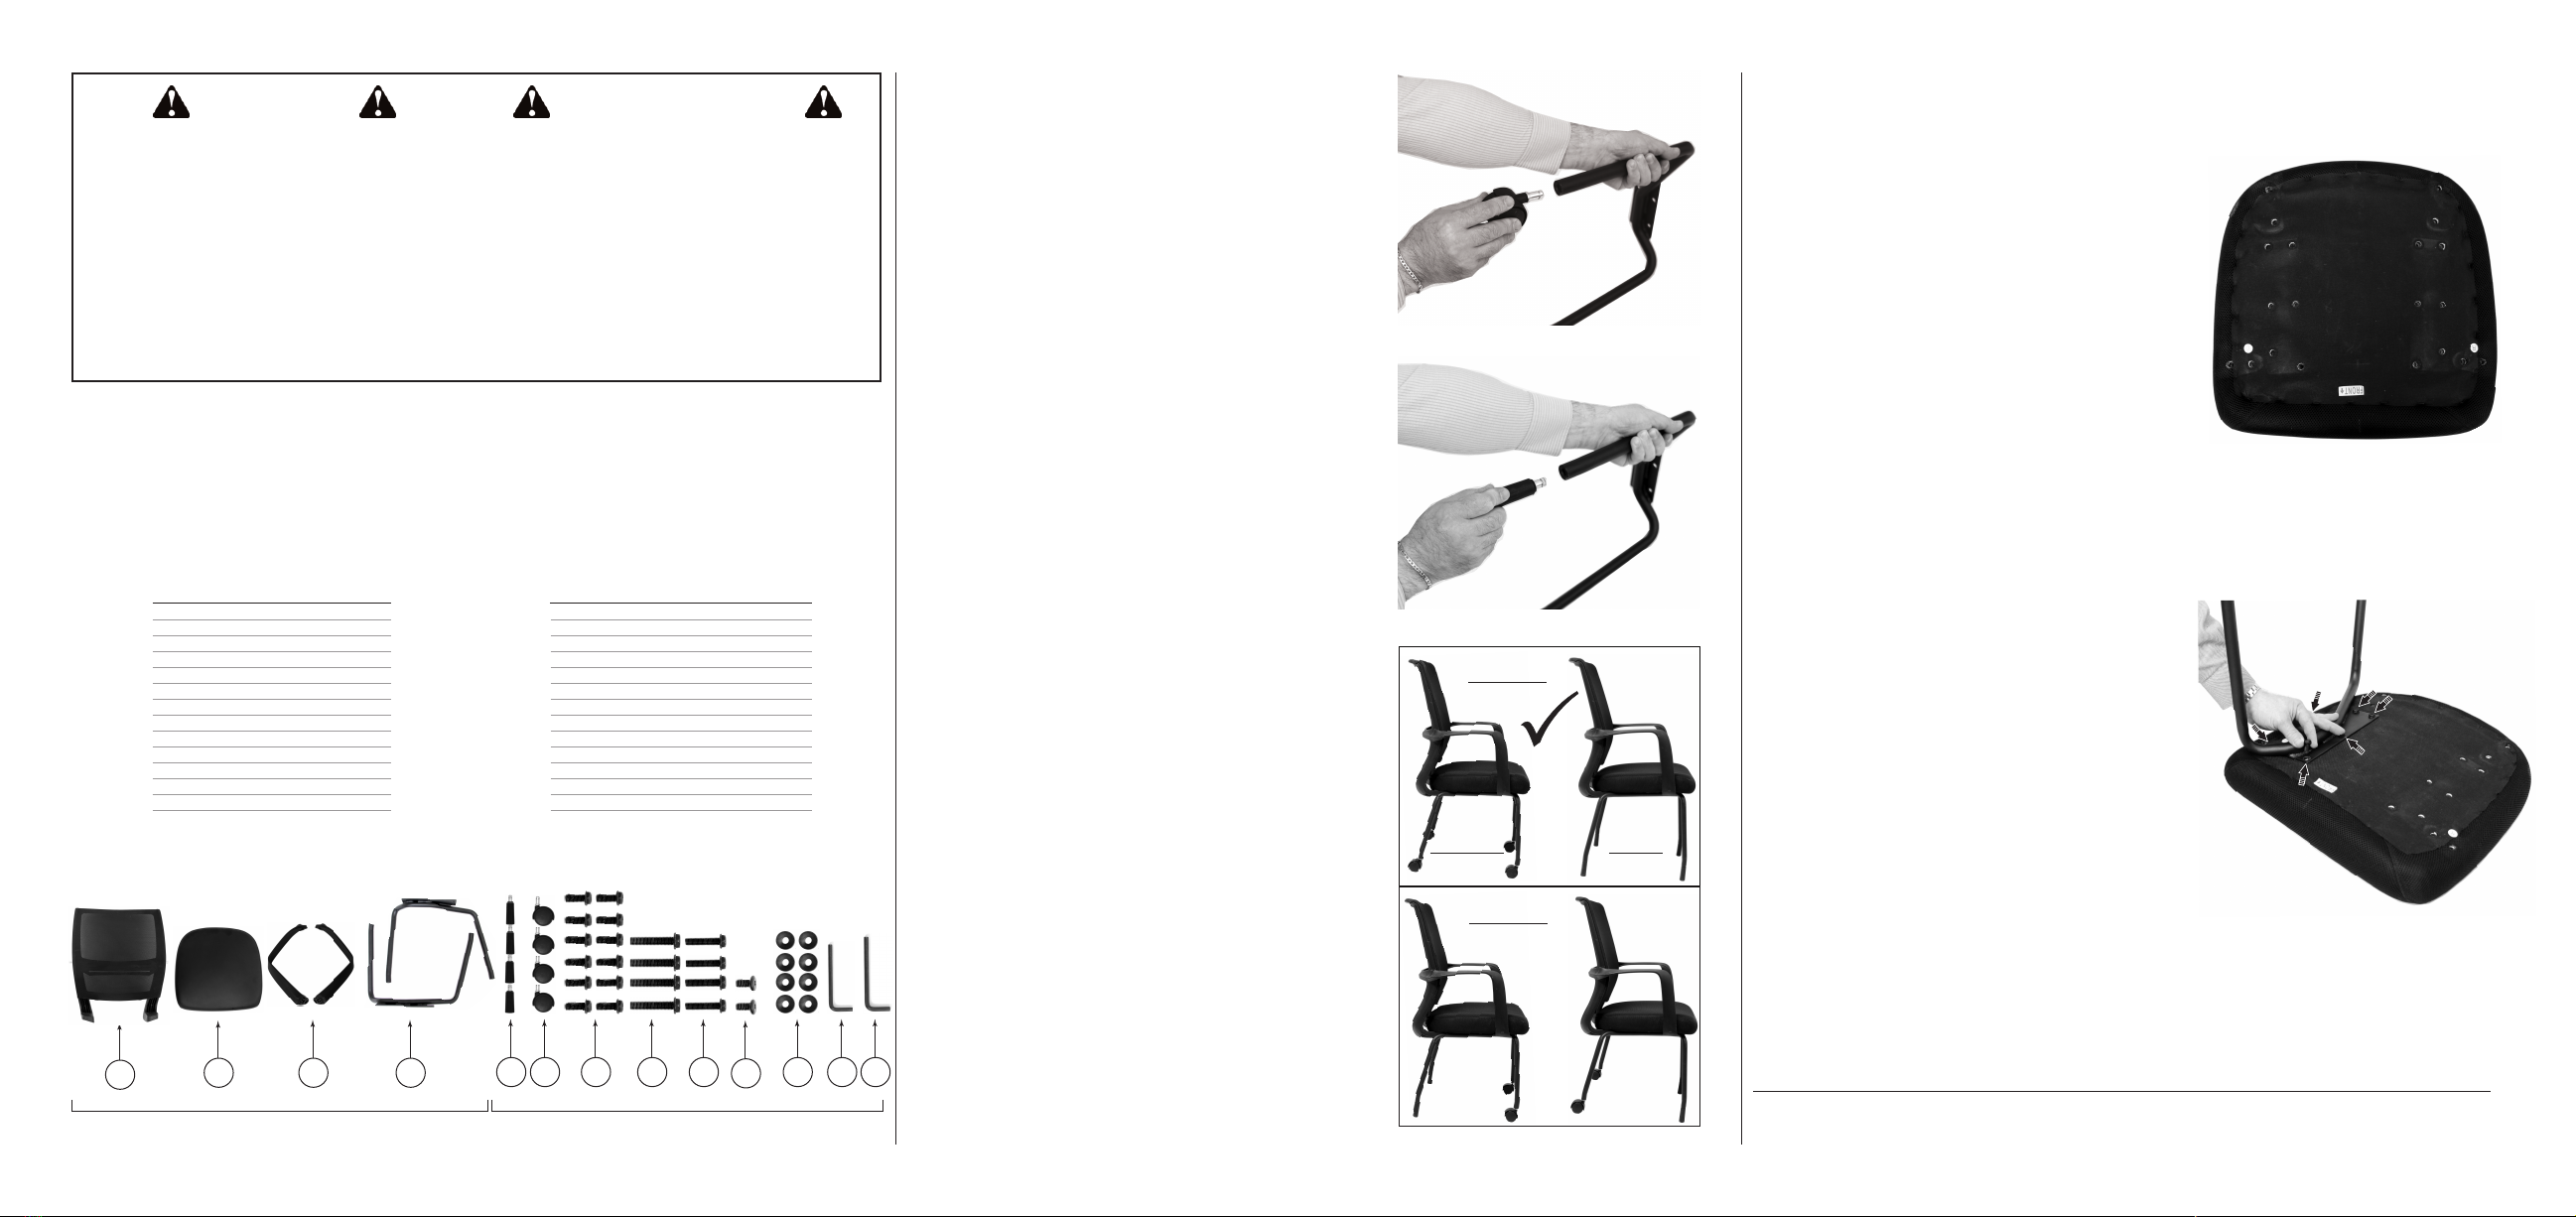
F
B C
A
Push one caster (F) or glide (E) into each hole
on the bottom of metal legs (D) as shown in
figure 3 or 4. When partially inserted, there will
be some resistance before the caster or glide
“snaps” into position.
ASSEMBLY
Attaching casters or glides
1.
MONTAGE
Figure 5
Figure 4
Figure 3
Position the seat (B) on the floor with the
bottom facing upward and the front facing
towards you, as shown in figure 6. The bottom
is clearly marked with a label pointing toward
the front of the seat.
Attaching seat cushion
2.
Position the Left leg (D) on the seat bottom,
carefully align the holes on the left side of the
seat cushion (B) with the holes in the metal leg
(D) as shown in Figure 7.
3.
Using six screws (G) and hex key (M), loosely
attach the seat cushion (B) to the metal leg (D)
as shown in Figure 7. Leave all screws loose
until all six have been started. THEN, TIGHTEN
ALL SCREWS SECURELY using the supplied
hex key (M).
4.
Fixation de l’assise de chaise
Figure 7
Figure 6
DKH L M
Hex key 5mm 1Clé hexagonale 5mm 1
I
Hex key 4mm Clé hexagonale 4mm
EJ
G
Your chair comes with an option
to install casters or glides for your
preferred application. Please
follow assembly instructions
below to install casters or glides.
Casters / Roulettes
Glides / Patins
Glides
Glisse
Casters
Roulettes
X
WRONG
FAUX
RIGHT
DROITE
To attach the Right leg (D) to seat bottom,
repeat steps 5 and 6.
5.
WARNING: DO NOT INSTALL
CASTERS AND GLIDES AT THE
SAME TIME, REFER TO FIGURE 5.
FAILURE TO FOLLOW THIS
WARNING COULD RESULT IN
SERIOUS INJURY.
Enfoncer une roulette (F) ou un patin (E) dans
chaque trou sous les pieds métalliques (D)
comme illustré à la figure 3 ou 4. Une légère
résistance se fera sentir avant que la roulette
ou le patin « s’enclenche » complétement en
place.
Pose des roulettes ou des patins
1.
Votre chaise peut être équipée, au
choix, des roulettes ou des patins
fournis. Procéder selon les direc-
tives pour la pose des roulettes ou
des patins.
AVERTISSEMENT : NE PAS POSER
DES ROULETTES ET DES PATINS
ENSEMBLE, VOIR FIGURE 5.
NE PAS RESPECTER CET AVER-
TISSEMENT RISQUE D’ENTRAÎNER
DES BLESURES GRAVES.
Poser l’assise (B) à l’envers sur le sol avec
l’avant dirigé vers soi, comme illustré à la figure
6. Une étiquette avec une flèche indique
clairement l’avant de l’assise.
2.
Placer les pieds de gauche (D) sur l’assise en
alignant les trous sur le côté gauche de l’assise
(B) avec ceux des pieds métalliques (D) comme
illustré à la figure 7.
3.
Fixer sans serrer les pieds métalliques (D) sur
l’assise (B) avec six vis (G), comme illustré à la
figure 7. Lorsque les six vis sont en place, LES
SERRER FERMEMENT avec la clé hexagonale
(M) fournie.
4.
Répéter les opérations des alinéas 3 et 4
ci-dessus pour fixer les pieds de droite (D) sur
l’assise.
5.


