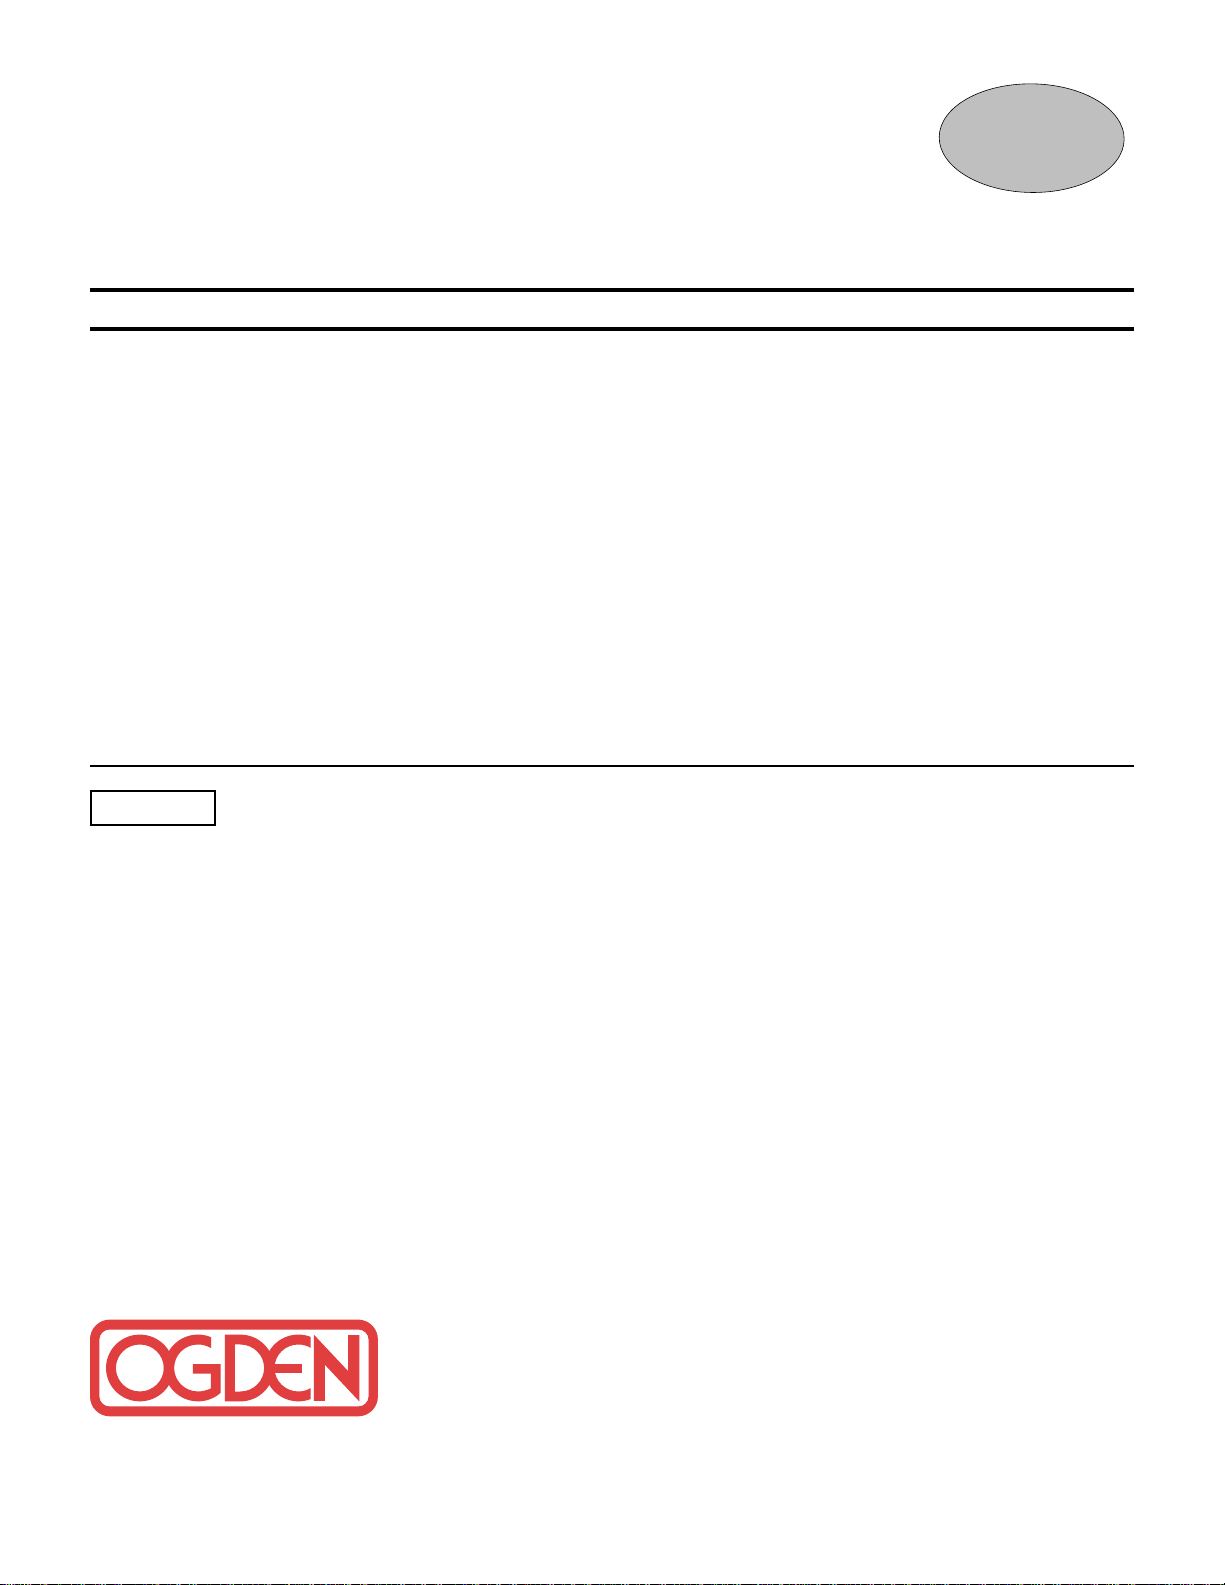
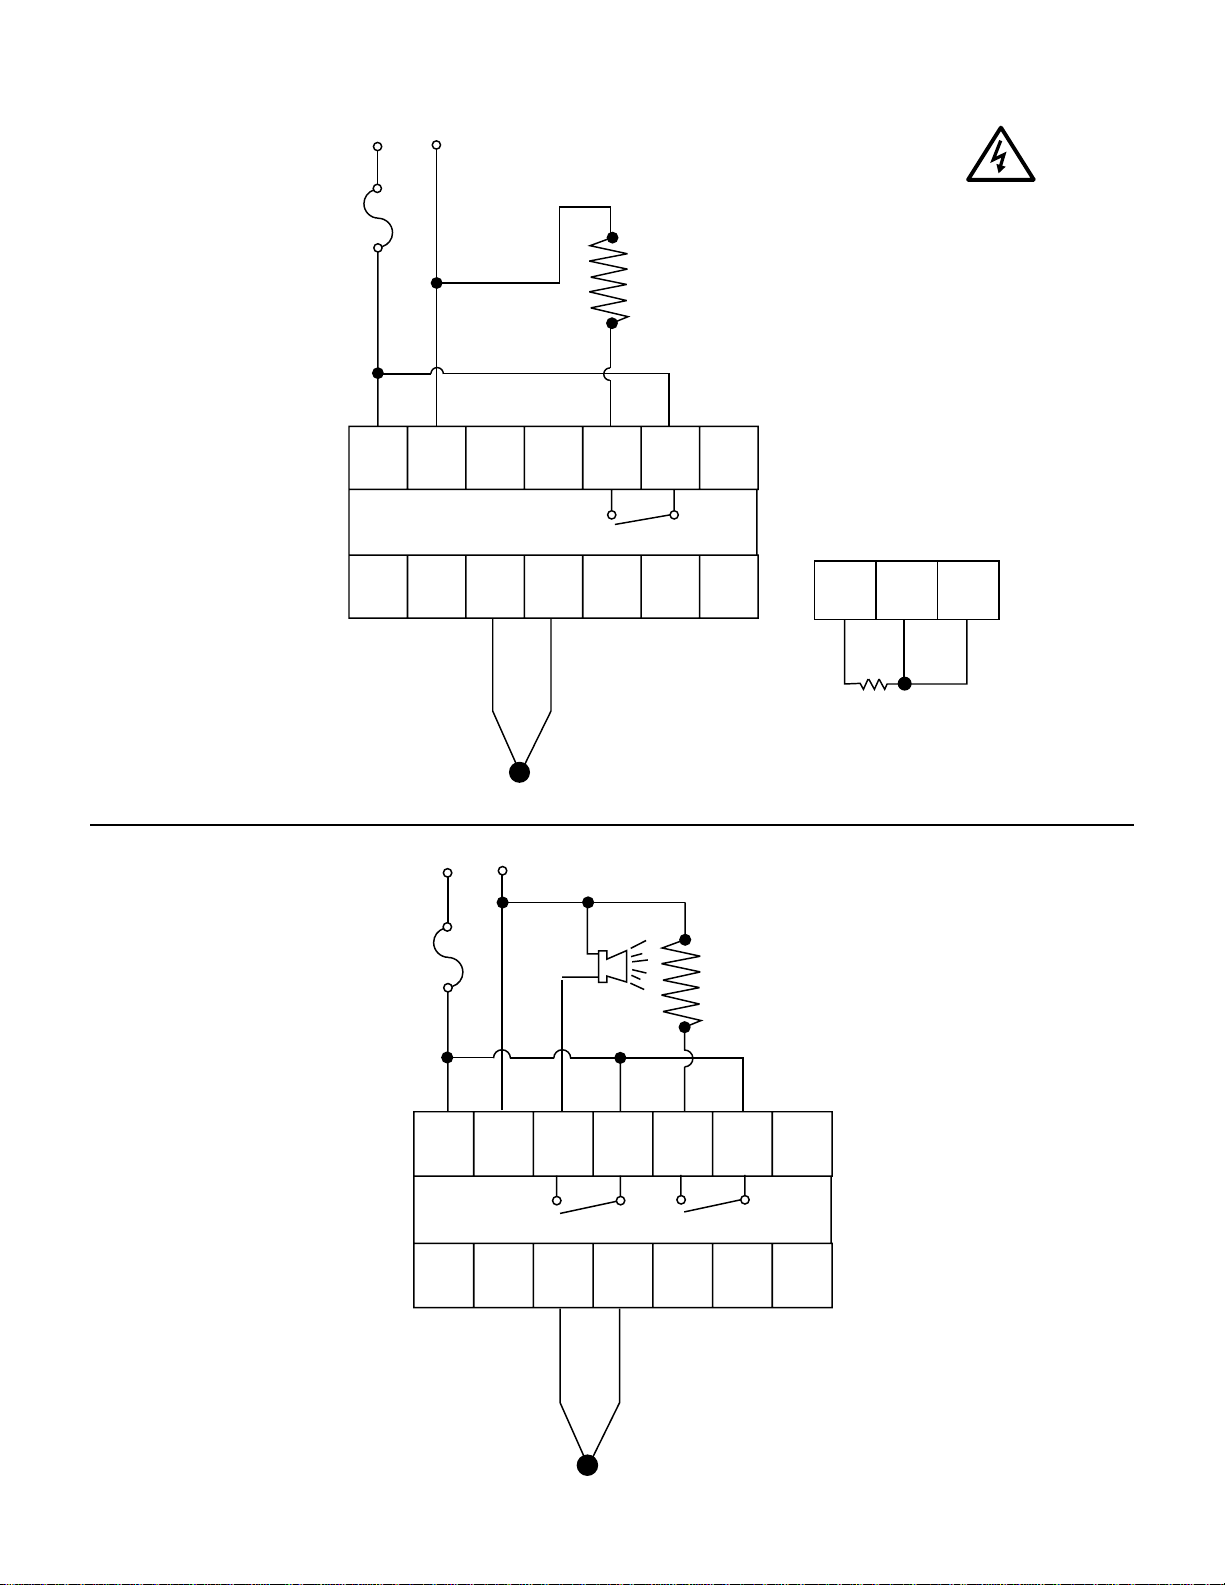
Ogden ETR-3200 User manual

MANUAL NO. 29
SOFTWARE VERSION
1.8 and HIGHER
Model ETR-3200
AUTOMATIC TUNING 1/32 DIN
SMARTER LOGIC®Controller
S
M
A
R
T
E
R
S
M
A
R
T
E
R
L
O
G
I
C
L
O
G
I
C
L
O
G
I
C
®
INSTRUCTION MANUAL

INSTRUCTION MANUAL
FOR ETR-3200
CONTENTS
Failure of devices, such as the thermocouple-RTD sensor, heater output relay or temperature control can result in
severe damage to a product while in process, melting of the heater or a damaging fire. An over-temperature protec-
tion device must be installed in your process that will remove all power from the heating circuit if the above failure
occurs. We recommend that this device be classified as a safety control and carry FM, U.L. and CSA Listing or
Certification. Failure to install high-limit temperature control protection where a potential hazard exists, could result
in damage to equipment and property, and fatal injury to personnel.
WARNING!
Section 1: INTRODUCTION
This manual contains information for the installation and
operation of the Ogden Model ETR-3200 auto-tuning
micro-processor based controller.
Ease of use is an essential feature on this versatile
controller. Three touch keys are used to select sensor
type, control mode, control parameters, alarm mode,
degrees C/F, auto-manual mode, and to lock the para-
meters from the prevention of unauthorized tampering.
A large 4-digit display shows process values at a
glance. Precise 14 slope sensor linearization, self-diag-
nostic capability, cold junction compensation and 3-
mode PID calculations are automatically executed by
the single chip microprocessor. The wide selection of
parameters, values, sensor types, set points, control
modes, alarm modes, degrees C/F and security codes
are held in a non-volatile memory. Batteries are not
necessary.
The auto-tuning function determines the correct propor-
tional band, rate and reset values to provide accurate
control with minimal overshoot and temperature oscilla-
tion. This is accomplished without the need for expen-
sive and time consuming procedures for set-up of con-
trol parameters. In case of a power failure or temporary
shutdown, the instrument retains the correct parame-
ters. This instrument also has manual override capabili-
ties that allow the operator to bypass the auto-tuning
parameters. Required fine tuning adjustments can then
be made.
S
M
A
R
T
E
R
S
M
A
R
T
E
R
L
O
G
I
C
L
O
G
I
C
L
O
G
I
C
®
64 West Seegers Road
Arlington Heights, IL 60005
(847) 593-8050 •Fax: (847) 593-8062
Printed in U.S.A. 11/99
© Ogden Manufacturing Co. 1999
OGDEN, SMARTER LOGIC, ETR and
ETR-3200 are Registered Trademarks of
Ogden Manufacturing Co.
MARCA REGISTRADA
Specifications subject to change without notice.

Section 2: CATALOG NUMBERING SYSTEM
ETR-3200-
Signal Input*
1Thermocouple J, K,
T, E, B, R, S, N
2RTD PT100 ohms,
Alpha = .00385/DIN
3RTD PT100 ohms
Alpha = .00392/JIS
4Other Voltage
(up to 10VDC)
or current
(up to 20mA)
Control Output
2Relay rated
3A/240VAC resistive
3Pulsed voltage to
drive SSR, 3-32VDC
4Triac rated 1A,
240VAC
5Isolated 4-20mA
linear
6Isolated 0-20mA
linear
7Isolated 0-10VDC
linear
8Special order
Alarm/Cooling
Outputs
1None
2With auxiliary relay
rated 3A/240VAC
resistive for alarm or
cooling
3Special order
Example:
ETR-3200-1221
•Thermocouple type
J, K, T, E, B, R, S, N
•Relay Output
•With Alarm/Cooling Option
NOTE: True universal input can be
re-programmed in the field.
□ □ □ 4
1 2 3
Sensor Sensor
Sensor Input Type Max. Range F°Accuracy F°Max. Range C°Accuracy C°
J Iron/Constantan –58 to 1832°F±3.6°F–50 to 1000°C±2°C
K Chromel/Alumel –58 to 2500°F±3.6°F–50 to 1370°C±2°C
T Copper/Constantan –454 to 752°F±3.6°F–270 to 400°C±2°C
E Chromel/Constantan –58 to 1382°F±3.6°F–50 to 750°C±2°C
B Pt-30%RH/Pt-6%RH 32 to 3272°F±5.4°F 0 to 1800°C±3°C
R Pt-13%RH/Pt 32 to 3182°F±3.6°F 0 to 1750°C±2°C
S Pt-10%RH/Pt 32 to 3182°F±3.6°F 0 to 1750°C±2°C
N Nicrosil/Nisil –58 to 2372°F±3.6°F–50 to 1300°C±2°C
RTD PT 100 ohms (DIN) –328 to 752°F ±0.72°F–200 to 400°C±0.4°C
RTD PT 100 ohms (JIS) –328 to 752°F ±0.72°F–200 to 400°C±0.4°C
Linear 4 - 20 mA –1999 to 9999 ±0.05% –1999 to 9999 ±0.05%
Linear 0 - 20 mA -1999 to 9999 ±0.05% -1999 to 9999 ±0.05%
Linear 0 - 1 VDC -1999 to 9999 ±0.05% -1999 to 9999 ±0.05%
Linear 0 - 5 VDC -1999 to 9999 ±0.05% -1999 to 9999 ±0.05%
Linear 1 - 5 VDC -1999 to 9999 ±0.05% -1999 to 9999 ±0.05%
Linear 0 - 10 VDC -1999 to 9999 ±0.05% -1999 to 9999 ±0.05%
Maximum Temperature Ranges or SPAN:
Chromel®and Alumel®are Registered Trademarks of Hoskins Manufacturing Company.
Communications
1None
2RS-495
3Retransmission
4RS-232C
NOTE: If a low voltage power source is used, place the number
"3" before the Signal Input for 20-32VAC/VDC operation.

NON-VOLATILE MEMORY
Retains process parameters when power is off
EXTERNAL LOCKOUT CODE
•Prevents accidental or
unauthorized changes
SET POINT/PROCESS
PARAMETER DISPLAY
•Process display updated 5
times per second
•Menu and error codes
STATUS INDICATORS
•Output and alarm condition
AUTOMATIC TUNING
•Eliminates complicated
and time consuming
manual tuning proce
dures
•Smarter Logic
practically eliminates
overshoot and tempera
ture variations
•Universal input
3 PUSHBUTTONS
•For ease of control set-up
NEMA 4X/IP55 FRONT PANEL
•Water and corrosion resistant
Line Voltage: 90-264VAC, 50-60Hz,
20-32VAC/DC optional
Consumption: Less than 5VA.
Input: Thermocouple Type: J, K, T,
E, B, R, S, N
RTD 2 or 3 wire PT-100
DIN @ = .00385 or
JIS @ = .00392
0 - 1V, 0 - 5V, 1 - 5V, 0 –
10V, 0 - 20mA, 4 - 20mA
Linear Voltage Input Impedance: 100k ohms
Cold Junction Compensation: .1°C/C ambient typical
Sensor Break Protection: Operator selectable
External Resistance: 100 ohms max.
Sample Rate: 5 samples per second
Accuracy: ±.1%, ±least significant digit
Normal Mode Rejection: 60db
Common Mode Rejection: 120db
Operating Ambient for
Rated Accuracy: 14 - 122°F (-10 - 50°C)
Storage Temperature: -4 - 160°F (-20 - 70°C)
Humidity: 5 - 90% RH (non-condensing)
Insulation: 20M ohms min. (500VDC)
Breakdown: 2000V (AC), 50/60Hz,
1 minute
Shock: 200m/s2(20g)
Weight: 4 oz. (110 grams)
EMC Emission: EN50081-1, EN61326
(EN55011 class B, EN61000-
3-2, EN61000-3-3)
EMC Immunity: EN50082-2, EN61326
(EN6100-4-2, EN61000-4-3,
EN61000-4-4, EN61000-4-5,
EN61000-4-6, EN6100-4-11)
Dimensions: Front Panel H - 15⁄16”(24mm)
W - 17⁄8”(48mm)
D -45⁄16”(110mm)
Depth Behind Panel:
37⁄8”(99mm)
Panel Cutout: 7⁄8”x 125⁄32”(22 x 45mm)
Proportional Band: 0 - 360°F (0 - 200°C)
Integral (Reset): 0 - 3600 seconds
Derivative (Rate): 0 - 1000 seconds
Ramp Rate: 0- 99.99°F (0 - 55.55°C)
/minute
Dwell: 0 - 9999 minutes
On-Off: Adjustable hysteresis (0.1 -
19.9°F, (0 - 11.0°C)
Proportional Cycle Time: 0 - 99 seconds
°F/°C: External keypad selectable
Linearization: Software driven
Outputs: Heating or cooling/alarm
Output Modules:
–Linear Current: 4-20mA isolated, max. load
500 ohms
–Linear Voltage: 0 - 10V isolated, minimum
impedance 500K ohms
–Pulsed Logic Voltage: 24VDC, unisolated Max.
current 20mA
–Triac: Rated 1A, 240V max.
–Relay: 3A/240V, resistive load for
heating, 3A/240V, resistive
load for alarm
Control Actions: Heating (relay closed on
temperature rise) or cooling
(relay open on temperature
rise) front panel selectable
Section 3: SPECIFICATIONS

Wiring Precautions:
•Before wiring, verify the label for correct model num-
ber and options. Switch off the power when checking.
•Care must be taken to ensure that maximum voltage
ratings specified in Section 3 on previous page are
not exceeded.
•It is recommended that power to these instruments
be protected by fuses and circuit breakers rated at
the minimum value possible.
•All units should be installed inside a suitably ground-
ed metal enclosure to prevent live parts being acces-
sible to human hands and metal tools.
•All wiring must conform to appropriate standards of
good practice, national and local codes and
regulations. Wiring must be suitable for the maximum
voltage, current, and temperature ratings expected in
the system.
•Take care not to over-tighten the terminal screws.
•Unused control terminals should not be used as
jumper points as they may be internally connected,
causing damage to the unit.
•Verify that the ratings of the output devices and the
inputs as specified on page 3 are not exceeded.
•Electric power in industrial environments contains a
certain amount of noise in the form of transient volt-
ages and spikes. This electrical noise can enter and
adversely affect the operation of microprocessor-
based controls. For this reason we strongly recom-
mend the use of shielded thermocouple extension
wire which connects from the sensor to the controller.
This wire is a twisted-pair construction with foil wrap
and drain wire. The drain wire is to be attached to
earth ground at the sensor end only. We carry both
type J and type K in our stock.
RISK OF ELECTRIC SHOCK - Dangerous and poten-
tially fatal voltages are present when working on this
equipment. Before installation or beginning any trou-
bleshooting procedures, the electric power to this equip-
ment must be disconnected and locked out as described
by OSHA Standards. Units suspected of being faulty
must be removed and returned to Ogden for inspection
and/or repair. They contain no user serviceable compo-
nents.
To help minimize the possibility of fire or shock hazards,
do not expose this instrument to rain or excessive
moisture. This control is not to be used in hazardous
locations as defined in Articles 500 and 505 of the
National Electric Code.
Do not use this instrument in areas subject to
hazardous conditions such as excessive shock,
vibration, dirt, moisture, corrosive gases or oil. The
ambient temperature of the areas should not exceed
the maximum rating specified in Section 3, on previous
page.
Unpacking:
Upon receipt of the shipment inspect the unit for ship-
ping damage. If any damage due to transit is noticed,
report and file a claim with the carrier. Write down the
model number and serial number for future reference
when corresponding with our service center. The serial
number is located on the housing of the control.
Mounting:
Make panel cutout to dimensions shown below. Insert
the controller into the panel cutout. The maximum
panel thickness is 1⁄8" (3.2mm).
Section 4: INSTALLATION
Panel
Mounting Clamp
3 7/16"
(99mm)
4 5/16
(110mm)
15/16"
(24mm)
Panel
Mounting Screw
3 7/16"
(96mm)
13/32"
(10.0mm)
31/64"
(12.5mm)
7/8"
(22.2mm)
1 25/32"
(45mm)
PANEL CUT OUT
.080" max. (2.0mm)
1/4" (6.4mm)
20 Ga. Wire
Fig. 4.2 Mounting Diagram
Fig. 4.1 Lead Termination
Controls are supplied with mounting clamp and mounting screws.
Release the mounting clamp by depressing the ends of the clamp together.
The mounting screws are to be used in applications that require
NEMA 4X rating.
WARNING!
WARNING!
WARNING!
!

Power Wiring:
Connect terminals as shown in Figure 4.3. The power
switch S1 and Fuse F1 are included for illustrative
purpose only. Refer to Figures 4.4, 4.5, 4.6, 4.7 on the
following pages for sample wiring diagrams.
Input Wiring:
Connect the appropriate sensor to terminals 8, 9, 10, 11
or 12 as illustrated in Figure 4.3. Verify that the instru-
ment is selected for the correct sensor and the correct
polarity is observed at both the sensor-end and instru-
ment-end of the cable. Do not run sensor cables in the
same conduit or wiring trough as the power lines,
because the low level signal is noise sensitive.
When wiring the thermocouple, check the thermocouple
and extension wire (compensating cable) to make sure
they conform to the appropriate thermocouple type
specified by the instrument. Extension wires must be
the same alloy and polarity as the thermocouple. The
total lead resistance should not exceed 100 ohms for
accurate measurements. One hundred ohms of lead
resistance will introduce a 1°F (0.5°C ) error.
For wiring 3 wire RTD (Resistance Temperature
Detector) all leads connecting the RTD to the controller
must be the same gauge and material. If the RTD is a
3 wire device, install the two common wires of the RTD
to terminals 10 and 11. If a 2 wire RTD is to be used,
install a jumper between terminals 10 and 11.
See page 21 for instructions to re-range the input to
volts, milli-volts or milli-amps.
1234567
8910
11 12 13 14
+
–
RTD
AB
B
PTA TC–
MV–COM+ mA–
V–
+
–MV
90-264
VAC
50/60Hz
ALARM/COOLING
OUTPUT
Power
Input:
S1
F1
Current
+
+
–
–
VPulsed
Voltage
20-32/VDC/VAC
Optional
CONTROL
OUTPUT
Current
+
+
–
–
VPulsed
Voltage
TX1 TX2
0 -20mA
4 - 20mA
OPTIONAL
RS-485
INTERFACE
OR
0 - 10V
UNIVERSAL INPUT
Relay or Triac
Relay
N/O N/O
CC
LN
THERMOCOUPLE RETRANSMISSION
OUTPUT.
Refer to page 21 for
instructions.
Figure 4.3 Rear Terminal Connections
Thermocouple Cable American British German French
Type Material ANSI BS DIN NFE
1843 43710 18001
JIron/Constantan + white
- red
* black
+ yellow
- blue
* black
+ red
- blue
* blue
+ yellow
- black
* black
KChromel/Alumel + yellow
- red
* yellow
+ brown
- black
* red
+ red
- green
* green
+ yellow
- purple
* yellow
TCopper/
Constantan
+ white
- blue
* blue
+ blue
- red
* blue
+ red
- brown
* brown
+ yellow
- black
* black
R
SPlatinum/Rhodium + white
- blue
* green
+ black
- red
* green
+ red
- white
* white
+ yellow
- green
* green
BPlatinum/Rhodium + grey
- red
* grey
+ red
- grey
* grey
Table 4.1 International Thermocouple Cable Color Codes
* Color of overall sheath Chromel®and Alumel®are registered trademarks of Hoskins Mfg. Co.

(Red) –
+
T/C
1234567
8910
11 12 13 14
OUT 1
Load
3 Amp/240VAC
Max. for Relay
1A for Triac
Power Input
Hot
Fuse
Neutral
BB
A
910 11
Three-Wire RTD
Connections
Standard to All Models
(Red) –
+
T/C
1234567
8910
11 12 13 14
OUT 1
Power Input
ALM 1
Load & Alarm/Cooling
3A/240VAC
Max. for Relay
1A for Triac
Hot
Fuse Neutral
Figure 4.4
Example of wiring connections for
ETR-3200-1211 Single Relay Output
No Alarm or Cooling
Figure 4.5
Example of wiring connections for
ETR-3200-1221 Heating Output
with Alarm/Cooling
Typical Wiring Diagrams
CAUTION
SHOCK
HAZARD

(Red) –
+
T/C
1234567
8910
11 12 13 14
OUT 1
Power Input
+
–
ALM 1
Alarm/Cooling
Output
3A/240VAC max
12
3
4+
Solid State
Relay
Load
N
L
Heater Power
Hot
Fuse Heater
Fuse
This diagram can also be used
for controls with 4-20mA output.
(Red) –
+
T/C
1234567
8910
11 12 13 14
OUT 1
Power Input
ALM 1
o
oo
o
o
o
o
o
o
Coil
Three Phase
Heaters
Heater
Fuses
Three
Phase
Power
Fuse
Alarm/Cooling Output
3 A/240VAC max
Hot
Neutral
Three Pole
Magnetic
Contactor
Figure 4.6
Example of wiring connections for
ETR-3200-1321
SSR Output with Alarm
Figure 4.7
Example of wiring connections for
ETR-3200-1221 with three phase Delta
Heater Load and Alarm/Cooling
NOTE: The use of motor starters in place of
magnetic contactors should be avoided. They
have very large inductive loads that can
damage the controller’s relay.

Output Wiring:
Five different types of output devices can be used from
output one. Relay, Triac, current, voltage and pulsed
voltage provide a variety of control applications, Verify
that the output device is correctly selected to meet your
application requirements and make certain the ratings
of the output devices are not exceeded before wiring
the system.
The external connections depend on what type of
output is installed. Pulsed voltage output is not
isolated from the internal circuits of the instrument.
Sensor Placement
Proper sensor placement can eliminate many problems
in a control system. The probe should be placed so
that it can detect any temperature change with minimal
thermal lag. In a process that requires fairly constant
heat output, the probe should be placed close to the
heater. In processes where the heat demand is
variable, the probe should be closer to the work area.
Some experimenting with probe location is often
required to find this optimum position.
In a liquid process, addition of a stirrer will help to
eliminate thermal lag. Since the thermocouple is
basically a point measuring device, placing more than
one thermocouple in parallel will provide an average
temperature reading and produce better results in most
air heated processes.
Proper sensor type is also a very important factor in
obtaining precise measurements. The sensor must
have the correct temperature range to meet the
process requirements. In special processes the sensor
might have to have different requirements such as
leak-proof, anti-vibration, antiseptic, etc.
Standard thermocouple sensor limits of error are ± 4
degrees F (±2 degrees C) or 0.75% of sensed temper-
ature (half that for special) plus drift caused by improp-
er protection or over-temperature occurance. This
error is far greater than controller error and cannot be
corrected at the sensor except by proper selection and
replacement.
When installation has been completed, the clear protective
film can be removed from the faceplate.
(Red) –
+
T/C
1234567
8910
11 12 13 14
OUT 1
Load
3 Amp Max
Power Input
90-264VAC 50/60Hz
Hot
Fuse Neutral
ALM 1
Figure 4.8
ETR-3200-1221
Ramp and Soak
CAUTION
SHOCK
HAZARD

TOUCHKEYS FUNCTION DESCRIPTION
Scroll Key Advances the display to the desired parameter.
Parameters advance continuously and cyclically by pressing this key.
The value of the parameter will be displayed after 2 seconds.
Up Key 1. Increases the value of a numerical parameter.
2. Selects a desired item in the engineering level.
Down Key 1. Decreases the value of a numerical parameter.
2. Selects a desired item in the engineering level.
To change the set point or another parameter, tap the or key quickly. This will brighten the individual digit
of the display. Once the desired digit is brighter, simply hold down the or key to increase or decrease the
value.
Press Long Scroll/ 1. Selects the parameters in higher security level.
for 4 Enter Key 2. Actuates the selected program when in engineering level.
seconds.
Reverse Scroll/ 1. Selects the parameters in a reverse direction during parameter
Press and Calibration scrolling.
Verification Key 2. Verifies the display accuracy for various input types during
calibration.
Press and Disables keypad operation to protect all parameters from being
for 4 Lock Key tampered with.
seconds.
Press and Engineering
Selects the Engineering level. Scrolls through the Engineering Programs.
Level Key
1. Resets the control to its normal status.
Press and Reset (Exit) Key 2. Unlocks keypad operation.
Unlock Key 3. Exits the engineering level program.
4. Stops the Autotuning function.
Press and
for 4 Autotune Key Starts the Autotune function. Note description on Page 16.
seconds.
ETR-3200 TOUCH KEY DESCRIPTIONS:
To move from one level of parameters to
another. Scroll to the end of the level. Hold
down the key, the display will flash, once
the display stops flashing, release the key.
To return from any parameter to the process
and set point values, press the and
keys simultaneously.
Section 5: OPERATION
Table 5.1 Keypad Operation
SET POINT/PROCESS PARAMETER DISPLAY
CONTROL
OUTPUT
INDICATOR SCROLL KEY UP KEY DOWN KEY
ALARM/
COOLING
INDICATOR

PROCESS VALUE
SET POINT VALUE
Security
Level 2
Security
Level 1
Security
Level 0
Hold until display
stops strobing (4 seconds)
Hold until display
stops strobing (4 seconds)
Table 5.2 Control Function
and Display Flow Chart
(OPERATOR LEVEL)
Engineering Level can be entered
at any time by pressing the
and keys.
NOTE: Control will return to Process
Value in 25 seconds if no entry is made.
Short Scroll returns
to PV/SV
Short Scroll advances step by step
through parameters in forward direction
Short Scroll advances step by step
through parameters in forward direction
Short Scroll advances step by
step through parameters in
forward direction
Short Scroll returns to PV/SV
(See page 13.)
Short Scroll returns to PV/SV
Views parameters step by step
in reverse order
Exits parameters and returns
to process and set point values.
1) 3200/ /Software Version
displayed for 4 seconds.
2) LED check/all LED segments
lit for 4 seconds
POWER APPLIED:
Views parameters step
by step in reverse order

Security
Levels Display Code: Description: Adjusting Range:
Set point Value of Control
Alarm 1 Set Point Value. Dwell Time
Ramp Rate
Offset Value for Manual Reset
(Integral Time TI = 0)
Display Shift
Proportional Band of Output 1
Integral (Reset) Time of Output 1
Derivitive (Rate) Time of Output 1
Hysteresis of Alarm 1
Hysteresis of ON-OFF control
Low Scale of Range. Adjust for
your process
High Scale of Range. Adjust for
your process
Power Limit of Output 1
Power Limit of Output 2
Input Type Selection
Display Units
Resolution
Control Action of Output 1
Alarm 1 Mode
Alarm 1 Special Function
Proportional Cycle Time of Output 1
Cooling Cycle Time
Cooling P Band
Dead Band for pB and CPB
Low scale to high scale value. ( , ).
Trip Point within High/Low scale or 0 - 9999 minutes (for Dwell Time)
0 - 99.99°F/minute (0 - 55.55°C/minute)
0 - 100%
Only functional if Integral is set to 0.
-199°to 199°F (-111 - 111°C) (Refer to page 20)
0 - 360°F (0-200.0 °C)
O: for ON-OFF control (Refer to Page 16)
0 - 3600 seconds
0 - 1000 seconds
0 - 19°F (0 - 11 °C)
0 - 19°F (1 - 11 °C)
0 - 40
Minimum value for the selected Input (INPT) to High Scale (HISC)
Low Scale (LOSC) to maximum value for the selected Input (INPT)
0 - 100%
0 - 100%
= J Type T/C
= E Type T/C
= S Type T/C
= PT100 JIS
0 - 1V = 1 - 5V
= K Type T/C
= B Type T/C
= N Type T/C
= 4-20 mA
= 0-5V
T Type T/C
R Type T/C
PT100 DIN
= 0-20 mA
0 - 10V
= degree C = degree F = process units (Engineering Units)
= No decimal point used
= 2 Digit decimal (only for Linear Voltage or Current Input)
= 1 Digit decimal
= Direct (Cooling) Action = Reverse (Heating) Action
0
= Deviation High Alarm
= Deviation Band High Alarm
= Full Scale High Alarm
= Deviation Low Alarm
= Deviation Band Low Alarm
= Full Scale Low Alrm
= No Special Function
= Alarm with Hold Function
= Dwell Timer ON as Time Out
= Alarm with Latch Function
= Alarm with Latch & Hold Function
= Dwell Timer OFF as Time Out
0 - 99 Seconds, 0 for Linear current/voltage output
0 - 360°F (0 - 200°C)
-199 - 199°F (-111 - 111°C)
1
2
Default
Setting:
18°F
(10°C)
0.00
0.0
18°F
(10.0°C)
120
40
0
0
0
100%
100%
20
For Relay Output
20
For Relay Output
0
=or /Minutes
0
0
999
18°F
(10.0°C)
212
Interface Address
= Proportional Cooling
Press the or key to display set point.
Table 5.3 Index Code (Menu) Descriptions (OPERATOR LEVEL)
Long Scroll For convenience, parameters can be recorded on the next page.
NOTE: Further parameter definitions on page 15.

SET POINT VALUE
ALARM SET POINT 1
RAMP RATE
OFFSET
DISPLAY SHIFT
PROPORTIONAL BAND/HEAT
INTEGRAL TIME
DERIVATIVE TIME
HYSTERESIS ALARM 1
HYSTERESIS ON/OFF
ADDRESS
LOW LIMIT OF RANGE
HIGH LIMIT OF RANGE
POWER LIMIT OUTPUT 1
POWER LIMIT OUTPUT 2
INPUT TYPE
UNIT TYPE
RESOLUTION
CONTROL ACTION
ALARM MODE 1
ALARM 1 SPECIAL FUNCTION
PROPORTIONAL CYCLE TIME
COOLING CYCLE TIME
COOLING PROPORTIONAL BAND
DEADBAND
CONTROL
NO.
PARAMETER
DATE
Table 5.4 Parameter Record Sheet (OPERATOR LEVEL)
Long Scroll

Table 5.5 Engineering Level
The engineering level can be entered at any time by
pressing the keys. This level contains six
parameters for control configuration and options. The
parameters are defined as:
Manual Mode (hand control) –This feature is used if
the sensor fails. The control can now be used as an
on-off proportional timer to control the load until a new
sensor can be installed. The setting for heating or cool-
ing is 0 - 100% of the proportional cycle time.
Peak Process Values –The minimum and maximum
peak values of the process are indicated here.
Calibrate A-D Converter –This parameter is used
during the calibration procedure.
Fail Safe –This defines the status of the outputs if the
sensor fails.
Lock Parameters –Levels 0, 1 or 2 in the operators
level can be locked-out to prevent unauthorized
tampering.
Configuration Level –This feature allows parameters
to change levels (0, 1 or 2) in the operators level. The
purpose of this is to allow only selected parameters to
be adjustable and all the others to be locked-out. For
example, if only the set point is to remain un-locked, all
the other parameters in level 0 can be moved to level 1.
Then lock out level 1 and 2.
Press the keys to exit the engineering level.
Manual Mode
(hand control).
Used if
sensor fails.
Peak Process
Value. Stored
minimum and
maximum values.
Calibrate
A-D Converter
Indicates the percentage
power of output 1. (Heating)
Long
Long
Indicates the percentage
power of output 2. (Cooling)
or
Indicates the maximum (peak) process value.
Indicates the minimum (peak) process value.
or
or
or
Adjusts the Cold junction compensation code.
(Range -19.9 to 42.7)
Adjusts the Drift compensation code.
(Range -6.6 to 6.6)
The percentage of on-time for output 1 can be
adjusted by using the keys. Range: 0 - 100%
(Not functional with ETR-3200)
Long
Long Resets the maximum process value.
Resets the minimum process value.
Long
Long
Long
Calibrate the A-D converter and enter
the Cold-Junction compensation code.
Calibrate the 0 4-20mA and enter it.
Enter the drift compensation code
(Also note the calibration procedure on page 22.)
(Continued on next page)

(Engineering Level continued)
Parameter levels can be
locked-out to prevent
unauthorized tampering.
Configure
Security levels
(Parameters can be
moved from one
level to another)
: Security LEVEL.
: Places the parameter
in LEVEL 0.
: Places the parameter
in LEVEL 1.
: Places the parameter
in LEVEL 2.
= 0
= 1
= 2
FAIL SAFE
Long
Long
Long
Long
or
or
or
or
Select the status for Output 1.
: Output 1 ON * : Output 1 OFF
or
or
or
or
or
Changes the value of security level of the
selected parameter.
Changes the value of security level of the
selected parameter.
Displays the rest of the
parameters according
to the standard sequence.
Changes the value of security level of the
selected parameter.
Enters the selection.
or
Enters the updated security
level of ASP1.
Enters the updated security
level of RAMP.
Enters the updated security
level of DB.
Defines the status of the
outputs if the sensor fails.
Select the status for Alarm 1.
* : Alarm 1 ON : Alarm 1 OFF
Select the status for Alarm 2.
* : Alarm 2 ON : Alarm 2 OFF
Select the status for Output 2.
* : Output 2 ON : Output 2 OFF
Select Lock or Free for operator Security Level 0.
Locks all the level 0 parameters.
* : Allows all the Level 0 parameters to be adjustable.
Select Lock or Free for operator Security Level 1.
: Locks all the level 1 parameters.
* : Allows all the Level 1 parameters to be adjustable.
Select Lock or Free for operator Security Level 2.
: Locks all the level 2 parameters.
* : Allows all the Level 2 parameters to be adjustable.
Long
Long
Long
*Default Setting
(Not functional with ETR-3200)
Enters the selection.
Long
Long
Long
Press the keys to exit the engineering level.

Operator Level Parameter Definitions:
PV - Process Value This is the temperature (or other
process variable) as measured at the sensor. This will
indicate a value within the range between the low scale
(Lo.SC) and high scale value (hi.SC). This indication
will read an error code if the temperature (process
variable) goes out of the preset span. Note items 6 and
7 of the troubleshooting guide on page 24 for the error
code descriptions.
SV - Set Point Value This parameter is the desired set
point of the process. It can be adjusted within the
range defined by the low scale (Lo.SC) and high scale
value (hi.SC). The span adjustments can be used to
limit the set point of the controller.
ASP1 - Alarm 1 Set Point Value or Dwell Time This
sets the points at which alarm 1 will energize if A1.SF
(alarm 1 special function) is set for an alarm function.
If A1.SF is selected for the dwell timer function (toon or
toof), then this becomes the timer setting in minutes.
The dwell timer starts counting when the process value
reaches the set point value. Note page 19 for more
information.
rAMP - Ramp Rate This controls the heat-up and
cool-down rate of the process. This setting is in
degrees per minute.
oFSE - Offset Value This parameter is only functional
if the integral time (automatic reset) is set to zero. The
oFSE then functions the same as manual reset to
correct the process temperature to the set point temper-
ature. If the process temperature stabilizes below the
set point, then set a positive amount of oFSE. If the
process temperature stabilizes above the set point, set
a negative amount of oFSE. Wait for the system to
stabilize and make further adjustments as required.
ShiF - Display Shift A value entered here will be
added or subtracted from the process value. This offset
can be used as a correction factor if the sensor does
not read the same temperature as the item being
sensed. Note page 21 for more information.
Pb, Ei and Ed - PID Values Proportional band,
Integral (reset) and Derivative (rate) time constants.
These must be set as close as possible to the process
application requirements. Note page 16 for more infor-
mation.
AhY1 - Hysteresis of Alarm 1 The values entered
here define the deadbands for the alarm. The alarm
will not change state until the temperature is outside of
the deadband.
hySE - Hysteresis of On-Off Control This parameter
defines the deadband when on-off control is used and
PID control has been disabled. For on-off control, set
Pb, Ei and Ed to 0. The output on a relay control will
not change state until the temperature is outside the
deadband. Note page 16 for further information.
Addr - Interface Address For external communica-
tions with a computer or retransmission output setting.
Lo.SC, hi.SC - Low/High Scale Range These
parameters are used to define the range (span) of the
control. These should be set for the requirements and
safety of your process. Refer to Initial operation on
page 16 for further information. If inputs other than
thermocouples or RTDs are required, refer to page 21
for directions.
PL.1, PL.2 - Power Limit These parameters are used
to limit the output percentage of power for heating or
cooling. If the control has relay or pulsed voltage
outputs, then the percentage of “on”time will be
decreased. The actual output levels will be decreased
if the control has linear current (4-20mA) or linear volt-
age outputs.
inPE - Input Type This parameter is used to program
the control to the type of input sensor used.
uniE - Process Units This parameter is used to set
the display in degrees F, C or blank for engineering
units.
rESo - Display Resolution This parameter is used to
place a decimal point in the process and set point
values. A two-place decimal point can only be set if the
uniE adjustment is set to engineering units (PU).
Con.A - Control Action of Output 1 This parameter
selects heating (reverse) or cooling (direct) action for
output 1.
A1.Md - Alarm Mode Selection for Alarm 1 and This
adjustment sets the type of alarm required: deviation
alarm, band alarm or process alarm. Refer to page 19
for more information.
A1.SF - Alarm 1 Special Function This selects
special functions required for use with alarm 1. The
special functions include latching alarms, hold
(inhibited) function or dwell timer function. Refer to
page 19 for more information on alarms.
CyC - Proportional Cycle Time of Output 1 This sets
the proportional cycle time for output 1. This should be
set according to the type of output device used. For
mechanical relays, cycle times of 15 to 20 seconds are
used. For solid-state relays, set this adjustment to 1 or
0. For 4-20mA or other linear outputs set this to 0.
CCyC - Cooling Cycle Time Only used if A1.SF
(alarm 2 special function) has been set for cooling. Use
the same settings as the above paragraph.
C.Pb, d-b Cooling Proportional Band, Cooling
Deadband Only used if A1.SF (alarm 1 special
function) has been set for cooling. Refer to page 21 for
further information on the settings to be used for cooling
output.

Initial Operation:
When the control has been wired you can apply power.
The display should indicate 2220, software version and
LED lamp illumination test. The temperature (or other
process variable) as measured at the sensor should be
indicated by the PV display. The thermocouple is wired
in reverse if the indicated temperature decreases as the
temperature at the thermocouple increases. While
making initial settings to configure the control, the set
point should be lowered to a value (eg. 30°F) to assure
the heaters will not be energized. This will allow time to
make any adjustments of the parameters in the opera-
tors or engineering level.
During this initial set-up, alarm points and other settings
can be made. The low limit and high limit range set-
tings (Lo.SC) and (hi.SC) should be adjusted to your
process. This sets the range (span) of the control. The
set point cannot be adjusted out of this range.
Generally, for plastics processing and packaging, a
span of 0 - 800°F is common. If oils are used, a lower
span such as 0 -300°F should be entered.
When the configuration settings have been made, you
can return to the PV/SV level. Adjust the required
process set point. The red “out”lamp should illuminate,
indicating the heaters have been powered.
Autotuning:
The autotune function “teaches”the controller the main
characteristics of the process. It “learns”by cycling the
output on and off. The process will oscillate around the
set point during autotuning. Note the diagram below:
Adjust the set point to a lower value if overshoot
beyond the normal process value may cause damage.
The results are measured and used to calculate the
optimum PID values. It should not have to be repeated
on the same process. The autotune function starts by
depressing the and keys for 4 seconds; then
release. The process value display will flash on and off
indicating the control is in the autotune mode. No other
adjustments can be made to the system while the con-
trol is autotuning. The control will finish autotuning by
itself and the correct PID values will be entered into the
control’s memory.
Autotuning will not function if the control has been con-
figured from PID to ON-OFF. For electric heating PID is
usually recommended.
Autotuning may not give satisfactory results and hold a
close temperature on all applications. If this occurs,
you can change the PID values manually using the
three charts in Figure 5.2 on the top of the next page
for a guide. It is recommended to change only one
parameter at a time, so the results of that change can
be clearly noted.
Adjusting PID Parameters:
The PID parameters can be reviewed by operating the
scroll key and noting whether the values are reasonable
or not. Examine the controller’s result. Modify the PID
values until the control quality is acceptable.
ON-OFF Control:
On-off control action is recommended when continuous
cycling of the load cannot be used. Examples are
mechanical solenoids, large contactors and valves. For
on-off control, set the following parameters to zero:
proportional band; integral; derivative and offset (oFSE).
The hysteresis (hySE) adjustment is now used to set
the deadband. The larger the hysteresis is set, the
larger the deadband will be. A large deadband will
cause the contactor (or other device) to switch less
often, but the process will oscillate farther from the set
point. This setting is measured in degrees.
Initial Period
Process Oscillates Verifying period
PID Control Smarter Logic + PID
Set Point
Value PB, TI, TD
Obtained
Autotune Finished
oFSE Value
Obtained
TEMPERATURE
TIME
Process
Value
Figure 5.1 Autotuning

The proportional band ( ) adjustment is a percentage of
SPAN or RANGE value.
Integral action (automatic reset) corrects for offset (load
error) for load variations. Reset wind-up inhibition prevents
integral action from occurring outside of the proportional
band. Software antisaturation minimizes process oscilla-
tions when the load changes.
Derivative action is adjusted to match the response time of
the process and to compensate the integral action.
Correct adjustment provides power output compensation
for process load variations. It also minimizes overshoot
and oscillations at start up or in large process upsets.
Refer to Figure 5.1 for additional adjustment instructions.
Manual Tuning Procedures:
For some systems it is difficult to execute automatic tuning
or the automatic tuning results are not satisfactory. The
following steps can then be used for initial tuning of a
three-mode control:
Step 1: Adjust the integral and derivative values to 0. This
inhibits the rate and reset action.
Step 2: Set an arbitrary value of proportional band and
monitor the control results.
Step 3: If the original setting introduces a large process
oscillation then gradually increase the proportional
band until the oscillation disappears.
Step 4: If the original setting does not introduce process
oscillations then gradually decrease the propor-
tional band until steady cycling is observed.
Record this important proportional band percent-
age (Pc).
Step 5: Time the period of steady cycling. Record this crit-
ical period Tc. The PID parameters are deter-
mined as:
This method was developed by Ziegler and Nichols.
If you are unfamiliar with tuning PID Controllers, we sug-
gest that you obtain and become familiar with the following
reference material:
Tuning of Indusrial Control Systems
by A.R. Corripio ISBA: 1-55617-253-20. Available from:
ISA Publications and Training Aids, Phone: 919-549-8411.
This method should be performed with a temperature
chart recorder.
Fig. 5.2 Steady State Cycling TIME
PV (Process value)
PV
Tc
P Band (Pb) = 1.7 Pc
Integral Time (ti) = Tc
Derivative Time (td) = 0.125 Tc
PV
UPPER PB
SET POINT
LOWER PB
PI PID
PD P
OFFSET PROPORTIONAL
BAND
TIME
Perfect
Proportional Band Too Low
Proportional Band Too High
SP
PV
TIME
PROPORTIONAL ACTION
Derivative Too High
Perfect
Derivative Too Low
TIME
SP
PV
DERIVATIVE ACTION
INTEGRAL ACTION
PV
SP
Integral Too High (Too long for recovery)
Perfect
Integral Too Low
TIME
FIG 5.1 Effects of PID Adjustment on Process Response
Fig. 5.3 Response of a Typical Control System Using Various Modes of Control
The proportional band (Pb) is a temperature band
expressed in degrees. When the process temperature is
within this band, the time proportioning function is
active.
TEMPERATURE
Intergal action (automatic reset) corrects for offset (load
error) for load variations. Anti-reset wind-up inhibition
prevents integral action from occuring outside of the pro-
portinal band. Software antisaturation minimizes process
oscillation when the load changes
Fig. 5.3 Steady State Cycling
Fig. 5.4 Response of a Typical Control Ststem Using Various Modes of Control
Fig. 5.2 Effects of PID Adjustment of Process Response
This method was developed by Ziegler and Nichols.
If you are unfamiliar with tuning PID Controllers, we sug-
gest that you obtain and become familiar with the following
reference material: Tuning of Industrial Control Systems
by A.R. Corripio ISBN: 1-55617-253-2-Q. Available from:
ISA Publications and Training Aids, Phone: 919-549-8411.
This method should be performed with a temperature chart
recorder.

PID Control
For various applications the controller can be used as P
control only (set integral = 0, derivative = 0); PI control (set
derivative = 0), PD control (set integral = 0), and PID
control.
Figure 5.4, on page 17, represents the response of a
typical control system using various modes of control.
1.) P control results in a response showing a deviation
(offset), a high overshoot and a moderate period of
oscillation. In addition, a significant length of time is
required before the system ceases to oscillate.
2.) PI control has no offset, but elimination of offset comes
at the expense of higher overshoot, larger period of
oscillation and a longer time required for oscillations to
cease compared with other modes of control.
3.) PD control generally brings the system to steady state
in the shortest time with the least oscillation. However,
it still has offset.
4.) PID control is essentially a compromise between the
advantages of PI and PD control. Offset is eliminated
by the integral action. The derivative action serves to
lower offshoot and to eliminate some of the oscillations
realized with PI control.
Ramp and Soak Function:
The ETR-3200 can be programmed as a two segment
ramp and soak control. The ramp rate, in degrees per
minute, is determined by the ““setting. The soak
function is accomplished by configuring alarm 1 relay as a
timer. The heater (or contactor coil) must be wired in
series through the alarm 1 relay and the “out 1”relay.
Refer to wiring diagram figure 4.8 on page 8. To use this
feature, set A1.SF (alarm 1 special function) to . Set
the soak period at ASP1 (alarm 1 set point). The alarm
relay will be closed at start-up. It will remain closed until
the process temperature has remained at the set point
temperature for the time period (minutes) set in ASP1.
Note the following example: The ramp rate is set to 20
(degrees per minute), A1.SF is set to and ASP1 to
30 (minutes). When the control is powered, the process
will climb at 20 degrees per minute to the set point of
475°F. Once the set point temperature has been reached,
the soak timer begins counting. After a time period of 30
minutes has elapsed, the alarm relay 1 will open and the
process temperature falls at an uncontrolled rate. This
process will repeat every time power has been switched
off and on to the controller. Note diagram 1 below.
Single Event (Dwell) Function:
The single event (dwell) function may be used to control
external devices such as lights, bells or locks. It could
also be used to alert the operator when a guaranteed
soak time has been reached. To use this feature, set
ASP1 (alarm 1 set point) to the time period (in minutes) of
the timer. Set A1.SF (alarm 1 special function) to .
The alarm relay will now operate as a timer. The alarm
relay will be open at start-up. Once the set point tempera-
ture has been reached and the time period set in ASP1
has elapsed, the alarm relay will close. This relay will
remain closed until power to the control has been discon-
nected. The cycle will repeat each time the control has
been energized. Other features such as ramp rate can
also be used. Note diagram 2 below. The set point is
175°F and the dwell time has been set to 30 minutes.
Table 5.6 Tuning Guide
ADJUSTMENT SEQUENCE: SYMPTOM: SOLUTION:
1.) Proportional Band Slow Response Decrease P Band (Pb)
High Overshoot or Oscillations Increase P Band (Pb)
2.) Integral Time (Reset) Slow Response Increase Reset (i.e. Decrease Integral Time)
Instability or Oscillations Decrease Reset (i.e. Increase Integral Time)
3.) Derivative Time (Rate) Slow Response or Oscillations Decrease Rate (i.e. Decrease Derivative Time)
High Overshoot Increase Rate (i.e. Increase Derivative Time)
475
400
300
100
75
020 40 60 80 90
°F
30 Minutes
Alarm Relay
OFF
TIME/Minutes
10 30 50 70
ON
Process Value
= 20
=
200
SET POINT = 475°F175
150
125
100
75
020 40 60 80 90
°F
30 Minutes Alarm Relay
OFF
TIME/Minutes
10 30 50 70
ON
Process Value
Set point
=
Diagram 1: Ramp and Soak Diagram 2: Single Event

SV + ASP1
DEVIATION
HIGH ALARM DEVIATION
LOW ALARM
SV
DEVIATION
IN-BAND
ALARM
DEVIATION
OUT-BAND
ALARM
PROCESS
LOW ALARM PROCESS
HIGH ALARM
SV - ASP1
SV + ASP1
SV - ASP1
SV - ASP1
SV
SV SV
SV + ASP1
ASP1
ASP1
Alarm Modes:
There is one independent alarm available. The alarm modes are selected by designating the alarm types with the
parameter: . The alarm special functions ( )can be implemented together with the mode that is
selected.
•Latch Alarm: A1.SF =
When the latch mode is selected, the alarm will
stay active until the power is reset.
•Inhibited Alarm: A1.SF =
This mode prevents an alarm at start up. The alarm
is enabled only when the Process Value reaches the
Set Point (SV).
•Latch and Inhibited Alarm: A1.SF =
When selected, the alarm will stay active until the
power is reset. The alarm mode is only enabled
when the Process Value reached the Set Point Value
(SV).
•Cooling: A1.SF =
Alarm 2 can be designated as a cooling output if
heating and cooling operation is desired.
•Hysteresis (AHY1)
EXAMPLE: No special function used with (SV)
Deviation High Alarm.
SV = 100°F ASPI = 10°F AHY1 = 4°F
: Alarm ON SV = SETPOINT VALUE
= Alarm 1 Set Point
•ALARM SPECIAL FUNCTIONS: A1.SF
SV + ASP1 = 100°F
112°F
108°F
= Alarm 1 Mode
•Alarm Set Point Ranges
–Low scale High scale (Full scale Alarms)
–-199 - 199°F (-111 - 111°C) Deviation alarms
–0-9999 minutes for (A1.SF = toon or toof) Dwell
Time
Table of contents
Other Ogden Controllers manuals
Popular Controllers manuals by other brands

Sentera
Sentera SDX-DM Mounting and operating instructions

SDC
SDC EntryCheck 923 installation instructions

Johnson Controls
Johnson Controls TEC3620 Series Installation & operation manual

Omron
Omron C20H installation guide

ETI
ETI PFC6DA TECHNICAL MANUAL OF INSTALLATION

Varian
Varian Turbo-V 150 PCB instruction manual