Oh!FX TC-106 Instruction manual

1 CHANNEL DMX DIMMER
QUICK USER GUIDE / MANUAL DE INSTRUCCIONES
REF: TC-106

INSTRUCTION MANUAL
1 CHANNEL DMX DIMMER
The 1 CHANNEL DMX DIMMER is a regulator of current intensity controlled by DMX
for the control of machines or dimmable light eff ects. / El 1 CHANNEL DMX DIMMER
es un regulador de intensidad de corriente controlado por DMX destinado a controlar
máquinas de efectos o luces dimerizables.
Weight / Peso: 2.05 Kg.
Dimensions / Dimensiones: 13,70 x 17,30 x 10,70 cm
Power / Alimentación: 110-230 V. 50-60 Hz
Maximum admissible load: / Carga máxima admitida: 20A of resistive load / 15A of inductive
load
1. Power Input (power In) / Entrada de corriente (powercon)
2. Link current / Link corriente
3. Power Output (power Out) / Salida de corriente (power out)
4. DMX input / Entradas DMX
5. DMX output / Salidas DMX
6. Thermic Protector / Protector térmico
7. On/Off switch / Interruptor de encendido
8. Led power indicator / Led indicador de encendido
9. Led indicator for DMX signal / Led indicador de señal DMX
10. Mode button / Botón de función
11. Operating channel of DMX / Canal operativo de DMX
TECHNICAL SPECIFICATIONS / ESPECIFICACIONES TÉCNICAS

INSTRUCTION MANUAL
1 CHANNEL DMX DIMMER
SETUP AND OPERATION / MONTAJE Y OPERATIVA
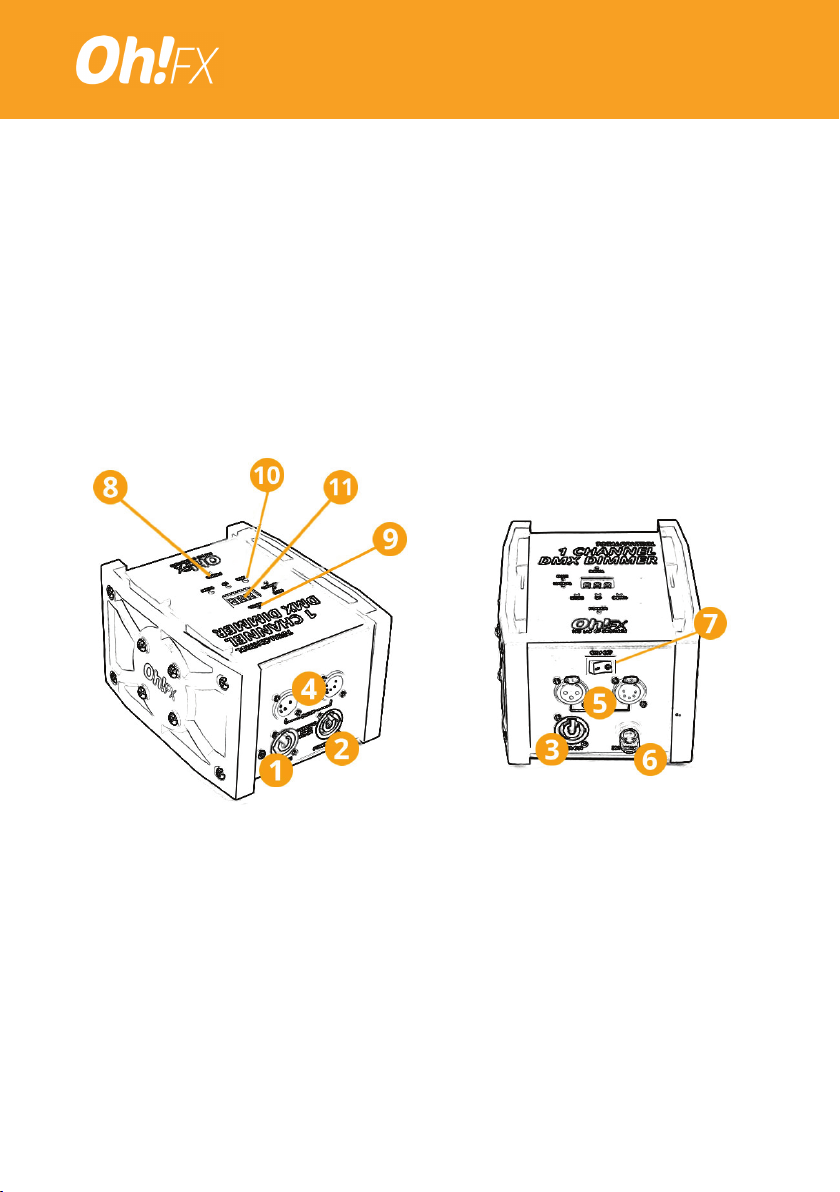
1. Place the 1 CHANNEL DMX DIMMER on a fl at and stable surface. Connect the power supply
cable (not included) using the POWER IN input connector (1). Make sure that the power cable
supports the power of the FX machine/s you want to control.
2. Make sure that the power switch (7) is in OFF position.
3. Connect the device (s) you want to control to the POWER OUT connector (3). The 1 CHANNEL
DMX DIMMER supports up to 20A of resistive load, or 15A of inductive load.
4. Connect the DMX cable to the DMX IN connector (4). You can use either of the 3-pin or 5-pin
DMX IN connectors according to your needs.
5. You can connect other machines and DMX devices using the DMX OUT connector (5).
6. Switch on (7) the 1 CHANNEL DMX DIMMER.
7. If the 1 CHANNEL DMX DIMMER is receiving DMX signal, the signal led (9) will light up.
8. Assign the OPERATING DMX channel (11) using the buttons “UP” and “DOWN”. Make sure that
the channel selected is free.
9. Now, control the FX machine using your DMX controller.
10. The 1 CHANNEL DMX DIMMER can also be used manually,that is, without DMX signal. Press the
MODE button (10). the “DMX “ led will turn off , and the “MANUAL” led will turn on. Use then “UP”
and “DOWN” buttons to assign the dimerization of the machine.
1. Coloque el 1 CHANNEL DMX DIMMER en una superfi cie llana y estable. Conecte la alimentación
de corriente mediante el conector powercon de entrada (1). Asegúrese de que el cable de
alimentación admite la potencia de la/s máquina/s de FX que quiere controlar.
2. Asegúrese de que el interruptor de encendido (7) está en posición OFF.
3. Conecte el/los dispositivo/s a controlar a la toma de salida de corriente (power out) (3). El 1
CHANNEL DMX DIMMER soporta hasta 20A de carga resistiva o 15A de carga inductiva.
4. Conecte el cable DMX a la toma de entrada DMX “DMX IN” (4). Para su comodidad dispone de
una toma DMX de 3 pin y otra de 5 pin.
5. Puede conectar otras máquinas y dispositivos DMX utilizando la toma de salida DMX “DMX
OUT” (5).
6. Encienda el 1 CHANNEL DMX DIMMER (7).
7. Si el 1 CHANNEL DMX DIMMER está recibiendo señal DMX se encenderá el led “SIGNAL”(9).
8. Asigne el canal DMX operativo (11) mediante los botones “UP” y “DOWN”. Asegúrese de que el
canal seleccionado esté libre.
9. Controle la máquina de FX mediante su controlador DMX.
10. El 1 CHANNEL DMX DIMMER también se puede utilizar manualmente, sin señal DMX. Pulse
el botón de modo (10). Se apagará el led “DMX” y se encenderá el led “MANUAL”. Utilice los
botones “UP” y “DOWN” para asignar la dimerización a la máquina.

INSTRUCTION MANUAL
1 CHANNEL DMX DIMMER
DANGER / PELIGRO
WARRANTY / GARANTIA
If you detect a fault on this device, please contact your distributor. Any damage should be repaired
by an authorized technician of Oh!FX. / Si detecta una avería en este dispositivo póngase en contacto
con su distribuidor. Cualquier avería debe ser reparada por un técnico autorizado por Oh!FX.
1. Switch off and disconnect the machines connected to the 1 CHANNEL DMX DIMMER. / Apague
y desconecte las máquinas conectadas al 1 CHANNEL DMX DIMMER.
2. Switch off and disconnect the 1 CHANNEL DMX DIMMER. / Apague y desconecte el 1 CHANNEL
DMX DIMMER.
DISCONNECTION / DESMONTAJE
www.ohfx.eu
This device has warranty of 2 years against manufacturing deff ects. The warranty will not be valid if:
The device has been used for purposes not described in this manual or if has been manipulated
because of improper use. / Éste dispositivo dispone de garantía de 2 años contra defectos de
fabricación. La garantía no será válida si: el dispositivo se ha utilizado para fi nes no descritos en este
manual, si el dispositivo ha sido manipulado, a causa de un uso indebido.
Oh!FX will not be responsible for any accident or damage caused as a result of: failure to comply
with the warnings or instructions set for this device, use for other purposes that are not expressly
indicated in these instructions, manipulation of this device by unauthorized people, insuffi cient
maintenance, improper use of the device. In any case, Oh!FX will not be responsible for any
consequential loss in the event of a malfunction of this device. / Oh!FX no se responsabilizará por
accidentes y daños que sean resultado de: incumplimiento de las advertencias o instrucciones
establecidas para éste dispositivo, uso para otros fi nes que no estén expresamente indicados en
estas instrucciones, manipulaciones por personas no autorizadas, mantenimiento insufi ciente, uso
indebido del dispositivo. Oh!FX no se responsabilizará de ninguna pérdida consecuencial en caso de
una avería de este dispositivo.
Table of contents