Oh!FX TC-113 User manual

INSTRUCTION MANUAL
MANUAL DE INSTRUCCIONES
1 CHANNEL
CHRONO PUSHER

2
INSTRUCTION MANUAL
REF: TC-113
SIZE: 27,8 X 17,3 X 10,6 cm.
WEIGHT: 2,60 KG.
VOLTAGE IN: 100-230V 50/60Hz
MAX. INPUT LOAD: 20A resistive load / 15A of
inductive load
TECHNICAL SPECIFACTIONS PARTS
1. Power Input (power in)
2. Power indicator led
3. Link current
4. Power Outputs (power Out)
5. Led current output (power out)
6. Safety key
7. Flash button
8. Thermic Protector
9. Shot limiter
10. Limiter editor buttons
11. Enable/Disable button
12. Time counter
13. Total time button
14. Total time mode led
15. Countdown button
16. Countdown mode led
17. Counter editor buttons
18. “Reset” button
1 CHANNEL CHRONO PUSHER
The 1 CHANNEL CHRONO PUSHER is a pushbutton designed to activate FX machines,
especially CO2, as it comes fully equipped with time counters which allow you to control the
CO2 consumption. The 1 CHANNEL CHRONO PUSHER also has a time shot limiter that
allows to control the exact time of each activation.

3
INSTRUCTION MANUAL
1. Place the CHANNEL CHRONO PUSHER on a at and stable surface. Connect the
power supply via the input powercon connector (1). The Power indicator led (2) will turn
on. Make sure the power connector supports the power of the FX Machine(s) you want
to control.
2. Verify the safety key (6) is in OFF position and switch on the device(s) to the power out
connector (4). Ensure the consumption of all the machines which must be activated
at the same time don’t exceed the maximum allowed of 20A resistive load or 15A of
inductive load.
3. Remove the safety key to avoid undesired shootings.
BASIC PUSHER OPERATING
1. Insert the safety key (6) and switch the device on (ON position).
2. Press the ash button (7) to activate the device. During the operation the led current
output (5) will light up.
TIME COUNTER: TOTAL MODE
1. The time counter (12) in total time mode will show you at all time the total time of the
activations you have made. Check the total time mode led (14) is switched on. If not,
press the total time button (13).
2. The display will show you the total time of the activations in “Minutes:seconds:hundredths”
format.
3. If you would like to reset the counter to 00:00:00 press the “reset button” (18).
THE TIME COUNTER: COUNTDOWN MODE
If you know the duration of your CO2 bottle, insert it in the 1 CHANNEL CHRONO PUSHER
and you will know the remaining time of the bottle all along. The time counter (12) in
countdown mode will show you at all time the time left of your CO2 bottle.
1. Verify the countdown mode led (16) is on. On the contrary press the countdown button
(15).
2. To introduce the duration of your CO2 bottle press the counter editor buttons (17).
Each button changes the value of the next digit. The format shown in the screen is
“Minutes:seconds:hundredths”.
3. In each activation the display will show the remaining time and will start ashing when it
reaches at 00:00:00.
4. To reset the counter at the time you have specied press the “reset” button (18).
5. If at any time you click the counter editor buttons (17) again, the 1 CHANNEL CHRONO
PUSHER will take that value as the default time.
SET UP
OPERATION AND OPERATING METHODS

4
INSTRUCTION MANUAL
FREQUENT QUESTIONS (FAQS)
• Do all the CO2 bottles have the same durability?
No. there are dierent sizes, features (ow rate) bottles and there are even suppliers
who are not exact with the charge quantity of the bottles. The duration of the eect is
also inuenced by the CO2 hoses used (length, diameter, leaks…) and also the type
of the jet you have. That’s why the “countdown” mode will be especially useful in xed
installations where the same type of bottles, hoses and machines are used. Empty
completely a full bottle with the 1CH CHRONO PUSHER in “Total” mode to know the
exact duration. Once you have this data, enter it in the “Countdown” mode and you will
know the remaining CO2 time.
• Do I have to program the 1 CHANNEL CHRONO PUSHER every time I start it up?
No. If you switch o or disconnect the 1 CHANNEL CHRONO PUSHER, you will see
when you switch it on again that the settings are the same as the last time.
SHOT LIMITER
The 1 CHANNEL TIMER PUSHER is equipped with a shot limiter which allows you to set a
maximum time for each shot. The shot limiter can be used together with any of the timers.
1. Check that the shot limiter is enabled. If in the limiter display (9) appears “dis”, the shot
limiter is disabled. Press then the enable/Disable button (11) to enable it.
2. Introduce the maximum shot time you would like pressing the limiter edit buttons (10).
Each button changes the value of the next digit. The format shown in the display is
“seconds:hundredths”.
3. From that moment on, the action of the ash button (7) will be limited maximum to the
time you have already introduced.
4. After each activation the limiter resets automatically to the time you have programmed.
5. If you want to disable the limiter again, press the enable/disable button (11) and make
sure that “dis” is shown on the shot limiter screen (9).
CAUTION
• The machine 1 CHANNEL CHRONO PUSHER has been designed for the described
purpose.Any other use will exclude Oh!FX (CONFETTISHOTS SLU) from any responsibility
or warranty.
• Don’t wet or cover the 1 CHANNEL CHRONO PUSHER machine. Use a wet cloth to
clean it and dry it immediately.
• In case of malfunction, do not try to disassemble the machine and contact your dealer.
• Any unauthorized manipulation will invalidate the warranty.
• Only a qualied adult person should operate the machine.

MANUAL DE INSTRUCCIONES
5
MANUAL DE INSTRUCCIONES
REF: TC-113
DIMENSIONES: 27,8 X 17,3 X 10,6 cm.
PESO: 2,60 KG.
ALIMENTACIÓN: 100-230V 50/60Hz
CARGA MÁXIMA ADMITIDA: 20A de carga resistiva /
15A de carga inductiva
ESPECIFICACIONES TÉCNICAS PARTES
1. Toma de entrada de corriente
2. Led indicador de corriente
3. Link corriente
4. Salida de corriente
5. Led salida de corriente
6. Llave de seguridad
7. Pulsador
8. Protector sobre-corriente
9. Limitador de disparo
10. Botones de edición del limitador
11. Botón de deshabilitado
12. Contador de tiempo
13. Botón tiempo total
14. Led modo tiempo total
15. Botón cuenta atrás
16. Led modo cuenta atrás
17. Botones de edición del contador
18. Botón “reset”
1 CHANNEL CHRONO PUSHER
El 1 CHANNEL CHRONO PUSHER es un pulsador destinado a activar máquinas de efectos,
especialmente de CO2, ya que viene equipado con contadores de tiempo que permiten
controlar el consumo de CO2. El 1 CHANNEL CHRONO PUSHER cuenta además de un
limitador de tiempo de disparo con el que conseguirá controlar exactamente el tiempo de
cada activación.

MANUAL DE INSTRUCCIONES
6
1. Coloque el 1 CHANNEL CHRONO PUSHER en una supercie llana y estable. Conecte
la alimentación de corriente mediante el conector powercon de entrada (1). El led
indicador de corriente (2) se encenderá. Asegúrese de que el cable de alimentación
admite la potencia de la/s máquina/s de FX que quiere controlar.
2. Asegúrese de que la llave de seguridad (6) está en posición OFF y conecte el/los
dispositivo/s a controlar a la toma de salida de corriente (power out) (4). Asegúrese que
el consumo de todas las máquinas que tengan que ser activadas al mismo tiempo no
exceden el máximo permitido de 20A de carga resistiva o 15A de carga inductiva.
3. Retire la llave de seguridad para evitar accionamientos no deseados.
OPERATIVA BÁSICA DEL PULSADOR
1. Inserte la llave de seguridad (6) y encienda el dispositivo (posición ON).
2. Accione el dispositivo mediante el pulsador (7). Durante el accionamiento el led de
salida de corriente (5) se iluminará.
CONTADOR DE TIEMPO: MODO TOTAL
El contador de tiempo en modo total le indicará en todo momento el tiempo total de las
activaciones que ha efectuado.
1. Compruebe que el led de modo tiempo total (14) está encendido. En caso contrario
presione el botón tiempo total (13).
2. La pantalla le mostrará el tiempo total de las activaciones en el formato “minutos :
segundos : centésimas”.
3. Si quiere restablecer el contador a 00:00:00 pulse el botón “reset” (18).
CONTADOR DE TIEMPO: MODO CUENTA ATRÁS
Si conoce la duración de su botella de CO2, introdúzcala en el 1 CHANNEL CHRONO
PUSHER y en todo momento conocerá el tiempo restante de disparo. El contador (12) en
modo cuenta atrás le idicará en todo momento la cantidad de CO2 que le queda.
1. Compruebe que el led de modo cuenta atrás (16) está encendido. En caso contrario
presione el botón cuenta atrás (15).
2. Para introducir la duración de su botella de CO2 pulse los botones de edición del
contador (17). Cada botón modica el valor del dígito contiguo. El formato que le
muestra la pantalla es “minutos : segundos : centésimas”.
3. En cada activación la pantalla mostrará el tiempo restante y empezará a parpadear al
llegar a 00:00:00
4. Para restablecer el contador al tiempo que ha denido pulse el botón “reset” (18).
5. Si en cualquier momento vuelve a presionar los botones de edición del contador (17), el
1 CHANNEL CHRONO PUSHER tomará ese valor como tiempo predenido.
MONTAJE
OPERATIVA Y MODOS DE FUNCIONAMIENTO

MANUAL DE INSTRUCCIONES
7
PREGUNTAS FREQUENTES
• ¿Todas las botellas de CO2 tienen la misma duración?
No. Hay botellas de diferentes tamaños, de diferentes prestaciones (caudal) e incluso
hay proveedores que no son exactos con la cantidad de carga de las botellas. En la
duración del efecto también inuyen las mangueras de CO2 utilizadas (largo, diámetro,
fugas, …) y también del tipo de Jet que tenga. Por eso la función “Cuenta atrás” le será
especialmente útil en instalaciones jas en las que siempre se utilice el mismo tipo de
botellas, mangueras y máquinas. Vacíe completamente una botella llena con el 1CH
CHRONO PUSHER en modo “Total” para conocer la duración exacta. Una vez tenga
el dato, introdúzcalo en el modo “Cuenta atrás” y en todo momento sabrá el tiempo
restante de CO2.
• ¿Tengo que programar el 1 CHANNEL CHRONO PUSHER cada vez que lo ponga en
marcha?
No. Si apaga o desconecta el 1 CHANNEL CHRONO PUSHER, comprobará al
encenderlo de nuevo que se mantiene la conguración del último uso.
LIMITADOR DE DISPARO
El 1 CHANNEL TIMER PUSHER viene equipado con un limitador de disparo que le
permitirá establecer un tiempo máximo para cada disparo. El limitador de disparo se puede
usar conjuntamente con cualquiera de los contadores de tiempo.
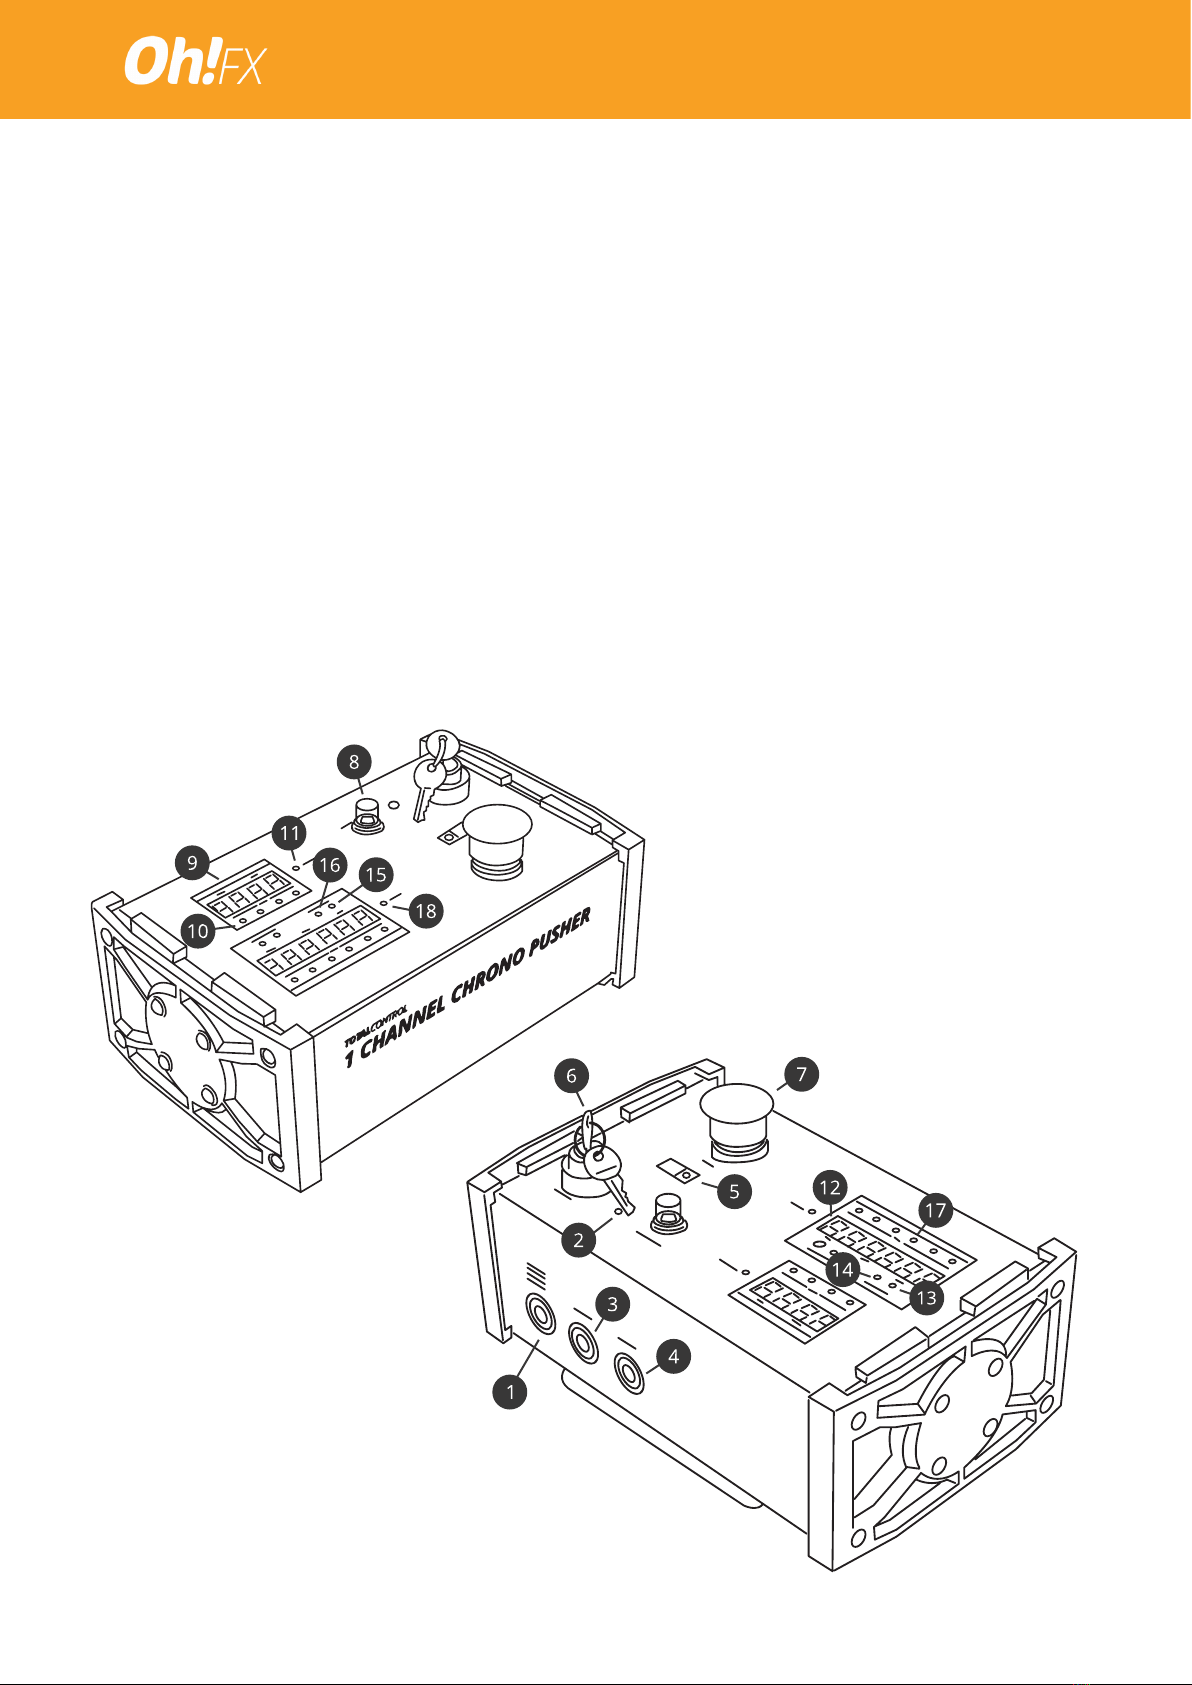
1. Compruebe que el limitador de disparo está habilitado. Si en la pantalla del limitador de
disparo (9) aparece “dis”, el limitador está deshabilitado. Si quiere habilitarlo presione el
botón de deshabilitado (11).
2. Introduzca el tiempo máximo de disparo que desee pulsando los botones de edición
del limitador (10). Cada botón modica el valor del dígito contiguo. El formato que le
muestra la pantalla es “segundos : centésimas”.
3. A partir de ese momento, la acción del pulsador (7) quedará limitada como máximo al
tiempo que haya introducido.
4. Después de cada activación el limitador se restablece automáticamente al tiempo que
haya programado.
5. Si desea deshabilitar de nuevo el limitador vuelva a pulsar el botón de deshabilitado (11)
y asegúrese de que en la pantalla del limitador de disparo (9) aparece “dis”.
PRECAUCIÓN
• La máquina 1 CHANNEL CHRONO PUSHER ha sido diseñada para el efecto descrito.
Cualquier otro uso excluirá a Oh!FX (CONFETTISHOTS SLU) de toda responsabilidad y
garantía.
• No moje ni cubra la máquina 1 CHANNEL CHRONO PUSHER. Para la limpieza de la
misma utilice un paño húmedo y séquela inmediatamente.
• En caso de mal funcionamiento, no intente desmontar la máquina y contacte con su
distribuidor.
• Cualquier manipulación no autorizada invalidará la garantía.
• Solo una persona adulta y cualicada debe manejar la máquina.

www.ohfx.eu
+34 93 8125572 | info@ohfx.eu | www.ohfx.eu | C/ Indústria, 4 | 08592 Sant Marti de Centelles| Barcelona | Spain
Table of contents
Languages:
Other Oh!FX Recording Equipment manuals