Okayo AT-500 User manual

4 10/17 1
AT-500
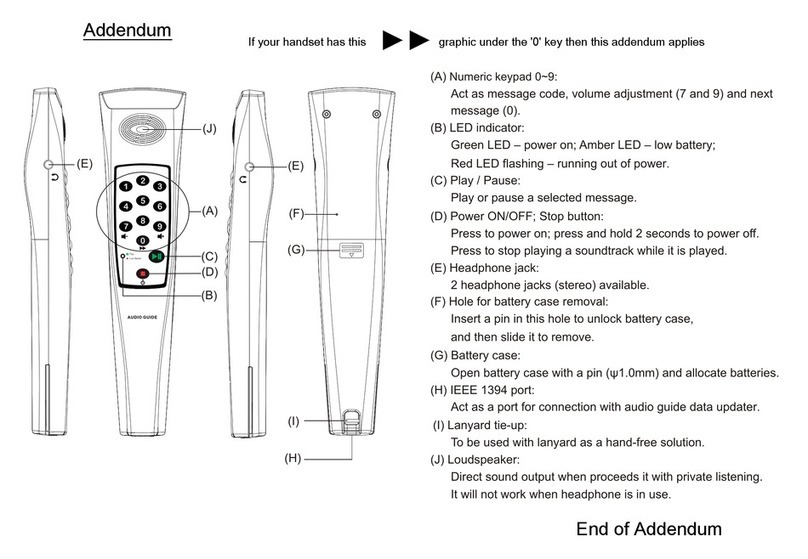
Illustration
Flashing red indicator stands for potentially defective battery inside.
Steady red/green indicator stands for charging/fully charged status.
Inbuilt infrared trigger is available for commentary (auto) playback.
Play/Pause
Volume down Power on/Power off/Stop Volume up
Charging is applicable only when the player is connected with PC via an USB cable.
Follow steps below.
1. Connect the player with your PC via an USB cable.
2. shows up on the screen.
3. Press the button and red indicator illuminates.
4. The player is being charged now. When the player is fully charged, green indicator
illuminates.
This port is connected with compatible updater for content updating.
1
110
9
8
7
6
5
4
3
2
Charging/battery indicator
1
Earphone jacks
7
Uploading/Charging port6
Backlit keypad5
2.8” TFT touch screen
4
Hi-Fi stereo and hearing-aid-compatible (HAC) speaker3
Triggering area
2
Lanyard hole
10
Reset button9
Wireless charging module8
USB
1
1
Players are being wirelessly charged when they are inserted into compatible chargers.
The player will be forced to be shut down when this button is pressed.
Fast forward
Fast backward
No display
No sound
Check if battery is properly installed and powered.
T urn on the player as instructed above.
If the problem still exists, return the player to your supplier.
Adjust the player volume to the proper level.
I f you are using an earphone, make sure it is properly connected.
C heck if the audio content is correctly uploaded.
If the problem still exists, return the player to your supplier.
Troubleshooting
SD error
File error
Anti-theft system alarmed
An error happens to uploaded files in the SD card. Return the player to the counter for
content re-uploading.
If the problem still exists, return the player to your supplier.
Alarm can be released via Loop Controller LT-200+ or chargers/updaters.
Alarm will also be active when this screen shows up. Return the player to the counter
for alarm release.
To mute the player temporarily, press both and button simultaneously.
Alarm screen will remain on the screen.
An error happens to the SD card. Press the reset button and then reboot the player.
If the problem still exists, return the player to your supplier.
9
General paramters
Display
Memory capacity
Automatic triggering
Alarm
Nubmer of languges
Number of messages
Operating temperature
2.8 inch TFT-LCD (240 x 320 pixel)
8 GB, support up to 32 GB
3.7 V, 1700 mAh Li-Polymer battery
12 hours
IR
Anti-theft system
Max. 32
Max. 9999 x 32
Battery
battery life
-10 °C ~ +50 °C
23.2 x 61.5 x 135 (mm)
175 g (with battery)
Dimensions (DxWxH)
Weight
Specifications
Audio parameters
Audio format
Bandwidth
Dynamic range
Distortion
Speaker
Earphone output
20 Hz - 15 kHz
High quality audio compression
90 dB
< 0.1%
Built-in 0.5 W @ 8 Ω
3.5 mm Jack x 2 (stereo)
AT-500 Audio GuideAT-500 Audio Guide

AT-500 Audio GuideAT-500 Audio Guide
2
3
2
Select your language
Select your mode
Power on
Press the power button ( ) for 1 second to turn the player on.
If shows up, press both and buttons simultaneously for 1 second to turn the player on.
Operation
When the player is turned on, language screen shows up for your selection.
Max. 6 languages per page can be edited. Press the or button to turn the page if more
than 6 languages are uploaded.
Once preferred language is selected, please the button to enter next screen of main menu.
12
3334
No. Mode Details
Information mode
Max. 9 images (to be edited via Audio Master 5) are available here
to show exhibition information.
To return to previous page, touch the symbol on the screen.
Press the or button to turn the page, if needed.
1
2
Numeric mode
Display mode
Map mode
Type in preferred track numbers (1 ~ 9,999) and then touch the
symbol or press the button to play the track.
Touch the symbol on the screen if you would like to type in
another new track number.
333
Max. 9 images (to be edited via Audio Master 5) are available here
to show related map information of the exhibition.
Press the or button to turn the page, if needed.
To return to previous page, touch the symbol on the screen.
4
3 display options are available (to be defined on Audio Master 5).
Image only
I mage & text
Text only
To return to previous page, touch the symbol on the screen.
Listen to your audio track
The track starts to play automatically when being entered.
P ress the or button to fast backward or forward the track.
Press the button if you would like to pause the track.
Touch the or symbol on the screen if you would like to pause current main track and
listen to one of assistive tracks. After the assistive track plays to the end, you will return to
the main track where you just left.
Max. 2 assistive tracks (to be defined on Audio Master 5) are available per main audio track.
Press the or button to adjust the volume when the player is on.
Adjust your player volume
Power off
There are 11 volume levels in total and default volume is at level 6. When level 0 is set, the
player will be muted.
Kindly note listening at high volume for long periods may damage your hearing.
To turn the player off, either press the button for 10 seconds or place it into chargers.
Anti-theft system is still on.
To turn the player and its anti-theft system off, press both and buttons simultaneously for
3 seconds or place it into updaters.
Setting check and adjustment
To check or adjust the player settings, press , and buttons simultaneously when the
player is off.
Above screen shows up. Touch one of settings to disable ( ) or enable () the function.
Press the or button to turn the page, if needed.
Touch the symbol on the screen after all settings are manually adjusted. The player will be off
(anti-theft system remains on) again.
If the player was turned off by pressing both and buttons simultaneously earlier,
, , and buttons should be pressed at the same to enter this screen.
This device complies with part 15 of the FCC Rules.
Operation is subject to the following two conditions: (1) This device may not cause harmful interference, and (2) this device must accept any interference received,
including interference that may cause undesired operation.
Notice:
The changes or modifications not expressly approved by the party responsible for compliance could void the user’s authority to operate the equipment.
FCC INFORMATION
The Federal Communication Commission Radio Frequency Interference Statement includes the following paragraph:
The equipment has been tested and found to comply with the limits for a Class B Digital Device, pursuant to part 15 of the FCC Rules.
These limits are designed to provide reasonable protection against harmful interference in a residential installation.
This equipment generates, uses and can radiate radio frequency energy and, if not installed and used in accordance with the instruction, may cause harmful
interference to radio communication.
However, there is no grantee that interference will not occur in a particular installation.
If this equipment dose cause harmful interference to radio or television reception, which can be determined by turning the equipment off and on , the user is encouraged
to try to correct the interference by one or more of the following measures:
-- Reorient or relocate the receiving antenna.
-- Increase the separation between the equipment and receiver.
-- Connect the equipment into an outlet on a circuit different from that to which the receiver is connected.
-- Consult the dealer or an experienced radio/TV technician for help.
Other Okayo Media Player manuals


