OligoMaker X12 User manual

!
!
! !
!
!
OligoMaker+DNA/RNA+Synthesizer+
OligoMaker+ApS!•!Kong!Georgs!Vej!12!•!DK-2000!Frederiksberg!•!Tel:!+45!321!322!00!!
www.oligomaker.com!•!email:![email protected]! !
p.1
Manual January 2nd, 2019
DNA/RNA Synthesizer
2019
OligoMaker X12
220V/60Hz

!
!
! !
!
!
OligoMaker+DNA/RNA+Synthesizer+
OligoMaker+ApS!•!Kong!Georgs!Vej!12!•!DK-2000!Frederiksberg!•!Tel:!+45!321!322!00!!
www.oligomaker.com!•!email:![email protected]! !
p.2
Content:
1.+INTRODUCTION+................................................................................................................................+3!
2.+SYMBOLS+AND+ABBREVIATIONS+.......................................................................................................+3!
3.+TOUCH+SCREEN+MANUAL+.................................................................................................................+4!
3.1!OPENING!SCREEN!...................................................................................................................................!4!
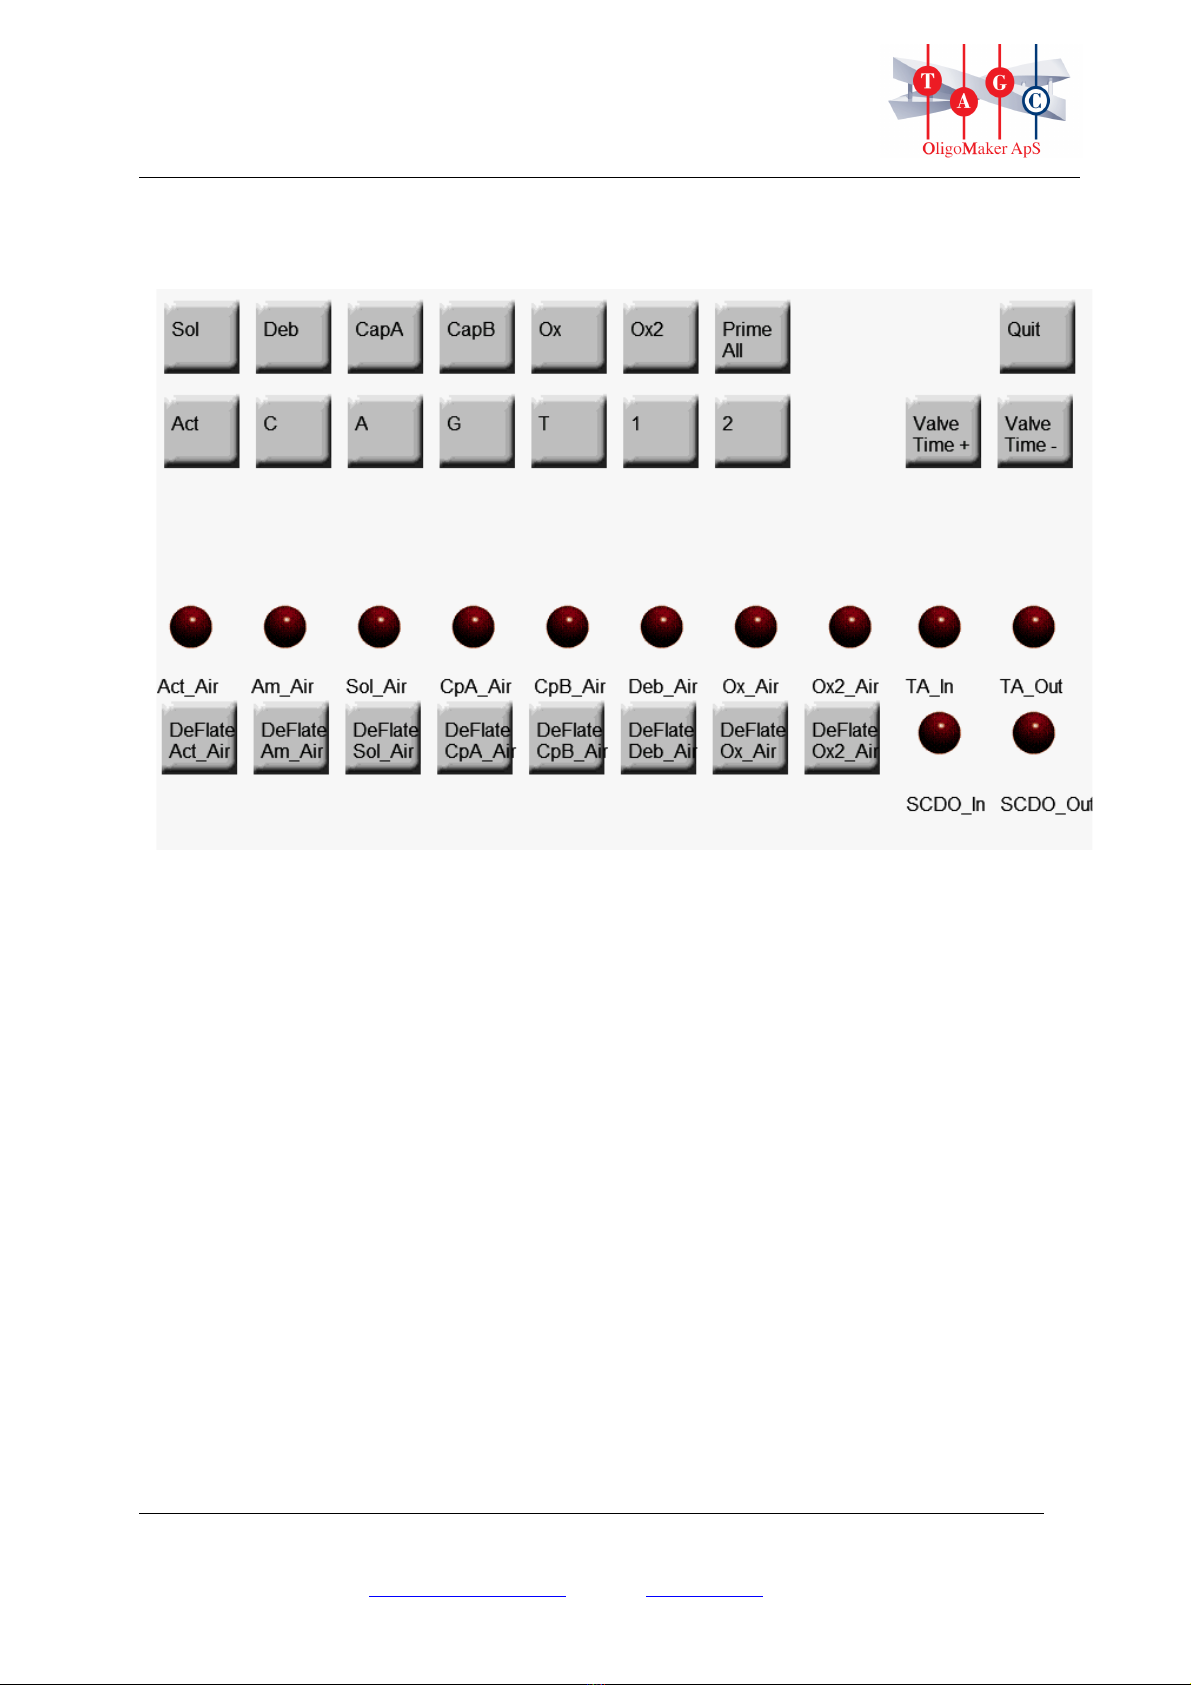
3.2!MANUAL!CONTROL!.................................................................................................................................!5!
3.3!PRIMING!...............................................................................................................................................!7!
3.4!GET!DATA!.............................................................................................................................................!8!
3.5!SYNTHESIS!.............................................................................................................................................!9!
3.6!DELETE!OLIGO!.....................................................................................................................................!10!
4.+TERMS+............................................................................................................................................+11!
5.+APPLICATION+.................................................................................................................................+11!
6.+SAFETY+...........................................................................................................................................+12!
7.+TRANSPORTATION+.........................................................................................................................+13!
8.+INSTALLATION+................................................................................................................................+13!
8.1!A!QUICK!GUIDE!....................................................................................................................................!14!
9.+SYNTHESIS+START+-+A+USERS+GUIDE+................................................................................................+16!
9.1!CONTROL!OF!COLUMNS!.........................................................................................................................!16!
9.2!CHECK!REAGENTS!.................................................................................................................................!17!
9.3!PRIMING!.............................................................................................................................................!18!
9.4!REAGENT!PRESSURE!AND!VACUUM!TEST!...................................................................................................!18!
9.5!STARTING!THE!BASIC!SYNTHESIS!...............................................................................................................!19!
9.6!END!SYNTHESIS!....................................................................................................................................!19!
9.7!REMOVING!COLUMNS!FROM!THE!REACTION!BLOCK!....................................................................................!19!
10.+SYNTHESIS+PROTOCOL+..................................................................................................................+20!
11.+MAINTENANCE+.............................................................................................................................+25!
12.+SERVICE+........................................................................................................................................+26!
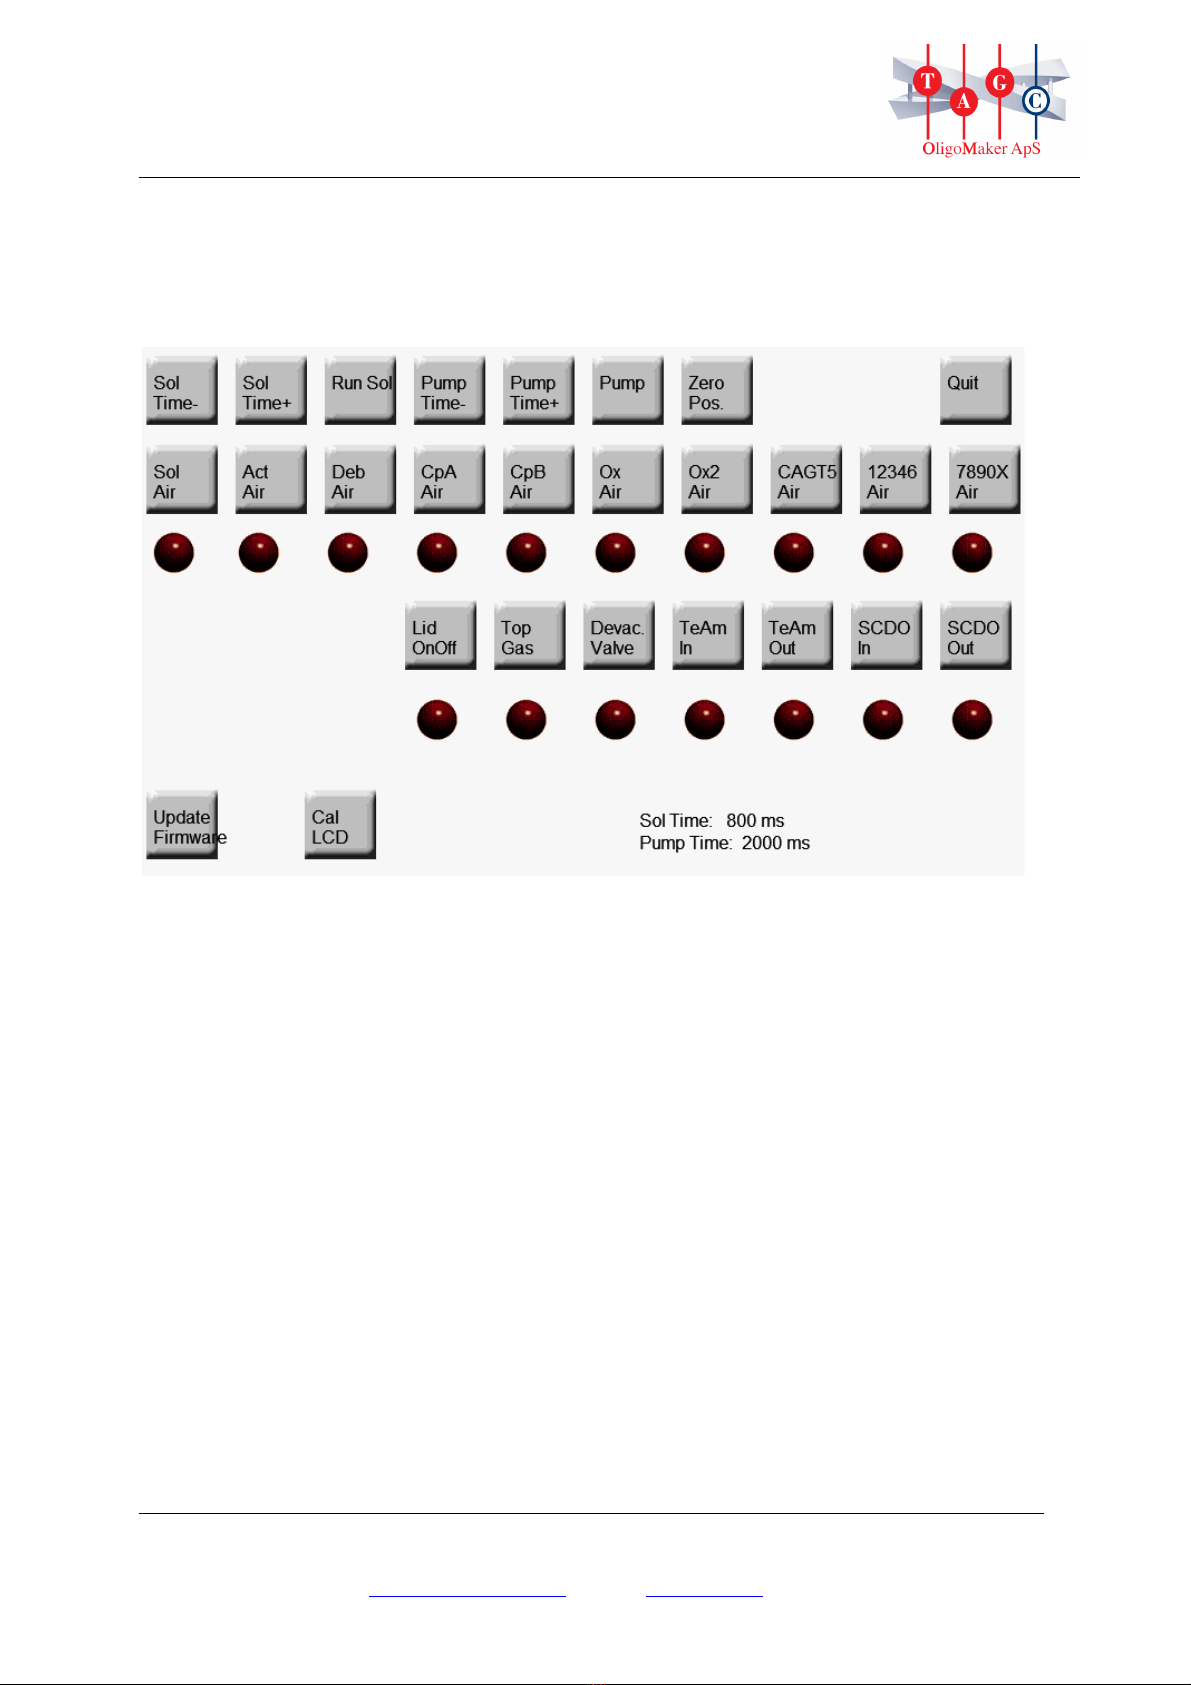
12.1!SERVICE!HOLDER!POSITION!...................................................................................................................!26!
12.2!REMOVING!THE!U-PIN!.........................................................................................................................!27!
12.3!CHANGING!A!VALVE!............................................................................................................................!28!
13.+SPARE+PARTS+................................................................................................................................+29!
14.+DECLARATION+OF+CONFORMITY+...................................................................................................+31!
+

!
!
! !
!
!
OligoMaker+DNA/RNA+Synthesizer+
OligoMaker+ApS!•!Kong!Georgs!Vej!12!•!DK-2000!Frederiksberg!•!Tel:!+45!321!322!00!!
www.oligomaker.com!•!email:![email protected]! !
p.3
!
1. Introduction
This manual is a guide in how to operate the OligoMaker X12.
OligoMaker is produced by OligoMaker ApS, Kong Georgs Vej 12,
DK-2000 Frederiksberg, Denmark - www.oligomaker.com
OligoMaker ApS obtained CE marking in May 2009
This manual must be kept in the laboratory next to the OligoMaker.
The responsible operator or personnel of the OligoMaker must read these instructions
carefully.
2. Symbols and abbreviations
Bottle holders:
T T amidite solution
A dA amidite solution
G dG amidite solution
C dC amidite solution
1 Extra amidite solution
2 Extra amidite solution
3 Extra amidite solution
4 Extra amidite solution
5 Extra amidite solution
6 Extra amidite solution
7 Extra amidite solution
8 Extra amidite solution
9 Extra amidite solution
0 Extra amidite solution
Act Activator solution
Sol Solvent (ex. Acetonitrile)
Deb Deblock solution
Cap A Capping A solution
Cap B Capping B solution
Ox1 Oxidizer (iodine) solution
Ox2 Oxidizer (thio) solution

!
!
! !
!
!
OligoMaker+DNA/RNA+Synthesizer+
OligoMaker+ApS!•!Kong!Georgs!Vej!12!•!DK-2000!Frederiksberg!•!Tel:!+45!321!322!00!!
www.oligomaker.com!•!email:![email protected]! !
p.4
3. Touch screen manual
3.1 Opening Screen
!
Prime Opens for Priming (section 3.3)
Manual control Opens for Manual Control (section 3.2)
Get data Imports data (section 3.4)
Delete Oligo Opens for removing single synthesis
Pause Pause in the synthesis
Start Synthesis Start the synthesis
Center Center the Reaction Block

!
!
! !
!
!
OligoMaker+DNA/RNA+Synthesizer+
OligoMaker+ApS!•!Kong!Georgs!Vej!12!•!DK-2000!Frederiksberg!•!Tel:!+45!321!322!00!!
www.oligomaker.com!•!email:![email protected]! !
p.5
3.2 Manual Control
!
Sol Time-Opening time for acetonitrile valve, here 800 ms. It can be
lowered by pushing the button (-50 ms)
Sol Time+ Opening time can be adjusted higher by pushing the button (+50 ms).
Run Sol A program that fills all the columns with the desired amount of
acetonitrile, following with activating of Pump Run. You can check
whether all columns have been filled with solvent and subsequently sucked
dry. Should be performed prior to every run.
Pump Sucktion time, here 2000 ms. It can be lowered by pushing the button
Time- (-50ms)
Pump Sucktion time can be higher by pushing the button (+50 ms).
Time+
Run Activate the pump.
Pump
Zero Set Reaction Block in center-position
Position
Sol Air Switch On and Off the valve from the nitrogen cylinder to acetonitrile (Sol)
bottle

!
!
! !
!
!
OligoMaker+DNA/RNA+Synthesizer+
OligoMaker+ApS!•!Kong!Georgs!Vej!12!•!DK-2000!Frederiksberg!•!Tel:!+45!321!322!00!!
www.oligomaker.com!•!email:![email protected]! !
p.6
Act Air Switch On and Off the valve from the nitrogen cylinder to activator bottle
Deb Air Switch On and Off the valve from the nitrogen cylinder to Deblock bottle
Cp A Air Switch On and Off the valve from the nitrogen cylinder to Cap A bottle
Cp B Air Switch On and Off the valve from the nitrogen cylinder to Cap B bottle
Ox Air Switch On and Off the valve from the nitrogen cylinder to Oxidizer bottle
Ox2 Air Switch On and Off the valve from the nitrogen cylinder to oxidizer2 bottle
CAGT5 Air Switch On and Off the valve from the nitrogen cylinder to amidite bottles C, A,
G, T and bottle No. 5
12346 Air Switch On and Off the valve from the nitrogen cylinder to amidite bottles No. 1,
2, 3, 4 and No. 6
7890X Air Switch On and Off the valve from the nitrogen cylinder to amidite bottles No. 7,
8, 9, 0 and X
Lid OnOff Power on and off on the lid
Top Gas Opens the valve from the nitrogen cylinder to the space above the reaction
chamber
Devac Opens the drain valve (removes vacuum)
TeAm In Opens for nitrogen cylinder to all bottles of Activator and amidites
TeAm Out Release pressure for bottle Activator and amidites
SCDO In Opens for Acetonitrile, Cap, Deb and Ox reagtens
SCDO Out Release pressure for bottle Acetonitrile, Cap, Deb and Ox reagents
Update For updating the software (instrument)
firmware Comments: In order to use the FTP server, the program must
introduced to OligoMaker through a USB-stick. OligoMaker will
remember the IP address. You can change the log code om12345.log to
your own code on both the program on the FTP-server and the USB-stick.
Cal LCD Calibrating
Quit Back to Opening Screen (Fig. 1)

!
!
! !
!
!
OligoMaker+DNA/RNA+Synthesizer+
OligoMaker+ApS!•!Kong!Georgs!Vej!12!•!DK-2000!Frederiksberg!•!Tel:!+45!321!322!00!!
www.oligomaker.com!•!email:![email protected]! !
p.7
3.3 Priming
!
C Opens dC amidite valve for priming
A Opens dA amidite valve for priming
G Opens dG amidite valve for priming
T Opens T amidite valve for priming
1 to 6 Opens 1 to 6 amidite valves for priming
Act Opens Act valve for priming
Ox Opens Ox valve for priming
CapA Opens Cap A valve for priming
CapB Opens Cap B valve for priming
Deb Opens Deb valve for priming
Sol Opens Acetonitrile valve for priming
ValveTime+ Increase opening time with 5 ms
ValveTime- Decrease opening time with 5 ms
DeFlate Act_Air Release pressure for Act
DeFlate Am_Air Release pressure for all amidites
DeFlate Sol_Air Release pressure for Acetonitrile
DeFlate CpA_Air Release pressure for CapA
DeFlate CpB_Air Release pressure for CapB
DeFlate Deb_Air Release pressure for Deb
DeFlate Ox_Air Release pressure for Ox
DeFlate Ox2_Air Release pressure for Ox2
Quit Back to Main (Fig.1)

!
!
! !
!
!
OligoMaker+DNA/RNA+Synthesizer+
OligoMaker+ApS!•!Kong!Georgs!Vej!12!•!DK-2000!Frederiksberg!•!Tel:!+45!321!322!00!!
www.oligomaker.com!•!email:![email protected]! !
p.8
3.4 Get Data
!
!
Get data Imports data
Prime Opens for Priming (section 3.3)
Manual control Opens for Checkpoints (section 3.2)
Delete Oligo Opens for removing single syntheses (section 3.6)
Pause Pause in the synthesis
Start Synthesis Start the synthesis
Center Put the Reaction Block into Center-position

!
!
! !
!
!
OligoMaker+DNA/RNA+Synthesizer+
OligoMaker+ApS!•!Kong!Georgs!Vej!12!•!DK-2000!Frederiksberg!•!Tel:!+45!321!322!00!!
www.oligomaker.com!•!email:![email protected]! !
p.9
3.5 Synthesis
Prime Opens for Priming (section 3.3)
Stop Synthesis Stops the synthesis
Pause Pause in the synthesis
Delete Oligo Opens for removing single oligos in the synthesis (section 3.6)
Trityl Check The synthesis stops before the Deblock step, insert the holder with
tubes, and collect Deblock reagents. Check colour, and press
continue in order to proceed the synthesis

!
!
! !
!
!
OligoMaker+DNA/RNA+Synthesizer+
OligoMaker+ApS!•!Kong!Georgs!Vej!12!•!DK-2000!Frederiksberg!•!Tel:!+45!321!322!00!!
www.oligomaker.com!•!email:![email protected]! !
p.10
3.6 Delete Oligo
Delete oligo:
1. Enter the location of the oligo by typing the specific number of the oligo
2. Press Del
3. Press Quit - and the synthesis continue.

!
!
! !
!
!
OligoMaker+DNA/RNA+Synthesizer+
OligoMaker+ApS!•!Kong!Georgs!Vej!12!•!DK-2000!Frederiksberg!•!Tel:!+45!321!322!00!!
www.oligomaker.com!•!email:![email protected]! !
p.11
4. Terms
OligoMaker X12 is an instrument designed to synthesize DNA oligonucleotides or
similar structures and is not supposed to be used for anything else.
The instrument is constructed, so it is possible to add extra valves and bottle holders
(upgrade). An engineer from OligoMaker ApS must perform any changes.
Operators of the OligoMaker are recommended to attend a workshop on how to use the
OligoMaker either at the users location or in the laboratory at OligoMaker ApS in
Copenhagen, Denmark. During the workshop the operator will be trained in how to
operate and maintain the OligoMaker.
5. Application
OligoMaker X12 synthesizes oligonucleotides. Columns filled with a solid support
material are placed in the Reaction Block. Bottles of reagents designed for
oligonucleotide synthesis are attached to OligoMaker. Using a positive pressure (less
than 1 bar) of Nitrogen (or Argon) the reagents are distributed to the columns through
the valves and tubing controlled by a preinstalled software program.
Use Microsoft Excel to transfer the sequence data from a Mac or a PC to the
OligoMaker. Sequence data can be transferred using your choice of a network
connection or a USB memory stick. When the OligoMaker starts, the reaction block with
the columns move to start position, and the program in the OligoMaker ensures, that the
proper column will be placed below the specific reagent, which is applied.
The software program will open the appropriate valves, and the reagent is added to the
column. The supply of the reagents are performed according to the synthesis protocol
selected by the operator. Subsequently the reagents are drained through the columns
into a vacuum chamber using an attached vacuum pump located outside of the
OligoMaker. The vacuum chamber has a drain, which ensures that the reagent will drain
into a waste container.

!
!
! !
!
!
OligoMaker+DNA/RNA+Synthesizer+
OligoMaker+ApS!•!Kong!Georgs!Vej!12!•!DK-2000!Frederiksberg!•!Tel:!+45!321!322!00!!
www.oligomaker.com!•!email:![email protected]! !
p.12
6. Safety
The OligoMaker X12 should be placed under a ventilated hood or similar. The waste
container should be placed under the fume hood and have a recommended
independent exhaust ventilation.
OligoMaker cannot start unless the front Lid is in place, and the Reaction Block is filled
with 12 columns.
When the tubing from the reagents are rinsed (priming), the Valve Manifold has to be
placed in the priming position with the waste tub placed below. The waste tub must be
cleaned immediately afterwards.
Holder in priming position
When replacing a broken valve, the pressure in the bottles must be off, and the Valve
Manifold has to be placed in the service holder.

!
!
! !
!
!
OligoMaker+DNA/RNA+Synthesizer+
OligoMaker+ApS!•!Kong!Georgs!Vej!12!•!DK-2000!Frederiksberg!•!Tel:!+45!321!322!00!!
www.oligomaker.com!•!email:![email protected]! !
p.13
Service holder position
7. Transportation
OligoMaker will be delivered to the customer on a pallet in a wooden box. Unpacking
must be done by professionals from OligoMaker ApS.
8. Installation
On site requirements: A ventilated hood or similar, connection to power (115 / 220
volts), and connection to Nitrogen (or Argon) bottle (at around 3 bar). A valve should be
nearby for possible shut down of gas.
1. Connect power supply 115 / 220 volts
2. Connect power supply from the Vacuum Pump to OligoMaker.
3. Connect Nitrogen (or Argon) to OligoMaker (tubing 6.0mm)
4. Connect OligoMaker to the pump (tubing 6.0mm)
5. Connect Vacuum Pump to waste container.
OligoMaker has a sound pressure level below 70db.

!
!
! !
!
!
OligoMaker+DNA/RNA+Synthesizer+
OligoMaker+ApS!•!Kong!Georgs!Vej!12!•!DK-2000!Frederiksberg!•!Tel:!+45!321!322!00!!
www.oligomaker.com!•!email:![email protected]! !
p.14
8.1 A Quick Guide
A Quick Guide to install the OligoMaker X12 DNA synthesizer
Provided together with the instrument you will find 5-6 meter of teflon tube (6mm).
The 6mm tube should be used for:
•Gas inlet (nitrogen or argon)
•Chemical waste – from instrument to pump
•Chemical waste – from pump to waste container (placed in ventilated area)
When you have placed the instrument in the selected location, placed the vacuum pump
and the Gas cylinder (Nitrogen or Argon) you can cut the tubing into 3 pieces all in the
required length.
The tubes should be attached to the instrument and to the pump according to the
description in the following:
Backside of the DNA synthesizer
Chemical waste, connect
this fitting to the 6mm tube.
The other end of the tubing
should be attached to the
vacuum pump.
Connect the electricity cable
from the vacuum pump to
this plug.
Gas inlet: simply press the tube into the fitting and it will be
connected.

!
!
! !
!
!
OligoMaker+DNA/RNA+Synthesizer+
OligoMaker+ApS!•!Kong!Georgs!Vej!12!•!DK-2000!Frederiksberg!•!Tel:!+45!321!322!00!!
www.oligomaker.com!•!email:![email protected]! !
p.15
Place the fittings on the tubing as shown to
the right
The tubing should be connected to the synthesizer and to the pump. You can choose to
have your vacuum pump located next to your DNA synthesizer or on the floor below the
synthesizer.
When you have decided the best location
for your pump you can cut the tubing in the
appropriate length.
You should connect the tubing to the in-let
on the pump.
When you tighten the fittings on the
vacuum pump you should carefully use two
wrenches. One for tightening and the other
to hold contra as indicated in the picture.
From the outlet of the pump you should
connect a tubing to the waste container.
We recommend that you place the waste
container in a ventilated area according to
your local safety regulations.

!
!
! !
!
!
OligoMaker+DNA/RNA+Synthesizer+
OligoMaker+ApS!•!Kong!Georgs!Vej!12!•!DK-2000!Frederiksberg!•!Tel:!+45!321!322!00!!
www.oligomaker.com!•!email:![email protected]! !
p.16
9. Synthesis start - A users guide
OligoMaker X12 has to be operated as intended by a trained operator. The instrument
includes an operator’s manual.
All valves must be closed, when the OligoMaker is not in use. When the OligoMaker is
not in use, keep Reaction Block in Center-position.
An ON/OFF switch is located on the back side of the instrument. The pressure on the
bottles are adjusted with two regulators, located on the right side of the instrument.
Regulator up right P1 Pressure on bottles Wash, Deblock, Cap A, Cap B
Regulator down right P2 Pressure on bottles Activator and amidites
Regulator up left P3 Pressure on Top gas
Regulator down left Main valve
We recommend that 0,6 bar is used on the phosphoramidite bottles and 0,7 bar on all
others. The manometers are situated on top of the instrument. The vacuum manometer
to the left shows the vacuum, when the reagents are drained through the columns.
OligoMaker may only be started, when the front lid is placed on the reaction block, and
when the valve manifold is placed in the correct position above the synthesis columns.
The waste container must be inspected prior to each run and emptied when full. The
disposal of waste is done according to local regulations.
9.1 Control of Columns
The start-up of the instrument is done with the Reagent Block in Center-position. The
touch-screen on the instrument will show the Opening screen. Select the button
”Manual Control”, select the button ”Center position”.
To import data from the USB-stick or network connection, select ”Get Data”. You may
now check the placed synthesis-columns.
You can use prepacked culumns, frits or you can fill your own columns. You can use
universal CPG or CPG with the 3’-base attached.
You can choose columns in 50 nmol scale or 200 nmol scale. Make sure that the
columns are correctly fitted in the Reaction Block.

!
!
! !
!
!
OligoMaker+DNA/RNA+Synthesizer+
OligoMaker+ApS!•!Kong!Georgs!Vej!12!•!DK-2000!Frederiksberg!•!Tel:!+45!321!322!00!!
www.oligomaker.com!•!email:![email protected]! !
p.17
9.2 Check Reagents
It is indicated on the display how much reagent is required during synthesis. Make a
visual check on the reagent bottles to verify the amount of reagent which is available.
The numbers can vary and has to be adjusted according to the real use (adjusted on
Synthesis Report, delivered seperately).
On the Opening screen, press ”Prime” on the display. Make sure you have activated the
pressure to be able to prime. Activate the pressure for each reagent and shut down the
pressure to the bottles afterwards. When the pressure is off again, the pressure on P1
and P2 should not fall more than 0,2 during a period of two min. P3 indicates the
pressure on the top gas.
!
Manometer
Vac Vacuum when pumping
P1 Pressure on bottles Wash, Deblock, Cap A, Cap B and Oxidizer
P2 Pressure on bottles Activator and Amidites
P3 Pressure on Top gas

!
!
! !
!
!
OligoMaker+DNA/RNA+Synthesizer+
OligoMaker+ApS!•!Kong!Georgs!Vej!12!•!DK-2000!Frederiksberg!•!Tel:!+45!321!322!00!!
www.oligomaker.com!•!email:![email protected]! !
p.18
9.3 Priming
The Valve Manifold is placed in the Priming Position. If necessary the reagent tips
(Nozzles) are cleaned with ethyl acetate (or acetone) and a toothbrush. Touch the
button “Prime” on the touch screen. All positions and chemicals are shown on the
display and can be primed manually. Each chemical is shown on the display. Push the
“Prime”-button on the display until a straight beam shows from the reagent tip. It is an
option to push “Prime” and “Prime all”. Pushing the “Quit”-button terminates the
process.
Holder in Priming Position
If the reagent is not supplied during priming, the tube or the valve must be inspected
and if necessary replaced. If the tube is dripping, the valve, or the fitting, must be
inspected and possibly replaced. For other errors contact the supplier.
9.4 Reagent pressure and vacuum test
Before synthesis is initiated the Reaction Block has to be tested for being tight by using
the buttons “Manual Control” and “Pump”. When pushing the “Pump”-button on the
display, a slight whistle noise is heard. The tolerated range for the pressure of the
vacuum is between -0,2 bar and -0,4 bar. The tolerated range for the pressure for
Amidite and special amidite position is between 0,5 bar and 0,6 bar (P1).

!
!
! !
!
!
OligoMaker+DNA/RNA+Synthesizer+
OligoMaker+ApS!•!Kong!Georgs!Vej!12!•!DK-2000!Frederiksberg!•!Tel:!+45!321!322!00!!
www.oligomaker.com!•!email:![email protected]! !
p.19
The tolerated range for the pressure for the remainder of synthetic chemistry is between
0,6 bar and 0,7 bar.
Pushing the “Quit”-button on the display terminates the pressure control process, and
the Start Menu will appear.
9.5 Starting the basic synthesis
Transfer the Synthesis Report from your computer to a USB-stick. Place the USB-stick
in the OligoMaker and select “Get Data” to transfer the sequence to the instrument. All
starting bases on the Synthesis Report is compared and reviewed. If universal support
is used this step can be skipped.
The synthesis starts by pushing the “Start synthesis”-button on the display. For safety
reasons the synthesis will not start, if the vacuum is not obtained because of the
missing Front Lid or missing columns in the Reaction Block.
9.6 End Synthesis
When a synthesis is done, the display will show END.
9.7 Removing columns from the Reaction Block
The OligoMaker X12 will be delivered with a multi-tool which can be used to remove the
columns from the reaction block.
Universal tool

!
!
! !
!
!
OligoMaker+DNA/RNA+Synthesizer+
OligoMaker+ApS!•!Kong!Georgs!Vej!12!•!DK-2000!Frederiksberg!•!Tel:!+45!321!322!00!!
www.oligomaker.com!•!email:![email protected]! !
p.20
10. Synthesis Protocol
This short manual will enable you to take advantage of all the flexibility of the synthesis
program used by OligoMaker.
The standard procedure for loading sequences from your database to the OligoMaker
DNA synthesizer is to transfer by using an USB-stick.
The instrument will read the file named ”OM data” on the USB-stick.
For every new run you should rewrite the ”OM data” file on the USB-stick. Simply open
the ”OM data” file in Excel (or similar application) and paste your sequences into the file.
The ”OM data file must be saved as a txt-file in Excel.
For each run you can change the synthesis settings according to the guideline below.
You can change the orientation of the sequences
in your database. ”Off” means that the sequence
will be synthesized as writtten 5’-…-3’
If you use
columns with
universal support
you can change to
”on”.
You can make the synthesizer stop
before the last base (n-1).
Used for 5’-labelling
After reagent is
added a short
vacuum is
performed. Should
be ”0” if there is
no top-filter on the
columns.
Topgas is the flow of
Nitrogen on top of the
reaction plate.
In this case the gas valve
will open for 1 sec. for
every 24 columns in a ring.
For extra sensitive
synthesis you can add a
pre gas before reagents
are added.
Table of contents
Popular Laboratory Equipment manuals by other brands

Biorep Technologies
Biorep Technologies PERI-4.2 user manual

Dabi Atlante
Dabi Atlante AUTOCLAVE BIOCLAVE 12 LITERS owner's manual

MECHLINE
MECHLINE HYGENIKX+ instructions

CETAC
CETAC ASXpress Operator's manual

REPLIGEN
REPLIGEN Spectrum KR2i User guide and operating instructions

NEW BRUNSWICK SCIENTIFIC
NEW BRUNSWICK SCIENTIFIC AF 2000 user guide

PHYWE
PHYWE Cobra SMARTexperiment operating instructions

Durst
Durst DA-900 operating instructions

Thermo Scientific
Thermo Scientific Shandon TissueWave 2 Operator's guide

SICCO
SICCO V 1830-07 operating instructions

Reverberi
Reverberi STERILIX 2 PLUS Operation and maintenance manual

Saphire Scientific
Saphire Scientific 370 SS Service and operation manual