IT
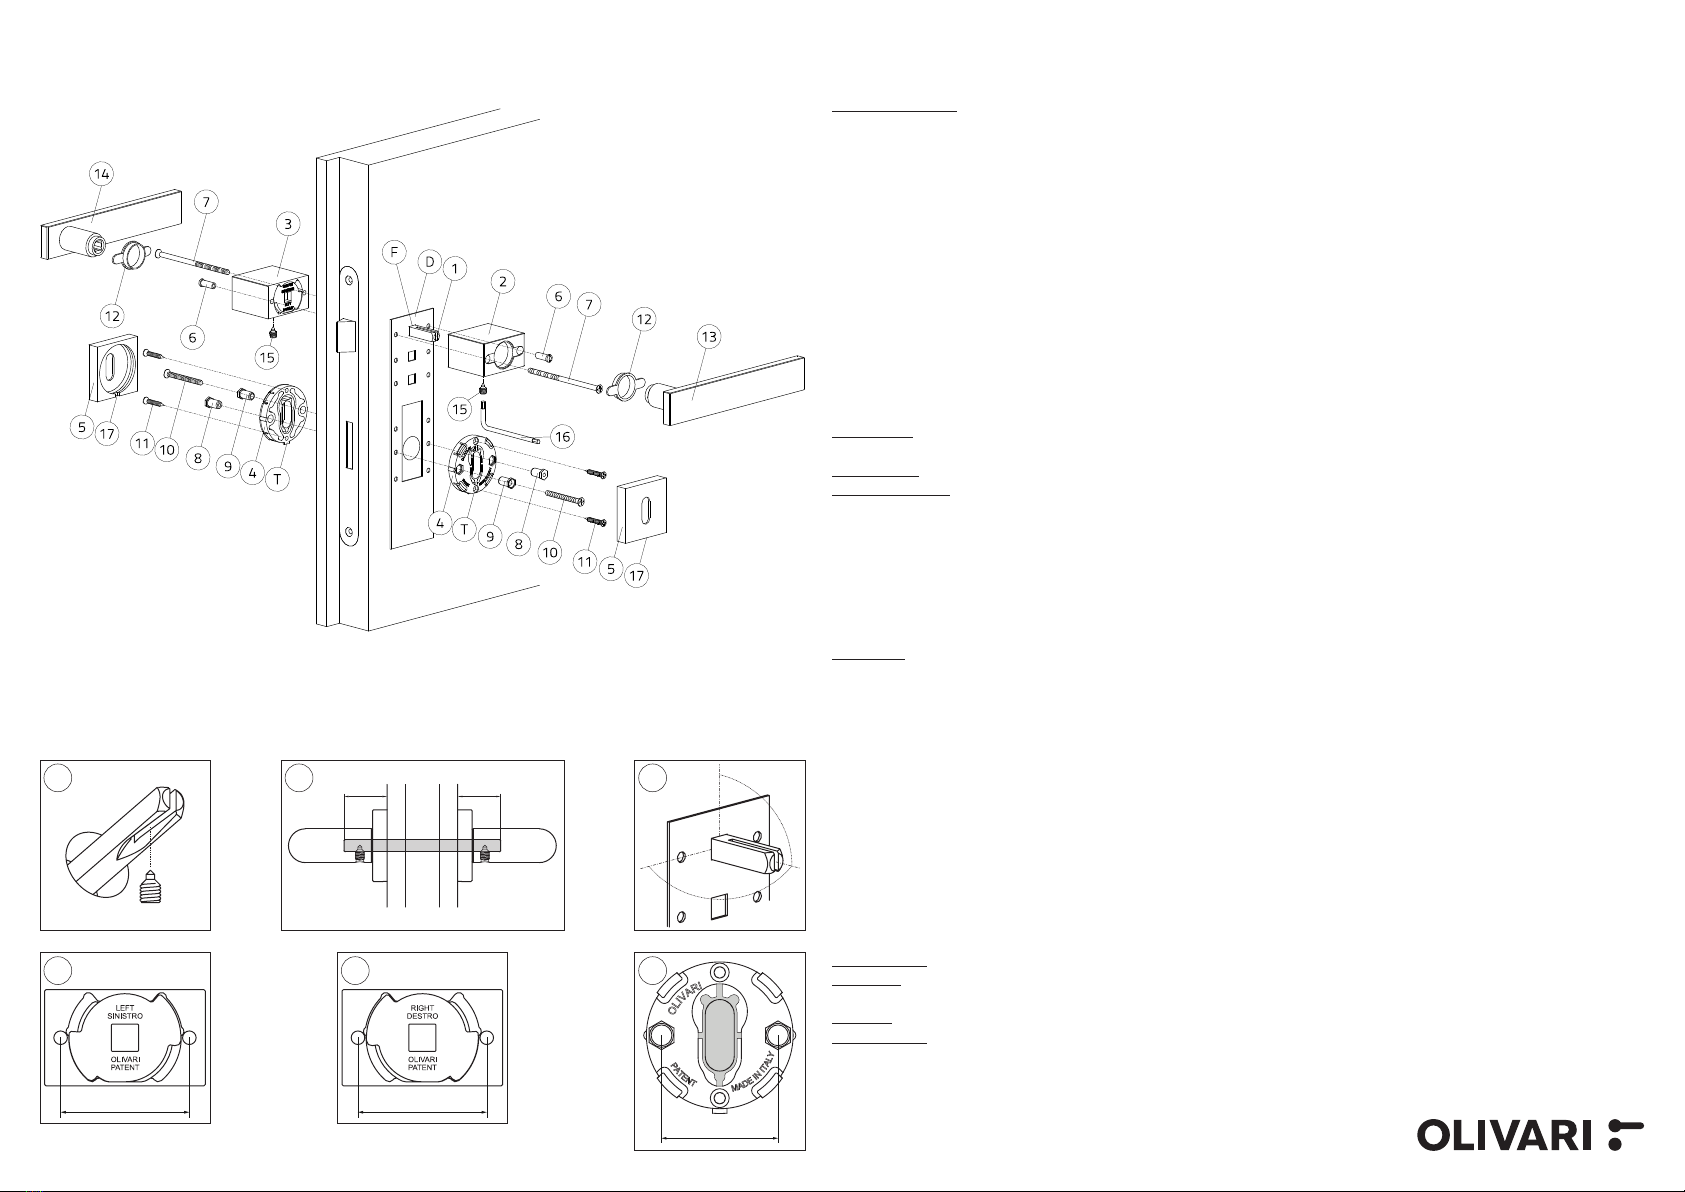
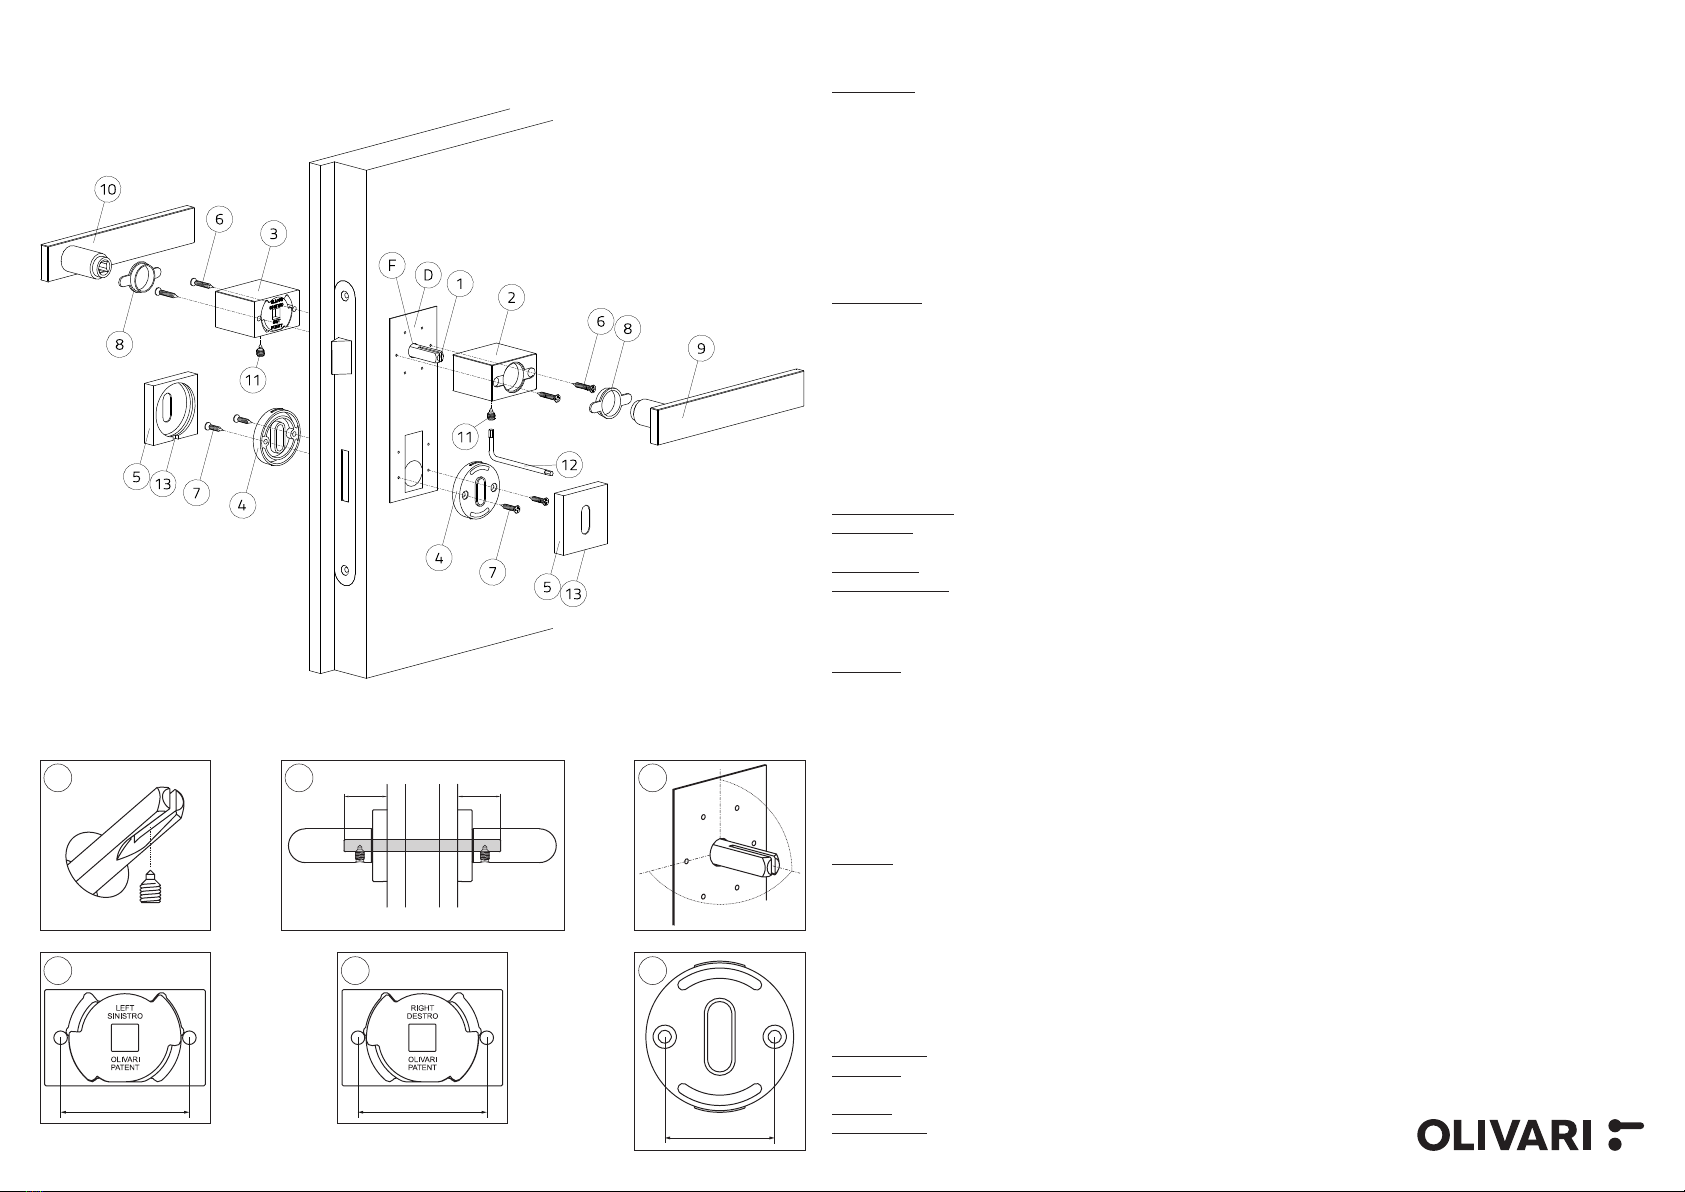
●Inserire nella serratura il ferro quadro (1) con la svasatura rivolta verso il basso (1A), centrandolo rispetto allo spessore porta (1B).
●Lato destro: inserire la rosetta destra (2) sul ferro quadro (1) con le scritte rivolte verso l’alto (2A) allineandola
parallelamente al pavimento.
○Verificare attentamente che il quadro (1) sia posizionato perpendicolarmente rispetto al piano della porta (1C).
○Segnare i 2 fori relativi alla rosetta destra (2).
○Togliere la rosetta destra (2).
○Nel caso di bocchetta yale presentare direttamente la sottobocchetta (4) sul cilindro e segnare i 2 fori altrimenti
inserire la DIMA (D) sul ferro quadro (1) attraverso il foro (F) e allinearla verticalmente alla porta.
○Verificare attentamente che il quadro (1) sia posizionato perpendicolarmente rispetto al piano della porta (1C).
○Con bocchetta patent segnare solamente i fori B70 o B90 per la sottobocchetta (4) in base alla serratura a disposizione.
○Togliere la DIMA (D) e forare tutti i fori precedentemente segnati con una punta Ø2mm per una profondità di circa 3mm.
○Reinserire la rosetta destra (2) sul ferro quadro (1) con le scritte rivolte verso l’alto (2A) e avvitare le viti (6).
●Lato sinistro: inserire la rosetta sinistra (3) sul ferro quadro (1) con le scritte rivolte verso l’alto (3A) allineandola
parallelamente al pavimento.
○Verificare attentamente che il quadro (1) sia posizionato perpendicolarmente rispetto al piano della porta (1C).
○Segnare i 2 fori relativi alla rosetta sinistra (3).
○Togliere la rosetta sinistra (3).
○Nel caso di bocchetta yale presentare direttamente la sottobocchetta (4) sul cilindro e segnare i 2 fori altrimenti
inserire la DIMA (D) sul ferro quadro (1) attraverso il foro (F) e allinearla verticalmente alla porta.
○Verificare attentamente che il quadro (1) sia posizionato perpendicolarmente rispetto al piano della porta (1C).
○Con bocchetta patent segnare solamente i fori B70 o B90 per la sottobocchetta (4) in base alla serratura a disposizione.
○Togliere la DIMA (D) e forare tutti i fori precedentemente segnati con una punta Ø2mm per una profondità di circa 3mm.
○Reinserire la rosetta sinistra (3) sul ferro quadro (1) con le scritte rivolte verso l’alto (3A) e avvitare le viti (6).
●Su entrambe i lati: applicare a pressione le bussole in nylon (8) posizionandole nelle rispettive sedi.
●Lato destro: inserire l’impugnatura (9) sul ferro quadro (1), mantenendolo centrato rispetto allo spessore porta (1B) e
avvitare a fondo il grano (11) con la chiave (12).
●Lato sinistro: ripetere l’operazione con l’impugnatura (10).
●Su entrambi i lati: fissare la sottobocchetta (4) tramite le viti (7) quindi applicare a pressione la bocchetta (5) con il taglio
(13) rivolto verso il basso.
GB
●Place the spindle (1) in the lock with the flared routed side downwards (1A) and centered within the door thickness (1B).
●Right side: place the right hand sprung pillar rose (2) on the spindle (1) with the writing facing upwards (2A), aligning it
parallel to the floor.
○Check carefully that the spindle (1) is positioned perpendicular to the door (1C).
○Mark the 2 holes for the right hand sprung pillar rose (2).
○Remove the right hand sprung pillar rose (2).
○If using euro cylinder escutcheons slide the inner baseplate (4) directly on the cylinder and mark the 2 holes. If using
keyhole escutcheons slide the template (D) on the spindle (1) through the hole (F) and align vertically with the door.
○Mark the 2 holes B70 or B90 for the inner baseplate (4) depending on the lock being used.
○Remove the template (D) and drill Ø2mm holes where marked to a depth of approximately 3mm.
○Place the right hand sprung pillar rose (2) on the spindle (1) with the writing facing upwards (2A) and tighten the screws (6).
●Left side: place the left hand sprung pillar rose (3) on the spindle (1) with the writing facing upwards (3A), aligning it
parallel to the floor.
○Check carefully that the spindle (1) is positioned perpendicular to the door (1C).
○Mark the 2 holes for the left hand sprung pillar rose (3).
○Remove the left hand sprung pillar rose (3).
○If using euro cylinder escutcheons slide the inner baseplate (4) directly on the cylinder and mark the 2 holes. If using
keyhole escutcheons slide the template (D) on the spindle (1) through the hole (F) and align vertically with the door.
○Mark the 2 holes B70 or B90 for the inner baseplate (4) depending on the lock being used.
○Remove the template (D) and drill Ø2mm holes where marked to a depth of approximately 3mm.
○Place the left hand sprung pillar rose (3) on the spindle (1) with the writing facing upwards (3A) and tighten the screws (6).
●On both sides: fix the nylon bushes (8) in their respective slots.
●Right side: slide the handle (9) on the spindle (1) keeping it centered with the door thickness (1B) and tighten the Allen
screw (11) with the key (12).
●Left side: repeat the operation with the handle (10).
●On both sides: fix the escutcheon inner baseplate (4) with the screws (7) and
then apply pressure to the escutcheon covers (5) with the notch (13) facing down.
1A
90°
90°
1C
= =
1B
38
3A
38
2A
32
4
RADIAL/TOTAL con bocchette:
fissaggio con viti a legno
RADIAL/TOTAL with escutcheons:
fixing with woodscrews