Olympia Omega 1630 User manual

Omega 1630/1630f/1632
GDI PRINTER USER MANUAL


Contents
i
Contents
1 Getting Ready
1.1 System Requirements ..................................................................1-1
Minimum System Requirements.................................................1-1
2 Connecting to a Computer
2.1 Types of Connections...................................................................2-1
Parallel Port Connection.............................................................2-1
USB port connection...................................................................2-1
2.2 Parallel Port Connection ..............................................................2-2
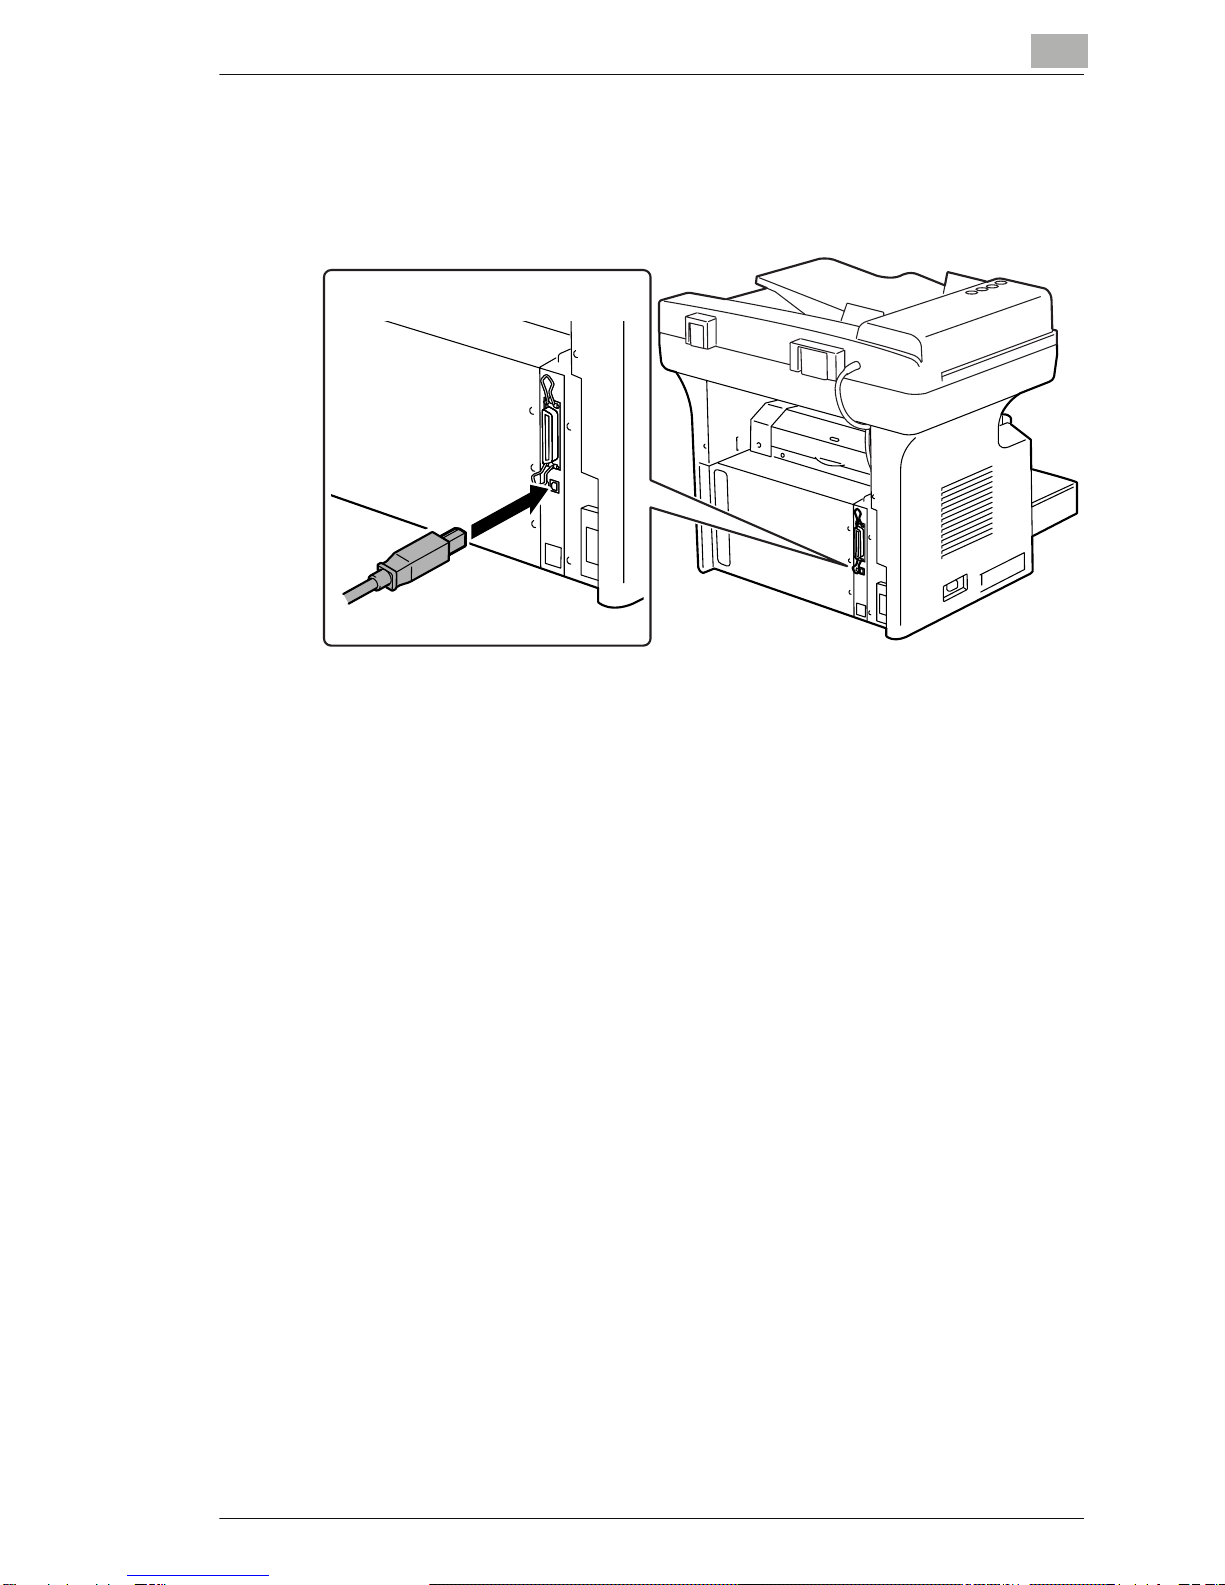
2.3 USB Port Connection....................................................................2-3
3 Installing the Printer Driver
3.1 Installing the Printer Driver Using Plug and Play ......................3-1
3.2 Installing the Printer Driver Using the Add Printer Wizard .......3-5
4 Configuring Printer Driver Settings
4.1 Displaying Printer Driver Properties for Configuring Global
Settings..........................................................................................4-1
4.2 Common Operations.....................................................................4-3
OK ..............................................................................................4-3
Cancel ........................................................................................4-3
Apply...........................................................................................4-3
Help ............................................................................................4-3
Easy Set .....................................................................................4-4
Page Layout/Printer Figure.........................................................4-4
4.3 “Setup” Tab ...................................................................................4-5
N-up List .....................................................................................4-5
Border Line .................................................................................4-6
N-up Style...................................................................................4-6
Watermark list.............................................................................4-7
First Page Only...........................................................................4-7
Edit Watermark...........................................................................4-7
New ............................................................................................4-8
Delete .........................................................................................4-8
Shading ......................................................................................4-8
Style............................................................................................4-8

Contents
ii
Font............................................................................................ 4-8
Angle.......................................................................................... 4-8
Position ...................................................................................... 4-9
4.4 “Paper” Tab................................................................................. 4-10
Fit to Paper .............................................................................. 4-11
Output Paper List ..................................................................... 4-11
Scaling ..................................................................................... 4-11
4.5 “Quality” Tab .............................................................................. 4-13
Contrast ................................................................................... 4-13
Brightness ................................................................................ 4-13
4.6 “Device Options” Tab ................................................................ 4-14
5 Control Panel Operations
(PC Print Mode)
5.1 Printer Operations ........................................................................ 5-1
General Guide............................................................................ 5-2
[Printer] Indicator........................................................................ 5-3
Entering and Exiting the PC Print Mode .................................... 5-3
6 Troubleshooting
6.1 Correcting Errors.......................................................................... 6-1
“MACHINE TROUBLE” Error ..................................................... 6-3
Temporary Errors....................................................................... 6-3
7 Specifications

Getting Ready 1
1-1
1 Getting Ready
1.1 System Requirements
Minimum System Requirements
The following operating environment is required in order to use the printer
driver.
GIntel Pentium 200 MHz
GWindows XP (SP1 or later)/Windows 2000 (SP3 or later)/Windows NT
Workstation Version 4.0 (SP6a or later)/Windows Me/Windows 98/
Windows 95
G128 MB RAM (Windows XP), 64 MB RAM (Windows 95/98/Me/2000/
NT 4.0)
GIEEE 1284 parallel port (ECP/Nibble-compatible) or USB Revision 1.1
port
GCD-ROM drive

1Getting Ready
1-2

Connecting to a Computer 2
2-1
2 Connecting to a Computer
2.1 Types of Connections
You can use either of the following two methods to connect the machine
to a computer.
Parallel Port Connection
Use this type of connection when you want to connect the machine
directly to a computer’s parallel port.
Refer to “Parallel Port Connection” on page 2-2.
USB port connection
Use this type of connection when you want to connect the machine
directly to a computer’s USB port. Refer to “USB Port Connection” on
page 2-3.

2Connecting to a Computer
2-2
2.2 Parallel Port Connection
Use the parallel cable to connect the parallel port of the machine to the
parallel port of the computer.
Important!
Be sure to use a shielded parallel cable. Use of an unshielded cable
may result in radio frequency interference.
The parallel port is compatible with IEEE1284 Type B standards.
1Turn off both the machine and your computer.
2Connect one end of the parallel cable to the parallel port (printer port)
of the computer.
3Connect the other end of the cable to the parallel port on the back of
the machine. Secure the interface cable connectors using the two
clips.
This completes connection of the machine to the computer.

Connecting to a Computer 2
2-3
2.3 USB Port Connection
Use the USB cable (Type B) to connect the machine’s USB port to the
USB port on your computer.

2Connecting to a Computer
2-4

Installing the Printer Driver 3
3-1
3 Installing the Printer Driver
This section describes the procedure for installing the printer driver. The
printer driver can be installed in two ways: by using Plug and Play or by
using the Add Printer Wizard.
3.1 Installing the Printer Driver Using Plug and Play
Installation using Plug and Play is not possible on Windows 95 and
NT 4.0. Refer to the procedure for using the Add Printer Wizard.
For a parallel connection, quit the Add Printer Wizard that started up with
Plug and Play, and then install the printer driver by clicking the Add Printer
icon.
Installing the Printer Driver Using Plug and Play Under Windows XP
1With Windows running, insert the CD-ROM into your computer’s CD-
ROM drive.
2Turn on the machine.
3When the machine is ready, connect it to the computer with the USB
cable.
The “Found New Hardware Wizard” dialog box appears.
4Select Install from a list or specific location [Advanced], and then
click [Next].
5Select Include this location in the search: under Search for the
best driver in these locations., and then click [Browse].
If you want to use
this function to
install the printer
driver:
Follow this procedure:
Plug and Play
(for USB connection)
“Installing the Printer Driver Using Plug and Play”
on page 3-1
Add Printer Wizard
(for parallel
connection)
“Installing the Printer Driver Using the Add
Printer Wizard” on page 3-5

3Installing the Printer Driver
3-2
6Browse to “Driver\(language)\WinXP” on the CD-ROM, and then click
[OK].
Tip
Select the language you prefer. For example, if you prefer English,
browse to:
Driver\English\WinXP
7Click [Next].
HClick [Continue Anyway].
8The “Completing Found New Hardware Wizard” dialog box appears.
HClick [Finish].
9The “Found New Hardware Wizard” dialog box appears again.
HRepeat steps 4 through 7.
Note
This completes the installation of the printer driver.

Installing the Printer Driver 3
3-3
Installing the Printer Driver Using Plug and Play Under Windows
2000
1With Windows running, insert the CD-ROM into your computer’s CD-
ROM drive.
2Turn on the machine.
3When the machine is ready, connect it to the computer with the USB
cable.
The “Found New Hardware Wizard” dialog box appears.
4Select Search for a suitable driver for my device (recommended)
in the “Install Hardware Device Drivers” dialog box, and then click
[Next].
The “Locate Driver Files” dialog box appears.
5Select Specify a location, and click [Next].
6Click [Browse...] on the next dialog box, browse to
“Driver\(language)\Win2000” on the CD-ROM, and then click [OK].
Tip
Select the language you prefer. For example, if you prefer English,
browse to:
Driver\English\Win2000
7Click [OK], and follow the instructions that appear on the screen until
the “Completing the Found New Hardware Wizard” dialog box
appears.
HClick [Finish].
8The “Found New Hardware Wizard” dialog box appears again.
HRepeat steps 4 through 7.
Note
This completes the installation of the printer driver.

3Installing the Printer Driver
3-4
Installing the Printer Driver Using Plug and Play Under Windows Me/
98
1With Windows running, insert the CD-ROM into your computer’s CD-
ROM drive.
2Turn on the machine.
3When the machine is ready, connect it to the computer with the USB
cable.
The “Add New Hardware Wizard” dialog box appears.
4Click [Next], and then select Search for the best driver for your
device (Recommended) on the next dialog box.
HClick [Next] again.
5Select [Specify a location], and then click [Browse…].
6Browse to “Driver\(language)\Win9x” on the CD-ROM, and then click
[OK].
Tip
Select the language you prefer. For example, if you prefer English,
browse to:
Driver\English\Win9x
7Click [Next], and then follow the instructions that appear on the screen
until you can click [Finish].
8The “Add New Hardware Wizard” dialog box appears again.
HRepeat steps 4 through 7.
Note
Repeat steps 4 through 7 until the installation is completely
finished. This completes the installation of the printer driver.

Installing the Printer Driver 3
3-5
3.2 Installing the Printer Driver Using the Add Printer
Wizard
Installing the Printer Driver Using the Add Printer Wizard Under
Windows XP
1With Windows running, insert the CD-ROM into the CD-ROM drive of
your computer.
2Click the Windows [Start] button, and then click [Printers and Faxes].
3Select [Add a printer] from the [Printer Tasks] menu.
The Add Printer Wizard starts.
4Follow the instructions that appear on your computer screen.
Note
When instructed to specify the driver, browse to
“Driver\English\WinXP” (for Windows XP) on the CD-ROM.

3Installing the Printer Driver
3-6
Installing the Printer Driver Using the Add Printer Wizard Under
Windows 2000/NT 4.0/Me/98/95
1With Windows running, insert the CD-ROM into the CD-ROM drive of
your computer.
2Click the Windows [Start] button, point to [Settings], and then click
[Printers].
The “Printers” window appears.
3Double-click the “Add Printer” icon.
The Add Printer Wizard starts.
4Follow the instructions that appear on your computer screen.
Note
When instructed to specify the driver, browse to
“Driver\English\Win2000” (for Windows 2000),
“Driver\English\WinNT” (for Windows NT 4.0), or
“Driver\English\Win9x” (for Windows Me, 98, and 95) on the CD-
ROM.

Configuring Printer Driver Settings 4
4-1
4 Configuring Printer Driver Settings
The printer driver “Properties” dialog box appears when you display print
driver properties from the Windows “Printers” window. The settings you
make on the “Properties” dialog box are applied globally to all
applications.
4.1 Displaying Printer Driver Properties for
Configuring Global Settings
Displaying Settings Under Windows XP
1Click the Windows [Start] button, and then click [Printers and Faxes].
2Select the “PrinterCenter 16P” icon form the “Printers and Faxes”
window.
3To display the printer driver settings, click [Printing Preferences...]
from the [File] menu.

4Configuring Printer Driver Settings
4-2
Displaying Settings Under Windows 2000/NT 4.0/Me/98/95
1Click the Windows [Start] button, point to [Settings], and then click
[Printers].
2Select the “PrinterCenter 16P” icon.
3To display the printer driver settings:
HWindows 2000 — Select [Printing Preferences...] from the [File]
menu.
HWindows NT 4.0 — Select [Document Defaults...] from the [File]
menu.
HWindows Me/98/95 — Select [Properties] from the [File] menu.
The following printer setup dialog box appears.
Note
Use the four rightmost tabs of this dialog box to configure the
printer driver settings.

Configuring Printer Driver Settings 4
4-3
4.2 Common Operations
This section describes settings and buttons that are common to all four of
the tabs (“Setup”, “Paper”, “Quality”, and “Device Options”).
OK
Click this button to exit the “Properties” dialog box and apply all settings
you changed.
Cancel
Click this button to exit the “Properties” dialog box without applying any
changes.
Apply
Click this button to apply all settings you changed without exiting the
“Properties” dialog box.
Help
Click this button to view help information about the items in the currently
displayed screen.

4Configuring Printer Driver Settings
4-4
Easy Set
Easy Set lets you save the setup of each tab for later recall, when you
want to use it again. To save the current settings, click the [Save] button.
Afterward, you can recall the settings by selecting them from a list.
Select “Factory Defaults” from the list to reset all settings on the tab to their
default values.
The button changes to [Delete] while an Easy Set setup is selected from
the list. Clicking the [Delete] button deletes the currently highlighted setup.
Page Layout/Printer Figure
The Page Layout image shows what the printed document will look like
using the current printer driver settings. The Page Layout image changes
as you select different settings.
The Printer Figure image shows a graphic image of what trays, and other
options are currently installed on the machine. All installed options are
displayed, and the tray currently selected under Paper Source on the
“Setup” tab appears in light blue.
Other manuals for Omega 1630
1
This manual suits for next models
2
Table of contents
Other Olympia Printer manuals