Omnia 9sg Technical manual

Omnia.9sg
Stereo Encoder
Preliminary Quick Start Setup Guide
Version 3.15.11 and Later
August 26, 2015
ATTENTION!
This preliminary quick start guide is intended to aid with basic deployment of the unit.
A full user manual is forthcoming.
Since many many of the controls are identical to those found in our
Omnia.9 processor, you may find value in downloading its full user manual
from the Omnia website at http://omniaaudio.com in the interim
for more detailed information.
!

IMPORTANT SAFETY INFORMATION
ABOUT YOUR NEW PRODUCT.
We’ll say it again in a few paragraphs, but we’re saying it here too because it really is
important: The Telos Alliance strongly suggests that you use independent
Uninterruptible Power Supplies (UPS’s) with power line filtering to feed both Omnia.9sg
power supplies in an effort to prevent damage from electrical storms or power surges.
Your Product Warranty (found at the end of this guide and in the User Manual) does not
cover lightning damage!
More information about lightning protection can be found on the Telos Alliance website
at http://blogs.telosalliance.com/tech/surge-surpression-pointers.
!2

Quick Start Setup Guide
We’ve prepared this preliminary Quick Start Setup Guide to get you and your new Omnia.9sg up and
running as quickly as possible.
It is deliberately brief and does not provide a full explanation of all available controls and settings.
A complete user manual is currently being prepared and will be published soon, but because many of the
controls are identical to those found in our Omnia.9 processor you may find value in downloading its full
user manual from the Omnia website at http://omniaaudio.com in the interim should you require more
detailed documentation.
Omnia.9sg is a slim 1RU design so it doesn’t take up much vertical rack space, but it is deep. Accordingly,
you may wish to enlist the help of an assistant when racking it up and ensure there’s nothing to obstruct
it toward the back of the rack.
The unit is fan cooled but leaving an empty rack space directly above and below it is still good practice for
both Omnia.9sg and the equipment directly above and below it. Air is drawn in via an intake near the front
right side of the unit (looking at the front panel) and exhausted near the front left side, so ensure there are
no obstructions around these areas that would impede air flow.
Physical Installation
Connect AC power to both of the internal power supplies. There is no power switch.
It is always possible for a power supply to fail and so having redundant supplies does help protect you
against losing power altogether in that event. In reality, it is far more likely that the unit will lose power
because of an interruption to the circuit feeding it. Therefore, good engineering practice dictates that each
supply should be fed from a different source. At minimum we recommend that each source should be a
good quality UPS with adequate surge protection. In an ideal world (where everyone gets along and you
got to build the plant of your dreams from scratch with an unlimited budget) each would be fed from a
completely different circuit for maximum redundancy.
Next, connect the audio inputs as appropriate for your installation. Omnia.9sg accepts balanced
professional line-level analog audio via its Left and Right Analog Inputs and AES/EBU digital audio on
standard XLR connectors via its AES inputs. Two composite (MPX) inputs are also provided and can
accept a full MPX signal from the composite output of another processor.
In the event of a power (or software) failure, Omnia.9sg provides a hard relay bypass. When the bypass
relay is engaged, MPX Input 1 is directly connected to MPX Output 1 while MPX Input 2 is directly
connected to MPX Output 2. Accordingly, it is possible to take the composite output of a hot backup
processor or stereo generator and feed it into the MPX input corresponding to the employed MPX Output.
!3

The main AES XLR input can accept audio with or without a clock reference of between 32kHz and
96kHz. If necessary, the built-in sample rate converter (SRC) on this input will up- or down-convert to the
fixed system standard of 48kHz.
A dedicated external reference input is provided on the rear panel via a BNC connector should it be
necessary to sync to a clock that is not present on the incoming AES audio signal, but this must be a
48kHz signal as no SRC is present on the BNC input. An adapter (Pin 2 hot, Pin 3 shield) may be used
for short runs without concern. For longer runs, a transformer may be used.
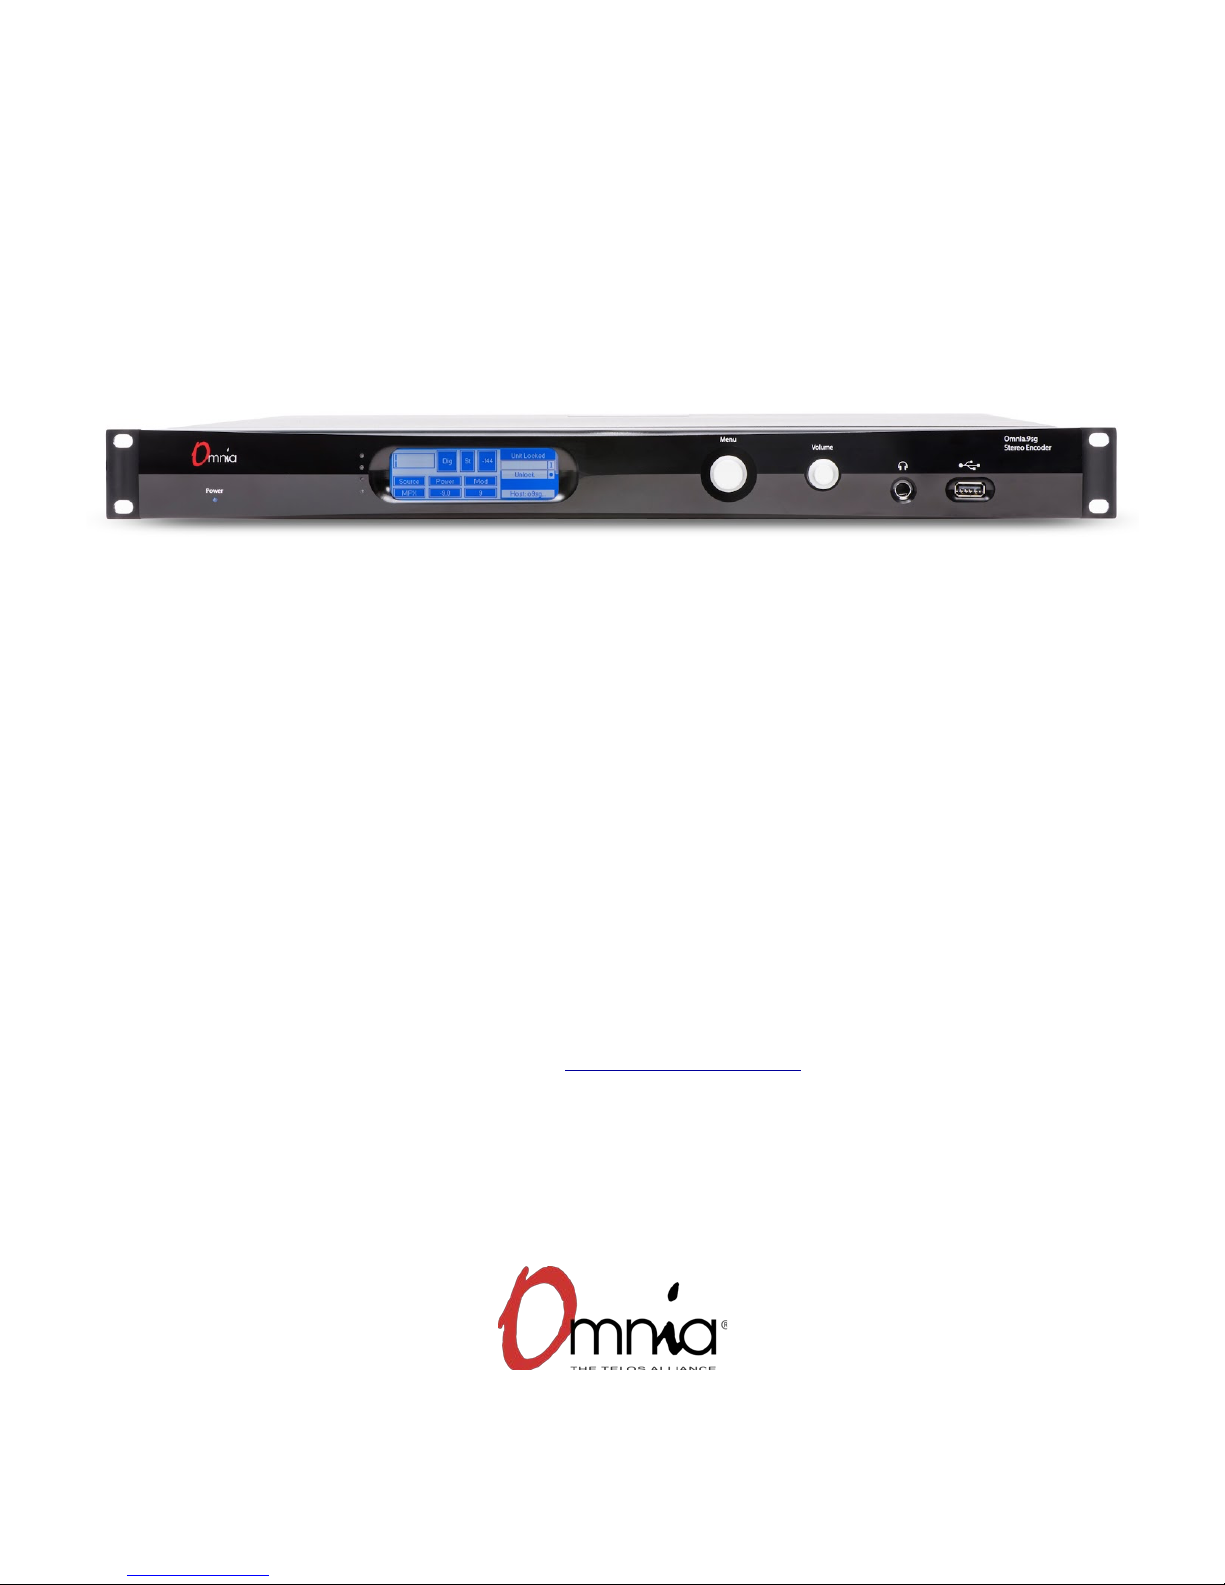
Front Panel Control, Menu Navigation, and Password
Much like our Omnia.7 processor (but unlike other legacy Omnia products), Omnia.9sg uses a “joystick”
type of rotary encoder for menu navigation and control adjustment on the front panel. “Rocking” the
control left, right, up or down facilitates navigation through the various menus, while turning the knob
clockwise or counterclockwise adjusts individual controls.
The factory default password is “1234”. To unlock the unit, navigate to the “Password” field then move the
joystick to the right to bring up the on-screen keyboard. When the keyboard is displayed, turning the
control clockwise or counterclockwise moves the cursor around the screen while rocking it to the right
enters the highlighted value. Once the password is entered, highlight and enter “OK”. Next, highlight and
enter “Unlock”.
The unit will always lock itself when the display times out and goes dark. The length of time before this
happens is adjustable in the System > System Config > Power
menu. The default timeout is the
maximum 24 hour duration.
While front panel navigation is always an option, additional setup and configuration can be much
more easily accomplished via the NfRemote software provided on the USB drive included with
Omnia.9sg. All screenshots and visual references within this document will be taken from the
NfRemote interface.
Installing NfRemote and Configuring Network Settings
Connect Omnia.9sg to your local network via the rear panel Ethernet connection. The unit is set up to
receive an IP address via DHCP by default. Navigate to System > System Configuration > IP
Configuration from the Main Menu and verify that an IP address has been assigned. This may take a
minute or two depending upon your network. A static IP address can also be assigned.
Copy the NfRemote application to a Windows laptop or desktop computer or tablet. Double-click to begin
the installation and follow the on-screen directions to complete it.
When the NfRemote connection screen appears, enter the IP address and password of your Omnia.9sg.
You may also fill in a “friendly” name in the Comment field to help identify the unit.
Be sure to click on the dropdown menu to the far right of the connection window and choose the correct
input method (local mouse, remote desktop/VM, touch screen, etc.)
You may click on the “Add” button to add this unit to a quick recall list in the bottom of the window or
simply click “Connect”.
Once the connection is complete, the main Home screen will appear. Clicking the left mouse button
highlights displays, menu items and controls. Clicking and holding the left mouse button while dragging
adjusts sliding controls.
!4

Configuring I/O Sources and Settings
Omnia.9sg makes the perfect “split chassis” solution for Omnia.9 (and Omnia.7) customers who want the
benefits of having their main processor at the studio without sacrificing the advantages of having the
composite generator at the transmitter.
It’s default settings presume that the “FM Pre-final L/R” output patchpoint found on Omnia.9 and Omnia.7
will be used to feed Omnia.9sg. However, the appeal of Omnia.9sg goes even further in that it can be
used to improve the quality and performance of any FM processor.
Select the Input Audio Source
Navigate to the Omnia.9sg > Stereo Generator > Input Selection menu and select the proper source
(analog or AES digital) for the primary and/or backup inputs. Only the primary input is required. If a
backup source is provided, it can be used as a failover source in the event of a loss of audio on the
primary input.
Adjust the Input Gain
From the Omnia.9sg > Stereo Generator > Input Adjustment menu, set the “Input Gain” control as
appropriate for your input source and processing needs.
By default this control is set to +12.5dB as it is presumed Omnia.9sg will normally be fed from an Omnia.9
(or Omnia.7) using the “FM Pre-final L/R” patchpoint output which has been attenuated by the same
amount to provide adequate headroom.
When set at the default level, this will exactly emulate the sound and behavior of a standalone Omnia.9
using its composite outputs. Accordingly any adjustments to the Omnia.9’s “Final Clip Drive” control will
yield identical results. This also holds true if you you are feeding Omnia.9sg from another processor with
a similar “post-limiter, pre-clipper, pre-emphasis” patchpoint providing it applies the same pre-attenuation.
!5

If you are using a processor that does not have such a patchpoint, the best performance will be realized
by using its HD output to feed Omnia.9sg. It will be necessary to adjust the “Input Gain” control on Omnia.
9sg to “0” as the HD output will not be pre-attenuated.
Finally, it is also possible to use a “flat” (non-pre-emphasized) FM output to feed Omnia.9sg or even a de-
emphasized FM output (with the final clipper drive of the processor turned all the way down) but this
output will have been clipped at 91%, defeating the headroom built into the Omnia.9sg’s composite
embedder and consequently yielding the poorest results.
Configure the Output
Connect the audio outputs as appropriate for your installation. Omnia.9sg supports balanced professional
line-level analog audio via its Left and Right Analog Outputs and AES/EBU digital output on standard XLR
connectors via the AES output. The AES outputs can also be used to provide an Omnia Direct™
(composite over AES) signal. Two composite outputs are provided to feed a main/backup composite STL
or transmitter.
!
!6

To adjust the levels of each of the composite outputs, navigate to the Omnia.9sg > Stereo Generator >
MPX menu and adjust the corresponding “MPX Output Level” sliders until the desired modulation is
indicated on a dedicated, calibrated modulation monitor. The “Pilot Level” and “Pre-emphasis” controls
are also found here.
If the AES outputs will be used to feed an Omnia Direct signal, navigate to the Omnia.9sg > Stereo
Generator > Digital Output menu and choose the appropriate source to feed the digital output.
Adjust FM Diversity Delay
If the output of Omnia.9sg needs to be delayed to match an HD signal, the adjustment can be made in
the Omnia.9sg > Stereo Generator > Diversity Delay menu. Double-clicking on the “Diversity Delay”
slider will provide course, medium, and fine adjustment sliders to make adjustment easier.
ITU-R BS.412 (MPX Power Limiting)
Omnia.9sg supports ITU-R BS.412, which requires that average MPX power be limited to a particular
standard and measured with a rolling 60-second integration time.
If Omnia.9sg is used in conjunction with Omnia.7 or Omnia.9, the BS.412-specific presets in those
processors should be used.
Any adjustments to the MPX power limiter should be made in the Omnia.9sg via the controls in the
Omnia.9sg > Stereo Generator > MPX Power Limit
menu keeping in mind that it may be necessary to
set the “MPX Power Limit” slider to very different levels than the settings in the processor’s preset to
achieve the same power output level.
!7

The “MPX Power Limiter” button turns the power limiter on and off. The amount of limiting performed by
the MPX power limiter is set by the “Power Limiter Drive” control. A choice of limiter styles is offered in the
“Limiter Style” menu. The “Standard” mode is less audible and more gentle. “Aggressive” mode, as the
name suggests, is more audible but provides levels that are consistently closer to the designated power
limit.
Troubleshooting FAQ
!
In a perfect world, you will have read and followed the set up procedures in the handy Quick Start Setup
Guide and all of the ins and outs pair up nicely.
But every now and again, there are surprises or something doesn’t go quite as you expected the first time
around (this IS radio, after all) so we’ve assembled some frequently asked questions (and, as a bonus,
some answers!) to the most common unexpected issues based upon conversations with our customers
and our Omnia support team.
The unit is totally dead. What should I check first?
Let’s start with the catastrophically bad first and get it out of the way: The unit won’t power up at all.
Double-check that the unit is receiving AC line power to BOTH AC power connectors and the outlets into
which they are plugged are live and working. Make sure all connections are secure at both ends of both
cords.
If all checks out so far, look at the front panel screen - is it on? If not or if the screen appears scrambled, it
may indicate a power supply problem. If you wish to examine the power supplies, be aware that they are
of the switching type and therefore require a load in order to start up and operate properly, and voltage
measured when the supplies are not connected to the Omnia.9sg’s circuitry may not be correct.
!8

The unit boots up normally, but there is no audio output. What should I
check?
First, verify that there is audio appearing on both the input and output
meters. If the metering looks
normal, check to see if there is audio in the front panel headphone jack. If audio is present in the
headphones, make sure your output connections are good.
If there is no metering activity, go to Omnia.9sg > Stereo Generator > Input Selection and Omnia.9sg
> Stereo Generator > Input Adjustment menus and verify your input source is properly set. You should
also verify there is audio present on the cable(s) feeding audio into the unit.
It sure is noisy when it starts up!
When Omnia.9sg first powers up it does so with its fans set to full speed. Once up and running, fan speed
will be automatically controlled to keep the unit operating in the optimum temperature range.
I have set the unit up on my network but I cannot “ping” it. Why?
This is normal as network security is accomplished via a whitelist that is initially set up from the front
panel in the same manner as Omnia.7 and Omnia.9.
Navigate to System > System Configuration > HTTP Access
and add the IP address/addresses of
computers that need to access Omnia.9sg’s HTTP server on Port 7380. Begin adding your IP addresses
to the whitelist in the “IP 2” box, as “IP 1” is for use by the front panel.
The HTTP server can be used to download the remote client software from the unit and for advanced
scripting functions. Once downloaded, the remote client software itself does not require additional security
access.
The diversity delay is turned off, but there a lot of delay through the unit. Can
this be reduced?
No. The degree of latency is normal and integral to the the processing algorithms. In applications where
analog FM and HD are broadcast, this should not be an issue as the analog audio must be delayed to
match the digital audio.
Obtaining Service
Before contacting Omnia Customer Support, please have the serial number of the unit (located on a small
barcode sticker on the rear panel) and a description of the symptoms/problems ready for the technician.
All units being returned for service MUST have a Return Authorization Number (RA) assigned to them
first.
Units shipped without an RA number will experience delays in service. Be sure to write the RA
prominently on the box on or near the shipping label.
Whenever possible, return Omnia.9sg in its original shipping carton with original packing materials. This
will provide the best protection possible during shipping. Remember, damaged caused by improper
packaging is not covered under warranty.
!9

Our shipping address is:
Telos Alliance
1241 Superior Avenue East
Cleveland, Ohio 44114 USA
ATTN: (RA Number obtained from Omnia Customer Service)
Support via the Web
The Omnia website (http://telosalliance.com/omnia) has a wide variety of information that may be useful
for product support, applications information, software updates, and user manuals.
Factory Support via Phone and E-mail
Customer support personnel in the Cleveland, Ohio, USA office are available by phone or e-mail Monday
through Friday 9:00am to 5:00pm Eastern Time by calling +1-216-241-7225 or sending an e-mail to
After Hours Support
After hours support is available 24/7 by telephone by calling +1.216.622.0247 or by sending an e-mail to
If you are outside the United States and non-English speaking, please contact the dealer from whom you
purchased your Omnia.9sg first.
!10

Telos Alliance Limited Warranty
This Warranty covers “the Products,” which are defined as the various audio equipment, parts, software
and accessories manufactured, sold and/or distributed by or on behalf of TLS Corp. and its affiliated
companies, collectively doing business as The Telos Alliance (hereinafter “Telos”).
With the exception of software-only items, the Products are warranted to be free from defects in material
and workmanship for a period of five (5) years from the date of receipt of such Product by the end-user
(such date of receipt the “Receipt Date”). Software-only items are warranted to be free from defects in
material and workmanship for a period of 90 days from the Receipt Date. Telos will repair or replace (in
its discretion) defective Products returned to Telos within the warranty period, subject to the provisions
and limitations set forth herein.
This warranty will be void if the Product: (i) has been subjected, directly or indirectly, to Acts of God,
including (without limitation) lightning strikes or resultant power surges; (ii) has been improperly installed
or misused, including (without limitation) the failure to use telephone and power line surge protection
devices; (iii) has been damaged by accident or neglect. As with all sensitive electronic equipment, to help
prevent damage and or loss of data, we strongly recommend the use of an uninterruptible power supply
(UPS) with all of our Products. Telos products are to be used with registered protective interface devices
which satisfy regulatory requirements in their country of use.
This Warranty is void if the associated equipment was purchased or otherwise obtained through sales
channels not authorized by Telos.
EXCEPT FOR THE ABOVE-STATED EXPRESS WARRANTY, TELOS MAKES NO WARRANTIES,
EXPRESS OR IMPLIED (INCLUDING IMPLIED WARRANTIES OF MERCHANTABILITY AND FITNESS
FOR A PARTICULAR PURPOSE).
In no event will Telos, its directors, officers, employees, agents, owners, consultants or advisors (its
“Affiliates”), or authorized dealers or their respective Affiliates, be liable for incidental or consequential
damages, or for loss, damage, or expense directly or indirectly arising from the use of any Product or the
inability to use any Product either separately or in combination with other equipment or materials, or from
any other cause.
In order to invoke this Warranty, the Product must be registered via Telos’ website (found at: http://
telosalliance.com/legal/warranty) at time of receipt by end-user and notice of a warranty claim must be
received by Telos within the above stated warranty period and warranty coverage must be authorized by
Telos. Contact may be made via email: [email protected] or via telephone: (+1) 216-241-7225.
If Telos authorizes the performance of warranty service, the defective Product must be delivered to: Telos,
1241 Superior Avenue, Cleveland, Ohio 44114 or other company repair center as may be specified by
Telos at the time of claim.
Shipping Costs and Warranty Service:
If the date the customer’s notice of warranty claim is received by Telos (such date the “Warranty Claim
Notice Date”) is within the first 90 days following the Receipt Date, Telos will pay the costs of shipping
such warranted Product to and from the end user’s location, and the cost of repair or replacement of such
warranted Product.
If the Warranty Claim Notice Date occurs after the first 90 days following the Receipt Date and before the
end of the second (2nd) year, the customer will pay the freight to return the warranted Product to Telos.

Telos will then, at its sole discretion, repair or replace the warranted Product and return it to the end user
at Telos’ expense.
If the Warranty Claim Notice Date occurs between the end of the second (2nd) year following the Receipt
Date and the completion of the fifth (5th) year, the customer will pay the costs of shipping such warranted
Product to and from the end user’s location. Telos will then, in its sole discretion, repair or replace the
warranted Product at Telos’ expense. Telos also reserves the right, if it is not economically justifiable to
repair the warranted Product, to offer a replacement product of comparable performance and condition
direct to the customer at a discounted price, accepting the failed warranted Product as a trade-in.
The end user will in all cases be responsible for all duties and taxes associated with the shipment, return
and servicing of the warranted Product.
No distributor, dealer, or reseller of Telos products is authorized under any circumstances to extend,
expand or otherwise modify in any way the warranty provided by Telos, and any attempt to do so is null
and void and shall not be effective as against Telos or its Affiliates.
Out of warranty units returned to the factory for repair may be subject to a $500 evaluation fee, which fee
must be prepaid prior to shipping the unit to Telos. If no repairs are required, the $500 fee will be retained
by Telos as an evaluation charge. If repairs are required, the $500 fee will be applied to the total cost of
the repair.
!
Omnia Audio • 1241 Superior Ave. • Cleveland, Ohio, 44114, USA • +1.216.241.7225 • TelosAlliance.com
Publication O15/15018
Table of contents
Other Omnia Recording Equipment manuals