oneConcept 10026855 User manual

Espressomaschine
10026855
10026856

2
Sehr geehrter Kunde,
wir gratulieren Ihnen zum Erwerb Ihres Klarstein Gerätes. Lesen Sie die folgenden Anschluss- und
Anwendungshinweise sorgfältig durch und befolgen Sie diese, um möglichen technischen Schäden
vorzubeugen. Für Schäden, die durch Missachtung der Sicherheitshinweise und unsachgemäßen Ge-
brauch entstehen, übernehmen wir keine Haftung.
Sicherheitshinweise
Gerät
Zur Reduzierung der Gefahr von Brand, elektrischem Schlag und Beschädigung:
• Setzen Sie dieses Gerät nicht dem Regen aus.
• Stellen Sie keine mit Flüssigkeiten gefüllten Gefäße, wie Vasen, auf dieses Gerät.
• Ausschließlich das empfohlene Zubehör verwenden.
• Reparieren Sie dieses Gerät nicht selbst. Wenden Sie sich zur Wartung an qualiziertes Kunden-
dienstpersonal.
• Lassen Sie keine Gegenstände aus Metall in dieses Gerät fallen.
• Stellen Sie keine schweren Gegenstände auf dieses Gerät.
Netzkabel/Netzteil
Zur Reduzierung der Gefahr von Brand, elektrischem Schlag und Beschädigung:
• Gewährleisten Sie, dass die Spannung der Stromversorgung dem auf diesem Gerät angegebenen
Wert entspricht.
• Stecken Sie den Netzstecker vollständig in die Steckdose ein.
• Ziehen Sie nicht am Kabel, knicken Sie es nicht und stellen Sie keine schweren Gegenstände da-
rauf.
• Fassen Sie den Stecker nicht mit nassen Händen an.
• Fassen Sie den Stecker beim Herausziehen an seinem Korpus an.
• Verwenden Sie keinen beschädigten Netzstecker oder eine beschädigte Steckdose.
• Installieren Sie dieses Gerät so, dass das Netzkabel sofort aus der Steckdose gezogen werden
kann, wenn Störungen auftreten.
Kleine Objekte/Verpackungsteile
• Bewahren Sie die kleine Objekte (z.B. Schrauben und anderes Montagematerial, Speicherkarten)
und Verpackungsteile außerhalb der Reichweite von Kindern auf, damit sie nicht von diesen ver-
schluckt werden kann. Lassen Sie kleine Kinder nicht mit Folie spielen. Es besteht Erstickungsge-
fahr!
Aufstellung
• Stellen Sie das Gerät auf eine trockene, ebene, wasserfeste und hitzebeständige Oberäche.
• Suchen Sie einen Aufstellort, an dem Kinder nicht an die heißen Oberächen des Gerätes gelangen
können.
• Die Steckdose muss leicht zugänglich sein, um im Notfall das Gerät schnell vom Stromkreis tren-
nen zu können.
• Installieren oder positionieren Sie dieses Gerät nicht in einem Bücherregal, Einbauschrank oder
einem sonstigen engen Raum. Stellen Sie eine gute Belüftung des Gerätes sicher.
• Stellen Sie das Gerät nicht auf Verstärker oder andere Geräte, die heiß werden können. Diese Hitze
könnte das Gerät beschädigen.
• Setzen Sie dieses Gerät keinem direkten Sonnenlicht, hohen Temperaturen, starker Feuchtigkeit
und übermäßigen Erschütterungen aus.
• Der Netzadapter kann mit Wechselstrom von 220 - 240 V betrieben werden. Verwenden Sie aber
einen geeigneten Steckeradapter, wenn der Stecker nicht in die Netzsteckdose passt.

Bestimmungsgemäßer Gebrauch
Dieses Gerät dient dem Zubereiten von Kaee. Es ist ausschließlich für diesen Zweck bestimmt und
darf nur zu diesem Zweck verwendet werden. Es darf nur in der Art und Weise benutzt werden, wie
es in dieser Gebrauchsanleitung beschrieben ist.
Dieses Gerät ist nicht dafür bestimmt, durch Personen (einschließlich Kinder) mit eingeschränkten
physischen, sensorischen oder geistigen Fähigkeiten oder mangels Erfahrung und/oder mangels
Wissen benutzt zu werden, es sei denn,sie werden durch eine für ihre Sicherheit zuständige Person
beaufsichtigt oder erhielten von ihr Anweisungen, wie das Gerät zu benutzen ist. Kinder sollten be-
aufsichtigt werden, um sicherzustellen, dass sie nicht mit dem Gerät spielen.
Transport und Reinigung
Bitte bewahren Sie die Originalverpackung auf. Um einen ausreichender Schutz beim Transport des
Gerätes zu erreichen, verpacken Sie das Gerät in der Originalverpackung.
Reinigung der äußeren Oberäche
Verwenden Sie keine üchtigen Flüssigkeiten, wie Insektensprays. Durch zu starken Druck beim
Abwischen können die Oberächen beschädigt werden. Gummi- oder Plastikteile sollten nicht über
einen längeren Zeitraum mit dem Gerät in Kontakt sein.
Reinigung des Brühmechanismus
Reinigen Sie den Brühmechanismus etwa alle 2 bis 3 Monate, indem Sie die Bedienvorgänge wie
Sie in den Kapiteln „Espresso zubereiten“ und „Milch schäumen“ mit einer leichten Essiglösung (und
ohne Hinzunahme von Kaee oder Milch) durchführen. Sie können das Reinigungsprocedere mit der
Essiglösung 2 bis 3 mal wiederholen. Anschließend wiederholen Sie die Bedienvorgänge merhmals
mit einfachem Wasser, bis sich die Essigrückstände verüchtigt haben.
Geräteübersicht und Bedienelemente
1 Wassertankverschluss
2 Kaeesieb
3 Messlöel
4 Knopf
5 Siebträger
6 Anzeige
7 Lösemechanismus
8 Dampfrohr
9 Trichtergri
10 Schäumer
11 Kannenabdeckung
12 Kannengri
13 Kanne
14 Abstelläche
15 Abtropfgitter
3

Hinweise zu Reparatur und Wartung
• Reparaturen am Gerät sollten nur von einer autorisierten Fachwerkstatt durchgeführt werden.
• Ein Umbauen oder Verändern des Produktes beeinträchtigt die Produktsicherheit. Achtung Verlet-
zungsgefahr!
• Önen Sie das Produkt niemals eigenmächtig und führen Sie Reparaturen nie selber aus!
• Falscher Zusammenbau führt möglicherweise zu Fehlfunktionen oder dem Totalausfall.
• Önen Sie in keinem Fall das Gerät.
Achtung:
Es wird keine Haftung für Folgeschäden übernommen. Technische Änderungen und Irrtümer vorbe-
halten! Die Gewährleistung verfällt bei Fremdeingrien in das Gerät.
Inbetriebnahme und Bedienung
Inbetriebnahme
Reinigen Sie alle Teile wie im Abschnitt „Reinigung“ beschrieben.
Espresso zubereiten
1. Entfernen Sie den 1.Wassertankverschluss durch Schraubbewegungen gegen den Uhrzeigersinn.
Befüllen Sie die Kanne mit der gewünschten Menge Wasser. Achten Sie darauf, die Maximalmenge
nicht zu überschreiten. Achtung: Die Kanne hat eine Maximalpegelanzeige, die eine Umrechen-
menge von 4 Tassen indiziert. Die Minimalmarke weist 2 Tassen aus.
2. Achten Sie vor Befüllung des Tanks darauf, dass das Stromkabel gezogen ist und der Bedienknopf
auf die Position „O“ gelegt.
3. Füllen Sie das Wasser in den Tank und verschließen Sie diesen, indem Sie den Wassertankver-
schluss mit Schraubbewegungen im Uhrzeigersinn fest verschließen.
4. Setzen Sie das Kaeesieb in den Siebträger ein und befüllen Sie es mit der gewünschten Menge
Kaeepulver. Verdichten Sie das Kaeepulver gegebenfalls. Achtung: Das Kaeesieb verfügt über
2 Markierungen, die die Pulvermengen für 2 und 4 Tassen ausweisen.
5. Setzen Sie den Siebträger in die Kaeemaschine ein, indem Sie den Siebträger vor dem Ge-
rät stehend leicht in im Uhrzeigersinn bewegen, den Siebträger in zentrale Position unter den
Brühauslass bringen, ihn nach oben führen und sobald Siebträger und Brühauslass miteinander
korrepondieren eine langsame Bewegung des Siebträger gegen den Uhrzeigersinn ausführen bis
dieser im Brühauslass einrastet.
6. Stellen Sie die Kanne auf die Abstelläche.
7. Verbinden Sie das Gerät mit dem Stromnetz. Bringen Sie den Bedienknopf auf das Symbl mit der
Tasse. Die Betriebs-LED wird nun aueuchten. Nach etwa 2 Minuten wird Kaee austreten.
8. Nachdem die gewünschte Menge Kaee in der Kanne ust bringen Sie den Bedienknopf in die
Position „Close“. Die Betriebs-LED wird erlöschen. Entfernen Sie die Kanne und bringen Sie den
Bedienknopf in die Position „O“, um Dampf langsam abzulassen. Achtung: Lassen Sie das Ge-
rät während des Brühvorgangs nicht unbeobachtet. Önen Sie den Wassertankverschluss nicht
während des Brühvorgangs.
9. Achten Sie darauf, dass der Dampf vor Entfernen des Siebträgers oder Aufschrauben des Was-
sertankverschlusses vollständig abgelassen ist. Bringen Sie dazu den Bedienknopf in die Position
„O“ und warten Sie darauf, dass der Siebträger abgekühlt ist.
10. Sie entfernen den Siebträger, indem Sie ihn vor dem Gerät stehend gegen im Uhrzeigersinn be-
wegen und dann nach unter gleiten lassen.
4

Milch schäumen / Cappiccino zubereiten
1. Bereiten Sie - wie im vorangegangenen Kapitel beschrieben - Espresso zu.
2. Befüllen Sie einen Behälter mit Milch. Die Größe des Glases sollte etwa 7 cm betragen.
3. Bringen Sie den Bedienknopf auf die Position mit dem Wolkensymbol. Die Betriebs-LED wird nun
au euchten.
4. Halten Sie den Schäumer nun etwa 2 Zentimeter tief in die Milch. Nach etwa 2 Minuten wird
Dampf ausgestossen werden, der die Milch sukzessive aufschäumt.
5. Bringen Sie den Bedienknopf nach Abschluss des Schäumens in die Position „Close“. Entfernen
Sie nun das Glas und bringen Sie den Bedienknopf in die Posion „O “, um den Dampfdruck ab-
zulassen.
Technische Daten
Artikelnummer 10026855, 10026856
Stromversorgung 220-240 V ~ 50-60 Hz
Hinweise zur Entsorgung
Be ndet sich die linke Abbildung (durchgestrichene Mülltonne auf Rädern) auf dem
Produkt, gilt die Europäische Richtlinie 2002/96/EG. Diese Produkte dürfen nicht mit
dem normalen Hausmüll entsorgt werden. Informieren Sie sich über die örtlichen
Regelungen zur getrennten Sammlung elektrischer und elektronischer Gerätschaf-
ten. Richten Sie sich nach den örtlichen Regelungen und entsorgen Sie Altgeräte
nicht über den Hausmüll. Durch die regelkonforme Entsorgung der Altgeräte werden
Umwelt und die Gesundheit ihrer Mitmenschen vor möglichen negativen Konsequen-
zen geschützt. Materialrecycling hilft, den Verbrauch von Rohsto en zu verringern.
Konformitätserklärung
Hersteller: Chal-Tec GmbH, Wallstraße 16, 10179 Berlin, Deutschland.
Dieses Produkt entspricht den folgenden Europäischen Richtlinien:
2014/30/EU (EMV)
2014/35/EU (LVD)
2011/65/EU (RoHS)
5

Dear Customer,
Congratulations on purchasing this Klarstein equipment. Please read this manual carefully and take
care of the following hints on installation and use to avoid technical damages. Any failure caused by
ignoring the mentioned items and cautions mentioned in the operation and installation instructions
are not covered by our warranty and any liability.
Technical Data
Item number 10026855, 10026856
Power supply 220-240 V ~ 50-60 Hz
Safety Instructions
• Please read this manual carefully before using and save it for future reference
• This appliance can be used by children aged from 8 years and above if they have been given su-
pervision or instruction concerning use of the appliance in a safe way and if they understand the
hazards involved. Cleaning and user maintenance shall not be made by children unless they are
older than 8 and supervised. Keep the appliance and its cord out of reach of children aged less
than 8 years.
• WARNING: The lling aperture must not be opened during use. This appliance is intended to be
used in household and similar applications.
• If the supply cord is damaged, it must be replaced by the manufacturer, its service agent or simi-
larly qualied persons in order to avoid a hazard.
IMPORTANT SAFEGUARDS
Before using the electrical appliance, the following basic precautions should always be followed in-
cluding the following:
1. Read all instructions.
2. Before using check that the voltage of wall outlet corresponds to rated voltage marked on the
rating plate.
3. Do not touch hot surfaces. Use handles or knobs.
4. To protect against re, electric shock and injury to persons do not immerse cord, plug, or main
unit in water or other liquid.
5. Unplug from outlet before cleaning and when not in use. Allow appliance to cool down completely
before putting on or taking o, attaching components or before cleaning the appliance.
6. Do not operate any appliance with a damaged cord or plug or after the appliance malfunctions,
or has been damaged in any manner, return appliance to the nearest authorized service facility
for examination, repair or electrical or mechanical adjustment.
7. The use of accessory attachments not recommended by the appliance manufacturer may result
in re, electric shock or injury to persons.
8. Place appliance on at surface or table, do not let cord hang over the edge of table or counter.
9. Ensure the power cord do not touch hot surface of appliance.
10. Never use the coee maker in the environment of high temperature, high magnetic eld and
humidity, do not place the coee maker on or hot surface or beside re or another electrical ap-
pliance, such as on the top of refrigerator, avoid to be damaged. And also never place another
objects on the top of coee maker.
11. To disconnect, turn any control to “o”, then remove plug from wall outlet. Always hold the plug.
But never pull the cord.
12. Do not use appliance for other than intended use and place it in a dry environment.
13. Close supervision is necessary when your appliance is operating. Do not let the appliance on the
standby state for a long time. And never allow the children or inform persons to operate the ap-
pliance.
14. Be careful not to get burned by the steam.
6

15. Some parts of appliance are hot when operated (such as stainless decorated plate, drip tray shelf,
top cover, steam tube and froth nozzle and so on), so do not touch with hand directly. Only use
the handle or knob.
16. Clean and maintain the coee maker regularly according to the section of “Cleaning and main-
tenance” to ensure the quality of coee and the using life of appliance. And add lubricant oil on
the running parts regularly.
17. If you do not want to use the appliance for a long time, rstly clean all the detachable compo-
nents, and dry them for storage.
18. During the coee maker is on the states of making coee, making hot water and making steam,
never open the side door to remove the component and shut o the power. The detail operation
refers to the operation manual.
19. When the appliance prompts trouble, never operation the appliance, do not place the foreign
object into the brewer.
20. Never use the detergent or hot water for cleaning the brewing component, to avoid the running
component is lack of lubricant oil and the component will be distortion as the high temperature.
21. Do not let the coee maker operate without water.
22. Do not use outdoors.
23. Close supervision is necessary when any appliance is used by or near children.
24. The use of an accessory not evaluated for use with this appliance may cause injuries.
25. Do not place on or near a hot gas or electric burner, or in a heated oven.
26. HOUSEHOLD USE ONLY
27. A short power-supply cord is to be provided to reduce risks resulting from becoming entangled
in or tripping over a longer cord. Longer detachable power-supply cords or extension cords are
available and may be used if care is exercised in their use. If a long detachable power-supply
cord or extension cord is used: 1) The marked electrical rating of the detachable power-supply
cord or extension cord should be at least as great as the electrical rating of the appliance; 2)
If the appliance is of the grounded type, the extension cord should be a grounding type 3-wire
cord; and 3) The longer cord should be arranged so that it will not drape over the counter top or
table top where it can be pulled on by children or tripped over.
28. This appliance has polarized plug (one blade is wide than the other),To reduce the risk of electric
shock. this plug is intended to t into a polarized outlet only one way. If the plug does not t fully
into the outlet , reverse the plug . If it still does not ll, contact a qualied electrician. Do not
attempt to modify the plug in any way.
Product Description
1 Tank cover
2 Steel mesh
3 measuring cup
4 Steam knob
5 Metal funnel
6 Indicator
7 Press bar
8 Steam conduit
9 Funnel Handle
10 Frothing device
11 Carafe cover
12 Carafe handle
13 Carafe
14 Cup pad
15 Drip tray
7

Use and Operation
A FOR THE FIRST USE
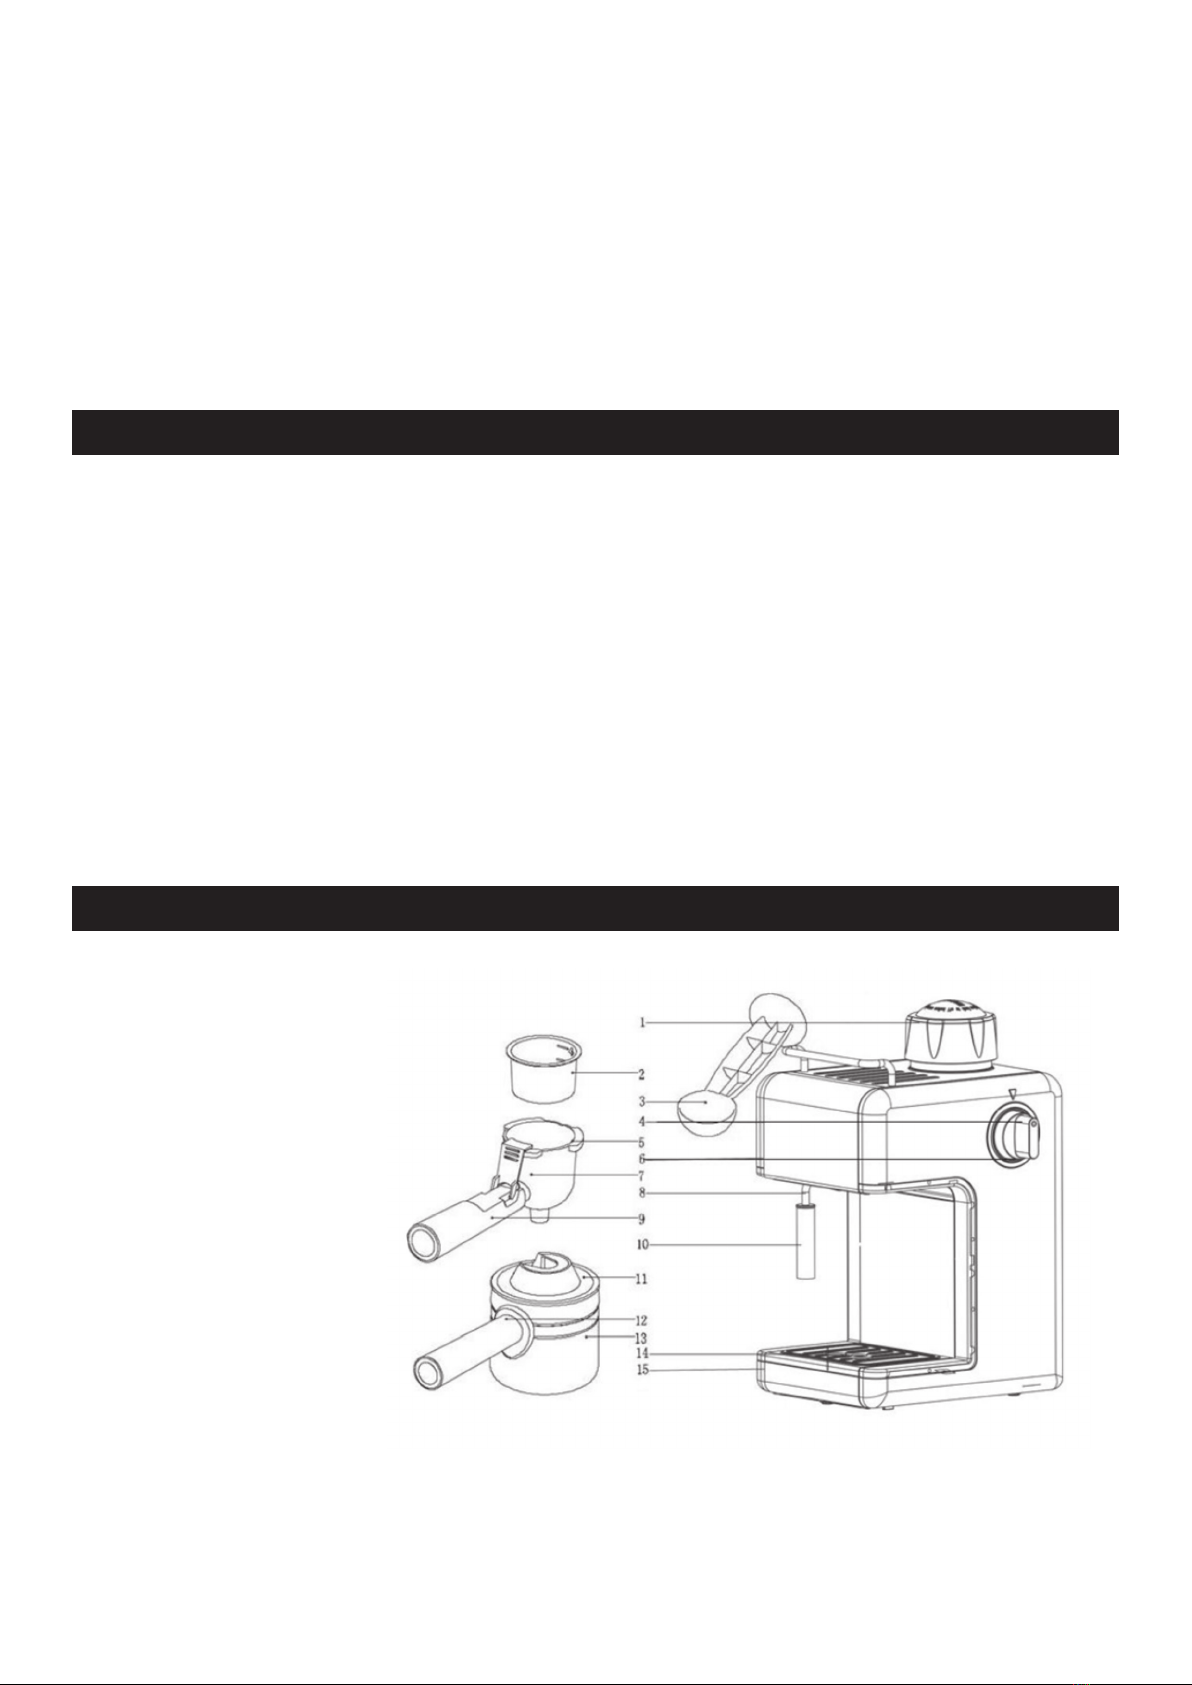
1. Remove the coee maker from the package, and check the accessories according to the list.
2. Clean all the detachable components according to the following section of “CLEANING AND MAIN-
TENANCE”. Then assemble them completely.
3. Ensure the steel mesh place in position. Place the carafe on removable shelf.
4. Operation the appliance according to the section of “B” and “C” (no coee powder in steel mesh).
Repeat 2-3 times.
B MAKE ESPRESSO COFFEE
1. Remove the tank cover by turning it in anti-clockwise. Pour appropriate water in water tank with
the carafe. Do not exceed the maximum capacity. Note: 1. the carafe has the cup marks, the ma-
ximum tank capacity is equal to 4 cups marks water quantity. The minimum tank capacity is equal
to 2 cups marks water quantity.
2. Before pouring the water into the water tank, be sure the power cord is unplug from the power
outlet and the steam knob is in the OFF position.
3. Replace the tank cover in place by turning the cover in clockwise until it locks in position.
4. Put the steel mesh into metal funnel, add coee powder to steel mesh with measuring spoon, a
spoon coee powder can make about a cup of top-grade coee. Then press the coee powder
tightly with the tamper. Note: Select your desired coee powder to make desired cups coee, the
steel mesh has 2 cups and 4 cups marks.
5. Make sure the tubers on the funnel align with the grooves in the appliance, then insert the funnel
into from the “Insert” position, and you can x the funnel into coee maker rmly through turn it
anti-clockwise until it is locked in the “Lock” position.
6. Place the carafe on the removable shelf.
7. Plug the power cord into the outlet. Turn the steam knob to position, and the indicator is illumina-
ted, wait for about 2 minutes, there will be coee owing out.
8. After desired coee has obtained, you should turn steam knob to position, the indicator go out and
the coee maker stops working, your coee is ready now. Then remove the carafe and turn the
steam control knob to OFF position release the residual steam in the tank. WARNING: Do not leave
the coee maker unattended during making the coee, as you need operate manually sometimes!
9. Before removing steel mesh or opening the tank cover, make sure the pressure in the tank shall
be released. The method is turn the steam knob to the OFF position rstly, the steam in the tank
will eject from the frothing device. After pressure has released, and wait for the steel mesh cooling
down, you can remove the steel mesh or open the tank cover.
10. After nishing making the coee, you can take the metal funnel out through turn clockwise, and
then pour the coee residue out with the steel mesh pressed by press bar. Let them cool down
completely, then rinse under running water. (When assemble the steel mesh again, you shall turn
over the press bar to the original position)
C. FROTHING MILK/ MAKE CAPPUCCINO
You get a cup of cappuccino when you top up a cup of espresso with frothing milk. Method:
1. Prepare espresso rst with container big enough according to the part “B. MAKE ESPRESSO COFFEE”.
2. Fill a jug with desired amount of milk for each cappuccino to be prepared, you are recommended
to use whole milk at refrigerator temperature (not hot!). Note: In choosing the size of jug, it is
recommend the diameter is not less than 70±5mm, and bear in mind that the milk increases in
volume, make sure the height of jug is enough.
3. Turn the steam knob to the position, the indicator will light up.
4. Insert the frothing device into the milk about two centimetres, after about 2 minutes, the steam
will come out from the frothing device. Froth milk in the way moving vessel round from up to
down.
5. When the required purpose is reached, you can turn the steam control knob to position stop
frothing. Then remove the jug and turn the steam control knob to OFF position release the resi-
dual steam in the tank. Note: Clean steam outlet with wet sponge immediately after steam stops
generating, but care not to hurt!
8

6. Pour the frothed milk into the espresso prepared, now the cappuccino is ready. Sweeten to
taste and if desired, sprinkle the froth with a little cocoa powder. Note: We recommend you allow
the appliance to cool down before making co ee again. Otherwise burnt odor may occur in your
espresso co ee.
Cleaning and Care
1. Cut o power source and let the co ee maker cool down completely before cleaning.
2. Clean housing of co ee maker with moisture-proof sponge often. Note: Do not clean with alcohol
or solvent cleanser. Never immerse the housing in water for cleaning.
3. Detach the metal funnel through turn it clockwise, get rid of co ee residue inside, then you can
clean it with cleanser, but at last you must rinse with clear water.
4. Clean all the detachable attachments in the water and dry thoroughly.
CLEANING MINERAL DEPOSITS
1. To make sure your co ee maker operating e ciently, internal piping is cleanly and the peak avor
of co ee, you should clean away the mineral deposits left every 2-3 months.
2. Fill the tank with water and descaler to the MAX level ( the scale of water and descaler is 4:1, the
detail refers to the instruction of descaler. Please use “household descaler”, you can use the citric
acid (obtainable from chemist’s or drug stores) instead of the descaler (the one hundred parts of
water and three parts of citric acid).
3. According to the program of make espresso co ee, put the metal funnel (no co ee powder in it)
and carafe (jug) in place. Brewing water per “B. MAKE ESPRESSO COFFEE”.
4. Turn the steam knob to position, the indicator will be illuminated, and make two cups co ee (about
2Oz). Then turn the steam knob to OFF position and wait for 5s.
5. Turn the steam knob to position and make steam for 2min, then turn the steam knob to OFF po-
sition to stop the unit immediately, make the descalers deposit in the unit at least 15 minutes.
6. Restart the unit and repeat the steps of 4-5 at least 3 times.
7. Then turning the steam knob to position to brew until no descaler is left.
8. Then brewing co ee (no co ee powder) with tap water in the MAX level, repeat the steps of 4-5
for 3 times (it is not necessary to wait for 15 minutes in step of 5), then brewing until no water is
left in the tank.
9. Repeat the step of 8 at least 3 times to make sure the piping is cleanly.
10. Any other servicing should be performed by an authorized service representative. You can help
protect the environment! Please remember to respect the local regulations: hand in the non-
working electrical equipments to an appropriate waste disposal centre.
Disposal Considerations
According to the European waste regulation 2002/96/EC this symbol on the product
or on its packaging indicates that this product may not be treated as household was-
te. Instead it should be taken to the appropriate collection point for the recycling of
electrical and electronic equipment. By ensuring this product is disposed of correct-
ly, you will help prevent potential negative consequences for the environment and
human health, which could otherwise be caused by inappropriate waste handling of
this product. For more detailed information about recycling of this product, please
contact your local council or your household waste disposal service.
Declaration of Conformity
Producer: Chal-Tec GmbH, Wallstraße 16, 10179 Berlin, Germany.
This product is conform to the following European Directives:
2014/30/EU (EMC)
2014/35/EU (LVD)
2011/65/EU (RoHS)
9

10
Très cher client,
Nous souhaitons tout d‘abord vous féliciter pour l‘achat de cet appareil Klarstein. Veuillez lire at-
tentivement les consignes de branchement et d‘utilisation suivantes an d‘éviter tout accident ou
dommage. Les dommages pouvant survenir suite à la non-observation des consignes ci-dessous
exposées ne seront pas prises en compte.
Consignes de sécurité
Appareil
Pour réduire le risque d‘incendie, d‘électrocution et de dommages en général :
• N‘utilisez pas cet appareil sous la pluie
• Ne le disposez pas à proximité de récipients contenant des liquides, comme par exemple un vase.
• N‘utilisez que les accessoires indiqués.
• Ne tentez pas de réparer l‘appareil par vous-même. Mais adressez-vous à du personnel qualié.
• Ne faites pas tomber d‘objet en métal sur l‘appareil.
• Ne posez pas d‘objets lourds sur l‘appareil.
Câble alimentation
Pour réduire le risque d‘incendie, d‘électrocution et de dommages en général :
• Assurez-vous que le courant de votre prise soit conforme à celui de l‘appareil.
• Insérez le câble complètement dans la prise.
• Ne tordez pas le câble, ne le tirez pas et ne déposez pas d‘objet lourd sur celui-ci.
• Ne touchez pas le câble avec des mains humides.
• Retirez la prise en la tenant par le corps.
• N‘utilisez pas de prise qui soit abîmée.
• Veillez à ce que la prise ne soit pas abîmée.
• Installez l‘appareil de sorte à pouvoir le débrancher rapidement.
Emballage (sacs plastiques, cartons, etc.)
• Conservez les petites pièces (vis, cartes mémoires et autres petits objets) et les emballages hors
de la portée des enfants pour éviter qu’ils ne s’étouent avec. Ne laissez pas jouer les enfants avec
les sacs plastiques – risque d’étouement!
Mise en place
• Placez l‘appareil sur une surface plane et sèche, résistante à la chaleur.
• Choisissez un endroit hors de la portée des enfants.
• La prise doit être accessible de sorte à pouvoir débrancher l‘appareil rapidement.
• Ne placez pas l‘appareil sur une étagère ou un endroit trop exigu de sorte à ce que celui-ci soit
bien ventilé.
• Ne placez pas l‘appareil sur un ampli ou un autre appareil dégageant de la chaleur.
• Placez l‘appareil à l‘abri de la lumière du soleil, de l‘humidité et des vibrations.
• L‘appareil doit être branché sur une prise de courant 220-240V. Si vous ne disposez pas de ce type
de prise, procurez-vous un adaptateur.
Usage indiqué
• Cet appareil sert à préparer le café. Cet appareil ne doit être utilisé que pour jouer l‘usage indiqué
en respectant les conditions d‘utilisation telles qu‘indiquées dans la présente notice.
• Cet appareil ne doit pas être manipulé par les personnes sourant de limitations physiques ou
mentales ainsi que les enfants sans la surveillance d‘un adulte ou tuteur. Assurez-vous que les
enfants ne jouent pas avec l‘appareil.

Transport et nettoyage
Conservez l‘emballage d‘origine an de pouvoir transporter l‘appareil sans risque.
Nettoyage de la surface externe
N‘utilisez pas de liquide en spray qui pourrait abîmer la surface de l‘appareil. N‘appuyez pas trop fort
en essuyant l‘appareil pour ne pas laisser de trace sur la surface. Les éléments en plastique ou en
caoutchouc ne doivent pas rester longtemps en contact avec l‘appareil.
Nettoyage du mécanisme de moulure
Nettoyez le mécanisme environ tous les 2 à 3 mois en procédant aux étapes telles que décrites dans
les chapitres «préparer un expresso» et «préparer de la mousse de lait» en utilisant une solution à
base de vinaigre. Répétez ensuite ces étapes avec de l‘eau claire pour éliminer le goût du vinaigre.
Aperçu de l‘appareil et commandes
1 Verrouillage réservoir d‘eau
2 Filtre café
3 Cuillère de mesure
4 Bouton
5 Porte ltre
6 Achage
7 Mécanisme d‘activation
8 Tuyau vapeur
9 Bec verseur
10 Émulseur
11 Couvercle carafe
12 Poignée carafe
13 Carafe
14 Surface support
15 Grille d‘égouttage
11

Indications sur l‘entretien et les réparartions
• Les réparations ne doivent être eectuées que par du personnel qualié.
• Tout démontage ou modication peut entraîner un dysfonctionnement de l‘appareil. Vous risquez
également de vous blesser!
• N‘ouvrez jamais l‘appareil et ne tentez jamais de le réparer par vous-même!
• Un mauvais remontage peut entraîner un dysfonctionnement voire une panne totale.
• N‘ouvrez jamais l‘appareil.
Attention:
Les dommages pouvant survenir en cas de contravention à ces consignes ne seront pas pris en char-
ge!
Mise en fonctionnement et utilisation
Mise en fonctionnement
Nettoyez avant la mise en fonctionnement toutes les composantes tel que décrit dans le chapitre
«nettoyage».
Préparer un expresso
1 Déverrouillez le réservoir d‘eau en le dévissant dans le sens contraire des aiguilles d‘une montre.
Remplissez la carafe d‘eau en respectant la limite maximale. La carafe peut contenir au minimum
2 tasses, au maximum 4 tasses, quantités auxquelles correspondent les marques.
2 Avant de remplir le réservoir, assurez-vous que l‘appareil soit débranché et en position OFF.
3 Fixez le réservoir rempli d‘eau en revissant celui-ci dans le sens des aiguilles d‘une montre.
4 Placez le ltre à café sur le support ltre et remplissez-le de café. Le ltre café se dote de deux
marques indiquant la quantité de café idéale pour 2 ou 4 tasses.
5 Fixez le ltre en faisant tourner légèrement dans le sens des aiguilles d‘une montre de sorte à ce
qu‘il soit parfaitement placé sous le verseur de café. Lorsque les deux parties correspondent par-
faitement, exercez un léger mouvement du ltre dans le sens inverse des aiguilles d‘une montre
pour que celles-ci soient reliées.
6 Déposez la carafe sur le support.
7 Branchez l‘appareil. Placez le bouton de commande sur le symbole tasse. La LED de fonctionne-
ment s‘allume. Après environ 2 minutes, la machine va se mettre en marche.
8 Une fois que la carafe est remplie de café, tournez le bouton de commande sur «close» jusqu‘à
ce que la LED s‘éteigne puis sur OFF. Attention: Ne laissez jamais la machine sans surveillance
lorsque le café est en train de passer et n‘essayez pas d‘ouvrir le réservoir d‘eau.
9 Veillez à ce que la vapeur soit complètement éliminée avant de retirer le ltre ou le réservoir.
Placez le bouton de commande sur OFF et attendez que le ltre ait refroidi avant de procéder.
10 Retirez le ltre en le bougeant dans le sens inverse des aiguilles d‘une montre et vers le bas.
Préparer une mousse de lait / un cappuccino
1 Préparez un expresso tel que décrit plus haut.
2 Versez du lait dans un verre d‘environ 7 cm de hauteur.
3 Placez le bouton de commande sur le symbole avec un nuage, la LED de fonctionnement s‘allume
alors.
4 Plongez l‘émulseur dans le verre de lait à environ 2cm de profondeur. Attendez environ 2 minutes
et la mousse sera produite.
5 Une fois terminé, placez le bouton de commande sur «Close». Retirez le verre puis placez le bou-
ton sur OFF pour que la vapeur s‘évacue.
12

Données techniques
Numéro d'article 10026855, 10026856
Alimentation 220-240 V ~ 50-60 Hz
Indications concernant l‘élimination
Vous trouverez sur le produit l’image ci-contre (une poubelle sur roues, barrée d‘une
croix), ce qui indique que le produit se trouve soumis à la directive européenne 2002/96/
CE. Renseignez-vous sur les dispositions en vigueur dans votre région concernant la
collecte séparée des appareils électriques et électroniques. Respectez-les et ne jetez
pas les appareils usagés avec les ordures ménagères. La mise en rebut correcte du pro-
duit usagé permet de préserver l’environnement et la santé. Le recyclage des matériaux
contribue à la préservation des ressources naturelles.
Déclaration de conformité
Fabricant : Chal-Tec GmbH, Wallstraße 16,10179 Berlin, Allemagne
Ce produit est conforme aux directives européennes suivantes :
2014/30/UE (CEM)
2014/35/UE (LVD)
2011/65/UE (RoHS)
13
This manual suits for next models
1
Table of contents
Languages:
Other oneConcept Coffee Maker manuals